1
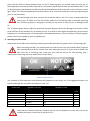
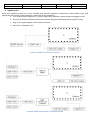
When placing the LEDs, you should consider the following factors: TV distance from the wall (the bigger the TV is, the closer the LEDs should be placed to the edge of the back cover of the TV). The minimum distance of the LEDs from the visible wall area (the part of the wall you can see when watching your TV should be at least 6cm, otherwise you may get a “spotlight” effect. The LED height (including LED body and fastening tapes) is 25mm, so the minimum distance between the TV and the wall must be 25mm. (see Picture 3). Per the standard configuration, that you will find on the Lightberry website, the first LED (i.e. the first one from the connector wire), should be placed 3-4cm above the right-bottom corner of the TV screen, and then the LEDs should be aligned in equal spaces up to the last LED on this side, which should be 3-4cm below the righttop corner. Similar alignment should be made on the remaining sides of the TV. If your TV structure does not allow the installation of Lightberry according to the exact instructions above, then you should start with equally aligned LEDs on the first side of the TV, and then the LED mounting on remaining sides should be as similar as possible. You should ALWAYS make sure that wire is neither twisted nor bent. Where a nonstandard boblight configuration file is needed (see further below), please let us know. When configuration does not make use of all LEDs from the strand, unused LEDs should nevertheless be attached behind the TV screen, and they will remain off (with proper boblight configuration). Picture 2. Distances from the wall 5. Connecting the set. Connecting Lightberry is very simple and consists of the following steps: a. Turn off/disconnect Raspberry Pi® power supply. Keep Lightberry power supply unplugged as well. b. Connect Converter to Raspberry Pi® with the supplied connection cable. Connection to Raspberry Pi® is made through GPIO port to the pins presented on picture 3.