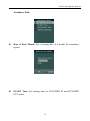
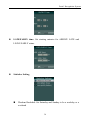
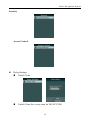
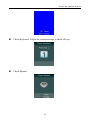
1
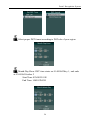
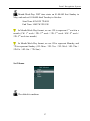
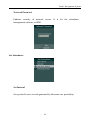
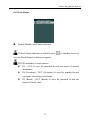
FK300 Series Facial Recognition System User Manual March 2013 Facial Recognition System Content PART 1 OVERVIEW ................................................................................... 3 CHAPTER 1 INTRODUCTION................................................................................ 3 CHAPTER 2 FEATURES & INSTALLATION GUIDE .................................................. 4 Device Features ............................................................................................ 4 Installation Guide ......................................................................................... 6 PART 2 ADMINISTRATOR OPERATING ................................................ 8 CHAPTER 3 ADMIN SETTING .............................................................................. 8 Enter to Menu ............................................................................................... 8 Set Admin. .................................................................................................... 9 Admin Verification .......................................................................................10 Modify & Delete Admin account .................................................................. 11 User Management........................................................................................12 Register User ..............................................................................................................12 Modify User ................................................................................................................14 Delete User .................................................................................................................15 Delete All Users ..........................................................................................................15 Record Management ....................................................................................16 Record Inquiry ............................................................................................................16 Delete All Records ......................................................................................................18 USB Management ........................................................................................19 Export Management ...................................................................................................19 Import Management ...................................................................................................22 Set Wallpaper ..............................................................................................................23 Set Prompt Voice ........................................................................................................23 Firmware Upgrade ......................................................................................................23 System Setting ..............................................................................................24 Basic Setting ...............................................................................................................24 Language Setting ...................................................................................................24 1 Facial Recognition System Set Date&Time ......................................................................................................25 Set Volume .............................................................................................................27 Set Network ................................................................................................................28 Set Network............................................................................................................28 Network Password .................................................................................................29 Set Attendance ............................................................................................................29 Set Interval .............................................................................................................29 Set Bell ...................................................................................................................30 Set Work Status ......................................................................................................32 Attendance Rule .....................................................................................................33 Security .......................................................................................................................36 Access Control .......................................................................................................36 Advanced Setting ........................................................................................................37 Auto Test ................................................................................................................37 Default Setting .......................................................................................................40 System Information ......................................................................................41 Capacity Information ..................................................................................................41 Product Information....................................................................................................42 PART 3 DAILY USAGE ....................................................................................43 Standby Status..............................................................................................43 Face Recognizing ........................................................................................44 Enroll Face Templates .................................................................................44 APPENDIX ........................................................................................................46 Advanced Menu ...........................................................................................46 Adv. Menu 1 ...............................................................................................................46 Adv. Menu 2 ...............................................................................................................47 Specification ................................................................................................48 Caution ........................................................................................................50 2 Facial Recognition System PART 1 Overview Chapter 1 Introduction Face ID is industry first embedded facial recognition system with leading facial recognition algorithm, FAR<0.001% which makes recognition more faster and accurate. Source-light technology enable the system works well under different environment for access control and time attendance application. 3 Facial Recognition System Chapter 2 Features & Installation Guide Device Features ① LCD Display ② Keypad Digital Key / Key: Move cursor to previous or next field Key: Confirm button Key: Cancel button 4 Facial Recognition System ③ ④ ⑤ ⑥ ⑦ ⑧ ⑨ ⑩ ⑪ ⑫ ⑬ ⑭ ⑮ Key: Backspace and delete button Key: Enter to the main function menu Camera / Mirror / RFID Sensor During face recognition, look at the mirror and position your eyes in the mirror. Indicator LED Indicate the statues of system Speaker Mini USB Port For factory maintaining use only USB Port Reset Button Mounting Port To place mounting plate Network Cable Port Power Adaptor Port Connection Port Cable Slot Place cables and wires Mounting Port To place mounting plate LED Lights 5 Facial Recognition System Installation Guide Indoor use only Do not exposure to sunshine Keep 2 meters away from a window. Drill 3 holes on the wall. Plug wires and network cable to jacks through the mounting plate. Place 6 Facial Recognition System and fix the plate on the wall. Install the terminal on the plate. Connection port: NC/NO/COM: relay output for access power supplies Normal Close (NC): the standard status is CLOSE. Normal Open (NO): the standard status is OPEN. COM: common port Power up terminal Select proper language for a terminal when the first boot. The terminal provides 4 languages: English Portuguese Spanish Turkish 7 Facial Recognition System PART 2 Administrator Operating Chapter 3 Admin Setting Enter to Menu If no admin in a system, then press If there has enrolled admin in a system, then press to enter the main menu. to enter admin verifying process. While the verification is correct, then the system enter to the main menu. Press / to move selection to Set Admin, and press to enter into admin. menu. Press 1-7 digital buttons on the keypad to enter the corresponding functions directly. 8 Facial Recognition System Set Admin. There are total 8 admin accounts. An “Unset” sign will display for unset admin accounts. Choose an “Unset” account to register an admin. Input user ID: Input an ID for admin. If the ID is in the database, then the device displays user’s name. User ID uses natural sequence numbers. User ID cannot start with 0 and cannot be duplicated. Input user name: Press to switch character inputting mode between “Upper Case”, “Lower Case” and “Digital”. 9 Facial Recognition System Verification modes: ID and Pin: Use ID and password sequentially as a verification method. ID and Face: Use ID and face templates sequentially as a verification method. Card and Face: Use card and face templates sequentially as a verification method. Card: Use card as a verification method. Admin Verification After set an admin account for the device, then press activate admin verification process. 10 to Facial Recognition System Input admin ID (or using registered RFID card) Input corresponding password or using face verification, according to the mode during admin registration, after verification is successful, then the system enter to the main menu. Modify & Delete Admin account Select a registered admin account to modify or delete this account. Modify admin name; Change verification mode; Modify password Re-enroll face template Re-register RFID card Delete the certain admin account: If only one registered admin account within the system, then it will be banned to erase. 11 Facial Recognition System User Management Register User Enter user ID The range of user ID is from 1-99,999,999,999,999. Enter name 12 Facial Recognition System Press to switch character inputing mode between “Upper Case”, “Lower Case” and “Digital”. User name can contain 18-bit characters totally. Select a verification mode Face: Use face templates as a verification method. Card and Face: Use card and face templates sequentially as a verification method. Card or Face: Use card or face templates separately as a verification method. Card: Use card as a verification method. ID and Pin: Use ID and password sequentially as a verification method. Select a privilege 13 Facial Recognition System Access & Attendance: The terminal is used for access control and time attendance with relay signals. Attendance: The terminal is only used for time attendance without relay signals. User registering finished. Modify User Enter user ID Following the procedure to change user name, verification mode and privilege. 14 Facial Recognition System Delete User Enter a user ID Press (or ) to confirm (or cancel) this process Delete All Users Press (or ) to confirm (or cancel) this process All user’s ID, name and templates will be erased. This step is irreversible. Not affect Admin data and records. Backup all user data before doing this function. 15 Facial Recognition System Record Management Record Inquiry Search by ID 16 Facial Recognition System Search by name Select duration: 1 day records 7 days records 30 days records All records From start date to end date 17 Facial Recognition System Press / to browse records. Delete All Records All records will be erased. This step is irreversible. Backup all user data before doing this function. 18 Facial Recognition System USB Management Do not remove USB drive pen while data transferring. Try other USB drive pen, if the terminal does not recognize it. Export Management Export records Export all user records “TIME+SN”.TXT. into a file, which named as For example, TIME063.TXT, “063” is the last 3 bits of SN of the terminal. 19 Facial Recognition System Export record details Enter user ID and date. Press to export details report of selected individual person. The file is named as <dutydetails_ID_Date_.csv>. ID 1812 1812 1812 1812 1812 1812 1812 1812 1812 1812 1812 1812 1812 1812 1812 1812 1812 1812 1812 1812 1812 1812 1812 1812 1812 1812 1812 1812 1812 1812 1812 1812 Name Date KYLE 2013-1-1 KYLE 2013-1-2 KYLE 2013-1-3 KYLE 2013-1-4 KYLE 2013-1-5 KYLE 2013-1-6 KYLE 2013-1-7 KYLE 2013-1-8 KYLE 2013-1-9 KYLE 2013-1-10 KYLE 2013-1-11 KYLE 2013-1-12 KYLE 2013-1-13 KYLE 2013-1-14 KYLE 2013-1-15 KYLE 2013-1-16 KYLE 2013-1-17 KYLE 2013-1-18 KYLE 2013-1-19 KYLE 2013-1-20 KYLE 2013-1-21 KYLE 2013-1-22 KYLE 2013-1-23 KYLE 2013-1-24 KYLE 2013-1-25 KYLE 2013-1-26 KYLE 2013-1-27 KYLE 2013-1-28 KYLE 2013-1-29 KYLE 2013-1-30 KYLE 2013-1-31 KYLE 2013-2-1 Week Tuesday Wednesday Thursday Friday Saturday Sunday Monday Tuesday Wednesday Thursday Friday Saturday Sunday Monday Tuesday Wednesday Thursday Friday Saturday Sunday Monday Tuesday Wednesday Thursday Friday Saturday Sunday Monday Tuesday Wednesday Thursday Friday Time --:--:---:--:---:--:---:--:---:--:---:--:---:--:---:--:---:--:---:--:---:--:---:--:---:--:---:--:-16:43:21 16:43:34 16:43:35 16:43:37 16:47:11 16:47:17 --:--:---:--:---:--:---:--:---:--:---:--:---:--:---:--:---:--:---:--:---:--:---:--:---:--:---:--:---:--:---:--:---:--:-- Export record statistics Enter user ID and date. Press to export statistics report of selected individual person. The file is named as <dutystatus_ID_Date_.csv> and <dutystatistics_ID_Date_.csv>. 20 Facial Recognition System <dutystatus_ID_Date_.csv> ID 1812 1812 1812 1812 1812 1812 1812 1812 1812 1812 1812 1812 1812 1812 1812 1812 1812 1812 1812 1812 1812 1812 1812 Name Date KYLE 2013-1-1 KYLE 2013-1-2 KYLE 2013-1-3 KYLE 2013-1-4 KYLE 2013-1-7 KYLE 2013-1-8 KYLE 2013-1-9 KYLE 2013-1-10 KYLE 2013-1-11 KYLE 2013-1-14 KYLE 2013-1-15 KYLE 2013-1-16 KYLE 2013-1-17 KYLE 2013-1-18 KYLE 2013-1-21 KYLE 2013-1-22 KYLE 2013-1-23 KYLE 2013-1-24 KYLE 2013-1-25 KYLE 2013-1-28 KYLE 2013-1-29 KYLE 2013-1-30 KYLE 2013-1-31 Week IN Time Tuesday --:--:-Wednesday --:--:-Thursday --:--:-Friday --:--:-Monday --:--:-Tuesday --:--:-Wednesday --:--:-Thursday --:--:-Friday --:--:-Monday --:--:-Tuesday --:--:-Wednesday --:--:-Thursday --:--:-Friday --:--:-Monday --:--:-Tuesday --:--:-Wednesday --:--:-Thursday --:--:-Friday --:--:-Monday --:--:-Tuesday --:--:-Wednesday --:--:-Thursday --:--:-- IN StatusOUT Time OUT Status Total Hours (H) ABSENCE --:--:-ABSENCE 0 ABSENCE --:--:-ABSENCE 0 ABSENCE --:--:-ABSENCE 0 ABSENCE --:--:-ABSENCE 0 ABSENCE --:--:-ABSENCE 0 ABSENCE --:--:-ABSENCE 0 ABSENCE --:--:-ABSENCE 0 ABSENCE --:--:-ABSENCE 0 ABSENCE --:--:-ABSENCE 0 ABSENCE --:--:-ABSENCE 0 ABSENCE 2013-1-15 16:47 LEA. EARLY 3.3 ABSENCE --:--:-ABSENCE 0 ABSENCE --:--:-ABSENCE 0 ABSENCE --:--:-ABSENCE 0 ABSENCE --:--:-ABSENCE 0 ABSENCE --:--:-ABSENCE 0 ABSENCE --:--:-ABSENCE 0 ABSENCE --:--:-ABSENCE 0 ABSENCE --:--:-ABSENCE 0 ABSENCE --:--:-ABSENCE 0 ABSENCE --:--:-ABSENCE 0 ABSENCE --:--:-ABSENCE 0 ABSENCE --:--:-ABSENCE 0 <dutystatistics_ID_Date_.csv> Name KYLE Total Hours(Hour) ARR. LATE LATE Hours(Hour) LEA. EARLY EARLY Hours(Hour) ABSENCE 3.3 0 0 1 1.2 22.5 Export part users Enter user ID. Press Press Date is stored into a USER.TXT file. to continue inputing the next ID. to start exporting listed user data and templates. Export all users Export all user data and templates Date is stored into a USERALL.TXT file. Export admin. Export all admin data and templates Date is stored into a ADMIN.TXT file. 21 Facial Recognition System Export admin. Logs Export all admin operating logs. Date is stored into a LOG.TXT file. Import Management Import part users Import all users data from USER.TXT file on a USB drive pen in to the terminal. Import all users Import all users data from USERALL.TXT file on a USB drive pen in to the terminal. Import user list Import all ID and name information of users from USERLIST.TXT file on a USB drive pen in to the terminal. It is a shortcut way to add user ID and name for a terminal before registration process. The contents of USERLIST.TXT file are list of <ID> + <TAB 22 Facial Recognition System Key> + <Name>. The range of user ID is from 1-99,999,999,999,999. Import admin Import all admins data from MANAGER.TXT file on a USB drive pen in to the terminal. Set Wallpaper Update new wallpaper on a terminal. 240 * 320pix BMP/JPG file, and named to <idlepicture.bmp> or <idlepicture.jpg>. Set Prompt Voice Update Successful and Failed voice on a terminal. PCM, 16000Hz, 16-bit, stereo wave file, and named to <granted.wav> and <deny.wav> Keep voice length less than 1 second. Firmware Upgrade Upgrade a new firmware for a terminal. Firmware files are <FK300.BIN> and <FK300.TXT> 23 Facial Recognition System System Setting Basic Setting Language Setting 24 Facial Recognition System Set Date&Time Set Date & Time Set Date Format: Display different date format on a device. Set DST Time: Set daylight saving time. 25 Facial Recognition System Select proper DST format according to DST rule of your region Month-Day-Hour: DST time starts on 01:00AM May 1, and ends at 03:00AM October 2 Start Time: 05M 01D 01H End Time: 10M 02D 03H 26 Facial Recognition System Month-Week-Day: DST time starts on 01:00AM first Sunday in May, and ends at 03:00AM third Tuesday in October. Start Time: 05M 1W 7D 01H End Time: 10M 3W 2D 03H In Month-Week-Day format, we use 1W to represent 1 st week in a month. (1W: 1st week / 2W: 2nd week / 3W: 3rd week / 4W: 4th week / 5W: 5th week in a month) In Month-Week-Day format, we use 1D to represent Monday, and 7D to represent Sunday. (1D: Mon. / 2D: Tue. / 3D: Wed. / 4D: Thu. / 5D: Fri. / 6D: Sat. / 7D: Sun.) Set Volume The default is medium. 27 Facial Recognition System Set Network Set Network Set IP address, mask address, and gateway for a device. Port Set a new network port for a device. The default port is 9922. 28 Facial Recognition System Network Password Enhance security of network access. It is for the attendance management software or SDK. Set Attendance Set Interval Set a period to save records generated by the same user periodicity. 29 Facial Recognition System 0 means to disable this function Range from 0 – 255 minutes Set Bell Press Edit period and times / to select a bell 30 Facial Recognition System Select a sound Edit ON/OFF status 31 Facial Recognition System Set Work Status Enable/Disable work status function. If Work Status function is enabled, press in standby screen to activate Work Status list before recognize. FK300 concludes 6 work statuses IN / OUT: It uses for punched in and out status of normal attendance. IN (Overtime) / OUT (Overtime): It uses for punched in and out status of working extra hours. IN (Break) / OUT (Break): It uses for punched in and out status for break time. 32 Facial Recognition System Attendance Rule Date of Each Month: Set a starting date of a month for attendance reports. IN/OUT Time: Set starting time for PUNCHED IN and PUNCHED OUT status. 33 Facial Recognition System LATE/EARLY time: Set starting minutes for ARRIVE LATE and LEAVE EARLY status. Statistics Setting Weekend Included: Set Saturday and Sunday to be a workday or a weekend 34 Facial Recognition System Unit (Work Time): Set work time unit to Hour or Day Unit (LATE/EARLY): Set a unit for LATE/EARLY status to Hour or Minute 35 Facial Recognition System Security Access Control Relay Settings Unlock Time Unlock Time: Set a relay time for NO/NC/COM 36 Facial Recognition System Default time is 3 seconds Advanced Setting Auto Test Testing All: Test all below entries automatically Press Press to repord as “Good” to repord as “Trouble”. Check LCD: Display Red, Green and Blue on the screen 37 Facial Recognition System Check Keyboard: Follow the screen message to check all keys. Check Speaker 38 Facial Recognition System Check Camera Check TF Card Check RFID Card 39 Facial Recognition System Check Network Check USB Default Setting Delete all data including admins’ data, users’ data, all records and device settings. 40 Facial Recognition System System Information Capacity Information Face & Face Cap.: Current enrolled user numbers and total capacity of user numbers for face related recognition mode. Non Face & Non Face Cap.: Current enrolled user numbers and total capacity of user numbers for other recognition mode. Record Num & Record Cap.: Current record numbers and total capacity of record numbers. 41 Facial Recognition System Product Information 42 Facial Recognition System Part 3 Daily Usage Standby Status After powering up a terminal (around 30 seconds), the terminal will enter to a standby status. In standby status, the system display time and date. The terminal will activate to face detecting mode while a user stand in front of it. Message <Eyes in Mirror> and <Verifying…> will show on the screen. Indicator will flash if face position is proper for detecting and terminal will activate verification process at the same time. The terminal will return to standby status if there is no face detected around 30 seconds. When record storage is occupied up to 85%, the system will display a notification on the screen. An administrator should export records first, and then clear all records. 43 Facial Recognition System Face Recognizing When user stands in front of a terminal, it will activate and detect user’s face automatically. The terminal will activate to face detecting mode while a user stand in front of it. Message <Verifying…> and <Eyes in Mirror> will show on the screen. Indicator is flashing, if the terminal locates user’s eyes. Then the system activates recognition status. When recognizing is finished and successful, the system will list user’s registered information: ID, name, enter time, etc. If Work Status function is enabled, press to activate Work Status list before recognize. If the terminal could not recognize a user in first 5 seconds, it will show “Adjust Your Position” message on the screen; if it still could not recognize the user in second 3 seconds, the terminal will show rejecting message. In standby status, press to enter ID & Face (ID & Pin) recognition method directly. Enroll Face Templates Usage: 30cm to 80cm (between face and mirror) Normal face expression 44 Facial Recognition System No sunglasses Follow instructions on the screen to enroll face templates. <Move Farther>: move your head or body father to the terminal. <Move Closer>: move your head or body closer to the terminal. <Collecting…>: terminal is collecting face templates. <Find Eyes in Mirror>: adjust your position and keep the eyes in the mirror. There is a LED Indicator under the mirror. <Red flashing>: face position is proper for enrollment or verification. <Red lighting>: face position is not proper for enrollment or verification. <Green lighting>: Verification successful. After templates enrolling, user selects access status in User Privilege list. The terminal will list the user’s information (ID, name and privilege), after choosing one privilege. During templates extracting, the user should keep normal expression. 45 Facial Recognition System Appendix Advanced Menu Adv. Menu 1 Press OK 6 4 2 1 6 8 OK to enter the advanced menu: Super Password: Unlock the terminal by a password. / : Move the green frame upwards or downwards. / : Move the green frame leftwards or rightwards. Black/White Image: Display image collected from infrared camera on terminal screen. System Info.: Display kernel and algorithm version. Import Sample Img.: Import sample image from USB pen drive. 46 Facial Recognition System Sample files is named to <USERALL.IMG> Export Sample Img.: Export sample image to USB pen drive. Sample files is named to <USERALL.IMG> Extract Templates: Extract user data from existing sample data. Obtain IP Address: Obtain IP Address automatically Adv. Menu 2 Press OK 1 5 9 3 5 7 OK to enter the advanced menu: Update SN/MAC: Upload SN and MAC of terminal from a file. Files is named to <PARAMETER.TXT> Content: <IP="192.168.132.251",PORT="9922",SN="1234567890123 49",MAC="00-0C-5B-00-68-73"> Browse SN/MAC: Display terminal SN and MAC 47 Facial Recognition System Specification User capacity 300 users for face related recognition method; 3,000 users for other methods Record capacity 100,000 entries Recognition methods Face Card & Face Card or Face Card Card & Photo ID & Pin Languages: English Portuguese Spanish Turkish Recognition algorithm V3.1 Face templates of user 18 templates per person Display: 2.8 inch TFT 48 Facial Recognition System Keypad: 4 * 4 touch keypad RFID card: Proximity card or Mifare card (Optional) Communication TCP/IP USB port Power: 12V DC, 1A Environment Light: 0-7000Lux Working Temperature: 0°C-40°C Working Humidity: 20% - 80% 49 Facial Recognition System Caution Restoration and restart When the system halted and cannot quit, you can remove the adapter to restore and restart the system, or you also can press RESET to restart the device. Restore to default setting Restore all parameter to the default setting. Non-Water proof The device is non-waterproof, please keep away from water. Prevent from Falling The parts in this device are friable; please prevent the device from dropping, smashing, bending and high pressure. Cleaning Please use soft cloth or the other similar material to clean the screen and faceplate, please avoid cleaning with water and cleanser. Low Temperature Environment The working temperature for screen and the main parts in this device are the normal indoor temperature. The performance of this device will get worse, if the working temperature extend this temperature range. 50 Facial Recognition System Please prevent the screen from oil or any sharp objects. Please use the equipped adapter for the device, the other unknown adapters will burn out the device. 51