1
Software User Manual
Software Version 1.1
EN 150309
End User License Agreement (EULA)
Do not use this product until the following license agreement is understood and accepted.
By using this product, or allowing anyone else to do so, you are accepting this agreement.
Sparkverb (henceforth ‘the Product’) is licensed to you as
3. Ownership
the end user. Please read this Agreement carefully.
As between you and UVI, ownership of, and title to, the
You cannot transfer ownership of these Sounds and Software
enclosed digitally recorded sounds (including any copies)
they contain. You cannot re-sell or copy the Product.
are held by UVI. Copies are provided to you only to enable
you to exercise your rights under the license.
LICENSE AND PROTECTION
4. Term
This agreement is effective from the date you open this package,
and will remain in full force until termination. This agreement
1. License Grant
will terminate if you break any of the terms or conditions of this
UVI grants to you, subject to the following terms and
agreement. Upon termination you agree to destroy and return to
conditions, a non-exclusive, non-transferable right
UVI all copies of this product and accompanying documentation.
to use each authorized copy of the Product.
5. Restrictions
The product is the property of UVI and is licensed to you only
Except as expressly authorized in this agreement, you may not rent,
for use as part of a musical performance, live or recorded. This
sell, lease, sub-license, distribute, transfer, copy, reproduce, display,
license expressly forbids resale or other distribution of the
modify or time share the enclosed product or documentation.
sounds and software included in the Product or their derivatives,
either as they exist on disc, reformatted for use in another
digital sampler, or mixed, combined, filtered, resynthesized or
otherwise edited, for use as sounds, multi-sounds, samples,
multi-samples, wavetables, programs or patches in a sampler,
microchip or any hardware or software sample playback device.
You cannot sell the Product content or give it away for use
by others in their sampling or sample playback devices.
In the event UVI terminates this agreement due to your
breach, you agree to return the original and all other
copies of the software and documentation to UVI.
UVI reserves all rights not expressly granted to herein.
2. Protection of Software
You agree to take all reasonable steps to protect the product and
any accompanying documentation from unauthorized copying
or use. You agree not to modify the product to circumvent any
method or means adopted or implemented by UVI to protect against
or discourage the unlicensed use of copying of the Product.
©2014 UVI. All rights reserved.
2
Table of Contents
Introduction......................................................................................................................................................4
System Requirements..................................................................................................................................5
Installing Your License onto Your iLok Key.........................................................................................6
Installing Your License onto Your Computer......................................................................................7
GUI Overview
Main Interface...........................................................................................................................................8
Preset Voyager..........................................................................................................................................10
Control Bar / Menu.................................................................................................................................11
How-To’s
Creating a New User Preset.................................................................................................................12
Using Parameter Locks..........................................................................................................................13
Changing the GUI Size...........................................................................................................................14
Using Sparkverb in a DAW
ProTools.......................................................................................................................................................15
Digital Performer......................................................................................................................................16
Live.................................................................................................................................................................17
Logic..............................................................................................................................................................18
Cubase..........................................................................................................................................................19
Reaper...........................................................................................................................................................20
Links.....................................................................................................................................................................21
Credits and Thanks........................................................................................................................................22
3
Introduction
Sparkverb shines in traditional mixing sessions but was designed to
be an exceptionally flexible creative tool as well. Discover new spaces
and explore the full range of sonic possibilities effortlessly with built
in mutation and randomization. These functions are made even more
useful by parameter locks available on every control. Experiment
within prescribed boundaries such as a fixed mix amount or pitch
modulation to find exciting variations that work for your specific need.
Another innovative tool comes in the form of the Preset Voyager.
At launch, Sparkverb creates a 2-dimensional array of all presets on
your machine; simply toggle the Preset Voyager display and clickdrag between preset nodes to freely interpolate new settings. Watch
controls update in real time to see what’s happening and create
new presets to redefine the space—the possibilities are limitless.
Under Spark’s elegant exterior lays a powerful and extensively
optimized DSP engine. Built on UVI’s Parametric FDN Engine,
Sparkverb can be instanced near-limitlessly. The dramatic
performance gives you unprecedented access to Sparkverb’s highfidelity sound throughout your sessions. Use it on as many tracks
and busses as you need without worrying about CPU overload.
Additionally you’ll find numerous features which help to make
Sparkverb indispensable such as fully continuous parameters;
With a cutting-edge algorithmic design, Sparkverb breaks
freeze; multiple operation modes; variable densities; unique
many boundaries of contemporary reverbs giving users
and decorrelated multi-channel operation; full automation
modern and innovative controls that dramatically enhance
control; advanced diffusion algorithms and tunable modulation
usability, speed and creative freedom while delivering
for pitch accuracy regardless of scale. Add a generous helping
remarkable sound quality and CPU efficiency.
of factory presets and you’ve got a versatile and powerful sonic
tool suited for the most demanding studio environments.
Easily traverse everything from natural sounding spaces to
infinite, shimmering ambiences with stunning depth and fidelity
Whether you’re working with small ensembles, massive
throughout the entire spectrum. This type of range typically implies
orchestras, sound design or anything in-between, Sparkverb
a dense and complex interface—not in Sparkverb. Usability was
offers a unique experience and innovative feature set that
a pivotal consideration in development. A great deal of care was
helps you work faster, smarter and more creatively than ever
taken to allow a high degree of customization with the fewest
before. Let Sparkverb redefine the way you resound.
controls possible, resulting in less time spent fidgeting and more
time being productive. At the core of Sparkverb’s interface is a
frequency-based spectrum editor; use it to sculpt and refine your
sound with phenomenal speed and control. Adjust decay globally
and across multiple bands with hi/lo multipliers and crossovers
directly on a single canvas. It’s an entirely new way to work
with reverb. All other controls are clearly arranged and labeled,
including A/B comparison, making fine-tuning a painless process.
Version 1.1 Change Log:
Added Predelay parameter
Added Quad channel support
Better integration with REAPER
Fixed a crash in Cubase
Dialing in a reverb, simple or complex, has never been this fast.
4
System Requirements
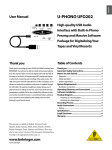
Compatibility
Compatibility
Audio Units, VST, MAS, AAX, RTAS
VST, AAX, RTAS
Minimum System Requirements
Minimum System Requirements
Intel CPU
Core Duo or faster
4 GB of RAM
4 GB of RAM
400 MB of disk space
400 MB of disk space
Mac OS X 10.7 or higher
Windows 7 or higher
iLok account (free, dongle not required)
iLok account (free, dongle not required)
Authorize the Way You Want
Your license allows 3 concurrent authorizations on any combination of computers and iLok dongles.
License management is a simple drag-and-drop process done through iLok License Manager.
Visit ilok.com/
to download iLok License Manager and create your free account.
5
Installing Your License onto Your iLok Key
First, make sure you have downloaded and
1
installed the latest iLok License Manager from
www.ilok.com
Once installed, launch the iLok License Manager
2
and log in to your iLok account (if you don’t have
one, please create one on the iLok website)
Then:
1. Go to the ‘Available’ tab
2. Drag and drop the license onto your iLok key
3
3. Click ‘OK’ when prompted to confirm activation
4. A dialog box will appear stating the process was
successful, click ‘OK’
5. You can now see that the license has been
successfully transferred to your iLok key
4
The process is complete, you can now quit iLok
License Manger.
Please note: If you need to deactivate your
license at any time, simply right-click it and select
‘Deactivate’—doing so will return your license to the
‘Available’ tab
5
6
Installing Your License onto Your Computer
First, make sure you have downloaded and
1
installed the latest iLok License Manager from
www.ilok.com
Once installed, launch the iLok License Manager
2
and log in to your iLok account (if you don’t have
one, please create one on the iLok website)
Then:
1. Go to the ‘Available’ tab
2. Drag and drop the license onto your computer
3
3. Click ‘OK’ when prompted to confirm activation
4. A dialog box will appear stating the process was
successful, click ‘OK’
5. You can now see that the license has been
successfully transferred to your computer
4
The process is complete, you can now quit iLok
License Manger.
Please note: If you need to deactivate your
license at any time, simply right-click it and select
‘Deactivate’—doing so will return your license to the
‘Available’ tab
5
7
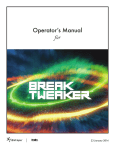
Main Interface
Decay Editor
7
Size
1
Pre-Delay
8
Shape
2
Freeze
9
Lo Section
1
2
»
»
3
4
5
Room Size
Set the mean room dimension in meters
with continuous control (from tiny rooms to huge halls)
Room Shape
Change the delay distribution and distort the room
Shape=0: highest echo density
Shape=1: highest spectral mode density
Density
Change the echo density (affects the number of internal delays; from sparse echoes to dense reflection patterns)
Decay Time
Main decay time in seconds
(e.g. the time it takes for the reverb to
decay about 60dB aka RT60. For more
naturalness, changing the room size will
also affect the actual decay time in order
to keep the room absorbtion properly
constant)
5
»
»
»
6
»
»
»
7
»
»
»
Lo Section
Lo Decay
Decay time multiplier at low frequencies
Lo Crossover
Cutoff ƒ between Low and Mid bands
Lo Cut
Changes the shelving filter to a highpass and disables the [Lo Decay] multiplier
Hi Section
Hi Decay
Decay time multiplier at high frequencies
Hi Crossover
Cutoff ƒ between Mid and High bands
Hi Cut
Changes the shelving filter to a lowpass and disables the [Hi Decay] multiplier
Decay Editor
Click-drag in the Center Column
Modify [Decay Time]
Click-drag in the Left-Column
Modify [Lo Decay] and [Lo Crossover]
Click-drag in the Right-Column
Modify [Hi Decay] and [Hi Crossover]
Horizontal drag modifies crossover ƒ
Vertical drag modifies decay time
8
4
Decay Time
10
Diffusion
3
Density
6
Hi Section
Pre-Delay
Add a delay to the reverb tail (use to
increase voice intelligibility by delaying
early reflections)
9
Freeze
Freezes the reverbs with infinite decay
(Input gain is kept very low during freeze
to avoid endless energy accumulation in
the reverb)
10 Diffusion
» Diffusion Toggle
Enable the short-term diffusion section
{percussive material may benefit from
diffusion to reach suffiently high shorttime echo density}
» Start Time
Changes the delay-time of the first
diffuse. (Short values have a quick and
compact spread but can sound metallic.
Longer values create more time-spread,
sound less metallic but can be heard as
discrete echoes instead of diffusion.)
8
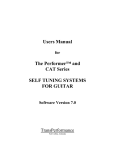
Main Interface (continued)
I/O Metering
Modulation
Right-click
Any Param
15
11
12
Mix
13
Rolloff
14
Width
10
Diffusion
16
10 Diffusion (continued)
»Amount
The optimal diffusion amount lies
around 0.618 (Shorter values have a
more pronounced attack-time while
longer values sounds more like long-term
reverberation and less like short-term
diffusion. Longer values sounds more
metallic.)
11 Modulation
» Depth (in cents)
Explicit control over the modulation
amount in cents for perfectly
controlled modulated tails, lush pads,
unisons and chorus/reverb ensembles
» Rate [multiplier)
Controls the relative rate of modulation
(different for each delay line)
(The default value is enough most of the
time, but for maximum control or special
effects it can be adjusted to match the
reverberated audio input.)
» Mode [lo-fi)
Low-fi interpolation mode, generated
lots of high frequency diffusion
» Mode [dark]
Default mode, exhibit some additional
high-frequency decay damping
for dark and natural room sounds
» Mode [bright]
Precise mode, more expensive, respects
the high frequency decay
specifications more accurately
12 Mix
15 I/O Metering
» Left side: input level meter
» Right side: Output level meter
16
Right-Click Any Parameter
Toggles a contextual menu where you
can enable and reset Parameter Locks,
and toggle MIDI Learn/MIDI UnLearn
(MIDI Learn is not available in the Audio
Unit version of Sparkverb)
Dry/Wet amount
13 Rolloff
Lowpass filter cutoff frequency to
control the reverberation bandwidth
(from oldschool reverberation units
with limited sampling-rate to high-end
contemporary devices}
14 Width
Stereo/Surround width
9
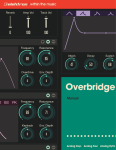
Preset Voyager
1
Toggle
1
Voyager
2
Toggle
Toggles the main display between [Decay Editor] and [Preset Voyager]
2
Operation
» Click-dragging in the cloud
Changes the current reverb setting by
The Preset Voyager displays all factory
and user presets in a cloud arranged
according to their similarity and colorcoded based on their category
The array is generated at Launch, so if
you save a new preset it won’t show up
to center the array
interpolating between the parameters of
the adjacent presets
Preset Voyager
Overview
» Hold the [alt/option] key while zooming » Double-click on a preset to load it
» Right-click anywhere in the display Opens a contextual menu where you can show/hide [Text Labels], [Legend] and [Triangulation Lines]
» Use the scroll-wheel on your mouse to zoom for increased fidelity
in the Preset Voyager until Sparkverb has
been reloaded
10
Control Bar / Menu
1
2
3
1
7
Mutate
Load/Save
2
8
Randomize
9
A/B
10
Preset
Voyager
Factory
3
User
4
GUI Size
5
Tool Tips
11
Menu Toggle
Toggle the drop-down menu on/off
Load/Save Preset
Load and Save Sparkverb presets
Factory Presets
5
6
GUI Size
Choose between Small and Large UIs
Next / Previous Preset
Quickly move through the presets
9
Use to store two different plugin states for A/B comparison
» Initial Click: Stores current state to » Following Clicks: Stores current state in bank A (resp B) and loads the previous state from bank B (resp A)
cursor over the menu bar
Applies a small random change to all 10
unlocked parameters (use to explore the region around the current setting)
User Presets
Mutate
11
A selection of factory presets
» To add a preset to the list simply hit 8
Applies a large random change to all unlocked parameters (use to find unexpected results and fuel creativity)
[Save] and choose the default location
memory A
» Buttons appear when you move the A list of loadable factory presets
the current plugin state
A/B Snapshot
7
Next/Prev
Menu Toggle
» Select one from the menu to replace
4
6
Randomize
Preset Voyager
Toggles the Preset Voyager on/off
Tool Tips
Display instructions for any parameter by mousing over it
11
Creating a New User Preset
Changing the Dynamic
Creating a user preset is a task most will be quite familiar with. The functionality is pretty standard but it comes with an added
perk in Sparkverb. Everytime you create a new preset you update the Preset Voyager’s node array. So how does it work?
At launch, Sparkverb builds a 2-dimensional array of all factory and user presets, mapping the presets in space based on the bias
of their settings. The more varied the presets the more interesting the array becomes, allowing you to travel and interpolate
new settings with each addition. The result will be personal to each user based on the types of presets they create.
In the following example we’ll save a new preset that we’ve made, and name it ‘My New Preset’.
Remember: the Preset Voyager’s node array is calculated at launch, so you’ll need to re-instance Sparkverb for it to update
1
Select ‘Save’ in the Toolbar Menu
Within the Toolbar Menu are the Save and Load
Preset commands, as well as all User and Factory
Presets and two GUI resolution options
2
Give Your Preset a Name
3
Finding Your Preset Later
You can now find your preset under ‘User Presets’ in
the Toolbar Menu
12
Using Parameter Locks
Controlling the Chaos
Sparkverbs features such as Randomize, Mutate and the Preset Voyager allow you to modify multiple parameters at once, making subtle
shifts to extreme changes with one click. This can be a powerful way to quickly preview numerous configurations. However, to make
the most of these features you will want to lock certain parameters from time to time. That’s where Parameter Locks come in.
In the following example we’ll lock the Mix Amount to 50%. As a result the Mix Amount parameter will be ignored by global
functions like Randomize, Mutate and the Preset Voyager. Parameter Locks are available on every control in Sparkverb.
1
Right-click the ‘Mix Amount’ knob
Right-clicking any parameter in the Sparkverb UI will open a
contextual menu where two commands are available:
» Locked (toggle)
» Unlock All Parameters
Locked: toggles the parameter lock for that control on/off
Unlock All Parameters: does just that
2
Select ‘Locked’
By selecting the ‘Locked’ toggle in the contextual menu we’ve
now locked the Mix Amount knob
You’ll see a small orange lock appear next to the parameter
name signifying the state change
If you right-click the Mix Amount knob again you’ll see the
‘Locked’ toggle has been switched on, signified by a √
To deactivate the lock, simply select the ‘Locked’ toggle
again or select ‘Unlock All Parameters’ to disable parameter
locks globally
13
Changing the GUI Size
Sometimes Bigger is Better
Sparkverb’s default UI resolution provides a compact footprint which is
adequate for standard use and suitable for most screens, however, some users
prefer a larger window to interact with so we’ve included a more grandoise
option. Toggle between them at any time in the menu as illustrated below.
Resolution Settings
To change the UI window size in Sparkverb select
the desired size from the Toolbar Menu
Sparkverb GUI Resolution Options
14
ProTools
In the following example we’ll load Sparkverb onto an Aux track in Avid ProTools 11 and route signal to it:
1. Click on a Send slots of your track to open the
routing menu—then select an empty bus (named
SparkVerb here)
1
2. Create an Aux stereo track
3. Click on the Input menu of your new Aux track and
assign ‘SparkVerb’ as the input source
4. Click on one of the Insert slots on your new Aux
2
track and select ‘UVI / SparkVerb’ from the plugin menu
5. Set the amount of signal to send into Sparkverb
Now let’s check to see if Sparkverb is getting signal..
3
6
6. Click on ‘SparkVerb’ and open the editor
7. In the Sparkverb editor we can see the signal meters
showing input signal on the left, and output signal on
the right
(For more information on using plugins in your DAW,
please consult the appropriate user manual)
7
4
5
7
15
Live
In the following example we’ll load Sparkverb onto a Return track in Ableton Live 9 and route signal to it:
1. In the ‘Categories’ column select ‘Plug-ins’, then
click the expand arrow next to ‘UVI’
2. Drag ‘Sparkverb’ from the plug-in list onto a Return
track, in this example we’ll choose the ‘A Return’ track
1
3. Send some signal to the Return track by cranking up
the ‘Send’ pot on one of your tracks
Now let’s check to see if Sparkverb is getting signal..
4. Click on the ‘A Return’ track
5. Click on the wrench icon of Sparkverb
6. In the Sparkverb editor we can see the signal
2
meters showing input signal on the left, and output
signal on the right
(For more information on using plugins in your DAW,
3
please consult the appropriate user manual)
4
5
6
6
16
Digital Performer
In the following example we’ll load Sparkverb onto an Aux Track in MOTU Digital Performer 8 and route signal to it:
1. Click on an empty Send slot of your track
2. Select a bus to route signal to from your source
track—in this case a stereo bus, bus 1-2
3. Click in one of the empty plugin slots on your new
Aux track and choose ‘UVI / Sparkverb’ from the menu
1
Now let’s check to see if Sparkverb is getting signal..
2
4 Click on ‘SparkVerb’ and open the editor
5. In the Sparkverb editor we can see the signal
meters showing input signal on the left, and output
signal on the right
(For more information on using plugins in your DAW,
please consult the appropriate user manual)
3
4
5
5
17
Logic
In the following example we’ll load Sparkverb onto an Aux Track in Apple Logic X and route signal to it:
1. Click on an empty Send slot of your track
2. Select a bus to route signal to from your source
track—in this case Bus 1
2
3. Adjust the send knob so that signal is being sent to
the new Aux track
1
4. Click in one of the empty plugin slots on your new
Aux track and choose ‘Audio Units / UVI / Sparkverb /
Stereo’ from the menu
Now let’s check to see if Sparkverb is getting signal..
5. In the Sparkverb editor we can see the signal
3
meters showing input signal on the left, and output
signal on the right
(For more information on using plugins in your DAW,
please consult the appropriate user manual)
4
5
5
18
Cubase
In the following example we’ll load Sparkverb onto an FX Send in Steinberg Cubase 7 and route signal to it:
1. Click on the ‘Sends’ tab of your track
2. Click in one of the empty Send slots and choose
‘Add FX Channel to Send 1...’
3. Under the ‘Effects’ menu, choose Sparkverb
1
4. Set the amount of signal to send into Sparkverb
Now let’s check to see if Sparkverb is getting signal..
2
5. Click on ‘SparkVerb’ and open the editor
6. In the Sparkverb editor we can see the signal
meters showing input signal on the left, and output
signal on the right
(For more information on using plugins in your DAW,
3
please consult the appropriate user manual)
4
5
6
6
19
Reaper
In the following example we’ll load Sparkverb onto a track in Cockos Reaper 4 and route signal to it.
Here we have two tracks set up, one with our source signal and a second to act as an Aux for Sparkverb:
1. Click on the ‘FX’ tab of the Aux track, track 2 here
2. Select ‘Sparkverb’ from the ‘Add FX’ menu
1
3. Click the ‘I/O’ button on the source track
4. A Routing options menu will appear, add a Send to
the track with Sparkverb on it - this will allow us to route
signal from track 1 to track 2
5. Set the amount of signal to send
Now let’s check to see if Sparkverb is getting signal..
2
6. In the Sparkverb editor we can see the signal
meters showing input signal on the left, and output
signal on the right
(For more information on using plugins in your DAW,
3
please consult the appropriate user manual)
4
5
6
6
20
Links
UVI
Home . . . . . . . . . . . . . . . . . . . . . . . . . . . . . . . . . . . . . . . . . . . uvi.net/
Download UVI Workstation and User Manuals . . . . . . . . . . . . . . . . . . . uvi.net/downloads
Your Registered Product Serial Numbers and Download Links . . . . . . . . . uvi.net/my-products
FAQ . . . . . . . . . . . . . . . . . . . . . . . . . . . . . . . . . . . . . . . . . . . . uvi.net/faq
Tutorial and Demo Videos . . . . . . . . . . . . . . . . . . . . . . . . . . . . . . . youtube.com/
Support . . . . . . . . . . . . . . . . . . . . . . . . . . . . . . . . . . . . . . . . . . uvi.net/contact-support
iLok
Home . . . . . . . . . . . . . . . . . . . . . . . . . . . . . . . . . . . . . . . . . . . ilok.com/
iLok License Manager . . . . . . . . . . . . . . . . . . . . . . . . . . . . . . . . . ilok.com/ilm.html
FAQ . . . . . . . . . . . . . . . . . . . . . . . . . . . . . . . . . . . . . . . . . . . . ilok.com/supportfaq
21
Credits and Thanks
Produced by UVI
DSP
Remy Muller
Software
Olivier Tristan
Remy Muller
GUI
Nathaniel Reeves
Preset Design
Remy Muller
Damien Vallet
Alain Etchart
Simon Stockhausen
Laurent Bergman
Special Thanks
To our fantastic beta testers!