1
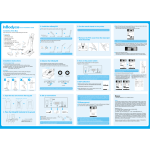
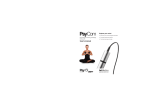
Installation
BODY COMPOSITION ANALYZER
Install Manual
Hand Electrode
Input Buttons
1. Raise the stand.
Head
2. Tighten the joint screw and close the joint cover.
B
C
6. Connect the thermal printer cable and the
adapter to the ports on the rear panel of the
equipment as illustrated.
A
Hand Electrode Cable
<Rear view of InBody170>
Stand
7. Connect the adapter (
wall outlet.
Foot Electrode
) to the power cord (
) and plug it to the
Base
Contents of the Box
InBody170
Joint Screw 1EA
Joint Cover
Thermal Printer
Screws 4EA
Thermal Printer Paper
Thermal Printer Cable
Adapter 1EA (12V, 3.4A)
Power Cord 1EA
Install Manual 1EA
User’s Manual CD 1EA
Warranty
Cord Clips 2EA
3. Connect the thermal printer firmly to the
supporting metal plate using the screws.
<Side view of InBody 170>
A
<Rear view of InBody170>
B
4. Open the thermal printer lid and insert the thermal printer paper
in the direction illustrated.
8. If the air bubble is not in the center of the level indicator, tighten or
loosen the leveling screws(4EA) on the foot plate to adjust the level
of InBody170. InBody170 must be leveled properly for accurate weight
measurement.
Level Indicator
< Leveled state >
C
Leveling Screws
<InBody170 Base>
Please keep the packaging for future events of repacking InBody170 and sending
it for servicing or otherwise transporting InBody170 elsewhere.
CAUTION
1.
If you use the
InBody170 on a carpet, static electricity may cause serious damage to the
DANGER
NOTE
electronic components. If the InBody170 is to be installed on a carpet, use antistatic mats
below the InBody170. Use InBody tissue to wipe feet and hands before the measurement
starts.
5. Thermal printer cables are connected as shown below. Attach the cord
clips( ) to the back of the InBody170 as illustrated below and fix the
thermal printer cable into the clips.
9. Turn the InBody170 and thermal printer on.
2. Do not wipe the base and hand electrode with cleaning liquids. If cleaning liquids enter
into InBody170, it may cause corrosion or electric shock by short circuit. For cleaning of
the InBody170, please use InBody tissue, which also has antibacterial functionality.
3. Do not place the InBody170 directly against a wall. The cables connected to InBody170
may get bent, resulting in communication faults or damage to the ports on the rear panel.
The measurement results may also be inaccurate if the base touches the nearest wall.
4. Do not dismantle the equipment. Internal parts are not for customer use and may cause
electric shock. If the equipment is dismantled, the warranty is void, and service costs
will be charged.
170매뉴얼_B.indd 1
<Rear view of InBody170>
<Rear view of InBody170>
POWER Switch
POWER Button
Do not touch the base when turning on and during warm up.
Applying pressure or weight to the base during warm up will result in an inaccurate
CAUTION calibration,
NOTE
which mayDANGER
cause the measurements to be inaccurate.
2011-10-21 오전 11:38:03
Measurement
Proper Posture
FAQs
1. Step on the foot plate and stand still until the weight is set.
Proper posture is essential to achieve reliable results and high reproducibility.
Do not talk or move during the InBody test.
Q1. I do not know how to configure the settings.
A. Press the
button and then press the
button.
The setup manual will be printed by the thermal printer. Refer to the
manual for descriptions of setup menu items and setup instructions.
Q2. I pressed the
button in order to change the setup configuration but
InBody170 is asking for the access code. What is the access code?
A. The factory default access code is “0000.” and it may be changed
in the Setup menu.
Q3. How do I adjust the sound volume?
A. Press the
,
button on the home screen to adjust the sound
volume. To mute the voice guide, press the
button.
The
icon at the bottom of the home screen will disappear.
ID
2. After weight is measured, select gender with
ID
Armpits are not closed up.
buttons.
Straight both arms.
Q4. I would like to set ID every time I use InBody. Is there an easy way to
do this?
A. Press the
button. → Enter the access code (default is “0000”) →
To enter your ID, please press
CAUTION
ID
button.
If the examinee’s
thighs are in contact
with each other, have
the examinee wear a
pair of knee-length
shorts so that the
thighs are not in contact
each other.
3. Use input buttons to enter age and height in order. Then, press the
DANGER
NOTE
button after entering each information to proceed.
Gently grip the hand
electrodes so that all the
four fingers of each hand
are touching the surface
of the either hand
electrode. Touch the
circular electrode with
the thumb.
Press the
button and then the
button. →
button to bring up the home screen.
Q5. How do I change Date/Time?
A. Press the
button. → Enter the access code (default is “0000”). →
Press the
button. → Press the
button until you see
.
Date/time are displayed at the bottom of the screen and they can be
changed by using the number buttons.
Q7. Where can I buy thermal printer paper and other optional devices?
A. Please contact Biospace or the local distributor.
Net
Step on the foot plate with bare feet,
ensuring that both heels are touching
the smaller foot electrode on either side
as illustrated.
Net
Net
Net
CAUTION
button twice. → Press the
Q6. The thermal printer is not printing results sheet.
A. Ensure that the thermal printer is turned on. Also check that the paper is
loaded in the thermal printer and the thermal printer cable is correctly
connected.
Net
Please enter your gender, age and height accurately.
Press the
Q8. How do I know if the correct measurement has been taken?
A. After taking the measurement, check the
impedance at the bottom of the results sheet
printed. The impedance value must decrease
in the arrow direction.
Do not wear socks
during measurement.
4. Maintain correct posture and the measurement will begin.
DANGER
NOTE
When the measurement is complete, the results screen will be displayed
as illustrated below.
Net
Net
Q9. How do I clean the hand/foot electrodes?
A. Please use InBody tissues provided by Biospace and wipe the
hand/foot electrodes. InBody tissues have antibacterial functionality
which protects cross-contamination.
Cautions before Measurement
5. Once the measurement is complete, step off the foot plate. The thermal
printer will automatically print the results sheet about 15 seconds later.
Do not use this equipment in combination with the following electronic medical devices.
- Medical devices, such as a pacemaker.
- Electronic life support systems, such as an artificial heart/lung.
- Portable electronic medical devices, such as an electrocardiograph.
Measurements may not be possible due to callouses on the palm or sole. In this case, wipe the palm and
sole with an InBody Tissue before measuring.
For any problems with InBody170 or for any clinical information, contact:
Biospace Co., Ltd. [Head office]
518-10 Dogok 2- dong, Gangnam-gu, Seoul 135-854 KOREA
TEL : 82-2-501-3939 FAX : 82-2-501-3978 Homepage : http://www.e-inbody.com
E-mail : info @biospace.co.kr
For more information on the functions of InBody170 and descriptions on the thermal results sheet items,
see the user’s manual CD included.
For purpose of improvement, specifications and design are subject to change without notice.
ⓒ 1996 ~ Biospace Co., Ltd. All rights reserved. BM-ENG-C0-B-111017
170매뉴얼_B.indd 2
2011-10-21 오전 11:38:06