1
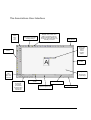
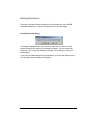
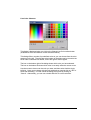
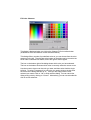
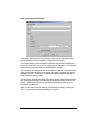
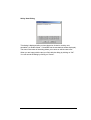
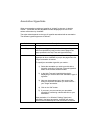
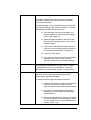
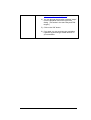
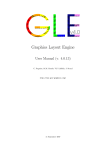
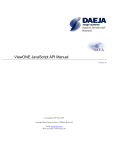
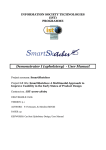
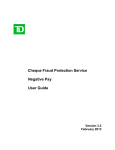
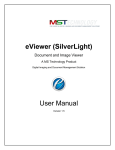
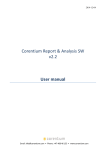
viewONE annotations
Version 2.0
? Daeja Image Systems. All Rights Reserved.
Email: [email protected]
Web site: http://www.daeja.com
D A E J A
I M A G E
S Y S T E M S
Contents
Introduction........................................................................................................................................................3
Annotations Feature List ..................................................................................................................................4
The Annotations User Interface.......................................................................................................................5
Annotations Toolbar..........................................................................................................................................7
Context Sensitive Toolbar...............................................................................................................................17
Dialog Interfaces .............................................................................................................................................18
Annotation Hyperlinks....................................................................................................................................23
The Keyboard ...................................................................................................................................................26
Introduction
viewONE is a Java applet that extends your web browser so that you can view,
zoom, magnify, scroll, pan, rotate and print your images and image documents
quickly and easily.
The viewONE Annotations Module allows you to create, view and edit annotations
on image-based documents using the viewONE Java applet.
This document is the Applet Annotations User Manual. It assumes you already
know how to use viewONE (without annotations). If this is the first time you have
used viewONE, please read the viewONE User Manual before going further.
We have worked hard to ensure you get a high performance, reliable and easy to
use annotations editor. If you feel we can do more, please send us your
comments.
For further information about viewONE please consult the following documents…
?
Applet User Manual
?
Applet HTML Manual
?
Applet JavaScript Manual
?
Applet Annotations Configuration Manual
?
or our web site at www.daeja.com.
3
Annotations Feature List
The viewONE Annotations Extension adds the following features…
?
Powerful, easy to use interface
?
Annotation draw features that include…
- lines
- arrows
- text overlays (solid and transparent)
- sticky notes
- redaction
- rectangles
- ovals
- filled (solid) and empty polygons with any number of vertices
- open-ended polygons with any number of vertices
- freehand
- text and image stamps/overlays (solid and transparent)
- rectangle and polygon highlights (semi transparent rectangles)
- many of the above also have optional hyperlinks/hotspots and
can all be customized for line size, color and fill color
?
Configurable user privileges for annotation viewing, printing and editing
?
Comprehensive HTML and Javascript API with manuals
4
The Annotations User Interface
File
Open,
Close,
and
Save
Print Page, Document,
and Page Range
Zoom Area, Zoom In, Zoom Out,
Magnify, Zoom 100%, Fit to
Width, Fit to Height, Best Fit,
Rotate Clockwise, Rotate Anticlockwise, Flip Horizontally, Flip
Vertically, and Invert
New Window
Sample text
annotation
and its
context
sensitive
toolbar
Annotations
toolbar
Vertical
scrollbar
Scroll to
First,
Previous,
Next, and
Last Page.
Image Area
Drag mouse
to pan image
View Fullpage,
Thumbnails,
Two Pages,
Thumbs-left,
Thumbs bottom,
Thumbs right,
Thumbs top
Image Enhance
On/Off
Horizontal scrollbar
Help and progress
captions appear here
5
Adjust Brightness
Two page and Thumbnails only view modes
Annotation edit options are not available in these modes, they may only be viewed.
For an explanation of how to change view modes within viewONE please refer to
the Applet User manual.
6
Annotations Toolbar
This section details the various annotation toolbar buttons.
Action buttons
The annotation action buttons…
Restore
Returns all annotations in a document to the state they were in when they
were last saved.
Save
Saves your annotations away. Up until this point they could still be lost if
you close your browser or turn off your computer.
7
Select button
The “Select”button…
Select
The “Select”button puts the mouse cursor into “select”mode. This means
that while the cursor is over an annotation you can select that annotation by
using a single left-click. This will highlight the annotation and bring up its
context sensitive toolbar.
An annotation can also be selected without having to go into “select”mode
by using a single right-click when over an annotation.
8
Annotation draw buttons
The annotation draw buttons indicate which type of annotations you can create…
When these buttons are clicked the mouse cursor changes to “annotation draw”
mode. The annotation drawn depends on the button clicked. The draw mode will
terminate after an annotation’s placement has been completed.
viewONE chooses the line width or font size for an annotation to suite the
particular zoom factor you are using at the time it is drawn. Those affected are the
line, arrow, text, rectangle, polygon, open polygon, text stamp and freehand
annotation types.
Line
The annotation drawn will be a straight line. To draw this annotation…
1) Select the line button using a single left-click.
2) There are two ways of drawing a line…
a) Hold down the left mouse button where you want the line to start,
and drag the cursor in the direction you want. Release the mouse
button where you want the line to end.
b) Alternatively, single left-click where you want the start of the line,
then release the mouse button. Now move the cursor to where you
want the end of the line, and perform another single left-click.
Arrow
The annotation drawn will be an arrow. The arrowhead is drawn where the
first point of the line is placed. To draw this annotation…
1) Select the arrow button using a single left-click.
2) There are two ways of drawing an arrow…
a) Hold down the left mouse button where you want the arrow to point,
and drag the cursor in the direction you want. Release the mouse
button where you want the line to end.
b) Alternatively, use a single left-click where you want the arrow to
point, then release the mouse button. Now move the cursor to
where you want the end of the arrow, and perform a single left-click.
9
Transparent Text
The annotation drawn will be text. The text drawn will have a transparent
background unless it is drawn on to a color image. If it is drawn on to a
color image the text will have a white background. To draw this
annotation…
1) Select the transparent text button using a single left-click.
2) Single left-click where you want the text to start.
3) Enter the text you want using the keyboard.
4) Single left-click outside the annotation to end the edit, or click on the
“fix”context button.
Solid Text
The annotation drawn will be text. The text drawn will have a solid (colored)
background. To draw this annotation…
1) Select the solid text button using a single left-click.
2) Single left-click where you want the text to start.
3) Enter the text you want using the keyboard.
4) Single left-click outside the annotation to end the edit, or click on the
“fix”context button.
Sticky Note
The annotation drawn will be a sticky note. To draw this annotation…
1) Select the sticky note button using a single left-click.
2) Single left-click where you want the sticky note to go.
3) Enter the text you want in the box that pops up, then select “OK”.
10
Highlight Rectangle
The annotation drawn will be a highlight rectangle. To draw this
annotation…
1) Select the highlight rectangle button using a single left-click.
2) There are two ways of drawing a rectangle…
a) Hold down the left mouse button where you want the top left of the
rectangle, and drag the cursor in the direction you want. Release
the mouse button when the rectangle is the required shape and
size.
b) Alternatively, use a single left-click where you want the top left of
the rectangle and then release the mouse button. Now move the
cursor in the direction you want until the rectangle is the required
shape and size, then perform another single left-click.
Transparent Highlight
The annotation drawn will be a highlight rectangle. The highlight will be
completely transparent. To draw this annotation…
1) Select the transparent highlight button using a single left-click.
2) There are two ways of drawing a rectangle…
a) Hold down the left mouse button where you want the top left of the
rectangle, and drag the cursor in the direction you want. Release
the mouse button when the rectangle is the required shape and
size.
b) Alternatively, use a single left-click where you want the top left of
the rectangle and then release the mouse button. Now move the
cursor in the direction you want until the rectangle is the required
shape and size, then perform another single left-click.
11
Highlight Polygon
The annotation drawn will be a highlight polygon. To draw this
annotation…
1) Select the highlight polygon button using a single left-click.
2) Single left-click where you want the polygon to start.
3) Move the cursor to where you want the next point of the polygon, then
perform another single left-click.
4) Repeat step 3 until your polygon is formed. To finish the polygon use a
double left-click on the last point you place.
Rectangle
The annotation drawn will be a rectangle. To draw this annotation…
1) Select the rectangle button using a single left-click.
2) There are two ways of drawing a rectangle…
a) Hold down the left mouse button where you want the top left of the
rectangle, and drag the cursor in the direction you want. Release
the mouse button when the rectangle is the required shape and
size.
b) Alternatively, use a single left-click where you want the top left of
the rectangle and then release the mouse button. Now move the
cursor in the direction you want until the rectangle is the required
shape and size, then perform another single left-click.
12
Redaction
The annotation drawn will be a rectangular rectangle. To draw this
annotation…
1) Select the redaction button using a single left-click.
2) There are two ways of drawing a rectangle…
a) Hold down the left mouse button where you want the top left of the
rectangle, and drag the cursor in the direction you want. Release
the mouse button when the rectangle is the required shape and
size.
b) Alternatively, use a single left-click where you want the top left of
the rectangle and then release the mouse button. Now move the
cursor in the direction you want until the rectangle is the required
shape and size, then perform another single left-click.
Redaction Polygon
The annotation drawn will be a redaction polygon. To draw this
annotation…
1) Select the redaction polygon button using a single left-click.
2) Single left-click where you want the polygon to start.
3) Move the cursor to where you want the next point of the polygon, then
perform another single left-click.
4) Repeat step 3 until your polygon is formed. To finish the polygon use a
double left-click on the last point you place.
13
Closed Polygon
The annotation drawn will be an enclosed polygon. To draw this
annotation…
1) Select the closed polygon button using a single left-click.
2) Single left-click where you want the polygon to start.
3) Move the cursor to where you want the next point of the polygon, then
perform another single left-click.
4) Repeat step 3 until your polygon is formed. To finish the polygon use a
double left-click on the last point you place.
Open Polygon
The annotation drawn will be an open-ended polygon. To draw this
annotation…
1) Select the open polygon button using a single left-click.
2) Single left-click where you want the polygon to start.
3) Move the cursor to where you want the next point of the polygon, then
perform another single left-click.
4) Repeat step 3 until your polygon is formed. To finish the polygon use a
double left-click on the last point you place.
Oval
The annotation drawn will be an oval. To draw this annotation…
1) Select the oval button using a single left-click.
2) There are two ways of drawing an oval…
a) Hold down the left mouse button where you want the top left of the
oval, and drag the cursor in the direction you want. Release the
mouse button when the oval is the required shape and size.
b) Alternatively, use a single left-click where you want the top left of
the oval and then release the mouse button. Now move the cursor
in the direction you want until the oval is the required shape and
size, then perform another single left-click.
14
Freehand
The annotation drawn will be a freehand line. To draw this annotation…
1) Select the freehand button using a single left-click.
2) Hold down the left mouse button where you want the line to start, and
drag the cursor to draw the line.
3) Release the mouse button when the line is completed.
Stamp
The annotation drawn will be a stamp. To draw this annotation…
1) Select the stamp button using a single left-click.
2) Use a single left-click to choose the stamp you want to place from the
dropdown menu that appears.
3) Single left-click where you want the top left of the stamp.
15
Show annotations button
The “Show annotations”button is located on viewONE’s status bar (unlike
other annotations buttons).
Show annotations
When the “Show annotations”button is selected all annotations in the
document (for which you have edit privileges) are displayed.
When the button is deselected all annotations in the document (for which
you have edit privileges) are hidden, revealing the original document
underneath.
16
Context Sensitive Toolbar
An annotation’s context sensitive toolbar becomes available when the annotations
has been selected. This can be achieved either through putting the cursor into
“select”mode then performing a single left-click on an annotation, or simply by
using a single right-click on an annotation.
Fix Annotation
Moves the annotation out of “edit”mode.
Increase Line Width/Text Size
Increases the annotation’s line width or text size (depending on what kind of
annotation it is) by one unit.
Decrease Line Width/Text Size
Decreases the annotation’s line width or text size (depending on what kind
of annotation it is) by one unit.
Edit Annotation Text
Brings up the sticky note dialog box (see page 22).
Change Line Color
Brings up the line color chooser dialog box (see page 19).
Change Fill Color
Brings up the fill color chooser dialog box (see page 20).
Help Text and Hyperlink
Brings up the help text and hyperlink dialog box (see page 21).
Move Behind
Moves the annotation behind any others it might be covering.
Delete
Deletes the annotation.
17
Dialog Interfaces
There are a number of dialog interfaces for various features in the viewONE
Annotations Extension. They are described over the next few pages.
Annotations Save Dialog
This dialog is displayed when you try to close a document or move to a new
document without first saving your annotation changes. You can respond by
clicking on “OK”to save the annotation changes, or by clicking on “Cancel”to
discard them.
If you have not made changes to any annotations, or if you have already saved
your changes, then the dialog will not appear.
18
Line Color Chooser
This dialog is displayed when you click on the Change Line Color toolbar button
(available on some annotation’s context sensitive toolbar).
This dialog offers a number of pre-defined colors or you can choose from the color
spectrum on the left. The slide bar at the bottom of the dialog can be moved to the
left to make a selected color darker, and to the right to make it lighter.
The box on the bottom right of the dialog shows which color you have selected.
The box on the bottom left shows which color is currently under the mouse cursor.
Use the mouse to hover over the color you want, and then select it with a single
left-click. Once you are happy with the color selected you need to click on “OK”to
finish with the dialog. You can cancel the dialog at any point by clicking on
“Cancel”. Alternatively, you can use a double-left click on a color selection.
19
Fill Color Chooser
This dialog is displayed when you click on the Change Fill Color toolbar button
(available on some annotation’s context sensitive toolbar).
This dialog offers a number of pre-defined colors or you can choose from the color
spectrum on the left. The slide bar at the bottom of the dialog can be moved to the
left to make a selected color darker, and to the right to make it lighter.
The box on the bottom right of the dialog shows which color you have selected.
The box on the bottom left shows which color is currently under the mouse cursor.
Use the mouse to hover over the color you want, and then select it with a single
left-click. To select “Transparent”as a fill color you need to click on the box near
the center of the dialog that has an “X". Once you are happy with the color
selected you need to click on “OK”to finish with the dialog. You can cancel the
dialog at any point by clicking on “Cancel”. Alternatively, you can use a double-left
click on a color selection.
20
Help Text and Hyperlink Dialog
This dialog is displayed when you click on the Help Text and Hyperlink toolbar
button (available on some annotation’s context sensitive toolbar).
The Help text field is for the annotation’s tooltip text (the text that is displayed by
the mouse cursor when the cursor is hovering over an annotation). The Label text
field is used to give an annotation an identifier within viewONE.
The next part of the dialog deals with an annotation’s hyperlink. The radio buttons
down the left-hand side allow you to choose which type of hyperlink you want an
annotation to have. The fields in the middle of the dialog change depending on
which annotation style you select.
The two buttons towards the bottom of the dialog, labeled “Grab Window Settings”
and “Use Window Settings”are used when the annotation is being “linked”to by
another. Please see this manual’s “Annotations Hyperlinks”section for more
information (see page 23).
When you are happy with your settings you finish with the dialog by clicking on
“OK”. You can cancel the dialog by clicking on “Cancel”.
21
Sticky Note Dialog
This dialog is displayed after you have placed or clicked on a sticky note
annotation (or double-clicked - if viewONE has the annotations toolbar displayed).
The area in the center of the dialog allows you to enter or edit the note’s text.
When you are happy with the text you finish with the dialog by clicking on “OK”.
You can cancel the dialog by clicking on “Cancel”.
22
Annotation Hyperlinks
When an annotation containing a hyperlink is “clicked”by the user (or doubleclicked – if viewONE has the annotations toolbar displayed) then one of four
actions will be taken by viewONE.
The action taken depends on the type of hyperlink associated with an annotation.
The different hyperlink types are as follows…
Selection
None
Description
No hyperlink.
Page
A page-based hyperlink. Activation of this type of hyperlink
will force viewONE to jump from the current page to the
page specified in the Help Text and Hyperlink dialog.
Annotation
An annotation-based hyperlink. Activation of this type of
hyperlink will force viewONE to jump to the page where the
“target”annotation is located.
To specify an annotation hyperlink you need to…
1) Select the annotation you wish to provide with a
hyperlink, and click on the Help Text and Hyperlink
button in the context sensitive toolbar.
2) In the Help Text and Hyperlink dialog that is
displayed you need to select the “annotation”type of
hyperlink.
3) Now use the dropdown box in the center of the
dialog to select the annotation you wish to link to –
your “target”annotation.
4) Click on the “OK”button.
5) If you want, you can now test your annotation
hyperlink by performing a double left-click on your
annotation.
Upon activation, if no “Window”Settings”have been
specified in the target annotation, viewONE will use the
current zoom and attempt to scroll the window so that the
23
annotation is in the top left of the screen.
If “Window Settings”have been specified in the target
annotation, viewONE will use them when the hyperlink
annotation is activated.
“Window Settings”can be specified through the Help Text
and Hyperlink dialog of the “target”annotation. To specify
windows settings follow these instructions…
1) Go to the page of the document where your
target annotation is located and set the page’s
zoom, scroll, rotate, etc.
2) Select the target annotation, and click on the
Help Text and Hyperlink button in the context
sensitive toolbar.
3) Click on the “Grab Window Settings”button to
capture the current window settings (these will
be used when the annotation is jumped to).
4) Click on the “OK”button.
5) If you want, you can now use the “Use Window
Settings”button from the Help Text and
Hyperlink dialog to test your window settings.
JavaScript
Activation of this type of hyperlink will pass the specified text
to the applet’s nominated event handler (see the “Applet
JavaScript Manual”for more information). The text is
passed as the “text parameter”and the “id”passed is 23.
Web Page
A Web page-based hyperlink. Activation of this type of
hyperlink will force the browser to display a window
containing the specified Web page.
To specify this Web page follow these instructions…
1) Select the annotation you wish to provide with a
hyperlink, and click on the Help Text and
Hyperlink button in the context sensitive toolbar.
2) In the Help Text and Hyperlink dialog that is
displayed you need to select the “Web page”
type of hyperlink.
3) Now use the text field in the center of the dialog
to enter the address of the Web page you wish
to link to (also known as a Universal Resource
Locator – URL -- e.g.,
24
http://www.mysite.com/page1.htm).
4) You can also set the hyperlink’s window “target”
from the dropdown box on the right of the
dialog. (This works in the same way as HTML
targets.)
5) Click on the “OK”button.
6) If you want, you can now test your annotation
hyperlink by performing a double left-click on
your annotation.
25
??
The Keyboard
viewONE provides keyboard access only to some of the functions offered by the
context sensitive toolbar. The majority of annotation features are controlled by the
mouse.
Non-text annotations
Delete annotation
Increase annotation size
Decrease annotation size
DEL
+
-
Text annotations
Delete character
DEL
26