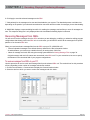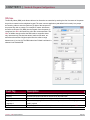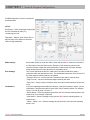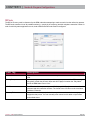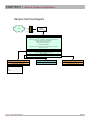
1
SBX2
Installation & Operation Manual
SBX2 Operation
System Manual
Interalia | SBX
Manual
Copyrights
This manual and the software accompanying it are copyrighted © 2013 by Interalia Inc. ®
SBX2 System Manual
41-UM-000-001-00-EN-85
All rights reserved. No part of this book, including interior design, cover design, and icons, may be reproduced or
transmitted in any form, by any means (electronic, photocopying, recording, or otherwise) without the prior written
permission of Interalia Inc.
Interalia Inc. Marketing Department
6815 8th Street N.E, Suite N275
Calgary, Alberta, Canada T2E 7H7
Phone: (800) 661-9406 or (403) 288-2706
Fax: (403) 288-5935
Interalia and the publisher have used their best efforts in preparing this book as accurately and completely as
possible, however we do not make any guarantees or warranties regarding its content.
Trademarks
Interalia is a registered trademark of Interalia Inc.
SBX2 is a registered trademark of Interalia Inc.
All other product names and services identified throughout this book are used in an editorial fashion only, and for
the benefit of such companies. No such use, or the use of any trade name, is intended to convey endorsement or
other affiliation with the book.
Canada
United States
United Kingdom
6815 - 8th Street NE.
701-24th Ave. SE.
58 Hershal Street
Calgary, Alberta
Minneapolis, Minnesota
Slough, UK
Canada T2E 7H7
U.S.A. 55414
SL1 1HD
Tel: 403 288 2706
Tel: 952 942 6088
Tel: +44 (0) 1476 594207
Toll Free 800 661 9406
Toll Free 800 531 0115
Fax: +44 (0) 1476 594208
Fax: 403 288 5935
Fax: 952 942 6172
[email protected]
[email protected]
[email protected]
Interalia | SBX2 Manual
Table Of Contents
CHAPTER 1 | Introducing the SBX2 ........................................... 1
About the SBX2 Announcement and Call Processing System............................................................. 2
Who Uses SBX2 ................................................................................................................................. 2
About the XMUCOM+ Application....................................................................................................... 2
SBX2 Product Overview....................................................................................................................... 2
Typical Applications............................................................................................................................. 3
In This Book......................................................................................................................................... 4
For More Information........................................................................................................................... 4
CHAPTER 2 | Installing the SBX2 ............................................... 5
Meeting System Requirements............................................................................................................ 6
Environmental Requirements............................................................................................................ 6
Power Requirements........................................................................................................................ 6
Installing the SBX2 Unit........................................................................................................................ 6
To install an SBX2 in a rack............................................................................................................... 7
To mount an SBX2 to a wall............................................................................................................... 7
Checking System Startup................................................................................................................. 7
To check system startup...................................................................................................................... 7
Setting Country Code........................................................................................................................ 8
To set the country code..................................................................................................................... 8
Soft Stop Option................................................................................................................................ 8
Cabling the SBX2 ................................................................................................................................ 8
Cabling Activities.................................................................................................................................. 9
Preparing to Cable the SBX2 ........................................................................................................... 9
PBX Interface Table Conventions and Abbreviations.......................................................................... 9
Matching SBX2 Cables and Connectors.......................................................................................... 10
SBX2 Port Descriptions and Cabling Instructions............................................................................11
Connecting the SBX2 to a PC with XMUCOM+ Software............................................................... 12
To connect to the PC with an analog line to the modem connector................................................ 12
To connect to the PC through an Ethernet (LAN) Network............................................................. 13
To connect to the PC directly with the Network port....................................................................... 13
Connecting Remote Telephone Access (optional) ......................................................................... 13
To connect an analog line to provide Remote Telephone Access................................................... 13
Connecting Alarms (optional).......................................................................................................... 14
To Wire The Alarm Connector......................................................................................................... 14
Cabling SBX2 Analog Ports............................................................................................................. 15
To cable the MOH (Audio) Ports..................................................................................................... 15
MOH Applications........................................................................................................................... 16
Call Processing/Auto Attendant Applications.................................................................................. 16
About SBX2 Operating Modes........................................................................................................... 17
Continuous Play (CP)..................................................................................................................... 17
Synchronized Continuous Play (SCP)............................................................................................ 17
Level Start/Pulse Return - Single Play (LS/PR-SP)........................................................................ 17
Interalia | SBX2 System Manual
Page i
Table Of Contents
Level Start/Pulse Return - Multiple Play (LS/PR-MP)..................................................................... 18
Level Start/Level Return - Single Play (LS/LR-SP)......................................................................... 18
Pulse Start/Level Return (PS/LR)................................................................................................... 18
Pulse Start/Pulse Return (PS/PR).................................................................................................. 19
Ring Start (R).................................................................................................................................. 19
Ring Start without Loop Current Check (RN).................................................................................. 19
Ring Start/Tone Disconnect (RT) & (RT+)....................................................................................... 19
Ring Start/DTMF Disconnect (RD).................................................................................................. 19
Ring Start/Busy Disconnect (RB).................................................................................................... 19
Ring Start/Busy Disconnect+ (RB+)................................................................................................ 19
Ring Start/Quick Answer (RQ)........................................................................................................ 19
Ring Immediate (RI)........................................................................................................................ 19
CHAPTER 3 | Installing XMUCOM+ .......................................... 20
Overview............................................................................................................................................ 21
About the Installation Process........................................................................................................... 21
Meeting System Requirements.......................................................................................................... 22
Operating System Requirements.................................................................................................... 22
Installing Microsoft Dial-Up Networking.......................................................................................... 22
Installing XMUCOM+ Software.......................................................................................................... 23
To install XMUCOM+ Software....................................................................................................... 23
To start XMUCOM+......................................................................................................................... 23
Understanding the XMUCOM+ Application Interface........................................................................ 25
XMUCOM+ Tool bar........................................................................................................................ 25
XMUCOM+ Menu Commands........................................................................................................ 26
File Menu ....................................................................................................................................... 27
Communication Menu..................................................................................................................... 27
Configuration Menu......................................................................................................................... 28
Administration Menu....................................................................................................................... 28
Window Menu................................................................................................................................. 29
About Menu..................................................................................................................................... 29
XMUCOM+ File Formats................................................................................................................... 29
.XMP Files....................................................................................................................................... 29
.WAV Message and Music Files...................................................................................................... 30
.CSV Files....................................................................................................................................... 30
Testing Information Transfer between XMUCOM+ and SBX2 .......................................................... 30
To retrieve SBX2 system information.............................................................................................. 30
CHAPTER 4 | Recording, Playing, & Transferring Messages.33
About SBX2 Music and Messages..................................................................................................... 34
SBX2 Message Administration Methods............................................................................................ 34
About .WAV Message and Music Files.............................................................................................. 34
Naming Message Files...................................................................................................................... 34
Interalia | SBX2 System Manual
Page ii
Table Of Contents
About Recording and Playing Messages........................................................................................... 35
Recording Messages......................................................................................................................... 35
To record messages from the SBX2 Front Panel............................................................................ 36
To record messages with Remote Telephone Access..................................................................... 36
To record messages in a Studio...................................................................................................... 36
To record messages and music from your PC................................................................................ 36
Playing Messages.............................................................................................................................. 36
To play messages from the Front Panel......................................................................................... 37
To play messages via Remote Access............................................................................................ 37
To play messages and music on your PC....................................................................................... 37
Deleting Messages............................................................................................................................ 37
To delete messages from the Front Panel...................................................................................... 38
To delete messages with Remote Telephone Access..................................................................... 38
Sending Messages to the SBX2 ....................................................................................................... 38
To send messages from your PC to SBX2 Unit.............................................................................. 39
Receiving Messages from SBX2 ....................................................................................................... 40
To receive messages from SBX2 to your PC.................................................................................. 40
CHAPTER 5 | Nodes & Program Configurations..................... 42
About Basic SBX2 Commands.......................................................................................................... 43
About SBX2 Nodes............................................................................................................................ 43
Types of nodes................................................................................................................................ 43
Field Descriptions For Nodes............................................................................................................ 48
COMMAND Node............................................................................................................................ 48
LIST Node....................................................................................................................................... 48
TIME/DATE Nodes.......................................................................................................................... 49
TIME Node...................................................................................................................................... 49
DATE Nodes (Day and Date configurations) .................................................................................. 50
DTMF/AUTO Nodes........................................................................................................................ 51
VOX Node....................................................................................................................................... 53
XFER/STYLE Nodes....................................................................................................................... 54
STYLE Node................................................................................................................................... 55
STYLE Node................................................................................................................................... 56
MESSAGE Node............................................................................................................................. 57
MOH Node...................................................................................................................................... 58
PAAS node...................................................................................................................................... 59
TABLE node.................................................................................................................................... 61
NIS Node........................................................................................................................................ 62
DBN Node....................................................................................................................................... 63
DIR Node........................................................................................................................................ 65
About SBX2 Program Configurations................................................................................................. 66
Planning for an SBX2 Program Configuration................................................................................. 66
Sample SBX2 Call Flow Diagram.................................................................................................... 66
Interalia | SBX2 System Manual
Page iii
Table Of Contents
CHAPTER 6 | Remote Telephone Access................................. 68
Understanding SBX2 Remote Telephone Access.............................................................................. 69
Setting Up SBX2 Remote Telephone Access (optional)..................................................................... 69
To Set SBX2 Remote Telephone Access Mode................................................................................. 70
To Change the Default Remote Telephone Access Code.................................................................. 70
Using Remote Telephone Access...................................................................................................... 70
Remote Telephone Access Commands............................................................................................. 72
Working with Remote Telephone Access Messages......................................................................... 73
To Remotely Access The SBX2 ..................................................................................................... 73
To Disconnect From The SBX2 ...................................................................................................... 73
To record a message remotely........................................................................................................ 73
To Play A Message Remotely......................................................................................................... 73
To Delete A Message Remotely...................................................................................................... 74
To Change The Default Language Of SBX2 System Prompts......................................................... 74
CHAPTER 7 | Upgrades & Keycodes........................................ 75
About SBX2 Keycodes....................................................................................................................... 76
To Enter Keycodes.......................................................................................................................... 76
CHAPTER 8 | SBX2 Technical Specifications & Approvals..... 79
Detailed SBX2 Technical Specifications............................................................................................. 80
System Specifications Technical Feature Details............................................................................ 80
SBX2 Approvals................................................................................................................................. 83
Safety Approvals............................................................................................................................. 83
Telecom Approvals.......................................................................................................................... 83
Emissions Approvals....................................................................................................................... 83
Interalia | SBX2 System Manual
Page iv
CHAPTER 1 |
Introducing SBX2
CHAPTER 1 | Introducing the SBX
2
Read this chapter to gain an understanding of the SBX2 and of how this manual can help you
get started in installing and using the SBX2.
In This Chapter
•• About the SBX2 Announcement and Call Processing System on page 2
•• Who Uses SBX2 on page 2
•• About the XMUCOM+ Application on page 2
•• SBX2 Product Overview on page 2
•• Typical Applications on page 3
•• In This Book on page 4
•• For More Information on page 4
Interalia | SBX2 System Manual
Page 1
CHAPTER 1 |
Introducing SBX2
About the SBX2 Announcement and Call Processing System
The SBX2 Digital Call Processor is a microprocessor based, voice announcement and call processing system. Field upgradable, the SBX2 offers major advantages in processing customer calls for a broad range of customer needs. The SBX2
delivers:
•• High quality ACD/UCD announcements.
•• Interactive auto attendant functionality.
•• Messages that play to assigned port(s) when the unit is activated by an incoming call.
•• Ability for users to navigate through different levels of messages by entering commands with a touch-tone tele.phone.
•• Flash memory that ensures configurations and messages are not lost in the event of power failures.
Who Uses SBX2
SBX2 is used by a broad range of industries for a variety of functions such as:
•• Passive announcements.
•• Interactive announcements.
•• Music on Hold.
•• Public Announcements.
•• Interactive Auto Attendants.
•• Call Processing and Transferring.
See “Typical Applications” on page 3 for more information about each of the above functions.
About the XMUCOM+ Application
The XMUCOM+ application is a Windows based program that works in conjunction with the SBX2 unit, and allows you to
program, receive, download, update, and backup configurations and messages between the PC and SBX2 unit.
The intuitive XMUCOM+ interface displays configuration outlines and structures within a tree-style navigational pane,
and provides detailed node information in a parallel pane.
Configurations designed with XMUCOM+ are transmitted to the SBX2 unit through a modem connection or a LAN based
(Ethernet) network.
SBX2 Product Overview
SBX2 units are compatible with all major telephone systems and can be remotely managed through a modem, telephone,
or Ethernet connection that uses XMUCOM+.
The SBX2: provides an effective solution
for users requiring up to 8 channels.
SBX2: 1-8 PSTN channels, 2 MOH outputs/1 input.
Interalia | SBX2 System Manual
Page 2
CHAPTER 1 |
Introducing SBX2
Typical Applications
Passive Announcer
An SBX2 can be used as a Passive Announcement system.
Typical uses include:
•• ACD/UCD customized announcements.
•• Day of week announcement.
•• Time of day announcements.
•• Date specific announcements.
Interactive Auto Attendant
An SBX2 can be used as an Interactive Auto Attendant system.
Typical uses include:
•• Audio Text/Information lines that provide automated
messages to callers. An extremely flexible system, the SBX2
can be configured to play different messages depending on:
•• Time of day.
•• Day of week.
•• Date and selections made by a caller.
•• Interactive Auto Attendants such as:
•• Press 1 for Sales, Press 2 for Technical Support.
•• Please enter the extension of the person you wish to
speak to.
Dial By Name
An SBX2 can be used for Dial By Name applications, allowing
callers to reach staff members or departments simply by keying
their name into the telephone key pad.
DTMF Call Processing System
An SBX2 can be used as a DTMF Call Processing system.
Typical uses include Call Centre routing with either front ending
or back ending ACD queues:
•• In front-ending ACD queues, SBX2 presents a menu, and
transfers the call to the appropriate queue.
•• In back-ending ACD queues, the client’s telephone system
answers the call and places the user in the queue. SBX2
plays the appropriate holding messages, and transfers the
caller to the appropriate person when the line becomes
available.
Music On Hold Player
An SBX2 is capable of mixing music and messages to create an
“On Hold” environment for your callers:
•• Stored in and played from a solid state medium in the flash
memory.
•• Played directly to the MOH from a licensed external audio
feed.
Each MOH system provides up to one hour of recording
time.
Messages can be recorded from three sources:
•• From the front panel using the included Interalia 13416
handset.
•• Remote access using a touch tone telephone.
•• WAV files that are downloaded using a PC.
Interalia | SBX2 System Manual
Page 3
CHAPTER 1 |
Introducing SBX2
In This Book
The SBX2 manual helps you to set up the XMUCOM+ application on your Personal Computer and introduces you to the
fundamentals of designing and building program configurations for the SBX2 system.
See the following for a brief description about each chapter.
CHAPTER 1 | Introducing the SBX2
The SBX2 product and how it can be used to address the needs of your organization.
CHAPTER 2 | Installing the SBX2
How to set up the physical connections to your SBX2 system.
CHAPTER 3 | Installing XMUCOM+
The prerequisites for installing the XMUCOM+ application and the installation procedure you must follow. This chapter
also introduces you to the fundamentals of the XMUCOM+ application interface.
CHAPTER 4 | Recording, Playing, & Transferring Messages
The techniques and methodology for preparing, generating and working with messages and music for your SBX2 unit.
CHAPTER 5 | Nodes & Program Configurations
How to configure the commands, nodes, messages, and music that are executed when a call is received.
CHAPTER 6 | Remote Telephone Access
Understanding and using the remote telephone access port and features.
CHAPTER 7 | Upgrades & Keycodes
How to upgrade your SBX2 system’s memory and features.
CHAPTER 8 | SBX2 Technical Specifications & Approvals
Physical dimensions, system information, port specs, etc.
For More Information
Please refer to the following for more information:
Interalia Web Site at www.interalia.com.
Interalia | SBX2 System Manual
Page 4
CHAPTER 2 |
Installing the SBX2
CHAPTER 2 | Installing the SBX
2
The SBX2 unit must be installed in a location that meets all the requirements detailed in
“Meeting System Requirements” on page 6. The installation process consists of physical
installation at the appropriate location, connecting the SBX2 to its designated power supply,
and checking system startup.
Caution: Do not connect PSTN cables to the ALARM or NETWORK ports
Caution: Since the AC power cord is the disconnect for the SBX2, ensure that the
AC receptacle is near the unit.
Caution: The installation of an SBX2 unit should only be completed by a qualified
telecommunications electronics technician.
Interalia® cannot be held responsible for damage to parts or equipment caused by improper
handling or installation.
In This Chapter
•• Meeting System Requirements on page 6
•• Installing the SBX2 Unit on page 6
•• To check system startup on page 7
•• Cabling the SBX2 on page 8
•• Cabling Activities on page 9
•• PBX Interface Table Conventions and Abbreviations on page 9
•• About SBX2 Operating Modes on page 17
Interalia | SBX2 System Manual
Page 5
CHAPTER 2 |
Installing the SBX2
Meeting System Requirements
Before you begin to install the SBX2 unit, you need to ensure that SBX2 system requirements are met.
Environmental Requirements
•• For optimum operation of the SBX2 unit, ensure that the SBX2 is placed in an environment that meets the following
requirements:
•• Rack, wall, or shelf space is available for proper mounting. If mounting on a rack, it must be 19”.
•• The SBX2 is designed to operate within a 0°C - 40°C (32°F - 104°F) temperature range.
Adequate cooling or heating must be provided to guarantee this range.
•• HVAC requirements must also be met: SBX2 produces a maximum of 160 BTU/hour of heat production.
See “Detailed SBX2 Technical Specifications” on page 80 for more detailed thermal information.
Power Requirements
SBX2 power consumption is 21 Watts maximum. See “Detailed SBX2 Technical Specifications” on page 80 for more
power consumption information.
To meet SBX2 power requirements, ensure that the necessary power sockets are available, unoccupied, and have a
protective earth/ground connection.
Note: Since the AC power cord is the disconnect for the SBX2, ensure that the AC receptacle is near the unit.
If operation on a UPS is required, ensure that the appropriate UPS requirements (power and runtime) are determined.
•• The power rating must be at least that of the SBX2 system.
•• The amount of runtime is up to the user.
Installing the SBX2 Unit
Before installing the SBX2 unit, you should ensure that all system requirements have been met
(see “Meeting System Requirements” on page 6).
As well, you should ensure that the following tools, hardware, and accessories are near:
•• The SBX2 unit.
•• Mounting brackets and screws.
•• Phillips screwdriver
Interalia | SBX2 System Manual
Page 6
CHAPTER 2 |
Installing the SBX2
To install an SBX2 in a rack
1. Attach the rack mounting bracket to the SBX2 with the screws provided, as shown below:
Screws (4 per side)
Flange
2. Install the SBX2 in the rack using the flanges of the mounting brackets.
To mount an SBX2 to a wall
1. Attach the mounting brackets to the SBX2 with the screws provided, as shown below:
Flange
Screws (4 per side)
2. Use appropriate screws to mount the SBX2 to a plywood backboard.
Note: Do not mount the SBX2 directly to standard wall board material.
Checking System Startup
At system startup, the SBX2 identifies the current system configuration. You should watch the information displayed on the
LCD to ensure that the SBX2 is working correctly.
Record the system details since the system configuration information may be required at a later date for maintenance and
upgrades.
To check system startup
1. Attach the SBX2 to the power supply.
2. Verify that the LCD illuminates.
3. Verify that the SBX2 identifies the current system configuration in the following order:
•• Confirms loading of messages and prompts.
•• The current firmware version installed.
•• The total amount of recording time currently installed.
•• The amount of recording time that is currently available.
•• The date and time.
The date and time may have to be reset to show the correct values.
Interalia | SBX2 System Manual
Page 7
CHAPTER 2 |
Installing the SBX2
Setting Country Code
The SBX2 is designed to work globally, and as such has different line impedance settings to match the line impedance
requirements for different countries around the world. It is important to set the correct country code for your region. The
available settings are: PBX 600 Ohms, North America, Europe & Australia.
To set the country code
•• From the front panel with the time and date displayed, press the Enter key to reach ‘Main Menu, Messages.’
•• Press the right arrow until you reach ‘Main Menu, System.’ Press Enter.
•• Press the right arrow until you reach ‘System, Country Code.’ Press Enter.
•• Press Enter again, now use the right and/or left arrow to scroll through the country options.
•• Select the setting you require and Press enter.
Note: Not setting the country code may invalidate the SBX2 Telecom Approvals, and the unit will not be optimized to work in your region.
Soft Stop Option
Soft Stop is a setting that can be enabled to minimize the line disconnect ‘click’ heard when the SBX2 is connected to a
Siemens PBX.
To enable this option...
•• From the panel with the time and date displayed, Press the Enter key, and right arrow key to reach ‘Main Menu,
Lines.’ Press Enter.
•• Now Press Enter to select which line you wish to enable with the ‘soft stop’ option. Scroll through to select ‘ALL lines’
should you wish to enable soft stop on every line. Press enter.
•• Press the right arrow key to reach ‘Lines, Soft Stop.’ Press Enter.
•• Press Enter again and the right arrow key to select ‘Enabled.’ Press Enter.
IMPORTANT* This feature will affect the actual hook flash timing that is presented to the PBX, as the gradual release of
the line appears as a reduced hook flash. A PBX that uses a North American style 500ms hook flash will be unaffected,
but a PBX that uses 100ms Time Break Recall will need to make the following adjustments:
•• The XFER_STYLE hook flash in the SBX2 program should be set to 350ms.
•• Then, in order that the lines release time parameters fall within the switch times, check the analogue port template
for the HiCom or HiPath (enter command DIS-SCSU) and check parameter CCTIDX. The default is blank - this must
be changed to table 0-15. Enter command DIS-PTIME: SLMA1; then select or edit a table that has a FLASHMIN and
FLASHMAX that suit the SBX2 requirements. i.e. TBLOCK=3; FLASHMIN=100MS. FLASHMAX=400MS
Cabling the SBX2
Cabling the SBX2 involves connecting and/or wiring each port to the appropriate PBX, transmitter, or amplifier.
In addition, it involves cabling the communication ports to the appropriate connections, which could include:
•• Alarm connection.
•• Telephone lines for Remote Access and modem connections.
•• Ethernet (network or direct) connection.
Interalia | SBX2 System Manual
Page 8
CHAPTER 2 |
Installing the SBX2
Caution: The cabling of the SBX2 to the PBX should only be completed by a qualified telecommunications
technician. Standard electrostatic discharge precautions must be followed when handling any internal
components.
STD ESD handling precautions should be observed.
Interalia® cannot be held responsible for damage to parts or equipment caused by improper handling or installation.
Cabling Activities
1. Ensure that the appropriate preparations are taken before cabling the SBX2. See Preparing to Cable the SBX2 on page
9.
2. Cable the communication ports to the appropriate connections. See SBX2 Port Descriptions and Cabling Instructions on
page 11.
3. Connect and wire the appropriate SBX2 analog ports. See the following for more information:
•• Cabling SBX2 Analog Ports on page 15.
•• Understand PBX operating modes. See About SBX2 Operating Modes on page 17.
Preparing to Cable the SBX2
To properly cable the various communication port connections, as well as to wire and connect SBX2 analog ports to the
PBX, you should ensure that the following prerequisites have been met:
•• Ensure that all system requirements have been met. See Meeting System Requirements on page 6.
•• Ensure that the appropriate cables are available for connecting and wiring the SBX2.
As always, cables should be properly managed during SBX2 connecting and wiring, and properly stored after installation.
•• Understand the PBX table conventions used in this chapter. See PBX Interface Table Conventions and Abbreviations
on page 9
PBX Interface Table Conventions and Abbreviations
The following color abbreviations are used in the PBX interface tables:
Abbreviation Cable Color
Abbreviation
Cable Color
Blk
Black
Grn
Green
Brn
Brown
Blu
Blue
Red
Red
Vlt
Violet
Org
Orange
Slt
Slate
Yel
Yellow
Wht
White
Interalia | SBX2 System Manual
Page 9
CHAPTER 2 |
Installing the SBX2
Matching SBX2 Cables and Connectors
Use the following table to match communication ports and analog port connectors to the appropriate cables and mating
connectors.
Some cables are shipped with the SBX2, but others may need to be purchased separately.
SBX2 Port
Connector
Function
Required Connectors
Communication Ports
Modem - RJ45
Connector
Communicate with
XMUCOM+
RJ45 Mating connector and
twisted pair cable
Remote - RJ45
Connector
Program messages from
a remote location using a
telephone keypad
RJ45 Mating connector and
twisted pair cable
Alarm - RJ45
Connector
Connect alarm circuitry
RJ45 Mating connector and
twisted pair cable
Network 1 - RJ45
Connector
Set up connections to
XMUCOM+ application via
Ethernet
RJ45 - RJ45 (6’) Cat 5 UTP
connector and std Ethernet
cable
MOH Ports
1 RCA / Phono Input
2 RCA / Phono Outputs
Music-On-Hold
applications only
Std RCA / Phone connector
and coaxial cable
Analog Ports
RJ45 Female
Connector
ACD, Call Processing
& Auto Attendant
applications
RJ45 Mating connector and
twisted pair cable
Interalia | SBX2 System Manual
Page 10
CHAPTER 2 |
Installing the SBX2
SBX2 Port Descriptions and Cabling Instructions
1
2
3
4
5 6 7 8
9
Available Ports
Ports Descriptions
1. Alarm
Connect to external alarms
2. Modem
Wireline Comm to XMUCOM+
3. RS232
Serial Comm to XMUCOM+
4. Network1
IP Comm to XMUCOM+
5. Network2
Future Use
6. Audio Out1
600 Ohm output to PA and or PBX
7. Audio Out2
600 Ohm output to PA and or PBX
8. Audio In
Streamed audio input
9. Remote
Message management utilizing DTMF
10. Qty 8 Analog Extensions
Analog Key/PBX Extensions
10
Note Status Lights:
MODEM port status indicators
• Green - carrier detect.
• Yellow - transmit and receive data.
Network1 status indicator
• Green (in connector)- link.
• Yellow (in connector) - activity (transmit and receive data).
• Green - 100 Base T (when on) and 10 Base T (when off).
• Yellow - collision.
Interalia | SBX2 System Manual
Page 11
CHAPTER 2 |
Installing the SBX2
Connecting the SBX2 to a PC with XMUCOM+ Software
The XMUCOM+ software is a Windows based program that allows you to program, download, update, and backup
configurations and messages to the SBX2 from a PC.
Users that have multiple SBX2 units distributed across several geographical sites must consider how to interconnect
and communicate with the various units. Depending on the location, available network facilities, and modem capabilities
of the XMUCOM+ system and SBX2 units, users can choose to apply a combination of one or more of the following
communication methods for each of their SBX2 sites:
Port
XMUCOM+ Communication
Modem Connection
Through a dial-up modem connection. This method is effective for sites that are
not connected via LAN/WAN networks. Modem connections require PC’s with a
modem, and the modem phone numbers for the XMU + unit.
See Understanding SBX2 Remote Telephone Access on page 69 for more
information.
Ethernet (LAN) Connection
Through LAN/WAN networks. This method is effective for organizations that have
existing LAN/WAN networks operating at all SBX2 sites. Ethernet connections
require:
•• A network port must be available on the XMUCOM+ PC.
•• Both the PC and SBX2 (Network 1 Port) unit be connected to the network for
LAN access.
•• A fixed IP address for the SBX2 unit.
•• An IP address for the XMUCOM+ (Admin) PC.
See To connect to the PC through an Ethernet (LAN) Network on page 13 for
more information.
The most effective means for SBX2 to communicate with XMUCOM+ depends on the communication systems currently
available in the environment in which the SBX2 will be placed.
To connect to the PC with an analog line to the modem connector
The SBX2 provides a modem access port, which is accessed through the MODEM connector. See SBX2 Port
Descriptions and Cabling Instructions on page 11 for more information. An analog line is connected (using a standard
RJ45 telephone jack and cable) to the SBX2.
1. Ensure that a vacant, active telephone outlet is nearby. If one is not nearby, install one.
2. Connect the one end of the POTS line to the RJ45 modem port on the SBX2.
3. Plug the free end of the POTS line into the vacant, active telephone outlet.
Interalia | SBX2 System Manual
Page 12
CHAPTER 2 |
Installing the SBX2
To connect to the PC through an Ethernet (LAN) Network
The SBX2 provides a RJ45 port (Network 1) to connect the SBX2 to a PC via a network.
See SBX2 Port Descriptions and Cabling Instructions on page 11 for more information.
1. Ensure that a vacant, active network outlet is nearby. If one is not nearby, install one.
2. Connect one end of the RJ45 to RJ45 cable to the Network 1 RJ45 port on the SBX2.
3. Plug the free end of the RJ45 to RJ45 cable into the vacant, active network outlet.
4. Ensure the “link” LED is on (green).
To connect to the PC directly with the Network port
It is possible to create a non-LAN Ethernet connection by connecting the network port of a PC directly to the Network 1
Port on the SBX2.
See the Interalia document SBX2 How to Enable Direct Connection to a PC (document number 41-HG-000-001-00EN-85).
Connecting Remote Telephone Access (optional)
The SBX2 provides a remote telephone access port, which is accessed through the REMOTE RJ45 connector on the
SBX2. See SBX2 Port Descriptions and Cabling Instructions on page 11 for more information.
An analog line is connected (using a standard telephone jack and cable) to the SBX2 to provide Remote Access to the
SBX2. Remote Access allows control of the SBX2 from a remote location using a DTMF (touch tone) telephone. Thus an
operator who is not in the same room as the SBX2, or who does not have XMUCOM+ installed on their PC, can still create
and modify SBX2 messages.
To connect an analog line to provide Remote Telephone Access
1. Ensure that a vacant, active telephone outlet is nearby. If one is not nearby, install one.
2. Connect the one end of the POTS line or analog extension to the RJ45 REMOTE access port on the SBX2.
3. Plug the RJ45 Mating Connector (telephone jack) on the opposite end of the POTS line or analog extension into the
vacant active telephone outlet.
4. Configure the SBX2 to allow Remote Access. See Understanding SBX2 Remote Telephone Access on page 69.
Interalia | SBX2 System Manual
Page 13
CHAPTER 2 |
Installing the SBX2
Connecting Alarms (optional)
The SBX2 provides two output alarm contacts and one input alarm contacts all of which are accessed through the alarm
RJ45 connector.
Alarm Contact
Is Used To
See Also
Output 1
Trigger an external device (a light or
a buzzer) in the event of a system
failure, such as input power loss or
microprocessor failure.
See To Wire The Alarm Connector on
page 14 for more information.
Output 2
Trigger an external device or monitor
in the event the power supplies fails.
See To Wire The Alarm Connector on
page 14 for more information.
Input 1
Connect the optional override switch
feature. When connected to the SBX2,
the override switch allows regular
programming to be overridden by a
pre-recorded message in case of an
emergency.
See the XMUCOM+ application to
program override messages.
To Wire The Alarm Connector
When the system is powered up and running normally, there is a closed circuit between the Common (C) and the
Normally Open (NO) contacts, and an open circuit between the Common (C) and the Normally Closed (NC) contacts. In
an alarm condition, the opposite occurs, with an open circuit between the (C) and the (NO) contacts, and a closed circuit
between the (C) and the (NC) contacts. The Input is not polarity sensitive.
1. Wire the connector pinouts on the alarm RJ-45 connector using the following table.
Pin
Used For
1 Input 1+
5 Alarm 1 Output (NO)
2 Input 1_
6 Alarm 2 Output (C)
3 Alarm 1 Output (C)
7 Alarm 2 Output (NC)
4 Alarm 1 Output (NC)
8 Alarm 2 Output (N0)
2. Connect the wires to the appropriate external device, such as a light or a buzzer.
3. Plug the alarm RJ45 connector into the ALARM port on the SBX2.
Interalia | SBX2 System Manual
Page 14
CHAPTER 2 |
Installing the SBX2
Cabling SBX2 Analog Ports
This section describes the procedures for cabling SBX2 analog ports.
The Analog ports provide the SBX2 the ability to provide Auto-Attendant/Audiotex announcements, 1-800 ACD call routing,
ACD/UCD intercept messages, Dial by Name functionality, etc.
Cable the Analog ports using the steps shown below.
1. Verify that PBX line cards are configured for the appropriate SBX2 application (Call Processing, Auto Attendant, or
ACD). See About SBX2 Operating Modes on page 17 for more information.
2. Punch down wires from PBX to the punch block.
3. Punch down wires from SBX2 to the punch block.
4. Cross connect the wires in the punch block as per the following PBX table
•• Call Processing/Auto Attendant Applications on page 16
Pin out for the RJ-45
analog ports on the SBX2.
To cable the MOH (Audio) Ports
MOH ports combine music (from an external or internal source) and messages to create an “On Hold” environment for the
SBX2.
1. Verify that PBX line cards are configured for the MOH application. See About SBX2 Operating Modes on page 17 for
more information.
2. Verify that PBX line cards are correct.
3. Punch down wires from PBX to punch block.
4. Punch down wires from SBX2 to punch block.
5. Cross connect the wires in the punch block as per MOH Applications below.
Interalia | SBX2 System Manual
Page 15
CHAPTER 2 |
Installing the SBX2
MOH Applications
The following table describes the cabling of the MOH ports to a PBX.
PABX Signal
Input 1
External
grn
External
red
Output 1 Output 2
MOH Input
grn
grn
MOH Input
red
red
Call Processing/Auto Attendant Applications
This table describes the cabling of Analog ports (Ring Start) to the following PBXs:
•• Public Telephone Network
•• PBX Analog Station Port.
•• Analog Centrex Line.
The colors used are for 25 pair cables, not CAT5. Always follow the diagram on page 15.
See Cabling SBX2 Analog Ports on page 15 for more information.
PABX
Announcer
Line 1
Line 2
Line 3
Line 4
Line 5
Line 6
Line 7
Line 8
Signal
Signal
Pin-Color
Pin-Color
Pin-Color
Pin-Color
Pin-Color
Pin-Color
Pin-Color
Pin-Color
Ring
Ring
5 - Blu/Wht
5 - Blu/Wht
5 - Blu/Wht
5 - Blu/Wht
5 - Blu/Wht
5 - Blu/Wht
5 - Blu/Wht
5 - Blu/Wht
Tip
Tip
4 -Wht/Blu
4 -Wht/Blu
4 -Wht/Blu
4 -Wht/Blu
4 -Wht/Blu
4 -Wht/Blu
4 -Wht/Blu
4 -Wht/Blu
See About SBX2 Operating Modes on page 17 for more information
Interalia | SBX2 System Manual
Page 16
CHAPTER 2 |
Installing the SBX2
About SBX2 Operating Modes
SBX2 operating modes are PBX dependent. They determine the specific way SBX2 lines behave when communicating with
a PBX. If required, determine the appropriate operating mode (listed below) and set the PBX line card to that operating
mode. The Control Pulse (CP) relay in the following diagrams can be configured for Normally Open (NO) or Normally
Closed (NC) during message play.
Continuous Play (CP)
The message plays continuously to the line,
independent of what is happening on other
lines. The CP contacts toggle position for
approximately 250 msec. at the start of the
message.
Synchronized Continuous Play (SCP)
The message plays continuously to the line.
All lines begin playing the message(s) at the
same time. The CP contacts toggle position
for approximately 500 msec. at the start of
the message(s).
Level Start/Pulse Return - Single Play (LS/PR-SP)
The message plays in response to a start
signal. The CP contacts toggle position for
approximately 250 msec. at the start and
end of the message. The message stops
playing if the start signal is removed.
Interalia | SBX2 System Manual
Page 17
CHAPTER 2 |
Installing the SBX2
Level Start/Pulse Return - Multiple Play (LS/PRMP)
The message plays in response to a start
signal. The CP contacts toggle position for
approximately 250 msec. at the start and
end of the message. The message stops
playing if the start signal is removed. The
message plays repeatedly until the start
signal is removed.
Level Start/Level Return - Single Play (LS/LR-SP)
The message plays in response to a start
signal. The CP contacts toggle position
while the message is playing. The message
stops playing if the start signal is removed.
Pulse Start/Level Return (PS/LR)
The message plays in response to a start
signal. The CP contacts toggle position
while the message is playing.
Interalia | SBX2 System Manual
Page 18
CHAPTER 2 |
Installing the SBX2
Pulse Start/Pulse Return (PS/PR)
The message plays in response to a start
signal. The CP contacts toggle position for
approximately 250 msec. at the end of the
message.
Ring Start (R)
The message plays in response to a Loop or Ground Start
signal. The message will stop playing, before completion,
if loop current is removed from the line.
Ring Start without Loop Current Check (RN)
The message plays in response to a Loop or Ground Start
signal. The line will not disconnect until the message has
played out completely.
Ring Start/Tone Disconnect (RT) & (RT+)
Will disconnect after 4 seconds of continuous tone. (RT+ is
less sensitive to far-end background noise than RT)
Ring Start/Busy Disconnect (RB)
Will disconnect after two cycles of busy tone.
Ring Start/Busy Disconnect+ (RB+)
Will disconnect after four cycles of busy tone.
Ring Start/Quick Answer (RQ)
Line is answered 1/10 second after the first ring cycle.
Ring Immediate (RI)
Only available with T1 connection. Line is answered after
1/4 second (during ring cycle.)
Ring Start/DTMF Disconnect (RD)
Will disconnect on A, B, C or D.
Interalia | SBX2 System Manual
Page 19
CHAPTER 3 |
Installing XMUCOM+
CHAPTER 3 | Installing XMUCOM+
Read this chapter to ensure you meet system prerequisites for using the XMUCOM+ application,
to install the application, and to learn about the XMUCOM+ interface.
In This Chapter
•• Overview on page 21
•• About the Installation Process on page 21
•• Meeting System Requirements on page 22
•• Installing XMUCOM+ Software on page 23
•• Understanding the XMUCOM+ Application Interface on page 25
•• XMUCOM+ File Formats on page 29
•• Testing Information Transfer between XMUCOM+ and SBX2 on page 30
Interalia | SBX2 System Manual
Page 20
CHAPTER 3 |
Installing XMUCOM+
Overview
The XMUCOM+ application is a Windows compatible program capable of running on Windows XP, Windows
Vista Ultimate (32 bit), and Windows 7 Professional (32 and 64 bit).
It provides an intuitive interface for:
•• Easily developing SBX2 program configurations for your organization.
•• Quickly downloading and uploading SBX2 system and program configurations and messages from the SBX2 unit to the
PC, and vice-versa.
•• Managing and maintaining SBX2 units.
The XMUCOM+ application provides standard pull-down menus, graphical interfaces, popup dialog boxes,
and other components familiar to all Windows users.
With XMUCOM+, users can download, upload, and modify program configurations quickly and easily.
There is little guesswork on the part of the user since the pull-down menus and pop-up windows only present
programmable options.
Note: Administrator privileges are required to install.
About the Installation Process
Users should complete the following activities before actually installing the XMUCOM+ software application.
XMUCOM+ Installation Process
Ensure you meet all system requirements.
Ensure Microsoft Networking is set up on your PC.
If required, export Site Book information and back up configurations.
Back up all MSG files.
Uninstall previous versions of XMUCOM+ using the Interalia unintaller application
in Start > All Programs > Interalia > XMUCOMM+ > Uninstall XMUCOM+
Install current version of XMUCOM+
See the following procedures for more information:
•• Meeting System Requirements on page 22
•• Installing XMUCOM+ Software on page 23
Interalia | SBX2 System Manual
Page 21
CHAPTER 3 |
Installing XMUCOM+
Meeting System Requirements
XMUCOM+ is a versatile tool that can operate on a Windows based system including Windows XP, Windows
Vista Ultimate (32 bit) and Windows 7 Professional (32 and 64 bit). Ensure that your operating system has had the latest
service packs installed and meets the following requirements before installing XMUCOM+.
Operating System Requirements
The following list outlines the suggested minimum operating system requirements for running XMUCOM+.
•• Intel Pentium 4 processors or equivalent
•• Windows XP, Windows Vista Ultimate (32 bit), or Windows 7 Professional (32 or 64 bit)
•• 100 MB of available hard drive space
•• A CD-ROM
•• A network or modem interface for communications
•• Monitor resolution setting no lower than 800x600
Installing Microsoft Dial-Up Networking
In order for XMUCOM+ software to function correctly, Microsoft Dial-Up Networking must be installed on your
PC. Dial-Up Networking enables you to connect one computer to another by using a modem connection.
Installation and implementation of Dial-Up Networking is required even if only the LAN option is used for connection.
Install and implement Microsoft Dial-Up Networking on your PC before beginning the installation and setup process.
Depending on the type of communication option you have selected, you must set up the appropriate Microsoft Networking
options.
•• Set up individual Microsoft Dial-Up Networking Modem connections.
•• Set up Standard Microsoft Networking with TCP/IP for LAN/WAN connections.
Please refer to your PC and Windows documentation for detailed procedures about setting up Microsoft Dial - Up and
Standard Networking. The setup process varies depending on the Operating System that you are currently running.
NOTE: XMUCOM+ will not operate correctly unless Microsoft Dial-Up Networking is installed before installing XMUCOM+ on your system.
Interalia | SBX2 System Manual
Page 22
CHAPTER 3 |
Installing XMUCOM+
Installing XMUCOM+ Software
Installing the XMUCOM+ software is a simple process. The Install Shield Wizard guides you through the complete
installation process.
To install XMUCOM+ Software
1. Insert the XMUCOM+ CD in the computer’s CD-ROM drive.
2. CD will auto-run, skip to step 6. If not go to step 3.
3. Choose Start > Run.
4. Click Browse and select the Setup.exe file on the XMUCOM+ CD.
5. Click OK to begin the installation.
6. Follow the on-screen instructions to complete the installation.
7. If prompted, restart your computer.
To start XMUCOM+
1. Choose Start > Programs > XMUCOM+ Folder> XMUCOM+ Executable
XMUCOM+ displays the startup window:
Interalia | SBX2 System Manual
Page 23
CHAPTER 3 |
Installing XMUCOM+
2. Choose File > New > SBX2 Configuration to start a new program configuration.
3. Choose File >Open and find and select the configuration with which you want to work.
..............................
Navigate to the folder
. here your existing SBX2
w
.configurations are stored. Select the Configuration you want to work with and
press Open.
..............................
4. Use the XMUCOM+ menu options to manage your SBX2 unit.
See the following pages for more information about the XMUCOM+ interface and its features.
Interalia | SBX2 System Manual
Page 24
CHAPTER 3 |
Installing XMUCOM+
Understanding the XMUCOM+ Application Interface
The XMUCOM+ interface consists of a main screen, pull-down menus, tab-based series of screens, and button based
options that provide access to a variety of functions.
The following illustration shows some of the key components of the XMUCOM+ interface, and uses the Site
Book and Edit Site windows as examples.
Menu Bar
Tool Bar
Site List window
Edit Site window
XMUCOM+ Tool bar
The XMUCOM+ Tool bar provides quick access to commonly used commands and tools. The Tool bar remains accessible
through all XMUCOM+ functions and screens.
Interalia | SBX2 System Manual
Page 25
CHAPTER 3 |
Installing XMUCOM+
The following table provides a brief description of each of these tool bar commands.
Commands
Response
Exit XMUCOM+
Exit the XMUCOM+ application. You will be asked to confirm and save changes.
New Configuration
•• XMU+ Configuration
•• SBX Configuration
Create a new system configuration. System configurations can be created and applied to
any number of XMU+ or SBX2 sites
Open
Open an existing system configuration. This command also opens the Config builder
window so that you can immediately begin editing program configurations for this site
Save
Save the current system configuration to the database.
View Configuration
Display a text-based view of your current system configuration. This file provides summary information about all the partitions, cards, default nodes, program nodes, commands, and messages that make up your current system configuration.
Communicate with XMU+ /
SBX
Open the Communication window so that you can send or receive system configurations
and messages to and from the SBX2 unit. This window also lets you schedule retrieval
and resetting of statistics for each SBX2 unit.
XMU+ Card / SBX Line
Configuration`
Open the SBX2 line configuration window so that you can configure and set options for
the various lines on the SBX2 unit. This includes the starting node and the mode of operation for the line, e.g. ring start, continuous play, etc
Configuration Builder
Open the Config Builder window where you can design, edit, modify, or delete program
configurations, their associated nodes, and their partition settings.
Developers can create the program configuration on the XMUCOM+ (independent of
the SBX2 unit) and download them by using the Communicate command when they are
ready to test and implement them.
XMUCOM+ Menu Commands
The XMUCOM+ application uses pull-down menus to provide access to all the main elements of the system. Menus
include File, Communication, Configuration, Administration, and About. The following provides a brief description of each
menu command and its function.
Interalia | SBX2 System Manual
Page 26
CHAPTER 3 |
Installing XMUCOM+
File Menu
Command
Response
New
Create a new SBX2 system configuration.
Open
Open an existing system configuration.
Close
Close current configuration.
Save
Save the current program or system configuration to the database.
Save As
Save the current system configuration under a new file name.
Recent Files
Open the nine most recently used configurations.
Exit
Exit the XMUCOM+ application.
Communication Menu
Command
Response
Site Book
Manage and enter site specific information such as site name, site ID, connection
methods, file handling standards, and configuration and statistic file handling guidelines.
Import Site Book
Import previously stored site information to a new or existing version of XMUCOM+.
Imported site information is stored in the XMUCOM+ database. This process will
overwrite any existing entries.
Export Site Book
Export site information from the current version of XMUCOM+ into a backup file.
Communicate
Enter and manage uploads and downloads of configurations to and from the SBX2.
These tabs allow you to identify the elements to be downloaded or uploaded, and lets
you set schedules for certain activities, such as generating statistics.
Completed Scheduled Tasks
View a list of completed scheduled tasks. This menu lets you determine which
scheduled communication tasks are completed and can be processed.
Delete Partition
Delete a selected partition from the SBX2 configuration
Synchronize
This feature allows the user to cross reference the PC software configuration with the
one currently residing on the SBX2. A list of nodes / messages existing on the SBX2, but
not found in the PC software file will be displayed and can be deleted from the SBX2 at
this time if required.
Launch Rescheduler
Open an application which tracks all tasks scheduled and/or repeated in the future
before submitting them to SchedulerPlus to be executed.
Launch Telnet Session
Start a diagnostic session with an SBX2 via Telnet.
Interalia | SBX2 System Manual
Page 27
CHAPTER 3 |
Configuration Menu
Installing XMUCOM+
Command
Response
SBX2 Line Configuration
Open the Line Configuration window so that you can configure and set options for the
various lines in the SBX2 unit. This includes:
•• Identifying the program configuration (start nodes) that are to run from each line
and partition.
•• Setting Line and Partition behaviors.
Once these options are set and stored in the system configuration for this site, users
can use the Communicate command to download these settings to the SBX2 unit.
Configuration Builder
Open the Config Builder window, where you can design, edit, modify, or delete program
configurations, their associated nodes, and their partition settings.
Developers can create the program configuration on the XMUCOM+ (independent of
the SBX2 unit) and download them using the Communications command when they are
ready to test and implement them.
View Configuration
Administration Menu
Display a text-based view of your current system configuration. This file provides
summary information about all the partitions, cards, default nodes, program nodes,
commands, and messages that make up your current system configuration
Command
Response
System
Set XMU+ system settings, access codes, session limits, partitioning, and other SBX2
options. The four main sub-menu options are:
XMU+/SBX2 Settings
Use this window to set access codes, session limits,enable partitioning, chassis type,
modes of operation, and language of operation.
Daylight Savings
Use this window to set the start and stop dates for daylight savings. This command is
only required for those parts of the country that implement daylight savings.
EWT Configuration
Allows you to configure the EWT options from a pull down menu of:
•• Disabled (default setting)
•• Siemens 9006
•• AVOTUS
•• CCA
•• Smart Telecom
Statistics
Retrieve and view statistics for a specific site and partition of the selected SBX2 unit.
Users can also choose to view existing or already retrieved statistics. Window Menu.
Interalia | SBX2 System Manual
Page 28
CHAPTER 3 |
Window Menu
Installing XMUCOM+
Command
Response
Cascade
Cascade open windows for easy access.
About Menu
Command
Response
About Interalia’s XMUCOM+
Provide general information about the XMUCOM+ application, its version, and contact
information.
XMUCOM+ File Formats
There are three major types of files generated by the XMUCOM+ program. These are:
•• Configuration files stored with an .XMP file extension.
•• Audio messages and music files are stored with a .WAV file extension.
•• Statistic files are stored with a .CSV file extension.
Note: X
. MUCOM+ uses the following default directories (if you do not enter specific directories) for storage of these files.
•• Windows XP:
•• C:\Program Files\XMUCOM+\CONFIGS
•• C:\Program Files\XMUCOM+\MSGS
•• C:\Program Files\XMUCOM+\STATS
•• Windows Vista and Windows 7 Professional:
•• C:\Users\Public\Documents\Interalia\XMUCOM+\Configs
•• C:\Users\Public\Documents\Interalia\XMUCOM+\Msgs
•• C:\Users\Public\Documents\Interalia\XMUCOM+\Stats
.XMP Files
. XMP files store XMUCOM+ configurations or programs. They can be downloaded to and from the SBX2 unit.
For example, if you design a Music on Hold (MOH) configuration on the XMUCOM+, the .XMP file would contain all the
instructions for when to play each music file, how long to play it, and any other details that you specified. The actual music
files are stored separately as .WAV files.
You must set up a default directory for storing these .XMP configuration files.
Interalia | SBX2 System Manual
Page 29
CHAPTER 3 |
Installing XMUCOM+
.WAV Message and Music Files
All music and message files must be stored in .WAV format. In order to be included or used within a program
configuration, the WAV files must have the following properties:
• 8 bit compression
• Mono sound
• 8K sampling rate
• CCITT μ-Law Format - providing compliance with the lowest common denominator for WAV
files.
See About Recording and Playing Messages on page 35 for more information about .WAV files, naming of message
and music files, and the processes involved in creating, receiving, and sending .WAV files to the SBX2 unit.
.CSV Files
XMU Statistics and reports are generated in .CSV (comma separated) files. These .CSV text files can be imported into
any word processor or spreadsheet for viewing, editing, or report generation purposes.
All statistics for a site are downloaded to the default directory specified in the File Handling section of the Site Book
window. You must set up a default directory, for each SBX2 site, where .CSV statistic files can be stored.
Testing Information Transfer between XMUCOM+ and SBX2
This is to ensure information is properly transferred between the two systems, and is best accomplished by transferring
and receiving information to and from the SBX2 unit.
To retrieve SBX2 system information
Use this procedure to retrieve the current system information from the selected SBX2 unit. This is a short retrieval and
should occur very quickly. If this works, you have confirmed that XMUCOM+ is able to retrieve information from the
selected SBX2 unit and it will also auto-populate the system information with the firmware version for that site to facilitate
smooth operation of information transfer.
1. Choose Administration > System > System Commands to display the System Commands window.
Interalia | SBX2 System Manual
Page 30
CHAPTER 3 |
Installing XMUCOM+
2. Select the SBX2 unit and site from the Select Site drop-down list box.
3. Click Apply.
SchedulerPlus submits your retrieval request to the selected SBX2 site, and waits for SBX2 to return the requested information to XMUCOM+.
A successful communication would look similar to the following
Interalia | SBX2 System Manual
Page 31
CHAPTER 3 |
Installing XMUCOM+
Note: The SchedulerPlus window is accessed from the Windows Program Bar. It shows the current status of jobs submitted to various SBX2 sites.
The ReScheduler application queues scheduled jobs, and submits them to SchedulerPlus to execute them when the scheduled time arrives. The
ReScheduler window is accessed from the Communication menu.
Your PC must remain on and active for ReScheduler and SchedulerPlus to operate correctly.
Scheduled tasks will not run if you shut down your PC.
Use the Communications > Completed Scheduled Tasks command to review the results of scheduled activities and jobs.
Interalia | SBX2 System Manual
Page 32
CHAPTER 4 |
Recording, Playing & Transferring Messages
CHAPTER 4 | Recording, Playing, &
Transferring Messages
Review this chapter to understand how to prepare, use, and manage music and messages that are
used by SBX2 configurations.
In This Chapter
•• About SBX2 Music and Messages on page 34
•• SBX2 Message Administration Methods on page 34
•• About .WAV Message and Music Files on page 34
•• Naming Message Files on page 34
•• About Recording and Playing Messages on page 35
•• Recording Messages on page 35
•• Playing Messages on page 36
•• Deleting Messages on page 37
•• Sending Messages to the SBX2 on page 38
•• Receiving Messages from SBX2 on page 40
Interalia | SBX2 System Manual
Page 33
CHAPTER 4 |
Recording, Playing & Transferring Messages
About SBX2 Music and Messages
The SBX2 unit is capable of storing and playing messages as part of its various program configurations. Users can upload
messages from the SBX2 unit or download messages from XMUCOM+ to the SBX2 unit.
These music and message files can be recorded directly into the SBX2 unit, or be provided as files on the PC, that are
then integrated into configurations, and downloaded to the SBX2 unit.
Music and messages can be used in conjunction with the MOH ports to create a seamless on-hold environment for your
callers. With the MOH ports, you can combine on-hold promotional and/or information messages with music. The SBX2
can fade the music out before the messages are played, and then fade the music back in. Users can configure both the
volume and music fade time.
SBX2 Message Administration Methods
Messages are stored and managed separately from the program configurations that are developed with the XMUCOM+
application. Program configurations can be developed independently of the messages and music files that they call. The
two components (messages and program configurations) are only integrated in the SBX2 unit.
Messages can be administered and managed from:
•• SBX2 Front Panel.
•• XMUCOM+ Application.
•• Remote Telephone Access.
•• Interalia’s Message Manager.
About .WAV Message and Music Files
All music and message files used in XMUCOM+ configurations must be stored in .WAV format. In order to be included
within a configuration, the WAV files must have the following properties:
• 8 bit compression
• Mono sound
• 8K sampling rate
• CCITT μ-Law Format - providing compliance with the lowest common denominator for WAV
files.
Note: Messages that are recorded from either the SBX2 front panel, or from a remote port, will be automatically configured with the properties listed in
this section.
Naming Message Files
During Configuration development, users can create message files with any name that they want, as long as it is in .WAV
format. These files can be located in any folder that is accessible to the XMUCOM+ application. They do not have to
be stored in the default site folders defined for the site. XMUCOM+ applies a standardized naming methodology to all
message files that are received from the SBX2 unit.
When messages (.WAV files) are received from the SBX2 into the XMUCOM+ application, each message is reassigned
a default filename such as P01M001. To uniquely identify a message file with a meaningful name, users must enter a
filename or description in the Label field of the MSG node.
Interalia | SBX2 System Manual
Page 34
CHAPTER 4 |
Recording, Playing & Transferring Messages
The default naming structure is as shown here:
PxxMxxx
Pxx refers to the SBX2 Partition
number, if the partitioning feature is
activated. If not, this will default to
P01 (Partition #1).
Each message on the SBX2 has an
associated index number. The Mxxx
refers to the message number. For
example, M001 identifies message
number 1, M002 identifies message
number 2 and so on
Note: Messages that are saved or reside in the SBX2 Unit are automatically converted to the .WAV format when received
from the SBX2. Files received from the SBX2 unit are saved with auto-numbered file names.
About Recording and Playing Messages
Ideally, you should plan, record, play, and test your messages and music files outside of the XMUCOM+ application, and
before building your program configurations. During this process, you should:
•• Use logical filenames that reflect the content of the message file.
•• Keep an index of the filenames, their actual content, and the program configuration in which you plan to use them.
•• Copy all the messages and music to an easily accessible directory for development of program configurations.
•• Store a backup copy of all messages and music files in an area other than the default location.
Note: When a message file has been created in the Config Builder window and has a .WAV file associated with it, a play button is enabled to allow you
to hear the file.
See the following topics for more information about:
•• Recording Messages on page 35 .
•• Playing Messages on page 36 .
•• Deleting Messages on page 37 .
Recording Messages
You must record all music and messages used by your program configurations. Ideally, this task should be completed
after planning the program configuration, but before building the program configuration in XMUCOM+. This ensures that
required messages are readily available for use, testing, and for download to the SBX2.
Messages and music can be recorded by using one of the following procedures.
•• To record messages from the SBX2 Front Panel on page 36
•• To record messages with Remote Telephone Access on page 36
•• To record messages in a Studio on page 36
•• To record messages and music from your PC on page 36
Interalia | SBX2 System Manual
Page 35
CHAPTER 4 |
Recording, Playing & Transferring Messages
To record messages from the SBX2 Front Panel
1. Connect the Interalia handset P/N 13416 (included with the SBX2) to the SBX2 handset port.
2. Press Enter to access the Main Menu.
3. Press Enter to select Messages.
4. Press the Right Arrow button until you reach the desired message number and press Enter.
5. Press the Right Arrow button until you reach Record and press Enter.
6. Press Enter (again) to begin recording your message. SBX2 monitors your recording time.
7. Press Exit to stop recording.
8. Press Exit until the menu returns to the main display.
To record messages with Remote Telephone Access
1. Identify the message number you want to record.
2. Remotely access the SBX2.
3. When the SBX2 responds Enter Command, press 7.
4. Press the message number (nnn) you want to record, followed by #.
5. When the SBX2 responds with a short beep, record the message.
6. Press any key to stop recording. The SBX2 responds with Message ‘nnn’ recorded.
To record messages in a Studio
1. Prepare a list of messages or music that you need for your program configurations.
2. Detail the contents of each message in written text format and specify the name of the file you want to use.
3. Record the messages in the studio with the properties detailed in About .WAV Message and Music Files on page 34.
4. Save each message as an individual .WAV file, using the names you specified in step 2.
5. Copy these messages to the default SBX2 Messages directory.
6. Download or send these messages to SBX2 when you are ready to test and use them as part of the SBX2 program
configurations.
To record messages and music from your PC
A broad range of tools are available for recording and playing messages and music on your PC.
We recommend using Interalia’s ‘Message Manager.’ A tool designed specifically to work with your SBX2 unit.
Playing Messages
Messages can be played from the SBX2 Front Panel, through Remote Access, or directly from your PC.
See the following procedures for more information:
•• To play messages from the Front Panel on page 37
•• To play messages via Remote Access on page 37
•• To play messages and music on your PC on page 37
Interalia | SBX2 System Manual
Page 36
CHAPTER 4 |
Recording, Playing & Transferring Messages
To play messages from the Front Panel
1. Connect the Interalia handset P/N 13416 (included with the SBX2) to the SBX2 handset port.
2. Press Enter to access the Main Menu.
3. Press Enter to select Messages.
4. Press the Right Arrow button until you reach the desired message number and press Enter.
5. Press Enter to select Play on the menu. SBX2 plays the message, and displays the total
playing time of the message.
6. Press Enter again to play the message. SBX2 plays the message, counting-down the
remaining playing time of the message.
7. Press Exit to stop playing (or allow the message to play itself out).
8. Press Exit until the menu returns to the main display.
To play messages via Remote Access
1. Identify the message number you want to play.
2. Remotely access the SBX2.
3. Press 8 when the SBX2 responds Enter Command.
4. Press the message number (nnn) you want to play, followed by #. SBX2 plays the message.
5. Press any key to stop playing the message.
To play messages and music on your PC
A broad range of tools are available for recording and playing messages and music on your PC.
We recommend using Interalia’s ‘Message Manager.’ A tool designed specifically to work
with your SBX2 unit.
Deleting Messages
Unused messages should be deleted from the SBX2 unit to reduce the amount of memory occupied by these files.
Deletion of old files would also serve to increase the rate of upload of information from the SBX2 unit to the
XMUCOM+ PC. See the following procedures for more information:
•• To delete messages from the Front Panel on page 38
•• To delete messages with Remote Telephone Access on page 38
Interalia | SBX2 System Manual
Page 37
CHAPTER 4 |
Recording, Playing & Transferring Messages
To delete messages from the Front Panel
1. Press Enter to access the Main Menu.
2. Press Enter to select Messages.
3. Press the Right Arrow button until you reach the desired message number and press Enter.
4. Press the Right Arrow button until you reach Delete and press Enter.
SBX2 displays a message asking if you are sure that you want to delete this message.
5. Press Enter to delete the message.
6. When SBX2 re-displays Message # <Delete>,
press Exit until the menu returns to the main display.
To delete messages with Remote Telephone Access
1. Identify the message number you want to delete.
2. Remotely access the SBX2.
3. When the SBX2 responds Enter Command, press 39.
4. Press the message number (nnn) you want to delete, followed by #.
5. The SBX2 responds with Done.
Sending Messages to the SBX2
You will want to send messages and music to the SBX2 unit when you have updated or created new configurations that
use these messages, or if you have updated or changed messages used by existing message nodes in the program
configurations for the SBX2 unit.
When you send or download messages from your PC to the SBX2 unit, SBX2 will:
•• Store these message files in 8 bit, 8 K, μ-Law format.
•• Ignore all filename information.
•• Map the messages to the program configurations that use them.
•• Use these messages when the program configurations require them.
Interalia | SBX2 System Manual
Page 38
CHAPTER 4 |
Recording, Playing & Transferring Messages
To send messages from your PC to SBX2 Unit
1. Choose Communication > Communicate to display the Communication window.
2. Select the Step1: Operations tab and select an option from the Send Messages section.
Select the Send
Messages option.
Select the messages
you want to send and
click the Add button.
Click Apply to send
the selected
messages to the SBX2.
3. Select the messages you want to send from the Available Nodes list box, and click Add>>. XMUCOM+ displays a list of
all the messages in the current configuration. The filename for each message is defined within the message nodes of
the current configuration.
4. Select the Step2: Site/Schedule tab, select the sites to which you want to send the messages, and click Add>>.
5. Select your scheduling option from the drop-down Select Schedule Option list box.
•• Choose Immediate to call the SBX2 unit and immediately send the messages.
•• Choose Scheduled to set a time to send these messages. Your PC must remain turned ON, for this option to work.
Interalia | SBX2 System Manual
Page 39
CHAPTER 4 |
Recording, Playing & Transferring Messages
6. Click Apply to send the selected messages to the SBX2.
7. Wait patiently for the messages to be sent and downloaded to your system. The download process could take time
depending on the speed of your selected communication connection and the number of messages you are downloading.
8. XMUCOM+ displays a response dialog box while it is sending the messages, and notifies you once all messages are
sent. This response dialog box is only displayed when the Immediate Scheduling Option is selected.
Receiving Messages from SBX2
You will want to receive messages from the SBX2 unit when you are debugging, modifying, or otherwise editing program
configurations that already exist in the SBX2 unit. In such cases, you will want to retrieve all the messages for a specific
partition or for the entire SBX2 unit.
When you receive and store message files from the SBX2 onto your PC, XMUCOM+ will:
•• Place all uploaded messages in the default directory defined in the Site Information window.
As administrators, you must set up a default directory for storing these .WAV files.
•• Name all message and music files using the naming syntax detailed in Naming Message Files on page 34.
Original message and music file names are not retained in the SBX2 unit. For your convenience, be sure to specify
the filename in the comments field of your program configurations.
To receive messages from SBX2 to your PC
Use this procedure to receive music and message files from the selected SBX2 unit. The retrieval time for this procedure
will vary depending on the number of messages selected for retrieval.
1. Choose Communication > Communicate to display the Communication window.
2. Select the site from which you want to receive the messages and click Add>>.
Interalia | SBX2 System Manual
Page 40
CHAPTER 4 |
Recording, Playing & Transferring Messages
3. Select your scheduling option from the drop-down Option list box.
•• Choose Immediate to communicate with the SBX2 unit and to immediately begin retrieval of the messages.
4. Click the Step 1: Operations tab and select an option from the Receive Messages section.
Select the Receive
Messages option.
Select the partition
from which you
want to retrieve
messages.
Click View XMU
to view a list of
messages on the
SBX2 unit.
Select the messages
you want to retrieve
and click the Add
button.
Click Apply to receive
the selected messages
from the SBX2.
5. Click View SBX2 to retrieve a list of messages that reside on the selected SBX2 and partition.
6. Select the messages you want to retrieve from the Available Nodes list box, and click Add>>.
7. Click OK to retrieve the selected messages from the SBX2.
8. Wait for the messages to be retrieved and uploaded to your system. The upload process could take time depending on
the speed of your selected communication connection and the number of messages you are uploading.
9. XMUCOM+ displays a response dialog box while it is retrieving the messages, and notifies you once all messages are
retrieved.
10. Retrieved messages are placed in the default directory. They will be assigned names according to the naming
conventions specified in Naming Message Files on page 34.
Interalia | SBX2 System Manual
Page 41
CHAPTER 5 |
Nodes & Program Configurations
CHAPTER 5 | Nodes & Program
Configurations
SBX2 is an extremely versatile call processing and management tool. Each SBX2 unit can
be programmed to perform a broad range of activities. SBX2 program configurations are
composed of commands, nodes, messages, and music that are executed when a call is
received.
You can develop and build your own program configurations from either the XMUCOM+
application (recommended, and most intuitive method) or from the Front Panel of the SBX2
(only recommended for very simple configurations).
The remainder of this guide provides a brief overview of each of these components, and
how they fit together. You can learn how to apply and integrate these concepts into an SBX2
program configuration in any of the Application Guides on the CD supplied with your SBX2
In This Chapter
•• About Basic SBX2 Commands on page 43
•• About SBX2 Nodes on page 43
•• Field Descriptions For Nodes on page 48
•• About SBX2 Program Configurations on page 66
Interalia | SBX2 System Manual
Page 42
CHAPTER 5 |
Nodes & Program Configurations
About Basic SBX2 Commands
SBX2 Commands are the most basic elements required to direct the actions and results of an SBX2 program
configuration. All commands in SBX2 are numbered sequentially in the order that they were created. For example, you
could have Play1, Play2, Play3.
Basic commands include:
PLAY
Play the message number specified by the program configuration.
PAUSE
Introduce a pause for a specified number of seconds.
BEEP
Generate a short beep tone.
NOOP (No Operation)
Move the user to the next step without pauses, beeps, or other messages.
About SBX2 Nodes
SBX2 Nodes comprise the second category of SBX2 commands and are a fundamental component of all SBX2 program
configurations.
A node consists of a group of commands or SBX2 settings. Nodes are building blocks that are linked together to create a
program configuration (or program) to control the actions that SBX2 performs. The actions performed by each node are
based on specific commands and parameters that are coded within that node.
Nodes are used as steps within a call flow, to add menu choices, play additional messages, add time/date screening,
provide user interaction and responses, transfer calls, or allow branching to new actions.
SBX2 program configuration design and implementation requires a good understanding of the nodes that can be used,
and the best way in which to interlink and apply them. Typically, during the design of your program configuration, you will
develop a call flow diagram that details the types of nodes to be used, and the parameters that must be applied to each.
Types of nodes
SBX2 provides a number of different types of nodes that can be used to develop program configurations and applications
for your organization.
Interalia | SBX2 System Manual
Page 43
CHAPTER 5 |
Nodes & Program Configurations
The following table provides a summary of the types of nodes available for use in your program configurations.
Node Type
Function
Auto Nodes
Develop Auto-Attendant program configurations. Allows the user to provide a DTMF
menu to callers to select by name or extension the party they wish to transfer to.
CMD (command) Nodes
Contain other commands and nodes to group a related set of commands. It is typically
used to execute of series of commands that can send the caller to various destinations.
Example: Command Node is often used for Time/Date filtering before presenting the
caller with the appropriate auto-attendant menu.
Command nodes can call AUTO, CMD, DATE, DBN, DTMF, LIST, MOH, PAAS,MSG,
TIME, VOX, TABLE and XFER nodes and the PAUSE command.
DATE Nodes
Execute a set of commands on a specific date or day, or within a range of dates.
Typically, Date Nodes are used to play different messages on different days or to
transfer calls to a different extension for weekends and holidays.
Calls arriving outside of the specified ranges are ignored by the Date Node,allowing the
call flow to move on to the next command.
DATE and TIME nodes can be combined together.
TIME Nodes
Execute a group of commands when a call is received within a specified time range. If
the call arrives outside of this time range, SBX2 ignores the Time Node and moves the
call flow to the next command.
Use Time Nodes to play different messages at different times of the day or to transfer
calls to a different extension after hours.
Date and Time nodes can be combined together.
DTMF Nodes
Present menu selection prompts to a caller, and to execute specific actions depending
on the digits the caller entered. Each action has pre-defined targets such as messages,
transfers to specific extensions or telephone numbers, or to sub-menus.
Example: “Press 1 for directions to our office, press 2 to reach customer service, press
3 to reach Mary Hill in Accounting or press 4 for additional options.”
DTMF nodes can call AUTO, CMD, DATE, DBN, DTMF, LIST, MSG, PAAS, TIME, VOX,
TABLE and XFER nodes.
Interalia | SBX2 System Manual
Page 44
CHAPTER 5 |
Nodes & Program Configurations
(continued)
Node Type
Function
LIST Nodes
Insert a series of messages into an SBX2 program configuration. List nodes are
typically used to:
Play a list of different advertising messages. By applying the Rotate mode of operation,
the next message in the list is played whenever a new call is received.
Act as second ACD announcement for callers who are held in queue for extended
periods of time. When the List Node is in Rotate mode, the caller will hear different
messages while cycling to the same SBX2 port.
Allow users to sequentially access all messages that have been configured at one time,
rather than rotating through the list one at a time. The List Node must be placed in ALL
Mode for this action.
List nodes can call MSG nodes to play a list of messages, and to set modes of
operation (all, rotate, and skip).
MOH Nodes
Group instructions that configure the SBX2 into a Music on Hold source for delivering a
combination of messages and music to callers on hold.
The MOH program configuration lets you control the delivery of voice, music, volume,
and fade time.
MOH Nodes can call CMD, DATE, LIST, MSG, TABLE and TIME nodes and PAUSE,
and NOOP commands.
MSG Nodes
Identify and store message file information. Each message node, with its associated
message or music file, can be re-used in multiple locations within a single program
configuration, or within a different program configuration.
Message nodes are referenced using the PLAY command. The PLAY command is
typically incorporated into the command structure of other nodes such as MOH, CMD,
and LIST nodes.
Message nodes cannot call other nodes.
Interalia | SBX2 System Manual
Page 45
CHAPTER 5 |
Nodes & Program Configurations
(continued)
Node Type
Function
PAAS Nodes
Group instructions that activate a message or a series of messages for a Public
Address Announcement System (PAAS).
PAAS nodes can call CMD, DATE, LIST, MSG, PAAS, TABLE and TIME nodes, and the
NOOP andPAUSE commands.
Starting Nodes
Set the first action that SBX2 must perform when a call is received at a specific port.
This is a one-step entry. Each SBX2 port must be assigned a Starting Node.
The Starting Node indicates the beginning point of an XMUCOM+ program
configuration.
The same Starting Node can be applied to multiple ports. This is a useful feature when
the same program configuration is run on multiple ports.
VOX Nodes
Provide a menu node that responds to voice prompts instead of DTMF prompts. It
allows rotary callers to use speech to select their option from the menu.
The SBX2 listens for audio on the line after each prompt, but does not interpret the
actual word the caller speaks.
VOX nodes can call CMD, DATE, LIST, TIME, VOX, PAAS, TABLE and XFER nodes as
well as the PLAY command.
XFER Nodes
Group settings and commands that allow the SBX2 to perform call transfers. XFER
nodes carry out a call transfer based on user generated DTMF signals in a DTMF or
Auto node, or with
a voice signal in a VOX node.
XFER nodes can call CMD, AUTO, DATE, DBN, DTMF, LIST, TIME, VOX,
PAAS,TABLE and XFER nodes as well as the PLAY command
All program configurations using XFER nodes must also include at least one XFER
STYLE node.
Interalia | SBX2 System Manual
Page 46
CHAPTER 5 |
Nodes & Program Configurations
(continued)
Node Type
Function
XFER STYLE Nodes
Enter settings to ensure the SBX2 unit performs in a manner compatible with the PBX.
This includes PBX specific information such as hookflash, timings, ring cadence, and
supervised vs. non-supervised transfers.
At least one XFER STYLE node must be included with all program configurations using
XFER nodes.
TABLE Nodes
Carry out an action based on a user defined schedule. This schedule can be activated
using the following modes: Time, Date, Month, Day, Weekly, Hourly, Monthly,
Calendar, DBN range, NIS range/match, EWT.
The table node contains a mode of operation, an ‘invalid, the table does not apply’
instruction and a ‘continue after the table is created’ instruction followed by a list of
action table entries
NIS Nodes
Carry out an action, usually a transfer, based on DTMF digits received after going off
hook, such as DNIS/ANI digits. Actions can be based on the whole DTMF string or sub
sections within it.
DBN Nodes
Contain details used by the SBX2 to perform Dial By Name applications.
DIR Nodes
Contains the Directory of names and extensions used by the DBN node.
Interalia | SBX2 System Manual
Page 47
CHAPTER 5 |
Nodes & Program Configurations
Field Descriptions For Nodes
The XMUCOM+ PC software offers various methods of configuring the different nodes that make up an SBX2
configuration. To avoid confusion, the various drop down menus and pop up windows only present the options that are
available for each node. In this point and click environment, buttons, drop down menus and pop up windows are used
to make selections and configure nodes. These conventions are similar to those used in many other Windows based
programs. Double click on any node in your configuration to edit it.
COMMAND Node
The COMMAND node is used when an application requires
multiple steps. A command node may be configured to play
a series of messages, to screen for times and dates before
playing a message or presenting a menu to callers. Any
combination of nodes and commands may be programmed
into a command node.
The user may set up the Command node pressing the CMD
button in the Config Builder window to create a new entry,
modify an existing entry (double click the current entry),
delete or rename an entry by right clicking on it.
LIST Node
The All/Rotate boxes allow the user to program the SBX2 to
play all messages to callers or to rotate messages to ensure
all messages get equal play. The Skip option allows a caller
to jump over a message by pressing a DTMF key on their
phone. Clicking on the Edit box in the LIST node will display
a window that will allow the user to Add/Update/Delete a
play message.
Interalia | SBX2 System Manual
Page 48
CHAPTER 5 |
Nodes & Program Configurations
TIME/DATE Nodes
These two nodes instruct the SBX2 to play messages or execute actions on specified days, dates or times. These nodes
are inserted into Command nodes as steps in a call process. Each call is screened to determine if the call is arriving
during a specified time frame (Time node) or on a specific day or date (Date node). When the call makes a match, the
Time or Date node takes control of the call. The SBX2 follows the commands configured in that particular node. Multiple
Time and Date nodes may be configured in a call flow.
TIME Node
Configure the Start and Stop fields in Time node. Then
configure the action by clicking on the Edit button. In this
example message 1 will play between 5 pm and 8 am.
Interalia | SBX2 System Manual
Page 49
CHAPTER 5 |
Nodes & Program Configurations
DATE Nodes (Day and Date configurations)
Select Date & Day then configure the Start and Stop fields. Configure the action using the Edit button.
Interalia | SBX2 System Manual
Page 50
CHAPTER 5 |
DTMF/AUTO Nodes
DTMF Node:
AUTO Node: Note:
Nodes & Program Configurations
Specifies the action taken on the DTMF digit(s) collected.
Specifies the action taken on the DTMF digit(s) collected. The action will only be executed If the
DTMF digits collected match the programmed range of digits. The range must have a beginning
and an end.
DTMF: Selection of input
Auto: Select from a range of inputs
See image on the next page for an example
Interalia | SBX2 System Manual
Page 51
CHAPTER 5 |
w
Nodes & Program Configurations
Field Tag
Description
Prompts
Specifies the prompts message(s) that are played to the caller.
Timeout
Specifies the action taken when the caller does not make a selection. Enter No Operation
(NOOP)
Invalid
Specifies the action taken when a selection is made that is not defined in the Action Table.
Abort
Specifies the action taken when the retry limit has been reached.
Action
Table The left side of the Action Table is made up of digits that can be entered by the
caller. The right side of the table contains the XMU+ action instructions.
Number of Digits
Specifies the number of digits to be collected, from one to seven digits.
Terminating Digits
Specifies the optional terminating digit, # or *.
Selection Timeout (sec)
Specifies the digit collection timeout period, one to sixty seconds. The default is 5
seconds.
Digit Timeout (sec)
Specifies the inter-digit timeout value in seconds, one to 15.
Retry Limit
Specifies the number of retries that are allowed, one to five, if invalid selections or
timeouts occur.
DTMF Clear
Erases the DTMF buffer. Options are Yes or No; not applicable to AUTO Nodes.
Note: Click on the Edit buttons to view the options available to each node.
Interalia | SBX2 System Manual
Page 52
CHAPTER 5 |
Nodes & Program Configurations
VOX Node
Field Tag
Description
Field Tag
Description
Prompts
Specifies the prompt message(s) that are played to the caller.
Timeout
Specifies the action taken when the caller does not make a selection. Enter NOOP if
the caller should return to the prompt message.
Abort
Specifies the action taken when the retry limit has been reached.
DTMF
Specifies the action taken when the caller presses a DTMF key.
Action Table
The entry consists of two items, a prompt and an action. The Action Table specifies the
action taken based on the VOX selection.
Beep
Specifies whether or not a BEEP is presented to the caller after each VOX Prompt.
Threshold
Specifies the sensitivity level of detecting a voice activation selection; zero to seven,
zero is the least sensitive and seven is the most sensitive.
Wait (sec)
Specifies the amount of time the XMU+ waits to receive a response from the caller.
Retry Limit
Specifies the number of retries that are allowed; one to five, if invalid selections or
timeouts occur.
Interalia | SBX2 System Manual
Page 53
CHAPTER 5 |
Nodes & Program Configurations
XFER/STYLE Nodes
These two nodes work together to allow the SBX2 to perform a call transfer. The XFER target (extension) is configured in
the XFER node and the STYLE node identifies the sequence (hookflash only or hookflash plus an access code) that the
PBX requires to transfer a call. XFER node
Note: Each XFER Node must refer to a valid x-style.
Field Name
Description
Field Tag
Description
Dial
Specifies the DTMF String to be transferred to. The letters AUTO can be entered when
the XFER Node is collecting digits entered in an AUTO Node. If the PBX uses least cost
routing, you may require delays at the end of the dial string. One comma (,) represents
a half second delay.
X Style
Specifies the XFER STYLE Node to be referenced when transferring a call.
Hold
Specifies the message to play to the caller prior to transferring the call.
MOH
Specifies the message to play that contains the music on hold message while callers
are waiting on hold in the XMU+.
Busy 1
Specifies the action to be taken in response to the first busy condition; this applies to
supervised transfers only.
Busy 2
Specifies the action to be taken in response to further busy conditions; this applies to
supervised transfers only.
No Answer
Specifies the action to be taken in response to a no answer condition; this applies to
supervised transfers only.
Answer
Specifies the action to be taken in response to an answer condition (this applies to
supervised transfers only.
Note: Each XFER Node must refer to a valid x-style.
Interalia | SBX2 System Manual
Page 54
CHAPTER 5 |
Nodes & Program Configurations
STYLE Node
The following characters are used to configure the Transfer, Disconnect and Retrieve fields: 0-9, *, and # are DTMF
entries that can be used in a dial string. An exclamation mark (!) is the entry used to represent a Hook Flash. The duration
of the Hook Flash is configured in the Hook Flash field.
Interalia | SBX2 System Manual
Page 55
CHAPTER 5 |
STYLE Node
Nodes & Program Configurations
Field Tag
Description
HookFlash (msec)
Defines the duration of the hook flash, 50 to 2000 milliseconds. Default is 500 msec.
Supervised
Specifies the treatment required during a call transfer; Blind, Partial, Full, D&C or
• Blind - no call progress monitoring
• Partial - busy condition monitoring only
• Full - busy and no answer call monitoring
• D&C - issues re-route digits to a network provider
• Enhanced - Dual busy condition monitoring only (fast/slow busy)
Note: If Blind Supervision is selected, the programming features after Disconnect are
not available.
Threshold
Defines the level at which call progress monitoring is carried out. The default is ‘Low.’ If
problems with noisy lines are experienced during supervised transfers, Medium or High
can be selected.
Transfer
Specifies the dial string needed to perform a call transfer/conference function; default =
!.
Disconnect
Specifies the dial string used to perform a disconnect function; default = blank.
Retrieve
Specifies the dial string used to perform a retrieve function; default = !
Busy Retry (sec)
Specifies the duration between call transfer retries on a busy condition; one to 30
seconds
Num. Retries
Specifies the number of times the XMU+ should attempt a retry when a busy condition
is detected; one to 30 retries.
Ring Limit
Specifies the number of rings needed to determine a ring no answer condition; one to
20 seconds.
Busy On (msec)
Specifies the duration of the busy on tone; 50 to 1500 milliseconds.
Busy Off (msec)
Specifies the duration of the busy off tone; 50 to 1500 milliseconds.
Ring On (msec)
Specifies the duration of the ring on tone; 50 to 10000 milliseconds.
Ring Off (msec)
Specifies the duration of the ring off tone; 50 to 10000 milliseconds.
Note: When Enhanced Supervision is selected, the Busy On/Busy Off changes to Busy1/On Busy2/On. The setting in
milliseconds represents half of the busy signal.
For example, a setting of 500 milliseconds looks for a busy signal that is 500 milliseconds of tone and 500 milliseconds of silence.
A fast busy signal is set for half the time of a regular busy tone or 250 milliseconds.
Interalia | SBX2 System Manual
Page 56
CHAPTER 5 |
Nodes & Program Configurations
MESSAGE Node
Each message has several configurable fields that affect
its functionality. To view message fields, double click on the
desired message number in the Config Builder. The messages
can be assigned the following characteristics:
•• Maximum Message Length - this limits the length of the
message so that one message cannot be recorded and
utilize all of the recording time in the SBX22. This feature is
useful when different people may be recording messages.
•• On/Off State - messages can be turned off and on
remotely from any touch tone telephone. The default is On.
•• DTMF - the message can be interrupted by a DTMF tone if
configured. Rather than listen to the message,
callers can enter any DTMF digit and skip to the next
message or node in the call flow. The default setting is
ignore.
•• Backup to Flash Memory - default is to back up so
messages will be stored even in a power fail situation.
De-select if you don’t wish to use Flash memory
•• Access Code - if set, you must enter a password before changing this message using the remote access feature.
Each message can have its own password or a password may be shared.
•• Filename - When messages are uploaded from the XMU+ each message is stored as a separate file and assigned a
default filename.
You can assign a new filename to the messages.
•• Directory - reflects the path or directory location of the .wav file for this message.
•• Comment - available for additional information about the message.
Interalia | SBX2 System Manual
Page 57
CHAPTER 5 |
Nodes & Program Configurations
MOH Node
The MOH ports connect to the MOH input(s) on the PBX. Using the MOH node, music and messages are combined to
create a seamless on-hold environment. Music and messages may be recorded within the SBX2 or the music may be
provided from an external source. In either case, the SBX2 will insert messages into the music at configured intervals. The
SBX2 fades the music out before the messages are played. When the messages are finished, the SBX2 fades the music in
again. The music volume and the duration of the music fade time is user configurable.
The SBX2 has 1 input and 2 outputs: The audio input is used when music is provided by an external source (this is
typically an existing source, such as muzak). When the music source is a message recorded within the SBX2, the audio
input is not used. The MOH audio outputs connect to the MOH input(s) on the PBX. The audio outputs are used in one of
two ways: To output messaging in combination with an existing music source. To output music and messages that reside
in the SBX2 (when the music source is a message recorded within SBX2). The PBX will be configured in the same way as
it would be when a stand alone MOH source is installed. When the PBX connects a caller to a MOH port, the caller hears
music or music and messages from the MOH port(s) on the SBX2.
The MOH Node has four fields as follows:
•• Fade Time is the time it will take for the music to fade in and out before and after the promotional and/or information
messages are played to callers on hold. Default is 2.5 seconds.
•• Music Level field is configured to control the volume level during the fade in and fade out. Default level is 6 while the
range is 1-9, 1 representing the lowest volume and 9 the highest.
•• Voice field is configured to instruct the SBX2 which message to insert into the music stream. Other available options
are: Play, CMD, List, Date, DBM, Time, Table, Pause & NOOP.
•• Music field is configured to identify the music source. The music source may be either internal (stored in onboard
Flash memory) or an external source :
•• Source - A message recorded within the SBX2. The music field can be configured to play a message (this uses
recording memory). Options available are: Play,
CMD, List, Date, DBN,Time, Table, Pause and
NOOP.
•• External Music Source - Music coming from an
external source. The music can be provided by an
external source via the MOH input port (muzak,
etc.).
Interalia | SBX2 System Manual
Page 58
CHAPTER 5 |
Nodes & Program Configurations
PAAS node
The Public Address Announcement System (PAAS) operation on the SBX2 is designed to play announcements on a public
address system.
Announcements can be triggered by an external contact closure or by a caller dialing into the system. A message or a
group of messages are played when a trigger is received.
The PAAS operation uses two elements - the PAAS instruction and the PAAS Node.
PAAS Instruction: The PAAS instruction is used to trigger a PAAS node. Whenever a PAAS instruction is executed, a
PAAS node is triggered and begins to play on the output channel (configured in the PAAS node).
PAAS Input: The PAAS instruction may be used as the starting node for a channel configured in PAAS mode.
When a contact closure is received on the channel, it will execute the starting instruction. Since the starting node is a
PAAS instruction, the contact closure will trigger a PAAS node. The messages in the PAAS node are played to the paging
system.
PAAS NODE: The PAAS Node contains a list of messages that are played to a particular channel. The PAAS node has
the following elements:
Line
The channel number to be used for playback (note - this line must be configured for PAAS
mode of operation)
Priority
The priority of the PAAS node. The priority ranges from 0 (lowest) to 9 (highest).
Interrupt
Indicates if the PAAS node can be interrupted, either Yes or No.
Actions
The PAAS node contains a list of messages to be played to the paging system
Interalia | SBX2 System Manual
Page 59
CHAPTER 5 |
Nodes & Program Configurations
PAAS Priority: If no PAAS nodes are playing and a trigger
is received for a PAAS node, the PAAS node is played
immediately.
If a PAAS node is currently playing (current PAAS node)
and a trigger is received for a different PAAS node
(triggered PAAS node), the SBX2 will check the priority of
the current node with the triggered node. The following are
the possible cases:
1. Trigger PAAS priority less than Current PAAS priority the triggered PAAS node will be queued up to play after
the current PAAS node
2. Trigger PAAS priority equal to Current PAAS priority - the
triggered PAAS node will be queued up to play after the
current PAAS node
3. Trigger PAAS priority greater than Current PAAS priority
- the system checks the ‘interrupt’ to see if the current
PAAS node can be interrupted.
If the Current PAAS interrupt is set to Yes, then the Current
PAAS node is stopped and the triggered PAAS node is
started, or if the Current PAAS interrupt is set to No, the
Current PAAS node is allowed to finish. The triggered
PAAS node is queued up to play after the current PAAS
node.
is prompted “Please enter your area code”, the digits
collected by the system are stored (in the AUTO buffer) and
are played back to the caller using the APLY instruction
“Your area code is … Is this correct?”
The APLY instruction uses messages to play back each
digit entered by the user. The digit to message mapping is
as follows.
a
Digit
Message Number
Audio Message
*
988
“star”
#
989
“pound”
0
990
“zero”
1
991
“one”
2
992
“two”
3
993
“three”
4
994
“four”
5
995
“five”
6
996
“six”
7
997
“seven”
8
998
“eight”
9
999
“nine”
Multiple PAAS Triggers: If multiple triggers are received,
they will follow the rules as stated previously. If a node is
queued up,
the following rules apply to the order in which the PAAS
nodes are queued:
1. If the PAAS node has a higher priority than any item in
the queue, it is placed at the front of the queue.
2. If the PAAS node has the same priority as other items in
the queue, it is added to the queue after any other PAAS
nodes with the same priority.
3. If the PAAS node has a lower priority as other items in
the queue, it is added to the end of the queue.
APLY instruction (Auto Play): Takes the digits entered by
the user (via the AUTO node) and plays back the digits
(using recorded messages). For example, if the user
Interalia | SBX2 System Manual
Page 60
CHAPTER 5 |
Nodes & Program Configurations
TABLE node
The TABLE node is used to allow the SBX2 to perform different actions at different periods or intervals (time, date, month,
day, weekly, hourly, monthly & calendar). It contains a Mode of operation, an ‘invalid’ and a ‘continue’ instruction, followed
by a list of Action Table entries. Each Action Table entry contains a starting and ending value, followed by an instruction.
When the Table node is encountered in the call flow, the contents of the Table are checked and if any of the entries match,
the Action is executed. If none of the entries match, the SBX2 executes the ‘Invalid’ instruction.
Field Tag
Description
Mode
The Mode specifies the period that is being compared in the Action Table. For example;
weekly, hourly, monthly
Invalid
The invalid instruction is executed if there was no match in the Action Table
Continue
The Continue instruction is executed if the Action Table instruction executed was a
PLAY or LIST node
Action Table
The Action Table contains a variable number of “start - end” choices depending on
which Mode was selected.
Interalia | SBX2 System Manual
Page 61
CHAPTER 5 |
Nodes & Program Configurations
NIS Node
The NIS node allows callers to be directed to a different call flow based on the number they dialed or based on the
number of the caller. The NIS feature allows the SBX2 to handle DNIS/ANI information and to direct the caller accordingly.
The SBX2 receives the digits either before going off hook (T1 wink start or immediate start) or after going off hook (Hybrid
line card.) The digits are captured into a NIS buffer, the call flow is directed using a TABLE node to decode portions of the
NIS buffer.
Field Name
Description
Field Tag
Description
Number of Digits
Specifies the number of digits to be collected, from 1 to 31 digits.
Terminating Digit
Specifies the optional terminating digit.
Selection Time Out
Specifies the digit collection timeout period, from 1 to 60 seconds. Default is 5 seconds.
Digit Time Out
Specifies the inter-digit timeout value in seconds. From 1 to 15 seconds.
Interalia | SBX2 System Manual
Page 62
CHAPTER 5 |
Nodes & Program Configurations
DBN Node
The Dial By Name (DBN) node allows callers to be directed to an extension by entering the first / last name of the person
they wish to contact into the telephone keypad. The most common application (and default for this node) is to prompt
the incoming caller to enter the first three (3) digits of the last name of
the person they wish to contact. For example to contact John Brown,
the caller would enter 276 (BRO) into the keypad. Once the person is
recognized, the SBX2 will transfer the call to the correct extension. The
SBX2 is flexible enough to allow the DBN node to accept first name
only, last name only, first then last names, last then first name, etc.
It
also allows the number of digits required from the caller to range
between one (1) to nine (9) The DBN node when ‘Default Last Name’ is
selected in the method field:
d Name
Description
Field Tag
Description
Greeting
Specifies which MSG node will be used as the greeting message to callers.
Directory
Specifies which DIR node will be referenced by this DBN node.
Method
Choose either Default (last name only) or choose Custom for additional options.
Language 1
Language 2
Select which language will be used for this dial by name feature. Two languages can be
used if required
Action
Table Displays what action will take place when a condition is seen by the SBX2.
Interalia | SBX2 System Manual
Page 63
CHAPTER 5 |
Nodes & Program Configurations
The DBN node when ‘Custom’ is selected in
the Method field:
On Exit
Exit Prompt – Select a message to play before
the SBX2 transfers the caller, e.g.
“transferring your call.”
Play Name – Select if you’d like the SBX2 to
play the name of the person to which the
caller is being transferred.
Mode Settings Select which criteria you wish the caller to enter and the SBX2 to match from. Selections
are First name, Last name, Both names, Extension. Then select the minimum and
maximum number of digits the caller should enter. Finally choose a .Prompt message
which should instruct the caller what they are expected to enter.
Error Settings The Timeout field instructs the SBX2 what to do if the caller should fail to make a
connection within the specified time limit.. The Invalid field instructs the SBX2 what to do if
the caller enters a selection that isn’t recognized.
• Selection Time Out – set the time limit in seconds for the caller to make an .entry.
• Digit Time Out – set time limit between digits entered by the caller
• Retry Limit – set the number of retries a caller can make if invalid selections or .timeouts
occur.
Confirmation If you have matching names within your directory, it may be necessary to select “yes” for
confirmation. This allows the caller to select from a list of matching .names. For example :
“Press 1 for John B, press 2 for John T.”
• Before Name – Select a message to play before the SBX2 lists the matching names. (Or
select No-op if no message is required)
• After Names – Select a message to play after the SBX2 lists the matching names. (or
select No-op.)
• Name 1, Name 2, etc – Select a message to play before the SBX2 lists each matching
name in turn.
Interalia | SBX2 System Manual
Page 64
CHAPTER 5 |
Nodes & Program Configurations
DIR Node
The DIR or Directory node is referenced by the DBN node when attempting to make a match from the callers key presses.
The DIR node contains a list of all possible matches (i.e. people in the company) and their telephone extension number. In
order for a dial-by-name application to work, both a DBN and a DIR node must be configured.
Field Name
Description
Field Tag
Description
Access Code
Optional. Enter an access code for remote telephone users to access and modify this
node.
Starting Prompt
Set the message number you wish your directory prompts to start from. This message
will typically contain the person’s name and will be played out when the “Play Name”
field in the DBN Node is set to “Yes.”
CSV Filename
The DIR node will allow you to import a CSV file (e.g. M/S Excel) that contains a list of
personnel and their extension numbers. The format of the CSV file must be Last Name,
FirstName, Extension
Directory Table
This table shows all the people in the directory, their extension and the message prompt
assigned to that person. You can manually enter names into this table or import them
as described above.
Interalia | SBX2 System Manual
Page 65
CHAPTER 5 |
Nodes & Program Configurations
About SBX2 Program Configurations
SBX2 program configurations are simple programs that you, the user, can develop with the XMUCOM+ application, and
that run on the SBX2 unit.
SBX2 program configurations are composed of commands, nodes, messages, and music that are executed when a call is
received.
You can develop and build your program configurations from either the XMUCOM+ application (recommended, and most
intuitive method) or from the Front Panel of the SBX2 (only recommended for very simple configurations).
Planning for an SBX2 Program Configuration
It is important to spend some time planning and designing your SBX2 program configurations, before creating and
implementing them in XMUCOM+.
During the planning phase, you should:
1. Determine your program configuration requirements
Your requirements will depend on the type of program configuration you are designing, the size of your organization,
options and variances you need to include, and the complexity and depth of your call flow requirements.
2. Plan your call flow order
Begin by determining what should happen when a call is first received, and proceed to call completion in a logical
fashion, through all the options and paths that the call can take. This plan should provide a clear representation of all of
your desired call flow.
3. Draw a call flow diagram (node map plan) showing the calls, menu selections, messages, transfers to extensions,
music, and other options you want to include in your program configuration.
The call flow diagram helps you to understand how the various nodes are linked together to create and execute
program configurations.
Sample SBX2 Call Flow Diagram
You should develop call flow diagrams that document and show the transfer of control from one node to the next for every
program configuration that you plan to create and implement.
Call Flow diagrams provide a visual means for documenting and showing how callers are moved through the SBX2
system. They are effective for showing all the possible paths that a caller can take through your system.
The following diagram illustrates a typical call flow diagram. You should create similar, detailed call flows for each of your
program configurations.
Interalia | SBX2 System Manual
Page 66
CHAPTER 5 |
Nodes & Program Configurations
Sample Call Flow Diagram
Caller
Central Office Switch
DTMF 1
Prompt: MSG 1, Pause 2 sec, MSG 2
"Thank you for your call. If you would like to: make a collect call to the USA…
or charge any international call to a credit card…
or charge a US call to a US calling card…
press 1 now & we will connect you.
(PAUSE FOR 2 SECONDS)
Otherwise, stay on the line & we will connect you to the service you dialled.
Thank you for your call."
Timeout : XFER 2
Invalid : MSG 4
I'm sorry that selection is invalid, please try again
Abort : MSG 99
1 : XFER 1
XFER 2
MSG 6: Please hold while we transfer your call
Enter the telephone number here
MSG 99
XFER 1
No message recorded, unit disconnects
MSG 6: Please hold while we transfer your call
Enter the telephone number here
Location: ____________________
Card:
_____________________
Lines:
_____________________
Modem #: _____________________
IP Address: _____________________
Interalia | SBX2 System Manual
Page 67
CHAPTER 6 |
Remote Telephone Access
CHAPTER 6 | Remote Telephone Access
Review this chapter to understand how to access the SBX2 via the remote telephone access
port.
In This Chapter
•• Understanding SBX2 Remote Telephone Access on page 69
•• Setting Up SBX2 Remote Telephone Access (optional) on page 69
•• To Set SBX2 Remote Telephone Access Mode on page 70
•• To Change the Default Remote Telephone Access Code on page 70
•• Using Remote Telephone Access on page 70
•• Remote Telephone Access Commands on page 72
•• Working with Remote Telephone Access Messages on page 73
Interalia | SBX2 System Manual
Page 68
CHAPTER 6 |
Remote Telephone Access
Understanding SBX2 Remote Telephone Access
The Remote Access feature allows a programmer to access SBX2 from a remote location using a touch-tone telephone.
When the programmer presses the touch-tone keys, the SBX2 receives a DTMF tone and responds with voice prompts
that instruct the programmer on how to proceed.
When a user accesses the SBX2 remotely, the SBX2 responds immediately with a request for an access code. The manner
in which the SBX2 responds from that point on depends on the access code entered.
Entering This Access
Code
Allow
Specifications
System
Administrators access to all levels of
SBX2 features and options
This number is unique from all other
SBX2 access
Message
Users access to specific messages
in the SBX2. A message access code
only allows changes to messages with
that access code assigned to it.
This code can be shared by one or
more messages. Message access
codes cannot be the same as the
system access codes
Each message in the SBX2 can be
assigned an access code. If the user
enters a message specific access
code via remote access, they then do
not have to enter the message number and the # symbol when using the
record, play or replace functions.
Setting Up SBX2 Remote Telephone Access (optional)
If Remote Access will be used to communicate with the SBX2, the unit must be:
1. Cabled to a telephone line.
2. Set SBX2 to Remote Access mode using the SBX2 Front Panel.
See To Set SBX2 Remote Telephone Access Mode on page 70.
3. Programmed with a Remote Access code using the SBX2 Front Panel (optional).
See To Change the Default Remote Telephone Access Code on page 70.
Interalia | SBX2 System Manual
Page 69
CHAPTER 6 |
Remote Telephone Access
To Set SBX2 Remote Telephone Access Mode
Remote access mode is set to Ring Start (R) by default, and is rarely changed.
1. Press Enter to access the Main Menu.
2. Press the Right Arrow until you reach System on the Main Menu, and press Enter.
3. Press the Right Arrow until you reach Remote Mode, and press Enter.
4. Press the Right Arrow until you reach the desired remote mode, and press Enter.
You can choose from the following options:
•• R - Ring start with loop/shunt disconnect (default).
•• RD - Ring start with DTMF disconnect.
•• RB / RB+ - Ring start with busy tone disconnect.
•• RT / RT+ - Ring start with dial tone disconnect.
•• RQ - Ring start with quick answer.
5. Press Exit until the menu returns to the main display.
To Change the Default Remote Telephone Access Code
Assigning a new, unique access code to each SBX2 is recommended to prevent
unauthorized telephone access to your system.
1. Press Enter to access the Main Menu.
2. Press the Right Arrow until you reach System on the Main Menu, and press Enter.
3. Press Enter, hit the right arrow key & Enter to select Access Codes.
4. Press Enter to select Remote Access.
5. Press Enter to select the first digit in the existing access code.
6. Use the Right Arrow or Left Arrow to select a new Remote Access code digit, and press
Enter.
7. Repeat Step 6 until the new access code is entered. Access codes must have a minimum
of 4 and a maximum of 8 digits.
8. Press Exit until the menu returns to the main display.
Using Remote Telephone Access
There are many reasons to use Remote Telephone Access on the SBX2, including:
•• Ease of use by users who are accustomed to making touch-tone keypad commands.
•• Crisp, clear messages, since the background noise from other equipment in a COMS room is eliminated.
•• Access to the SBX2 from any location.
Every remote access session starts with the user entering a Remote Access security code.
Interalia | SBX2 System Manual
Page 70
CHAPTER 6 |
Remote Telephone Access
Once the code has been verified by SBX2, the various activities listed on the next page can be completed by entering
the appropriate remote telephone access command. There are two ways to enter remote telephone access commands Interactive and Direct.
Commands
User Entries
Examples
Interactive
A single digit command, immediately
followed by #.
Enter 8#. The SBX2 then prompts Enter
Message Number.
Pressing # indicates the end of a
command to the SBX2. If required, the
system then prompts the user to the
next step or option, where they again
enter the command and #.
Enter the nnn #(where nnn is the message number). The SBX2 then prompts
the user to the next step or option.
The SBX2 will give the user 10 seconds
to enter the message number.
Direct
A multi-level command, immediately
followed by #.
Enter 8 nnn #(where nnn is the message number.)
The direct entry method allows
advanced users to enter commands
quickly, without waiting for a prompt
from the SBX2. Pressing # indicates
the end of a command to the SBX2.
The SBX2 then prompts the user to the
next step or option.
Note: Once a digit is pressed, additional digits must be entered within 2 seconds, or the SBX2 will automatically terminate the entry.
Pressing # at any time during an entry will terminate the entry.
Interalia | SBX2 System Manual
Page 71
CHAPTER 6 |
Remote Telephone Access
Remote Telephone Access Commands
Function
Interactive Command
Direct Command
Record Message
7#, then nnn#
7nnn#
Record Standby Message+
7#, then 0#
70#
Play Message
8#, then nnn#
8nnn#
Replace Message
9#, then nnn#
9nnn#
Delete Message
39# then nnn#
39nnn#
Delete Messages in a List Node
51# then nnn#
51nnn#
Change System Access code
1#, then 0# (administrators only)
10# (administrators only)
Change Partition Access code using
1#, then nnn# (administrators only)
1nnn# (administrators only)
System Access code*
Change Partition Access code*
1#
1#
Change Message Access code**
1#, then nnn#
1nnn#
Obtain Line Counts
2#, then xy
2xy#
Switch Partition*
-0
nnn#
Obtain line counts for all lines on a
card
2#, then x, then 0
2x0#
Clear all line counts
-
299#
Terminate Remote Access and Restart
-
00#
Disconnect
0#
0#
Change Remote Access Language
-
4z#
Change Partitions*
-
0nnn#
Turns message on
31#, then nnn#
31nnn#
Turn message off
30#, then nnn#
30nnn#
Override Enabled
-
591#
Override Disabled
-
590#
Note:
nnn =
partition, message, or access code number
x=
card number
y=
line number
z=
language number
*=
only available with partitioning enabled
** =
only available with partitioning disabled
+=
Message number ‘0’ is a temporary message (Standby Message), which can be recorded and played without affecting any other
messages. When the user decides that the temporary message is recorded properly, they can replace any message
Interalia | SBX2 System Manual
Page 72
CHAPTER 6 |
Remote Telephone Access
Working with Remote Telephone Access Messages
Users wanting to add, remove, or change a message remotely must have a good understanding of the configuration and
messages in the SBX2. The user must also know the message number associated with each message they want to work
with. This information is collected during configuration design and implementation.
To Remotely Access The SBX2
1. Dial the Remote Access telephone number.
When the SBX2 answers the line, it responds Enter Access Code.
2. Enter the appropriate Remote Access code, followed by #.
The access code entered determines the functions and options that the user is allowed access to.
The SBX2 responds Enter Command.
3. Enter the command number (see Remote Telephone Access Commands on page 72), and follow the SBX2
responses until the desired command has been completed.
Note: If an invalid command or message number is selected, the SBX2 responds with the following message:
Error - Invalid Command or Error - No or Invalid Message.
To Disconnect From The SBX2
1. Complete the command.
2. Press 0, followed by #. The SBX2 responds Done, and disconnects the line.
Note: If a remote command is not received within 30 seconds, the SBX2 automatically disconnects from the line.
To record a message remotely
1. Determine the number of the message you want to record.
2. Remotely access the SBX2. See Working with Remote Telephone Access Messages on page 73 for more
information.
3. When the SBX2 responds Enter Command, press 7.
4. Press the message number (nnn) you want to record, followed by #.
5. When the SBX2 responds with a short beep, record the message.
6. Press # to stop recording. The SBX2 responds with Message ‘nnn’ recorded.
To Play A Message Remotely
1. Determine the number of the message you want to play.
2. Remotely access the SBX2. See Working with Remote Telephone Access Messages on page 73 for more
information.
3. When the SBX2 responds Enter Command, press 8.
4. Press the message number (nnn) you want to play, followed by #. SBX2 plays the message.
5. Press # to stop playing the message.
Interalia | SBX2 System Manual
Page 73
CHAPTER 6 |
Remote Telephone Access
To Delete A Message Remotely
1. Determine the number of the message you want to delete.
2. Remotely access the SBX2. See Working with Remote Telephone Access Messages on page 73 for more
information.
3. When the SBX2 responds Enter Command, press 39.
4. Press the message number (nnn) you want to delete, followed by #.
5. The SBX2 will respond with a verbal confirmation ‘done’.
To Change The Default Language Of SBX2 System Prompts
When the SBX2 is accessed remotely, the first response it gives is always in English (Enter Access Code). The language it
responds with from that point is also English, unless the language of operation is changed to French, Spanish, German.
With single or multi-partitioned SBX2 units, each partition can be programmed to respond with a different language.
1. Remotely access the SBX2. See Working with Remote Telephone Access Messages on page 73 for more
information.
2. When the SBX2 responds Enter Command, press 4.
3. Press the number for the language you want to use, followed by #:
•• Press 1 # for English (default).
•• Press 2 # for French
•• Press 3 # for Spanish
•• Press 4 # for German
The SBX2 will now use the selected language as its default language of operation for Remote Access.
Interalia | SBX2 System Manual
Page 74
CHAPTER 7 | Upgrades & Keycodes
CHAPTER 7 | Upgrades & Keycodes
Read this chapter to understand how to perform system upgrades by entering keycodes.
In This Chapter
•• About SBX2 Keycodes on page 76
Interalia | SBX2 System Manual
Page 75
CHAPTER 7 | Upgrades & Keycodes
About SBX2 Keycodes
The SBX2 unit is designed to be upgraded on site by entering keycodes via the front panel key-pad. These keycodes are
obtained from your SBX2 dealer and are encrypted for security. To obtain a keycode, you will be required to have the serial
number of the SBX2 at hand. This can be obtained via the front panel, or from the label on the back of the unit.
Note: Follow steps 1 to 5 to obtain the serial number of your unit via the front panel.
Upgrades include additional memory and features. Visit the Interalia web site at www.interalia.com for more information on
available upgrades.
To Enter Keycodes
The front panel of the SBX2 has a simple user interface, consisting of a 2 x 16 LCD display and four key-pad button; Left,
Right, Enter & Exit.
To enter your twelve (12) character keycode you will first need to navigate to the correct screen.
1. From the main time & date screen, press the enter key.
2. You will now see the ‘Main Menu, Messages’ screen. Press the right arrow key three (3) times.
3. You are now at the ‘Main Menu, System’ screen. Press the enter key.
Interalia | SBX2 System Manual
Page 76
CHAPTER 7 | Upgrades & Keycodes
4. You are now at the ‘System, Communications’ screen. Press the right arrow key once to reach the ‘System,
Part Numbers’ screen and press the enter key.
5. This screen automatically displays the units part number and serial number
6. From this screen you will need to press the right arrow key until you reach the ‘Add feature, Press Enter’ screen. If
you have already entered any keycodes, you will need to scroll through these first before reaching the ‘Add feature...’
screen.
Interalia | SBX2 System Manual
Page 77
CHAPTER 7 | Upgrades & Keycodes
7. From the ‘Add feature, press enter’ screen you will need to press the enter key. You are now at the screen where you
will enter your keycode.
8. On this screen you will need to change the twelve (12) zeros to match the characters in your keycode. This is done by
using the left and right arrow keys to change to the required character and using the enter key to accept that character
and move on to the next.
Note: The keycodes are case sensitive. It is important to use upper or lower case characters where required. Holding down the left or right arrow key will
allow you to scroll through all available characters quickly.
9. Once you have correctly entered the keycode, the last ‘enter’ press will display a new screen that shows the keycode
has been accepted and the MOH feature has been enabled.
10. You will now need to reset the SBX2 unit for the new features to take effect. Your SBX2 unit is now ready to use the
MOH port upgrade you have purchased.
Note: To reset the unit either cycle the power or select SYSTEM > SYSTEM RESET > RESET.
Interalia | SBX2 System Manual
Page 78
CHAPTER 8 |
SBX2 Technical Specifications and Approvals
CHAPTER 8 | SBX
Technical
Specifications & Approvals
2
The Approvals information in this chapter details the standards that SBX2 conforms with.
•• Safety approvals: SBX2 compliance with safety standards.
•• Telecom approvals: SBX2 compliance with telephone network standards.
•• Emissions: SBX2 compliance with radiated and conducted emission (and immunity)
standards.
In This Chapter
•• Detailed SBX2 Technical Specifications on page 80
•• SBX2 Approvals on page 83
Interalia | SBX2 System Manual
Page 79
CHAPTER 8 |
SBX2 Technical Specifications and Approvals
Detailed SBX2 Technical Specifications
The following tables describe the technical features of the SBX2. These SBX2 features are approximate, and are subject to
change without notice.
System Specifications Technical Feature Details
Technical Feature
Physical
Unit Dimensions:
Details
•• 44H x 444W x 231D mm (1.75H x 17.5W x 9.1D inches)
Rack Space:
•• 1U
Shipping Dimensions:
•• 127H x 558W x 381 mm (5H x 22W x 15D inches)
Unit Weight:
•• 2.9 Kg (6.4 pounds)
Shipping Weight:
•• 4.3 Kg (9.4 pounds)
Power and Thermal
Power Consumption:
•• 21 Watts @ 120v
•• 18 Watts @ 240v
Heat Production:
•• 20 Watts (160 BTU/hr) maximum
Note: BTU/hr = Consumption in Watts x 3.415
Environmental
Temperature:
0°C - 40°C (32°F - 104°F) temperature range. Adequate cooling or heating
must be provided to guarantee this range.
Dust:
Do not operate in conductive dust atmospheres (i.e. coal dust, metal dust,
etc.). Do not operate in combustible dust atmospheres (i.e. saw dust, flour,
etc.).
Humidity / Moisture:
Do not operate outdoors or in conditions where condensation forms.
Atmosphere:
Do not operate in explosive atmospheres (i.e. natural gas fumes, oil based paint
fumes, etc.)
Digital Audio Core Specifications:
Encoding / Decoding:
8 bit PCM / 8 KHz sampling / μ-law (no data compression)
Frequency Response:
200 - 3400 Hz (+/- 3 dB)
Channel Capacity:
Interalia | SBX2 System Manual
•• 8 analog ports, 2 audio out ports, 1 audio in port, 1 remote port, 1 handset
port
Page 80
CHAPTER 8 |
Technical Feature
Processor Memory:
SBX2 Technical Specifications and Approvals
Details
•• 64Mbit NOR FLASH / 512Mbit SDRAM
•• NAND FLASH on memory modules
Processor Firmware:
•• Proprietary, with a Licensed Real Time Operating System (RTOS)
Real Time Clock:
•• Accuracy: 2 minutes / year
•• Back-up power duration: 2 days
Port Specifications:
Remote:
•• Compatible with global PSTN (FCC / IC / CTR-21)
•• Ring detection feature
•• DTMF detection feature
•• Loop current direction detection feature
•• Connector: RJ45
•• Impedance: Configurable (FCC / IC / CTR-21)
•• Input Level (AGC onset): -30 dBm
•• Nominal Output Level: -9 dBm
•• Loop current: 10 mA - 60 mA (limiting)
•• Off Hook Loop Voltage: 40VDC maximum
Modem:
•• Compatible with global PSTN (FCC / IC / CTR-21)
•• 56Kbps (V.90), 33.6Kbps (V.34), 14.4Kbps (V.32) + other modes
•• V.42 LAPM and MNP 2-4 error correction
•• V.42bis and MNP 5 data compression
•• Connector: RJ45
Alarm:
•• Input: contact closure or applied DC voltage up to +/-60V
•• Outputs: dry relay contacts (1 form “C” - NO/NC/COM)
•• Output contacts: 1.0 A @ 30V / 0.5A @ 60V (60V maximum)
•• Input current: 5 mA @ 60V (maximum)
Serial Port
•• Type: RS-232 Transmit and Receive data (software flow control required)
•• Data Rate: 115 Kbps (maximum)
•• Connector: DB-9 with standard pin-out
•• Input Impedance (typ): 5 KΩ
•• Input Voltage (low): -15 V to +1.2 V
•• Input Voltage (high): +1.5 V to +15 V
•• Output Voltage Swing (typ): +/- 5.4 V into 3 KΩ
•• Protection (ESD): +/- 15KV Human Body
•• +/- 15KV IEC1000-4-2 Air Discharge
Network 1 Port:
•• Type: 10/100BaseTX Ethernet
•• IEEE 802.3 compliant
•• Connector: RJ-45 connector (“Network 1”) with standard pin-out
•• Impedance: 100Ω / matched for Category 5 UTP cable
•• Protection: 1500 V RMS Hipot
•• 2000 W / 100 A 8/20μs pulse
Interalia | SBX2 System Manual
Page 81
CHAPTER 8 |
SBX2 Technical Specifications and Approvals
Technical Feature
Network 2 Port:
Details
•• Reserved for future applications, non operational
Analog Ports
Connector:
•• RJ45
Output Level:
•• -15 dBm / -9 dBm (high volume)
Impedance:
•• Configurable (FCC / IC / CTR-21)
Loop current:
•• 10 mA - 60 mA (limiting)
Off Hook Loop Voltage:
•• 40VDC maximum
Control Relay Current:
•• 100 mA maximum (60 VDC maximum)
Start Input (Voltage Sense):
•• 10 mA at 48 VDC (60 VDC maximum)
Start Input (Contact Closure):
•• 5 mA (maximum)
Ringer Equivalence Number (REN)
•• 0.34
Music on Hold (MOH) Ports
Connectors:
•• RCA “phono” jacks
Input Impedance:
•• 10 KΩ nominal
Input level (AGC onset):
•• -30 dBm (note: POTS / CO compatible)
Output Impedance:
•• 600 Ω
Output Level:
•• User configurable: -15, -9, +9 dBm (600 Ω)
Interalia | SBX2 System Manual
Page 82
CHAPTER 8 |
SBX2 Technical Specifications and Approvals
SBX2 Approvals
The following approvals information details the North American and European Information Technology Equipment (ITE)
standards with which the SBX2 conforms:
•• Safety Approvals: SBX2 compliance with safety standards.
•• Telecom Approvals: SBX2 compliance with telephone network standards.
•• Emissions Approvals: SBX2 compliance with radiated and conducted emission (and immunity) standards.
Safety Approvals
CSA C22.2 No 60950 - 01 Safety: ........................................................Information Technology Equipment (Canada)
UL 60950 - 01 Safety:.................................................................................. Information Technology Equipment (US)
IEC 60950 - 3rd Edition Safety: ................................................................... Information Technology Equipment (CE)
AS/NZS 60950 Safety: ............................................... Information Technology Equipment (Australia / New Zealand)
Telecom Approvals
Industry Canada (IC) CS-03....................................................................... Terminal Equipment Standard (Canada) *
47 CFR Part 68 ................................................................................................... Terminal Equipment Standard (US)
ESTI TS 103 021 (TBR 21) ................................................................................. Terminal Equipment Standard (CE)
AS/ACIF S002 ............................................................................................ Terminal Equipment Standard (Australia)
Emissions Approvals
FCC Part 15 .......................................................................................Radiated Emissions - Class A (North America)
FCC Part 15 ....................................................................................Conducted Emissions - Class A (North America)
EN550221: ..............................................................................................1998 Radiated Emissions - Class A (CE) **
EN550221: ...........................................................................................1998 Conducted Emissions - Class A (CE) **
EN61000-3-2 ...................................................................................................................... Harmonics - Class A (CE)
EN61000-3-3 ............................................................................................................................................Flicker (CE)
EN61000-4 ...........................................................................................................................................Immunity (CE)
AS/NZS CISPR 22 .............................................................................Radiated Emissions (Australia / New Zealand)
AS/NZS CISPR 22 ..........................................................................Conducted Emissions (Australia / New Zealand)
* The abbreviation “IC” before the registration number signifies that registration was performed based on a Declaration of Conformity indicating that
Industry Canada technical specifications were met. It does not imply that Industry Canada approved the equipment.
** This is a Class A product compatible with commercial/industrial environments. In a domestic environment, this product may cause radio interference
that the user may be required to take adequate measures to control.
Interalia | SBX2 System Manual
Page 83