1
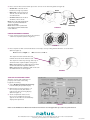
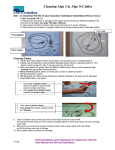
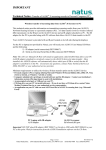
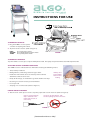
INSTRUCTIONS FOR USE
TURNING ON THE DEVICE
1. Plug the ALGO 3 screener power
cord into a hospital grade outlet.
2. To power on the screener: (Refer to Figure 1).
FIRST:
SECOND:
THIRD:
Press main power switch
Press laptop computer power switch
Press printer power switch
FIGURE 1
TURNING OFF THE DEVICE
To power off the screener, press only the main power switch. The laptop and printer will be automatically turned off.
SELECTING OPTIMAL SCREENING CONDITIONS
The ALGO screener is indicated for use with babies meeting the following criteria:
• Term, healthy newborns
• NICU graduates, 34 weeks gestational age or older
• Newborns with normal outer ear anatomy and no obvious
deformities of the head or neck
A baby is best
screened after
his/her recent
feeding
• Ready for discharge, or scheduled to go home within a few days
• Receiving no central nervous system stimulants
• In an open crib
FIGURE 2
• Sleeping or in a relaxed state (Refer to Figure 2)
PROPER SENSOR PLACEMENT
1. Attach sensor cable clips to sensors: clip onto purple tab section of sensors (Refer to Figure 3)
Correct clip attachment:
Clip is attached to the
purple tab portion of
sensor only.
Incorrect clip attachment: Clip
touches hydrogel portion of sensor.
FIGURE 3
[Continued on Reverse Side]
2. Place sensors with colored cable clips to the correct site on the baby (Refer to Figure 4):
• Vertex site: centered on the
forehead, as high as possible.
Vertex
Black Clip
• Nape site: centered on back
of neck, not on skull and not
on infant’s back.
• Common site: back of either
shoulder, not on cheek.
Note: Ensure the tab portion of all
sensors are pointed towards the
same side of baby.
Note: Hold sensors in place for a
few seconds to warm and activate
sensor adhesive.
Nape
White Clip
Common
Green Clip
FIGURE 4
PROPER EARPHONE PLACEMENT
1. Insert colored acoustic transducers of earphone
cable into earphones (Refer to Figure 5)
FIGURE 5
2. Place earphones with colored transducers over baby’s ears by rolling from behind the ear to the front
(Refer to Figure 6).
Red transducer: Right ear
Blue transducer: Left ear
The earphone tab should be directed
towards the back of the infant’s head.
The earphone cable may emerge either up or
down from the earphone (Refer to Figure 6)
or
Note: Hold earphones in place for a few seconds
to warm and activate earphone adhesive.
Note: Removal of the earphones and sensors can
be aided with the use of wet gauze.
FIGURE 6
STARTING THE HEARING SCREEN
After the sensors and earphones are
properly connected to the baby,
begin the screening:
1. Select Begin Screening (press F1 key)
from the Baby Preparation display.
2. Monitor the screening progress. As
the screen proceeds, the status is
indicated on the Screening display
(Refer to Figure 7).
3. At the completion of the screen,
the “Screen completed” message
appears and results are automatically
displayed and printed.
FIGURE 7
Refer to the ALGO 3 User Manual for further information and all applicable precautionary information.
1501 Industrial Road • San Carlos, CA 94070 • +1 650-802-0400, 800-255-3901 • Fax:+1 650-802-0401
[email protected] • www.natus.com
P/N 051722A