1
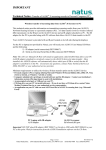
IMPORTANT
Technical Notice- Installing EchoLink™II to Personal Computer (PC)
This technical notice provides information on installing EchoLink II onto a personal computer
(PC). Also provided are brief instructions for transmitting screening results from your Natus
Newborn Hearing Screener to EchoLink II on PC. Please refer to the Help file contained within
the EchoLink II program for complete explanation of all functions.
EchoLink II is a data management program that allows you to visualize and organize your
hearing screening results. Allowing the accumulation of results from multiple hearing screening
devices, EchoLink II runs on a separate computer (not supplied) to allow for features such as
patient or test searching, printing, and various exporting functionalities.
Contents:
Part I – Installation instructions for EchoLink II program
Part II – Installation of USB-to-Serial adaptor driver
Part III – Using Infrared adaptor directly connected to PC
Part IV – Data Transfer Instructions for ALGO 3
Part V – Data Transfer Instructions for ALGO 3i
Part VI – Data Transfer Instructions for Echo-Screen
Note: Part II is required only for ALGO 3i and Echo-Screen if your PC has no free serial port and
requires a USB port for your USB-to-Serial Adaptor to connect your Infrared adaptor.
Dependent on the availability of free serial or USB ports, you have the choice of the following
installation options:
For ALGO 3,
Using EchoLink II by saving data on external media, see
Part I – Installation of EchoLink II, and
Part IV – Data Transfer Instructions for ALGO 3
For ALGO 3i,
Using EchoLink II via Infrared adaptor directly connected to PC, see
Part I – Installation of EchoLink II,
Part III – Using Infrared adaptor directly connected to PC, and
Part V – Data Transfer Instructions for ALGO 3i
Using EchoLink II via Infrared adaptor connected to USB-Serial adaptor, see
Part I – Installation of EchoLink II,
Part II – Installation of USB-to-Serial Adaptor
Part V – Data Transfer Instructions for ALGO 3i
For Echo-Screen,
Using EchoLink II via Infrared adaptor directly connected to PC, see
Part I – Installation of EchoLink II, and
Part III – Using Infrared adaptor directly connected to PC, and
Part VI – Data Transfer Instructions for Echo-Screen
Using EchoLink II via Infrared adaptor connected to USB-to-Serial adaptor, see
Page 1 of 17
Natus Medical Inc. 1501 Industrial Road, San Carlos, CA 94070 USA
P/N 051815A
(650) 802-0400 Fax: (650) 802-0401
IMPORTANT
Technical Notice- Installing EchoLink™II to Personal Computer (PC)
Part I – Installation of EchoLink II,
Part II – Installation of USB-to-Serial Adaptor
Part VI – Data Transfer Instructions for Echo-Screen
Using EchoLink II via Serial to Serial cable, see
Part I – Installation of EchoLink II, and
Part VI – Data Transfer Instructions for Echo-Screen
Using EchoLink II via USB-to-Serial connector to Serial to Serial cable, see
Part I – Installation of EchoLink II, and
Part II – Installation of USB-to-Serial Adaptor
Part VI – Data Transfer Instructions for Echo-Screen
If you have any questions, contact Natus Technical Service at (888) 496-2887 or your
authorized service provider.
Part I
Installation instructions for EchoLink II program
Insert the EchoLink II installation CD-Rom into the CD-Rom drive of your personal computer.
The Installation CD is set to autorun upon insertion into your PC. After placing the CD in the
drive, the following message should appear:
If it does not, please determine what directory (C, D, E, or F) the CD-Rom drive is listed as.
It is commonly listed as the E:drive. Open the CD-Rom drive on your PC (commonly the E:
Disc) where the CD-Rom resides by double-clicking on the E: Disc icon titled EchoLink II.
See following picture (arrow points to CD-Rom).
Within EchoLink II disk, browse to EchoLink-setup.exe and double-click on the Setup icon:
Page 2 of 17
Natus Medical Inc. 1501 Industrial Road, San Carlos, CA 94070 USA
P/N 051815A
(650) 802-0400 Fax: (650) 802-0401
IMPORTANT
Technical Notice- Installing EchoLink™II to Personal Computer (PC)
This message will appear:
Click “Yes” to start the installation. In the next window, select the setup language
and press OK.
Page 3 of 17
Natus Medical Inc. 1501 Industrial Road, San Carlos, CA 94070 USA
P/N 051815A
(650) 802-0400 Fax: (650) 802-0401
IMPORTANT
Technical Notice- Installing EchoLink™II to Personal Computer (PC)
Follow the instructions from the Setup Wizard to complete the installation.
Page 4 of 17
Natus Medical Inc. 1501 Industrial Road, San Carlos, CA 94070 USA
P/N 051815A
(650) 802-0400 Fax: (650) 802-0401
IMPORTANT
Technical Notice- Installing EchoLink™II to Personal Computer (PC)
Part II
Installation of USB-to-Serial Adaptor driver
For the PC or laptop (not provided by Natus), you will need your EchoLink II installation CDRom and the following:
1) For ALGO3i:
IR adapter (REF 900617)
For Echo-Screen:
IR adapter (REF 900727)
and additionally, in case your PC does not have a serial connector, but has USB ports:
2) Serial-to-Universal Serial Bus (USB) connector (REF 900624)
Serial to USB connector drivers installed. Drivers will need to be installed as
described in the following paragraph.
Important! Prior to installing software, ensure that the personal computer is utilizing Microsoft
Windows 98 Second Edition (SE), Windows 2000, Windows ME, or Windows XP.
Important! When attaching hardware or installing software, contact your institution’s IS
department to assist in the installation. As part of hospital IS security measures, personnel other
than IS technicians may not have access privileges to install the software or hardware in
question.
Note: Prior to utilizing the EchoLink II installation CD-Rom for this installation, it is often
required that you utilize the administrative access privileges for the PC where the installation will
occur.
During the installation process an administrative password may be requested, if you have not
logged in as an IS administrator prior to the installation process.
Important! Use only the IR adaptors specific to your screening device provided by Natus. For
ALGO 3i use IR adapter (REF 900617) and for Echo-Screen use IR adapter (REF 900727). The
IR adaptors are not interchangeable.
Other IR adaptors than mentioned above may function improperly or may not transfer data at
all. Natus is not responsible for incorrect data transfer if other IR adaptors are utilized.
a) To connect the IR adaptor to the PC using the USB port, you must use the Serial-to-USB
connector cable (REF 900624) and the correct IR adaptor cable.
b) Attach the Serial-to-USB connector cable to the IR adaptor cable. Tighten the cables using
the thumbscrews on the IR adaptor cable. See the following picture (example with IR
adaptor cable for ALGO 3i):
Page 5 of 17
Natus Medical Inc. 1501 Industrial Road, San Carlos, CA 94070 USA
P/N 051815A
(650) 802-0400 Fax: (650) 802-0401
IMPORTANT
Technical Notice- Installing EchoLink™II to Personal Computer (PC)
IR Adapter Cable (REF 900617) connected to
Serial-to-USB Connecter Cable (REF 900624), with IR Port (arrow A) and USB Connection (arrow B)
c) Locate the PC’s USB port. Insert the USB connector of the Serial-to-USB cable into the
PC’s USB port.
d) Press the OK button on the message box on the PC.
e) PCs using Windows 2000 and XP may automatically recognize the USB cable and install
the necessary driver or the following window will appear:
Select the “Next” button.
Page 6 of 17
Natus Medical Inc. 1501 Industrial Road, San Carlos, CA 94070 USA
P/N 051815A
(650) 802-0400 Fax: (650) 802-0401
IMPORTANT
Technical Notice- Installing EchoLink™II to Personal Computer (PC)
PCs using Windows 98 SE and ME will not automatically recognize the USB cable. If your
PC is using one of these operating systems, you may receive the following screen:
Note: The filename and source directory for which your PC is searching for and from will
vary from PC to PC, and therefore may not match the above example, but the following
steps will still correctly install the USB cable.
To correctly install the USB cable, you will need to click on “Browse…”
a) A “Locate File” Screen will appear. Select your CD drive which will appear similar to
where “Z” is the letter associated with your drive.
b) Select the EchoLink II icon.
Page 7 of 17
Natus Medical Inc. 1501 Industrial Road, San Carlos, CA 94070 USA
P/N 051815A
(650) 802-0400 Fax: (650) 802-0401
IMPORTANT
Technical Notice- Installing EchoLink™II to Personal Computer (PC)
c) Select the USB to Serial drivers folder
d) Once inside the “USB to Serial drivers” folder, select:
a. “Win2k-XP” for Windows XP or Windows 2000
b. “Win98-ME” for Windows 98 or Windows ME
Page 8 of 17
Natus Medical Inc. 1501 Industrial Road, San Carlos, CA 94070 USA
P/N 051815A
(650) 802-0400 Fax: (650) 802-0401
IMPORTANT
Technical Notice- Installing EchoLink™II to Personal Computer (PC)
e) Once inside the USB folder, the appropriate file will be selected. Click “Open”. A
confirmation screen will follow; click “Install Driver”. Your operating system will now
recognize the Serial-to-USB cable.
1. Eject the EchoLink II installation CD-Rom and store in a safe place.
2. For PCs with Windows 98 SE or Windows ME, restart (reboot) your computer with the IR
cable attached. This will correctly configure your computer to use the IR cable.
For PCs with Windows 2000 or Windows XP, you may immediately begin using the attached
IR cable.
Note: For Windows XP users, on several occasions during the installation you may
encounter the following message:
Page 9 of 17
Natus Medical Inc. 1501 Industrial Road, San Carlos, CA 94070 USA
P/N 051815A
(650) 802-0400 Fax: (650) 802-0401
IMPORTANT
Technical Notice- Installing EchoLink™II to Personal Computer (PC)
Contact your hospital’s IS department if you have questions or concerns. Per the
manufacturer’s recommendation*, press the “Continue Anyway” button to proceed with
the installation. To discontinue the installation, press the “Stop Installation” button.
If the ATEN USB to Serial Cable is not installed, you will not be able to transfer
screening records via USB to your PC.
*Found in ATEN USB to Serial Cable manufacturer’s driver installation instructions.
Part III
Using Infrared adaptor directly connected to PC
To connect the IR adapter to the PC, use only the IR adaptor cables specific to your screener.
See the following picture (example IR adaptor cable for ALGO 3i):
IR Adapter Cable (REF 900617) with Sub-D Connection (arrow A) and IR Port (arrow B)
Locate the PC’s serial port. Insert the IR adapter cable and tighten using the thumbscrews.
Page 10 of 17
Natus Medical Inc. 1501 Industrial Road, San Carlos, CA 94070 USA
P/N 051815A
(650) 802-0400 Fax: (650) 802-0401
IMPORTANT
Technical Notice- Installing EchoLink™II to Personal Computer (PC)
Part IV
Data Transfer instructions for ALGO 3
Important! Do not attempt to install EchoLink II on your ALGO 3 Hearing Screener.
The ALGO 3 allows you to retrieve and export records based on your search criteria of date of
screen, Medical Record Number, or Patient Name.
See ALGO 3 Newborn Hearing Screener User Manual Section 5 – Using ALGO DataBook®
NHS Data Tracking System (Software) for complete instructions.
Within DataBook on ALGO 3 Hearing Screener, select Start New Search.
From within search window, choose criteria to search records and press Continue.
Save records found as search results onto media within ALGO 3 Hearing Screener.
Note: You should save the file containing your records with an individualized file name differing
from other previously saved files to avoid confusion with other files.
Choose “Tab Delimited (2e Color)” as the data format for proper import into EchoLink II.
Eject the media from ALGO 3 and move media to a PC running EchoLink II.
From within EchoLink II, select File > Open or click on the Open File icon.
Within the Open dialog, under Files of Type, select ALGO File.
Page 11 of 17
Natus Medical Inc. 1501 Industrial Road, San Carlos, CA 94070 USA
P/N 051815A
(650) 802-0400 Fax: (650) 802-0401
IMPORTANT
Technical Notice- Installing EchoLink™II to Personal Computer (PC)
Browse to the file on the drive that you wish to import into EchoLink II and click Open.
EchoLink II will populate with the exported results from the ALGO 3 records.
Part V
Data Transfer instructions for ALGO 3i
Important! Do not connect or disconnect the battery charger to the ALGO 3i screener during
data export to a PC. This may cause an interruption in the data transfer process requiring the
data to be exported again.
Important! If your PC or laptop computer has a built-in IR port, ensure that this port is covered
or is beyond the proximity (e.g., other side of the computer) of the path between the ALGO 3i
device and the IR adapter. A computer’s built-in IR port may interrupt the transfer of screening
data.
Warning! When exporting ALGO 3i data to a PC, transmit the data outside of the
immediate patient care area.
The ALGO 3i screener allows you to export all, or any subset of the records stored in the device
to a personal computer (PC). Your ALGO 3i Screener is provided with an IR port located on its
left side (facing the display), along with an IR adaptor cable for your PC.
Please refer to the ALGO 3i User Manual Section VII: Data Management for complete
instructions.
Page 12 of 17
Natus Medical Inc. 1501 Industrial Road, San Carlos, CA 94070 USA
P/N 051815A
(650) 802-0400 Fax: (650) 802-0401
IMPORTANT
Technical Notice- Installing EchoLink™II to Personal Computer (PC)
PC Laptop with IR adaptor
A) IR adaptor
ALGO 3i screener
B) Infrared (IR) port
Note: For proper transfer of data, insure that the IR ports of both personal computer IR adaptor
and ALGO 3i device are
a) facing toward each other, b) unobstructed by objects, c) at least 6 inches (15 cm) apart.
It is recommended that the IR ports be no more than 2 feet (61 cm) apart.
1. Within EchoLink II, select Edit > ALGO 3iÆ PC or click the “ALGO 3i Æ to PC” icon
on the EchoLink II toolbar.
EchoLink II will now display a message:
2. Power on the ALGO 3i device by sliding the power switch (if the device has not been
powered on already).
3. On the ALGO 3i screener, select the Data Management function using the “Up/Down”
arrow button. Press the “OK” button.
Page 13 of 17
Natus Medical Inc. 1501 Industrial Road, San Carlos, CA 94070 USA
P/N 051815A
(650) 802-0400 Fax: (650) 802-0401
IMPORTANT
Technical Notice- Installing EchoLink™II to Personal Computer (PC)
4. Select the records to be transferred to PC. For instructions on selecting records, refer to
the ALGO 3i user manual: VII. Data Management: To select records.
5. Use the “Up/Down” button on the ALGO 3i device to select Export Selected Records or
to select Export All Records. Press the “OK” button. One of the following messages
appears to confirm exporting “Records stored: XXX, Export all of the records?” or
“Records Selected: YY, Export the selected records?” The XXX is the total number of
records stored and YY is the total number of records selected.
6. Select Tab-Delimited Format for export format and press OK:
Page 14 of 17
Natus Medical Inc. 1501 Industrial Road, San Carlos, CA 94070 USA
P/N 051815A
(650) 802-0400 Fax: (650) 802-0401
IMPORTANT
Technical Notice- Installing EchoLink™II to Personal Computer (PC)
7. The following dialog box appears on the PC to indicate that the data export is in
progress:
Note: This process can take approximately 5 minutes.
Upon successful data transfer, the A3i will display a message confirming transfer.
If you receive an error message on either the PC or the ALGO 3i device during the data
transfer process, proceed to Step 9.
8. On the ALGO 3i device, in the “Review/Select Records” section of the Data
Management function, exported screening records display a
symbol next to the
record. See arrow in figure:
Note: If the PC dialog box (showing a successful data transfer) does not appear, this
indicates that the selected screening records were not exported to the PC; however, the
ALGO 3i device will still mark the screening records as exported ( next to the record).
9. If data transmission is interrupted during the export process, the following message will
appear on your personal computer.
The ALGO 3i screener will correspondingly display a message window “Error Detected.
Error exporting records: No records exported. Please try again.”
Page 15 of 17
Natus Medical Inc. 1501 Industrial Road, San Carlos, CA 94070 USA
P/N 051815A
(650) 802-0400 Fax: (650) 802-0401
IMPORTANT
Technical Notice- Installing EchoLink™II to Personal Computer (PC)
Note: The ALGO 3i screener will not mark the records as exported if the above error
message appears; however, the screening records will still be selected, allowing you to
attempt the data export again.
To restart the data export process, repeat previous steps 1-8.
Part VI
Data Transfer instructions for Echo-Screen
Note: If patients have been entered manually (by using the keypad on the Echo-Screen), these
patients will be added to the current patient list when uploading to EchoLink II.
Note: If you have downloaded patients from a patient list in EchoLink II and you upload the
same patients back into EchoLink II after performing your test(s), the patient list will be
overwritten with the new data if you are using the same file for upload and download.
Note: If you have used one patient file to download patients to the Echo-Screen screener and
you upload the patients when a new EchoLink II file is open, the patients in the Echo-Screen
device will be added to the new patient list.
Note: Data can be transferred either by the Infrared port or by the Serial Port (via cable). Before
initiating a transfer of data, EchoLink II requires you to specify the COM port to which you have
connected the IR adaptor, the USB-to-serial Adaptor or the Serial Data Transfer Cable.
Information on COM ports can be found in the device manager of your operating system. In
case you are using the USB-to-Serial connector, search for the “ATEN USB to serial” device.
1. To set up EchoLink II for data transfer with Echo-Screen, start EchoLink II, go to the
“Settings” menu and select “Options”.
The following window appears:
Page 16 of 17
Natus Medical Inc. 1501 Industrial Road, San Carlos, CA 94070 USA
P/N 051815A
(650) 802-0400 Fax: (650) 802-0401
IMPORTANT
Technical Notice- Installing EchoLink™II to Personal Computer (PC)
2. To set up transfer of data via infrared:
Select “Infra Red” and select the appropriate serial port, to which you have connected
the IR adaptor.
This does also apply, if you have connected the IR adaptor via the USB-to-Serial
connector.
3. To set up transfer of data using a serial cable:
Connect the serial data transfer cable (REF 900732) to your screener and to a COM port
on your PC or to the USB-to-Serial adaptor described in Part II.
Select “Serial Line” and select the appropriate COM port of your PC, to which you have
connected the serial data transfer cable.
This does also apply, if you have connected the serial data transfer cable via the USBto-Serial connector.
4. To initiate a transfer:
Within EchoLink II, select Edit > Echo-ScreenÆ PC or click the “Echo-Screen Æ PC”
icon
on the EchoLink II toolbar.
a) If using a serial cable:
The Echo-Screen will now automatically download all patient results into EchoLink II.
b) If using infrared:
On the Echo-Screen device select the Transfer / Delete option from the main Menu.
From the Transfer / Delete menu, select “Start Infrared”.
The Echo-Screen will now automatically download all patient results into EchoLink II.
Note: For proper transfer of data, insure that the IR ports of the IR adaptor and of the
EchoScreen device are
a) facing toward each other, b) unobstructed by objects, c) at least 6 inches (15 cm)
apart.
It is recommended that the IR ports be no more than 2 feet (61 cm) apart.
Page 17 of 17
Natus Medical Inc. 1501 Industrial Road, San Carlos, CA 94070 USA
P/N 051815A
(650) 802-0400 Fax: (650) 802-0401