1
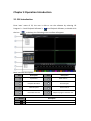
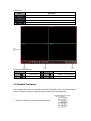
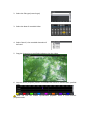
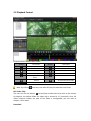
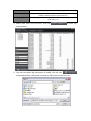
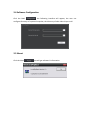
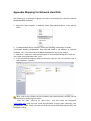
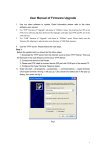
Local Playback Software
User Manual
V1.0
Index
Chapter 1 Introduction................................................................................................... 3
1.1 Overview ............................................................................................................................. 3
1.2 System Requirements.......................................................................................................... 3
Chapter 2 Install & Uninstall............................................................................................. 4
2.1 Install the Software ............................................................................................................. 4
2.2 Uninstall .............................................................................................................................. 4
Chapter 3 Operation Introduction ..................................................................................... 5
3.1 GUI introduction.................................................................................................................. 5
3.2 Playback Procedures ........................................................................................................... 6
3.2 Playback Control.................................................................................................................. 8
3.3 Log Query .......................................................................................................................... 10
3.4 Software Configuration ..................................................................................................... 12
3.5 About................................................................................................................................. 12
Appendix Mapping for Network Hard Disk........................................................................ 13
Chapter 1 Introduction
1.1 Overview
Local playback software, which is particular for managing the recorded video that
stored in hard disk of DVR, SD/SDHC card or network hard disk (NAS), by using this
software, the user is able to search and playback the video, edit the video chip and
save the specified video chip, to view the log information as well.
The contents of this manual may contain something not accurate in technology
part, and are subject to update without notice, the updated part will be included in
new version manual.
Note: please install hard disk (which is disassembled from DVR) or SD/SDHC card
to the PC before use, and it’s required to map the network hard disk to user’s PC if
needed, the user can refer to the appendix section for detail on how to do mapping.
1.2 System Requirements
OS: Windows XP or Windows2003
Display: 1024*768 resolution or above
Chapter 2 Install & Uninstall
2.1 Install the Software
Double-click on the installation file, and you will see the following dialog box.
Select ‘Next’ to continue, then input the user’s information and select
installation folder, the wizard will guide you through the process.
2.2 Uninstall
Enter ‘start’ menu of PC, select ‘All Programs’-> ‘Local Playback Software’-> ‘Uninstall
Local Playback Software’, the dialog box will shown as below, select ‘Yes’ to complete
the uninstall process.
Chapter 3 Operation Introduction
3.1 GUI introduction
Enter ‘start’ menu of PC, the user is able to run the software by selecting ‘All
Programs’-> ‘Local Playback Software’->
the icon
Local Playback Software, or double-click
in desktop, the following main interface will appear.
Main interface description:
Area
Description
Area
Description
1
System bar
2
3
Playback Windows
4
Record types
5
Calendar panel
6
Search button
7
Recorded channels
8
Hard disk list
Playback progress indicator bar
Buttons description:
Buttons
Description
Minimize the interface
Exit
System bar:
Area
Description
Playback interface
Log query interface
Configuration interface
Software version information
Playback control buttons:
Area
Description
Area
Description
Sound control
Playback control buttons
Screen divisions
Playback screen layout
3.2 Playback Procedures
The recorded files which are existed in hard disk, SD/SDHC card or network hard disk
can be viewed by using this software, please refer to the following steps:
1. Select the disk which includes recorded video
2. Select the file type (record type)
3. Select the date of recorded video
4. Select ‘Search’, the recorded channels will
be listed
5. Drag the channel to a specified window to play the video.
6. You can locate playback process via indicator bar which is marked with specified
color.
Note: the user can enable ‘Synchronous playback’ while in multi-channels
playback mode.
3.2 Playback Control
Playback control buttons description:
Buttons
Description
Buttons
Description
Open/close sound
Capture snapshot
Pause
Edit video chip
Play
Download
Stop
One screen mode
Step forward by
frame
4 screen divisions mode
Stop all
16 screen divisions mode
Speed control bar
Note: by clicking
one time, the video will play forward with one frame
Edit Video Chip:
The user can click the button
to start/stop to edit video chip while in the process
of playback, the default folder for video chip is located in C:\ channelXX, here ‘XX’
means channel number, the path of this folder is configurable, you can refer to
chapter 3.4 for detail.
Download
The user can click
to save a specified video chip while in the process of playback,
the software will prompted with following configuration dialog box, you only need to
input exact time period and click
to select folder for saving video chip, then click
to complete.
Synchronous Playback
In multi-channels playback mode, enable
will be synchronized.
, the playback process
3.3 Log Query
Click icon
to enter log query interface.
Log query:
1. Select the disk icon
2. Select major type and minor type for log query
Log Type Description
Major type log
Description
Alarm
Alarm in, alarm out, start motion detection, end motion detection,
start tempering alarm and end tempering alarm
Exception
Signal lost, illegal access, HDD full, HDD error, DCD lost, IP address
conflict, network disconnect and record error
Operation
Start up, login, playback, configure, preview, PTZ control, upgrade, time
synchronous, etc
3. Select ‘start time’ and ‘end time’, then click
to enter log
query process.
4. The user can export log information if needed, click the icon
will prompted with a dialog box as below, the file format can be txt or xls.
3.4 Software Configuration
Click the label
, the following interface will appear, the user can
configure directory of captured snapshot, the directory of edit video chip as well.
3.5 About
Click the label
, you will get software’s information.
Appendix Mapping for Network Hard Disk
The following is an example to guide you how to do mapping for network hard disk
(HIKVISION NAS products)
1. Right-click ‘My Computer’ in desktop, select ‘Map Network Drive’ in the pop up
menu.
2. In ‘Map Network Drive’ interface, enter the following information in folder:
\\192.168.1.100\dvr_hik\datadir0. Here 192.168.1.100 is the address of network
hard disk, ‘hik’ is the share name of NAS and datadir0 is one of the folders.
3. After that , input user name and password in the prompted dialog box, both the
user name and password are dvr_user.
4. If you successfully add the network hard disk, you can see the hard disk icon in
‘My Computer’ interface.
Note: one or more folders can be included in one share directory of DVR, you can
see the detail by following instruction:
Enter the ‘start’ menu of PC, select ‘Run…’ and then input the command:
\\192.168.0.100, enter the user name and password to login (user name:dvr_user,
password:dvr_user), finally, you will see all of the shared hard disk that for DVR, and
the folder as well.