1
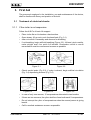
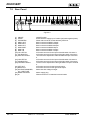
DISCOVERY User Manual Manufactured by Italy File Name: capitoli_en.p65 Version: 2.1 Date: 27/11/2003 Revision History Version Date Reason 2.1 27/11/2003 New Version Editor J. berti DISCOVERY - User Manual Version 2.1 © Copyright 1999-2003 R.V.R. Elettronica SpA Via del Fonditore 2/2c - 40138 - Bologna (Italia) Telefono: +39 051 6010506 Fax: +39 051 6011104 Email: [email protected] Web: www.rvr.it All rights reserved Printed and bound in Italy. No part of this manual may be reproduced, memorized or transmitted in any form or by any means, electronic or mechanic, including photocopying, recording or by any information storage and retrieval system, without written permission of the copyright owner. DISCOVERY Table of Contents 1. 2. 3. 3.1 3.2 4. 5. 5.1 5.2 5.3 6. 6.1 6.2 6.3 7. 7.1 7.2 7.3 8. 8.1 8.2 9. 10. 10.1 10.2 10.3 10.4 10.5 10.6 10.7 10.8 10.9 11. 11.1 11.2 Preliminary Instructions Warranty First Aid Treatment of electrical shocks Treatment of electrical Burns General Description Menù Menù Detect Priority Menu Times and Levels: "Var" Menu Operation Heading Operations Trasferimento dati da P.C. alla CPU-SWITCH External description Front Panel Rear Panel Connectors Description Technical Specification Dimensional and Environmental Specifications Electrical Specifications Principles of Functioning Setting and Impostation 1L Channel Input Level Selection 2L Channel Input Level Selection MPX-1 Channel Input Level Selection MPX-2 Channel Input Level Selection MPX-M Channel Input Level Selection Digital Inputs Polarity Selection (Switch) MPX Channels S/N Control Selection MPX Channel Stereo Detection Control Selection MPX Channel 50ms/75ms De-Emphasis Selection References Meant of the LED Legenda of the states of the software Appendix: Component layouts, schematics, bills of material User Manual Rev. 2.1 - 27/11/03 1 3 5 5 6 7 9 9 10 11 17 17 17 18 21 21 22 23 25 25 25 27 31 31 32 34 34 35 36 37 38 39 41 41 43 i DISCOVERY This page was intentionally left blank ii Rev. 2.1 - 27/11/03 User Manual DISCOVERY 1. Preliminary Instructions This manual is written as a general guide for those having previous knowledge and experience with this kind of equipment, well conscious of the risks connected with the operation of electrical equipment. It is not intended to contain a complete statement of all safety rules which should be observed by personnel in using this or other electronic equipment. The installation, use and maintenance of this piece of equipment involve risks both for the personnel performing them and for the device itself, that shall be used only by trained personnel. R.V.R. Elettronica SpA doesn’t assume responsibility for injury or damage resulting from improper procedures or practices by untrained/unqualified personnel in the handling of this unit. Please observe all local codes and fire protection standards in the operations of this unit. WARNING: always disconnect power before opening covers or removing any part of this unit. Use appropriate grounding procedures to short out capacitors and high voltage points before servicing. WARNING: this device can irradiate radio frequency waves, and if it’s not installed following the instructions contained in the manual and local regulations it could generate interferences in radio communications. This is a "CLASS A" equipment. In a residential place this equipment can cause hash. In this case can be requested to user to take the necessary measures. R.V.R. Elettronica SpA reserves the right to modify the design and/or the technical specifications of the product and this manual without notice. User Manual Rev. 2.1 - 27/11/03 1 / 44 DISCOVERY This page was intentionally left blank 2 / 44 Rev. 2.1 - 27/11/03 User Manual DISCOVERY 2. Warranty Any product of R.V.R. Elettronica is covered by a 24 (twentyfour) month warranty. For components like tubes for power amplifiers, the original manufacturer’s warranty applies. R.V.R. Elettronica SpA extends to the original end-user purchaser all manufacturers warranties which are transferrable and all claims are to be made directly to R.V.R. per indicated procedures. Warranty shall not include: 1 danni verificatisi durante la spedizione della macchina alla R.V.R. per eventuali riparazioni; 2 Any unauthorized repair/modification; 3 Incidental/consequential damages as a result of any defect 4 Nominal non-incidental defects 5 Re-shipment costs or insurance of the unit or replacement units/parts Any damage to the goods must be reported to the carrier in writing on the shipment receipt. Any discrepancy or damage discovered subsequent to delivery, shall be reported to R.V.R. Elettronica within 5 (five) days from delivery date. To claim your rights under this warranty, you shold follow this procedure: 1 Contact the dealer or distributor where you purchased the unit. Describe the problem and, so that a possible easy solution can be detected. Dealers and Distributors are supplied with all the information about problems that may occur and usually they can repair the unit quicker than what the manufacturer could do. Very often installing errors are discovered by dealers. 2 If your dealer cannot help you, contact R.V.R. Elettronica and explain the problem. If it is decided to return the unit to the factory, R.V.R. Elettronica will mail you a regular authorization with all the necessary instructions to send back the goods. 3 When you receive the authorization, you can return the unit. Pack it carefully for the shipment, preferably using the original packing and seal the package perfectly. The customer always assumes the risks of loss (i.e., R.V.R. is never responsible for damage or loss), until the package reaches R.V.R. premises. For this reason, we suggest you to insure the goods for the whole value. Shipment must be effected C.I.F. (PREPAID) to the address specified by R.V.R.’s service manager on the authorization DO NOT RETURN UNITS WITHOUT OUR AUTHORIZATION AS THEY WILL BE REFUSED User Manual Rev. 2.1 - 27/11/03 3 / 44 DISCOVERY 4 Be sure to enclose a written technical report where mention all the problems found and a copy of your original invoice establishing the starting date of the warranty. Replacement and warranty parts may be ordered from the following address. Be sure to include the equipment model and serial number as well as part description and part number. R.V.R. Elettronica SpA Via del Fonditore, 2/2c 40138 BOLOGNA ITALY Tel. +39 051 6010506 4 / 44 Rev. 2.1 - 27/11/03 User Manual DISCOVERY 3. First Aid The personnel employed in the installation, use and maintenance of the device, shall be familiar with theory and practice of first aid.. 3.1 3.1.1 Treatment of electrical shocks If the victim is not responsive Follow the A-B-C's of basic life support • Place victim flat on his backon a hard surface. • Open airway: lift up neck, push forehead back (Fig. 3-1). • clear out mouth if necessary and observe for breathing • if not breathing, begin artificial breathing (Figure 3-2): tilt head, pinch nostrils, make airtight seal, four quick full breaths. Remember mouth to mouth resuscitation must be commenced as soon as possible Figure 3-1 • Figure 3-2 Check carotid pulse (Fig 3-3); if pulse is absent, begin artificial circulation (Fig. 3-4) depressing sternum (Fig. 3-5) Figure 3-3 Figure 3-4 Figure 3-5 • In case of only one rescuer, 15 compressions alternated to two breaths. • If there are two rescuers, the rythm shall be of one brath each 5 compressions. • Do not interrupt the rythm of compressions when the second person is giving breath. • Call for medical assistance as soon as possible. User Manual Rev. 2.1 - 27/11/03 5 / 44 DISCOVERY 3.1.2 3.2 3.2.1 If victim is responsive Keep them warm Keep them as quiet as possible Loosen their clothing (a reclining position is recommended) Call for medical help as soon as possible Treatment of electrical Burns Extensive burned and broken skin Cover area with clean sheet or cloth Do not break blisters, remove tissue, remove adhered particles of clothing, or apply any salve or ointment. Treat victim for shock as required. Arrange transportation to a hospital as quickly as possible. If arms or legs are affected keep them elevated If medical help will not be available within an hour and the victim is conscious and not vomiting, give him a weak solution of salt and soda: 1 level teaspoonful of salt and 1/2 level teaspoonful of baking soda to each quart of water (neither hot or cold). Allow victim to sip slowly about 4 ounces (half a glass) over a period of 15 minutes. Discontinue fluid if vomiting occurs DO NOT give alcohol 3.2.2 6 / 44 Less severe burns • Apply cool (not ice cold) compresses using the cleansed available cloth article. Do not break blisters, remove tissue, remove adhered particles of clothing, or apply salve or ointment. Apply clean dry dressing if necessary. Treat victim for shock as required. Arrange transportation to a hospital as quickly as possible If arms or legs are affected keep them elevated. Rev. 2.1 - 27/11/03 User Manual DISCOVERY 4. General Description The Discovery control unit is an appliance that allows providing for audio black outs. If positioned in series with the transmitting appliance, it allows automatically selecting the alternate audio in case of failures or damages to the main signal. This appliance is extremely useful for those systems where one or more satellite receivers combined with an already existing terrestrial backbone are used. The reception by satellite offers excellent technical advantages, but is vulnerable during summer storms. When these meteorological conditions occur, the high flow of rain screens the radio carrier coming from the satellite, making the audio signal unavailable, and the blackout time changes from five to twenty minutes on average. Discovery allows automatically changing over, according to the priorities entered, up to four audio channels, two of which are composite (MPX) and two stereo. The automatism is based on the detection of the selected channel functionality. Operation times for the several detection modes and reset times may be programmed. In case of analog detection, operation thresholds may be programmed as well. All operative parameters of Discovery may be downloaded/loaded by PC or changed by display and keyboard installed on the appliance front panel. It is possible to lock the operative configuration of Discovery by means of the software from PC; in such situation, data may only be examined, but not changed. The monitoring circuit of Discovery was designed with the always-present "Fault tolerance" concept; therefore, if the network fuse breaks down, the channel defined as primary channel does not cuts off. Other solutions have been adopted and will be described further on, in this manual. User Manual Rev. 2.1 - 27/11/03 7 / 44 DISCOVERY This page was intentionally left blank 8 / 44 Rev. 2.1 - 27/11/03 User Manual DISCOVERY 5. Menù Once the Discovery is switched on, it comes visualized the loading display: After that appear the following main display: Press ESC to display menus. Available menus are the following ones: 5.1 5.1.1 Menù Detect Stereo channel The detecting method may be selected by means of the software. Stereo channels are available in two modes: with a hardware-type contact later defined as "Switch" and a control on the amplitude of the signal defined as "Analog". Contacts defined as Switch are equipped with a selection inside Discovery and set the polarity: ON when is OFF and vice-versa (see section on settings). All contacts are enabled to ground. To change the detection, operates as follows: 1) Position the cursor on the Detect menu and press key OK. 2) Using the arrow keys, move the menu to the channel concerned and press key OK. 3) Using arrow keys, scroll the several configurations and press key OK. 4) Press key ESC to go back to the previous menu. 5) Repeat point 2 to change another channel. More controls may be also enabled at the same time per each channel, obtaining as a result that, in case of failures, the channel will be changed over with the priority level immediately down (function Or). User Manual Rev. 2.1 - 27/11/03 9 / 44 DISCOVERY 5.1.2 MPX Channels Stereo detecting and noise signal ratio control have been added on channels defined as MPX. These signals may be disabled by means of the hardware selection. The signal defined as S/n is useful for detecting the presence of too high noise on MPX channels. The Stereo signal allows warning when the stereo sub-carrier is missing. The S/N signal does not appear as an item of the software selection menu, but is automatically combined with item ANALOG. If you do not want to enable this appliance, remove the specific jumper. All MPX channels are provided with S/n and Stereo signals and may be selected through the hardware in an independent way. To change the detection mode, operate as follows: 1) Move the cursor to the Detect menu and press key OK. 2) Using arrow keys, move the menu to the channel concerned and press key OK. 3) Using arrow keys, scroll the several configurations and press key OK. 4) Press key ESC to go back to the previous menu. 5) Repeat point 2 to change another channel. N.B.: When entering the changing menu, press key ESC to exit the changing menu, before commutating the selector from the manual to the automatic mode. Do not force this situation, otherwise the manual control is not accepted. Unused MPX or stereo input channels have to be disabled. 5.2 Priority Menu This menu allows defining the exchange priorities regardless of the input sequence of signals on XLR and BNC connectors. The lowest number has the priority; for instance, if channel 2 is assigned priority 1 and channel 1 is assigned priority 2, the channel destined to the output is number two. To change the detection mode, operate as follows: 1) Move the cursor to Prior menu and press key OK. 10 / 44 Rev. 2.1 - 27/11/03 User Manual DISCOVERY 2) Using arrow keys, move the menu to the channel concerned and press key OK. 3) Using arrow keys, scroll the several configurations and press key OK. 4) Press key ESC to go back to the previous menu. 5) Repeat point 2 to change another channel. The several channels: Ch. 1, Ch. 2, Mpx 1 and Mpx 2, when enabled, must be assigned the priority. The channel with higher priority must be assigned number 1; accordingly, the others will have priorities 2, 3, or 4. It is impossible to assign two channels the same priority. 5.3 Times and Levels: "Var" Menu Menu Var is made up of the following menus: start up time, analog off time, switch off time, restore time, analog low level and analog high level. 5.3.1 Start-Up Time The start-up time is enabled every time that Discovery is switched off. During such periods, no exchange move is operated. We advise you not to set this time for a period less than 15-20 seconds. The ideal condition is to set this period 2-3 seconds longer than the PLL synchronisation of the transmitting apparatus. During the start-up phase, the keyboard is disabled and the display visualises possible programmed text lines or the words "R.V.R. Elettronica". 5.3.2 Analog Off time This parameter is associated with analog level. When a signal maintains under the preset threshold in the "analog low level" field or exceeds the "Analog High level" threshold for a period of time equal to or higher than the Analog Off Time, the Discovery changes over the audio signals to the following channel defined in the menu of priorities. If the S/N control is enabled by means of the jumper, the off time is the same as the time relevant to the analogue signals. User Manual Rev. 2.1 - 27/11/03 11 / 44 DISCOVERY 5.3.3 Switch Off time This parameter is associated with contacts coming from the outside. When a contact keeps closed (or opened) for a period of time equal to or longer than the Switch Off Time, Discovery changes over the audio signal to the following channel defined in the menu of priorities. If the control on the detection of the stereo sub-carrier has been enabled by means of the jumper, the off time is the same as the commutating time associated with the on/off contacts (only MPX). 5.3.4 Restore time This feature determines the period of time during which the audio signal has to keep within the parameters to be sent again to the output stage. This time is reset if during the restore time itself, the signal is missing for a period equal to or higher than the Analog off time or Switch off time parameters. If, when the restore time is elapsed, the channel status fails, the restore timer stops at the end of the corresponding time; if the channel restores before off times elapse, it can be sent to the output stage; otherwise the restore time will be reset. 5.3.5 Analog Low Level This parameter determines the threshold level that is lower than the audio and below which the Analog Off timer is enabled. 5.3.6 Analog High Level This parameter determines the threshold level that is higher than the audio and above which the Analog Off timer is enabled. To change the detection parameters, operate as follows: 1) Move the cursor to the Var menu and press key OK. 2) Using arrow keys move the menu to the field concerned and press key OK. 3) Using arrow keys, scroll the several configurations and press key OK. 4) Press key ESC and go back to the previous menu. 5) Repeat point 2 to change another parameter. 12 / 44 Rev. 2.1 - 27/11/03 User Manual DISCOVERY Table summarising level times that may be selected The control needs for four times: Start Up Time (1 - 250 sec.). Commutating Time for Analogue Signals. (5 - 255 sec.). Commutating Time for Digital Signals. (5 - 255 sec.). Restore Time (1 - 30 min.). Minimum Level (-18 / -0.2 db). Maximum Level (+0.2 / +6 db). When even one only control on the analogue signal is enabled, also specify the minimum and maximum level it has to be performed. 5.3.7 Views: the "View" Menu During standard operation, the display visualises the analogue level of the channel that is currently sent to the output stage. When you want to check the level of a non-primary channel, you need to enter menu View and select the desired channel. Even this menu is operative only if the LED showing the manual status is ON. To change the view channel parameters, operate as follows: 1) Move the cursor to the Var menu and press key OK. 2) Using arrow keys, move the menu to the field concerned and press key OK. 3) Using arrow keys, scroll the several configurations and press key OK. 4) Press key ESC to go back to the main menu. 5) Repeat point 2 to change another parameter. User Manual Rev. 2.1 - 27/11/03 13 / 44 DISCOVERY 5.3.8 Outputs: the "Out" menu Putting the apparatus in the manual mode, it is possible to send the several connected input signals to the output stages; this is especially useful in case of maintenance operations on the station. Output stages are two. The first one is called "out to stereo coder" and allows transmitting already decoded signals. Inputs that may be selected for this type of outputs are the forthcoming ones: Chn-1, Chn-2, Mpx-1 (already decoded), Mpx-2 (already decoded) The second output allows selecting MPX channels in a composite way. Inputs that may be selected for this type of output are the following ones: Mix, Mpx-1,Mpx-2, Mpx-M Mpx-type outputs have been conveniently provided with three connectors and each one of them has been provided with a low-impedance buffer. Outputs are denominated as MPX A OUT, MPX B OUT, MPX C OUT and the output signal may be taken indifferently. The mix signal allows mixing stereo channels that are in outputs, moving them again to the MPX-type outputs. This type of device is used in case no MPX channel has been provided. The mix signal does not contain any stereophonic information. To change the channel designed for the output defined as stereo code, operate as follows: 1) Move the cursor to the Out menu and press key OK. 2) Using arrow keys, move the menu to the field concerned and press key OK. 3) Press key OK. 4) Using arrow keys, move the cursor to the input that you want to output. 5) Press key OK. 6) Repeat point 3 to change another parameter. 7) Press key ESC to go back to the previous menu. 14 / 44 Rev. 2.1 - 27/11/03 User Manual DISCOVERY To change the channel intended for the output defined as MPX, operate as follows: 1) Move the cursor to the "out to stereo coder" menu. 2) Press the DOWN arrow. 3) Press key OK. 4) Using the arrow keys, move the cursors to the input that you want to output. 5) Press key OK. 6) Repeat point 3 to change another parameter. 7) Press the UP arrow to go back to the previous menu. User Manual Rev. 2.1 - 27/11/03 15 / 44 DISCOVERY This page was intentionally left blank 16 / 44 Rev. 2.1 - 27/11/03 User Manual DISCOVERY 6. Operation 6.1 Heading At starting-up, it is possible to view on the display two 40-digits lines that will keep visible for the Start-Up time. The configuration of these lines may be changed in any moment, without having to change the microprocessor configuration. The text may only be changed by means of the PC. 6.2 Operations At start-up, the Discovery views the Heading for the Start-Up time. No check is performed during this period. Once the Start-Up time has elapsed, the Discovery starts operating in the standard mode, looking for the high priority channel and transmitting it on air. The acquisition of all inputs takes place every 50 ms and the operation is checked per enabled channel. If the control gives a negative outcome, due to one of the possible programmed causes, a (Analog Off or Digital Off) timer starts operating. If during the timer operating time, the channel restarts operating in the standard mode, the timer is set to zero; otherwise, when the time elapses, the control changes over the output to the channel with a priority level immediately higher than the operating one and gives indications (Led Switch ON). In such a situation, checks performed changes: both the new and the old channels are checked. The control on the new channel follows the rules said for the main channel; the old channel is checked and if the standard operation restarts, a (restore) timer works; if the system correctly operates until the timer elapses, a change over to the old channel (with high priority) will occur. If, during the timer operation, the old channel restore fails again and for a time longer than the time off, the timer will be reset; otherwise it will continue the previous count. When the control decides to commutate the channel, if no other is available, an indication is shown (LED Fault ON); in such conditions, it is possible to directly transmit on-air one of the composite channels, if available. In such situation, all available channels are checked and if one of them restarts operating normally, it will be commutated to the output with the same rules above as for the Switch status reset. Regardless of the control status, if the Man. Switch (or button) is enabled, the control manual operation goes on. In such situation, it is possible to change the control operation, if configured: detection method, priority and analogue levels. It is always possible to view or transmitting on air the channel you want. During the manual functioning, no check is performed. It is possible to exit the manual status by powering the switch (or button); in case a button is provided, the automatic operation may be restored, if not powered before, after 15 minutes. The control resets the condition prior to the manual operation, if no change was determined. User Manual Rev. 2.1 - 27/11/03 17 / 44 DISCOVERY When it is allowed while performing changes in Detect, Priority or Var., it is not possible to exit the Manual function until the change is ended or aborted. It is also possible to proceed with the control operation from the PC. To do it, after connecting it to the serial port, enter the order: Micro|Read, to read its configuration from control, followed by the order Micro|Test, which will display on a panel the status of inputs and outputs. For channels anyway enabled, the voltage value is also displayed on the left and right channel, also value db is visualised. The view is updated every two seconds. 6.3 Trasferimento dati da P.C. alla CPU-SWITCH To transfer operative parameters to CPU-SWITCH, previously made or loaded from file, it is required to follow the procedure below. 1) Using the manager file or my computer, click on icon Switch to run the program. 2) Make or load from files the desired parameters. 3) Switch the CPU-SWITCH off. 4) Press key <Ok> on the CPU-SWITCH. Switch it on keeping pressed the key and release the button after one second approximately. If the procedure has been complied with, the display will view the word Configuration; at this point, operate as follows: Select the Micro field or the corresponding icon. Select item Micro Write Configuration. By this last operation, data has been transferred from the PC memory to the E²prom memory of CPU-SWITCH; if the operation has been correctly performed, the Transfer Completed message will be displayed. To start the machine, after configuring the processor, switch it off and again on. During the operation, if icon Micro|Write Configuration is pressed by chance, the Eeprom write protected message or, if the control has been configured as unchangeable, the Program Running message will be displayed. Anyway, to change parameters, the procedure set forth in point [3] needs to be repeated. Only to change the Heading, it is needed to make a new one with the Configuration|Title command; subsequently, repeat points [3] and [4] above and at this point: Select item Micro|Write Title in field Micro. N.B.: When the CPU-SWITCH is started for the first time, being the programming parameters available, it automatically preset to receive data. No other operation is allowed. 18 / 44 Rev. 2.1 - 27/11/03 User Manual DISCOVERY During the normal operation of the CPU-SWITCH, the addressed assigned to the appliance may be changed, during the parameters entry phase. To do that, select Read Status from Menu Micro. This operation reads from the CPU-SWITCH the following parameters: Peripheral Talk Address. Peripheral Type. Software Version. Error/Status Code. Out to Stereo Coder. Out to Mpx. The user is allowed to change the field relevant to the Peripheral Talk Address if a new value is entered (1-127), and whereas button OK is pressed, the new value is stored in the CPU-SWITCH E²prom. N.B.: Every time the CPU-SWITCH is switched off or disconnected from RS232 when program Switch.exe runs, the following error message may be displayed: Error code 24. User Manual Rev. 2.1 - 27/11/03 19 / 44 DISCOVERY This page was intentionally left blank 20 / 44 Rev. 2.1 - 27/11/03 User Manual DISCOVERY 7. External description This chapter describe the elements of the DISCOVERY front and rear panel. 7.1 Front Panel Figure 6.1 [1] [2] [3] [4] CH1 CH2 Brightness MAN [5] CHANGE [6] FAULT [7] MPX1 [8] MPX2 [9] Display [10] AUT [11] ESC [12] LEFT/UP [13] RIGHT/DOWN [14] OK [15] RS232 User Manual LED indicating, when it lit, the measure of the level on channel CH1 LED indicating, when it lit, the measure of the level on channel CH2 Trimmer of regulation of the contrast of the display LED indicating, when it lit, the manual commutation of the channels. This operation mode allows changing operation data relevant to DISCOVERY if they have been previously enabled. When the manual LED is on, exchangers are frozen up to the automatic mode reset. LED indicating, whrn it lit, that the channel defined as priority channel is not sent to the output stage. LED indicating, when it lit, that no channel among those programmed has the required features for being sent to the output stages. In case such a situation occurs, commutating devices are disconnected and inputs definied as Fault tollerance are automatically connected to the output stages. LED indicating, when it lit, the measure of the level on channel MPX1 LED indicating, when it lit, the measure of the level on channel MPX2 LCD dIsplay. The display usually visualizes the channel sent to the output stages the display is of analogue type with scrolling bar. Two vertical small bars show the dB zero level. the display is porvided with backlighting that automatically goes off after two minutes that the keyboard is not used. Selector to change the automatic/manual mode. The selector may be of two types: stable or unstable. When the unstable model is installed, the automatic mode reset takes placed after 15 minutes. Button used to exit from a menu Button used to navigate in the menu system and to modify the changeable parameters Button used to navigate in the menu system and to modify the changeable parameters Button used to accept a parameter’s value or to enter into a menu DB9 female connector for the auxiliary data communication Rev. 2.1 - 27/11/03 21 / 44 DISCOVERY 7.2 Rear Panel Figure 6.2 [1] [2] [3] [4] [5] [6] [7] [8] [9] [10] [11] [12] ON/OFF 24VDC TELEMETRY MPX C OUT MPX B OUT MPX A OUT MPX M OUT MPX 2 IN MPX 1 IN CH1 LEFT IN CH1 RIGHT IN CH2 LEFT IN ADJ. [13] CH2 LEFT IN [14] CH2 RIGHT IN [15] CH2 RIGHT IN ADJ. [16] LEFT OUT [17] RIGHT OUT [18] VOLTAGE CHANGER, A.C. LINE FUSE [19] MAINS VOLTAGE [20] I2C 22 / 44 ON/OFF switch. External 24Vdc supply input. Positive (red) and negative (black). DB15 male connector for the telemetry functions. BNC connector for MPX C Output. BNC connector for MPX B Output. BNC connector for MPX M Output. BNC connector for MPX M Intput. BNC connector for MPX 2 Output. BNC connector for MPX 1 Output. XLR male connector for the input of the left audio of channel 1. XLR male connector for the input of the right audio of channel 1. Trimmer for the adjustment of the left audio level per of channel 2. XLR male connector for the input of the left audio of channel 2. XLR male connector for the input of the right audio of channel 2. Trimmer for the adjustment of the right audio level per of channel 2. XLR male connector for the left audio output. XLR male connector for the right audio output. Mains fuse with voltage changer. Mains supply plug DB9 connector for I2C standard communication Rev. 2.1 - 27/11/03 User Manual DISCOVERY 7.3 7.3.1 Connectors Description RS 232 Type: DB9 female 1 7.3.2 6 1 2 3 4 5 6 7 8 9 N.C. TX_D RX_D Connected together 4-7-8 GND N.C. Connected together 4-7-8 Connected together 4-7-8 N.C. Ext. Interface Type: DB16 female 1 9 User Manual 1 2 3 4 5 6 7 8 9 10 11 12 13 14 15 16 O.C. Chn-1 O.C. Chn-2 O.C. MPX-3 O.C. MPX-4 O.C. Change O.C. Fault O.C. Manual GND Switch Chn-1 Switch Chn-2 Switch MPX-3 Switch MPX-4 Switch MPX-M +15 Vdc 100mA Max +15 Vdc 100mA Max GND Rev. 2.1 - 27/11/03 23 / 44 DISCOVERY 7.3.3 I2C Type: DB9 female 1 7.3.4 6 1 2 3 4 5 6 7 8 9 N.C. SDA SCL N.C. GND N.C. N.C. N.C. N.C. Left (MONO) / Right (MPX Bal) Ttpe: XLR female 2 3 24 / 44 1 1 2 3 GND Signal (+) inphase Signal (-) return Rev. 2.1 - 27/11/03 User Manual DISCOVERY 8. Technical Specification 8.1 Dimensional and Environmental Specifications Panel size Depth Weight Working Temperature 8.2 483 mm (19.0”) x 42.5 mm (1.7”) 371.5 mm (14.6”) 7 Kg 0 °C ÷ 50 °C Electrical Specifications AC voltage AC fuse DC voltage DC fuse Absorbed power Output current CN1 PWM converters operating frequency Electromechanical contact current Microprocessor Processor clock frequency Watch-dog protection User Manual 220 Vac ±15% 1AT 24Vdc -10% ÷ +30% 2AT 10VA +15V ptc 200mA 75KHz 15mA 68HC11F1 8MHz yes Rev. 2.1 - 27/11/03 25 / 44 DISCOVERY This page was intentionally left blank 26 / 44 Rev. 2.1 - 27/11/03 User Manual DISCOVERY 9. Principles of Functioning A schematic view of the modules and connections making up the DISCOVERY is shown in figure 9.1. Figure 9.1 User Manual Rev. 2.1 - 27/11/03 27 / 44 DISCOVERY The figure 9.2 shown the exchange logics. Figure 9.2 28 / 44 Rev. 2.1 - 27/11/03 User Manual DISCOVERY The figure 9.3 shown the block diagram of DISCOVERY connection general configuration. Figure 9.3 User Manual Rev. 2.1 - 27/11/03 29 / 44 DISCOVERY This page was intentionally left blank 30 / 44 Rev. 2.1 - 27/11/03 User Manual DISCOVERY 10. Setting and Impostation All inputs are standardised at the 0 dB level equal to 0.77V R.M.S.; by means of the specific jumpers it is possiblwe to change to levels -12dB and +12dB. Keys: • Jumper Enabled -- No Jumper 10.1 10.1.1 1L Channel Input Level Selection 1L Channel Input Level Selection Jumpers concerd: JP40, JP39 10.1.2 &KQ/-XPSHUV6HOHFWLRQ G%9UPV G%9UPV G%9UPV -3 •$ •% -3 •$ •% 1L Channel Unbalanced or Balanced Input selection Jumpers concerned: JP56, JP59 10.1.3 &KQ/&RQILJXUDWLRQ6HOHFWLRQ %DODQFHG,QSXW 8QEDODQFHG,QSXW -3 • -3 • -3 $ % -3 $ % 1R Channel Input Level Selection Jumper concerned: JP37, JP38 User Manual &KQ5-XPSHUV6HOHFWLRQ G%9UPV G%9UPV G%9UPV Rev. 2.1 - 27/11/03 31 / 44 DISCOVERY 10.1.4 1 R Channel Unbalanced or Balanced Input selection Jumper concerned: JP54, JP55 10.1.5 &KQ5&RQILJXUDWLRQ6HOHFWLRQ %DODQFHG,QSXW 8QEDODQFHG,QSXW -3 • -3 • &KQ/)DXOW7RO6HOHFWLRQ -3 • -3 • &KQ5)DXOW7RO6HOHFWLRQ -3 • -3 • FAULT tolerance Input selection Jumper concerned: JP1, JP2, JP9, JP10 Warning: Chn-1 and Chn-2 may not be contemporarily selected. in the standard adjustment, fault tolerance jumpers relevant to channel Chn-1 are entered. 10.2 10.2.1 2L Channel Input Level Selection 2L Channel Input Level Selection Jumper concerned: JP43, JP44 10.2.2 &KQ/-XPSHUV6HOHFWLRQ G%9UPV G%9UPV G%9UPV -3 •$ •% -3 •$ •% 2L Channel Unbalanced or Balanced Input Selection Jumper concerned: JP58, JP61 32 / 44 &KQ/&RQILJXUDWLRQ6HOHFWLRQ %DODQFHG,QSXW 8QEDODQFHG,QSXW Rev. 2.1 - 27/11/03 -3 • -3 • User Manual DISCOVERY 10.2.3 2R Channel Unbalanced or Balanced Input Selection Jumper concerned: JP41, JP42 10.2.4 &KQ5-XPSHUV6HOHFWLRQ G%9UPV G%9UPV G%9UPV -3 •$ •% -3 •$ •% -3 • -3 • &KQ/)DXOW7RO6HOHFWLRQ -3 • -3 • &KQ5)DXOW7RO6HOHFWLRQ -3 • -3 • 2R Channel Input selection Jumper concerned: JP57, JP60 10.2.5 &KQ56HOHFWLRQ&RQILJXUDWLRQ %DODQFHG,QSXW 8QEDODQFHG,QSXW FAULT Tolerance Input Selection Jumper concerned: JP11, JP12, JP13, JP14 Warning: Chn-1 and Chn-2 may not be contemporarily selected. User Manual Rev. 2.1 - 27/11/03 33 / 44 DISCOVERY 10.3 10.3.1 MPX-1 Channel Input Level Selection MPX-1 Channel Input Level Selection Jumpers concerned: JP16 JP21 10.3.2 03;-XPSHUV6HOHFWLRQ G%9UPV G%9UPV G%9UPV -3 •$ •% -3 •$ •% Fault Tolerance Input Selection Jumper concerned: JP3 03;)DXOW7RO6HOHFWLRQ -3 • It is not allowed contemporarily selecting more than one channel MPX-1, MPX-2 and MPX-m. Fault Tolerance jumpers relevant to channel MPX-1 are entered in the standard adjustment. 10.4 10.4.1 MPX-2 Channel Input Level Selection MPX-2 Channel Input Level Selection Jumpers concerned: JP17 JP18 34 / 44 03;-XPSHUV6HOHFWLRQ G%9UPV G%9UPV G%9UPV Rev. 2.1 - 27/11/03 -3 •$ •% -3 •$ •% User Manual DISCOVERY 10.4.2 Fault Tolerance Input Selection Jumper concerned: JP5 03;)DXOW7RO6HOHFWLRQ -3 • Attention: It is not allowed contemporarily selecting more than one channel MPX1, MPX-2 and MPX-m. 10.5 10.5.1 MPX-M Channel Input Level Selection MPX-M Channel Input Level Selection Jumpers concerned: JP19 JP21 10.5.2 03;0-XPSHUV6HOHFWLRQ G%9UPV G%9UPV G%9UPV -3 •$ •% -3 •$ •% Fault Tolerance Input Selection Jumper concerned: JP7 03;0)DXOW7ROHUDQFH6HOHFWLRQ -3 • Attention: It is not allowed contemporarily selecting more than one channel MPX1, MPX-2 and MPX-m. User Manual Rev. 2.1 - 27/11/03 35 / 44 DISCOVERY 10.6 Digital Inputs Polarity Selection (Switch) In order to select the polarity logics of the digital inputs, position the jumpers as specified in the table. The standard setting fixes that when a switch signal is closed to ground the associated channels fails. 36 / 44 6LJQDO -XPSHU &KQ6ZLWFK -3 &KQ6ZLWFK -3 03;6ZLWFK -3 03;6ZLWFK -3 03;06ZLWFK -3 Rev. 2.1 - 27/11/03 6WDQGDUG •$ •$ •$ •$ •$ ,QYHUWHG % % % % % User Manual DISCOVERY 10.7 MPX Channels S/N Control Selection When S/N controls of MPX channels are not enabled due to special environmental conditions, it is possible to disable them by removing the corresponding jumpers. Jumpers are enabled in the standard setting. User Manual 6Q&RQWURO 03; 03; 03;0 (QDEOHG • • • 'LVDEOHG Rev. 2.1 - 27/11/03 1.1.1.1.1 Jumper -3 -3 -3 37 / 44 DISCOVERY 10.8 MPX Channel Stereo Detection Control Selection When Stereo controls of MPX channels are not enabled due to special environmental conditions, it is possible to disable them by removing the corresponding jumpers. Jumpers are enabled in the standard setting. 38 / 44 6WHUHR&RQWURO 03; 03; 03;0 (QDEOHG • • • Rev. 2.1 - 27/11/03 'LVDEOHG -XPSHU -3 -3 -3 User Manual DISCOVERY 10.9 MPX Channel 50ms/75ms De-Emphasis Selection In the standard setting, MPX channels are with a 50ms de-emphasis; to obtain a 75ms de-emphasis add as much jumpers as in the table. 10.9.1 Mpx-1 Channel De-Emphasis User Manual 03;/&KDQQHO µV µV •-3 •-3 -3 •-3 (85 86$ 03;5&KDQQHO µV µV •-3 •-3 -3 •-3 (85 86$ Rev. 2.1 - 27/11/03 39 / 44 DISCOVERY 10.9.2 Mpx-2 Channel De-Emphasis 10.9.3 •-3 •-3 -3 •-3 (85 86$ 03;5&KDQQHO µV µV •-3 •-3 -3 •-3 (85 86$ Mpx-M Channel De-Emphasis 40 / 44 03;/&KDQQHO µV µV 03;0/&KDQQHO µV µV •-3 •-3 -3 •-3 (85 86$ 03;05&KDQQHO µV µV •-3 •-3 -3 •-3 (85 86$ Rev. 2.1 - 27/11/03 User Manual DISCOVERY 11. References 11.1 Meant of the LED User Manual Rev. 2.1 - 27/11/03 41 / 44 DISCOVERY Digital Inputs DL7= On/off Digital Input (switch) channel 1 DL8= On/off Digital Input (switch) channel 2 DL9= On/off Digital Input (switch) Mpx 1 DL10= On/off Digital Input (switch) Mpx 2 DL11= On/off Digital Input (switch) MpxM Digital Outputs DL1= Mpx 1 Stereo Presence (LED lit-on means there’s not stereo) DL2= Mpx 2 Stereo Presence (LED lit-on means there’s not stereo) DL3= Mpx M Stereo Presence (LED lit-on means there’s not stereo) DL4= S/N Mpx 1 (LED lit-on means alarm noise) DL5= S/N Mpx 2 (LED lit-on meansalarm noise) DL6= S/N Mpx M (LED lit-on means alarm noise) Relais Outputs 42 / 44 DL12= Mix relay active when the LED is lit-on (when lacks Mpx main Mpx1 and Mpx2 and is available Ch1 or Ch2 sum out L/R on Mpx out) DL13= Mpx1 relay active when the LED is lit-on DL14= Mpx2 relay active when the LED is lit-on DL15= MpxM relay active when the LED is lit-on DL16= MpxFT relay active when the LED is lit-off (fault tollerance) DL17= ch1 acttived ch1 on out L/R DL18= ch2 actived ch2 on out L/R DL19= ch3 actived Mpx1 on out L/R DL20= ch3 actived Mpx2 on out L/R Rev. 2.1 - 27/11/03 User Manual DISCOVERY 11.2 Legenda of the states of the software The state of the software comes represented from a marked number in the right extremity on the display of the DISCOVERY. Legenda of the states of the software Control states: State 0 = Start-Up State 1 = Normal operation (channel with greater priority). State 2 = Switched operation (channel with lower priority of the previous one) (Optional). State 3 = Funzionamento switched (channel with lower priority of the previous one) (Optional). State 4 = Funzionamento switched (channel with lower priority of the previous one) (Optional). State 5 = Emergency: channels available not good. Tolto Stato 6 = Emergency: MpxM channelnot good. State 7 = Manual. Optional means that it could not exist. From whichever state (1-5) you can be gone in the Manual state (7). The return from the Manual state depends on the configuration and the carried out operations: If the configuration is not modifiable it returns to the start condition. If the configuration is modifiable if not come made modifications to the parameters detect and priority it is returned to the state of departure; if, instead, they have been made modifications it returns to state 1. User Manual Rev. 2.1 - 27/11/03 43 / 44 DISCOVERY This page was intentionally left blank 44 / 44 Rev. 2.1 - 27/11/03 User Manual