1
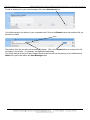
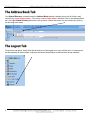
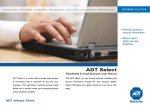
1. Launch your web browser.
2. Go to <http://portal.domain.name>
Enter your Email address and Password as requested. Click on login.
1. Enter your complete email
address; i.e.
johnsmith@<insert domain>
2. Enter your password
3. Click to log in
TIP: Click here to avoid typing in your username every time you log in. (NOTE: you must have the ‘accept
cookies’ feature enabled on you browser for this feature to function properly).
The Navigation Bar shown below is located at the top of the page.
This is where you will create folders to help with organization of your email messages. Creating folders to
organize your email will save you a great deal of time and it’s easy to do. Note, however, that mail moved out
of the Inbox will no longer be hosted on the mail server and therefore not available to other SMTP/POP3
clients.
By default, the Inbox is created for you. The Sent folder is created the first time you send an email, the Trash
folder is created the first time you delete an email, and the Draft folder is created the first time you save a draft
message.
To create additional folders
Select ‘Create Folder’ from the drop-down menu.
Type the name of the folder in the pop-up box.
Click the ‘Ok’ button
*By default, the new folder will be created under the Inbox.
The Navigation Bar shown below is located on the left side of the page. We will discuss only five of the
selections offered in the Navigation Bar below. We will discuss the Options, Mail Folders (Inbox, and
Compose), Address Book and Logout tabs.
To set general features:
From the navigation bar shown above, click on the Options Tab.
Under the Other Options column click Mailbox and Folder Display Options.
Determine which page in the mailbox view will be displayed when you access a mailbox for the first
time.
Default the sorting direction for email
Determine the number of messages per page in the mailbox view.
To set an auto-reply message: Under the Other Options column click Vacation
Type your away/vacation message in the box provided.
Click the Save button
To change your password: Under the Other Options column click Password
Type your old password in appropriate box marked ‘Old password’.
Type your new password in the appropriate box, ‘New password’.
Confirm your new password by entering it in the appropriate box, ‘Confirm new password’.
Click the CHANGE PASSWORD button.
To test, log in using your new password.
*All e-mail that was there under the old password will still be there!
This is the default folder for all your email. After reading an email you have several options, i.e. respond to it,
move it to another folder, delete it, etc.
Unread messages are in bold. Click to read.
In order to Delete, Flag, or Move messages, you must first select the message using the small check box.
In the view above, only the first message is selected. If you now select Delete, only that message will be
deleted. *This will move the selected email into your ‘Trash’ folder.
TIP: You may select more than one email at a time.
To move an email to another folder:
Be sure the message you want to move is selected (a check mark appears in the check box)
Select a folder from the drop down menu located to the right of the Move link
Click on the Move link
TIP: Keep an eye on your Quota Status. If this goes over 75%, you should empty your trash or delete
some of your old files.
Follow the steps below to create and send email messages.
5. Click on Send
1. Type the recipient’s email
address
2. Optionally, type addresses in
the Cc: field and the Bcc: field(s)
3. Add a subject
4. Type your message in the white space
After you click on the Send Message button, a confirmation message will appear to indicate your email has
been successfully sent. If you want to turn off this option, see the Option Tab > Under the Message Options
column click Message Composition.
TIP:
If you have email addresses stored in the Address Book, clicking on the To:, Cc:, or Bcc: link will
bring up your address book and Shared Directory. If you are looking for the address of someone in
<insert school name> but not in your Address Book, select the Shared Directory to find that address.
To add an attachment to your email message, click on the Attachments link.
You will be brought to the bottom of your composed email. Click on the Browse button and locate the file you
would like to attach.
The location of the file you select will automatically appear. Click on the Update button; the name of the file
will display in this section. *If necessary, add additional attachments.
You will be returned to the top of the Compose Email screen and will see the name(s) of your attachment(s)
Added in the yellow box above the Send Message button.
Your Shared Directory is located under the Address Book tab and is already set up with all of the e-mail
accounts for <insert school name>. To e-mail a <insert school name> individual, click on the Address Book
tab > then the Shared Directory and sort the list by Name. Choose the person you are e-mailing by clicking
the box next to the name.
To leave the mail portal, simply click this tab and you will be logged out of your mail account. It is important to
do this especially at school where computers are shared with students as well as other faculty members.