1
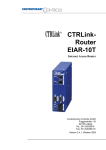
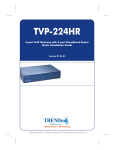
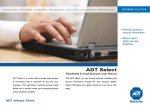
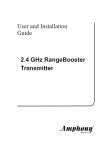
wireless internet video camera
Quick Installation Guide
v.1.04
Model: Y-cam Black / Language: English
IMPORTANT
Please read this manual carefully before you attempt to
install this product and retain it for your future reference.
Package contents:
A. Wireless Y-cam Black
D. Setup CD-ROM
B. Camera stand
E. Quick User Guide
C. Power
adapter
F. Warranty card
Before you begin
Broadband connection required at point of setup (minimum 128kb/s upload
recommended). The following Quick Installation Guide is intended for users
setting up with a router. Please refer to the User Manual on the Setup CD-ROM
for instructions if you do not have a router.
Warning
•
•
•
•
•
Keep the Y-cam away from water. If the Y-cam is wet, power off immediately
Do not place the Y-cam next to heat sources, such as heaters or ovens
Do not disassemble the Y-cam
Do not place the Y-cam in high humidity environments
Only use with the original power adapter. Do not use power adapters from other
devices as they may damage the Y-cam
• This Y-cam is for indoor installation only
(unless operated with the outdoor enclosure kit - purchased seperately)
1
Check your PC system
A PC is required for initial setup only and once the camera is configured, it can be
used independently without being connected to a computer.
Your computer and the network must meet the following technical specifications for
the Y-cam Black to work properly:
• Processor: Intel Pentium III, 800MHz or Higher
(Pentium IV, 2 GHz or Higher recommended)
• RAM: 128 MB or more
• Colour Monitor: Minimum resolution 800x600 and the latest driver for the
display adapter
• OS (Operating System): Windows 2000/XP/Vista
• Web Browser: Internet Explorer Version 5.5 or above
• Interface: 10/100 Mbps Ethernet card
• Wireless router for wireless connectivity
1. Connecting the Y-cam to your network
Setup diagram:
Fig 1.1
Wireless Connection
Wired Connection
Modem*
Router*
Internet
*Please note some users may have a combined modem and router,
in which case the local setup will differ slightly from the diagram above.
A. Using a standard network cable, connect the Y-cam to your network (usually directly
into your router however, depending on your own setup this may be to your switch.)
B.
Connect the included power adapter to the power port on the camera and the other
end into an electrical socket.
Note: Check that the power indicator is lit red on the front of the camera.
2
2. Setting up the camera
A. After you have connected the camera, insert the Setup CD into your CD-ROM drive
and the Installation screen should appear automatically. If it does not, click “Start”
and then “Run.” In the text field, enter “D:\autorun.exe” (if “D” is the letter of
your CD-ROM/DVD drive).
The following screen will be displayed.
Fig 2.1
B.
Click the “Install Software” button and this will install the utility that enables
you to view your cameras. Follow the on screen instructions and after the
installation finishes click “exit”.
C.
With the camera connected and the software installed, double-click the new
Y-cam setup icon on your desktop. The program will search for the camera(s)
connected to your local network and the following window will appear,
see fig 2.2
Note: Windows may ask whether you wish to”Allow” or “Block” this software.
It is perfectly safe to run so click “Allow”
3
Fig 2.2
D. An IP address will automatically be assigned to your camera and displayed in
the box above.
Note: if no camera details are displayed, try clicking “Refresh” Select the camera
you wish to connect to and click “Open”. This will then open up the Y-cam
Homepage in a new browser window,as shown in fig 3.1
3. Running the camera wizard
A. Now that you have successfully set up the camera in wired mode, you can access the
camera on your local network by:
Either selecting the camera in the setup ulitlity and clicking “Open” (as you have just
done in Step 2D)
or by typing in the camera’s IP address (as displayed in Camera Setup Fig 2.2) directly
into your Internet Browser’s address bar. For example, if your camera’s IP address is
192.168.1.100, enter “http://192.168.1.100” and you will see the Y-cam Homepage
screen below.
Fig 3.1
Note: Depending on your setup, your IP address may change from time to time.
If you ever need to re-check your IP address use the Setup Utility (fig2.2)
4
B.
Click on “live view” and in the verification box enter “admin” (in lowercase) in
the user name field and “1234” in the password field and click ok.
Note: If you are trying to view the Y-cam Black for the first time, Windows may
prompt you to install an “ActiveX Control”. Click on the bar that appears at the top
of the window and click “Install” and follow the on-screen instructions. You will only
need to install this control once. You should now be viewing the Y-cam video on a
screen similar to the one below.
Fig 3.2
C.
In the top right- hand corner click on “settings” and the following page will
appear:
D. Click on “wizard” to start the camera setup process and follow the basic
on-screen instructions.
Fig 3.3
Note: if you wish to connect wirelessly, you will need to have your wireless network
settings at hand such as the security encryption used (if any) and the password.
E.
Once you have completed the wizard you will need to close the settings page
and re-login using the setup utility (Fig 2.2). Now your camera will be fully
operational on your local network.
5
4. Viewing the camera from outside your local network
Now that you have set up the camera on your local network, you will no doubt want
to access your camera from a remote location over the Internet. The Y-cam Black
makes this easy to do as it supports technology called Universal Plug’n’Play (UPnP).
To make use of this feature your router will also need to support UPnP. Most routers
nowadays do support this however check your router manufacturer’s website
just to make sure.
A. Log into your camera’s Homepage (step 3.A) and click “settings”
B.
On the right-hand side under Network, click “UPNP setup” and the following
screen will appear:
Fig 4.1
C.
Ensure UPNP is enabled and leave the default port range as 8150 to 8350
D. Your router will usually have UPNP enabled by default, but just to make sure, log
into your router to check it is (refer to manufacturer guidelines on how to do this)
E.
Once both your camera and router are UPNP enabled, you are now able to view
your camera from any computer with high speed Internet access. To do this you
need to type your external IP address followed by your external port in your
Internet Browser address bar. The first available external port will automatically be
used so, in this instance, it is likely that it will be 8150. However, if that port is not
available, then it will use 8151 or 8152 etc.
For example, if your external IP address is 123.345.567.789 and your external port
is 8150, then type http://123.345.567.789:8150 in your Internet browser address bar.
Note: You can check all your external settings by clicking on “System” in the top right
section of the Settings page (see fig 4.1). In the UPNP section, you will find your external
IP address, your external port and the address you need to type in the Internet
Browser’s address bar to view from a remote location.
Please turn over
6
Note: there are 2 types of external IP addresses:
1.
Static – Your external IP address will never change, even if you turn your
broadband modem off and on.
2.
Dynamic – Your external IP address may be likely to change every time your
computer connects to the internet.
Basically this means that if you want to access your camera from outside your
network and have a Dynamic IP address, you will have to re-check your external
IP address every time you connect to the internet. You can ask your ISP if they
can provide you with a static IP address or you can eliminate the need to enter
an IP address at all by setting up DDNS. DDNS allows you to enter a normal style
internet address (e.g. johnsmith.dtdns.net) into your browser and it will find
your camera, even if you have a dynamic IP address. For more information on
how to set up DDNS, refer to the Y-cam User Guide PDF file to be found on
the CD-ROM.
CONGRATULATIONS
You are now able to view your world from anywhere... anytime
Points to note:
Like all electronic equipment, it may be necessary to turn the power off and on
again of the Y-cam and the router if you are experiencing difficulty.
You may also experience difficulty in accessing the camera from certain
work/corporate networks due to the high levels of network security.
In such cases it may be necessary to contact your network administrator.
Due to the complexity of broadband internet environments and Internet Service
Providers, you may not be able to view your camera from outside your local
network. In this case please refer to the User Manual for further information.
If you experienced any problems setting up your camera, please refer to the
User Guide (PDF file on the software CD).
Updated versions can also be downloaded from www.y-cam.com
Y-Cam Black Quick Installation Guide v.1.04
Reproduction in whole or in part without written permission is prohibited
7