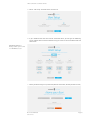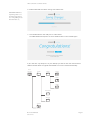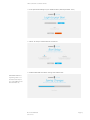
1
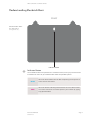
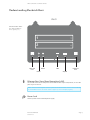
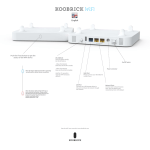
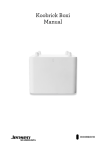
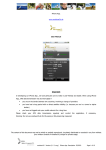
This is the name of the Document
Introduction
Congratulations on purchasing Koobrick Boxi.
Congratulations on purchasing Koobrick Boxi. Koobrick Boxi lets you easily share your files in your network. Simply plug in the hard disk drive, connect the LAN port to your network, and run the Boxi installer from CD,
and you’re ready to share files. Koobrick Boxi provides a total solution for
the Small and Medium-sized Business (SMB) and the Small Office/Home
Office (SOHO) markets, giving you an instant way to share and manage
your files through network. Enjoy!
Features
•
•
•
•
Supports two internal SATA hard disk drives
Provides two USB ports for connecting USB mass storage devices
Allows you to share your files via FTP or Network Neighborhood
Allows you to share your multimedia content to DLNA compliant media
adapters, like Xbox 360, Sony PS3…
•
•
Allows you to share your music to iTunes
Download engine which supports download through FTP, Web and WEB
torrent.
•
•
•
•
High file transfer throughput up to 300Mbps
Equipped with one gigabit LAN port (10/100/1000M)
Supports static IP and dynamic IP
Easy to use both Web-based GUI installation and configuration.
Minimum Requirements
One SATA hard disk drive
Network Interface Card (NIC) for each Personal Computer (PC)
PC/Mac
Computer with a Web-Browser (Internet Explorer 6.0 or higher, Opera, Firefox, Chrome
or other web-browser).
Package Contents
Koobrick Boxi
Power supply (12V 5A DC)
Quick Installation Guide
Ethernet cable
Warrenty card
CD with Easy Setup and software
Boxi User Manual
Version 1.0
Page 1
This is the name of the Document
Understanding Koobrick Boxi
Front
WE CAN HAVE TEXT
here. About Boxi
color options etc...
Indicator Button
Indicator Button
On the Koobrick Boxi front panel there is a indicator button, when you press the button
it will show the status of your Koobrick Boxi. Below are possible options:
Back
When the button blinks blue the Boxi is operating correctly with an
active internet connection
BLUE
RED
1
When the button is blinking red the Boxi has an error. Please restart
the router and access the control panel in your browser by typing
http://boxi.koobrick
2
Boxi User Manual
Version 1.0
Page 2
This is the name of the Document
Understanding Koobrick Boxi
Indicator Button
Back
WE CAN HAVE TEXT
here. About HDD volumes capacity etc...
1
2
Ethernet
Port
Reset
Power
USB
Ethernet
Port
On/Off
Ethernet Port (Local Area Network or LAN)
You should connect the LAN port of this Koobrick Boxi to your hub/switch, or one LAN
port of your router etc.
Note: To ensure the highest transfer speed we recommend to connect Jensen eBOX
to a broadband router or Switch which support up to 1000Mbps (Gigabit).
Power Jack
Connect power from enclosed power supply.
Boxi User Manual
Version 1.0
Page 3
This is the name of the Document
Reset Button
The Release button has two functions: unplug the external USB mass storage1,
reset the configuration of the Jensen eBOX to factory default settings2.
1
Unplug the external USB mass storage:
When you press and hold Release button for 2 seconds, the Jensen eBOX will beep for
0.5 second to hint that your command is detected. At this time, you should release the
Release button immediately if you want to unplug the external USB mass storage device
plugged in USB1 port. The Jensen eBOX will take several seconds to unplug the USB
mass storage. When the LED of the USB1 port goes off, you can safely detach the USB
mass storage device from this Jensen eBOX.
2
Restore factory default settings
If you want to reset the configuration of
the Jensen eBOX to factory default settings, you should press and hold BOTH the Release button and the Copy button at the same time for more than 5 seconds, the Jensen
eBOX will beep for 2 seconds to hint that your command is accepted. The Power LED
will keep flashing during the restore process. After the restore is complete, the Jensen
eBOX will restart itself automatically.
USB
The USB2 port allows you to share your files stored in the USB mass storage
device plugged in.
Note: Please plug the external power of your USB mass storage devices before you
connect them to the Jensen eBOX.
Note: If you have USB mass storage device (like USB external HDD), please plug it to
this Jensen eBOX’s USB 2 port, and plug the USB flash disk you wish to share to the
USB 1 port.
On/Off Button
When the Jensen eBOX is not working, switch the Power switch to “1” will switch on
the power and make the Jensen eBOX start. When the Jensen eBOX has been
shut down, switch the Power switch to “0” will switch off the power.
Boxi User Manual
Version 1.0
Page 4
This is the name of the Document
1. Getting Started
This is a step-by-step instruction on how to start using the Koobrick Boxi.
Note: The Koobrick Boxi is sold both with and without built-in hard disk drives. If you
have purchased Koobrick Boxi with built-in hard disk drive, please go to step 4.
1. Pull out the disk drawer from the case of Koobrick Boxi as shown in the setup diagram below.
2. Remove the plastic holder as shown, and fix the hard disk drive with four screws.
Boxi User Manual
Version 1.0
Page 5
This is the name of the Document
3. Push the disk drawer with hard disk drive installed back into the case of Koobrick Boxi
as shown in the setup diagram below.
Warning: Please make sure the disk drawer is safely installed.
For example, please DO NOT install hard disk by the way showed below :
Boxi User Manual
Version 1.0
Page 6
This is the name of the Document
4. Connect the power adapter to the Boxi’s power connector and to an earthed power
outlet ( see diagram below )
5. Connect a network cable from the Koobrick WiFi yellow LAN port to either yellow
LAN port on the Boxi. ( see diagram below )
6. Power ON the Koobrick Boxi by pressing the power switch at the back of your Boxi.
( see diagram below )
7. To configure your Boxi see chapter 2.
You can use any 802.11
WiFi router in place
of Koobrick WiFi.
1
2
On/Off
Power Outlet
Power Cable
Koobrick WiFi
(WiFi Router)
Network Cable
Boxi User Manual
Version 1.0
Page 7
This is the name of the Document
2. Setup
Initial installation of Koobrick Boxi (See chapter 2.1)
Please insert the enclosed CD and wait until the eBOX installer welcome
window is shown.
The installer will guide you through the whole setup procedure, including format
hard disk drive, map Jensen eBOX folder to “My computer” and if desired install
backup and NAS software.
Note !! Initial installation only need to run once and all data on hard disk drive will be
deleted.
Installation on addititonal computers (See chapter 2.2)
Please insert the enclosed CD and wait until the Boxi installer welcome
window is shown.
To enable additional computers to access the Koobrick Boxi select “PC Setup” and follow
the instructions.
Note !! Initial installation (chapter 2.1) must be completed before you can add
additional computers.
Boxi User Manual
Version 1.0
Page 8
This is the name of the Document
2.1 Initial installation of Koobrick Boxi
1. Insert enclosed CD into your computer and wait for Boxi installer to start.
2. Select your language.
3. Select your Koobrick Boxi and click SETUP
In this step we choose
which Koobrick Boxi we
want to configure. Later
on we can use this screen
to edit Boxi’s we’ve already configure before.
4. Enter password and login to your Koobrick Boxi ( default password: 1234 )
Boxi User Manual
Version 1.0
Page 9
This is the name of the Document
5. Select “Full Setup” and click SETUP to continue.
6. If your Koobrick Boxi has two internal SATA hard drives you will get the following
screen. Please select what kind of RAID setup you want to use for Koobrick Boxi and
click SETUP.
WE NEED TEXT here.
about possible options when
1 or 2 HDDD detected
7. Name your Boxi and give it a password ( default name: boxi, default password: 1234 )
Boxi User Manual
Version 1.0
Page 10
This is the name of the Document
8. Koobrick Boxi will save all the settings now. Please wait...
WE NEED TEXT here.
explaining what is created automatically for
user - like public,private
shared folders etc...
9. Your Koobrick Boxi is now ready for use. Click FINISH
To enable additional computers to access Koobrick Boxi run this installer again.
If you now click “My computer” on your desktop you will see the new network drives
added in wizard. Below is a typical Shared folders structure created automatically.
Boxi
Storage
Public
Media
Image
Music
Video
Download
Backup
Private
Boxi User Manual
Version 1.0
Page 11
This is the name of the Document
2.2 Install on additional computers
Before you start
Make sure you have completed ‘Initial installation’ (chapter 2.1) before you start to
install your Koobrick Boxi on additional computers.
1. Insert enclosed CD into your computer and wait for Boxi installer to start.
2. Select desired language.
3. Select your Koobrick Boxi and click SETUP
In this step we choose
which Koobrick Boxi we
want to configure. Later
on we can use this screen
to edit Boxi’s we’ve already configure before.
Boxi User Manual
Version 1.0
Page 12
This is the name of the Document
4. Enter password and login to your Koobrick Boxi ( default password: 1234 )
5. Select “PC Setup” and click SETUP to continue.
6. Koobrick Boxi will save all the settings now. Please wait...
WE NEED TEXT here.
explaining what is created automatically for
user - like public,private
shared folders etc...
Boxi User Manual
Version 1.0
Page 13
This is the name of the Document
7. Your Koobrick Boxi is now ready for use. Click FINISH.
If you now click “My computer” on your desktop you will see the new network drives
added in wizard. Below is a typical Shared folders structure created automatically.
Boxi
Storage
Public
Media
Image
Music
Video
Download
Backup
Private
Boxi User Manual
Version 1.0
Page 14