1
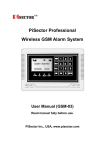
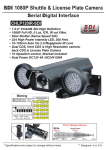
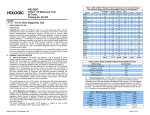
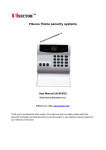
PiSECTOR Passive Infrared Motion Sensor
User Manual
PiSECTOR Passive Infrared Motion Sensor is industrial motion
sensor, made in high quality components and material, the motion
sensor affords you a reliable and trustable detector function and
maximum reduce false alarm. Intelligent Data Analysis system
builds in to refuse the false signal. More accurate and detect real
intruder. The intelligent Data Analysis system analyses the real
intruder signal or false signal. Bi-directional temperature
compensation over a wide operating temperature range to better
support excellent detection probe
PiSECTOR Passive Infrared Motion Sensor is pet immune motion sensor which can
waive pet trigger sensor up to 50Bls.
Program and Mount Motion Sensors:
Prepare Motion Sensor
A. Separate the front and back covers of the Motion Sensor by pressing the tab with
your finger or the top of a pen (Figure A.B).
B. Remove insulating paper from the battery and CLOSE the
cover. The sensor needs 1-3 minutes to initialize itself. You
will see a red indicator blink once every 3 seconds during
initialization. If you don't see the indicator blink as
described during initialization, please open the cover,
remove the battery and reinstall the battery again until you
see the indicator flash as described. The sensor will be ready
for use when the indicator stops blink. (Note: DO NOT keep
the cover open since it may affect the sensor during
initialization and cause the sensor to not work properly after)
S1 switch for LED signal light. The default is set to on, but if
you do not want a flashing light when the sensor detects an
intruder, you can turn it off. When the battery is low, the LED light becomes
yellow.
S2 settingS2 at the CH position enables the low battery notification. Setting S2 at
the DF position disables the low battery notification. Default is set to CH.
This feature only support model GS07, GS08 and PS03.
Program the Motion Sensor
1. Before programming any sensor, you need to switch off all your existing sensors
and disarm your system.
2. Press PROGRAM button on console and enter the default password 888 888
Use Scroll key to choose Sensor then press Enter on Console. Choose Add
and press Enter again. Then you will see Trigger Sensor.
Trigger your sensor by walking 2-3 steps in front of The Motion Sensor which you have
prepared and you will see nine digits displayed on console screen for 1-2 seconds. This
is the unique address for this sensor. The Console will request you add a Zone Name
for this sensor, then press SAVE. You will see Record Sensor Name*.
*Hint1: Recording a name is optional. You can record a voice for this sensor. You will
hear this voice when the alarm goes off and it is easy for you find which sensor has
been triggered. You can do it later in Edit which is under the Sensors menu. For more
information about Edit, please read Hint3*.
NOTE: Each time you select Add following the above steps, you can add from one up
to 50 sensors. After programming all sensors to your console, please test each sensor
before you mount the sensor in the appropriate location.
Test the Motion Sensor
The Motion Sensor is in Walk Test mode during the first 3 minutes after the front cover
is re-attached. During walk test mode, the LED blinks when motion is detected and then
waits 60 seconds before resuming motion detection. During normal operation, the LED
will remain on for 3 seconds when motion is detected until the Motion Sensor blinks
once again before resuming motion detection for next detector.
1. Move away from the area that is in direct line of sight of the Motion Sensor (move
to an adjacent room). Wait 60 seconds until the LED stops blinking.
2. Move back into the line of sight of the Motion Sensor, walk around 3-5 steps.
(this will trigger the main console).
If the Motion Sensor test is successful the LCD screen will display " xxx Sensor Alarm".
If these words do not appear, either (A) the 20-second waiting period since the last
trigger has not expired, or (B) the Motion Sensor is not in communication with the
PiSECTOR system main console.
If you want to re-start the Walk Test mode again, open the Front Cover as shown in
Figure 1 and then re-attach the Front Cover.
Mount Motion Sensor
C. Place the motion
sensor following the
location
recommendations
(check marked
locations) shown in
Figure C. Avoid the
example location marked with the "X" which are household areas that typically
cause false alarms, such as heat, air conditioning, fans, or direct sunlight. The
recommended mounting height is 6.5-7.0 feet for both
coverage and pet immunity purposes.
D. Apply the 3M adhesive tape in the locations shown in
Figure D for corner mounting or wall mounting
E. If you prefer to use screws to mount the motion sensor, follow the screw position
shown in Figure E (optional)
Detection
Patterns
Motion sensor Specifications
Replacement Battery: CR123A
Mounting Height: 6.5’-7.0Feet
Range: Approximately 40 feet with 90 degree field of view in Vertical and 110 degree
field of view in Horizon