1
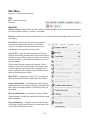
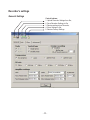
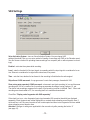
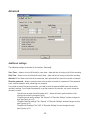
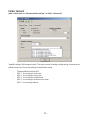
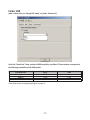
Rec Manager
for EDIC-mini Tiny 16
User Manual
Version February, 2011
-1-
Contents
Overview...................................................................................................................... 3
Glossary ............................................................................................................ 3
What is Rec Manager Program . ....................................................................... 3
Main Program Features:.................................................................................... 3
Starting the Program.......................................................................................... 4
Program’s Interface.................................................................................................... 5
Main menu of the program................................................................................. 5
Legend keys....................................................................................................... 5
Main Menu................................................................................................................... 6
File..................................................................................................................... 6
Recorder............................................................................................................ 6
Explorer.............................................................................................................. 7
Control buttons of the Recorder Content Panel................................................. 9
Control buttons of the Explorer Panel................................................................ 9
Recorder’s settings.................................................................................................. 10
General Settings.............................................................................................. 10
VAS Settings............................................................................................................. 12
Files settings............................................................................................................. 13
Advanced.................................................................................................................. 14
Additional settings:........................................................................................... 14
Folder General.......................................................................................................... 15
Folder General.......................................................................................................... 16
Folder VAS................................................................................................................ 17
Working with the program....................................................................................... 18
Connecting the Recorder................................................................................. 18
Recorder Memory Formatting.......................................................................... 18
Synchronize Clock with the PC........................................................................ 18
Battery Status Display...................................................................................... 18
Demo Mode...................................................................................................... 18
Recorder Content Processing.................................................................................... 19
Uploading of Records from Recorder to the PC............................................... 19
Uploading of Records from the PC to the Recorder Memory........................... 19
Erasing Records in the Recorder Memory....................................................... 19
Using Recorder as a Flash Drive............................................................................ 20
Multilanguage Support............................................................................................. 20
Firmware upgrade.................................................................................................... 20
-2-
Overview
Glossary
1.
2.
3.
4.
5.
6.
7.
Recording – an audio recording that is made by an audio recorder (or downloaded from a
computer) and saved in the recorder’s memory.
Demo-mode – a program operating mode when the recorder is not connected, but emulated
by the program. In this mode, the program works as the recorder is connected.
Default Folder – a previously set folder (chosen by a user) that some commands use to upload recordings and files from the recorder.
Digital Watermark – additional data that are added at the end of the final recording’s file while
uploading (these data keep the information about the recorder, which provided the recording,
and also help control the record’s integrity was there any change in the recording after its
uploading)
Firmware – a program that provides the recorder operation (kept in FLASH memory)
Voice Activating System (VAS) – a part of the recorder that checks if the audio signal is higher
than a previously set level or not (silence) according to set criteria. If there is not audio signal,
recording to the recorder’s FLASH memory stops. If the signal appears, recording starts. The
main goal is to reduce memory consumption. At this, as a rule, the period of autonomic work
increases.
Automatic gain control (AGC) – working mode, at which amplification of the signal from the
microphone is automatic or is subject to a fixed program.
What is Rec Manager Program
The Rec Manager for Edic-mini Tiny16 is an application that works with Edic-mini Tiny16 recorders.
The program is available for Windows XP(SP2&SP3)/Windows Vista and Windows 7. For normal program
functionality, computer hardware should be the same as the one recommended for the normal operation of
the user’s operational system.
Main Program Features:
• Reviewing the recorder’s memory;
• Uploading recordings from the recorder to a PC;
• Erasing recordings from the recorder’s memory;
• Downloading recordings from a PC to the recorder *;
• Showing the status of the recordings (uploaded/not uploaded/downloaded);
• Creating a recording’s digital watermark (only for the recordings that were created
by the currently connected recorder);
• Using a part of the recorder’s memory as a flash memory (downloading,
uploading, and erasing any available files) – Flash Drive *;
• Synchronizing of the recorder clock with the clock of the computer;
• Showing the rechargeable accumulator’s status;
• Setting of the recorder’s parameters * ;
• Formatting the recorder’s memory;
• Setting of amplification of the microphone signal (AGC or fixed);
• Operating in a demo-mode;
• Multi-language support **.
-3-
Notes:
*
**
Depends on the recorder’s model
English is set by default
Starting the Program
This section describes the main menu parts and their commands.
Connect USB cable to the Recorder, then to the USB connector of the PC. The system recognizes a new
removable drive. Use it to run «RecManager.exe» file. The Main window of the program opens.
There is the Recorder Content Panel at the left side of the window. If the button “Show Records” is
pressed, the panel displays the records made by the Recorder. If the button “Show Flash Drive Content”
is pressed, the panel displays the files copied from the PC to be transferred onto the other media (Flash
Drive Mode). There is the Explorer panel at the right side of the window which specifies the location of
files on your computer.
Read interface description of the program below.
-4-
Program’s Interface
Main menu of the program.
1
2
3
5
4
7
6
8
13
9
14
10
11
12
15
Legend keys
1. Main Menu line;
2. Control buttons of the Recorder Content Panel;
3. Display of the Recorder Content status:
– «Records» - the panel displays records made by the Recorder;
– «Flash Drive» - the panel is in File Transfer Mode
4. Write attributes;
5. Control buttons of the Explorer Panel;
6. The location of the uploaded records on the Recorder;
7. File attributes (record uploaded from the Recorder onto the PC);
8. Recorder’s Model;
9. Firmware version of the Recorder;
10. Recorder’s serial number;
11. Recorder’s charge indicator and voltage;
12. Recorder’s Date and Time;
13. Recorder’s total writable memory;
14. Recorder’s free writable memory in hours (depending on the Recorder’s settings);
15. Free memory capacity in Mb.
-5-
Main Menu
(see point 1 of the picture at page 5)
File
Exit – to exit the program.
Recorder
Recorder
Refresh content – refreshes the recorder’s memory content (reloads a list of the recordings and files that
are in the recorder’s memory). Usually it is automatic.
Records – switches the Recorder content panel in to a mode of showing recordings that are in the recorder’s memory.
Flash Drive – switches the Recorder content panel in
to a mode of showing files that are in the recorder’s
memory. This mode can be forbidden by the recorder’s settings or not supported by the recorder.
Copy To PC – copies the items (recordings or files) selected in the Recorder content panel to the current folder of
the Explorer panel. While copying recordings, the result file
names are created on the base of a mask that is set in the
program settings.
While copying files their names stay the same. If there
already is a file with the same name in the computer, the
program suggests overwriting the file, changing the file
name, or canceling the command. This command is active
when the Explorer panel is visible.
Move To PC– is analogous to Copy To PC command, but
after the command is finished, copied items are deleted.
Copy to default folder – copies selected in the Recorder
content panel items (recordings or files) into a default folder
that is set in the program settings. The Explorer panel can
be invisible.
Move to default folder – is analogous to Copy to Default
Folder command, but after the command is finished, copied
items are deleted.
Copy selected part… – allows to copy the selected items
(recordings or files) from the Recorder content panel to the
current folder of the Explorer panel.
-6-
Erase selected items – erases from the recorder’s memory items (recordings or files) selected in the
Recorder content panel.
Format recorder memory – erases all the items (recordings or files) from the recorder’s memory
Synchronize clock – sets the current PC time in the recorder.
Settings – shows a dialog window where you can see and change the recorder’s settings.
Connect – attempts to connect to recorder by means of the current type of connection.
Disconnect – disconnects from the recorder. It is recommended, that this command is activated before
the recorder (the adapter) is disconnected from the PC.
Connect type – the current type of connection can be chosen in the menu of this command. After the type
of connect6ion is chosen, the command Connect is automatically implemented.
Explorer
Copy to recorder – downloads
selected in the Explorer panel items
into the recorder. This command depends on the mode
of the Recorder content panel.
In the Flash Drive mode, files are copied without any
change: after following uploading, they will be identical
to the original ones. If there is no free space for copying
files, the command is canceled. In the showing content
mode, it is possible to copy only audio files which formats are supported by the program; otherwise, a notice
appears that the format is not supported.
Before copying audio files, the dialog window appears
where you can choose a format in which the record
will be downloaded to the recorder. In comparison with
copying files, if there is not free space for a whole audio
file (the needed amount of memory is detected according to the chosen format), you can download the audio
file partly according to the free memory space.
Show wave-file info – shows a window with characteristics of the chosen in the Explorer panel audio file along with the information about the file’s digital
watermark.
Go to default folder – sets a default folder of the program settings as a current folder of the Explorer
panel.
-7-
Set current folder as default – sets the current folder as a default folder.
New folder – creates a new folder in the current folder.
Delete – erases selected in the Explorer panel items.
Refresh – refreshes the Explorer panel content.
Folders – shows/hides the folders’ directories
Explorer window – shows/hides the Explorer panel
Notes: Along with abovementioned functions of the Explorer panel, the list of folders and files supports a
content menu for all the items. Use the right mouse button or a correspondent button of the keyboard to
call this menu. This menu is identical to the menu of the Explorer for Windows.
Language – allows to choose a language for the program interface (in the list there are all the languages
available for the program). English is set by default.
About… – shows a dialog window with the information about the program version.
-8-
Control buttons of the Recorder Content Panel
(See point 2 of the picture at page 5)
(from left to right)
☻ Upgrade Recorder Content backs up the option Upgrade Content of the Recorder Menu;
☻ Show Records backs up Records of the Recorder Menu;
☻ Show Flash Drive Contents backs up Flash Drive of the Recorder Menu;
☻ Go to higher level refers to the shift in the records’ structure onto the higher level;
☻ Copy selected elements to the PC backs up the option Copy to the PC of the Recorder Menu
☻ Copy selected elements to default folder backs up Copy to default folder of the Recorder Menu
☻ Copy selected part of the record backs up the option Copy selected part… of the Recorder Menu
☻ Delete selected elements backs up the option Delete selected elements of the Recorder Menu
☻ Recorder Settings backs up the option Settings of the Recorder Menu
☻ Connect backs up the option Connect of the Recorder Menu
☻ Disconnect backs up the option Disconnect of the Recorder Menu
Control buttons of the Explorer Panel
(See point 5 of the picture at page 5)
(from left to right)
☻ Copy to Recorder backs up the option Copy to Recorder of the Explorer Menu
☻ Show Wave-File Info backs up Wave-File Info of the Explorer Menu
☻ Go to higher level refers to the shift in the folders’ structure onto the higher level
☻ Go to default folder backs up the option Go to default folder of the Explorer Menu
☻ Upgrade backs up the option Upgrade of the Explorer Menu
☻ Create New Folder backs up the option “New Folder” of the Explorer Menu
☻ Delete selected elements backs up the option Delete of the Explorer Menu
☻ Show/Hide Folder Tree backs up the option Folders of the Explorer Menu
☻ Change Display Style – one of the four available display styles can be selected out of the
drop-down list
Explorer:
-
Large icons
-
Tiny icons
-
List
-
Report
-9-
Recorder’s settings
General Settings
Control buttons:
1. Upload Recorder Settings from file;
2. Save Recorder Settings to file;
3. Restore settings from Recorder;
4. Store Settings to file;
5. Restore Factory Settings.
- 10 -
General settings are situated in the insertion General.
Mode – reflects the type of mode for the given modification – Stereo or Mono. If the recorder supports
Stereo mode, it can be chosen for recording.
Control type. For the button- type operation there is an opportunity to choose between “Single Press”,
at which the recording is on after pushing the button during more them 2 seconds, or “Double Press”, at
which the recording is on after rapid double pushing. For switcher-type “Switch” is indicated without the
opportunity to change it.
Circular recording – turns on circular recording mode. The recorder’s memory space can be distributed
according to the user’s desire to use memory for circular recording – “Buffer size”. “Enabled” – turns on
circular recording mode.
The recording quality is adjusted by means of the following parameters:
Compression – sets one of the types of compression, which is for the recording.
Bit rate – sets the sampling frequency for the recording (20000 Hz can be activated only for the mode
“without compression”).
Note, that the more sampling frequency is, the better the quality, however, higher quality requires more
memory. Compression mode, on the contrary, requires less memory and at the same time leads to worse
quality.
Amplifier settings – allow to adjust the microphone amplifier working mode.
- 11 -
VAS Settings
Voice Activation System – turns on Voice Activation System. You can change VAS
settings (threshold). Also you can set a method of viewing of recordings with VAS on the Recorder panel.
You can choose a method of uploading these recordings to a computer (with or without pauses in recordings).
Enabled – activates the system while recording.
Level – sets the threshold of the input signal, at exceeding which the input signal is considered to be active. Silence is considered to be signal with volume less, than preset.
Time – sets the time, destined to be silence for the recording to finish before the active signal.
Skip silence if VAS was used – the program won’t count silent passages, formed with VAS.
Show voice parts separately if VAS was used – shows each part (sub-recording) of one and the same
recording with VAS in a common list of recordings as separate recordings, having numbers 1,2, etc.
The date of sub-recordings compared to the start of the recording is shown in the field “Data”. When subrecordings are downloaded to PC, the recording itself isn’t marked as downloaded.
Check Box “Display voice fragments with VAS separately”
If the check box is on, voice fragments (input signal exceeds VAS operation threshold) are displayed
separately. Silent fragments are neither displayed nor counted when estimating record duration time. If
the check box is off, the record consists of both uninterrupted and silent voice fragments. Both are added
when estimating record duration time.
Attention! Changes in settings are applicable to the recorder only after pressing the button “4”
(see page 10).
- 12 -
Files settings
Folder “Files” has the following settings:
Check box “Auto download records to default folder” – the recordings will be uploaded to default
folder, the tracking path of which is specified in the field Default folder.
Non-downloaded records only, Delete records after download – additional uploading functions.
Field “Restrictions” – allows to forbid deletion of non-uploaded recordings with Disable erasing of nondownloaded records.
Default folder – the default folder with uploaded recordings.
File name mask – setting the mask, basing on which file name will be given, when the recording is uploaded to the PC. File name will be formed according to the preset mask, where “m” – recording’s number,
“yyyy” – year, “mm” – month, dd – day, “hh” - hours, “ss” – seconds, “sn” – serial number of the recorder.
Split – when Split record to several parts while downloading is on, the program will devide re recording into several files with size, specified in the field.
- 13 -
Advanced
Additional settings:
The additional settings are situated in the insertion “Advanced|”.
Once Timer – allows to turn on/off the built-in once timer – date and time of turning on/off of the recording.
Daily Time – allows to turn on/off the built-in daily timer – date and time of turning on/off of the recording.
Attention! If both timers are active at the same time, their operational time must not coincide or intersect.
Recorder password – allows to protect access to the recorder’s content by a password. If the password
is set, it will be asked for while connecting to a computer.
If you need to remove the parole protection, you need to leave the password field blank and save the
recorder’s settings. If you forget the password, to get the access to the recorder, you have to erase the
recorder’s content.
-
“Synchronize recorder time with system time” – allows automatic synchronization of the
recorder clock with the computer’s clock.
-
“Simplified record quality settings” Tab “General” of “Recorder Settings” window changes its
style (see Figure at p.14)
-
“Simplified amplifier settings” Tab “General” of “Recorder Settings” window changes its style
(see Figure at p.15)
-
“Simplified VAS settings” Tab “VAS” of “Recorder Settings” window changes its style
(see Figure at p.16)
- 14 -
-
-
“Not to set. Official line”. This window should always stay unfilled.
“Resume recording after reset” (this point is applicable only for recorders with switch control).
If power supply is lost during recording and after a while is found again, the recording will continue with a mark in the check box and fill fail to continue – without a mark in the check box.
Changes in settings are applicable to the recorder only after pressing the button “4” (see page 10).
Folder General
(with a check mark on “Simple record quality set up” on folder “Advanced”)
There is only “Record quality” field instead of “Compression” and “Sampling rate”. There are five available
record quality choices that correspond to the following record parameters (see Table below).
Characteristics
Very high
High
Medium
Low
Very low
Bit rate
22 kHz
16 kHz
16 kHz
8 kHz
5 kHz
Other fields stayed unchanged (see picture at page 5).
- 15 -
Compression
Without compression
Without compression
ADPCM 4 bits
ADPCM 2 bits
ADPCM 2 bits
Folder General
(with a check mark on “Simple amplifier settings” on folder “Advanced”)
“Amplifier settings” field changes its style. The whole process of setting includes setting of maximum amplification and one of the pre-set settings of amplification modes:
-
-
-
-
-
-
Fixed amplification without AGC;
AGC 1 - for recording in quiet room;
AGC 2 - for recording in noisy room;
AGC 3 - for recording at long distance;
AGC 4 - for recording in spacious noisy areas;
AGC 5 - for recording outdoors.
- 16 -
Folder VAS
(with a check mark on “Simply VAS setup” on folder “Advanced”)
In the list “Sensitivity” three variants of VAS sensitivity are offered. These variants correspond to
the following parameters of the VAS system:
Characteristics
High
Medium
Low
Level
-30 dB
-17 dB
-12 dB
Other fields remain unchanged (see figure at page 6).
- 17 -
Time
2 sec
3 sec
5 sec
Working with the program.
Connecting the Recorder
Connect USB cable to the Recorder, then to the USB connector of the PC. The operating system recognizes a removable drive.
Among other files there are the following ones:
1. Operation Manual for EM Tiny16;
2. User Manual. The program «Rec Manager for Edic Tiny16».
3. The program «Rec Manager for Edic Tiny16”
There are also other files that are necessary for smooth operating of the Recorder.
The Recorder can be adjusted in the following way: when it is connected to the PC the records are uploaded onto the drive automatically. The setting can be performed in the Tab “Files” by ticking the corresponding check boxes in the field “Connecting the Recorder”
Recorder Memory Formatting
Attention! Recorder Memory is a united area in spite of the fact that records as well as files (in Flash
Drive Mode) are displayed in the Recorder Content Panel separately.
Therefore when formatting the memory all the records and files will be deleted (in Flash Drive Mode).
To format Recorder memory choose in the Main window Recorder => Format. The window appears to
warn that when formatting all data in the Recorder memory will be deleted. Press “Yes”. The window appears to dispplay the formatting process status. When completed the window closes. All the data in the
memory are deleted.
Synchronize Clock with the PC
To synchronize clock select Recorder => Synchronize Clock
Battery Status Display
There is a power supply indicator at the bottom of the Main window of the program (see position 11 of the
Figure, p.3). The figure refers to power voltage, and the indicator from three sections refers to the state of
charge.
The absence of colored sections means full charge.
Demo Mode
Demo Mode emulates the Recorder programmatically, not full-scale, but sufficient enough to study the interface of RecManager program, its opportunities, to perform simple operations with the Recorder content.
- 18 -
Recorder Content Processing
Uploading of Records from Recorder to the PC
The Recorder saves records in its internal format. While transferring records to the PC they are re-encoded to a standard WAV format. This procedure means uploading of record to the PC.
The Attribute Status field displays whether the record has been uploaded to the PC or not. While uploading data to the PC a so called digital signature is created (data concerning the recorder, file integrity, which
makes it possible to define whether the file has been changed after being uploaded to the PC).
To upload records to the PC do the following:
1. Select folder for the records uploaded from the Recorder using one of the following:
1.1 Select folder in the field “Default folder” of the Tab “Files” in the main window of the program;
1.2 Select folder in the Explorer Panel (see point 6 at picture 4)
2. Select one or several records in the Recorder Content Panel
3. To upload record to the folder specified in paragraph 1.2 select Recorder => Copy to the PC.
After that the record will be uploaded to the folder specified. The record itself will be saved in
the recorder’s memory, but the field specifies the status of the record as “Uploaded”.
- Recorder => Move to PC – the record will also be uploaded to the folder specified, but not
saved in the recorder memory
4. To upload record to the default folder (paragraph 1.1) select:
- Recorder => Copy to default folder – the record will be uploaded to the default folder. The
record itself will be saved in the recorder’s memory, but the field specifies the status of the
record as “Uploaded”.
- Recorder => Move to default folder - the record will be uploaded to the default folder, but
not saved in the recorder memory.
There is an option to upload only a part of recordto the PC. To do this:
1. Select the record a part of which is to be uploaded in the Recorder Content Panel.
2. Select Recorder – Copy selected part. Specify the boundaries of the record to be uploaded
to the PC. Press “OK”. After that the field Status reads “Uploaded”.
Uploading of Records from the PC to the Recorder Memory
There is an opportunity to upload a .wav file to the recorder memory. To do this:
1. Press “Show records” in the Recorder Content Panel
2. In the Explorer panel:
- select the desired file;
- select “Upload to the Recorder”.
The file uploaded to the Recorder memory will be marked by the status “Uploaded”. The record made by
the Recorder is marked by the status “Not uploaded”.
Erasing Records in the Recorder Memory
To erase file in the Recorder memory and displayed in the Recorder Content Panel choose “Erase selected elements”.
- 19 -
Using Recorder as a Flash Drive
Uploading of file to the Recorder memory presupposes its conversion to an internal format of the Recorder. The conversion is not carried out in Flash Drive Mode, which gives an opportunity to record file of any
format.
To do this:
1. Choose “Show Flash Drive Content”
2. Select in the Explorer Panel a desired file and push the button “Upload to the PC”.
The Recorder as a flash drive can be used only when transferring files to the other drive.
Multilanguage Support
The RecManager program is available in both Russian and English. However, you can translate the button
names, messages, and etc. into other languages. For this edit RecManager_rus.lng (or RecManager_eng.
lng) file in the following way:
1. In the first file line, change the number of the page code into the code of your language.
2. Translate all the messages and names from this file into your language and change them.
3. Rename RecManager_xxx.lng file (xxx- an abbreviation for the language).
After you run the program the next time, your language will be available.
If you want your language to be in the program installation, send the edited file to [email protected].
The installation with your language support will be available on the TS-Market website.
Firmware upgrade:
There should be RecManager program installed on your PC. It is intended for recognizing the
recorder when connecting it to the PC and operating it.
ETS16_FW_Updater_xx_x_Acc.exe (for recorders with rechargeable batteries), ETS16_FW_Updater_
xx_x_Bat.exe (for recorders with batteries) or ETS16_FW_Updater_xx_x_OldBat.exe (for B25 and B26
recorders) — the program intended for updating firmware is started from your PC.
ETS16_ImgWriter.exe — the program is started from your PC. It is aimed at uploading new version of
RecManager program into the Recorder’s memory.
All these files and the upgrade instructions file can be downloaded from our site www.ts-market.com
or from the software CD, if it’s available.
Please note: software upgrade can cause recorder’s breakdown. This is not a warranty case. All the new
recorders have the latest software version and there is no necessity to upgrade software after buying
the recorder.Don’t take the risk. In case there are problems with audio recorder operation please apply
to our technical support specialist: [email protected]
Technical Support
Our engineers constantly work at improving the software and documentation. You can always download
the last version of the program from our website for free - www.ts-market.com
Technical support e-mail: [email protected]
- 20 -