1
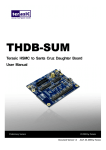
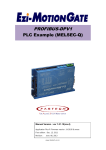
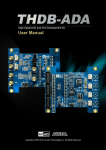
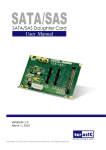
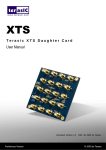
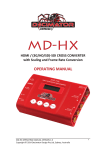
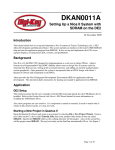
Terasic THDB-SUM
THDBHDB-HDMI
Terasic HDMI Video Daughter Board
User Manual
Document Version 1.2
JAN. 04, 2010 by Terasic
Introduction
Page Index
INTRODUCTION................................................................................................................................................................................. 1
1.1
ABOUT THE KIT................................................................................................................................................................... 1
1.2
ASSEMBLE THE HDMI BOARD............................................................................................................................................ 2
1.3
GETTING HELP .................................................................................................................................................................... 2
HDMI BOARD ..................................................................................................................................................................................... 3
2.1
FEATURES ........................................................................................................................................................................... 3
2.2
LAYOUT AND COMPONETS .................................................................................................................................................. 5
2.3
BLOCK DIAGRAM OF HDMI SIGNAL TRANSMISSION .......................................................................................................... 7
2.4
BLOCK DIAGRAM OF HDMI SIGNAL RECEIVING ................................................................................................................ 8
2.5
GENERATE PIN ASSIGNMENTS ......................................................................................................................................... 10
2.6
PIN DEFINITION OF HSTC CONNECTOR .......................................................................................................................... 11
DEMONSTRATION .......................................................................................................................................................................... 17
3.1
INTRODUCTION.................................................................................................................................................................. 17
3.2
SYSTEM REQUIREMENTS.................................................................................................................................................. 17
3.3
SETUP THE DEMONSTRATION ........................................................................................................................................... 18
3.4
OPERATION ....................................................................................................................................................................... 19
CASE STUDY.................................................................................................................................................................................... 23
4.1
OVERVIEW......................................................................................................................................................................... 23
4.2
SYSTEM FUNCTION BLOCK............................................................................................................................................... 23
4.3
NIOS PROGRAM ............................................................................................................................................................... 27
APPENDIX ......................................................................................................................................................................................... 30
5.1
REVISION HISTORY ........................................................................................................................................................... 30
5.2
ALWAYS VISIT THDB-HDMI W EBPAGE FOR UPDATE...................................................................................................... 30
ii
Introduction
1
Introduction
THDB-HDMI is a HDMI transmitter/receiver daughter board with HSTC (High Speed Terasic Connector)
interface. Host boards, supporting HSTC-compliant connectors, can control the HDMI daughter board through
the HSTC interface.
This THDB-HDMI kit contains complete reference designs with source code written in Verilog and C, for HDMI
signal transmitting and receiving. Based on reference designs, users can easily and quickly develop their
applications.
1.1 About the KIT
This section describes the package content.
The THDB-HDMI package, as shown in Figure 1.1, contains:
•
THDB-HDMI board x 1
•
System CD-ROM x 1
The CD contains technical documents of the HDMI receiver and transmitter, and one reference design for
HDMI transmitting and receiving with source code.
Figure 1.1 THDB-HDMI Package
1
Introduction
1.2 Assemble the HDMI Board
This section describes how to connect the HDMI daughter board to a main board, and use DE3 as an example.
The HDMI board connects to main boards through the HSTC interface. For DE3, the HDMI daughter board
can be connected to any one of four HSTC connectors on DE3.
Figure 1.2 shows a HDMI daughter board connected to the HSTC connector of DE3. Due to high speed data
rate in between, users are strongly recommended to screw the two boards together.
Note. Do not attempt to connect/remove the HDMI daughter board to/from the main board when the power is
on, or the hardware could be damaged.
Figure 1.2 Connect HDMI daughter board to DE3 board
1.3 Getting Help
Here are some places to get help if you encounter any problem:
Email to [email protected]
Taiwan & China: +886-3-550-8800
Korea : +82-2-512-7661
English Support Line: +1-408-512-12336
2
HDMI Board
2
HDMI Board
This chapter will illustrate technical details of HDMI board. Users may modify the reference designs for
various purposes accordingly.
2.1 Features
This section describes the major features of the HDMI board.
Board Features:
•
One HSTC interface for connection purpose
•
One HDMI transmitter with single transmitting port
•
One HDMI receiver with duel receiving ports
•
Two 2K EEPROM for storing EDID of two receiver ports separately
•
Powered from 3.3V pins of HSTC connector
HDMI Transmitter Features:
1.
HDMI 1.3 transmitter
2.
Compliant with HDMI 1.3a, HDCP 1.2 and DVI 1.0 specifications
3.
Supporting link speeds of up to 2.25 Gbps (link clock rate of 225MHZ)
4.
Various video input interface supporting digital video standards such as:
5.
24/30/36-bit RGB/YCbCr 4:4:4
16/20/24-bit YCbCr 4:2:2
8/10/12-bit YCbCr 4:2:2 (CCIR-656)
Bi-direction Color Space Conversion (CSC) between RGB and YCbCr color space with
programmable coefficients
6.
Up/down sampling between YCbCr 4:4:4 and YCbCr 4:2:2
7.
Dither for conversion from 12-bit/10-bit to component to 8-bit
8.
Support Gammat Metadata packet
9.
Digital audio input interface supporting:
Up to four I2S interface supporting 8-channel audio, with sample rates of 32~192 kHz and
sample sizes of 16~24 bits
S/PDIF interface supporting PCM, Dolby Digital, DTS digital audio at up to 192kHz frame rate
Support for high-bit-rate (HBR) audio such as DTS-HD and Dolby TrueHD through the four
I2S interface or the S/PDIF interface, with frame rates as high as 768kHz
Support for 8-channel DSD audio through dedicated inputs
3
HDMI Board
10.
Compatible with IEC 60958 and IEC 61937
Audio down-sampling of 2X and 4X
Software programmable, auto-calibrated TMDS source terminations provide for optimal source
signal quality
11.
Software programmable HDMI output current level
12.
MCLK input is optional for audio operation. Users could opt to implement audio input interface with
or without MCLK
13.
Integrated pre-programmed HDCP keys
14.
Purely hardware HDCP engine increasing the robustness and security of HDCP operation
15.
Monitor detection through Hot Plug Detection and Receiver Termination Detection
16.
Embedded full-function pattern generator
17.
Intelligent, programmable power management
Table 2.1 lists supported input video format:
Table 2.1. Input video formats supported by the HDMI board
HDMI Receiver Features:
1.
Dual-Port HDMI 1.3 receiver
2.
Compliant with HDMI 1.3a, HDCP 1.2 and DVI 1.0 specifications
3.
Supporting link speeds of up to 2.25 Gbps (link clock rate of 225MHZ)
4.
Various video input interface supporting digital video standards such as:
24/30/36-bit RGB/YCbCr 4:4:4
16/20/24-bit YCbCr 4:2:2
8/10/12-bit YCbCr 4:2:2 (ITU BT-656)
12/15/18-bit double data rate interface (data bus width halved, clocked with both rising and
falling edges) for RGB/YCbCr 4:4:4
24/30/36-bit double data rate interface (full bus width, pixel clock rate halved, clocked with
both rising and falling edges)
Input channel swap
MSB/LSB swap
4
HDMI Board
5.
Bi-direction Color Space Conversion (CSC) between RGB and YCbCr color space with
programmable coefficients
6.
Up/down sampling between YCbCr 4:4:4 and YCbCr 4:2:2
7.
Dither for conversion from 12-bit/10-bit to component to 10-bit/8-bit
8.
Support Gammat Metadata packet
9.
Digital audio output interface supporting:
Up to four I2S interface supporting 8-channel audio, with sample rates of 32~192 kHz and
sample sizes of 16~24 bits
S/PDIF interface supporting PCM, Dolby Digital, DTS digital audio at up to 192kHz frame rate
Optional support for 8-channel DSD audio up to 8 channels at 88.2kHz sample rate
Support for high-bit-rate (HBR) audio such as DTS-HD and Dolby TrueHD through the four
I2S interface or the S/PDIF interface, with frame rates as high as 768kHz
Automatic audio error detection for programmable soft mute, preventing annoying harsh
output sound due to audio error or hot-unplug
10.
Auto-calibrated input termination impedance provides process-, voltage- and temperature-invariant
matching to the input transmission lines.
11.
Integrated pre-programmed HDCP keys
12.
Intelligent, programmable power management
Table 2.2 lists the supported output video formats:
Table 2.2. Output video formats supported by the HDMI board
2.2 Layout and Componets
The photo of the HDMI board is shown in Figure 2.1 and Figure 2.2. It indicates the location of the connectors
and key components.
5
HDMI Board
Figure 2.1 HDMI transmitter and receiver on the front of the HDMI board
Figure 2.2 On the back of the HDMI board with HSTC connector and HDMI ports
The THDB-HDMI board includes the following key components:
•
Receiver (U3)
•
Receiver port 1/2 (J2/J3)
•
Transmitter (U6)
•
Transmitter port (J4)
•
27MHZ OSC (Y1)
•
HSTC expansion connector (J1)
•
Receiver I2C EEPORM (U4/U5)
•
RX Regulator (REG1)
•
TX Regulator (REG2)
•
Level shifter (U2)
6
HDMI Board
2.3 Block Diagram of HDMI Signal Transmission
This section describes the block diagram of HDMI signal transmission.
Figure 2.3 shows the block diagram of HDMI signal transmission. Please refer to the schematic included
in the CD for more details. The HDMI transmitter is controlled through I2C interface, where the host works
as master and the transmitter works as a slave. Because the pin PCADR is pulled low, the transmitter I2C
device address is set to 0x98. Through the I2C interface, the host board can access the internal registers
of transmitter to control its behavior.
PCADR
0
Video
deo
Video
deo
Audio
dio
TMDS
MDS
HDMI
DMI
Transmitter
DDC12C
12C
TX_RST_N
_RST_N
HPD
HPD
TX_IN
_INT_N
T_N
HST
HSTC
Connector
1.8
1.8V
3.3
3.3V
HDM
HDMI
Transmi
nsmit
mitter
Port
Regulat
ulato
ator
5V
TX_CE
_CEC
Figure 2.3 The block diagram of the HDMI signal transmission
The host can use reset pin TX_RST_N to reset the transmitter, and listen to the interrupt pin TX_INT_N to
detect change of the transmitter status. When interrupt happens, the host needs to read the internal
register to find out which event is triggered and perform proper actions for the interrupt.
Here are the steps 1-2-3 to control the transmitter:
1.
Reset the transmitter from the TX_RST_N pin
2.
Initialize the transmitter through the I2C interface
3.
Polling the interrupt pin INT_N continuously.
If a HDMI sink device is detected (HDP flag is on):
i.
Read and parse EDID to determine the capacity of the attached HDMI sink device.
7
HDMI Board
ii.
Configure desired output video/audio, including color space and color depth.
iii.
Perform HDCP authentication
iv.
Output video/audio signals to the Video/Audio bus.
Stop video output if a video sink device is removed (HPD flag is off).
Perform proper actions according to various interrupt events.
2.4 Block Diagram of HDMI Signal Receiving
This section describes the block diagram of HDMI signal receiving.
Figure 2.4 shows the block diagram of HDMI signal receiving. Please refer to the schematic included in
the CD for more details. The HDMI receiver is controlled through the I2C interface, where the host works
as master and the transmitter works as a slave. Because the pin PCADR is pulled low, the transmitter I2C
device address is set to 0x90. Through the I2C interface, the host board can access the internal registers
of receiver to control its behavior. The receiver can support two receiving ports, but only one port can be
activated at the same time.
8
HDMI Board
HPD
HPD
RX1_HPD_
X1_HPD_N
Loopba
pback
SV
CEC[0]
C[0]
EEPROM 12C(R
(RX0_S
X0_SCLR
CLRX0_SD
0_SDA)
WRITE-P
ITE-PROTECTOIN(
OIN(EDIC_
EDIC_WP_N
WP_N)
0
PCADR
DDC
12C
12C
Video
deo
Audio
dio
HST
HSTC
Connector
3.3
3.3V
DDC
12C
TMDS
MDS
HDMI
DMI
Receiver
RX_RST_
X_RST_N
X_INT_N
RX_INT_
N
Regulat
ulato
ator
EEPROM
PROM
(EDID)
HDM
HDMI
Receiv
eiver
Port 1
TMDS
MDS
EEPROM
PROM
(EDID)
1.8
1.8V
DDC
12C
EEPROM 12C(R
2C(RX1_SC
X1_SCL/R
L/RX1_SD
_SDA)
C[1]]
CEC[1
DDC
12C
HDM
HDMI
Receiv
eiver
Port 2
HPD
HPD
Loopba
pback
SV
RX2_HPD_
X2_HPD_N
Figure 2.4 The block diagram of HDMI signal receiving
The host can use the reset pin RX_RST_N to reset the receiver, and listen to the interrupt pin RX_INT_N
to detect change of the receiver status. When interrupt happens, the host needs to read the internal
register to find out which event is triggered and perform proper actions for the interrupt.
Here are the steps to control the receiver:
1.
Reset the receiver from the RX_RST_N pin
2.
Read the EEPROM (EDID) to check whether the EEPROM contents need to be updated. When
writing data to EEPROM, remember to pull-low the EEPROM write protection pin EDID_WP. Finally,
make sure EDID_WP is pulled high and configure the both I2C pins as input pins, so the attached
HSTC source device can read the EDID successfully.
3.
Initialize the receiver through the I2C interface
4.
Pull-Low the RX1_HPD_N and RX2_PHD_N pins to enable HPD pins of receiving ports.
5.
Set receiver port 1 as active port.
6.
Polling the interrupt pin RX_INT_N. Switch to another receiver port every three seconds and
9
HDMI Board
activate it if no HDMI source device found on the current active port.
If a HDMI source device is detected:
i.
Perform HDCP authentication.
ii.
Read the input video format, including color space and color depth.
iii.
Configure input and output color space.
Perform proper actions according to various interrupt events.
2.5 Generate Pin Assignments
This section describes how to automatically generate a top-level project, including HDMI pin assignments.
Users can easily create the HDMI board pin assignments by utilizing the DE3_System Builder V 1.3.1 or
later. Here are the procedures to generate a top-level project for THDB-HDMI.
1)
Launch DE3-System Builder
1)
Add a DE3 board. Enable the HSTC-C connector and type desired pin pre-fix name in the dialog of
DE3 Configuration.
1)
Add HDMI Board.
10
HDMI Board
1)
Connect DE3 and HDMI Board by drag-and-drop the mouse.
1)
Click “Generate” to generate the desired top-level and pin assignments for a HDMI project.
2.6 Pin Definition of HSTC Connector
This section describes pin definition of the HSTC interface onboard.
All the control and data signals of HDMI transmitter and receiver are connected to the HSTC connector,
so users can fully control the HDMI daughter board through the HSTC interface. Power is derived from
3.3V and 5V pins of the HSTC connector. Figure 2.4 shows the physical pin location and signal name on
the HSTC connector.
11
HDMI Board
Figure 2.5 HSTC Connector of HDMI board
The table below lists the HSMC signal direction and description.
Note. The power pins are not shown in the table.
12
HDMI Board
Signal Name
RX_I2S[3]
Pin
Direction
Description
Number
(FPGA View)
3
input
I2S serial data output, doubles as DSD
Serial Right CH2 data
output
RX_SCK
4
I2S serial clock output, doubles as DSD
input
clock
RX_WS
5
I2S word select output, doubles as DSD
input
Serial Right CH0 data
output
RX_MCLK
6
input
Audio master clock
RX_RD[0]
9
input
Digital Video Output Pins.
RX_GD[10]
10
input
Digital Video Output Pins.
RX_GD[11]
11
input
Digital Video Output Pins.
RX_GD[9]
12
input
Digital Video Output Pins.
RX_RD[2]
15
input
Digital Video Output Pins.
RX_GD[8]
16
input
Digital Video Output Pins.
RX_RD[1]
17
input
Digital Video Output Pins.
RX_GD[7]
18
input
Digital Video Output Pins.
RX_RD[4]
21
input
Digital Video Output Pins.
RX_HPD[1]
22
output
Enable
Hardware
Plug
Detection
for
HDMP Port 1, Low Active
RX_RD[3]
23
input
Digital Video Output Pins.
RX_CEC[1]
24
inout
CEC (Consumer Electronics Control) for
HDMI Port 1
RX_I2S[1]
27
I2S serial data output, doubles as DSD
input
Serial Right CH1 data
output
RX_RST_N
28
input
Hardware reset pin. Active LOW
RX_I2S[2]
29
input
I2S serial data output, doubles as DSD
Serial Left CH2 data
output
RX_SCDT
30
Indication for active HDMI signal at input
input
port
RX_SPDIF
33
S/PDIF audio output, doubles as DSD
input
Serial Left CH2 data
output
RX_INT_N
34
input
Interrupt output. Default active-low
RX_I2S[0]
35
input
I2S serial data output, doubles as DSD
13
HDMI Board
Serial Left CH0 data
output
RX_RD[11]
36
input
Digital Video Output Pins.
RX_MUTE
39
input
Mute output, doubles as DSD Serial
Right CH3 data output
RX_RD[10]
40
input
Digital Video Output Pins.
RX_DSD
41
input
DSD Serial Left CH3 data output
RX_RD[9]
42
input
Digital Video Output Pins.
RX_RD[8]
45
input
Digital Video Output Pins.
RX_RD[7]
46
input
Digital Video Output Pins.
RX_RD[6]
48
input
Digital Video Output Pins.
RX_RD[5]
52
input
Digital Video Output Pins.
EDID_WP
53
output
EEPROM Write Protection
RX_GD[3]
54
input
Digital Video Output Pins.
RX_GD[1]
57
input
Digital Video Output Pins.
RX_GD[5]
58
input
Digital Video Output Pins.
RX_GD[2]
59
input
Digital Video Output Pins.
RX_GD[6]
60
input
Digital Video Output Pins.
RX_GD[0]
63
input
Digital Video Output Pins.
RX_GD[4]
64
input
Digital Video Output Pins.
RX_BD[10]
65
input
Digital Video Output Pins.
RX_PCLK
66
input
Output data clock.
RX_BD[8]
69
input
Digital Video Output Pins.
RX_BD[11]
70
input
Digital Video Output Pins.
RX_BD[9]
71
input
Digital Video Output Pins.
RX_BD[3]
72
input
Digital Video Output Pins.
RX_BD[2]
75
input
Digital Video Output Pins.
RX_BD[1]
76
input
Digital Video Output Pins.
RX_DE
77
input
Data enable
RX_BD[0]
78
input
Digital Video Output Pins.
RX_PCSDA
81
inout
Serial
Programming
Data
for
chip
programming
RX_HS
82
output
Horizontal sync. signal
RX_BD[4]
83
input
Digital Video Output Pins.
RX_PCSCL
84
inout
Serial
Programming Clock
for chip
programming
RX_DDC_SDA[1]
87
inout
DDC I2C Data for HDMI Port 1
RX_EVENODD
88
input
Indicates whether the current field is
14
HDMI Board
Even or Odd for interlaced format
RX_DDC_SCL[1]
89
inout
DDC I2C Clock for HDMI Port 1
RX_VS
90
output
Vertical sync. signal
RX_DDC_SDA[0]
93
Inout
DDC I2C Data for HDMI Port 0
RX_BD[5]
94
Input
Digital Video Output Pins.
RX_DDC_SCL[0]
95
Inout
DDC I2C Clock for HDMI Port 0
RX_BD[6]
96
input
Digital Video Output Pins.
RX_HPD[0]
99
output
Enable
Hardware
Plug
Detection
for
HDMP Port 0, Low Active
RX_BD[7]
100
Input
Digital Video Output Pins.
TX_GD[8]
101
output
Digital video input pins.
RX_CEC[0]
102
inout
CEC (Consumer Electronics Control) for
HDMI Port 0
TX_GD[9]
105
output
Digital video input pins.
TX_GD[10]
106
output
Digital video input pins.
TX_GD[11]
108
output
Digital video input pins.
TX_RD[3]
111
output
Digital video input pins.
TX_RD[1]
112
output
Digital video input pins.
TX_RD[6]
113
output
Digital video input pins.
TX_RD[2]
114
output
Digital video input pins.
TX_RD[8]
117
output
Digital video input pins.
TX_RD[4]
118
output
Digital video input pins.
TX_RD[9]
119
output
Digital video input pins.
TX_RD[5]
120
output
Digital video input pins.
TX_RD[7]
123
output
Digital video input pins.
SDA
131
inout
I2S serial data for on-board EEPROM
SCL
132
output
I2S serial clock for on-board EEPROM
TX_RD[11]
133
output
Digital video input pins.
TX_GD[6]
134
output
Digital video input pins.
TX_RD[10]
135
output
Digital video input pins.
TX_GD[5]
136
output
Digital video input pins.
TX_GD[7]
137
output
Digital video input pins.
TX_GD[4]
138
output
Digital video input pins.
TX_PCSCL
139
output
I2C Clock for DDC
TX_PCSDA
140
inout
I2C Data for DDC
TX_RST_N
141
output
Hardware reset pin. Active LOW
TX_GD[3]
142
output
Digital video input pins.
TX_INT_N
143
input
Interrupt output. Default active-low
15
HDMI Board
TX_GD[2]
144
output
Digital video input pins.
TX_DSD_L[3]
145
output
DSD Serial Left CH3 data input
TX_GD[1]
146
output
Digital video input pins.
TX_DSD_R[3]
147
output
DSD Serial Right CH3 data input
TX_GD[0]
148
output
Digital video input pins.
TX_DSD_L[2]
149
output
DSD Serial Left CH2 data input
TX_BD[11]
150
output
Digital video input pins.
TX_DSD_R[2]
151
output
DSD Serial Right CH2 data input
TX_BD[10]
152
output
Digital video input pins.
TX_DSD_L[1]
153
output
DSD Serial Left CH1 data input
TX_BD[9]
154
output
Digital video input pins.
TX_DSD_R[1]
155
output
DSD Serial Right CH1 data input
TX_PCLK
156
output
Input data clock
TX_DSD_L[0]
157
output
DSD Serial Left CH0 data input
TX_BD[8]
158
output
Digital video input pins.
TX_DSD_R[0]
159
output
Digital video input pins.
TX_BD[7]
160
output
Digital video input pins.
TX_DCLK
161
output
DSD Serial audio clock input
TX_BD[6]
162
output
Digital video input pins.
TX_SCK
163
output
I2S serial clock input
TX_BD[5]
164
output
Digital video input pins.
TX_WS
165
output
I2S word select input
TX_BD[4]
166
output
Digital video input pins.
TX_MCLK
167
output
Audio master clock input
TX_BD[3]
168
output
Digital video input pins.
TX_I2S[0]
169
output
I2S serial data input
TX_BD[2]
170
output
Digital video input pins.
TX_I2S[1]
171
output
I2S serial data input
TX_BD[1]
172
output
Digital video input pins.
TX_I2S[2]
173
output
I2S serial data input
TX_BD[0]
174
output
Digital video input pins.
TX_I2S[3]
175
output
I2S serial data input
TX_DE
176
output
Data enable
TX_VS
177
output
Vertical sync. signal
TX_HS
178
output
Horizontal sync. signal
TX_SPDIF
179
output
S/PDIF audio input
TX_CEC
180
inout
CEC (Consumer Electronics Control)
Figure 2.6 The HSTC pin definition of the THDB-HDMI board
16
Demonstration
3
Demonstration
This chapter illustrates the video/audio demonstration for the HDMI board.
3.1 Introduction
This section describes the functionality of the demonstration briefly.
This demonstration shows how to use DE3 to control the HDMI board. The demonstration includes two
parts:
•
Transmission-Only:
Generate HDMI Video/Audio signal for transmission, including various video formats and color space.
There are 11 video formats available. The color space includes RGB444, YUV422, and YUV444.
•
Loopback:
Loopback (Internal bypass) the HDMI Video/Audio Signals. The audio and video output pins of the
receiver are directly connected to the input audio and video pins of the transmitter.
3.2 System Requirements
The following items are required for transmission-only and loopback demonstrations.
Transmission-Only
•
THDB-HDMI x 1
•
DE3 Board x 1
•
LCD monitor with at least one HDMI input x 1
•
HDMI Cable x 1
Loopback
•
THDB-HDMI x 1
•
DE3 Board x 1
•
LCD monitor with at least one HDMI input x 1
17
Demonstration
•
HDMI Source Device x 1
•
HDMI Cable x 2
3.3 Setup the Demonstration
Figure 3.1 and 3.2 show how to setup hardware for transmission and loop-back demonstrations, respectively.
Transmission Only
HDMI Cable
Figure 3.1 HDMI Transmission-Only Demonstration Setup
Loopback
Video in
HDMI Cable
Figure 3.2 HDMI Loopback Demonstration Setup
18
Demonstration
3.4 Operation
This section describes the procedures of running the demonstration.
FPGA Configuration
Please follow the steps below to configure the FPGA.
•
Make sure hardware setup is completed.
•
Connect PC and DE3 with a USB cable.
•
Power on DE3.
•
Make sure Quartus II is installed on your PC.
•
Execute the batch file hdmi_demo.bat under the folder “examples\DE3_xxx_TX_RX\demo batch”.
HDMI Transmission-Only
After FPGA is configured, please follow the steps below to run the HDMI transmission-only demonstration.
•
Connect the HDMI LCD monitor and the HDMI transmitting port with a HDMI cable.
•
Power on the LCD monitor and make sure the LCD monitor is set to the mode where HDMI input is
the source. Please refer to the user manual of your HDMI Display for more details.
•
When LCD monitor is detected, the LED2 of DE3 will be turned on.
•
After approximately 10 seconds, a test pattern will be displayed on the LCD monitor. The first
displayed pattern is 480p (720x480p60) pattern.
•
Press “BUTTON0” to change test patterns. Please refer to Table 5.1 for built-in test patterns. There
are eleven built-in test patterns available in this demonstration. You will not be able to see all the test
patterns if your LCD monitor doesn’t support such resolution.
•
Press “BUTTON1” to change the color space of pattern source. The color space includes RGB444,
YUV422, and YUV444.
Figure 3.3 and 3.4 show the test pattern of FULL HD (1920x1080p60) in RGB and YUV color space,
respectively.
It will take approximately 10 seconds to display a new pattern on the LCD when users change test pattern
or color space.
19
Demonstration
Figure 3.3 FULL HD in RGB444 Color Space
Figure 3.4 FULL HD in YUV Color Space
Figure 3.5 shows the NIOS program trace log when a HDMI LCD monitor is detected. It indicates the LCD
monitor in use supports color space YUV444 and YUV422, but not RGB444. Various video formats
supported are listed according to Video Identify Code (VIC). The format of input and output color of the
transmitter is RGB444 and RGB444, respectively. It implies there is no change of color format in between.
Figure 3.5 NIOS program trace log of transmitting-only demonstration
20
Demonstration
HDMI Internal Loopback
After FPGA is configured, please follow the steps below to run the HDMI loopback demonstration.
•
Connect the HDMI LCD and the HDMI TX port with a HDMI Cable.
•
Power on the LCD monitor and make sure the LCD monitor is set to the mode where HDMI input is
the source.
•
Connect the HDMI source device and HDMI RX port with a HDMI Cable.
•
Power on the HDMI source device and make sure its HDMI port is selected as the output.
•
Users will be able to see the video displayed on the LCD monitor and hear the sound, if there is a
speaker built-in.
•
Users can change the RX port connected to the HDMI source device. The demonstration can
automatically detect the RX port and activate it.
Figure 3.6 shows the NIOS program trace log when a HDMI LCD source device is detected. It indicates
the input video resolution is 1280 x 720 (VIC=4) with color space RGB444 and 36-bits color depth.
Both input color and output color of the receiver and transmitter are configured as RGB444. In another
words, the color format doesn’t change from the source to the LCD monitor during the loopback process.
The output color depth of the transmitter is configured as 24-bits.
21
Demonstration
Figure 3.6 NIOS program trace log of loopback demonstration
22
Case Study
4
Case Study
This chapter describes the design concepts for the HDMI demonstration in the previous chapter.
4.1 Overview
This section describes the overview of the reference design.
This reference design shows how to use DE3 to control HDMI board. Please refer to the pervious chapter
for the demonstration of this reference design.
The source code of the reference design can be found in the THDB-HDMI CD under the directory of
Examples folder. The demonstration includes the following two major functions:
•
Transmission only:
Generate HDMI Video/Audio signal for transmission, including various video formats and color space.
There are 11 video formats available. The color space includes RGB444, YUV422, and YUV444.
•
Loopback:
Loopback (internal bypass) the HDMI Video/Audio Signals. The audio and video output pins of the
receiver are directly connected to the input audio and video pins of the transmitter.
4.2 System Function Block
23
Case Study
This section will describe the system behavior in function blocks.
Figure 4.1 shows the system function block diagram of this demonstration. In the design, SOPC is
included because NIOS II processor is used to control both transmitter and receiver through I2C interface.
The NIOS program is designed to run on the on-chip memory. A customized I2S controller is designed to
generate I2S 48K stereo audio for the HDMI transmitting-only mode. The audio data is stored in the
on-chip memory and sent to the HDMI transmitter by NIOS II processor.
The video pattern generator is designed to generate test patterns for HDMI transmitter-only mode. It
provides eleven video formats in three color spaces. The source selector circuit is designed to select the
desired video source between the video pattern generator and the video from the receiver. Four LEDs and
two BUTTONs on DE3 are used for human interface. BUTTONs are designed to change the test pattern
and associated color space for transmission. LEDs are designed to indicate the HDMI status, which is
illustrated in Table 4.1. BUTTONs are designed to change the video format and color space of the build-in
video pattern generator, which is illustrated in Table 4.2.
Figure 4.1. System Function Block Diagram
24
Case Study
LED
Description
System is running.
HDMI sink device is detected and synchronized.
HDMI source device is detected and synchronized.
Table 4.1. LED Indications
BUTTON
Description
Press to change active video format of the built-in
video pattern generator.
Press to change active video color space of the built-in
video pattern generator.
Table 4.2. Button Operation Definition
Transmitter Controlled by NIOS II Processor
The transmitter is controlled by NIOS program through I2C interface. Based on I2C protocol, the NIOS
program can read/write the internal registers of the transmitter, and control the behavior of the transmitter.
The NIOS program controls the transmitter to perform the following procedures step by step:
o
Initialize the HDMI chip.
o
Detect if a HDMI sink device is attached or detached, e.g. LCD Display.
o
Read and parse the EDID content to find the capability of the HDMI sink device. The
capability includes supported color space, video format (VIC code), and color depth etc.
o
Perform HDCP authentication.
o
Configure the color space of input and output. The transmitter offers color space
transformation and outputs RGB444, YUV422, or YUV444
25
Case Study
o
Configure the color depth of output video.
o
Send VIC to the video sink device.
o
Configure the audio interface and format of output video.
Receiver Controlled by NIOS II Processor
The receiver is controlled by NIOS program through I2C interface. Based on I2C protocol, the NIOS
program can read/ write the internal registers of the receiver, and control the behavior of the receiver. The
revision number of receiver is either A1 or A2, which can be determined by querying the register 4 of
receiver.
The major differences between both revisions are:
1)
Receiver initialization process and
2)
Video synchronization process.
Please search the global variable “Is_A2” in cat6023.c for detail information.
The NIOS program controls the receiver to perform the following procedures step by step:
o
Initialize the HDMI receiver chip.
o
Detect if a HDMI source device is attached or detached.
o
Select one of the receiving ports and activate it.
o
Read and parse the EDID content to find the capability of the HDMI source device. The
capability includes supported color space, video format (VIC code), and color depth etc.
o
Perform HDCP authentication.
o
Report the input video (VIC) and audio format of the attached HDMI source device.
o
Configure the color space of input and output. The receiver can provide color space
transformation.
Video Pattern Generator
The video pattern generator is designed to generate test pattern for HDMI transmitting-only mode. The
supported video formats are listed in Table 4.2.
Video Format
VIC
PCLK (MHZ)
720x480p60
3
27
1024x76pP60
-
65
1280x720p50
19
74.25
1280x720p60
4
74.25
1280x1024
-
108
1920x1080i60
5
74.25
1920x1080i50
20
74.25
1920x1080p60
16
148.5
1920x1080p50
31
148.5
26
Case Study
1600x1200p5
-
1920x1080i120
46
162
148.5
Table 4.2 Built-in video formats
It also supports three color spaces, which are RGB444, YUV422, and YUV444.
The required PCLK is generated from Megafunction ALTPLL and ALTPLL_RECONFIG IP. The required
PLL-reconfigure data is stored in on-chip ROMs.
Video Source Selector
The source selector is implemented using Megafunction LPM_MUX.
4.3 NIOS Program
This section describes the design flow and how Nios II processor controls transmitter and receiver.
Figure 4.2 shows the software stack of the NIOS program. The I2C block implements the I2C read/write
functions based on GPIO system call. The HDMI transmitter block and receiver block are referred as the
HDMI driver. The HDMI transmitter chip and receiver chip are managed and controlled through the I2C
protocol. The I2S driver block is in charge of sending audio data to the transmitter.
Figure 4.2 Software Stack
Figure 4.3 shows the file list of the NIOS program. The control center is located in main.c. The beep.c
includes audio raw data for generating a tone sound. The folder named terasic_lib includes the I2C driver.
The folder named HDMI_Lib includes transmitter and receiver drivers. The platform-dependent functions
are located in mcu.c under HDMI_Lib.
27
Case Study
Figure 4.3 NIOS Program File List
System Configuration
To use the HDMI library in NIOS II, the const _MCU_ should be defined in the configuration settings, as
shown in Figure 4.4. Two on-chip memories are created to store the NIOS program and data separately.
The size of each on-chip memory is 128 K bytes. One on-chip memory is used to store program and the
other one is used to store data. The option “Small C Library” must be enabled to reduce the size of the
program. The associated configuration is shown in Figure 4.5
28
Case Study
Figure 4.4 Define _MCU_ constant
Figure 4.5 Configuration of System Library
Audio Test
If users would like to test audio during HDMI transmitting-only mode, please remove the constant
definition TX_VPG_COLOR_CTRL_DISABLED from main.c. Users will hear a tone sound from the
built-in speaker of HDMI LCD monitor when pressing BUTTON1 of DE3 board.
29
Appendix
5
Appendix
5.1 Revision History
Revision
Date
Change Log
1.0
DEC 02 2008
Initial Version
1.1
APR 06 2009
Support Receiver Revision A2
1.2
JAN 04 2010
Figure 2.1 Corrected
5.2 Always Visit THDB-HDMI Webpage for Update
We will be continuing providing interesting examples and labs on our THDB-HDMI web page. Please visit
www.altera.com or hdmi.terasic.com for more information.
30