1
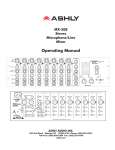
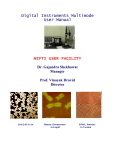
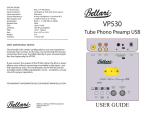
High Performance Software Defined Radio
Open Source Hardware and Software Project
Project Description: http://hpsdr.org
Penelope
Operation with PowerSDR
Text: Phil Harman, VK6APH
Joe de Groot, AB1DO
Revision 1.0
Graphics and Layout: Joe de Groot, AB1DO
PENELOPE
OPERATION WITH
POWERSDR
Table of Contents
Introduction........................................................................................................3
What you will Need.............................................................................................3
Penelope Set-up.................................................................................................4
1 RF Output...........................................................................................................................4
2 Microphone and PTT Connections..................................................................................5
3.5mm Plug Connections...........................................................................................................................5
Microphone Jumper Settings....................................................................................................................6
PTT Jumper Settings..................................................................................................................................6
3 Audio Out, Open Collectors, PTT Out, etc......................................................................7
Operation............................................................................................................8
PowerSDR Settings..............................................................................................................8
Setting the Output Power..................................................................................................10
Open Collector Outputs.....................................................................................................12
Table of Revisions............................................................................................13
[INTENTIONALLY LEFT BLANK]
Rev 1.0, May 2008
2
© AB1DO
PENELOPE
OPERATION WITH
POWERSDR
Introduction
Penelope is an exciter that provides up to 0.5W output on the 160m through 6m Amateur bands. Penelope can
be used with any form of digital or analog modulation.
Penelope is designed to plug into the HPSDR Atlas bus and be used in conjunction with other HPSDR boards. A
minimum configuration to provide a low power exciter also requires an HPSDR Atlas bus and an Ozy board.
Penelope is designed to be used with PowerSDR which will provide the necessary I & Q baseband
and control signals. This manual describes the connections to be made between Penelope, Ozy
and the PC. Subsequently it describes how to setup PowerSDR to use Penelope for generating an
RF signal.
What you will Need
Table 1 and Table 2 below summarize the hardware and software you will need to use a Penelope
board as part of an HPSDR based exciter.
Table 1: Hardware Requirements
Hardware
Comment
Atlas board
Backplane for all HPSDR boards
Ozy board
Control data and digital I/Q streams to/from PC
Penelope board
HF 0.5W exciter
Janus board
Optional – can be used as an alternative microphone input source
Atlas Power Supply
PC ATX type or equivalent
Microphone cable
To connect a microphone (incl PTT) to Penelope, see Fig 1 on page 4 and page 5
Table 2: Software Requirements
Software
Comment
Ozy and PowerSDR
See Table 2 in the manual Janus and Ozy operation with PowerSDR
In the following, the set-up of and connections to Penelope will be explained in detail, followed by
the PowerSDR settings.
[INTENTIONALLY LEFT BLANK]
Rev 1.0, May 2008
3
© AB1DO
PENELOPE
OPERATION WITH
POWERSDR
Penelope Set-up
To use the Penelope board with the Ozy (and other) HPSDR boards six jumpers must be set. These are
indicated in light blue in Fig 1 below. A further three jumpers that relate to the microphone, PTT connections
and to the microphone bias may also need to be set. These are explained in detail below. For ease of reference,
the I/O jacks in Fig 1 have been enumerated and each will be now dealt with in turn
Fig 1: Penelope Board Indicating Jumper Settings, Connections and LEDs
1 RF Output
This BNC connector provides the RF output from Penelope. It may be connected directly to an
antenna for QRP operation or to an external amplifier to increase the power output. The harmonic
and other spurious output levels meet the relevant FCC specifications as long as the output from
Penelope is maintained at 0.5W or below.
Should an external power amplifier be used then the user will need to ensure that adequate
harmonic suppression is achieved.
During normal operation, LEDs 2-6 form a bar-graph indicating the peak RF output level.
Rev 1.0, May 2008
4
© AB1DO
PENELOPE
OPERATION WITH
POWERSDR
2 Microphone and PTT Connections
Connect the microphone and any PTT connection from the microphone through a 3.5mm tip-ringsleeve audio plug1.
3.5mm Plug Connections
Connect the Sleeve to the outer braid of the coaxial
microphone cable (see Fig 2).
Since there is no standard relating to the wiring of
microphone plugs Janus allows several options:
●
The microphone may be connected to either the tip or
the ring (see Fig 2).
●
If the microphone has a PTT button, this can be
connected to the opposite terminal (ring or tip) to
where the microphone signal is connected.
Fig 2: Microphone Plug
Connections
Note: THE PTT BUTTON SHOULD PRESENT A VOLTAGE FREE CONTACT THAT CONNECTS
ITS ASSOCIATED PIN TO THE OUTER SLEEVE OF THE COAXIAL MICROPHONE CABLE WHEN
PRESSED. THIS IS THE MOST COMMON WIRING FOR A PTT BUTTON, BUT USERS ARE
ADVISED TO CHECK THE CONNECTIONS WITH A MULTIMETER IF UNSURE OF THE EXACT
CONFIGURATION.
[INTENTIONALLY LEFT BLANK]
1
If a Janus card is fitted to the Atlas bus the user may connect a microphone to either or both inputs and select the
desired one via the PowerSDR control panel – see the section on Power SDR Settings and Fig 3 on page 9.
Rev 1.0, May 2008
5
© AB1DO
PENELOPE
OPERATION WITH
POWERSDR
Microphone Jumper Settings
Penelope has three jumpers, just behind and below
the microphone and PTT jack (#2), which need to be
set in accordance with the connections chosen above
(see the “gray box” in Fig 1) . These are identified on
the board from left to right as PTT, +V (Bias) and
Aud (Audio) respectively. The upper jumper position
identifies the Ring, and the lower the Tip.
(see Table 3).
●
Set the AUD jumper to identify the terminal
(tip or ring) that the microphone is connected
to.
●
Penelope can provide DC bias for use with
Electret microphones. If your microphone
requires a DC bias, set the +V jumper to the
same terminal (tip or ring) the microphone is
connected to.
Table 3: Microphone and
Jumper Settings
Bias
Microphone
Tip
Ring
No
Yes
Note: IF YOUR MICROPHONE DOES NOT REQUIRE A DC BIAS THEN DO NOT FIT A
JUMPER.
IMPORTANT: DO NOT BLINDLY COPY THE JUMPER SETTINGS FROM A JANUS BOARD. THE
JUMPERS ARE NOT IN THE SAME ORDER AS THOSE FOUND ON JANUS. THE LEFT-TORIGHT ORDER ON JANUS IS BIAS, PTT, AUDIO AND ON PENELOPE PTT, BIAS, AUDIO.
PTT Jumper Settings
If your microphone is fitted with a PTT switch, then set the PTT jumper to identify the terminal
(ring or tip) that this PTT switch is connected to (see Table 4).
Note: MAKE SURE THIS IS NOT THE SAME TERMINAL YOUR MICROPHONE IS CONNECTED TO.
Note: DO NOT SET THIS JUMPER IF YOUR MICROPHONE HAS NO PTT SWITCH OR YOU DO NOT
CONNECT IT.
WARNING: IF YOUR MICROPHONE PLUG USES TIP AND
SLEEVE CONNECTIONS ONLY AND YOU SET THE PTT
JUMPER TO THE RING SETTING, THE PTT ON PENELOPE
WILL BE PERMANENTLY ACTIVATED.
Table 4: PTT
Jumper Settings
PTT
Ring
Tip
If you wish to connect an external PTT switch connect it
between the sleeve terminal of the plug and which ever
terminal is not being used by the microphone. Set the PTT
jumper accordingly.
Rev 1.0, May 2008
6
© AB1DO
PENELOPE
OPERATION WITH
POWERSDR
Note: AN ALTERNATIVE PTT INPUT IS AVAILABLE THROUGH THE PIN 1 OF THE DB-25
CONNECTOR (#3) - SEE BELOW FOR MORE DETAILS.
3 Audio Out, Open Collectors, PTT Out, etc.
The pin-out of this DB-25 socket is shown in Table 5 below.
Table 5: DB-25 Pin-out
Pin
Function
8, 7, 14
Ground reference for audio signals
1
PTT Input - active when connected to ground
13
PTT Output – open drain FET conducts when PTT active
16
Left Audio Output from PowerSDR on receive or monitor
3
Right Audio Output from PowerSDR on receive or monitor
2
Left Line level audio input
15
Right Line level audio input
5
PWM audio channel 0 (for future projects)
18
PWM audio channel 1 (for future projects)
4
PWM audio channel 2 (for future projects)
9
Open collector output 1
22
Open collector output 2
10
Open collector output 3
23
Open collector output 4
11
Open collector output 5
24
Open collector output 6
12
Open collector output 7
25
Open collector output reference
20
ADC input 1 (for future use)
7
ADC input 2 (for future use)
19
ADC input 3 (for future use)
6
ADC input 4 (for future use)
The open drain output on pin 13 is intended to be used to switch an external power amplifier or
transverter etc. The output switches to low impedance whenever the MOX is activated in
PowerSDR. The output is rated at 60V and 100mA and includes a relay back-emf protection
diode.
The open collector outputs are rated at 50v and 500mA.
Note: TOTAL CURRENT DRAIN FROM ALL OUTPUTS; COMMON, RELAY BACK-EMF PROTECTION,
Rev 1.0, May 2008
7
© AB1DO
PENELOPE
OPERATION WITH
POWERSDR
DIODES ARE PROVIDED AT PIN 25 – SEE ULN2003AD DATA SHEET FOR MORE DETAINS
(http://www.chipcatalog.com/TI/ULN2003AD.htm).
Note: WHEN USED WITH JANUS THE USER MAY PREFER TO USE THE LEFT AND RIGHT AUDIO
OUTPUTS FROM PENELOPE RATHER THAN THE AUDIO OUT CONNECTOR ON JANUS SINCE THE
AUDIO FROM PENELOPE WILL BE OF A HIGHER QUALITY.
Operation
The FPGA on Penelope is loaded with the latest version of firmware during manufacture hence no
additional firmware need be loaded prior to use. FPGA updates to add new features are expected
to be provided in the future. When new firmware is available it can be loaded into the Penelope
FPGA via an Ozy board. A separate manual will be provided that explains how the FPGA firmware
on HPSDR boards can be upgraded.
To use Penelope, plug it into an Atlas bus together with an Ozy and optionally a Janus board.
We will assume you are familiar with the use of your Ozy board (and Janus if fitted) and that you
have set up the board and it’s associated software as per the user manual Janus and Ozy
Operation with PowerSDR.
When powered on the two LEDs shown in Fig 1 on page 4 should be illuminated. The left hand
LED indicates power has been applied to the board whilst the right hand LED indicates the
firmware is loaded in the FPGA.
PowerSDR Settings
You will need to obtain PowerSDR from KD5TFD's SVN branch at:
svn://206.216.146.154/svn/repos_sdr_windows/PowerSDR/branches/kd5tfd/PennyMerge
Note: THIS CODE WILL BE MERGED INTO THE MAIN POWERSDR CODE AS SOON AS SUFFICIENT
USER FEEDBACK HAS BEEN OBTAINED.
Set up PowerSDR for use with Ozy and Janus (see the manual Janus and Ozy Operation with
PowerSDR) and select the various options in PowerSDR assuming that Ozy is being used with an
SDR1000.
To configure Penelope, in PowerSDR click Set-up on the Front Console to open the Setup Form.
Click on the General Tab and then on the HPSDR Sub-Tab (see Fig 3 below).
[INTENTIONALLY LEFT BLANK]
Rev 1.0, May 2008
8
© AB1DO
PENELOPE
OPERATION WITH
POWERSDR
Fig 3: Setup Form, General Tab - HPSDR sub-tab
In the section marked HPSDR Hardware Present check the Penelope box and also Janus if it
is present and you wish to use it.
In the section marked 10MHz Clock Source you may select either the 10MHz TCXO fitted to the
Penelope board or an external 10MHz reference connected to the Atlas bus at pin C16. The
selected 10MHz source will be used to phase lock the various HPSDR clocks.
IMPORTANT: DO NOT SELECT BOARDS OR CLOCKS THAT ARE NOT ACTUALLY PRESENT SINCE
DOING SO MAY CAUSE POWERSDR TO HANG AND MAY REQUIRE A RE-BOOT OF THE PC TO
RECOVER. SHOULD A CLOCK BE SELECTED THAT IS NOT ACTUALLY PRESENT THEN LED 0 ON
THE OZY BOARD WILL FLASH TO WARN YOU.
By checking the box to indicate that a Penelope board is fitted to the Atlas bus the 122.88MHz
Clock Source will automatically default to Penelope.
If you have checked the box to indicate that a Janus board is also fitted to the Atlas bus then you
may select either the Janus or Penelope Mic Source. This enables switching between different
microphones to determine their performance or leaving a single microphone connected to Janus
for use either with Penelope or an SDR1000.
Rev 1.0, May 2008
9
© AB1DO
PENELOPE
OPERATION WITH
POWERSDR
Setting the Output Power
Penelope is designed to provide a nominal output power of 0.5w PEP over the range 1.8 to 55MHz.
An ALC loop built into the FPGA firmware on Penelope is used to prevent this power level from
being exceeded. By restricting the output power to this level the spectral output meets the
relevant FCC specifications and provides a high level of intermodulation (IP3) performance.
The PA stage used on Penelope can provide up to 1W PEP of output but you will then need to alter
the FPGA code to disable the ALC function and provide external harmonic filtering.
The output level from Penelope is set using the Drive control on the Front Console of PowerSDR.
Should you use an external amplifier following Penelope then it is not unusual for this to show
significant variations in gain from 1.8 to 55MHz. Usually, such amplifiers show a decreasing gain
as the operating frequency increases This can require a low level of Drive on the lower bands and
much higher drive levels on the higher bands.
PowerSDR enables you to set the output level from Penelope on a band-by-band basis such that,
for example, with the Drive control set fully to the right the associated power amplifier will
achieve maximum output on all bands. This usually means that the actual output level from
Penelope will be internally set to a lower value on lower frequencies.
You can set the output level per band by using the PA Settings controls on the Setup Form of
PowerSDR. This will be available once Penelope has been selected under the HPSDR Sub-Tab (see
Fig 3 on page 9).
The PA Settings controls are shown in Fig 4 below.
[INTENTIONALLY LEFT BLANK]
Rev 1.0, May 2008
10
© AB1DO
PENELOPE
OPERATION WITH
POWERSDR
Fig 4: Setup Form, PA Settings Tab
Note: INCREASING THE GAIN BY BAND SETTING DECREASES THE OUTPUT POWER LEVEL. SEE
THE SDR1000 OPERATING MANUAL FOR ADDITIONAL INFORMATION IN RELATION TO THESE
SETTINGS. AS EXPLAINED ABOVE, ALC ACTION WILL PREVENT THE PEP OUTPUT FROM
EXCEEDING 0.5W.
[INTENTIONALLY LEFT BLANK]
Rev 1.0, May 2008
11
© AB1DO
PENELOPE
OPERATION WITH
POWERSDR
Open Collector Outputs
The DB25 connector provides seven open collector outputs that may be activated on a band-byband and receive or transmit basis. The set up screen for this facility is on the Setup Form,
General Tab - PennyCTL Sub-Tab as shown in Fig 5 below.
Fig 5: Setup Form, General Tab - PennyCtrl Sub-Tab
To activate external control, check the Ext Ctrl box on the far right. Then, to activate an output,
place your mouse within the relevant row/column of the J6 Recv Pins and/or J6 Transmit Pins
section and left click. A check mark will appear which indicates the selection has been applied. To
remove a selection simply left click on the check mark.
Note: TO ACTIVATE AN OUTPUT ON BOTH RECEIVE AND TRANSMIT AN CHECK MUST BE PLACED
IN BOTH THE RECEIVE AND TRANSMIT SECTIONS OF THE FORM.
The remainder of the selections on this screen concern the Alex Antenna Control. These settings
are documented in the (forth coming) Alex User Manual.
[INTENTIONALLY LEFT BLANK]
Rev 1.0, May 2008
12
© AB1DO
PENELOPE
OPERATION WITH
POWERSDR
Table of Revisions
Table 6: Revisions to this Document
Revision
Date
Comment
Rev 1.0
May 2008
Initial Publication
[INTENTIONALLY LEFT BLANK]
Rev 1.0, May 2008
13
© AB1DO