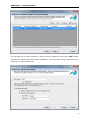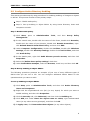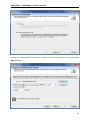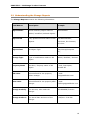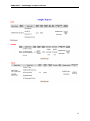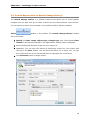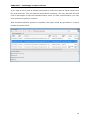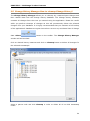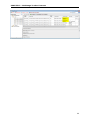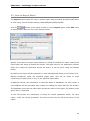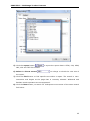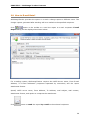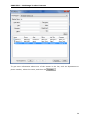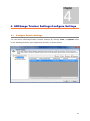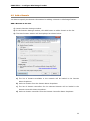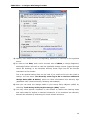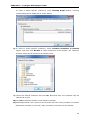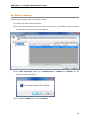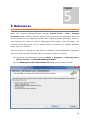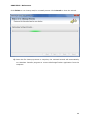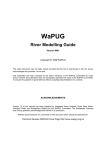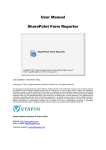
1
User Manual Active Directory Change Tracker ------------------------------------------------------------------- Table of Contents 1 2 3 4 Active Directory Change Tracker____________________________________________ 1 1.1 About ADChangeTracker ____________________________________________________ 1 1.2 System Requirements ______________________________________________________ 2 1.3 Who can Use ADChangeTracker? _____________________________________________ 3 1.4 How to Activate the Software? _______________________________________________ 3 Getting Started _________________________________________________________ 5 2.1 Configure ADChangeTracker _________________________________________________ 5 2.2 Configure Active Directory Auditing ___________________________________________ 8 2.3 Change Application Data folder location _______________________________________ 9 ADChange Tracker Features-Track Changes__________________________________ 11 3.1 How to Track Changes? ____________________________________________________ 11 3.2 Change Reports-How to Generate Change Reports? _____________________________ 15 3.3 Understanding the Change Reports __________________________________________ 16 3.4 Search Reports-How to Search Change History? ________________________________ 18 3.5 Change History Manager-How to cleanup Change History? _______________________ 20 3.6 How to Find Data in a Report? ______________________________________________ 21 3.7 How to Export Data? ______________________________________________________ 23 3.8 How to Print Data? _______________________________________________________ 24 3.9 How to E-mail Data? ______________________________________________________ 26 ADChange Tracker Settings-Configure Settings _______________________________ 31 4.1 Configure Domain Settings _________________________________________________ 31 4.2 Add a Domain____________________________________________________________ 33 4.3 Edit a Domain ____________________________________________________________ 37 4.4 Delete a Domain _________________________________________________________ 39 4.5 View Properties of Domain _________________________________________________ 40 ii Table of Contents 5 6 4.6 Configure SQL Server ______________________________________________________ 41 4.7 User Profiles _____________________________________________________________ 43 4.8 How to Exclude Properties? ________________________________________________ 45 References ____________________________________________________________ 47 5.1 How to Uninstall ADChange Tracker? _________________________________________ 47 5.2 Technical Support ________________________________________________________ 50 Index _________________________________________________________________ 51 iii Chapter 1 Active Directory Change Tracker 1 1.1 About ADChangeTracker About Vyapin Active Directory Change Tracker (ADChangeTracker) Vyapin Active Directory Change Tracker (ADChangeTracker) audits, tracks and analyzes all changes made to your Active Directory configuration The tool audits all changes made to your Active Directory by periodically collecting only the changed data, reporting what exactly changed, along with the new and old values, when the change was made, where the change happened in your Active Directory and the tool also determines who made the change by looking up the Security Event logs of your auditenabled Active Directory.. Active Directory Change tracker records and maintains the entire history all tracked changes along with the relevant Event log data in a SQL server database for future reference and analysis. A powerful search tool helps you analyze all past changes on any predefined search criteria. Changes can be selectively tracked (such as only OUs) and a powerful email notification mechanism lets you configure different types of changes (such as Created, Deleted, and Modified) and get them notified to different end users based on the OUs/containers where the changes happened. 1 CHAPTER 1 –Active Directory Change Tracker 1.2 System Requirements For the computer running ADChangeTracker Processor Intel Pentium Processor Disk Space & Memory 512 MB RAM and minimum of 20 MB of free disk space Operating System Windows 7 / Windows Vista / Windows XP / Windows Server 2000 / Windows Server 2003 / Windows Server 2008 / Windows Server 2008 R2 with .NET Framework 4.0 or higher with the latest service packs. Database Microsoft SQL Server 2008 (Enterprise / Standard / Developer / Express edition) or Microsoft SQL Server 2005 (Enterprise / Standard / Developer / Express edition) running in local / remote computer with latest Service Pack. Software MDAC v2.5/2.6/2.8 For the computers reported by ADChangeTracker Windows Server 2008 R2 / Windows Server 2008 / Windows Server 2003 (SP2) / Windows Server 2000 running Active Directory. 2 CHAPTER 1 –Active Directory Change Tracker 1.3 Who can Use ADChangeTracker? Organizations running ADChangeTracker. It Microsoft is a Active powerful Directory Change can auditing greatly tool for benefit Active from Directory Administrators. System Administrators can monitor changes to Active Directory Servers across the enterprise network in any location. Users that would benefit from ADChangeTracker: Systems management personnel CIOs and CSOs Security and Systems Audit personnel System Administrators Organizations that would benefit from ADChangeTracker: Companies having enterprise network based on Active Directory Any company having Windows 2008 R2 / 2008 / 2003 / 2000 Active Directory servers 1.4 How to Activate the Software? Once you purchase the software online or through any one of our resellers, you will receive a sale notification through e-mail from our sales department. We will send you an e-mail with the necessary instructions to activate the software. In case you do not receive an e-mail from our sales team after you purchase the software, please send the following information to our sales department at [email protected] with the sales order number: Company Name: End-user Company Name Location: City & Country for the Company Name given above Please allow 12 to 24 hours from the time of purchase for our sales department to process your orders. 3 CHAPTER 1 –Active Directory Change Tracker Image 1 - Activate screen Perform the following steps to activate the software: 1) Download evaluation/trial copy of software from the respective product page available in our website at http://www.vyapin.com/ 2) Install the software on the desired computer. 3) You will receive a license key through e-mail as soon as the purchase process is complete. 4) Click 'Activate' in Help -> About -> Activate menu to see the Activate dialog (as shown in Image 1). 5) Copy the license key sent to you through email and pastes it in the 'License Key' textbox. For help on how to copy the license key, click 'Click here to see how to copy and paste the license key' link in the Activate dialog (as shown in Image 2). Image 2 - How to copy license key screen 4 Chapter 2 Getting Started 2 2.1 Configure ADChangeTracker ADChangeTracker Startup wizard will help you configure the ADChangeTracker application to track changes in Active Directory domain. The following wizard will appear when you run the application for the very first time. Click Next to Proceed. 5 CHAPTER 2 – Getting Started You can add one or more domains in order to track changes by clicking on 'Add' button. Changes are tracked for each domain separately. You may add as many domains as you would like to track changes on. 6 CHAPTER 2 – Getting Started ADChangeTracker uses SQL Server database for its data storage to generate auditing reports. ADChangeTracker requires an SQL Server running SQL Server 2008 / 2005 (Enterprise / Standard / Express editions) to connect and create a database. ADChangeTracker will connect to the specified SQL Server based on the authentication mode and user credentials to create manage its own application databases. A new database will be created in your SQL server by the name ADChangeTracker<COMPUTER>, where COMPUTER stands for the computer name that is running ADChangeTracker application. Thus, each installation of ADChangeTracker will deploy its own database based on the computer where ADChangeTracker is installed. For example, if you install the software on 3 different machines, 3 different databases will be created and each installed application will track changes separately independent of each other. Specify the SQL Server name, authentication mode, user name and password in the above screen. Click Finish to save configuration settings. 7 CHAPTER 2 – Getting Started 2.2 Configure Active Directory Auditing This section provides step-by-step procedures for enabling auditing of changes to objects in AD DS. This process consists of two primary steps: Step 1: Enable audit policy. Step 2: Set up auditing in object SACLs by using Active Directory Users and Computers console. Step 1: Enable audit policy. 1) Click Start, point to Administrative Tools, and then Group Policy Management. 2) In the console tree, double-click the name of the forest, double-click Domains, double-click the name of your domain, double-click Domain Controllers, rightclick Default Domain Controllers Policy, and then click Edit. 3) Under Computer Configuration, double-click Policies, double-click Windows Settings, double-click Security Settings, double-click Local Policies, and then click Audit Policy. 4) In the details pane, right-click Audit directory service access, and then click Properties. 5) Select the ‘Define these policy settings’ check box. 6) Under Audit these attempts, select the Success, check box, and then click OK. Step 2: Set up auditing in object SACLs. The following procedure presents an example of just one of many different types of SACLs that you can set in AD. You can configure additional SACLs based on the operations that you want to audit. To set up auditing in object SACLs 1) Click Start, point to Administrative Tools, and then click Active Directory Users and Computers. 2) Right-click the organizational unit (OU) (or any object) for which you want to enable auditing, and then click Properties. 3) Click the Security tab, click Advanced, and then click the Auditing tab. 4) Click Add, and under Enter the object name to select, type Authenticated Users (or any other security principal), and then click OK. 5) In Apply onto, click Descendant User objects (or any other objects). 8 CHAPTER 2 – Getting Started 6) Under Access, select the Successful check box for write all properties. If you want to audit creation and deletion of objects, select the Successful check box for Delete, Delete Sub Tree and Create All Child Objects too. 7) Click OK until you exit the property sheet for the OU or other object. 2.3 Change Application Data folder location ADChangeTracker enables you to change Application Data folder location, where its application settings and error log are stored, at any time after installing ADChangeTracker software. To change the Application Data folder location, perform the following steps given below: 1) Select About ADChangeTracker from Help menu 2) The About ADChangeTracker dialog appears as shown below: 3) Click Change... button to change Application Data folder location of ADChangeTracker application. 9 CHAPTER 2 – Getting Started The Browse for Folder location dialog will appear as shown below: 4) Select a desired folder location and Click OK. The folder location can be local drives or mapped network drives. 5) ADChangeTracker provides an option to copy or move the existing ADChangeTracker application settings and error log to the new location once you change the Application Data Folder. Once you specify the new Application Data folder location, ADChangeTracker will prompt you to copy or move existing ADChangeTracker application settings to the new location as shown below: 6) Click the desired action (Copy / Move / Close) to proceed. ADChangeTracker will use the new Application Data folder location henceforth. 10 Chapter 3 3 ADChange Tracker Features-Track Changes 3.1 How to Track Changes? The Track Changes feature allows you to track the list of all the changes made in Active Directory. You can check for various changes in Active Directory like addition or deletion of objects, modification of properties. Select button in the toolbar. The Check for Changes report window will be launched. Select Track now option to track changes made to Active Directory domain immediately upon clicking the Finish button or select Track at scheduled intervals option to track changes made to Active Directory domain at scheduled intervals. Changes will be tracked since the last time a tracking was performed. The tracking process will only collect the changed data and store it in the application's change history database. You will have to view the changes by clicking on the Change Reports button in the toolbar. 11 CHAPTER 3 – ADChange Tracker Features Change the task schedule settings as required and set the password for the specified Run As user. 12 CHAPTER 3 – ADChange Tracker Features Click Next to proceed to the next step. Select Export or Print or E-mail options as necessary. Use Browse button to change the export path. The export path refers to the destination folder where the report output file generated should be stored. By default, for each task, a sub-folder with the task name will be created under the specified export path. All selected reports will be exported to a time-stamped folder in the format "yyyy-mm-dd hh.mm.ss", under the task name folder. If you want to export to the task name sub-folder in the specified folder (without time stamp folder) instead, clear "Export to timestamped sub-folder" option NOTE: Clearing the "Export to time-stamped sub-folder" option will not create time-stamp folder and overwrite existing files, if any, in the specified export path. 13 CHAPTER 3 – ADChange Tracker Features Click Message Settings button to specify optional e-mail settings as shown below. Click Finish to save the task details Once data collection was completed you can view the changes made to your Active Directory domain with the help of Change Reports feature. 14 CHAPTER 3 – ADChange Tracker Features 3.2 Change Reports-How to Generate Change Reports? The Change Reports feature allows you to report all the changes made to your Active Directory since the last time a tracking was done by the application. Tracking is a process where all changes made to your Active Directory are detected and synchronized with the application database. ADChangeTracker will maintain all the timestamps corresponding to the changes detected during tracking. Based on the timestamps listed in the left treeview of Change History report window, you can view the changes for a specific date and time. Select button in the toolbar. The Change Reports window will be launched. Select and expand the root node in the left pane of the newly launched report window. Select 'Show only AD changes' option to view timestamps related to only Active Directory changes and select 'Show only GPO changes' option to view only Group Policy changes. You can click Show All Changes, Only Added, Only Modified; Only Deleted tabs to view the list of all changes, added, edited and deleted changes. 15 CHAPTER 3 – ADChange Tracker Features 3.3 Understanding the Change Reports The Change Reports contains the following information: Field Names Description Example Object Name Active Directory object name of Administrator Added / modified / deleted objects. Object Path Fully Qualified Domain Name of AD CN=Administrator, objects. CN=Users, DC=Domain, DC=Com Object Class AD Object Type User/Group/Computer etc., Change Type Type of modification made on AD Added / Modified / Deleted object. Property Name Old Value New Value Change made by Attribute / Property name of AD E-mail, Description, object. Member Of Value defined for the property E-mail: before change. [email protected] Value defined for the property after E-mail: change. [email protected] The account, who made the PATHFINDER\Trainee1 change. Change made on The actual date and time of the 1/29/2011 3:46 PM change. 16 CHAPTER 3 – ADChange Tracker Features 17 CHAPTER 3 – ADChange Tracker Features 3.4 Search Reports-How to Search Change History? The Search Change History is a powerful feature that allows you to locate specific changes from the past such as ‘all newly created user accounts between a time period’. You can specify a search criteria based on the different search options available. Select button in the toolbar. The Search Change History window will be launched. Specify the Date range, Object type, Change type and a field based Filter criteria to find specific changes in the application’s Change History database. Select the desired domains to perform your search on. Optionally, you can save this search by specifying a name for your search and clicking on the Save button. This will save the search for a future use. You can thus maintain a list of your saved searches for repeated use in the future. Click Generate button to begin search. 18 CHAPTER 3 – ADChange Tracker Features If you want to use or edit an already saved search, select the name of saved search from the drop down list. This will load the saved search’s settings. You may also edit this and click on Save again to save the modified search. Once you load a saved search, you may click Generate to perform a search. After the data collection process is complete, the report would be generated in a report window as shown below: 19 CHAPTER 3 – ADChange Tracker Features 3.5 Change History Manager-How to cleanup Change History? The Change History Manager allows you to cleanup any unwanted past changes and their related data from the Change History database. The Change History database contains all changes from the time you started using the application. Please be careful while you perform cleanups of changes as this will permanently delete the selected changes from your database. It is highly recommended that you maintain a full backup of the application’s database at regular intervals to recover any accidental loss of change data. Select button in the toolbar. The Change History Manager window will be launched. Click on desired history instances and click on Cleanup button to delete all changes for the selected timestamps. Select a parent node and click Cleanup in order to delete all of its child timestamp nodes. 20 CHAPTER 3 – ADChange Tracker Features 3.6 How to Find Data in a Report? You can use the find feature in ADChangeTracker to search for specific data in a report. To search for data in a report, just type the characters or words you want to find in the find edit box available in the report window and click on . 1) ADChangeTracker performs a case insensitive search of the specified search criteria in the report. 2) The search criteria should not be enclosed within quotation marks. 3) You can use the "*" wildcard character in the search criteria. The "*" wildcard character act as a place holder for zero or more characters. However, note that you cannot use the "?" wildcard character in the search criteria. For instance, if you want to search for 'Domain' in a report, Type Domain, without quotations, in the edit box, and then clicks on Find Button. By default, ADChangeTracker adds an asterisk as a suffix to the specified search criteria, if no wildcard character is present in it. In this case, ADChangeTracker finds a match in the report for all fields that have the text Domain followed by zero or more characters, that is, Domain, Domain Controllers, Domain Admins, etc. For all the matches found, ADChangeTracker highlights the corresponding columns in the grid, and scrolls the grid automatically to the first occurrence. For all the matches found, ADChangeTracker highlights the corresponding columns in the grid, and scrolls the grid automatically to the first occurrence. 4) ADChangeTracker finds additional occurrences of the specified search criteria instantaneously. To locate other occurrences of the same search criteria in a report you need to scroll the report grid downwards. 21 CHAPTER 3 – ADChange Tracker Features 22 CHAPTER 3 – ADChange Tracker Features 3.7 How to Export Data? The Export feature helps the user to export report data generated by ADChangeTracker to a file using various formats namely HTML/MDB/CSV/PDF/XLS/TIFF. Click on button in the report window or select Export option under File menu to export report data to a file in the desired format. Specify a file name to export report data to or accept the default file name. Specify the export path and select a desired file format. The path refers to the destination location where the output file generated should be stored. It can be given using the Browse button. By default, the report will be exported to a time-stamped sub-folder in the format 'YYYYMM-DD HH.MM.SS' under the specified export path. This will be useful to avoid overwriting of existing files, if any, in the specified export path. In MDB file format, the information is stored as tables in databases. For each report, a new database will be generated with a table for holding the report data for the domain. The database name and the table name will be the name of the report, by default or the given name, if specified. In CSV file format, the information is stored as comma separated values. For each report, a CSV file will be generated. The name of the CSV file will be the name of the report. 23 CHAPTER 3 – ADChange Tracker Features In HTML, PDF, XLS and TIFF file formats; the information is stored in html, Pdf, xls and tiff files respectively. For each report, a file corresponding to the selected file format will be generated. The name of the file will be the name of the report. 3.8 How to Print Data? Preview the generated report output before printing the report. Click on button in the toolbar available in the report window or press CTRL + P to launch Preview window. The report viewer will be displayed as shown below: 1) Click the Navigation buttons to navigate through the report pages 2) Click the Refresh button to reprocess the report and reload the data from the cache. 3) Click the Print button to print the report. 4) Click the Settings button to Show/Hide columns. The Report Settings window will be displayed as shown below: 24 CHAPTER 3 – ADChange Tracker Features 5) Click the export button to export the report data in HTML, CSV, MDB, PDF, XLS and TIFF file formats. 6) Select the Zoom control to enlarge or shrink the view size of the report. 7) Click the Find button to find specific text within a report. The search is caseinsensitive and begins at the page that is currently selected. Wildcards and Boolean search operators are not supported. 8) Click the Next button, to search for subsequent occurrences of the same search field value. 25 CHAPTER 3 – ADChange Tracker Features 3.9 How to E-mail Data? ADChangeTracker provides the option to e-mail a change report to different users. The change reports generated after tracking will be e-mailed to the specified recipients. Click button in the toolbar to e-mail the report to e-mail recipients. E-mail Report dialog will be displayed as shown below: For e-mailing reports, ADChangeTracker requires the SMTP Server name, From E-mail Address, To E-mail Addresses (recipients separated by semicolon) and the report attachment format. Specify SMTP server name, From Address, To Address, mail subject, mail content, attachment format, and option to compress the attachment. Click button to send the report by e-mail to the selected recipients. 26 CHAPTER 3 – ADChange Tracker Features Check Names ADChangeTracker provides check name feature to check the existence of corresponding mail-enabled recipient object in Active Directory. To check name, click button. If the entered name matches with a mail object in the Active directory / its trusted domain, name entered in From Address textbox will be replaced by the corresponding active directory recipient object. If there is more than one match, a dialog which contains matching Active Directory recipients will appear as shown below. You can select one or more recipients and click OK. To get more information about the listed recipients under Change to, select the name and then click . 27 CHAPTER 3 – ADChange Tracker Features If there is no match for the name entered by the user in Active Directory, a dialog will appear as shown below: Select Delete option in the above dialog to remove the recipient name from the To Address text box. Click Cancel button to close this dialog and the unresolved recipient(s) will appear in red color. Address Book ADChangeTracker provides Address Book feature to search for any mail enabled recipient object (say, person, distribution list, contact, public folder) you want to send a message to. Click button and then use the Find Names dialog box to search for the recipient object you want to send a message to. (Note that you can't use the Find Names dialog box to search for distribution lists in your Contacts folder.) Select the object's name in the list and then click Add recipient to...To. 28 CHAPTER 3 – ADChange Tracker Features To get more information about one of the names in the list, such as department or phone number, select the name, and then click . 29 Chapter 4 4 ADChange Tracker Settings-Configure Settings 4.1 Configure Domain Settings You can launch ADChangeTracker Domain Settings by clicking Tools -> Options menu in the ADChangeTracker main application window, as shown below: 31 CHAPTER 4 – Configure ADChange Tracker The various operations that can be performed in the Domain Settings are given below: Operation Description Add To Add a Domain to the domain list. Edit To Edit the properties of the Domain in the domain list. Select a Domain and click Edit button. Delete To Delete a Domain from the domain list. Select a Domain and click Delete button. View Properties To view the properties of the Domain in the list. Select a Domain and click Properties button. 32 CHAPTER 4 – Configure ADChange Tracker 4.2 Add a Domain You have to specify the domain information for adding a domain in ADChangeTracker. Add a Domain to the List 1) Launch Domain Settings window. 2) In the Domain Settings window, click Add button to add a domain to the list. 3) The New Domain window will be displayed as shown below: a) The list of domains available in the network will be loaded in the Domain Name dropdown. b) Select a domain from the Domain Name dropdown. c) The list of domain controllers for the selected domain will be loaded in the Domain Controller Name dropdown. d) Select a domain controller from the Domain Controller Name dropdown. 33 CHAPTER 4 – Configure ADChange Tracker 4) Specify user name and the corresponding password to connect to the specified server. 5) In order to find Who, and a more accurate time of When, a change happened, ADChangeTracker will have to read the applicable change events (logged through native AD auditing) in the Windows Security Event Logs from all the domain controllers in the domain. This is an optional setting that can be used if you need to find out who made a change. You can select 'Use Security event log in DC to retrieve additional change data (Who & When)' option to collect information from Security logs (applicable only if Active Directory Auditing was enabled). 6) Also you can track the change made to your Group Policy Objects (GPOs) by checking 'Track Group Policy Object changes (GPO)' option. 7) You may select specific containers in the domain to restrict the tracking scope and collect data for objects in selected containers. If no containers are selected, data will be collected by searching the entire domain structure. 34 CHAPTER 4 – Configure ADChange Tracker In order to select specific containers, Click Tracking Scope button. Tracking Scope dialog will be displayed as shown below: 8) In order to select specific containers, select selected containers in Domain option, and then click Browse to select containers in the domain. The container browser dialog will be displayed as shown below: 9) Select the desired container and click OK. Note that only one container may be selected at a time. 10) Click OK to add the domain to the Domain Settings. 11) ADChangeTracker will connect to the domain with the newly provided connection parameters and add it to the list, upon successful connection to the domain. 35 CHAPTER 4 – Configure ADChange Tracker 36 CHAPTER 4 – Configure ADChange Tracker 4.3 Edit a Domain To Edit a domain in Domain Settings, follow the steps given below: 1) Launch Domain Settings window. 2) In the Domain Settings window, select any row (Domain), Click Edit button to Edit an existing Domain in the list, as shown below: 3) The Domain Name cannot be modified during the edit operation. 4) Specify user name and the corresponding password to connect to the specified domain. 5) You can change the Event Log, GPO settings and Tracking Scope settings. 6) Click OK to save and connect to the domain with the newly provided connection parameters and update the domain. 7) ADChangeTracker will connect to the domain with the newly provided connection parameters and modify it in the list, upon successful connection to the domain. 37 CHAPTER 4 – Configure ADChange Tracker 38 CHAPTER 4 – Configure ADChange Tracker 4.4 Delete a Domain Perform the following steps to delete a domain: 1) Launch Domain Settings window. 2) In the Domain Settings window, select any domain, click Delete button to delete the domain from the Domain Settings list. 3) An alert message asking for confirmation to delete the domain will be displayed as shown below: 4) Click Yes to delete the selected domain. 39 CHAPTER 4 – Configure ADChange Tracker 4.5 View Properties of Domain Perform the following steps to view properties of domain: 1) Launch Domain Settings window. 2) In the Domain Settings window, select any domain, click Properties button to view the properties of the selected domain. 3) The Properties window with the selected domain information will be displayed as shown below: 40 CHAPTER 4 – Configure ADChange Tracker 4.6 Configure SQL Server ADChangeTracker uses SQL Server database for its internal data storage, including storage of Change History. ADChangeTracker requires an SQL Server running SQL Server 2005 / 2008 (Enterprise / Standard / Express editions) to connect and create a new application database. ADChangeTracker will connect to the specified SQL Server based on authentication mode and user credentials to manage its own application database. You can launch SQL Server settings to use by clicking Tools -> Options menu in the ADChangeTracker main application window, as shown below ADChangeTracker wizard will prompt for the SQL settings (Server name, authentication mode, user name and password) when the application is launched for the very first time. These settings can be accessed again from the Tools -> Configuration Settings… menu: User Authentication To connect to SQL Server, ADChangeTracker uses the relevant user accounts based on the authentication mode as listed below: A. Windows Authentication: 41 CHAPTER 4 – Configure ADChange Tracker In this method, ADChangeTracker uses the currently logged on user account while running tracking changes using ‘Track Now’ or the Run as account while using ‘Track at scheduled intervals’. B. SQL Authentication: In this method, ADChangeTracker uses the specified SQL user account and password while tracking changes. ADChangeTracker stores the SQL user name and password as a user profile in 'Stored User Names and Passwords' applet for its usage. NOTE: ADChangeTracker expects the user account to have sufficient privileges to create, add to and delete database in the SQL server. Database Creation ADChangeTracker creates databases in SQL Server as per the information outlined below: ADChangeTracker creates a single application database in the default data storage location used by the SQL Server during application launch. ADChangeTracker uses the following naming convention: ADChangeTracker-<COMPUTERNAME>, where COMPUTERNAME is the name of the computer running ADChangeTracker. For example, if the computer running the ADChangeTracker is ‘CLIENT01’, ADChangeTracker creates 'ADChangeTracker-CLIENT01' with data ('ADChangeTrackerCLIENT01.mdf') and log ('ADChangeTracker-CLIENT01_log.LDF') files stored in the default SQL data folder in the SQL server (for example, C:\Program Files\Microsoft SQL Server\MSSQL.1\MSSQL\Data). Database Cleanup ADChangeTracker will delete the application database while uninstalling the ADChangeTracker application from the computer. 42 CHAPTER 4 – Configure ADChange Tracker 4.7 User Profiles ADChangeTracker creates a user profile in Windows Stored User Names and Passwords applet, in order to store the SQL and Directory Server user context for report generation. The stored user profile will be useful for generating reports using ADChangeTracker under the following scenarios: a) Using an SQL Server having a dedicated SQL user account for report generation using ADChangeTracker (highly recommended) b) Using an SQL Server where SQL authentication mode is enabled c) Using an alternate user account to connect to the Directory Server to retrieve AD information The stored user profile persists for all subsequent logon sessions on the same computer where ADChangeTracker is installed. The stored user profiles are visible to the application under other logon sessions on the same computer. The stored user profile created by ADChangeTracker is restricted to the Windows User Profile context. If the Windows User Profile is maintained locally, ADChangeTracker stored user profile is accessible only by the same user in the same computer. If the user who creates ADChangeTracker stored user profile, has a Roaming user account in the enterprise, the ADChangeTracker stored user profile can be accessed by the same user in any computer in the Windows enterprise. The stored user profile is a generic credential of Windows Stored User Names and Passwords applet and can be used by ADChangeTracker application only. The credential information is stored securely in an 256 bit encrypted format in Windows Stored User Names and Passwords applet. The stored user profile corresponding to the SQL user account will be used by ADChangeTracker application in order to connect to the SQL Server, if SQL authentication is enabled in ADChangeTracker SQL settings. Using the User Profiles dialog shown below (Tools -> User Profiles...), new profile can be created and available profiles can be removed from the profiles list. 43 CHAPTER 4 – Configure ADChange Tracker Click New button to add a new profile and a dialog will appear as shown below: Click Remove button in the User Profiles dialog to remove available profiles. 44 CHAPTER 4 – Configure ADChange Tracker 4.8 How to Exclude Properties? ADChangeTracker provides an option to exclude AD attributes from being tracked. To exclude properties from audit data collection by ADChangeTracker, click on Tools -> Exclude Properties.... This will launch the dialog as shown below: Select the list of properties to be excluded from data collection and click OK to save the settings NOTE: By default, ADChangeTracker DOES NOT track the following changes (owing to the repetitive nature of data): (Original USN, Current USN, Modified Date, Bad Password Count, Last Logon, Last Logoff, MEmber Of, Logon Count, Last Logon Timestamp, Direct Reports, Managed Objects) 45 Chapter 5 References 5 5.1 How to Uninstall ADChange Tracker? When you uninstall ADChangeTracker through Control Panel - Add / Remove Programs applet, Windows Installer program will remove only the application files from your computer. But, the application related files created by ADChangeTracker remain in the computer. In order to remove ADChangeTracker worker files completely, the uninstall wizard provides a set of cleanup options to perform the cleanup operation based upon your selection. Use this wizard to cleanup the files that are created by ADChangeTracker application selectively and uninstall ADChangeTracker completely from the computer. 1) Launch the Uninstall wizard by clicking Start -> Programs -> Active Directory Change Tracker -> Uninstall ADChangeTracker. 2) The ADChangeTracker Uninstall Wizard dialog will be shown as below: 47 CHAPTER-5- References Click Next to Proceed. 3) Select required cleanup options as shown below: Click Next to Proceed. 4) Confirm the cleanup and/or uninstall process. 48 CHAPTER-5- References Click Finish to run cleanup and/or uninstall process. Click Cancel to close the wizard. 5) Once the file cleanup process is complete, the uninstall wizard will automatically run Windows Installer program to remove ADChangeTracker application from the computer. 49 CHAPTER-5- References 5.2 Technical Support If and when a problem arises, please forward the following information to [email protected] to revert back to you with a solution. These files will be available where ADChangeTracker is installed. Error log file - e.g., <Application Data Folder>\ADChangeTracker\ADChangeTrackerErrorLog.log The <Application Data Folder> is the common location where ADChangeTracker settings will be stored in the computer running ADChangeTracker application. The <Application Data Folder> can be found from the Help -> About screen. The default path of <Application Data Folder> is as follows: a) Windows XP, Windows 2000, Windows 2003-C:\Documents and Settings\All Users\Documents b) Windows 7, Windows Vista, Windows 2008 - C:\Users\Public\Documents 50 Chapter 6 6 Index <All Users Application Data>, 44 Delete a Domain, ii, 28, 32, 33 Active Directory Auditing, ii, 6, 29 Delete button, 28, 32, 33 Active Directory Change Tracker, 1, ii, 1, destination folder, 10 41 ADChangeTracker, ii, 1, 2, 3, 4, 6, 12, 18, 19, 22, 23, 24, 27, 28, 29, 31, 32, Disk Space & Memory, 2 domain controller, 29 35, 36, 37, 39, 41, 43, 44 Domain Controller Name, 29 Administrative Tools, 6, 7 Domain Name, 13, 29 alert message, 33 Domain Settings, ii, 27, 28, 30, 32, 33, Browse button, 10, 19 browse option, 41 Change History Manager, ii, 17 Cleanup, 17, 36 cleanup options, 41, 42 Computer Configuration, 6 Create, 8, 27 Create Task, 8, 44 CSV file format, 19 Database, 2, 36 34 Edit Task, 27 E-mail Data, ii, 22 E-mail Report, 22 Error Log File, 44 export button, 21 Export Data, ii, 19 export path, 10, 19 Find button, 21 Find Data, ii, 18 51 Chapter-6-Index Intel Pentium Processor, 2 Settings button, 20 List contents, 41, 45 Software, 2 MDB file format, 19 specific containers, 30 Navigation buttons, 20 SQL Server, ii, 2, 6, 35, 36, 37 New Task, 27 System Administrators, 3 Next button, 21 Task, 27 Operating System, 2 Task List, 27 Press Ctrl, 27 Task Manager, 28 Print button, 20 Track Changes, ii, 8 Print Data, ii, 20 uninstall process., 42, 43 Refresh button, 20 User Authentication, 35 Report Settings, 20 User Profiles, ii, 37, 38 Search Change History, ii, 15 View Properties, ii, 28, 32, 34 Select Edit Task, 27 Windows Selected, 27 Settings, 27 Stored User Names and Passwords, 37 Zoom control, 21 52