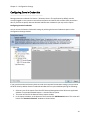
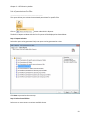
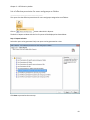
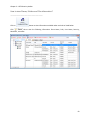
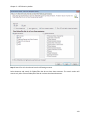
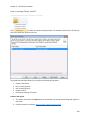
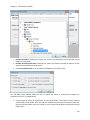
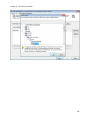
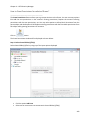
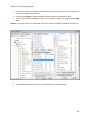
1
NTFS Security Management Suite Last Updated: June 2015 Copyright © 2014 Vyapin Software Systems Private Limited. All rights reserved. This document is being furnished by Vyapin Software Systems Private Ltd for information purposes only to licensed users of the NTFS Security Management Suite 2014 software product and is furnished on an “AS IS” basis, that is, without any warranties, whatsoever, express or implied. External Data Connector is a trademark of Vyapin Software Systems Private Ltd. Information in this document is subject to change without notice and does not represent any commitment on the part of Vyapin Software Systems Private Ltd. The software described in this document is furnished under a license agreement. The software may be used only in accordance with the terms of that license agreement. It is against the law to copy or use the software except as specifically allowed in that license. No part of this document may be reproduced or retransmitted in any form or by any means, whether electronically or mechanically, including, but not limited to the way of: photocopying, recording, or information recording and retrieval systems, without the express written permission of Vyapin Software Systems Private Ltd. Vyapin Software Systems Private Limited Website: http://www.vyapin.com/ Sales Contact: [email protected] Technical Support: [email protected] GENERAL INFORMATION ................................................................................................................. 1 About NTFS Security Management Suite 2014 ....................................................................................................... 2 System Requirements ............................................................................................................................................ 4 How to purchase? .................................................................................................................................................. 5 How to activate the software? ............................................................................................................................... 6 Technical support .................................................................................................................................................. 8 CONFIGURATION SETTINGS ............................................................................................................. 9 Database Settings ................................................................................................................................................ 10 Configure Computer Enumeration ....................................................................................................................... 13 Configuring Domain Credentials .......................................................................................................................... 14 Add a domain ...................................................................................................................................................... 17 Edit a domain....................................................................................................................................................... 19 Delete a domain .................................................................................................................................................. 21 Add domains from forest ..................................................................................................................................... 23 Configure SMTP Server ........................................................................................................................................ 26 User Connection Profiles...................................................................................................................................... 27 Module Listing ..................................................................................................................................................... 30 NTFS SECURITY AUDITOR ............................................................................................................... 31 Built-in Reports .................................................................................................................................................... 32 About Built-in Reports .............................................................................................................................................33 How to view Built-in Permissions Reports? ............................................................................................................34 How to view Built-in Reports for Shares and Resources? .......................................................................................88 Shares, Folders and Files ...................................................................................................................................... 92 How to view Shares, Folders and Files information? ..............................................................................................93 DAC Reports ........................................................................................................................................................ 97 About DAC Reports .................................................................................................................................................98 How to view the effective DAC permissions for the specified accounts? ...............................................................99 How to view the effective DAC permissions for Accounts having permissions on specific folders? ....................107 How to view Central Access Policies and policy permissions? ..............................................................................113 How to check the shared folders and subfolders affected by DAC policies? ........................................................117 Security Viewer.................................................................................................................................................. 123 How to view the permissions for shares and local drives? ...................................................................................124 How to enumerate shared folders/files? ..............................................................................................................132 Power Search ..................................................................................................................................................... 137 About Power Search ..............................................................................................................................................138 How to view Power Search Permissions (DACL) Reports? ....................................................................................139 How to view Power Search Exceptions (DACL) Reports? ......................................................................................149 How to view Power Search Auditing (SACL) Reports? ..........................................................................................159 How to manage Power Search? ............................................................................................................................169 Compare ACLs .................................................................................................................................................... 171 About Compare ACLs.............................................................................................................................................172 How to Compare ACLs of folders?.........................................................................................................................173 How to Compare ACLs of a folder with exported ACL data of another folder? ....................................................177 Security Vulnerabilities ...................................................................................................................................... 182 How to view Security Vulnerabilities Reports? .....................................................................................................183 Power Export ..................................................................................................................................................... 227 About Power Export ..............................................................................................................................................228 Scheduled Tasks Manager .....................................................................................................................................229 Schedule Shares, Folders and Files Reports ..........................................................................................................233 Schedule Built-in Reports ......................................................................................................................................242 NTFS SECURITY MANAGER ........................................................................................................... 338 Grant Permissions .............................................................................................................................................. 339 About Grant Permissions ......................................................................................................................................340 How to Grant Permissions for selected Shares? ...................................................................................................347 How to reuse the Grant Permissions template? ...................................................................................................358 Revoke Permissions ........................................................................................................................................... 360 About Revoke Permissions ....................................................................................................................................361 How to revoke permissions from the selected shares permissions list? ..............................................................376 How to reuse the Revoke Permissions template? ................................................................................................393 Modify Permissions ........................................................................................................................................... 395 How to view the share permissions? ....................................................................................................................396 How to Grant Permissions for selected Shares? ...................................................................................................402 How to add new accounts to the folder/file permissions list? .............................................................................412 How to replace an account with another account in the shared folder/file permissions list? .............................419 How to remove the selected account from the shared folder/file permissions list?............................................426 How to allow inheritance from the parent to current folder/file permissions? ...................................................428 How to block inheritance from the parent to the current folder/file permissions? .............................................430 How to modify an account Basic permissions? .....................................................................................................433 How to modify an account Advanced permissions? .............................................................................................436 Copy Permissions ............................................................................................................................................... 439 About Copy Permissions........................................................................................................................................440 How to Copy Permissions from one share to another share(s)? ..........................................................................447 How to reuse the Copy Permissions template? ....................................................................................................461 Copy Account Permissions ................................................................................................................................. 463 How to copy account permissions in the selected shared folder(s)/file(s) permissions list? ...............................464 Dynamic Access Control ..................................................................................................................................... 472 How to Apply Central Access Policy on selected Shares? .....................................................................................473 How to Revoke Central Access Policy from the selected Shares? .........................................................................482 Power Search ..................................................................................................................................................... 495 About Power Search ..............................................................................................................................................496 How to view Power Search Permissions (DACL) Reports? ....................................................................................497 How to manage Power Search? ............................................................................................................................506 Change History .................................................................................................................................................. 508 About Change History ...........................................................................................................................................509 How to view Permissions Change History? ...........................................................................................................510 How to view Central Access Policies Change History? ..........................................................................................514 ADDITIONAL FEATURES ................................................................................................................ 516 How to customize fields? ................................................................................................................................... 517 How to Apply Filter? .......................................................................................................................................... 518 How to Refresh data? ........................................................................................................................................ 520 How to Export data? .......................................................................................................................................... 521 How to E-mail data? .......................................................................................................................................... 523 How to find data in a report? ............................................................................................................................. 527 SCAN PROFILES MANAGER ........................................................................................................... 529 About Scan Profiles (Computers) ....................................................................................................................... 530 How to create Scan Profiles (Computers)? ......................................................................................................... 531 How to manage Scan Profiles (Computers)? ...................................................................................................... 536 How to apply Scan Profiles (Computers) in NTFS Security Auditor Module? ...................................................... 538 How to apply Scan Profiles (Computers) in NTFS Security Manager Module? .................................................... 540 About Scan Profiles (Users/Groups) ................................................................................................................... 543 How to create Scan Profiles (Users/Groups)? .................................................................................................... 544 How to manage Scan Profiles (Users/Groups)? .................................................................................................. 549 How to apply Scan Profiles (Users/Groups) in NTFS Security Auditor Module? .................................................. 551 How to apply Scan Profiles (Users/Groups) in NTFS Security Manager Module? ............................................... 556 About Scan Profiles (Shares) .............................................................................................................................. 559 How to create Scan Profiles (Shares)? ................................................................................................................ 560 How to manage Scan Profiles (Shares)? ............................................................................................................. 565 How to apply Scan Profiles (Shares) in NTFS Security Auditor Module? ............................................................. 567 How to apply Scan Profiles (Shares) in NTFS Security Manager Module? ........................................................... 572 REFERENCES ................................................................................................................................ 574 Frequently Asked Questions .............................................................................................................................. 575 Troubleshooting ................................................................................................................................................ 576 How to uninstall NTFS Security Management Suite 2014? ................................................................................. 577 Chapter 1 – General Information General Information ________________________________________ About NTFS Security Management Suite 2014 System Requirements How to purchase? How to activate the software? Technical support 1 Chapter 1 – General Information About NTFS Security Management Suite 2014 ________________________________________ Vyapin NTFS Security Management Suite 2014 is a powerful solution for auditing and managing NTFS security across your entire Windows network. The management suite consists of two modules – the NTFS Security Auditor module and the NTFS Security Manager module. About NTFS Security Auditor Module NTFS Security Auditor Module provides a powerful reporting solution for auditing NTFS security across your entire Windows network. NTFS Security Auditor module provides answers to important questions about the security and health of File systems in your servers and workstations. Who has access to what in your Files, Folders and Shares? Is there any unauthorized access? What type of access has been granted? Who can Read, Modify and Delete confidential Files and Folders? Do deleted or unknown users have access to files and folders? Who have been given special/explicit permissions on folders? Do the normal rules such as "inheritance of permissions by folders from parent" apply or have they been broken or subverted? Who have unauthorized access to confidential files and folders indirectly because of nested group membership? Are people sharing folders from their workstations? Are there Shares in workstations that need further security scrutiny? What type of permissions and conditions have been configured for each the Central Access Rules (CAR) in Central Access Policy (CAP) over the domain controller (Windows Server 2012)? Who have access limited permissions by Dynamic Access Control (DAC)/Central Access Policy (CAP) on Which folder? Which shared folders and subfolders (in Windows Server 2012) have been affected/not affected by the Central Access Policy? With Vyapin’s NTFS Security Auditor Module you can perform a complete security scan of Shares, Folders and Files present in your network. You can perform an automated inventory of permissions on Folders and Files at regular intervals and keep a constant watch on the health of your NTFS security. You can also view the effective DAC (Dynamic Access control) permissions in Windows Server 2012. Our solution provides a variety of audit reports that are simple, elegant and highly customizable for System 2 Chapter 1 – General Information Administrators, IT infrastructure Managers and Systems Audit personnel to use and act on. There are several powerful, ready-to-use reports that assist in both Management reporting and Compliance reporting requirements such as SOX and HIPAA. Vyapin’s NTFS Security Auditor serves your needs of administrative tasks as well as complex data preparation tasks for assisting in compliance. About NTFS Security Manager Module NTFS Security Manager module provides a powerful Management tool for managing NTFS Security across your entire Windows network. NTFS Security Manager module helps to manage the security of File systems in your servers and workstations. Grant permissions in bulk for multiple Accounts to your Files, Folders and Shares. Replace existing permissions with new permissions. Remove selected Accounts with all its permissions from the Files, Folders and Shares permissions list. Copy permissions from one File, Folder and Share to bulk of Files, Folders and Shares permissions list. Remove permissions from explicitly assigned Account permissions. Allow or Block inheritance from the parent Share, Folder into the current File, Folder and Share. View and Modify each Account permissions on Shares, Folders and Files. Replace an account with another account in the shared folder/file permissions list. Apply Central Access Policy on shared folder(s)/file(s). Revoke Central Access Policy from the shared folder(s)/file(s). Vyapin’s NTFS Security Management Suite 2014 has been architected using the latest Microsoft .NET technology, bringing you the best-in-breed NTFS reporting and management solution for your entire Windows Network. The software is highly optimized for performance (using native Windows API calls wherever appropriate), resulting in fast data collection of permissions from Shares, Folders and Files. You can create data subsets for your network using powerful scan options and meaningfully segment your entire network for data collection, reporting and managing. 3 Chapter 1 – General Information System Requirements ________________________________________ For the computer running NTFS Security Management Suite 2014 Disk space & Memory Operating System Database Software 512 MB RAM and minimum of 30 MB of free disk space Windows 8.1 / Windows 8 / Windows 7 / Windows Vista / Windows XP / Windows Server 2003 / Windows Server 2008 / Windows Server 2008 R2 / Windows Server 2012 / Windows Server 2012 R2 with .NET Framework 4.0 or higher with the latest service packs. Microsoft SQL Server 2012 (Enterprise / Standard / Developer / Express edition) or Microsoft SQL Server 2008 (Enterprise / Standard / Developer / Express edition) or Microsoft SQL Server 2005 (Enterprise / Standard / Developer / Express edition) running in local / remote computer with latest Service Pack. MDAC v2.5/2.6/2.8 For the computers reported and managed by NTFS Security Management Suite 2014 Windows 8.1 / Windows 8 / Windows 7 / Windows Vista / Windows XP / Windows Server 2012 R2 / Windows Server 2012 / Windows Server 2008 / Windows Server 2008 R2 / Windows 2003. 4 Chapter 1 – General Information How to purchase? ________________________________________ You can purchase NTFS Security Management Suite 2014 online from our website http://www.vyapin.com/. Please contact our Sales department at [email protected] for sales and price related queries. 5 Chapter 1 – General Information How to activate the software? ________________________________________ Once you purchase the software online or through any one of our resellers, you will receive a sale notification through e-mail from our sales department. We will send you an e-mail with the necessary instructions to activate the software. In case you do not receive an e-mail from our sales team after you purchase the software, please send the following information to our sales department at [email protected] with the sales order number: Company Name: End-user Company Name Location: City & Country for the Company Name given above Please allow 12 to 24 hours from the time of purchase for our sales department to process your orders. Image 1 – Activate screen Perform the following steps to activate the software: 1. Download evaluation/trial copy of software from the respective product page available in our website at http://www.vyapin.com/ 2. Install the software on the desired computer. 3. You will receive a license key through e-mail as soon as the purchase process is complete. 4. Click 'Activate' in Application Menu -> About -> Activate menu to see the Activate dialog (as shown in Image 1). 5. Copy the license key sent to you through email and paste it in the 'License Key' textbox. For help on how to copy the license key, click 'Click here to see how to copy and paste the license key' link in the Activate dialog (as shown in Image 2). 6 Chapter 1 – General Information Image 2 – How to copy license key screen 7 Chapter 1 – General Information Technical support ________________________________________ NTFS Security Management Suite 2014 Frequently Asked Questions (FAQ) section is available online at our website http://www.vyapin.com. Please direct all technical support questions to [email protected]. Include the following information to expedite a response: a. b. c. d. Include the version of the product you are using. If the problem is associated with installation, include the steps that led to the problem. If the problem is associated with usage, please state the series of steps you performed. Include the version of the OS, info about any service packs or hot-fixes and local language of the OS installed. e. Attach the Error Log File available in the common application data path of NTFS Security Management Suite 2014 (e.g., <Application Data> \NTFS Security Management Suite 2014\NTFSSecurityManagementSuite2014ErrorLog.Log). Note: <Application Data> is the common area where NTFS Security Management Suite 2014 settings will be stored in the computer running NTFS Security Management Suite 2014.The <Application Data Folder> can be found from the Help -> About screen. The default path of <Application Data Folder> is as follows: The path will be as follows: a. Windows XP, Windows 2003 - C:\Documents and Settings\All Users\Documents b. Windows Server 2008, Windows Server 2012, Windows Vista, Windows 7, Windows 8 C:\Users\Public\Documents 8 Chapter 2 – Configuration Settings Configuration Settings ________________________________________ Database Settings Computer Enumeration Configuring Domain Credentials Add a domain Edit a domain Delete a domain Add domains from forest Configure SMTP serves User Connection Profiles Module Listing 9 Chapter 2 – Configuration Settings Database Settings ________________________________________ NTFS Security Management Suite 2014 may be configured to use either MS-Access MDB or SQL Server database for its data storage to generate reports. If you choose SQL server NTFS Security Auditor module requires an SQL Server running SQL Server 2005 / 2008 / 2012 (Enterprise / Standard / Express editions) to connect and create a new application database. NTFS Security Management Suite 2014 will connect to the specified SQL Server based on authentication mode and user credentials to manage its own application database. You can access the Database settings by clicking Configuration -> Configuration Settings menu in the NTFS Security Management Suite 2014 main application window and choose Database settings, as shown below. User Authentication To connect to SQL Server, NTFS Security Management Suite 2014 uses the relevant user accounts based on the authentication mode as listed below: A. Windows Authentication: In this method, NTFS Security Management Suite 2014 uses the currently logged on user account while running reports 10 Chapter 2 – Configuration Settings B. SQL Authentication: In this method, NTFS Security Management Suite 2014 uses the specified SQL user account and password while running reports. NTFS Security Management Suite 2014 module stores the SQL user name and password as a user profile in 'Stored User Names and Passwords' applet for its usage. Read User Connection Profiles for more details. Note: NTFS Security Management Suite 2014 expects the user account to have sufficient privileges to create, add to and delete database in the SQL server. Database creation NTFS Security Management Suite 2014 creates databases in SQL Server based on the following database options (whichever is selected) as outlined below: 1. Use a single central database for all instances of the application o A new database will be created in the SQL server by the name NTFSSecurityManagementSuite2014. Inside the NTFSSecurityManagementSuite2014 database, separate tables will be created for each installation of NTFS Security Management Suite 2014. The table names will be prefixed with the computer name that is running NTFS Security Management Suite 2014 application. Thus, each installation of NTFS Security Management Suite 2014 will deploy its own tables based on the computer where NTFS Security Management Suite 2014 is installed. For example, if you install the software on 3 different computers, single database with 3 different tables will be created inside the single database and each installed application will generate reports separately independent of each other. o NTFSSecurityManagementSuite2014tmpSchduleInfo database will be created in the SQL server for scheduled tasks. 2. Use a separate database for each instance of the application o NTFS Security Management Suite 2014 module creates a single application database in the default data storage location used by the SQL Server during application launch. NTFS Security Management Suite 2014 uses the following naming convention: NTFSSecurityManagementSuite2014-<COMPUTERNAME>, where COMPUTERNAME is the name of the computer running NTFS Security Management Suite 2014. o NTFSSecurityManagementSuite2014tmpSchduleInfo<COMPUTERNAME> database will be created in the SQL server for scheduled tasks. o For example, if the computer running the NTFS Security Management Suite 2014 is ‘CLIENT01’, NTFS Security Management Suite 2014 creates 'NTFSSecurityManagementSuite2014-CLIENT01' with data ('NTFSSecurityManagementSuite2014-CLIENT01.mdf') and log (''NTFSSecurityManagementSuite2014-CLIENT01_log.LDF') files stored in the default SQL data folder in the SQL server (for example, C:\Program Files\Microsoft SQL Server\MSSQL.1\MSSQL\Data). 11 Chapter 2 – Configuration Settings NTFS Security Manager module stores its data in use MS-Access database. Database cleanup 'NTFS Security Management Suite 2014' will delete the application database while uninstalling the 'NTFS Security Management Suite 2014' application from the computer. 12 Chapter 2 – Configuration Settings Configure Computer Enumeration ________________________________________ For enumerating computers in your network automatically, NTFS Security Management Suite 2014 uses either Computer Browser Service or Active Directory Services. Select an option for enumerating computers in your domain as shown below. You may use the Browser service if you have a smaller network, as it may take time for the Browser service to respond to data requests on large networks. The advantage of a Browser service is that it lists only those computers that are currently active/alive on your network. You may use the Active Directory Services option if you have a large network and you need a quicker enumeration of computers in your domain. However, this option requires that the domain controller is contacted and queried. Therefore, the currently logged on user must have sufficient privileges to connect to a domain controller or you may specify alternate domain credentials for a domain controller (see configuring the Domain Credentials section in the wizard). NOTE: If you use the Browser service, ensure that NETBIOS over TCP/IP is enabled in both the client and the computers that need to be reported on. The Browser service must also be running. You can access the Computer Enumeration settings by clicking Configuration -> Configuration Settings in the NTFS Security Management Suite 2014 main application window and selecting "Computer Enumeration" node as shown below: 13 Chapter 2 – Configuration Settings Configuring Domain Credentials ________________________________________ Manage alternate credentials for Domain / Directory Servers. The application by default uses the currently logged on user context to enumerate computers and shares and to collect NTFS permissions data. If you want to specify alternate Domain Administrator credentials you may use this option. Configuring Domain Credentials You can access the Domain Credentials settings by selecting the Domain Credentials option in the Configuration Settings window. If you have chosen Active Directory Services under the Computer Enumeration settings, you can launch the NTFS Security Auditor Domain Credentials window within a report window by doing the following: 1. Select any one of the reports from the NTFS Security Management Suite 2014 main application window. For example Standard Reports -> Domains-Shares option. 2. The action will launch the Domains-Shares report window. 3. In the reports windows, at the bottom of the treeview click Add Domains button. This action will launch the "Domain Credentials" windows as shown below. 14 Chapter 2 – Configuration Settings 15 Chapter 2 – Configuration Settings The various operations that can be performed in the Domain Credentials screen are given below: Operation Add Edit Delete Connect Description To Add a new domain to the list. To Edit the properties of a domain in the list. Select a domain and click Edit button. To Delete a domain from the list. Select a domain and click Delete button. To connect to a domain in the list. Select a domain and click Connect button. 16 Chapter 2 – Configuration Settings Add a domain ________________________________________ You may also add one single domain at a time to the list of domains in the credentials list by using Add Domain feature. Add a domain to the list 1. Launch Domain Credentials window. 2. In the Domain Credentials window, click Add button to add a domain to the list. 3. The New domain connection dialog will be displayed as shown below: Enter the name of a domain. 4. Specify user name and the corresponding password to connect to the specified domain. 17 Chapter 2 – Configuration Settings Store the above user credential in Microsoft Windows Stored User Names and Passwords applet - NTFS Security Management Suite 2014 allows the user to enter different user credentials to connect to the domain. Uncheck the checkbox 'Log on using current user' if you like to connect to the domain using a different user context. NTFS Security Management Suite 2014 will store the user credential to connect to domain in the Microsoft Windows Stored User Names and Passwords applet / Credential Manager for security reasons. The stored user profile is tied to the user context (currently logged on user account) in which the profile is created. 5. Click OK to add the domain to the Domain Credentials list. 6. NTFS Security Management Suite 2014 will connect to the domain with the newly provided connection parameters and add it to the list, upon successful connection to the domain. 7. Click Cancel to abort the add process of the domain to the Domain Credentials list. 18 Chapter 2 – Configuration Settings Edit a domain ________________________________________ To Edit a domain in the Domain Credentials, follow the steps given below: 1. Launch Domain Credentials window. 2. In the Domain Credentials window, select any row (domain), Click Edit button to Edit an existing domain in the list, as shown below: 3. The domain name cannot be modified during the edit operation. 4. Specify user name and the corresponding password to connect to the specified domain. 5. Click OK to save and connect to the domain with the newly provided connection parameters and update the domain in the Domain Credentials list. 6. NTFS Security Management Suite 2014 will connect to the domain with the newly provided connection parameters and modify it in the list, upon successful connection to the domain. 19 Chapter 2 – Configuration Settings 7. Click Cancel to retain the existing connection parameters of the domain in the Domain Credentials list. 20 Chapter 2 – Configuration Settings Delete a domain ________________________________________ Perform the following steps to delete a domain: 1. Launch Domain Credentials window. 2. In the Domain Credentials window, select any row (domain), click from the Domain Enumeration Manager list. Delete button to delete the forest 3. An alert message asking for confirmation to delete the forest will be displayed as shown below: 21 Chapter 2 – Configuration Settings 4. Click Yes to delete the selected forest. 5. Click No to abort the delete process of the selected forest. 22 Chapter 2 – Configuration Settings Add domains from forest ________________________________________ In order to connect to a different forest in your Active Directory and configure these domains for enumerating computers and generating reports on them, you may use the ‘Add Domains from Forest’ feature. Add domains from forest to the list 1. Launch Domain Credentials window. 2. In the Domain Credentials window, click forest to the list. to add domains from forest button to add domains in the 3. The Add domains from forest connection dialog will be displayed as shown below: Enter the name of a forest. 23 Chapter 2 – Configuration Settings 4. Specify user name and the corresponding password to connect to the specified forest. Store the above user credential in Microsoft Windows Stored User Names and Passwords applet - NTFS Security Management Suite 2014 allows the user to enter different user credentials to connect to the forest. Uncheck the checkbox 'Log on using current user' if you like to connect to the forest using a different user context. NTFS Security Management Suite 2014 will store the user credential to connect to forest in the Microsoft Windows Stored User Names and Passwords applet / Credential Manager for security reasons. The stored user profile is tied to the user context (currently logged on user account) in which the profile is created. 5. Click 'Show Domains' button to add the domains in the specified forest to the list and select the desired domains in the list. Click OK to add the selected domains to the Domain Credentials list as shown below. 24 Chapter 2 – Configuration Settings 6. NTFS Security Management Suite 2014 will add the selected domains to the Domain Credentials list. 25 Chapter 2 – Configuration Settings Configure SMTP Server ________________________________________ NTFS Security Management Suite 2014 provides the option to e-mail the reports generated. For e-mailing reports, NTFS Security Management Suite 2014 requires SMTP Server, From E-mail Address, To E-mail Addresses (recipients separated by semicolon) and the e-mail report format. NTFS Security Management Suite 2014 maintains a single SMTP Server and a From E-mail Address for use by all reports. You can specify a separate set of To e-mail addresses (recipients), e-mail report format, subject and body of the message for each reports. You can set SMTP Server and From Address by clicking Configuration -> Configuration Settings in the NTFS Security Management Suite 2014 main application window, as shown below: 26 Chapter 3 – NTFS Security Auditor User Connection Profiles ________________________________________ NTFS Security Management Suite 2014 creates a user profile in Windows Stored User Names and Passwords applet / Credential Manager, in order to store the domain user context for enumerating servers using ADSI. The stored user profile will be useful for generating reports using NTFS Security Management Suite 2014 under the following scenarios: Using an alternate user account to connect to the domain to retrieve servers using ADSI. Providing credentials that have sufficient rights to enumerate shares present in computers within a domain. The stored user profile persists for all subsequent logon sessions on the same computer where NTFS Security Management Suite 2014 is installed. The stored user profiles are visible to the application under other logon sessions on the same computer. The stored user profile created by NTFS Security Management Suite 2014 is restricted to the Windows User Profile context. If the Windows User Profile is maintained locally, NTFS Security Management Suite 2014 stored user profile is accessible only by the same user in the same computer. If the user who creates NTFS Security Management Suite 2014 stored user profile, has a Roaming user account in the enterprise, the NTFS Security Management Suite 2014 stored user profile can be accessed by the same user in any computer in the Windows enterprise. The stored user profile is a generic credential of Windows Stored User Names and Passwords applet / Credential Manager and can be used by the application only. The credential information is stored securely in a 256 bit encrypted format in Windows Stored User Names and Passwords applet / Credential Manager. The stored user profile corresponding to the user account will be used by the application in order to connect to the domain, if 'Use ADSI' is selected in NTFS Security Management Suite 2014 Enumeration Settings. Using the Connection Profile dialog show below, new profile can be created and available profiles can be removed from the profiles list. 27 Chapter 3 – NTFS Security Auditor Click Add button to add a new profile and a dialog will appear as shown below: 28 Chapter 3 – NTFS Security Auditor Click Edit button in the Connection Profile dialog to edit available profiles. Click Remove button in the Connection Profile dialog to remove available profiles. 29 Chapter 3 – NTFS Security Auditor Module Listing ________________________________________ This option allows you to view/hide the license expired modules in the NTFS Security Management Suite 2014. You can access the Module Listing option by clicking Configuration -> Configuration Settings in the NTFS Security Management Suite 2014 main application window and selecting "Module Listing" node as shown below: Use the Show all modules option to view all available modules in the NTFS Security Management Suite 2014. Use the Show licensed modules only option to hide the license expired modules in the NTFS Security Management Suite 2014. 30 Chapter 3 – NTFS Security Auditor NTFS Security Auditor ________________________________________ Standard Reports Built-in Reports DAC Reports Security Viewer Power Search Power Export 31 Chapter 3 – NTFS Security Auditor Built-in Reports ________________________________________ About Built-in Reports How to view Built-in Permissions Reports? How to view Built-in Reports for Shares and Resources? 32 Chapter 3 – NTFS Security Auditor About Built-in Reports ________________________________________ Built-in reports are a set of predefined reports that are based on some of the common tasks in NTFS permissions reporting. Built-in reports are easy to use because of the built-in queries that speed up the report generation process. The built-in reports feature provides reports in the following categories: Permissions Reports Shares and Resources 33 Chapter 3 – NTFS Security Auditor How to view Built-in Permissions Reports? ________________________________________ Permissions Reports Permissions Reports includes reports that focus solely on reporting the access permissions assigned to users and groups on objects such as folders etcetera. Click on button under Built-in Reports. List of Permissions Reports: Report Name List of permissions for specific users and groups on folders List of permissions for folders List of permissions for specific users and groups on files List of permissions for files List of all permissions for folders (Inherit & Explicit) List of effective permissions for users and groups on folders List of effective permissions for users and groups on files List of effective permissions for specific users and groups on folders List of effective permissions for specific users and groups on files Description Reports the folder permissions assigned to specific users and/or groups on a selected set of folders. Reports the permissions associated with a selected set of folders. Reports the files permissions assigned to specific users and/or groups under a selected set of folders. Reports the permissions associated with files under a selected set of folders. Reports the permissions for users assigned in the folders directly and inherited by means of nested groups. Reports the effective permissions for users and groups for a set of folders. Reports the effective permissions for users and groups for files available in a set of folders. Reports the effective permissions for specific users and groups available in a set of folders. Reports the effective permissions for specific users and groups for files available in a set of folders. 34 Chapter 3 – NTFS Security Auditor List of permissions for specific users and groups on folders ________________________________________ This report allows you to view folder permissions for specific users and groups. Click on button under Built-in Reports. The Built-in Reports window with the list of reports will be displayed as shown below: Step 1: Report Selection Select the report to be generated. Only one report can be generated at a time. Click Next to proceed to the next step. 35 Chapter 3 – NTFS Security Auditor Step 2: Select User/Group Accounts Select user and/or group accounts for which you would like to view the permissions for folders/files. Enter the name of User/Group in domain\account name format and click Add to List to add the name to selected accounts list Use Select a Scan Profile (Users/Groups) option to use the users and groups added in the profile. For more information on Scan Profiles, click About Scan Profiles (Users/Groups). Use Browse and Select option to retrieve users and groups from servers or Scan Profile (Computers). 36 Chapter 3 – NTFS Security Auditor Use the Find option to search desired user/group accounts. Click Next to proceed. 37 Chapter 3 – NTFS Security Auditor Step 3: Select shared folders Select one or more servers to retrieve available shares. 38 Chapter 3 – NTFS Security Auditor You may also type the UNC path of a folder that is not in the list, such as a folder that is not shared, and then click Add, to add it to the list. In addition, you may also import a list of UNC paths to shared and nonshared folders from a text file by using the Import button. Folders that have identical permissions as the parent folder would show up with "Same as parent" in User Name and/or Security fields in the report. However, if you do not want folders with identical permissions as the parent folder reported, then select Do not display folders that have same permissions as the parent folder option. This option will not report folders with identical permissions as the parent folder. Note: The "Do not display folders that have same permissions as the parent folder" option would be enabled by default. You can select Include SID option to include SID value for user in the report. You can select Exclude inherited permissions option to exclude inherited permissions from the report. You can select Include group membership option to include all membership information of user and group in the report. You can select Include group members option to include all the members of a group and their sub-group members at all group levels in the report. You can use Customize option to exclude some of the fields from the report, as displayed below: 39 Chapter 3 – NTFS Security Auditor NTFS Security Auditor defaults to scanning all the sub-folders under a given shared folder. If you want to change the Include sub-folders and Folder level options click Edit Folder Options. Click OK to proceed. Click Finish to generate the selected report. After the data collection process is complete, the report would be generated in a report window as shown below: 40 Chapter 3 – NTFS Security Auditor 41 Chapter 3 – NTFS Security Auditor List of permissions for folders ________________________________________ This report allows you to view the associated permissions for specific folders. Click on button under Built-in Reports. The Built-in Reports window with the list of reports will be displayed as shown below: Step 1: Report Selection Select the report to be generated. Only one report can be generated at a time. Click Next to proceed to the next step. Step 2: Select shared folders Select one or more servers to retrieve available shares 42 Chapter 3 – NTFS Security Auditor 43 Chapter 3 – NTFS Security Auditor You may also type the UNC path of a folder that is not in the list, such as a folder that is not shared, and then click Add, to add it to the list. In addition, you may also import a list of UNC paths to shared and nonshared folders from a text file by using the Import button. Folders that have identical permissions as the parent folder would show up with "Same as parent" in User Name and/or Security fields in the report. However, if you do not want folders with identical permissions as the parent folder reported, then select Do not display folders that have same permissions as the parent folder option. This option will not report folders with identical permissions as the parent folder. Note: The "Do not display folders that have same permissions as the parent folder" option would be enabled by default. If you want to exclude specific accounts from reporting, select Exclude Accounts option. Click Accounts... button to launch Exclude Accounts window, as shown below: 44 Chapter 3 – NTFS Security Auditor Select the accounts for which you want to exclude and click OK. You can select Include SID option to include SID value for user in the report. You can select Exclude inherited permissions option to exclude inherited permissions from the report. You can select Include group membership option to include all membership information of user and group in the report. You can select Include group members option to include all the members of a group and their sub-group members at all group levels in the report. You can use Customize option to exclude some of the fields from the report, as displayed below: NTFS Security Auditor defaults to scanning all the sub-folders under a given shared folder. If you want to change the Include sub-folders and Folder level options click Edit Folder Options. 45 Chapter 3 – NTFS Security Auditor Click OK to proceed. Click Finish to generate the selected report. After the data collection process is complete, the report would be generated in a report window as shown below: 46 Chapter 3 – NTFS Security Auditor List of permissions for specific users and groups on files ________________________________________ This report allows you to view file permissions for specific users and groups. Click on button under Built-in Reports. The Built-in Reports window with the list of reports will be displayed as shown below: Step 1: Report Selection Select the report to be generated. Only one report can be generated at a time. Click Next to proceed to the next step. Step 2: Select User/Group Accounts Select user and/or group accounts for which you would like to view the permissions for folders/files. 47 Chapter 3 – NTFS Security Auditor Enter the name of User/Group in domain\account name format and click Add to List to add the name to selected accounts list Use Select a Scan Profile (Users/Groups) option to use the users and groups added in the profile. For more information on Scan Profiles, click About Scan Profiles (Users/Groups). Use Browse and Select option to retrieve users and groups from servers or Scan Profile (Computers). 48 Chapter 3 – NTFS Security Auditor Use the Find option to search desired user/group accounts. Click Next to proceed. Step 3: Select shared folders Select one or more servers to retrieve available shares. 49 Chapter 3 – NTFS Security Auditor 50 Chapter 3 – NTFS Security Auditor You may also type the UNC path of a folder that is not in the list, such as a folder that is not shared, and then click Add, to add it to the list. In addition, you may also import a list of UNC paths to shared and nonshared folders from a text file by using the Import button. Folders that have identical permissions as the parent folder would show up with "Same as parent" in User Name and/or Security fields in the report. However, if you do not want folders with identical permissions as the parent folder reported, then select Do not display folders that have same permissions as the parent folder option. This option will not report folders with identical permissions as the parent folder. Note: The "Do not display folders that have same permissions as the parent folder" option would be enabled by default. You can select Include SID option to include SID value for user in the report. You can select Exclude inherited permissions option to exclude inherited permissions from the report. You can select Include group membership option to include all membership information of user and group in the report. You can select Include group members option to include all the members of a group and their sub-group members at all group levels in the report. You can use Customize option to exclude some of the fields from the report, as displayed below: 51 Chapter 3 – NTFS Security Auditor NTFS Security Auditor defaults to scanning all the sub-folders under a given shared folder. If you want to change the Include sub-folders and Folder level options click Edit Folder Options. Click OK to proceed. Click Finish to generate the selected report. After the data collection process is complete, the report would be generated in a report window as shown below: 52 Chapter 3 – NTFS Security Auditor 53 Chapter 3 – NTFS Security Auditor List of permissions for files ________________________________________ This report allows you to view the associated permissions for specific files. Click on button under Built-in Reports. The Built-in Reports window with the list of reports will be displayed as shown below: Step 1: Report Selection Select the report to be generated. Only one report can be generated at a time. Click Next to proceed to the next step. Step 2: Select shared folders Select one or more servers to retrieve available shares 54 Chapter 3 – NTFS Security Auditor 55 Chapter 3 – NTFS Security Auditor You may also type the UNC path of a folder that is not in the list, such as a folder that is not shared, and then click Add, to add it to the list. In addition, you may also import a list of UNC paths to shared and nonshared folders from a text file by using the Import button. Folders that have identical permissions as the parent folder would show up with "Same as parent" in User Name and/or Security fields in the report. However, if you do not want folders with identical permissions as the parent folder reported, then select Do not display folders that have same permissions as the parent folder option. This option will not report folders with identical permissions as the parent folder. Note: The "Do not display folders that have same permissions as the parent folder" option would be enabled by default. If you want to exclude specific accounts from reporting, select Exclude Accounts option. Click Accounts... button to launch Exclude Accounts window, as shown below: 56 Chapter 3 – NTFS Security Auditor Select the accounts for which you want to exclude and click OK. You can select Include SID option to include SID value for user in the report. You can select Exclude inherited permissions option to exclude inherited permissions from the report. You can select Include group membership option to include all the membership information of user and group in the report. You can select Include group members option to include all the members of a group and their sub-group members at all group levels in the report. You can use Customize option to exclude some of the fields from the report, as displayed below: NTFS Security Auditor defaults to scanning all the sub-folders under a given shared folder. If you want to change the Include sub-folders and Folder level options click Edit Folder Options. 57 Chapter 3 – NTFS Security Auditor Click OK to proceed. Click Finish to generate the selected report. After the data collection process is complete, the report would be generated in a report window as shown below: 58 Chapter 3 – NTFS Security Auditor List of all permissions for folders (Inherited & Explicit) ________________________________________ This report lists the permissions (explicit and inherit) assigned to the users for a set of folders. Click on button under Built-in Reports. The Built-in Reports window with the list of reports will be displayed as shown below: Step 1: Report Selection Select the report to be generated. Only one report can be generated at a time. Click Next to proceed to the next step. Step 2: Select shared folders Select one or more servers to retrieve available shares 59 Chapter 3 – NTFS Security Auditor 60 Chapter 3 – NTFS Security Auditor You may also type the UNC path of a folder that is not in the list, such as a folder that is not shared, and then click Add, to add it to the list. In addition, you may also import a list of UNC paths to shared and nonshared folders from a text file by using the Import button. Folders that have identical permissions as the parent folder would show up with "Same as parent" in User Name and/or Security fields in the report. However, if you do not want folders with identical permissions as the parent folder reported, then select Do not display folders that have same permissions as the parent folder option. This option will not report folders with identical permissions as the parent folder. Note: The "Do not display folders that have same permissions as the parent folder" option would be enabled by default. If you want to exclude specific accounts from reporting, select Exclude Accounts option. Click Accounts... button to launch Exclude Accounts window, as shown below: 61 Chapter 3 – NTFS Security Auditor Select the accounts for which you want to exclude and click OK. You can use Customize option to exclude some of the fields from the report, as displayed below: NTFS Security Auditor defaults to scanning all the sub-folders under a given shared folder. If you want to change the Include sub-folders and Folder level options click Edit Folder Options. 62 Chapter 3 – NTFS Security Auditor Click OK to proceed. Click Finish to generate the selected report. After the data collection process is complete, the report would be generated in a report window as shown below: 63 Chapter 3 – NTFS Security Auditor List of effective permission for users and groups on folders ________________________________________ This report lists the effective permissions for users and groups assigned to set of folders. Click on button under Built-in Reports. The Built-in Reports window with the list of reports will be displayed as shown below: Step 1: Report Selection Select the report to be generated. Only one report can be generated at a time. Click Next to proceed to the next step. 64 Chapter 3 – NTFS Security Auditor Step 2: Select shared folders Select one or more servers to retrieve available shares 65 Chapter 3 – NTFS Security Auditor You may also type the UNC path of a folder that is not in the list, such as a folder that is not shared, and then click Add, to add it to the list. In addition, you may also import a list of UNC paths to shared and nonshared folders from a text file by using the Import button. Folders that have identical permissions as the parent folder would show up with "Same as parent" in User Name and/or Security fields in the report. However, if you do not want folders with identical permissions as the parent folder reported, then select Do not display folders that have same permissions as the parent folder option. This option will not report folders with identical permissions as the parent folder. Note: The "Do not display folders that have same permissions as the parent folder" option would be enabled by default. If you want to exclude specific accounts from reporting, select Exclude Accounts option. Click Accounts... button to launch Exclude Accounts window, as shown below: 66 Chapter 3 – NTFS Security Auditor Select the accounts which you want to exclude and click OK. You can use Customize option to exclude some of the fields from the report, as displayed below: You can select Include group members option to include all the members of a group and their sub-group members at all group levels in the report. NTFS Security Auditor defaults to scanning all the sub-folders under a given shared folder. If you want to change the Include sub-folders and Folder level options click Edit Folder Options. 67 Chapter 3 – NTFS Security Auditor Click OK to proceed. Click Finish to generate the selected report. After the data collection process is complete, the report would be generated in a report window as shown below: 68 Chapter 3 – NTFS Security Auditor List of effective permission for users and groups on files ________________________________________ This report lists the effective permissions for users and groups assigned to files available in a set of folders. Click on button under Built-in Reports. The Built-in Reports window with the list of reports will be displayed as shown below: Step 1: Report Selection Select the report to be generated. Only one report can be generated at a time. Click Next to proceed to the next step. 69 Chapter 3 – NTFS Security Auditor Step 2: Select shared folders Select one or more servers to retrieve available shares 70 Chapter 3 – NTFS Security Auditor You may also type the UNC path of a folder that is not in the list, such as a folder that is not shared, and then click Add, to add it to the list. In addition, you may also import a list of UNC paths to shared and nonshared folders from a text file by using the Import button. Folders that have identical permissions as the parent folder would show up with "Same as parent" in User Name and/or Security fields in the report. However, if you do not want folders with identical permissions as the parent folder reported, then select Do not display folders that have same permissions as the parent folder option. This option will not report folders with identical permissions as the parent folder. Note: The "Do not display folders that have same permissions as the parent folder" option would be enabled by default. If you want to exclude specific accounts from reporting, select Exclude Accounts option. Click Accounts... button to launch Exclude Accounts window, as shown below: 71 Chapter 3 – NTFS Security Auditor Select the accounts which you want to exclude and click OK. You can use Customize option to exclude some of the fields from the report, as displayed below: You can select Include group members option to include all the members of a group and their sub-group members at all group levels in the report. NTFS Security Auditor defaults to scanning all the sub-folders under a given shared folder. If you want to change the Include sub-folders and Folder level options click Edit Folder Options. 72 Chapter 3 – NTFS Security Auditor Click OK to proceed. Click Finish to generate the selected report. After the data collection process is complete, the report would be generated in a report window as shown below: 73 Chapter 3 – NTFS Security Auditor List of effective permissions for specific users and groups on folders ________________________________________ This report lists the effective permissions assigned to a specific user/group account for a set of folders. Click on button under Built-in Reports. The Built-in Reports window with the list of reports will be displayed as shown below: Step 1: Report Selection Select the report to be generated. Only one report can be generated at a time. Click Next to proceed to the next step. 74 Chapter 3 – NTFS Security Auditor Step 2: Select User/Group Accounts Select user and/or group accounts for which you would like to view the permissions for folders/files. Enter the name of User/Group in domain\account name format and click Add to List to add the name to selected accounts list Use Select a Scan Profile (Users/Groups) option to use the users and groups added in the profile. For more information on Scan Profiles, click About Scan Profiles (Users/Groups). Use Browse and Select option to retrieve users and groups from servers or Scan Profile (Computers). 75 Chapter 3 – NTFS Security Auditor Use the Find option to search desired user/group accounts. Click Next to proceed. Step 3: Select shared folders Select one or more servers to retrieve available shares. 76 Chapter 3 – NTFS Security Auditor 77 Chapter 3 – NTFS Security Auditor You may also type the UNC path of a folder that is not in the list, such as a folder that is not shared, and then click Add, to add it to the list. In addition, you may also import a list of UNC paths to shared and nonshared folders from a text file by using the Import button. Folders that have identical permissions as the parent folder would show up with "Same as parent" in User Name and/or Security fields in the report. However, if you do not want folders with identical permissions as the parent folder reported, then select Do not display folders that have same permissions as the parent folder option. This option will not report folders with identical permissions as the parent folder. Note: The "Do not display folders that have same permissions as the parent folder" option would be enabled by default. You can use Customize option to exclude some of the fields from the report, as displayed below: 78 Chapter 3 – NTFS Security Auditor You can use Include group members information option to include all the members of a group and their sub-group members at all group levels in the report. NTFS Security Auditor defaults to scanning all the sub-folders under a given shared folder. If you want to change the Include sub-folders and Folder level options click Edit Folder Options. Click OK to proceed. Click Finish to generate the selected report. After the data collection process is complete, the report would be generated in a report window as shown below: 79 Chapter 3 – NTFS Security Auditor 80 Chapter 3 – NTFS Security Auditor List of effective permissions for specific users and groups on files ________________________________________ This report lists the effective permissions assigned to a specific user/group account for files available in a set of folders. Click on button under Built-in Reports. The Built-in Reports window with the list of reports will be displayed as shown below: Step 1: Report Selection Select the report to be generated. Only one report can be generated at a time. Click Next to proceed to the next step. 81 Chapter 3 – NTFS Security Auditor Step 2: Select User/Group Accounts Select user and/or group accounts for which you would like to view the permissions for folders/files. Enter the name of User/Group in domain\account name format and click Add to List to add the name to selected accounts list Use Select a Scan Profile (Users/Groups) option to use the users and groups added in the profile. For more information on Scan Profiles, click About Scan Profiles (Users/Groups). Use Browse and Select option to retrieve users and groups from servers or Scan Profile (Computers). 82 Chapter 3 – NTFS Security Auditor Use the Find option to search desired user/group accounts. Click Next to proceed. 83 Chapter 3 – NTFS Security Auditor Step 3: Select shared folders Select one or more servers to retrieve available shares. 84 Chapter 3 – NTFS Security Auditor You may also type the UNC path of a folder that is not in the list, such as a folder that is not shared, and then click Add, to add it to the list. In addition, you may also import a list of UNC paths to shared and nonshared folders from a text file by using the Import button. Folders that have identical permissions as the parent folder would show up with "Same as parent" in User Name and/or Security fields in the report. However, if you do not want folders with identical permissions as the parent folder reported, then select Do not display folders that have same permissions as the parent folder option. This option will not report folders with identical permissions as the parent folder. Note: The "Do not display folders that have same permissions as the parent folder" option would be enabled by default. You can use Customize option to exclude some of the fields from the report, as displayed below: 85 Chapter 3 – NTFS Security Auditor You can use Include group members option to include all the members of a group and their sub-group members at all group levels in the report. NTFS Security Auditor defaults to scanning all the sub-folders under a given shared folder. If you want to change the Include sub-folders and Folder level options click Edit Folder Options. Click OK to proceed. Click Finish to generate the selected report. After the data collection process is complete, the report would be generated in a report window as shown below: 86 Chapter 3 – NTFS Security Auditor 87 Chapter 3 – NTFS Security Auditor How to view Built-in Reports for Shares and Resources? ________________________________________ Shares and Resources Reports The Shares and Resources reports can be generated against domains(s) and specific sever(s) as well. Click on button under Built-in Reports. The Built-in Reports window with the list of reports will be displayed as shown below: Step 1: Report Selection Select the report to be generated. Only one report can be generated at a time. Click Next to proceed to the next step. 88 Chapter 3 – NTFS Security Auditor Step 2: Select Domain(s) / Server(s) Select the server(s) / Domain(s), for which the report needs to be generated. The default option selected is All Domains, for all the reports. Click Next to proceed to the next step. 89 Chapter 3 – NTFS Security Auditor Step 3: Select Report Criteria To view the part of the report that is of more significance, change the report criteria settings. Only the data that matches the specified criteria will be displayed in the generated report. Click Finish to generate the selected report. After the data collection process is complete, the report would be generated in a report window as shown below: 90 Chapter 3 – NTFS Security Auditor List of Reports: Report Name List of Shares List of Shares with permissions Description Reports all the shares and their properties excluding the permission information. Reports all the shares and their properties including the permission information. 91 Chapter 3 – NTFS Security Auditor Shares, Folders and Files ________________________________________ How to view Shares, Folders and Files information? 92 Chapter 3 – NTFS Security Auditor How to view Shares, Folders and Files information? ________________________________________ Click on button to view information available under each tab as listed below. Click tab to view the following information: Share Name, Path, User Name, Security, Maximum, Comment. 93 Chapter 3 – NTFS Security Auditor How to view permissions of folders in a share? Click tab. The Folders and Permissions dialog appears. You can view permissions of folder(s) in a share or for all the shares in the selected server by selecting “All shares” option or “Select share(s)” option respectively. You can also optionally include the sub-folder(s) information by selecting the “Include sub-folders” option. The sub-folder(s) having permissions identical as the parent folder would be shown in bold text with "Same as parent" in both User Name and Security fields in the report. If you do not want folders with identical permissions as the parent folder reported, then select, the "Do not display folders that have same permissions as the parent folder" option. This option will not report folders with identical permissions as the parent folder. To view up to a certain level of sub-folders, select the "Traverse only 'n' level(s) of sub-folder in the share" option and specify a sub-folder level, Where the levels are numbered as follows: \\server\sharename\Level 1\Level 2\Level 3... Note: The "Include sub-folders" option defaults to enumerating all the sub-folders unless you specify a sub-folder level in "Traverse only 'n' level(s) of sub-folder in the share" option. Note: The "Do not display folders that have same permissions as the parent folder" option would be enabled by default. The report would be displayed as below: 94 Chapter 3 – NTFS Security Auditor How to view permissions of files in a share? Click tab. The "Files and Permissions" dialog appears. You can view permissions of files in a share or for all the shares in the selected server by selecting "All shares" option or "Select share(s)" option respectively. You can also optionally include the sub-folder(s) information by selecting the "Include sub-folders" option. The files having permissions identical to the parent folder would show up with "Same as parent" in both User Name and Security fields in the report. If you do not want files with identical permissions as the parent folder reported, then select, the "Do not display files that have same permissions as the parent folder" option. This option will not report files with identical permissions as the parent folder. 95 Chapter 3 – NTFS Security Auditor To view up to a certain level of sub-folders and files, select the "Traverse only 'n' level(s) of sub-folder in the share" option and specify a sub-folder level, where the levels are numbered as follows: \\server\sharename\Level 1\Level 2\Level 3... Note: The "Include sub-folders" option defaults to enumerating all the sub-folders unless you specify a sub-folder level in "Traverse only 'n' level(s) of sub-folder in the share" option. Note: The "Do not display files that have same permissions as the parent folder" option would be enabled by default. The report would be displayed as below: 96 Chapter 3 – NTFS Security Auditor DAC Reports ________________________________________ About DAC Reports How to view the effective DAC permissions for specified accounts? How to view the effective DAC permissions for the selected set of shared folder? How to view the Central Access Policies and policies permissions? How to check the shared folder and subfolders affected by DAC policies? 97 Chapter 3 – NTFS Security Auditor About DAC Reports ________________________________________ The DAC Reports feature provides many options to view the Dynamic Access Control (DAC) effective permissions on shared Folders. You may view the selected Account effective DAC permissions on shared folders and the associated effective DAC permissions for specific folders. You may also check the folders affected/not affected by DAC Central Access Policies and view the Central Access Policy and Central Access Rule (CAR) available on the selected Domain/Server. Here are some examples of how you may make effective use of this feature: 1. Determine what type of permissions and conditions have been configured for each the Central Access Rules in Central Access policy over the domain. 2. Search on who have access limited permissions by DAC on which folders. 3. Select a set of accounts and determine for which shared folders they have DAC permissions. 4. Determine on which shared folders and subfolders have been affected/not affected by the Central Access Policy. 5. Select a Set of Domain(s)/Server(s) and determine the configured Central Access Policies and Central Access Rules. The DAC reports feature provides reports in the following categories: Report Name Effective DAC permissions for specific users and groups on folders Effective DAC permissions for Accounts having permissions on specific folders List of Central Access Policies (CAP) and Central Access Rules on the Domain Folders affected/not affected by DAC Central Access Policies Description Reports the effective DAC permissions for the specified users and groups. Reports the effective DAC permissions for the specified folders. Reports the Central Access Policies (CAP) and Central Access Rules configured for a domain. Reports the folders affected/not affected by the DAC Central Access Policy and Central Access Rules. Note: The DAC Reports feature can run on Windows 8, Windows 8.1, Windows Sever 2012 and Windows Server 2012 R2 computers only. 98 Chapter 3 – NTFS Security Auditor How to view the effective DAC permissions for the specified accounts? ________________________________________ Effective DAC permissions for specific users and groups on folders: Click on button. The DAC Reports window with the list of reports will be displayed as shown below: Step 1: Report Selection Select the report to be generated. Only one report can be generated at a time. 99 Chapter 3 – NTFS Security Auditor Click Next to proceed to the next step. Step 2: Account Selection 1. Select the accounts, for which you wish to view the DAC permissions. 2. The selected accounts will be added to the wizard as shown below: 100 Chapter 3 – NTFS Security Auditor Enter the name of User/Group in domain\account name format and click Add to List to add the name to selected accounts list. Use Select a Scan Profile (Users/Groups) option to use the users and groups added in the profile. For more information on Scan Profiles, click About Scan Profiles (Users/Groups). Use Browse and Select option to retrieve users and groups from servers or Scan Profile (Computers). 101 Chapter 3 – NTFS Security Auditor Use the Find option to search desired user/group accounts. 102 Chapter 3 – NTFS Security Auditor Click Next to proceed. Step 3: Select Shared Folders Select shared folder(s) by using any of the input options displayed. Click the option Add From Select one or more servers to enumerate its shared folders. 103 Chapter 3 – NTFS Security Auditor Use Select a Profile option to use the shares added in the profile. 104 Chapter 3 – NTFS Security Auditor You may also type the UNC path of a folder that is not in the list, such as a folder that is not shared, and then click Add, to add it to the list. In addition, you may also import a list of UNC paths to shared and nonshared folders from a text file by using the Import button. NTFS Security Auditor defaults to scanning all the sub-folders under a given shared folder. If you want to change the Include sub-folders and Folder level options click Edit Folder Options. Click OK to proceed. Click Finish to generate the selected report. 105 Chapter 3 – NTFS Security Auditor After the data collection process is complete, the report would be generated in a report window as shown below: 106 Chapter 3 – NTFS Security Auditor How to view the effective DAC permissions for Accounts having permissions on specific folders? ________________________________________ Effective DAC permissions for Accounts having permissions on specific folders: Click on button. The DAC Reports window with the list of reports will be displayed as shown below: Step 1: Report Selection Select the report to be generated. Only one report can be generated at a time. 107 Chapter 3 – NTFS Security Auditor Click Next to proceed to the next step. Step 2: Select shared folders Select shared folder(s) by using any of the input options displayed. 108 Chapter 3 – NTFS Security Auditor Click the option Add From Select one or more servers to enumerate its shared folders. 109 Chapter 3 – NTFS Security Auditor Use Select a Profile option to use the shares added in the profile. 110 Chapter 3 – NTFS Security Auditor You may also type the UNC path of a folder that is not in the list, such as a folder that is not shared, and then click Add, to add it to the list. In addition, you may also import a list of UNC paths to shared and nonshared folders from a text file by using the Import button. NTFS Security Auditor defaults to scanning all the sub-folders under a given shared folder. If you want to change the Include sub-folders and Folder level options click Edit Folder Options. Click OK to proceed. Click Finish to generate the selected report. 111 Chapter 3 – NTFS Security Auditor After the data collection process is complete, the report would be generated in a report window as shown below: 112 Chapter 3 – NTFS Security Auditor How to view Central Access Policies and policy permissions? ________________________________________ List of Central Access Policies (CAP) and Central Access Rules on the Domain: Click on button. The DAC Reports window with the list of reports will be displayed as shown below: Step 1: Report Selection Select the report to be generated. Only one report can be generated at a time. 113 Chapter 3 – NTFS Security Auditor Click Next to proceed to the next step. Step 2: Select Domain(s) / Server(s) Select the Domain(s)/Server(s), for which the report needs to be generated. 114 Chapter 3 – NTFS Security Auditor Click Finish to proceed to the next step. After the data collection process is complete, the report would be generated in a report window as shown below: 115 Chapter 3 – NTFS Security Auditor 116 Chapter 3 – NTFS Security Auditor How to check the shared folders and subfolders affected by DAC policies? ________________________________________ Folders affected/not affected by DAC Central Access Policies: Click on button. The DAC Reports window with the list of reports will be displayed as shown below: Step 1: Report Selection Select the report to be generated. Only one report can be generated at a time. 117 Chapter 3 – NTFS Security Auditor Click Next to proceed to the next step. Step 2: Select shared folders Select shared folder(s) by using any of the input options displayed. 118 Chapter 3 – NTFS Security Auditor Click the option Add From Select one or more servers to enumerate its shared folders. 119 Chapter 3 – NTFS Security Auditor Use Select a Profile option to use the shares added in the profile. 120 Chapter 3 – NTFS Security Auditor You may also type the UNC path of a folder that is not in the list, such as a folder that is not shared, and then click Add, to add it to the list. In addition, you may also import a list of UNC paths to shared and nonshared folders from a text file by using the Import button. NTFS Security Auditor defaults to scanning all the sub-folders under a given shared folder. If you want to change the Include sub-folders and Folder level options click Edit Folder Options. Click OK to proceed. Click Finish to generate the selected report. 121 Chapter 3 – NTFS Security Auditor After the data collection process is complete, the report would be generated in a report window as shown below: 122 Chapter 3 – NTFS Security Auditor Security Viewer ________________________________________ How to view the permissions for shares and local drives? How to enumerate shared folders / files? 123 Chapter 3 – NTFS Security Auditor How to view the permissions for shares and local drives? ________________________________________ The Security Viewer feature allows you to view entire file system permissions. You can use many options to view the permissions of shares. With the option Local Drives you can view the permissions of the local system folders and files. With the option Domain you can view permissions of the shared folder(s)/file(s) in the entire network. Click on button. The Security Viewer window will be displayed as shown below: Step 1: Select folder/file path Select folder/file path by using an option below. 124 Chapter 3 – NTFS Security Auditor Select Local Drives and follow the steps below. Select and traverse one or more directory to enumerate its subfolders and files. Select a directory or subfolder/file path. 125 Chapter 3 – NTFS Security Auditor Select Domains and follow the steps below. Select one or more servers to enumerate its shared folder/file path. Select a shared folder/file path. 126 Chapter 3 – NTFS Security Auditor Select Scan Profiles (Computers) and follow the steps below. Select one or more servers to enumerate its shared folder/file. Select a shared folder/file path. 127 Chapter 3 – NTFS Security Auditor Select Scan Profiles (Shares) and follow the steps below. Select Shares profile and enumerate its shared folder(s)/file(s) list. Select a shared folder/file path. 128 Chapter 3 – NTFS Security Auditor 129 Chapter 3 – NTFS Security Auditor Step 2: Select an Account Select an account from the Basic or Advanced permissions list. After selecting an account, permissions of that account would be shown in the last column as shown below. 130 Chapter 3 – NTFS Security Auditor You may also verify the inheritance from the parent object (allowed or blocked) to this current object by using the option "Allow inherited permissions from the parent to propagate this object". If this option is checked then the inheritance from the parent to this current object has been allowed, otherwise if unchecked, it has been blocked. 131 Chapter 3 – NTFS Security Auditor How to enumerate shared folders/files? ________________________________________ The Security Viewer feature allows many options to enumerate the shared folders/files in the entire network. You can also enumerate and view the folders and files in the local file system. Click on button. The Security Viewer window will be displayed as shown below. Here is the list of ways you can enumerate the shared folders/files in the network. Local Drives Domains Scan Profiles (Computers) Scan Profiles (Shares) 132 Chapter 3 – NTFS Security Auditor Select Local Drives and follow the steps below. Select and traverse one or more directory to enumerate its subfolders and files. Select a directory or subfolder/file path. 133 Chapter 3 – NTFS Security Auditor Select Domains and follow the steps below. Select one or more servers to enumerate its shared folder/file path. Select a shared folder/file path. 134 Chapter 3 – NTFS Security Auditor Select Scan Profiles (Computers) and follow the steps below. Select one or more servers to enumerate its shared folder/file. Select a shared folder/file path. 135 Chapter 3 – NTFS Security Auditor Select Scan Profiles (Shares) and follow the steps below. Select shares profile and enumerate its shared folder(s)/file(s) list. Select a shared folder/file path. 136 Chapter 3 – NTFS Security Auditor Power Search ________________________________________ About Power Search How to view Power Search Permissions (DACL) Reports? How to view Power Search Auditing (SACL) Reports? How to manage Power Search? 137 Chapter 3 – NTFS Security Auditor About Power Search ________________________________________ The Power Search feature lets you perform powerful, conditional Search queries of NTFS Permissions on Files and Folders. You may select specific permissions from the list of standard permissions and Advanced (special) permissions and run a query to determine who have these permissions on which folders and files. You may Save frequently used queries for reuse them later. Here are some examples of how you may make effective use of this feature: 1. 2. 3. 4. Search on who has Full Control on which folders and files Select a set of accounts and determine for which folders and files they have Full control access. Determine which accounts have modify or delete permissions on critical files and folders. Determine what type of permissions members of the Administrators group have on specific folders and files. 5. Determine where Inheritance from Parent folder has been explicitly removed. 6. Determine Accounts for which folders have explicit Allows or Denys set on them. 138 Chapter 3 – NTFS Security Auditor How to view Power Search Permissions (DACL) Reports? ________________________________________ Click on button under Power Search. The Power Search window will be displayed as shown below: Step 1: Select Shared Folder(s)/Files Select one or more servers to enumerate its Shared Folder(s)/Files 139 Chapter 3 – NTFS Security Auditor 140 Chapter 3 – NTFS Security Auditor You may also type the UNC path of a folder that is not in the list, such as a folder that is not shared, and then click Add, to add it to the list. In addition, you may also import a list of UNC paths to shared and nonshared folders from a text file by using the Import button. Folders that have identical permissions as the parent folder would show up with "Same as parent" in User Name and/or Security fields in the report. However, if you do not want folders with identical permissions as the parent folder reported, then select Do not display folders that have same permissions as the parent folder option. This option will not report folders with identical permissions as the parent folder. Note: The "Do not display folders that have same permissions as the parent folder" option would be enabled by default. You can use Customize option to exclude some of the fields from the reports, as displayed below: 141 Chapter 3 – NTFS Security Auditor NTFS Security Auditor defaults to scanning all the sub-folders under a given shared folder. If you want to change the Include sub-folders and Folder level options click Edit Folder Options. Use Set Search Pattern option to exclude sub-folders that match certain pre-defined conditions like Folder name starts with, Folder name ends with. Example Folder name starts with test, Folder name ends with share. 142 Chapter 3 – NTFS Security Auditor Click Next to proceed to the next step. 143 Chapter 3 – NTFS Security Auditor Step 2: Select Access Control Entry Type and Permissions Select ACE Type and permissions to search in the Access Control List of the selected share(s) / folder(s) /files(s) 144 Chapter 3 – NTFS Security Auditor Step 3: User and/or Group Selection 1. Specific Account Types: Select user and/or group, for which you wish to run the search. 2. Specific Accounts: Select user and/or group accounts for which you would like to view the permissions for files/folders. 145 Chapter 3 – NTFS Security Auditor Use Select a Scan Profile (Users/Groups) option to use the users and groups added in the profile. Click Next to proceed to the Next step. 146 Chapter 3 – NTFS Security Auditor Step 4: Save Search Enter a name and description for search. Click Finish to generate the power search report. 147 Chapter 3 – NTFS Security Auditor After the data collection process is complete, the report would be generated in a report window as shown below: 148 Chapter 3 – NTFS Security Auditor How to view Power Search Exceptions (DACL) Reports? ________________________________________ Click on button under Power Search. The Power Search window will be displayed as shown below: Step 1: Select Shared Folder(s)/Files Select one or more servers to enumerate its Shared Folder(s)/Files. 149 Chapter 3 – NTFS Security Auditor 150 Chapter 3 – NTFS Security Auditor You may also type the UNC path of a folder that is not in the list, such as a folder that is not shared, and then click Add, to add it to the list. In addition, you may also import a list of UNC paths to shared and nonshared folders from a text file and CSV file by using the Import button. Folders that have identical permissions as the parent folder would show up with "Same as parent" in User Name and/or Security fields in the report. However, if you do not want folders with identical permissions as the parent folder reported, then select Do not display folders that have same permissions as the parent folder option. This option will not report folders with identical permissions as the parent folder. Note: The "Do not display folders that have same permissions as the parent folder" option would be enabled by default. You can use Customize option to exclude some of the fields from the reports, as displayed below: 151 Chapter 3 – NTFS Security Auditor NTFS Security Auditor defaults to scanning all the sub-folders under a given shared folder. If you want to change the Include sub-folders and Folder level options click Edit Folder Options. Use Set Search Pattern option to exclude sub-folders that match certain pre-defined conditions like Folder name starts with, Folder name ends with. Example Folder name starts with test, Folder name ends with share. 152 Chapter 3 – NTFS Security Auditor Click Next to proceed to the next step. Step 2: Search for ACLs that do not have the following permissions Select ACE Type and permissions. Search for folders/files that do not have these permissions. The search results will contain only those folders/files that do not have the selected permissions. 153 Chapter 3 – NTFS Security Auditor Step 3: Search for ACLs that do not have the following accounts Select Accounts and search for folders/files that do not have these accounts. The search results will contain only ACLs of those folders/files that do not have the selected accounts. 154 Chapter 3 – NTFS Security Auditor Use Select a Scan Profile (Users/Groups) option to use the users and groups added in the profile as shown below: 155 Chapter 3 – NTFS Security Auditor Click Next to proceed to the Next step. Step 4: Save Search Enter a name and description for search. 156 Chapter 3 – NTFS Security Auditor Click Finish to generate the power search report. After the data collection process is complete, the report would be generated in a report window as shown below: 157 Chapter 3 – NTFS Security Auditor 158 Chapter 3 – NTFS Security Auditor How to view Power Search Auditing (SACL) Reports? ________________________________________ Click on button under Power Search. The Power Search window will be displayed as shown below: Step 1: Select Shared Folder(s)/Files Select one or more servers to enumerate its Shared Folder(s)/Files 159 Chapter 3 – NTFS Security Auditor 160 Chapter 3 – NTFS Security Auditor You may also type the UNC path of a folder that is not in the list, such as a folder that is not shared, and then click Add, to add it to the list. In addition, you may also import a list of UNC paths to shared and nonshared folders from a text file by using the Import button. Folders that have identical permissions as the parent folder would show up with "Same as parent" in User Name and/or Security fields in the report. However, if you do not want folders with identical permissions as the parent folder reported, then select Do not display folders that have same permissions as the parent folder option. This option will not report folders with identical permissions as the parent folder. Note: The "Do not display folders that have same permissions as the parent folder" option would be enabled by default. You can use Customize option to exclude some of the fields from the reports, as displayed below: 161 Chapter 3 – NTFS Security Auditor NTFS Security Auditor defaults to scanning all the sub-folders under a given shared folder. If you want to change the Include sub-folders and Folder level options click Edit Folder Options. Use Set Search Pattern option to exclude sub-folders that match certain pre-defined conditions like Folder name starts with, Folder name ends with. Example Folder name starts with test. 162 Chapter 3 – NTFS Security Auditor Click Next to proceed to the next step. 163 Chapter 3 – NTFS Security Auditor Step 2: Select Audit Type and Permissions Select Audit Type and permissions to search in the Audit Control List of the selected share(s) / folder(s) /files(s) 164 Chapter 3 – NTFS Security Auditor Step 3: User and/or Group Selection 1. Select the user or group, for which you wish to run the search. 2. The selected users will be added to the wizard as shown below: 165 Chapter 3 – NTFS Security Auditor Use Select a Scan Profile (Users/Groups) option to use the users and groups added in the profile. Click Next to proceed to the Next step. 166 Chapter 3 – NTFS Security Auditor Step 4: Save Search Enter a name and description for search. Click Finish to generate the power search report. 167 Chapter 3 – NTFS Security Auditor After the data collection process is complete, the report would be generated in a report window as shown below: 168 Chapter 3 – NTFS Security Auditor How to manage Power Search? ________________________________________ Click to launch the saved search(s) window. The windows shows the list of search(s) that were saved over the period of time. The saved search window allows you to perform the following operations: Create a new search Run an existing search Edit an existing search Delete a search Preview the settings of a search Create a new search 1. To create a new search click New button in the window. The Power Search Dialog will appear on the screen. 2. Follow the steps as outlined in How to create a power search report? 169 Chapter 3 – NTFS Security Auditor Run an existing search 1. To Run an existing search click Run button in the window. The Power Search report window will appear on the screen and the report will be displayed once the data collection is finished. 2. During edit operation you can modify the search inputs, however, you cannot modify the type of the Scan Profile. Edit an existing search 1. To edit an existing search click Edit button in the window. The Power Search Dialog will appear on the screen which will allow you to edit the selected search. 2. During edit operation you can modify the computer list, however, you cannot modify the name of the search. Delete a search To delete a search, select the search you want to delete, and then click Delete button. The selected search will be deleted permanently. Preview the settings of a search To preview the settings of a saved search, select a search, and then click View Details button. The settings will be displayed in a window as shown below: 170 Chapter 3 – NTFS Security Auditor Compare ACLs ________________________________________ About Compare ACLs How to ACLS of Folders? How to Compare ACLs of a folder with exported ACL data of another folder? 171 Chapter 3 – NTFS Security Auditor About Compare ACLs ________________________________________ Compare ACLs allows you to compare the inherited and explicit permissions of the shared folders. Select any one of the following options to compare folder ACLs: Compare ACLs of folders Compare ACLs of a folder with exported ACL data of another folder 172 Chapter 3 – NTFS Security Auditor How to Compare ACLs of folders? ________________________________________ This option in Compare ACLs features allows you want to compare all inherited and explicit permissions of two different shared folders. This option will compare only those sub-folders that are available in common (by name) in the specified shared folders. Click on button. The Compare ACLs window will be displayed as shown below: Step 1: Select an option to compare ACLs Select Compare ACLs of folders option. Click Next to proceed to the Next step. Step 2: Select shared folder(s) Select a Baseline reference folder and a Folder to compare using the respective browse buttons. 173 Chapter 3 – NTFS Security Auditor Include sub-folders: Enabling this option will process the sub-folders of the specified shared folders for comparison. Exclude inherited permissions: Enabling this option will exclude inherited permissions of the specified shared folders for comparison. Use Set sub-folder levels option to set the levels of subfolder(s) to read ACLs from. 174 Chapter 3 – NTFS Security Auditor The Sub-folder levels window allows the user to specify the option to enumerate sub-folders for comparing their ACLs, as stated below: Compare upto N level(s) of sub-folder(s) in the shared folders: This option will take specified shared folders of sub-folders which are upto the traversal level and compare ACLs only those named sub-folders that are common to the specified shared folders Compare only Nth level of sub-folder(s) in the shared folders: This option will take specified shared folders of sub-folders which are in the specified folder level only and compare ACLs only those named sub-folders that are common to the specified shared folders. Compare folders after N level(s) of sub-folder(s) in the shared folders: This option will take subfolders which are after the nth folder level of specified shared folders and compare ACLs only those named sub-folders that are common to the specified shared folders. Compare only leaf nodes in the shared folders: This option will take last child (leaf) nodes of specified shared folders and compare ACLs only those named sub-folders that are common to the specified shared folders. Click Finish to generate the compared ACLs report. 175 Chapter 3 – NTFS Security Auditor 176 Chapter 3 – NTFS Security Auditor How to Compare ACLs of a folder with exported ACL data of another folder? ________________________________________ This option in Compare ACLs features allows you to find out the differences between a past snapshot of ACLs and the current ACLs of a shared folder. This option will compare only those sub-folders that are available in common (by name) in the specified shared folder and the shared folder in the exported report. Click on button. The Compare ACLs window will be displayed as shown below: Step 1: Select an option to compare ACLs Select Compare ACLs of a folder with exported ACL data of another folder option. Click Next to proceed to the Next step. Step 2: Select shared folder and exported file. The exported file must be from any one of the built-in permissions reports. Select a Baseline reference folder and a exported file to compare using the respective browse buttons. 177 Chapter 3 – NTFS Security Auditor Note: You may select an exported file of any one of the built-in permissions reports below: List of permissions for folders. List of permissions for specific users and groups on folders. List of permissions for files. List of permissions for specific users and groups on files. 178 Chapter 3 – NTFS Security Auditor Include sub-folders: Enabling this option will process the sub-folders of the specified shared folders for comparison. Exclude inherited permissions: Enabling this option will exclude inherited permissions of the specified shared folders for comparison. Use Set sub-folder levels to set the levels of subfolder(s) to read ACLs from. The Sub-folder levels window allows the user to specify the option to enumerate sub-folders for comparing their ACLs, as stated below: Compare upto N level(s) of sub-folder(s) in the shared folders: This option will take selected shared folder of sub-folders which are upto the specified traversal level and compare ACLs only those named sub-folders that are common to the selected shared folder and exported shared folder report. 179 Chapter 3 – NTFS Security Auditor Compare only Nth level of sub-folder(s) in the shared folders: This option will take selected shared folder of sub-folders which are in the specified folder level only and compare ACLs only those named sub-folders that are common to the selected shared folder and exported shared folder report. Compare folders after N level(s) of sub-folder(s) in the shared folders: This option will take selected shared folder of sub-folders which are after the nth folder level and compare ACLs only those name sub-folders that are common to the selected shared folder and exported shared folder report. Compare only leaf nodes in the shared folders: This option will take selected shared folder of last child (leaf) nodes of sub-folders and compare ACLs only those name sub-folders that are common to the selected shared folder and exported shared folder report. Click Finish to generate the compared ACLs report. 180 Chapter 3 – NTFS Security Auditor 181 Chapter 3 – NTFS Security Auditor Security Vulnerabilities ________________________________________ How to view Security Vulnerabilities Reports? 182 Chapter 3 – NTFS Security Auditor How to view Security Vulnerabilities Reports? ________________________________________ Security Vulnerabilities Reports provides reports that focus solely on reporting the vulnerabilities access permissions assigned to user and groups on shared folder(s)/file(s). Click on button. List of Security Vulnerabilities Reports: List of all explicit permissions for folders List of folders with broken inheritance and their permissions List of permissions for orphaned accounts on folders List of permissions for disabled user accounts on folders List of permissions for having destructive access on folders List of folders that have Deny permissions set (both Explicit and Inherited) List of user accounts that have indirect access to folders due to nested group membership List of Effective access for specific users and groups on folders List of folders that have permissions for 'Everyone' group 183 Chapter 3 – NTFS Security Auditor List of all explicit permissions for folders ________________________________________ This report allows you to view explicit permissions assigned to folders. Click on button. Step 1: Report Selection Select the report to be generated. Only one report can be generated at a time. Click Next to proceed to the next step. Step 2: Select shared folders: Select one or more servers to retrieve available shares 184 Chapter 3 – NTFS Security Auditor 185 Chapter 3 – NTFS Security Auditor You may also enter the UNC path of a folder that is not in the list, such as a folder that is not shared, and then click Add, to add it to the list. In addition, you may also import a list of UNC paths to shared and nonshared folders from a text file and CSV file by using the Import button. You can select Include files present inside folders option to include all files from the specified folders in the report. You can select Include Group members option to include all the members of a group and their sub-group members at all group levels in the report. Use Set sub-folder levels option to view permissions in the selected levels of sub-folder(s) in the shared folder. 186 Chapter 3 – NTFS Security Auditor Include upto N level(s) of sub-folder(s) in the shared folder: This option will view permissions from subfolders which are upto the specified folder traversal level. Include only Nth level of sub-folder(s) in the shared folder: This option will view permissions from subfolders which are in the specified folder level only. Include folders after N level(s) of sub-folder(s) in the shared folder: This option will view permissions from sub-folders which are after the nth folder level of the selected folder. Include only leaf nodes in the shared folder: This option will view permissions from the last child (leaf) nodes without affecting the parent folder’s permissions. Click OK to proceed. Click Next to proceed to the next step. Step 3: Select User/Group Accounts: This step is optional. Use this step to select user and/or group accounts for which you like to view the explicit permissions for folders/files. Enter User/Group name in domain\account name format and click Add to List to add the user/group to the selected accounts list 187 Chapter 3 – NTFS Security Auditor Use Select a Scan Profile (Users/Groups) option to use the users and groups added in a profile. For more information on Scan Profiles, click About Scan Profiles (Users/Groups). Use Browse and Select option to retrieve users and groups from servers or Scan Profile (Computers). Use the Find option to search desired user/group accounts. Click Finish to generate the selected report. Once the data collection process is complete, the report would be generated in a report window as shown below: 188 Chapter 3 – NTFS Security Auditor 189 Chapter 3 – NTFS Security Auditor List of folders with broken inheritance and their permissions ________________________________________ This report allows you to view the list of folders where inheritance is broken and the assigned permissions. Click on button. Step 1: Report Selection Select the report to be generated. Only one report can be generated at a time. Step 2: Select shared folders Select one or more servers to retrieve available shares. 190 Chapter 3 – NTFS Security Auditor 191 Chapter 3 – NTFS Security Auditor You may also enter the UNC path of a folder that is not in the list, such as a folder that is not shared, and then click Add, to add it to the list. In addition, you may also import a list of UNC paths to shared and nonshared folders from a text file and CSV file by using the Import button. You can select Include files present inside folders option to include all files from the specified folders in the report. You can select Include Group members option to include all the members of a group and their sub-group members at all group levels in the report. Use Set sub-folder levels option to view permissions in the selected levels of sub-folder(s) in the shared folder. 192 Chapter 3 – NTFS Security Auditor Include upto N level(s) of sub-folder(s) in the shared folder: This option will view permissions from subfolders which are upto the specified folder traversal level. Include only Nth level of sub-folder(s) in the shared folder: This option will view permissions from subfolders which are in the specified folder level only. Include folders after N level(s) of sub-folder(s) in the shared folder: This option will view permissions from sub-folders which are after the nth folder level of the selected folder. Include only leaf nodes in the shared folder: This option will view permissions from the last child (leaf) nodes without affecting the parent folder’s permissions. Click OK to proceed. Click Finish to generate the selected report. Once the data collection process is complete, the report would be generated in a report window as shown below: 193 Chapter 3 – NTFS Security Auditor List of permissions for orphaned accounts on folders ________________________________________ This report allows you to view the permissions for orphaned accounts on folders. Click on button. Step 1: Report Selection Select the report to be generated. Only one report can be generated at a time. Step 2: Select shared folders Select one or more servers to retrieve available shares. 194 Chapter 3 – NTFS Security Auditor 195 Chapter 3 – NTFS Security Auditor You may also enter the UNC path of a folder that is not in the list, such as a folder that is not shared, and then click Add, to add it to the list. In addition, you may also import a list of UNC paths to shared and nonshared folders from a text file and CSV file by using the Import button. You can select Include files present inside folders option to include all files from the specified folders in the report. Use Set sub-folder levels option to view permissions in the selected levels of sub-folder(s) in the shared folder. Include upto N level(s) of sub-folder(s) in the shared folder: This option will view permissions from subfolders which are upto the specified folder traversal level. 196 Chapter 3 – NTFS Security Auditor Include only Nth level of sub-folder(s) in the shared folder: This option will view permissions from subfolders which are in the specified folder level only. Include folders after N level(s) of sub-folder(s) in the shared folder: This option will view permissions from sub-folders which are after the nth folder level of the selected folder. Include only leaf nodes in the shared folder: This option will view permissions from the last child (leaf) nodes without affecting the parent folder’s permissions. Click OK to proceed. Click Finish to generate the selected report. Once the data collection process is complete, the report would be generated in a report window as shown below: 197 Chapter 3 – NTFS Security Auditor List of permissions for disabled user accounts on folders ________________________________________ This report allows you to view the permissions for disabled user accounts on folders. Click on button. Step 1: Report Selection Select the report to be generated. Only one report can be generated at a time. Step 2: Select shared folders Select one or more servers to retrieve available shares. 198 Chapter 3 – NTFS Security Auditor 199 Chapter 3 – NTFS Security Auditor You may also enter the UNC path of a folder that is not in the list, such as a folder that is not shared, and then click Add, to add it to the list. In addition, you may also import a list of UNC paths to shared and nonshared folders from a text file and CSV file by using the Import button. You can select Include files present inside folders option to include all files from the specified folders in the report. Use Set sub-folder levels option to view permissions in the selected levels of sub-folder(s) in the shared folder. Include upto N level(s) of sub-folder(s) in the shared folder: This option will view permissions from subfolders which are upto the specified folder traversal level. 200 Chapter 3 – NTFS Security Auditor Include only Nth level of sub-folder(s) in the shared folder: This option will view permissions from subfolders which are in the specified folder level only. Include folders after N level(s) of sub-folder(s) in the shared folder: This option will view permissions from sub-folders which are after the nth folder level of the selected folder. Include only leaf nodes in the shared folder: This option will view permissions from the last child (leaf) nodes without affecting the parent folder’s permissions. Click OK to proceed. Click Finish to generate the selected report. Once the data collection process is complete, the report would be generated in a report window as shown below: 201 Chapter 3 – NTFS Security Auditor List of permissions for accounts having destructive access on folders ________________________________________ This report allows you to view users and groups having destructive access permissions (Full Control, Delete etc.) on folders. Click on button. Step 1: Report Selection Select the report to be generated. Only one report can be generated at a time. Click Next to proceed to the next step. Step 2: Select shared folders Select one or more servers to retrieve available shares. 202 Chapter 3 – NTFS Security Auditor 203 Chapter 3 – NTFS Security Auditor You may also enter the UNC path of a folder that is not in the list, such as a folder that is not shared, and then click Add, to add it to the list. In addition, you may also import a list of UNC paths to shared and nonshared folders from a text file and CSV file by using the Import button. You can select Include files present inside folders option to include all files from the specified folders in the report. You can select Include Group members option to include all the members of a group and their sub-group members at all group levels in the report. Use Set sub-folder levels option to view permissions in the selected levels of sub-folder(s) in the shared folder. 204 Chapter 3 – NTFS Security Auditor Include upto N level(s) of sub-folder(s) in the shared folder: This option will view permissions from subfolders which are upto the specified folder traversal level. Include only Nth level of sub-folder(s) in the shared folder: This option will view permissions from subfolders which are in the specified folder level only. Include folders after N level(s) of sub-folder(s) in the shared folder: This option will view permissions from sub-folders which are after the nth folder level of the selected folder. Include only leaf nodes in the shared folder: This option will view permissions from the last child (leaf) nodes without affecting the parent folder’s permissions. Click Next to proceed to the next step. Step 3: Select User/Group Accounts: This step is optional. Use this step to select user and/or group accounts for which you like to view the destructive access rights for folders/files. Enter User/Group name in domain\account name format and click Add to List to add the user/group to the selected accounts list Use Select a Scan Profile (Users/Groups) option to use the users and groups added in a profile. For more information on Scan Profiles, click About Scan Profiles (Users/Groups). Use Browse and Select option to retrieve users and groups from servers or Scan Profile (Computers). 205 Chapter 3 – NTFS Security Auditor Use the Find option to search desired user/group accounts. Click Finish to generate the selected report. Once the data collection process is complete, the report would be generated in a report window as shown below: 206 Chapter 3 – NTFS Security Auditor List of folders that have Deny permissions set (both Explicit and Inherited) ________________________________________ This report allows you to view Deny permissions assigned to folders. Click on button. Step 1: Report Selection Select the report to be generated. Only one report can be generated at a time. Click Next to proceed to the next step. Step 2: Select shared folders Select one or more servers to retrieve available shares. 207 Chapter 3 – NTFS Security Auditor 208 Chapter 3 – NTFS Security Auditor You may also enter the UNC path of a folder that is not in the list, such as a folder that is not shared, and then click Add, to add it to the list. In addition, you may also import a list of UNC paths to shared and nonshared folders from a text file and CSV file by using the Import button. You can select Include files present inside folders option to include all files from the specified folders in the report. You can select Include Group members option to include all the members of a group and their sub-group members at all group levels in the report. Use Set sub-folder levels option to view permissions in the selected levels of sub-folder(s) in the shared folder. 209 Chapter 3 – NTFS Security Auditor Include upto N level(s) of sub-folder(s) in the shared folder: This option will view permissions from subfolders which are upto the specified folder traversal level. Include only Nth level of sub-folder(s) in the shared folder: This option will view permissions from subfolders which are in the specified folder level only. Include folders after N level(s) of sub-folder(s) in the shared folder: This option will view permissions from sub-folders which are after the nth folder level of the selected folder. Include only leaf nodes in the shared folder: This option will view permissions from the last child (leaf) nodes without affecting the parent folder’s permissions. Click Next to proceed to the next step. Step 3: Select User/Group Accounts: This step is optional. Use this step to select user and/or group accounts for which you like to view the deny permissions for folders/files. Enter User/Group name in domain\account name format and click Add to List to add the user/group to the selected accounts list Use Select a Scan Profile (Users/Groups) option to use the users and groups added in a profile. For more information on Scan Profiles, click About Scan Profiles (Users/Groups). Use Browse and Select option to retrieve users and groups from servers or Scan Profile (Computers). 210 Chapter 3 – NTFS Security Auditor Use the Find option to search desired user/group accounts. Click Finish to generate the selected report. Once the data collection process is complete, the report would be generated in a report window as shown below: 211 Chapter 3 – NTFS Security Auditor 212 Chapter 3 – NTFS Security Auditor List of user accounts that have indirect access to folders due to nested group membership ________________________________________ This report allows you to view the user accounts that have indirect access permissions on folders because of any nested group membership. Click on button. Step 1: Report Selection Select the report to be generated. Only one report can be generated at a time. Step 2: Select shared folders Select one or more servers to retrieve available shares. 213 Chapter 3 – NTFS Security Auditor 214 Chapter 3 – NTFS Security Auditor You may also enter the UNC path of a folder that is not in the list, such as a folder that is not shared, and then click Add, to add it to the list. In addition, you may also import a list of UNC paths to shared and nonshared folders from a text file and CSV file by using the Import button. You can select Include files present inside folders option to include all files from the specified folders in the report. Use Set sub-folder levels option to view permissions in the selected levels of sub-folder(s) in the shared folder. Include upto N level(s) of sub-folder(s) in the shared folder: This option will view permissions from subfolders which are upto the specified folder traversal level. 215 Chapter 3 – NTFS Security Auditor Include only Nth level of sub-folder(s) in the shared folder: This option will view permissions from subfolders which are in the specified folder level only. Include folders after N level(s) of sub-folder(s) in the shared folder: This option will view permissions from sub-folders which are after the nth folder level of the selected folder. Include only leaf nodes in the shared folder: This option will view permissions from the last child (leaf) nodes without affecting the parent folder’s permissions. Click OK to proceed. Click Finish to generate the selected report. Once the data collection process is complete, the report would be generated in a report window as shown below: 216 Chapter 3 – NTFS Security Auditor List of Effective access for specific users and groups on folders ________________________________________ This report allows you to view the effective permissions of specific user/group accounts on folders. Click on button. Step 1: Report Selection Select the report to be generated. Only one report can be generated at a time. Click Next to proceed to the next step. Step 2: Select User/Group Accounts: Select user and/or group accounts for which you like to view the effective permissions for folders/files. 217 Chapter 3 – NTFS Security Auditor Enter User/Group name in domain\account name format and click Add to List to add the user/group to the selected accounts list Use Select a Scan Profile (Users/Groups) option to use the users and groups added in a profile. For more information on Scan Profiles, click About Scan Profiles (Users/Groups). Use Browse and Select option to retrieve users and groups from servers or Scan Profile (Computers). 218 Chapter 3 – NTFS Security Auditor Use the Find option to search desired user/group accounts. Click Next to proceed. Step 3: Select shared folders Select one or more servers to retrieve available shares. 219 Chapter 3 – NTFS Security Auditor 220 Chapter 3 – NTFS Security Auditor You may also enter the UNC path of a folder that is not in the list, such as a folder that is not shared, and then click Add, to add it to the list. In addition, you may also import a list of UNC paths to shared and nonshared folders from a text file and CSV file by using the Import button. You can select Include files present inside folders option to include all files from the specified folders in the report. You can select Include Group members option to include all the members of a group and their sub-group members at all group levels in the report. Use Set sub-folder levels option to view permissions in the selected levels of sub-folder(s) in the shared folder. 221 Chapter 3 – NTFS Security Auditor Include upto N level(s) of sub-folder(s) in the shared folder: This option will view permissions from subfolders which are upto the specified folder traversal level. Include only Nth level of sub-folder(s) in the shared folder: This option will view permissions from subfolders which are in the specified folder level only. Include folders after N level(s) of sub-folder(s) in the shared folder: This option will view permissions from sub-folders which are after the nth folder level of the selected folder. Include only leaf nodes in the shared folder: This option will view permissions from the last child (leaf) nodes without affecting the parent folder’s permissions. Click OK to proceed. Click Finish to generate the selected report. Once the data collection process is complete, the report would be generated in a report window as shown below: 222 Chapter 3 – NTFS Security Auditor List of folders that have permissions for 'Everyone' group ________________________________________ This report allows you to view the folders that have permissions for 'Everyone' group. Click on button. Step 1: Report Selection Select the report to be generated. Only one report can be generated at a time. Step 2: Select shared folders Select one or more servers to retrieve available shares. 223 Chapter 3 – NTFS Security Auditor 224 Chapter 3 – NTFS Security Auditor You may also enter the UNC path of a folder that is not in the list, such as a folder that is not shared, and then click Add, to add it to the list. In addition, you may also import a list of UNC paths to shared and nonshared folders from a text file and CSV file by using the Import button. You can select Include files present inside folders option to include all files from the specified folders in the report. Use Set sub-folder levels option to view permissions in the selected levels of sub-folder(s) in the shared folder. Include upto N level(s) of sub-folder(s) in the shared folder: This option will view permissions from subfolders which are upto the specified folder traversal level. 225 Chapter 3 – NTFS Security Auditor Include only Nth level of sub-folder(s) in the shared folder: This option will view permissions from subfolders which are in the specified folder level only. Include folders after N level(s) of sub-folder(s) in the shared folder: This option will view permissions from sub-folders which are after the nth folder level of the selected folder. Include only leaf nodes in the shared folder: This option will view permissions from the last child (leaf) nodes without affecting the parent folder’s permissions. Click OK to proceed. Click Finish to generate the selected report. Once the data collection process is complete, the report would be generated in a report window as shown below: 226 Chapter 3 – NTFS Security Auditor Power Export ________________________________________ About Power Export Task Manager Schedule Standard Reports Schedule Built-in Reports 227 Chapter 3 – NTFS Security Auditor About Power Export ________________________________________ NTFS Security Auditor provides a powerful offline report generation tool called Power Export. Power Export allows the user to select multiple reports to be run for several domains and servers across the enterprise at scheduled intervals. The Power Export tool has the ability to export and/or email the reports in different file formats. Please note the following while using the Power Export Wizard: a. Scheduled reports will be created as a "task" in Windows Task Scheduler. b. The scheduled job will generate and export/email the reports in different file formats (HTML, CSV , XLSX and SQL) to the desired folder path/printer. c. By default, for each task, a sub-folder with the task name will be created under the specified export path. All selected Reports will be exported to a time-stamped sub-folder, in the format "yyyy-mm-dd hh.mm.ss", under the task name folder. Therefore, the full folder path for all the exported reports refers to the following directory: <Export path><Task name><Time stamp>. d. A separate file will be created for each report in the desired file format. For example, in the HTML file format, each report will be created as a.html file. Note: NTFS Security Auditor Power Export Wizard will help you create and store the settings for a task, which you may view or modify later using the Scheduled Tasks Manager. The task will be created with the settings (Schedule Type and Run As parameter) provided using the Power Export Wizard. A valid password must be specified for the Run As parameter of the task. You can schedule the two types of reports (Shares, Folder and Files report and Built-in report) available in NTFS Security Auditor. 228 Chapter 3 – NTFS Security Auditor Scheduled Tasks Manager ________________________________________ The Scheduled Tasks Manager allows you to perform the following operations: View summary information for the tasks created View exported files of the task Edit an existing task Delete a task View summary information of a task The pane on the left hand side in the Scheduled Tasks Manager window lists the tasks maintained in NTFS Security Auditor. To view summary information of a task, select the desired task on the left pane. The summary information of the selected task will be displayed in the right pane as shown below: The task summary includes information about the task information, reports selected, export/print settings. To view the selected servers/domains for a report in the task, click on the hyperlink in the Servers/Domains column in the right pane. The Selected Servers/Domains window will be displayed as shown below: 229 Chapter 3 – NTFS Security Auditor View exported files To view the reports generated and exported by the task, perform either one of the following steps: Select Scheduled Tasks node on the left pane, and then click on the hyperlink in the Exported Files column in the right pane for the desired task. OR Select the desired task on the left pane, and then click on the hyperlink next to Exported Files. Edit Task Select a task from the Scheduled Tasks Manager Window and Click Edit Task. Perform the steps as in Schedule Shares, Folders and Files or Schedule Built-in Report based on the scheduled report type. While proceeding through the wizard you may change the settings, add a new report, delete a report, edit a report, change the export path etc. The new settings will be used when the task runs the next time. Delete Task To delete a task from the Power Reports Task Manager Window, select the task and Click Delete Task. The deleted task will be removed permanently from the Windows Task Scheduler. 230 Chapter 3 – NTFS Security Auditor Task Status While running Power Export task configured with permissions reports, you may need to know the status of the tasks like last folder being processed, task start time, task complete status. For viewing this details, you can use the Task Status option. This option is especially useful when the schedule task is created in one user context other than currently logged user context. For knowing the status of the running permission report task, perform the following steps: 1. Select a permission report task from the Scheduled Tasks Manager Window. 2. The permission report task will be displayed as shown below 3. To view the selected folder(s)/ file(s) path being processed (task running), click on the hyperlink over the Task Status column in the right pane. The Task Status window will be displayed showing the folder(s)/ file(s) path being processed as shown below: 231 Chapter 3 – NTFS Security Auditor 232 Chapter 3 – NTFS Security Auditor Schedule Shares, Folders and Files Reports ________________________________________ Select option under Power Export. This will bring up the Power Export Wizard. Step 1: Report Selection 1. Select the report(s) using the checkboxes to the left of the reports. You may select any number of reports to run in a single task. 2. Reports falling under 'Server Reports' scan each server and collect data specific to each server. They are further classified by the category they report on (viz. Users, Policies, Events etc.). 3. Click Next to proceed to the next step. You may Click Back button anytime to come back to a previous step. 233 Chapter 3 – NTFS Security Auditor Step 2: Server Selection for Server Reports 1. Click Add Servers button to select the servers for which you wish to run the server reports selected in Step 1. This will display a window where you can select the servers you want to add. Selecting a domain will add all the servers in that domain to the report. 234 Chapter 3 – NTFS Security Auditor 2. You can restrict the domain scope and scan and collect data only for a specific set of computers by either selecting specific computers under a domain or by selecting a Scan Profile. 3. Click OK to apply the selected servers or a Scan Profile to the current report or click Apply to Reports to apply the selection to the rest of the selected server reports. The selected servers will be added to the wizard as shown below. 235 Chapter 3 – NTFS Security Auditor 4. Click Next to proceed to the next Step. 236 Chapter 3 – NTFS Security Auditor Step 3: Delivery options 1. Change the Export or E-mail settings as necessary. 2. Use Browse button to change the export path Click Additional E-mail Settings button to specify optional e-mail settings as shown below. 237 Chapter 3 – NTFS Security Auditor 238 Chapter 3 – NTFS Security Auditor Step 4: Schedule Settings Enter a unique name for the task. Change the Run as parameter, if necessary and set the password for the specified user. Change the task schedule settings as required. Click Next to proceed to the next and final step. 239 Chapter 3 – NTFS Security Auditor Step 5: Summary This step displays the summary information of the task. Click Finish to save the task details. The task will be added to Windows Schedule Tasks and will be displayed in the Scheduled Tasks Manager Window as shown below: 240 Chapter 3 – NTFS Security Auditor 241 Chapter 3 – NTFS Security Auditor Schedule Built-in Reports ________________________________________ The built-in reports have been categorized to the following: Permissions Reports Shares and Resources reports 242 Chapter 3 – NTFS Security Auditor Schedule Permissions Built-in Reports ________________________________________ Permissions Reports Permissions Reports includes reports that focus solely on reporting the access permissions assigned to users and groups on objects such as folders etcetera. List of permissions for specific users and groups on folders List of permissions for folders List of permissions for specific users and groups on files List of permissions for files List of all permissions for folders (Inherited & Explicit) List of effective permissions for users and groups on folders List of effective permissions for users and groups on files List of effective permissions for specific users and groups on folders List of effective permissions for specific users and groups on files 243 Chapter 3 – NTFS Security Auditor List of permissions for specific users and groups on folders ________________________________________ This report allows you to view folder permissions for specific users and groups. Select bring up the Power Export Wizard. option under Power Export. This will Step 1: Report Selection 244 Chapter 3 – NTFS Security Auditor 1. Select "Permissions Reports" from the select report category drop-down list. 2. Select the desired report. Only one report may be selected to run in a single task. 3. Click Next to proceed to the next step. You may Click Back button anytime to come back to a previous step. Step 2: User and/or Group Selection 245 Chapter 3 – NTFS Security Auditor Use Select a Scan Profile (Users/Groups) option to use the users and groups added in the profile. For more information on Scan Profiles, click About Scan Profiles (Users/Groups). 1. Select the user or group, for which you wish to run the permissions report. 2. The selected users will be added to the wizard as shown above: 3. Click Next to proceed to the Next step. 246 Chapter 3 – NTFS Security Auditor Step 3: Shared Folder Selection 1. Select the desired folder(s) for which you wish to run the permissions report. 2. You may also click Import button to import a list of UNC folder paths from a text file. 3. Folders that have identical permissions as the parent folder would show up with "Same as parent" in User Name and/or Security fields in the report. However, if you do not want folders with identical permissions as the parent folder reported, then select Do not display folders that have same permissions as the parent folder option. This option will not report folders with identical permissions as the parent folder. 4. NTFS Security Auditor defaults to scanning all the sub-folders for a given folder. If you want to modify the Include sub-folders and sub-folder level options click Edit Folder Options button. 247 Chapter 3 – NTFS Security Auditor That will show up a window as shown below: 5. Modify the folder options as required and click OK. 6. You can use Customize option to exclude some of the fields from the report, as displayed below: 7. Select the customize options as required and click OK. 8. You can select Exclude inherited permissions option to exclude inherited permissions from the report. 9. Click Next to proceed to the Next step. 248 Chapter 3 – NTFS Security Auditor Step 4: Additional report settings 1. Select the Validate for Errors option for validating the folders / files based on the folder traversal option selected, before proceeding to report generation. o o Generate report ignoring any errors found – This option will validate the folders/ files path(s) and generate the report even if errors are encountered during the validation option. Generate report only if no error were found. Send error report through e-mail – This option will validate the folders/ files path(s) and skip the report generation if errors were encountered during the validation option. It will then email the error(s) encountered during the validation process to users. 2. You may select Include errors as part of the report option for including the error information of folders / files into report data. Select error information that needs to be highlighted. 249 Chapter 3 – NTFS Security Auditor 3. You may also select Highlight Items for highlighting rows containing certain Permissions and Account status in the report data. Select the desired Permissions and status of Accounts that need to be highlighted. 4. You may also select Include group members for include members of group and their sub-group members at all group levels in the report. 5. You may also select Include group membership for include membership information of user and group in the report. 6. You may also select Include SID for include SID value for user in the report. 7. Click Next to proceed to the Next step. 250 Chapter 3 – NTFS Security Auditor Step 5: Delivery Options 1. Change the Export or E-mail settings as necessary. 2. Use Browse button to change the export path. Click Additional E-mail Settings button to specify optional e-mail settings as shown below. 251 Chapter 3 – NTFS Security Auditor 252 Chapter 3 – NTFS Security Auditor Step 6: Schedule Settings 1. 2. 3. 4. Enter a unique name for the task. Change the Run as parameter, if necessary and set the password for the specified user. Change the task schedule settings as required. Click Next to proceed to the next and final step. 253 Chapter 3 – NTFS Security Auditor Step 7: Summary 1. This step displays the summary information of the task. 2. Click Finish to save the task details. 3. The task will be added to Windows Schedule Tasks. 254 Chapter 3 – NTFS Security Auditor List of permissions for folders ________________________________________ This report, allows you to view the associated folder permissions for a set of folders. Select the Power Export Wizard. option under Power Export. This will bring up Step 1: Report Selection 1. Select "Permissions Reports" from the select report category drop-down list. 2. Select the desired report. Only one report may be selected to run in a single task. 3. Click Next to proceed to the next step. You may Click Back button anytime to come back to a previous step. 255 Chapter 3 – NTFS Security Auditor Step 2: Shared Folder Selection 1. Select the desired folder(s) for which you wish to run the permissions report. 2. You may also click Import button to import a list of UNC folder paths from a text file. 3. Folders that have identical permissions as the parent folder would show up with "Same as parent" in User Name and/or Security fields in the report. However, if you do not want folders with identical permissions as the parent folder reported, then select Do not display folders that have same permissions as the parent folder option. This option will not report folders with identical permissions as the parent folder. 4. NTFS Security Auditor defaults to scanning all the sub-folders for a given folder. If you want to modify the Include sub-folders and sub-folder level options click Edit Folder Options button. That will show up a window as shown below: 256 Chapter 3 – NTFS Security Auditor 5. Modify the folder options as required and click OK. 6. If you want to exclude specific accounts select Exclude Accounts option. Click Accounts... button. That will show up a window as shown below: 7. Select the accounts for which you want to exclude and click OK. 8. You can use Customize option to exclude some of the fields from the report, as displayed below: 257 Chapter 3 – NTFS Security Auditor 9. Select the customize options as required and click OK. 10. You can select Exclude inherited permissions option to exclude inherited permissions from the report. 11. Click Next to proceed to the Next step. 258 Chapter 3 – NTFS Security Auditor Step 3: Additional report settings 1. Select the Validate for Errors option for validating the folders / files based on the folder traversal option selected, before proceeding to report generation. o Generate report ignoring any errors found – This option will validate the folders/ files path(s) and generate the report even if errors are encountered during the validation option. o Generate report only if no error were found. Send error report through e-mail – This option will validate the folders/ files path(s) and skip the report generation if errors were encountered during the validation option. It will then email the error(s) encountered during the validation process to users. 2. You may select Include errors as part of the report option for including the error information of folders / files into report data. Select error information that needs to be highlighted. 3. You may also select Highlight Items for highlighting rows containing certain Permissions and Account status in the report data. Select the desired Permissions and status of Accounts that need to be highlighted. 259 Chapter 3 – NTFS Security Auditor 4. You may also select Include group members for include members of a group and their sub-group members at all levels in the report. 5. You may also select Include group membership for include membership information of user and group in the report. 6. You may also select Include SID for include SID value for user in the report. 7. Click Next to proceed to the Next step. Step 4: Delivery Options 1. Change the Export or E-mail settings as necessary. 2. Use Browse button to change the export path. 260 Chapter 3 – NTFS Security Auditor Click Additional E-mail Settings button to specify optional e-mail settings as shown below. 261 Chapter 3 – NTFS Security Auditor Step 5: Schedule Settings 1. 2. 3. 4. Enter a unique name for the task. Change the Run as parameter, if necessary and set the password for the specified user. Change the task schedule settings as required. Click Next to proceed to the next and final step. 262 Chapter 3 – NTFS Security Auditor Step 6: Summary 1. This step displays the summary information of the task. 2. Click Finish to save the task details. 3. The task will be added to Windows Schedule Tasks. 263 Chapter 3 – NTFS Security Auditor List of permissions for specific users and groups on files ________________________________________ This report allows you to view file permissions for specific users and groups. Select Power Export Wizard. option under Power Export. This will bring up the Step 1: Report Selection 1. Select "Permissions Reports" from the select report category drop-down list. 2. Select the desired report. Only one report may be selected to run in a single task. 264 Chapter 3 – NTFS Security Auditor 3. Click Next to proceed to the next step. You may Click Back button anytime to come back to a previous step. Step 2: User and/or Group Selection 265 Chapter 3 – NTFS Security Auditor Use Select a Scan Profile (Users/Groups) option to use the users and groups added in the profile. For more information on Scan Profiles, click About Scan Profiles (Users/Groups). 1. Select the user or group, for which you wish to run the permissions report. 2. The selected users will be added to the wizard as shown above: 3. Click Next to proceed to the Next step. 266 Chapter 3 – NTFS Security Auditor Step 3: Shared Folder Selection 1. Select the desired folder(s) for which you wish to run the permissions report. 2. You may also click Import button to import a list of UNC folder paths from a text file. 3. Files that have identical permissions as the parent folder would show up with "Same as parent" in User Name and/or Security fields in the report. However, if you do not want files with identical permissions as the parent folder reported, then select Do not display files that have same permissions as the parent folder option. This option will not report files with identical permissions as the parent folder. 4. NTFS Security Auditor defaults to scanning all the sub-folders for a given folder. If you want to modify the Include sub-folders and sub-folder level options click Edit Folder Options button. That will show up a window as shown below: 267 Chapter 3 – NTFS Security Auditor 5. Modify the folder options as required and click OK. 6. You can use Customize option to exclude some of the fields from the report, as displayed below: 7. Select the customize options as required and click OK. 8. You can select Exclude inherited permissions option to exclude inherited permissions from the report. 9. Click Next to proceed to the Next step. 268 Chapter 3 – NTFS Security Auditor Step 4: Additional report settings 1. Select the Validate for Errors option for validating the folders / files based on the folder traversal option selected, before proceeding to report generation. o Generate report ignoring any errors found – This option will validate the folders/ files path(s) and generate the report even if errors are encountered during the validation option. o Generate report only if no error were found. Send error report through e-mail – This option will validate the folders/ files path(s) and skip the report generation if errors were encountered during the validation option. It will then email the error(s) encountered during the validation process to users. 2. You may select Include errors as part of the report option for including the error information of folders / files into report data. Select error information that needs to be highlighted. 3. You may also select Highlight Items for highlighting rows containing certain Permissions and Account status in the report data. Select the desired Permissions and status of Accounts that need to be highlighted. 269 Chapter 3 – NTFS Security Auditor 4. You may also select Include group members for include members of a group and their sub-group members at all group levels in the report. 5. You may also select Include group membership for include membership information of user and group in the report. 6. You may also select Include SID for include SID value for user in the report. 7. Click Next to proceed to the Next step. Step 4: Delivery Options 1. Change the Export or E-mail settings as necessary. 2. Use Browse button to change the export path. Click Additional E-mail Settings button to specify optional e-mail settings as shown below. 270 Chapter 3 – NTFS Security Auditor 271 Chapter 3 – NTFS Security Auditor Step 5: Schedule Settings 1. 2. 3. 4. Enter a unique name for the task. Change the Run as parameter, if necessary and set the password for the specified user. Change the task schedule settings as required. Click Next to proceed to the next and final step. 272 Chapter 3 – NTFS Security Auditor Step 6: Summary 1. This step displays the summary information of the task. 2. Click Finish to save the task details. 3. The task will be added to Windows Scheduled Tasks folder. 273 Chapter 3 – NTFS Security Auditor List of permissions for files ________________________________________ This report allows you to view the associated file permissions under a specific set of folders. Select up the Power Export Wizard. option under Power Export. This will bring Step 1: Report Selection 274 Chapter 3 – NTFS Security Auditor 1. Select "Permissions Reports" from the select report category drop-down list. 2. Select the desired report. Only one report may be selected to run in a single task. 3. Click Next to proceed to the next step. You may Click Back button anytime to come back to a previous step. Step 2: Shared Folder Selection 1. Select the desired folder(s) for which you wish to run the permissions report. 2. You may also click Import button to import a list of UNC folder paths from a text file. 3. Files that have identical permissions as the parent folder would show up with "Same as parent" in User Name and/or Security fields in the report. However, if you do not want files with identical permissions as the parent folder reported, then select Do not display files that have same permissions as the parent folder option. This option will not report files with identical permissions as the parent folder. 4. NTFS Security Auditor defaults to scanning all the sub-folders for a given folder. If you want to modify the Include sub-folders and sub-folder level options click Edit Folder Options button. That will show up a window as shown below: 275 Chapter 3 – NTFS Security Auditor 5. Modify the folder options as required and click OK. 6. If you want to exclude specific accounts select Exclude Accounts option. Click Accounts... button. That will show up a window as shown below: 7. Select the accounts for which you want to exclude and click OK. 8. You can use Customize option to exclude some of the fields from the report, as displayed below: 276 Chapter 3 – NTFS Security Auditor 9. Select the customize options as required and click OK. 10. You can select Exclude inherited permissions option to exclude inherited permissions from the report. 11. Click Next to proceed to the Next step. 277 Chapter 3 – NTFS Security Auditor Step 3: Additional report settings 1. Select the Validate for Errors option for validating the folders / files based on the folder traversal option selected, before proceeding to report generation. o Generate report ignoring any errors found – This option will validate the folders/ files path(s) and generate the report even if errors are encountered during the validation option. o Generate report only if no error were found. Send error report through e-mail – This option will validate the folders/ files path(s) and skip the report generation if errors were encountered during the validation option. It will then email the error(s) encountered during the validation process to users. 2. You may select Include errors as part of the report option for including the error information of folders / files into report data. Select error information that needs to be highlighted. 3. You may also select Highlight Items for highlighting rows containing certain Permissions and Account status in the report data. Select the desired Permissions and status of Accounts that need to be highlighted. 278 Chapter 3 – NTFS Security Auditor 4. You may also select Include group members for include members of a group and their sub-group members at all group levels in the report. 5. You may also select Include group membership for include membership information of user and group in the report. 6. You may also select Include SID for include SID value for user in the report. 7. Click Next to proceed to the Next step. Step 4: Delivery Options 279 Chapter 3 – NTFS Security Auditor 1. Change the Export or E-mail settings as necessary. 2. Use Browse button to change the export path. Click Additional E-mail Settings button to specify optional e-mail settings as shown below. 280 Chapter 3 – NTFS Security Auditor Step 5: Schedule Settings 1. 2. 3. 4. Enter a unique name for the task. Change the Run as parameter, if necessary and set the password for the specified user. Change the task schedule settings as required. Click Next to proceed to the next and final step. 281 Chapter 3 – NTFS Security Auditor Step 6: Summary 1. This step displays the summary information of the task. 2. Click Finish to save the task details. 3. The task will be added to Windows Scheduled Tasks folder. 282 Chapter 3 – NTFS Security Auditor List of all permissions for folders (Inherited & Explicit) ________________________________________ This report lists the permissions (explicit and inherit) assigned to the users for a set of folders. Select the Power Export Wizard. option under Power Export. This will bring up Step 1: Report Selection 283 Chapter 3 – NTFS Security Auditor 1. Select "Permissions Reports" from the select report category drop-down list. 2. Select the desired report. Only one report may be selected to run in a single task. 3. Click Next to proceed to the next step. You may Click Back button anytime to come back to a previous step. Step 2: Shared Folder Selection 1. Select the desired folder(s) for which you wish to run the permissions report. 2. You may also click Import button to import a list of UNC folder paths from a text file. 3. Folders that have identical permissions as the parent folder would show up with "Same as parent" in User Name and/or Security fields in the report. However, if you do not want folders with identical permissions as the parent folder reported, then select Do not display folders that have same permissions as the parent folder option. This option will not report folders with identical permissions as the parent folder. 284 Chapter 3 – NTFS Security Auditor 4. NTFS Security Auditor defaults to scanning all the sub-folders for a given folder. If you want to modify the Include sub-folders and sub-folder level options click Edit Folder Options button. That will show up a window as shown below: 5. Modify the folder options as required and click OK. 6. If you want to exclude specific accounts select Exclude Accounts option. Click Accounts... button. That will show up a window as shown below: 7. Select the accounts for which you want to exclude and click OK. 8. You can use Customize option to exclude some of the fields from the report, as displayed below: 285 Chapter 3 – NTFS Security Auditor 9. Select the customize options as required and click OK. 10. Click Next to proceed to the Next step. 286 Chapter 3 – NTFS Security Auditor Step 3: Additional report settings 1. Select the Validate for Errors option for validating the folders / files based on the folder traversal option selected, before proceeding to report generation. o Generate report ignoring any errors found – This option will validate the folders/ files path(s) and generate the report even if errors are encountered during the validation option. o Generate report only if no error were found. Send error report through e-mail – This option will validate the folders/ files path(s) and skip the report generation if errors were encountered during the validation option. It will then email the error(s) encountered during the validation process to users. 2. You may select Include errors as part of the report option for including the error information of folders / files into report data. Selecting error information that needs to be highlighted. 287 Chapter 3 – NTFS Security Auditor 3. You may also select Highlight Items for highlighting rows containing certain Permissions and Account status in the report data. Select the desired Permissions and status of Accounts that need to be highlighted. 4. Click Next to proceed to the Next step. Step 4: Delivery Options 1. Change the Export or E-mail settings as necessary. 2. Use Browse button to change the export path. Click Additional E-mail Settings button to specify optional e-mail settings as shown below. 288 Chapter 3 – NTFS Security Auditor 289 Chapter 3 – NTFS Security Auditor Step 5: Schedule Settings 1. 2. 3. 4. Enter a unique name for the task. Change the Run as parameter, if necessary and set the password for the specified user. Change the task schedule settings as required. Click Next to proceed to the next and final step. 290 Chapter 3 – NTFS Security Auditor Step 6: Summary 1. This step displays the summary information of the task. 2. Click Finish to save the task details. 3. The task will be added to Windows Schedule Tasks. 291 Chapter 3 – NTFS Security Auditor List of effective permission for users and groups on folders ________________________________________ This report lists effective permissions for users and groups assigned to set of folders. Select up the Power Export Wizard. option under Power Export. This will bring Step 1: Report Selection 292 Chapter 3 – NTFS Security Auditor 1. Select "Permissions Reports" from the select report category drop-down list. 2. Select the desired report. Only one report may be selected to run in a single task. 3. Click Next to proceed to the next step. You may Click Back button anytime to come back to a previous step. Step 2: Shared Folder Selection 1. Select the desired folder(s) for which you wish to run the permissions report. 2. You may also click Import button to import a list of UNC folder paths from a text file. 3. Folders that have identical permissions as the parent folder would show up with "Same as parent" in User Name and/or Security fields in the report. However, if you do not want folders with identical permissions as the parent folder reported, then select Do not display folders that have same permissions as the parent folder option. This option will not report folders with identical permissions as the parent folder. 293 Chapter 3 – NTFS Security Auditor 4. NTFS Security Auditor defaults to scanning all the sub-folders for a given folder. If you want to modify the Include sub-folders and sub-folder level options click Edit Folder Options button. That will show up a window as shown below: 5. Modify the folder options as required and click OK. 6. If you want to exclude specific accounts select Exclude Accounts option. Click Accounts... button. That will show up a window as shown below: 7. Select the accounts for which you want to exclude and click OK. 8. You can use Customize option to exclude some of the fields from the report, as displayed below: 294 Chapter 3 – NTFS Security Auditor 9. Select the customize options as required and click OK. 10. Click Next to proceed to the Next step. 295 Chapter 4 – NTFS Security Manager Step 3: Additional report settings 1. Select the Validate for Errors option for validating the folders / files based on the folder traversal option selected, before proceeding to report generation. o Generate report ignoring any errors found – This option will validate the folders/ files path(s) and generate the report even if errors are encountered during the validation option. o Generate report only if no error were found. Send error report through e-mail – This option will validate the folders/ files path(s) and skip the report generation if errors were encountered during the validation option. It will then email the error(s) encountered during the validation process to users. 2. You may select Include errors as part of the report option for including the error information of folders / files into report data. Select error information that needs to be highlighted. 3. You may also select Highlight Items for highlighting rows containing certain Permissions and Account status in the report data. Select the desired Permissions and status of Accounts that need to be highlighted. 296 Chapter 4 – NTFS Security Manager 4. You may also select Include group members information for include members of group and their sub-group members at all group levels in the report. 5. Click Next to proceed to the Next step. Step 4: Delivery Options 1. Change the Export or E-mail settings as necessary. 2. Use Browse button to change the export path. Click Additional E-mail Settings button to specify optional e-mail settings as shown below. 297 Chapter 4 – NTFS Security Manager 298 Chapter 4 – NTFS Security Manager Step 5: Schedule Settings 1. 2. 3. 4. Enter a unique name for the task. Change the Run as parameter, if necessary and set the password for the specified user. Change the task schedule settings as required. Click Next to proceed to the next and final step. 299 Chapter 4 – NTFS Security Manager Step 6: Summary 1. This step displays the summary information of the task. 2. Click Finish to save the task details. 3. The task will be added to Windows Schedule Tasks. 300 Chapter 4 – NTFS Security Manager List of effective permission for users and groups on files ________________________________________ This report lists effective permissions for users and groups assigned to files available in a set of folders. Select the Power Export Wizard. option under Power Export. This will bring up Step 1: Report Selection 301 Chapter 4 – NTFS Security Manager 1. Select "Permissions Reports" from the select report category drop-down list. 2. Select the desired report. Only one report may be selected to run in a single task. 3. Click Next to proceed to the next step. You may Click Back button anytime to come back to a previous step. Step 2: Shared Folder Selection 1. Select the desired folder(s) for which you wish to run the permissions report. 2. You may also click Import button to import a list of UNC folder paths from a text file. 3. Folders that have identical permissions as the parent folder would show up with "Same as parent" in User Name and/or Security fields in the report. However, if you do not want folders with identical permissions as the parent folder reported, then select Do not display folders that have same permissions as the parent folder option. This option will not report folders with identical permissions as the parent folder. 4. NTFS Security Auditor defaults to scanning all the sub-folders for a given folder. If you want to modify the Include sub-folders and sub-folder level options click Edit Folder Options button. That will show up a window as shown below: 302 Chapter 4 – NTFS Security Manager 5. Modify the folder options as required and click OK. 6. If you want to exclude specific accounts select Exclude Accounts option. Click Accounts... button. That will show up a window as shown below: 7. Select the accounts for which you want to exclude and click OK. 8. You can use Customize option to exclude some of the fields from the report, as displayed below: 9. Select the customize options as required and click OK. 303 Chapter 4 – NTFS Security Manager 10. Click Next to proceed to the Next step. Step 3: Additional report settings 1. Select the Validate for Errors option for validating the folders / files based on the folder traversal option selected, before proceeding to report generation. o Generate report ignoring any errors found – This option will validate the folders/ files path(s) and generate the report even if errors are encountered during the validation option. o Generate report only if no error were found. Send error report through e-mail – This option will validate the folders/ files path(s) and skip the report generation if errors were encountered during the validation option. It will then email the error(s) encountered during the validation process to users. 2. You may select Include errors as part of the report option for including the error information of folders / files into report data. Select the error information that needs to be highlighted. 3. You may also select Highlight Items for highlighting rows containing certain Permissions and Account status in the report data. Select the desired Permissions and status of Accounts that need to be highlighted. 304 Chapter 4 – NTFS Security Manager 4. You may also select Include group members information for include members of a group and their sub-group members at all group levels in the report. 5. Click Next to proceed to the Next step. Step 4: Delivery Options 1. Change the Export or Print or E-mail settings as necessary. 2. Use Browse button to change the export path. Click Additional E-mail Settings button to specify optional e-mail settings as shown below. 305 Chapter 4 – NTFS Security Manager Step 5: Schedule Settings 1. 2. 3. 4. Enter a unique name for the task. Change the Run as parameter, if necessary and set the password for the specified user. Change the task schedule settings as required. Click Next to proceed to the next and final step. 306 Chapter 4 – NTFS Security Manager Step 6: Summary 1. This step displays the summary information of the task. 2. Click Finish to save the task details. 3. The task will be added to Windows Schedule Tasks. 307 Chapter 4 – NTFS Security Manager List of effective permissions for specific users and groups on folders ________________________________________ This report lists effective permissions for specific users and groups assigned to set of folders. Select Export Wizard. option under Power Export. This will bring up the Power Step 1: Report Selection 308 Chapter 4 – NTFS Security Manager 1. Select "Permissions Reports" from the select report category drop-down list. 2. Select the desired report. Only one report may be selected to run in a single task. 3. Click Next to proceed to the next step. You may Click Back button anytime to come back to a previous step. Step 2: User and/or Group Selection 309 Chapter 4 – NTFS Security Manager Use Select a Scan Profile (Users/Groups) option to use the users and groups added in the profile. For more information on Scan Profiles, click About Scan Profiles (Users/Groups). 1. Select the user or group, for which you wish to run the permissions report. 2. The selected users will be added to the wizard as shown above: 3. Click Next to proceed to the Next step. 310 Chapter 4 – NTFS Security Manager Step 3: Shared Folder Selection 1. Select the desired folder(s) for which you wish to run the permissions report. 2. You may also click Import button to import a list of UNC folder paths from a text file. 3. Folders that have identical permissions as the parent folder would show up with "Same as parent" in User Name and/or Security fields in the report. However, if you do not want folders with identical permissions as the parent folder reported, then select Do not display folders that have same permissions as the parent folder option. This option will not report folders with identical permissions as the parent folder. 4. NTFS Security Auditor defaults to scanning all the sub-folders for a given folder. If you want to modify the Include sub-folders and sub-folder level options click Edit Folder Options button. That will show up a window as shown below: 311 Chapter 4 – NTFS Security Manager 5. Modify the folder options as required and click OK. 6. You can use Customize option to exclude some of the fields from the report, as displayed below: 7. Select the customize options as required and click OK. 8. Click Next to proceed to the Next step. 312 Chapter 4 – NTFS Security Manager Step 4: Additional report settings 1. Select the Validate for Errors option for validating the folders / files based on the folder traversal option selected, before proceeding to report generation. o Generate report ignoring any errors found – This option will validate the folders/ files path(s) and generate the report even if errors are encountered during the validation option. o Generate report only if no error were found. Send error report through e-mail – This option will validate the folders/ files path(s) and skip the report generation if errors were encountered during the validation option. It will then email the error(s) encountered during the validation process to users. 2. You may select Include errors as part of the report option for including the error information of folders / files into report data. Select error information that needs to be highlighted. 3. You may also select Highlight Items for highlighting rows containing certain Permissions and Account status in the report data. Select the desired Permissions and status of Accounts that need to be highlighted. 313 Chapter 4 – NTFS Security Manager 4. You may also select Include group members information for include members of a group and their sub-group members at all group levels in the report. 5. Click Next to proceed to the Next step. Step 5: Delivery Options 1. Change the Export or E-mail settings as necessary. 2. Use Browse button to change the export path. 314 Chapter 4 – NTFS Security Manager Click Additional E-mail Settings button to specify optional e-mail settings as shown below. 315 Chapter 4 – NTFS Security Manager Step 6: Schedule Settings 1. 2. 3. 4. Enter a unique name for the task. Change the Run as parameter, if necessary and set the password for the specified user. Change the task schedule settings as required. Click Next to proceed to the next and final step. 316 Chapter 4 – NTFS Security Manager Step 7: Summary 1. This step displays the summary information of the task. 2. Click Finish to save the task details. 3. The task will be added to Windows Schedule Tasks. 317 Chapter 4 – NTFS Security Manager List of effective permissions for specific users and groups on files ________________________________________ This report lists effective permissions for specific users and groups assigned to files available in a set of folders. Select Power Export Wizard. option under Power Export. This will bring up the Step 1: Report Selection 318 Chapter 4 – NTFS Security Manager 1. Select "Permissions Reports" from the select report category drop-down list. 2. Select the desired report. Only one report may be selected to run in a single task. 3. Click Next to proceed to the next step. You may Click Back button anytime to come back to a previous step. Step 2: User and/or Group Selection 319 Chapter 4 – NTFS Security Manager Use Select a Scan Profile (Users/Groups) option to use the users and groups added in the profile. For more information on Scan Profiles, click About Scan Profiles (Users/Groups). 1. Select the user or group, for which you wish to run the permissions report. 2. The selected users will be added to the wizard as shown above: 3. Click Next to proceed to the Next step. 320 Chapter 4 – NTFS Security Manager Step 3: Shared Folder Selection 1. Select the desired folder(s) for which you wish to run the permissions report. 2. You may also click Import button to import a list of UNC folder paths from a text file. 3. Files that have identical permissions as the parent folder would show up with "Same as parent" in User Name and/or Security fields in the report. However, if you do not want files with identical permissions as the parent folder reported, then select Do not display files that have same permissions as the parent folder option. This option will not report files with identical permissions as the parent folder. 4. NTFS Security Auditor defaults to scanning all the sub-folders for a given folder. If you want to modify the Include sub-folders and sub-folder level options click Edit Folder Options button. That will show up a window as shown below: 321 Chapter 4 – NTFS Security Manager 5. Modify the folder options as required and click OK. 6. You can use Customize option to exclude some of the fields from the report, as displayed below: 7. Select the customize options as required and click OK. 8. Click Next to proceed to the Next step. 322 Chapter 4 – NTFS Security Manager Step 4: Additional report settings 1. Select the Validate for Errors option for validating the folders / files based on the folder traversal option selected, before proceeding to report generation. o Generate report ignoring any errors found – This option will validate the folders/ files path(s) and generate the report even if errors are encountered during the validation option. o Generate report only if no error were found. Send error report through e-mail – This option will validate the folders/ files path(s) and skip the report generation if errors were encountered during the validation option. It will then email the error(s) encountered during the validation process to users. 2. You may select Include errors as part of the report option for including the error information of folders / files into report data. Select error information that needs to be highlighted. 3. You may also select Highlight Items for highlighting rows containing certain Permissions and Account status in the report data. Select the desired Permissions and status of Accounts that need to be highlighted. 323 Chapter 4 – NTFS Security Manager 4. You may also select Include group members information for include members of a group and their sub-group members at all group levels in the report. 5. Click Next to proceed to the Next step. Step 5: Delivery Options 1. Change the Export or E-mail settings as necessary. 2. Use Browse button to change the export path. Click Additional E-mail Settings button to specify optional e-mail settings as shown below. 324 Chapter 4 – NTFS Security Manager 325 Chapter 4 – NTFS Security Manager Step 6: Schedule Settings 1. 2. 3. 4. Enter a unique name for the task. Change the Run as parameter, if necessary and set the password for the specified user. Change the task schedule settings as required. Click Next to proceed to the next and final step. 326 Chapter 4 – NTFS Security Manager Step 7: Summary 1. This step displays the summary information of the task. 2. Click Finish to save the task details. 3. The task will be added to Windows Scheduled Tasks folder. 327 Chapter 4 – NTFS Security Manager Schedule Shares and Resources Built-in Reports ________________________________________ Click option under Power Export. This will bring up the Power Export Wizard. Step 1: Report Selection 1. Select the report(s) using the checkboxes to the left of the reports. You may select any number of reports to run in a single task. 2. The above reports collect data on a server-basis. 3. Click Next to proceed to the next step. You may Click Back button anytime to come back to a previous step. 328 Chapter 4 – NTFS Security Manager Step 2: Server Selection 1. Click Add Servers button to select the servers for which you wish to run the server reports selected in Step 1. This will display a window where you can select the servers you want to add. Selecting a domain will add all the servers in that domain to the report. 2. Click OK to apply the selected servers to the current report or click Apply to Reports to apply the servers to the rest of the selected server reports. The selected servers will be added to the wizard as shown below: 329 Chapter 4 – NTFS Security Manager 3. Click Next to proceed to the next Step. 330 Chapter 4 – NTFS Security Manager Step 3: Report Criteria (Optional) This step allows you to apply specific conditions for filtering report data. 1. To set a criteria for a report, select a report and Click Edit Criteria or Double Click the report. 2. The Criteria Settings window will be displayed as shown below: 331 Chapter 4 – NTFS Security Manager 3. Specify the criteria to filter the report data using the checkboxes. 4. Click OK in Criteria Settings window to go back to the wizard. 5. A description of the selected criteria will be displayed under Criteria Description as shown below: 6. Click Next to proceed to the Next step. 332 Chapter 4 – NTFS Security Manager Step 4: Delivery Options 1. Change the Export or E-mail settings as necessary. 2. Use Browse button to change the export path. 3. Click Next to proceed to the next step. Click Additional E-mail Settings button to specify optional e-mail settings as shown below 333 Chapter 4 – NTFS Security Manager 334 Chapter 4 – NTFS Security Manager Step 5: Schedule Settings 1. 2. 3. 4. Enter a unique name for the task. Change the Run as parameter, if necessary and set the password for the specified user. Change the task schedule settings as required. Click Next to proceed to the next and final step. 335 Chapter 4 – NTFS Security Manager Step 6: Summary 1. This step displays the summary information of the task. 2. Click Finish to save the task details. 3. The task will be added to Windows Schedule Tasks and will be displayed in the Scheduled Tasks Manager Window as shown below: 336 Chapter 4 – NTFS Security Manager 337 Chapter 4 – NTFS Security Manager NTFS Security Manager ________________________________________ Grant Permissions Revoke Permissions Modify Permissions Copy Permissions Dynamic Access Control Power Search Change History 338 Chapter 4 – NTFS Security Manager Grant Permissions ________________________________________ About Grant Permissions How to Grant Permissions for selected Shares? How to reuse the Grant Permissions templates? 339 Chapter 4 – NTFS Security Manager About Grant Permissions ________________________________________ The Grant Permissions feature allows you to grant permissions to the Share permissions. You can use many options like Add the new permissions to the account's existing permissions, Replace the account's existing permissions with the new permissions, etc. You may select options to Allow, Block inheritance from the parent object and also Replace all child objects existing permissions with the inheritable permissions from this object while granting permissions for accounts. Here is the list of actions you can perform using the Grant Permissions feature. Note: This feature will not break the inheritance from the parent of current object. If you still wish to break the inheritance from the parent object, you may use the option "Block Inherited permissions from this object's parent" to block inheritance. Actions Grant permissions for selected Shares: (How to?) Grant permissions for the selected accounts to the selected shared folder(s)/file(s) permissions list. Replace existing accounts permissions with the new permissions: (How to?) Replace the existing accounts permissions, If an existing account is selected to grant permissions to a shared folder. Also apply the above to subfolders and files that do not have inheritance set (non-inherited folders and files): (How to?) Grant permissions on subfolders and files that do not have inherited permissions from its parent object with respect to the above options. Remove all the existing explicit accounts and replace with the new accounts: (How to?) Remove all existing accounts that have explicitly assigned permissions for shares and replace them with the selected accounts and permissions. Replace all explicit permissions existing in descendant with the inherited permissions from the current object: (How to?) Remove explicitly defined permissions on all descendant objects and replace them with the inheritable permissions from the shared folder(s)/file(s) permissions list. Allow inherited permissions from the parent object to the current shares: (How to?) Allow inheritable permissions from the parent object to the current shares. It will not affect the already existing explicit permissions. Copy and Remove inherited permissions from the parent object to the current shares: (How to?) Copy and Remove the inheritable permissions from the parent object to the current shares. Copying the inheritable permissions will add the inherited permissions as explicit permissions in the shares permissions list. Removing the inherited permissions will remove all the inherited permissions from the parent to the current object. 340 Chapter 4 – NTFS Security Manager How to replace existing accounts permissions with the new permissions? ________________________________________ The Grant Permissions feature allows you to replace the existing accounts permissions, If the existing account selected for grant permissions. Click on button. The Grant Permissions window will be displayed. Follow the steps 1 through 3 as outlined in How to Grant Permissions for selected Shares?. In step 4 select the option Replace the account's existing permissions with the new permissions. Click Next to proceed to the next step. Follow the steps 5 through 6 as outlined in How to Grant Permissions for selected Shares? 341 Chapter 4 – NTFS Security Manager How to grant permissions to the selected accounts on subfolders and files that do not have inherited permissions from its parent object? ________________________________________ The Grant Permissions feature allows to grant permissions to the selected accounts on all subfolders and files that do not have inherited permissions from its parent object. Click on button. The Grant Permissions window will be displayed. Follow the steps 1 through 3 as outlined in How to Grant Permissions for selected Shares?. In step 4 select the option "Add the new permissions to the account's existing permissions" or "Replace the account's existing permissions with the new permissions" Then select the option Also apply the above to subfolders and files that do not have inheritance set (non-inherited folders and files). Click Next to proceed to the next step. Follow the steps 5 through 6 as outlined in How to Grant Permissions for selected Shares? 342 Chapter 4 – NTFS Security Manager How to remove all the existing explicit accounts and replace with the new accounts? ________________________________________ The Grant Permissions feature allows you to remove all existing accounts that have explicitly assigned permissions for shares and replace them with the selected accounts and permissions. Note that this will not remove inherited permissions from parent folder. Click on button. The Grant Permissions window will be displayed. Follow the steps 1 through 3 as outlined in How to Grant Permissions for selected Shares? In step 4 select the option Remove all existing accounts and replace with the selected accounts and permissions. Click Next to proceed to the next step. Follow the steps 5 through 6 as outlined in How to Grant Permissions for selected Shares? 343 Chapter 4 – NTFS Security Manager How to replace all explicit permissions existing in descendant with the inherited permissions from the current object? ________________________________________ The Grant Permissions feature allows to remove explicitly defined permissions on all descendant object and replace them with the inheritable permissions from the shared folder(s)/file(s) permissions list. Click on button. The Grant Permissions window will be displayed. Follow the steps 1 through 3 as outlined in How to Grant Permissions for selected Shares?. In step 4 select the option Replace all child objects existing permissions with the inheritable permissions from this object. Click Next to proceed to the next step. Follow the steps 5 through 6 as outlined in How to Grant Permissions for selected Shares? 344 Chapter 4 – NTFS Security Manager How to allow inherited permissions from the parent object to the current share? ________________________________________ The Grant Permissions feature provides an option to Allow inheritable permissions from the parent object to the current shared folder(s)/file(s). Click on button. The Grant Permissions window will be displayed. Follow the steps 1 through 3 as outlined in How to Grant Permissions for selected Shares?. In step 4 select the option Inheritance Rule and then select the option Allow inherited permissions from this object's Parent. Click Next to proceed to the next step. Follow the steps 5 through 6 as outlined in How to Grant Permissions for selected Shares? 345 Chapter 4 – NTFS Security Manager How to block inherited permissions from the parent object to the current share? ________________________________________ The Grant Permissions feature allows an option to Copy the inheritable permissions from the parent object to the current shares. This option will add the inherited permissions as explicit permissions in the Shares permissions list. You can also remove the inherited permissions from the parent object to the current shares. Click on button. The Grant Permissions window will be displayed. Follow the steps 1 through 3 as outlined in How to Grant Permissions for selected Shares? In step 4 select the option Copy inherited permissions. If you wish to remove the inherited permissions, you may use the option Remove inherited permissions to remove all the inherited permissions from the parent object. Click Next to proceed to the next step. Follow the steps 5 through 6 as outlined in How to Grant Permissions for selected Shares? 346 Chapter 4 – NTFS Security Manager How to Grant Permissions for selected Shares? ________________________________________ The Grant Permissions feature allows you to grant permissions to the Shares. You can use many options like Add the new permissions to the account's existing permissions, Replace the account's existing permissions with the new permissions, etc. You may select options to Allow, Block inheritance from the parent object and also Replace all child objects existing permissions with the inheritable permissions from this object while granting permissions for accounts. Click on button. The Grant Permissions window will be displayed as shown below: Step 1: Select shared folder(s)/file(s) Select shared folder(s)/files by using any of the input options displayed If you want to select shares from servers for which you wish to add, then click Add From option Select one or more servers to enumerate its shared folder(s)/file(s) 347 Chapter 4 – NTFS Security Manager Use Select a Scan Profile (Shares) option to use the shares added in the profile. 348 Chapter 4 – NTFS Security Manager You may also type the UNC path of a shared folder that is not in the list and then click Add, to add it to the list. In addition, you may also import a list of UNC paths to shared folder list from a text file by using the Import button. Click Next to proceed to the next step. 349 Chapter 4 – NTFS Security Manager Step 2: Account Selection 1. Select the accounts, for which you wish to grant permissions. 2. The selected accounts will be added to the wizard as shown below: Use Select a Scan Profile (Users/Groups) option to use the users and groups added in the profile. 350 Chapter 4 – NTFS Security Manager Click Next to proceed to the Next step. Step 3: Select Access Control type and permissions Select ACE type and permissions to grant for the selected accounts on the selected shared folder(s) /files(s) 351 Chapter 4 – NTFS Security Manager Click Next to proceed to the next step. Step 4: Apply the required rules to be used while assigning permissions Select which rules to apply while assigning permissions. 352 Chapter 4 – NTFS Security Manager Add the new permissions to the account's existing permissions option will add the selected permissions to the existing permissions list and also it will not affect the existing permissions. You may also use the below options to grant permissions and also apply inheritance by Inheritance rule Replace the account's existing permissions with the new permissions. Also apply the above to subfolders and files that do not have inheritance set (non-inherited folders and files). Remove all existing accounts and replace with the selected accounts and permissions. Replace all child objects existing permissions with the inheritable permissions from this object. Inheritance Rule: Allow inherited permissions from this object's parent. Copy inherited permissions. Remove inherited permissions. Replace the account's existing permissions with the new permissions If a selected account already exists in the current list of permissions of the selected shared folder(s)/file(s), this option will replace all explicitly assigned account permissions with the newly selected permissions for that account. 353 Chapter 4 – NTFS Security Manager Example: If the share already has some accounts with permissions like Allow Read and Write and if the same existing accounts selected with permissions Deny Modify to grant permissions then this option will replace the existing accounts previous permissions (Allow Read and Write) with new permission (Deny Modify). Otherwise if the selected account not exist in the share permissions list then it will add into the permissions list. Also apply the above to subfolders and files that do not have inheritance set (non-inherited folders and files) This option will grant permissions to the selected accounts on subfolders and files that do not have inherited permissions from its parent object with respect to the above options. Note: If this option is checked, the subfolders and files must have the applicable rights for the owner or the currently logged on user to perform this operation. Example: If the share has some subfolders and files with the blocked inheritance then this option will assign permissions based on the selected options. Remove all existing accounts and replace with the selected accounts and permissions This option will remove all existing accounts that have explicitly assigned permissions for the selected shared folder(s)/file(s) and replace them with the selected accounts and permissions. Note that this will not remove inherited permissions from parent folder. Caution: All existing account permissions will be cleaned up completely and the newly selected permissions will be applied. Example: If the share has 7 accounts then this option will remove all the 7 accounts and replace with the new selected accounts and permissions. Replace all child objects existing permissions with the inheritable permissions from this object This option will remove explicitly defined permissions on all descendants of the selected shared folder(s)/file(s) and replace them with inheritable permissions from the selected shared folder(s)/file(s). Example: If the share has some subfolders with the explicitly assigned permissions and some subfolders with blocked inheritance then this option will remove all explicitly assigned permissions of subfolders and allow inherited permissions from the parent object. Allow inherited permissions from this object's Parent This option will allow the selected shared folder(s)/file(s) to inherit permissions from its parent object. Example: If the share do not have any inherited permissions and the inheritance from the parent object blocked then this option will allow inherited permissions from the parent object. Copy inherited permissions This option will copy the permission entries that were previously inherited from the parent to this selected shared folder(s)/file(s). 354 Chapter 4 – NTFS Security Manager Example: If the share already allowed to inherit permissions from parent object then this option will remove the inheritance and add the inherited permissions as explicit permissions in the permissions list. Remove inherited permissions This option will remove the permission entries that were previously inherited from the parent and keep only those permissions explicitly defined/granted here. Caution: Removing permission inheritance from parent may break permissions/policies designed with the default inheritance option enabled. Use this option after a careful review. Example: If the share is already set to inherit permissions from parent object then this option will remove the inheritance from parent object. Click Next to proceed to the Next step Step 5: Save as template Enter a name and description to save these settings as a template for reuse later. 355 Chapter 4 – NTFS Security Manager Click Next to proceed to the next step Step 6: Summary This step displays the summary of all the input data along with the selected options. Click Finish to complete the Grant Permissions wizard. Permissions will be granted as specified in the wizard. The summary of all the input data would be shown below along with the "View change log" option to view the task completion status. 356 Chapter 4 – NTFS Security Manager 357 Chapter 4 – NTFS Security Manager How to reuse the Grant Permissions template? ________________________________________ The Saved Templates contains the list of saved templates to Grant and Revoke Permissions. Click on button. The Saved Templates window will be displayed as shown below. The saved templates window allows you to perform the following operations: Open an existing template Delete a template Preview the contents of a template Open an existing Template 1. To open an existing Grant permissions template, select the Grant permissions template and click Open button in the window. The Grant permissions Dialog will appear on the screen which will allow you to edit the selected template. 2. During edit operation you can modify the computer list and permissions entries, however, you cannot modify the name of the template. 358 Chapter 4 – NTFS Security Manager Delete a template To delete a Grant permissions template, select a Grant permissions template which you want to delete, and then click Delete button. The selected template will be deleted permanently. Preview the settings of a Template To preview the settings of a saved Template, select a saved Grant permissions template, and then click View Details button. The settings will be displayed in a window as shown below: 359 Chapter 4 – NTFS Security Manager Revoke Permissions ________________________________________ About Revoke Permissions How to revoke permissions from the selected shares permissions list? How to reuse the revoke permissions template? 360 Chapter 4 – NTFS Security Manager About Revoke Permissions ________________________________________ The Revoke Permissions feature provides many options to remove Accounts and their permissions from the existing list of ACE entries in shared Folders and Files. You may revoke all existing explicit Accounts and also you may selectively revoke a set of permissions granted to accounts. Here is the list of actions you can perform using the Revoke Permissions feature. Note: This feature will not break the inheritance from the parent of current object. If you still wish to break the inheritance from the parent object, you may use the Grant Permissions or Modify Permissions feature to block inheritance. Actions Revoke permissions from the selected shares permissions list: (How to?) Remove the selected Account with the selected permissions from the shared folder(s)/file(s) permissions list. Revoke the selected permissions from all existing explicit accounts in shares permissions list: (How to?) Revoke the selected permissions from all existing explicit Accounts in the share permissions list. Revoke the exact matching permissions from the existing explicit accounts in the shares permissions list: (How to?) Revoke existing explicit accounts, only if the selected permissions match exactly with the ACE entries in the shares permissions list. Revoke all existing explicit permissions from the shares permissions list: (How to?) Revoke the selected permissions from all existing explicit accounts in the share permissions list. Revoke the exact matching permissions from the shares permissions list: (How to?) Revoke the selected accounts, only if the selected permissions match exactly with the ACE entries in the shares permissions list. Revoke the selected Accounts and all their permissions from the shares permissions list: (How to?) Revoke the selected Accounts with all existing explicit permissions in the shares permissions list. Revoke the Orphaned SIDs from the selected shares permissions list: (How to?) Remove the Orphaned SIDs from the shared folder(s)/file(s) permissions list. 361 Chapter 4 – NTFS Security Manager How to revoke the selected permissions from all existing explicit accounts in the share permissions list? ________________________________________ The Revoke Permissions feature allows an option to revoke selected permissions from all existing explicit accounts in the share permissions list. Click on button. The Revoke Permissions window will be displayed. Follow the steps 1 through 2 as outlined in How to Revoke permissions from the selected shares permissions list? Step 3: User and/or Group selection Select the option All existing accounts that have been assigned explicit permission. 362 Chapter 4 – NTFS Security Manager Click Next to proceed to the next step. Step 4: Select Access Control type and permissions Click the option Selected permissions and select the ACE type and permissions Click Next to proceed to the next step. Follow the steps 5 through 6 as outlined in How to Revoke Permissions from selected Shares permissions list? 363 Chapter 4 – NTFS Security Manager How to revoke the exact matching permissions from the existing explicit accounts in the share permissions list? ________________________________________ The Revoke Permissions feature allows an option to revoke existing explicit accounts, only if the selected permissions match exactly with the ACE entries in the shares permissions list. Click on button. The Revoke Permissions window will be displayed. Follow the steps 1 through 2 as outlined in How to Revoke Permissions from selected Shares permissions list? Step 3: Account selection Select the option All existing accounts that have been assigned explicit permissions. 364 Chapter 4 – NTFS Security Manager Click Next to proceed to the next step. Step 4: Select Access Control type and permissions Select ACE type, permissions and also select the option Revoke only if there is an exact match Click Next to proceed to the next step. Follow the steps 5 through 6 as outlined in How to Revoke Permissions from selected Shares permissions list? 365 Chapter 4 – NTFS Security Manager How to revoke all existing explicit permissions from the shares permissions list? ________________________________________ The Revoke Permissions feature allows an option to revoke all existing explicit accounts in the shares permissions list. Click on button. The Revoke Permissions window will be displayed as shown below: Step 1: Select a Revoke permissions option Select the option Revoke all existing accounts and their permissions from the selected shared folder(s)/file(s) Click Next to proceed to the Next step. 366 Chapter 4 – NTFS Security Manager Step 2: Select shared folder(s)/file(s) Select shared folder(s)/file(s) by using any of the input options displayed. Click the option Add From Select one or more servers to enumerate its shared folder(s)/file(s) 367 Chapter 4 – NTFS Security Manager Use Select a Scan Profile (Shares) option to use the Shares added in the profile. 368 Chapter 4 – NTFS Security Manager You may also type the UNC path of a folder that is not in the list and then click Add, to add it to the list. In addition, you may also import a list of UNC paths to share list from a text file by using the Import button. Click Next to proceed to the Next step. Step 3: Selection Summary This step displays the summary of data selected to Revoke permissions and you can also view and export the existing permissions before changes are applied, by clicking on the Export current permissions button. 369 Chapter 4 – NTFS Security Manager Click Next to proceed to the Next step. Step 4: Save as template Enter a name and description to save these settings as a template to reuse later. 370 Chapter 4 – NTFS Security Manager Click Finish to complete the Grant Permissions task. After the Revoke permissions action completed, the summary of all the input data would shown below along with the option "View changelog" to view the summary of all the input data and task completion status. 371 Chapter 4 – NTFS Security Manager How to revoke the exact matching permissions from the shares permissions? ________________________________________ The Revoke Permissions feature provides an option to revoke selected accounts and their permissions, only if the selected permission entries match exactly with the ACE entries in the shares permissions list. Click on button. The Revoke Permissions window will be displayed. Follow the steps 1 through 3 as outlined in How to Revoke Permissions from selected shares permissions list? Step 4: Select Access Control type and permissions Select ACE type and permissions and also check the option Revoke only if there is an exact match Click Next to proceed to the next step. Follow the steps 5 through 6 as outlined in How to Revoke Permissions from selected shares permissions list? 372 Chapter 4 – NTFS Security Manager How to revoke the selected accounts and all their permissions from the share permissions list? ________________________________________ The Revoke Permissions feature provide the option to remove the selected accounts and all their permissions from the share permissions list. Click on button. The Revoke Permissions window will be displayed. Follow the steps 1 through 3 as outlined in How to Revoke Permissions from selected Shares permissions list? Step 4: Select Access Control type and permissions Select the option All existing permissions Click Next to proceed to the next step. Follow the steps 5 through 6 as outlined in How to Revoke Permissions from selected Shares permissions list? 373 Chapter 4 – NTFS Security Manager How to revoke the Orphaned SIDs from the share permissions list? ________________________________________ The Revoke Permissions feature allows an option to revoke Orphaned SIDs from the share permissions list. Click button. The Revoke Permissions window will be displayed. Follow the steps 1 through 2 as outlined in How to Revoke permissions from the selected shares permissions list? Step 3: User and/or Group selection Select the Orphaned SIDs option and click Select... button. Select the Orphaned SIDs in Select Orphaned SIDs... dialog. Once SID selection is complete, click OK. Click Next to proceed to the next step. 374 Chapter 4 – NTFS Security Manager Step 4: Select Access Control type and permissions Click All existing permissions option. Click Next to proceed to the next step. Follow the steps 5 through 6 as outlined in How to Revoke Permissions from selected Shares permissions list? 375 Chapter 4 – NTFS Security Manager How to revoke permissions from the selected shares permissions list? ________________________________________ The Revoke Permissions feature provides many options to remove accounts and their permissions from the existing list of ACE entries in shared folders and files. You may revoke all existing explicit accounts and also you may selectively revoke a set of permissions granted to accounts. Click on button. The Revoke Permissions window will be displayed as shown below: Step 1: Select a Revoke permissions option Select any one of the following options: Revoke all existing accounts and their permissions from the selected shared folder(s)/file(s): This option will remove all explicitly assigned accounts with all their permissions from the selected shared folder(s)/file(s) permissions list. Note: This will not affect the accounts which are inherited from the parent of the current object. If you still wish to break the inheritance from the parent object, you may use the Grant Permissions or Modify Permissions tool to block inheritance. Revoke a selected set of accounts and their permissions from the selected shared folder(s)/file(s): This option will revoke the selected accounts and their permissions from the shared folder(s)/file(s) permissions list. In this option, you can selectively revoke a set of permissions granted to accounts. 376 Chapter 4 – NTFS Security Manager 377 Chapter 4 – NTFS Security Manager Click Next to proceed to the Next step. Step 2: Select shared folder(s)/file(s) Select shared folder(s)/file(s) by using any of the input options displayed. 378 Chapter 4 – NTFS Security Manager If you want to select shares from servers for which you wish to add, then click Add From option Select one or more servers to enumerate its shared folder(s)/file(s) 379 Chapter 4 – NTFS Security Manager Use Select a Scan Profile (Shares) option to use the Shares added in the profile. 380 Chapter 4 – NTFS Security Manager You may also type the UNC path of a folder that is not in the list, such as a folder that is shared, and then click Add, to add it to the list. In addition, you may also import a list of UNC paths to shared and nonshared folders from a text file by using the Import button. Apply to all the sub-folders: This option will revoke permissions from all sub-folders of the folders added in this wizard. Include files present inside folders: This option will revoke permissions from all files present in the added folders and their sub-folders. Use Set Search Pattern option to revoke permissions from sub-folders that match certain predefined conditions like Folder name starts with, Folder name ends with. Example: Folder name starts with test, Folder name ends with share. 381 Chapter 4 – NTFS Security Manager Use Set Folder Levels option to revoke permissions in the selected levels of sub-folder(s) in the shared folder. 382 Chapter 4 – NTFS Security Manager Apply upto N level(s) of sub-folder(s) in the shared folder: This option will revoke permissions from sub-folders which are upto the specified folder traversal level. Apply only Nth level of sub-folder(s) in the shared folder: This option will revoke permissions from sub-folders which are in the specified folder level only. Apply folders after N level(s) of sub-folder(s) in the shared folder: This option will revoke permissions from sub-folders which are after the nth folder level of the selected folder. Apply only leaf nodes in the shared folder: This option will revoke permissions from the last child (leaf) nodes without affecting the parent folder’s permissions. Click Next to proceed to the Next step. Step 3: Account Selection You may select one of the account selection options below All existing accounts that have been assigned explicit permission: This option will remove all the explicitly assigned accounts. It will not affect the accounts which are inherited from the parent of the current object. Selected accounts: This option will remove all or specific permissions for the selected accounts. 383 Chapter 4 – NTFS Security Manager Select the accounts, for which you wish to revoke permissions. The selected accounts will be added to the wizard as shown below: 384 Chapter 4 – NTFS Security Manager Use Select a Scan Profile (Users/Groups) option to use the accounts added in the profile. 385 Chapter 4 – NTFS Security Manager Click Next to proceed to the next step. Step 4: Select Access Control type and permissions You may select one of the options below: All existing permissions: This option will remove all existing permissions with accounts from the selected shared folder(s)/file(s) permissions list. Example: If the Account has many permissions like Allow type Read, Write, Take ownership and Deny type Modify, selecting this option will remove all the Allow and Deny permissions. Selected permissions: This option will remove only the selected permissions from the selected shared folder(s)/file(s) permissions list. Example: If the Account has the permissions Allow Read and Write and if Allow Read permission has been selected to revoke permissions, then this option will remove only Allow Read permissions from the permissions list and the remaining Write permissions will exist in the permissions list. Revoke only if there is an exact match: This option will remove the accounts permissions only when the selected permissions match exactly with an accounts existing permissions. Example: If a share has some accounts with permission as Allow Read and some accounts with permission as Allow Read and Execute, selecting the Allow Read permissions to revoke will remove only the accounts that exactly has Allow Read permission. 386 Chapter 4 – NTFS Security Manager Select ACE type and permissions to revoke the selected accounts on the selected shared folder(s) /files(s) 387 Chapter 4 – NTFS Security Manager Click Next to proceed to the next step. Step 5: Revoke permissions now or Schedule it to run later You may use either Run now or Run later option. In Run now option, you can optionally save the input settings as a template. Click on Save As Template... and enter a name and description to save the wizard settings as a template for reuse. In case of Run later option, enter a unique task name and specify its schedule settings. Select Run now option to run the task immediately after finishing the wizard steps. 388 Chapter 4 – NTFS Security Manager In Run now option, you can optionally save the wizard settings by clicking on Save As Template... as shown below: 389 Chapter 4 – NTFS Security Manager Click OK to save the input settings as a template. 390 Chapter 4 – NTFS Security Manager Click Next to proceed to the next step. Step 6: Selection Summary This step displays the summary of data selected to Revoke permissions and you can also view and export the existing permissions before changes are applied, by clicking on the Export current permissions button. 391 Chapter 4 – NTFS Security Manager Click Finish to complete the Revoke Permissions wizard. Permissions will be revoked as specified in the wizard. The summary of all the input data would be shown below along with the "View change log" option to view the task completion status. 392 Chapter 4 – NTFS Security Manager How to reuse the Revoke Permissions template? ________________________________________ The Saved Templates contains the list of saved templates to Grant and Revoke permissions. Click on button. The Saved Templates window will be displayed as shown below. The saved templates window allows you to perform the following operations: Open an existing Template Delete a Template Preview the contents of a Template Open an existing Template 1. To open an existing Revoke permissions, select the Revoke permissions template and click Open button in the window. The Revoke permissions Dialog will appear on the screen which will allow you to edit the selected template. 2. During edit operation you can modify the computer list and permissions entries, however, you cannot modify the name of the template. 393 Chapter 4 – NTFS Security Manager Delete a template To delete a Revoke permissions template, select a Revoke permissions template which you want to delete, and then click Delete button. The selected template will be deleted permanently. Preview the settings of a Template To preview the settings of a saved Template, select a saved Revoke permissions template, and then click View Details button. The settings will be displayed in a window as shown below: 394 Chapter 4 – NTFS Security Manager Modify Permissions ________________________________________ How to view the share permissions? How to grant permissions for a shared folder / file? How to add new accounts to the folder / file permissions list? How to replace an account with another account in the shared folder / file permissions list? How to remove the selected account from shared folder / file permissions list? How to allow inheritance from the parent to current folder / file permissions? How to block inheritance from the parent to the current folder / file permissions? How to modify the basic permissions for an account? How to modify the advanced permissions for an account? 395 Chapter 4 – NTFS Security Manager How to view the share permissions? ________________________________________ The Modify Permissions feature allows you to view and modify the entire file system permissions. You can use many options to modify the permissions of shares. With the option Add you can add an account with a permission "Read and Execute". With the option Remove you can remove an account and its explicit permissions from the share's permissions list. You can also edit the existing permissions and Allow and Block inheritance from the parent object. Click on button. The Modify Permissions window will be displayed as shown below: Step 1: Select folder/file path Select folder/file path by using the option below. 396 Chapter 4 – NTFS Security Manager Select Scan Profiles (Computers) and follow the steps below. Select one or more servers to enumerate its shared folder/file. Select a shared folder/file path. 397 Chapter 4 – NTFS Security Manager Select Scan Profiles (Shares) and follow the steps below. Select Shares profile and enumerate its shared folder(s)/file(s) list. Select a shared folder/file path. 398 Chapter 4 – NTFS Security Manager Select Domains and follow the steps below. Select one or more servers to enumerate its shared folder/file path. Select a shared folder/file path. Select Local Drives and follow the steps below. Select and traverse one or more directory to enumerate its subfolders and files. Select a directory or subfolder/file path. 399 Chapter 4 – NTFS Security Manager Step 2: Select an Account Select an account from the Basic or Advanced permissions list. After selecting an account, permissions of that account would be shown in the last column as shown below. 400 Chapter 4 – NTFS Security Manager You may also verify the inheritance from the parent object (allowed or blocked) to this current object by using the option "Allow inherited permissions from the parent to propagate this object". If this option is checked then the inheritance from the parent to this current object has been allowed, otherwise if unchecked, it has been blocked. 401 Chapter 4 – NTFS Security Manager How to Grant Permissions for selected Shares? ________________________________________ The Grant Permissions feature allows you to grant permissions to the Shares. You can use many options like Add the new permissions to the account's existing permissions, Replace the account's existing permissions with the new permissions, etc. You may select options to Allow, Block inheritance from the parent object and also Replace all child objects existing permissions with the inheritable permissions from this object while granting permissions for accounts. Click on button. The Grant Permissions window will be displayed as shown below: Step 1: Select shared folder(s)/file(s) Select shared folder(s)/files by using any of the input options displayed Click the option Add From Select one or more servers to enumerate its shared folder(s)/file(s) 402 Chapter 4 – NTFS Security Manager Use Select a Scan Profile (Shares) option to use the shares added in the profile. 403 Chapter 4 – NTFS Security Manager You may also type the UNC path of a shared folder that is not in the list and then click Add, to add it to the list. In addition, you may also import a list of UNC paths to shared folder list from a text file by using the Import button. Click Next to proceed to the next step. Step 2: Account Selection 1. Select the accounts, for which you wish to grant permissions. 2. The selected accounts will be added to the wizard as shown below: 404 Chapter 4 – NTFS Security Manager Use Select a Scan Profile (Users/Groups) option to use the users and groups added in the profile. 405 Chapter 4 – NTFS Security Manager Click Next to proceed to the Next step. Step 3: Select Access Control type and permissions Select ACE type and permissions to grant for the selected accounts on the selected shared folder(s) /files(s) 406 Chapter 4 – NTFS Security Manager Click Next to proceed to the next step. Step 4: Apply the required rules to be used while assigning permissions Select which rules to apply while assigning permissions. 407 Chapter 4 – NTFS Security Manager Add the new permissions to the account's existing permissions option will add the selected permissions to the existing permissions list and also it will not affect the existing permissions. You may also use the below options to grant permissions and also apply inheritance by Inheritance rule Remove all existing accounts and replace with the selected accounts and permissions. Replace the account's existing permissions with the new permissions. Replace all child objects existing permissions with the inheritable permissions from this object. Inheritance Rule: Allow inherited permissions from this object's parent. Copy inherited permissions. Remove inherited permissions. Remove all existing accounts and replace with the selected accounts and permissions This option will remove all existing accounts that have explicitly assigned permissions for the selected shared folder(s)/file(s) and replace them with the selected accounts and permissions. Note that this will not remove inherited permissions from parent folder. 408 Chapter 4 – NTFS Security Manager Caution: All existing account permissions will be cleaned up completely and the newly selected permissions will be applied. Example: If the share has 7 accounts then this option will remove all the 7 accounts and replace with the new selected accounts and permissions. Replace the account's existing permissions with the new permissions If a selected account already exists in the current list of permissions of the selected shared folder(s)/file(s), this option will replace all explicitly assigned account permissions with the newly selected permissions for that account. Example: If the share already has some accounts with permissions like Allow Read and Write and if the same existing accounts selected with permissions Deny Modify to grant permissions then this option will replace the existing accounts previous permissions (Allow Read and Write) with new permission (Deny Modify). Otherwise if the selected account not exist in the share permissions list then it will add into the permissions list. Replace all child objects existing permissions with the inheritable permissions from this object This option will remove explicitly defined permissions on all descendants of the selected shared folder(s)/file(s) and replace them with inheritable permissions from the selected shared folder(s)/file(s). Example: If the share has some subfolders with the explicitly assigned permissions and some subfolders with blocked inheritance then this option will remove all explicitly assigned permissions of subfolders and allow inherited permissions from the parent object. Allow inherited permissions from this object's Parent This option will allow the selected shared folder(s)/file(s) to inherit permissions from its parent object. Example: If the share do not have any inherited permissions and the inheritance from the parent object blocked then this option will allow inherited permissions from the parent object. Copy inherited permissions This option will copy the permission entries that were previously inherited from the parent to this selected shared folder(s)/file(s). Example: If the share already allowed to inherit permissions from parent object then this option will remove the inheritance and add the inherited permissions as explicit permissions in the permissions list. Remove inherited permissions This option will remove the permission entries that were previously inherited from the parent and keep only those permissions explicitly defined/granted here. Caution: Removing permission inheritance from parent may break permissions/policies designed with the default inheritance option enabled. Use this option after a careful review. 409 Chapter 4 – NTFS Security Manager Example: If the share is already set to inherit permissions from parent object then this option will remove the inheritance from parent object. Click Next to proceed to the Next step Step 5: Save as template Enter a name and description to save these settings as a template for reuse later. Click Next to proceed to the next step Step 6: Summary This step displays the summary of all the input data along with the selected options. 410 Chapter 4 – NTFS Security Manager Click Finish to complete the Grant Permissions wizard. Permissions will be granted as specified in the wizard. The summary of all the input data would be shown below along with the option "View change log" to view the task completion status. 411 Chapter 4 – NTFS Security Manager How to add new accounts to the folder/file permissions list? ________________________________________ The Modify Permissions feature allows you to add new accounts with the permission ReadandExecute to the permissions list. Click on button. The Modify Permissions window will be displayed. Step 1: Select folder/file path Follow the list of options to enumerate the shared folder/file as outlined in How to enumerate shared folders/files? Step 2: Click Add button and select accounts Click Add button in the Basic or Advanced permissions. The Account Selection window will be displayed as shown below. 1. Select the user or group, for which you wish to add into the folder/file permissions list. 2. The selected accounts will be added to the wizard as shown below: 412 Chapter 4 – NTFS Security Manager Click Add button in the Accounts selection window. The newly added accounts will be displayed as shown below. 413 Chapter 4 – NTFS Security Manager How to enumerate shared folders/files? ________________________________________ The Modify Permissions feature allows many options to enumerate the shared folders/files in the entire network. You can also enumerate and view the folders and files in the local file system. Click on button. The Modify Permissions window will be displayed as shown below. Here is the list of ways you can enumerate the shared folders/files in the network. Scan Profiles(Computers) Scan Profiles(Shares) Domains Local Drives 414 Chapter 4 – NTFS Security Manager Select Scan Profiles (Computers) and follow the steps below. Select one or more servers to enumerate its shared folder/file. Select a shared folder/file path. Select Scan Profiles (Shares) and follow the steps below. Select shares profile and enumerate its shared folder(s)/file(s) list. Select a shared folder/file path. 415 Chapter 4 – NTFS Security Manager Select Domains and follow the steps below. Select one or more servers to enumerate its shared folder/file path. Select a shared folder/file path. 416 Chapter 4 – NTFS Security Manager Select Local Drives and follow the steps below. Select and traverse one or more directory to enumerate its subfolders and files. Select a directory or subfolder/file path. 417 Chapter 4 – NTFS Security Manager 418 Chapter 4 – NTFS Security Manager How to replace an account with another account in the shared folder/file permissions list? ________________________________________ The Modify Permissions feature allows you to replace an existing account with single or multiple accounts by retaining the same permissions in the permissions list. You can replace accounts on specified levels of sub-folder and also replace accounts on sub-folders that match the specified search pattern. Click on button. The Modify Permissions window will be displayed. Step 1: Select folder/file path Follow the list of options to enumerate the shared folder/file as outlined in How to enumerate shared folders/files? Step 2: Select an account and click Replace Select an account from the Basic or Advanced permissions account list. Click Replace button. The Accounts Selection window will be displayed as shown below. 419 Chapter 4 – NTFS Security Manager 1. Select the user or group, for which you wish to replace the selected account in the folder/file permissions list. Replace accounts on sub-folders: This option will replace accounts on sub-folders of the selected folder. Include files present inside folders: This option will replace accounts on files present inside the selected folder. Use Set Search Pattern option to perform replace permissions for sub-folders that match certain pre-defined conditions like Folder name starts with, Folder name ends with. Example Folder name starts with test, Folder name ends with share. 420 Chapter 4 – NTFS Security Manager Click OK button in the Folder Search Options window. Use Set Folder Levels option to replace the accounts in the selected levels of sub-folder(s) in the shared folder. 421 Chapter 4 – NTFS Security Manager Apply upto N level(s) of sub-folder(s) in the shared folder: This option will replace the account with the selected account on sub-folders which are upto specified folder traversal level. Apply only Nth level of sub-folder(s) in the shared folder: This option will replace the account in sub-folders which are in the specified traversal level only. Apply folders after N level(s) of sub-folder(s) in the shared folder: This option will replace the account in sub-folders which are after the nth traversal level of the selected folder. Apply only leaf nodes in the shared folder: This option will replace the account with the selected account in the last child leaf nodes without affecting the parent folder’s permissions. Click OK button in the Folder Levels window. The Accounts Selection window will be displayed as shown below: 422 Chapter 4 – NTFS Security Manager Click Replace button in the Accounts Selection window. 423 Chapter 4 – NTFS Security Manager Click Yes to replace the selected account. The updated permissions list will be displayed as shown below: 424 Chapter 4 – NTFS Security Manager 425 Chapter 4 – NTFS Security Manager How to remove the selected account from the shared folder/file permissions list? ________________________________________ The Modify Permissions feature allows you to remove the selected account and its permissions from folder/file permissions list. Click on button. The Modify Permissions window will be displayed. Step 1: Select folder/file path Follow the list of options to enumerate the shared folders/files as outlined in -share.htm"How to enumerate shared folders/files? Step 2: Select an account and Click Remove Select an account from the Basic or Advanced permissions Account list. Click Remove. 426 Chapter 4 – NTFS Security Manager Click Yes to remove the selected Account. The updated permissions list will be displayed as shown below: 427 Chapter 4 – NTFS Security Manager How to allow inheritance from the parent to current folder/file permissions? ________________________________________ You may use the Permissions Modifier to allow inherited permissions from the parent to the current folder/file permissions. Click on button. The Modify Permissions window will be displayed as shown below: Step 1: Select folder/file path Follow the list of options to enumerate the shared folders/files as outlined in How to enumerate shared folders/files? Step 2: Check Allow inheritance Check the option Allow inherited permissions from the parent to propagate to this object. Click Yes to allow inheritance. The updated permissions list with inherited permissions from the parent object as shown below: 428 Chapter 4 – NTFS Security Manager 429 Chapter 4 – NTFS Security Manager How to block inheritance from the parent to the current folder/file permissions? ________________________________________ The Permissions Modifier allows you to block inherited permissions from the parent to the current folder/file permissions. Click on button. The Modify Permissions window will be displayed. Step 1: Select folder/file path Follow the list of options to enumerate the shared folders/files as outlined in -share.htm">How to enumerate shared folders/files? Step 2: Uncheck Allow inheritance Uncheck the option Allow inherited permissions from the parent to propagate to this object. 430 Chapter 4 – NTFS Security Manager Click the option Copy to copy all the permissions entries that were previously inherited from the parent to this current shared folder(s)/files permissions list. The updated permissions list with copied permissions from the parent object as shown below: Click the option Remove to Remove the permission entries that were previously inherited from the parent and keep only those permissions explicitly defined/granted this current shared folder(s)/file(s). The updated permissions list after removing the inherited permissions from the parent object as shown below: 431 Chapter 4 – NTFS Security Manager 432 Chapter 4 – NTFS Security Manager How to modify an account Basic permissions? ________________________________________ The Modify Permissions allows you to modify an account's Basic permissions. Click on button. The Modify Permissions window will be displayed. Step 1: Select folder/file path Follow the list of options to enumerate the shared folders/files as outlined in How to enumerate shared folders/files? Step 2: Select an Account Select an account in the Basic permissions to modify its permissions. 433 Chapter 4 – NTFS Security Manager Check the permissions you want to add and uncheck the permissions you want to remove, in the permissions column. Click the button Apply to update the basic permissions for the selected account Caution: If all the permissions are unchecked, the account will be completely removed from the ACE list. The updated basic permissions for the selected account as shown below. 434 Chapter 4 – NTFS Security Manager 435 Chapter 4 – NTFS Security Manager How to modify an account Advanced permissions? ________________________________________ The Modify Permissions allows you to modify an account advanced permissions. Click on button. The Modify Permissions window will be displayed as shown below: Step 1: Select folder/file path Follow the list of options to enumerate the shared folders/files as outlined in How to enumerate shared folders/files? Step 2: Select an Account Select the Advanced permissions account for which you want to modify the permissions. 436 Chapter 4 – NTFS Security Manager Check the permissions you want to add and uncheck the permissions you want to remove from the account's advanced permissions. Click the button Apply to update the advanced permissions for the selected account. You can also modify the propagation level to all it's subfolders and files by using the option Apply onto. Caution: If all the permissions are unchecked, the account will be completely removed from the ACE list. The updated advanced permissions for the selected account as shown below. 437 Chapter 4 – NTFS Security Manager 438 Chapter 4 – NTFS Security Manager Copy Permissions ________________________________________ About Copy Permissions How to Copy Permissions from one share to another share(s)? How to reuse the Copy Permission s template? 439 Chapter 4 – NTFS Security Manager About Copy Permissions ________________________________________ The Copy Permissions feature allows you to copy permissions from one share to another share(s). You can use many options like Add the new permissions to the account's existing permissions, Replace the account's existing permissions with the new permissions, etc. You may select options to Allow, Block inheritance from the parent object and also Replace all child objects existing permissions with the inheritable permissions from this object while copying permissions to share. Here is the list of actions you can perform using the Copy Permissions feature. Note: This feature will not break the inheritance from the parent of target object. If you still wish to break the inheritance from the parent object, you may use the option "Block Inherited permissions from this object's parent" to block inheritance. Actions Copy permissions from one share to another share(s): (How to?) Copy source shared folder/file permissions to the selected target shared folder(s)/file(s) permissions list. Replace existing accounts permissions with the new permissions: (How to?) Replace the existing accounts permissions, If an existing account is selected to copy permissions to a target shared folder/file. Also apply the above to subfolders and files that do not have inheritance set (non-inherited folders and files): (How to?) Copy permissions to the target object's subfolders and files that do not have inherited permissions from its parent object with respect to the above options. Remove all the existing explicit accounts and replace with the new accounts: (How to?) Remove all existing accounts that have explicitly assigned permissions for target shares and replace them with the selected accounts and permissions. Replace all explicit permissions existing in descendant with the inherited permissions from the current object: (How to?) Remove explicitly defined permissions on all descendant objects and replace them with the inheritable permissions from the target shared folder(s)/file(s) permissions list. Allow inherited permissions from the parent object to the current shares: (How to?) Allow inheritable permissions from the parent object to the target shares. It will not affect the already existing explicit permissions. Copy and Remove inherited permissions from the parent object to the current shares: (How to?) Copy and Remove the inheritable permissions from the parent object to the target shares. Copying the inheritable permissions will add the inherited permissions as explicit permissions in the target shares permissions list. Removing the inherited permissions will remove all the inherited permissions from the parent to the target object. 440 Chapter 4 – NTFS Security Manager How to replace existing accounts permissions with the new permissions? ________________________________________ The Copy Permissions feature allows you to replace the existing accounts permissions, If the existing account selected for copy permissions. Click on button. The Copy Permissions window will be displayed. Follow the steps 1 through 3 as outlined in How to Copy permissions from one share to another share(s)? In step 4 select the option Replace the account's existing permissions with the new permissions. Click Next to proceed to the next step. Follow the steps 5 through 6 as outlined in How to Copy permissions from one share to another share(s)? 441 Chapter 4 – NTFS Security Manager How to copy permissions to the target object's subfolders and files that do not have inherited permissions from its parent object? ________________________________________ The Copy Permissions feature allows to copy permissions to the target object's subfolders and files that do not have inherited permissions from its parent object. Click on button. The Copy Permissions window will be displayed. Follow the steps 1 through 3 as outlined in How to Copy Permissions from one share to another share(s)? In step 4 select the option "Add the new permissions to the account's existing permissions" or "Replace the account's existing permissions with the new permissions" Then select the option Also apply the above to subfolders and files that do not have inheritance set (non-inherited folders and files). Click Next to proceed to the next step. Follow the steps 5 through 6 as outlined in How to Copy Permissions from one share to another share(s)? 442 Chapter 4 – NTFS Security Manager How to remove all the existing explicit accounts and replace with the new accounts? ________________________________________ The Copy Permissions feature allows you to remove all existing accounts that have explicitly assigned permissions for shares and replace them with the selected accounts and permissions. Note that this will not remove inherited permissions from parent folder. Click on button. The Copy Permissions window will be displayed. Follow the steps 1 through 3 as outlined in How to Copy Permissions from one share to another share(s)? In step 4 select the option Remove all existing accounts and replace with the selected accounts and permissions. Click Next to proceed to the next step. Follow the steps 5 through 6 as outlined in How to Copy Permissions from one share to another share(s)? 443 Chapter 4 – NTFS Security Manager How to replace all explicit permissions existing in descendant with the inherited permissions from the target object? ________________________________________ The Copy Permissions feature allows to remove explicitly defined permissions on all descendant object and replace them with the inheritable permissions from the target shared folder(s)/file(s) permissions list. Click on button. The Copy Permissions window will be displayed. Follow the steps 1 through 3 as outlined in How to Copy permissions from one share to another share(s)? In step 4 select the option Replace all child objects existing permissions with the inheritable permissions from this object. Click Next to proceed to the next step. Follow the steps 5 through 6 as outlined in How to Copy Permissions from one share to another Share(s)? 444 Chapter 4 – NTFS Security Manager How to allow inherited permissions from the parent object to the target shares? ________________________________________ The Copy Permissions feature provides an option to Allow inheritable permissions from the parent object to the target shared folder(s)/file(s). Click on button. The Copy Permissions window will be displayed. Follow the steps 1 through 3 as outlined in How to Copy permissions from one share to another share(s)? In step 4 select the option Inheritance Rule and then select the option Allow inherited permissions from this object's Parent. Click Next to proceed to the next step. Follow the steps 5 through 6 as outlined in How to Copy permissions from one share to another share(s)? 445 Chapter 4 – NTFS Security Manager How to block inherited permissions from the parent object to the target shares? ________________________________________ The Copy Permissions feature provides an option to Copy the inheritable permissions from the parent object to the target shares. This option will add the inherited permissions as explicit permissions in the target Shares permissions list. You can also remove the inherited permissions from the parent object to the target shares. Click on button. The Copy Permissions window will be displayed. Follow the steps 1 through 3 as outlined in How to Copy permissions from one share to another share(s)? In step 4 select the option Copy inherited permissions. If you wish to remove the inherited permissions from the target shares, you may use the option Remove inherited permissions to remove all the inherited permissions from the parent object. Click Next to proceed to the next step. Follow the steps 5 through 6 as outlined in How to Copy permissions from one share to another share(s)? 446 Chapter 4 – NTFS Security Manager How to Copy Permissions from one share to another share(s)? ________________________________________ The Copy Permissions feature allows you to Copy Permissions from one share to another share(s). You can use many options like Add the new permissions to the account's existing permissions, Replace the account's existing permissions with the new permissions, etc. You may select options to Allow, Block inheritance from the parent object and also Replace all child objects existing permissions with the inheritable permissions from this object while copying permissions for accounts. Click on button. The Copy Permissions window will be displayed as shown below: Step 1: Select source shared folder/file Select source shared folder/file by using any of the input options displayed. If you want to select shares from servers for which you wish to add, then click Add From option Select one or more servers to enumerate its shared folder(s)/file(s) 447 Chapter 4 – NTFS Security Manager Use Select a Scan Profile (Shares) option to use the shares added in the profile. 448 Chapter 4 – NTFS Security Manager You may also type the UNC path of a shared folder that is not in the list and then click Add, to add it to the list. In addition, you may also import a list of UNC paths to shared folder list from a text file by using the Import button. Click Next to proceed to the next step. Step 2: Select target shared folder(s)/file(s) Select target shared folder(s)/file(s) by using any of the input options displayed 449 Chapter 4 – NTFS Security Manager If you want to select shares from servers for which you wish to add, then click Add From option Select one or more servers to enumerate its shared folder(s)/file(s) 450 Chapter 4 – NTFS Security Manager Use Select a Scan Profile (Shares) option to use the shares added in the profile. 451 Chapter 4 – NTFS Security Manager You may also type the UNC path of a shared folder that is not in the list and then click Add, to add it to the list. In addition, you may also import a list of UNC paths to shared folder list from a text file by using the Import button. Click Next to proceed to the next step. Step 3: Select Permissions/Access Control Entries Select permissions/Access control entries to copy accounts to the selected target shared folder(s) /files(s) 452 Chapter 4 – NTFS Security Manager Use Select explicit permissions only option to select only explicit permissions from the source shared folder/file permissions list. 453 Chapter 4 – NTFS Security Manager Use Select inherited permissions only option to select only inherited permissions from the source shared folder/file permissions list. 454 Chapter 4 – NTFS Security Manager Click Next to proceed to the next step. Step 4: Apply the required rules to be used while copying permissions Select which rules to apply while copying permissions. 455 Chapter 4 – NTFS Security Manager Add the new permissions to the account's existing permissions option will add the selected permissions to the existing permissions list and also it will not affect the existing permissions. You may also use the below options to Copy Permissions and also apply inheritance by Inheritance rule. Replace the account's existing permissions with the new permissions. Also apply the above to subfolders and files that do not have inheritance set (non-inherited folders and files) Remove all existing accounts and replace with the selected accounts and permissions. Replace all child objects existing permissions with the inheritable permissions from this object. Inheritance Rule: Allow inherited permissions from this object's parent. Copy inherited permissions. Remove inherited permissions. Replace the account's existing permissions with the new permissions If a selected account already exists in the current list of permissions of the selected target shared folder(s)/file(s), this option will replace all explicitly assigned account permissions with the newly selected permissions for that account. 456 Chapter 4 – NTFS Security Manager Example: If the share already has some accounts with permissions like Allow Read and Write and if the same existing accounts selected with permissions Deny Modify to Copy Permissions then this option will replace the existing accounts previous permissions (Allow Read and Write) with new permission (Deny Modify). Otherwise if the selected account not exist in the share permissions list then it will add into the permissions list. Also apply the above to subfolders and files that do not have inheritance set (non-inherited folders and files) This option will copy permissions to the target object's subfolders and files that do not have inherited permissions from its parent object with respect to the above options. Note: If this option is checked, the subfolders and files must have the applicable rights for the owner or the currently logged on user to perform this operation. Example: If the target share has some subfolders and files with the blocked inheritance then this option will copy permissions based on the selected options. Remove all existing accounts and replace with the selected accounts and permissions This option will remove all existing accounts that have explicitly assigned permissions for the selected target shared folder(s)/file(s) and replace them with the selected accounts and permissions. Note that this will not remove inherited permissions from parent folder. Caution: All existing account permissions will be cleaned up completely and the newly selected permissions will be applied. Example: If the target share has 7 accounts then this option will remove all the 7 accounts and replace with the new selected accounts and permissions. Replace all child objects existing permissions with the inheritable permissions from this object This option will remove explicitly defined permissions on all descendants of the selected shared folder(s)/file(s) and replace them with inheritable permissions from the selected target shared folder(s)/file(s). Example: If the target share has some subfolders with the explicitly assigned permissions and some subfolders with blocked inheritance then this option will remove all explicitly assigned permissions of subfolders and allow inherited permissions from the parent object. Allow inherited permissions from this object's Parent This option will allow the selected target shared folder(s)/file(s) to inherit permissions from its parent object. Example: If the target share do not have any inherited permissions and the inheritance from the parent object blocked then this option will allow inherited permissions from the parent object. 457 Chapter 4 – NTFS Security Manager Copy inherited permissions This option will copy the permission entries that were previously inherited from the parent to this selected target shared folder(s)/file(s). Example: If the target share already allowed to inherit permissions from parent object then this option will remove the inheritance and add the inherited permissions as explicit permissions in the permissions list. Remove inherited permissions This option will remove the permission entries that were previously inherited from the parent and keep only those permissions explicitly selected here. Caution: Removing permission inheritance from parent may break permissions/policies designed with the default inheritance option enabled. Use this option after a careful review. Example: If the target share is already set to inherit permissions from parent object then this option will remove the inheritance from parent object. Click Next to proceed to the Next step Step 5: Save as template Enter a name and description to save the input settings as a template. You may reuse this template later. 458 Chapter 4 – NTFS Security Manager Click Next to proceed to the next step Step 6: Summary This step displays the summary of all the input data along with the selected options. Click Finish to complete the Copy Permissions wizard. Permissions will be copied as specified in the wizard. The summary of all the input data would be shown below along with the "View change log" option to view the task completion status. 459 Chapter 4 – NTFS Security Manager 460 Chapter 4 – NTFS Security Manager How to reuse the Copy Permissions template? ________________________________________ The Saved Templates contains the list of saved templates to Grant, Revoke and Copy Permissions. Click on button. The Saved Templates window will be displayed as shown below. The saved templates window allows you to perform the following operations: Open an existing template Delete a template Preview the contents of a template Open an existing Template 1. To open an existing Copy permissions template, select the Copy permissions template and click Open button in the window. The Copy permissions Dialog will appear on the screen which will allow you to edit the selected template. 2. During edit operation you can modify the computer list and permissions entries, however, you cannot modify the name of the template. 461 Chapter 4 – NTFS Security Manager Delete a template To delete a Copy permissions template, select a Copy permissions template which you want to delete, and then click Delete button. The selected template will be deleted permanently. Preview the settings of a Template To preview the settings of a saved Template, select a saved Copy permissions template, and then click View Details button. The settings will be displayed in a window as shown below: 462 Chapter 4 – NTFS Security Manager Copy Account Permissions ________________________________________ How to copy account permissions in the selected shared folder(s)/file(s) permissions list? 463 Chapter 4 – NTFS Security Manager How to copy account permissions in the selected shared folder(s)/file(s) permissions list? ________________________________________ The Copy Account Permissions feature allows you to copy an existing account permissions to single or multiple accounts by granting the same existing permissions. You can copy account permissions on specified levels of sub-folder and also copy account permissions on sub-folders that match the specified search criteria. Click on button. The Copy Account Permissions window will be displayed as shown below: Step 1: Select shared folder(s)/file(s) Select shared folder(s)/file(s) by using any of the input options displayed. If you want to select shares from servers for which you wish to add, then click Add From option Select one or more servers to enumerate its shared folder(s)/file(s) 464 Chapter 4 – NTFS Security Manager Use Select a Scan Profile (Shares) option to use the Shares added in the profile. 465 Chapter 4 – NTFS Security Manager You may also type the UNC path of a folder that is not in the list, such as a folder that is shared, and then click Add, to add it to the list. In addition, you may also import a list of UNC paths to shared and nonshared folders from a text file and CSV file by using the Import button. Apply to sub-folders: This option will copy an account permissions on sub-folders of the selected folders. Include files present inside folders: This option will copy an account permissions on files present inside the selected folders. Use Set Search Pattern option to copy an account permissions for sub-folders that match certain predefined conditions like Folder name starts with, Folder name ends with. Example: Folder name starts with test, Folder name ends with share. 466 Chapter 4 – NTFS Security Manager Use Set Subfolder Levels option to copy an account permissions in the selected levels of sub-folder(s) in the shared folder. 467 Chapter 4 – NTFS Security Manager Include upto N level(s) of sub-folder(s) in the shared folder: This option will copy an account permissions on sub-folders which are upto the specified folder traversal level. Include only Nth level of sub-folder(s) in the shared folder: This option will copy an account permissions on sub-folders which are in the specified folder level only. Include folders after N level(s) of sub-folder(s) in the shared folder: This option will copy an account permissions on sub-folders which are after the nth folder level of the selected folder. Include only leaf nodes in the shared folder: This option will copy an account permissions on the last child (leaf) nodes without affecting the parent folder’s permissions. Click Next to proceed to the Next step. Step 2: Select user/group account(s) The User/Group Account(s) will be added to the wizard as shown below 468 Chapter 4 – NTFS Security Manager Enter a user or group account, for which you wish to Copy Permissions From. Note: The source account to copy permissions From must be available in the ACLs of the selected shared folder(s). Use Remove Source Account from the ACL after the copy operation option to remove the source account from the ACL once the copy operation is complete. Select the list of user or group accounts, for which you wish to Copy Permissions To. 469 Chapter 4 – NTFS Security Manager Click Next to proceed to the next step. Step 3: Selection Summary This step displays the summary of data selected to copy account permissions. 470 Chapter 4 – NTFS Security Manager Click Finish to complete the Copy Account permissions wizard. Permissions will be copied as specified in the wizard. The summary of all the input data would be shown below along with the "View change log" option to view the task completion status. 471 Chapter 4 – NTFS Security Manager Dynamic Access Control ________________________________________ Apply Central Access Policy Revoke Central Access Policy 472 Chapter 4 – NTFS Security Manager How to Apply Central Access Policy on selected Shares? ________________________________________ The Apply CAP feature allows you to apply central access policy on the selected shared folder(s)/file(s). You can view and select the required Central Access Policy from the domain that belongs to the selected shared folder(s)/file(s). Click on button in the toolbar. The Apply Central Access Policy window will be displayed as shown below: Step 1: Select shared folder(s)/file(s) Select shared folder(s)/file(s) by using any of the input options displayed If you want to select shares from servers for which you wish to add, then click Add From option Select one or more servers to enumerate its shared folder(s)/file(s) 473 Chapter 4 – NTFS Security Manager Use Select a Scan Profile (Shares) option to use the shares added in the profile. 474 Chapter 4 – NTFS Security Manager Apply to all the sub-folders: This option will apply central access policy on all sub-folders of the selected folders as specified in this wizard. Include files present inside folders: This option will apply central access policy on all files present in the selected folders as specified in this wizard. Click Next to proceed to the next step. Step 2: Select Central Access Policy 475 Chapter 4 – NTFS Security Manager Click Change to view available Central Access Policies that can be applied to the selected shared folders/files. Note: You must be a member of the selected shares' domain and connected to the shares from a domainauthenticated session to view Central Access Policy information. 476 Chapter 4 – NTFS Security Manager Select the Central Access Policy from the list of Central Access Policies. After you select the Central Access Policy, a list of Central Access Rules that are members of the selected Central Access Policy will appear in the tree view. You can view the details of the Central Access Rules by selecting the Central Access Rule from the tree view. Click Next to proceed to the next step. Step 3: Save as template (Optional) Enter a name and description to save the input settings as a template. You may reuse this template later. How to reuse the Apply CAP template? 477 Chapter 4 – NTFS Security Manager Click Next to proceed to the next step Step 6: Summary This step displays the summary of all the input data along with the selected options. 478 Chapter 4 – NTFS Security Manager Click Finish to complete the Apply Central Access Policy wizard. Central Access Policy will be applied as specified in the wizard. The summary of all the input data would be shown below along with the "View change log" option to view the task completion status. 479 Chapter 4 – NTFS Security Manager How to reuse the Apply CAP template? ________________________________________ The Saved Templates contains the list of saved templates to Apply CAP, Revoke CAP, Grant Permissions, Revoke Permissions and copy Permissions. Click on shown below. button in the toolbar. The Saved Templates window will be displayed as The saved templates window allows you to perform the following operations: Open an existing template Delete a template Preview the contents of a template Open an existing Template 1. To open an existing Apply CAP template, select the Apply CAP template and click Open button in the window. The Apply CAP Dialog will appear on the screen which will allow you to edit the selected template. 2. During edit operation you can modify the computer list and central access policy entries, however, you cannot modify the name of the template. 480 Chapter 4 – NTFS Security Manager Delete a template To delete a Apply CAP template, select a Apply CAP template which you want to delete, and then click Delete button. The selected template will be deleted permanently. Preview the settings of a Template To preview the settings of a saved Template, select a saved Apply CAP template, and then click View Details button. The settings will be displayed in a window as shown below: 481 Chapter 4 – NTFS Security Manager How to Revoke Central Access Policy from the selected Shares? ________________________________________ The Revoke CAP feature allows you to remove a central access policy from the shared folders and files. You will also have the option to revoke a central access policy only if the selected central access policy applied on the selected shared folders and files. Click on button in the toolbar. The Revoke CAP window will be displayed as shown below: Step 1: Select a Revoke CAP option Select any one of the options below: Revoke any applied CAP from selected shares and folders: This option will remove a central access policy from the selected shared folder(s)/file(s). Revoke a specific CAP from selected shares and folders: This option will revoke a central access policy only if the selected central access policy applied on the selected shared folders and files. 482 Chapter 4 – NTFS Security Manager 483 Chapter 4 – NTFS Security Manager Click Next to proceed to the Next step. Step 2: Select shared folder(s)/file(s) Select shared folder(s)/file(s) by using any of the input options displayed. 484 Chapter 4 – NTFS Security Manager If you want to select shares from servers for which you wish to add, then click Add From option Select one or more servers to enumerate its shared folder(s)/file(s) 485 Chapter 4 – NTFS Security Manager Use Select a Scan Profile (Shares) option to use the Shares added in the profile. 486 Chapter 4 – NTFS Security Manager You may also type the UNC path of a folder that is not in the list, such as a folder that is shared, and then click Add, to add it to the list. In addition, you may also import a list of UNC paths to shared and nonshared folders from a text file by using the Import button. Apply to all the sub-folders: This option will revoke central access policy from all sub-folders of the selected folders as specified in this wizard. Include files present inside folders: This option will revoke central access policy from all files present in the selected folders as specified in this wizard. Click Next to proceed to the Next step. 487 Chapter 4 – NTFS Security Manager Step 3: Select Central Access Policy Click Change to view available Central Access Policies that can be applied to the selected shared folders/files. Note: You must be a member of the selected shares' domain and connected to the shares from a domainauthenticated session to view Central Access Policy information. 488 Chapter 4 – NTFS Security Manager Select the Central Access Policy from the list of Central Access Policies. After you select the Central Access Policy, a list of Central Access Rules that are members of the selected Central Access Policy will appear in the tree view. You can view the details of the Central Access Rules by selecting the Central Access Rule from the tree view. Click Next to proceed to the next step. Step 4: Save as template Enter a name and description to save the input settings as a template. You can reuse this template later. How to reuse the Revoke CAP template? 489 Chapter 4 – NTFS Security Manager Step 5: Selection Summary This step displays the summary of data selected to Revoke CAP and you can also view and export the existing central access policy before changes are applied, by clicking on the Export Current Central Access Policies button. 490 Chapter 4 – NTFS Security Manager Click Finish to complete the Revoke CAP wizard. Central Access Policy will be revoked as specified in the wizard. The summary of all the input data would be shown below along with the "View change log" option to view the task completion status. 491 Chapter 4 – NTFS Security Manager 492 Chapter 4 – NTFS Security Manager How to reuse the Revoke CAP template? ________________________________________ The Saved Templates contains the list of saved templates to Apply CAP, Revoke CAP, Grant Permissions, Revoke Permissions and copy Permissions. Click on shown below. button in the toolbar. The Saved Templates window will be displayed as The saved templates window allows you to perform the following operations: Open an existing template Delete a template Preview the contents of a template Open an existing Template 1. To open an existing Revoke CAP template, select the Revoke CAP template and click Open button in the window. The Revoke CAP Dialog will appear on the screen which will allow you to edit the selected template. 493 Chapter 4 – NTFS Security Manager 2. During edit operation you can modify the computer list and central access policy entries, however, you cannot modify the name of the template. Delete a template To delete a Revoke CAP template, select a Revoke CAP template which you want to delete, and then click Delete button. The selected template will be deleted permanently. Preview the settings of a Template To preview the settings of a saved Template, select a saved Revoke CAP template, and then click View Details button. The settings will be displayed in a window as shown below: 494 Chapter 4 – NTFS Security Manager Power Search ________________________________________ About Power Search How to view Power Search Permissions (DACL) Reports? How to manage Power Search? 495 Chapter 4 – NTFS Security Manager About Power Search ________________________________________ The Power Search feature lets you perform powerful, conditional Search queries of NTFS Permissions on Files and Folders. You may select specific permissions from the list of standard permissions and Advanced (special) permissions and run a query to determine who have these permissions on which folders and files. You may Save frequently used queries for reuse them later. Here are some examples of how you may make effective use of this feature: 1. 2. 3. 4. Search on who has Full Control on which folders and files Select a set of accounts and determine for which folders and files they have Full control access. Determine which accounts have modify or delete permissions on critical files and folders. Determine what type of permissions members of the Administrators group have on specific folders and files. 5. Determine where Inheritance from Parent folder has been explicitly removed. 6. Determine Accounts for which folders have explicit Allows or Denys set on them. 496 Chapter 4 – NTFS Security Manager How to view Power Search Permissions (DACL) Reports? ________________________________________ Click on button under Power Search->New Search in button in the toolbar. The Power Search window will be displayed as shown below: Step 1: Select Shared Folder(s)/File(s) Select one or more servers to enumerate its Shared Folder(s)/File(s) 497 Chapter 4 – NTFS Security Manager 498 Chapter 4 – NTFS Security Manager You may also type the UNC path of a folder that is not in the list, such as a folder that is not shared, and then click Add, to add it to the list. In addition, you may also import a list of UNC paths to shared and nonshared folders from a text file by using the Import button. Folders that have identical permissions as the parent folder would show up with "Same as parent" in User Name and/or Security fields in the report. However, if you do not want folders with identical permissions as the parent folder reported, then select Do not display folders that have same permissions as the parent folder option. This option will not report folders with identical permissions as the parent folder. Note: The "Do not display folders that have same permissions as the parent folder" option would be enabled by default. NTFS Security Manager defaults to scanning all the sub-folders under a given shared folder. If you want to change the Include sub-folders and Folder level options click Edit Folder Options. 499 Chapter 4 – NTFS Security Manager Use Set Search Pattern option to exclude sub-folders that match certain pre-defined conditions like Folder name starts with, Folder name ends with. Example: Folder name starts with test, Folder name ends with share. Click Next to proceed to the next step. Step 2: Select Access Control Entry Type and Permissions Select ACE Type and permissions to search in the Access Control List of the selected share(s) / folder(s) /files(s) 500 Chapter 4 – NTFS Security Manager Step 3: User and/or Group Selection 1. Select the user or group, for which you wish to run the search. 2. The selected users will be added to the wizard as shown below: 501 Chapter 4 – NTFS Security Manager Use Select a Scan Profile (Users/Groups) option to use the users and groups added in the profile. 502 Chapter 4 – NTFS Security Manager Click Next to proceed to the Next step. Step 4: Save Search Enter a name and description for search. 503 Chapter 4 – NTFS Security Manager Click Finish to generate the power search report. After the data collection process is complete, the report would be generated in a report window as shown below: 504 Chapter 4 – NTFS Security Manager 505 Chapter 6 – Scan Profiles Manager How to manage Power Search? ________________________________________ Click to launch the saved search(s) window. The windows shows the list of search(s) that were saved over the period of time. The saved search window allows you to perform the following operations: Run an existing search Edit an existing search Delete a search Preview the settings of a search Run an existing search 1. To Run an existing search click Run button in the window. The Power Search report window will appear on the screen and the report will be displayed once the data collection is finished. 2. During edit operation you can modify the search inputs, however, you cannot modify the type of the Scan Profile. 506 Chapter 6 – Scan Profiles Manager Edit an existing search To edit an existing search click Edit button in the window. The Power Search Dialog will appear on the screen which will allow you to edit the selected search. During edit operation you can modify the computer list, however, you cannot modify the name of the search. Delete a search To delete a search, select the search you want to delete, and then click Delete button. The selected search will be deleted permanently. Preview the settings of a search To preview the settings of a saved search, select a search, and then click View Details button. The settings will be displayed in a window as shown below: 507 Chapter 6 – Scan Profiles Manager Change History ________________________________________ About Change History How to view Permissions Change History? How to view Central Access Policies Change History? 508 Chapter 6 – Scan Profiles Manager About Change History ________________________________________ The Change History feature lets you view the Permissions and Central Access Policies change history of NTFS Security Manager with the specified date interval. For more information about Change History follow the links given below. How to view Permissions Change History? How to view Central Access Policies Change History? 509 Chapter 6 – Scan Profiles Manager How to view Permissions Change History? ________________________________________ The Change History feature allows you to view permissions change history of NTFS Security Manager. You can view permissions change history between specific date interval by selecting From and To dates. By default, it shows the history of last 30 days. You can view permissions change history of specific task by selecting task name in the View option. Click on button in the toolbar. The Change History window will be displayed as shown below. You can view Permissions Change History in one of the following ways. Grant Permissions History Revoke Permissions History Copy Permissions History Modify Permissions History Copy Account Permissions History Select required From and To dates. Select Grant Permissions in the View option. Then click Show History button. The Grant Permissions history will be displayed as shown below. 510 Chapter 6 – Scan Profiles Manager Select required From and To dates. Select Revoke Permissions in the View option. Then click Show History button. The Revoke Permissions history will be displayed as shown below. Select required From and To dates. Select Copy Permissions in the View option. Then click Show History button. The Copy Permissions history will be displayed as shown below. 511 Chapter 6 – Scan Profiles Manager Select required From and To dates. Select Copy Permissions in the View option. Then click Show History button. The Replace Permissions history will be displayed as shown below. Select required From and To dates. Select Modify Permissions in the View option. Then click Show History button. The Modify Permissions history will be displayed as shown below: 512 Chapter 6 – Scan Profiles Manager Select required From and To dates. Select Copy Account Permissions in the View option. Then click Show History button. The Copy Account Permissions history will be displayed as shown below: 513 Chapter 6 – Scan Profiles Manager How to view Central Access Policies Change History? ________________________________________ The Change History feature allows you to view central access policies change history of NTFS Security Manager. You can view central access policies change history between specific date interval by selecting From and To dates. By default, it shows the history of last 30 days. You can view permissions change history of specific task by selecting task name in the View option. Click on button in the toolbar. The Central Access Policies Change History window will be displayed as shown below. You can view Central Access Policies Change History in one of the following ways. Apply CAP History Revoke CAP History Select required From and To dates. Select Apply CAP in the View option. Then click Show History button. The Apply CAP history will be displayed as shown below. 514 Chapter 6 – Scan Profiles Manager Select required From and To dates. Select Revoke CAP in the View option. Then click Show History button. The Revoke CAP history will be displayed as shown below. 515 Chapter 6 – Scan Profiles Manager Additional Features ________________________________________ How to Customize Fields? How to Apply Filters? How to Refresh Data? How to Export Data? How to Email Data? How to find data in a report? 516 Chapter 6 – Scan Profiles Manager How to customize fields? ________________________________________ Click on in Standard Reports for customizing the information. Click for selecting all the check boxes. Click for clearing all the check boxes. Click button for confirming the changes. Click button for canceling the operation. 517 Chapter 6 – Scan Profiles Manager How to Apply Filter? ________________________________________ Click in Standard Reports for setting filter options. The Filter window will be displayed. To set a filter condition, follow these steps. 1. Click (Clear All) button and clear the filter. 2. Choose a field name, an operator and a possible value from the respective dropdown options. 3. Click 4. The Add to Filter will change to AND to Filter. The OR to Filter button will be enabled. The selected condition will be set as a filter and displayed (as shown below). 518 Chapter 6 – Scan Profiles Manager 5. Click OK to apply the filter. Note: Use the , and enhanced filter condition as shown below: (Field A = Value 1 AND Field B = Value 2) OR (Field C = Value 3 AND Field D = Value 4) Use to remove the parenthesis Use to delete a selected condition. to build The status bar’s FILTERED indicator is used to indicate whether the current data is filtered or not. For a normal view, the status bar will appear as For a filtered view, the status bar will appear as 519 Chapter 6 – Scan Profiles Manager How to Refresh data? ________________________________________ Refresh the current report data to view the latest information from the Domain Controller. Click on button in the toolbar available in the report window or press F5 to refresh report data. Alternatively, you can right-click on the grid, in the right pane of the report window, and then select ‘Refresh Data’ from the context menu. The existing data will be cleared and latest data will be loaded in the report window. 520 Chapter 6 – Scan Profiles Manager How to Export data? ________________________________________ The Export feature helps the user to export report data generated by NTFS Security Management Suite to a file using various formats namely HTML/CSV/XLSX/SQL. Click for exporting the information in the desired format. Specify a file name to export report data to or accept the default file name. Specify the export path and select a desired file format. The path refers to the destination location where the output file generated should be stored. It can be given using the Browse button. To avoid overwrite existing files, if any, in the specified export path, By default, the report will be exported to a time-stamped sub-folder, in the format 'YYYY-MM-DD HH.MM.SS', under the specified export path. In XLSX file format, the information is stored as sheets in Excel file. For each report, a XLSX file will be generated. The name of the XLSX file will be the name of the report and is stored in the specified destination path if "Export to time-stamped folder" option is cleared. The XLSX file will be stored under a sub-folder, of the form YYYY-MM-DD HH.MM.SS, under the specified export path, if "Export to timestamped folder" option is set. In CSV file format, the information is stored as comma separated values. For each report, a CSV file will be generated. The name of the CSV file will be the name of the report and is stored in the specified destination path if "Export to time-stamped folder" option is cleared or under a sub-folder, of the form YYYY-MM-DD HH.MM.SS, under the specified export path if "Export to time-stamped folder" option is set. In SQL table format, the information is stored as SQL tables in the application database in the specified SQL server based on the selected SQL database option. For each report, a separate table will be created. The name of the table will be the name of the report. In HTML and XLSX file format, the information is stored in the html and xlsx file respectively. For each report, a HTML file will be generated. The name of the HTML file will be the name of the report and is stored in the specified destination path if "Export to time-stamped folder" option is cleared or under a 521 Chapter 6 – Scan Profiles Manager sub-folder, of the form YYYY-MM-DD HH.MM.SS, under the specified export path if "Export to timestamped folder" option is set. 522 Chapter 6 – Scan Profiles Manager How to E-mail data? ________________________________________ NTFS Security Management Suite provides the option to e-mail the reports generated. Click button in the toolbar to e-mail the report to e-mail recipients. E-mail dialog will be displayed as shown below: For e-mailing reports, NTFS Security Management Suite requires SMTP Server, From E-mail Address, To Email Addresses (recipients separated by semicolon) and the report attachment format. Specify SMTP server name, from Address, To address, mail subject, mail content, attachment format and option to compress the attachment. Click button to send the report by e-mail to the selected recipients. 523 Chapter 6 – Scan Profiles Manager Check names NTFS Security Management Suite provides check name feature to check the existence of corresponding mail-enabled recipient object in Active Directory. To check name, click button. If the entered name matches with a mail object in the Active directory / its trusted domain, name entered in From address textbox will be replaced by the corresponding active directory recipient object. If there is more than one match, a dialog which contains matching Active Directory recipients will appear as shown below. You can select one or more recipient and click OK. To get more information about the listed recipients under Change to, select the name, and then click . 524 Chapter 6 – Scan Profiles Manager If there is no match for the name entered by the user in Active Directory, a dialog will appear as shown below: Select Delete option in the above dialog to remove the recipient name from To address text box. Click Cancel button to close this dialog and the unresolved recipient(s) will appear in red color. 525 Chapter 6 – Scan Profiles Manager Address Book NTFS Security Management Suite provides Address Book feature to search for any mail enabled recipient object (say, person, distribution list, contact, public folder) you want to send a message to. Click button and then use the Find Names dialog box to search for the recipient object you want to send a message to. (Note that you can't use the Find Names dialog box to search for distribution lists in your Contacts folder.) Select the object's name in the list and then click Add recipient to.... To get more information about one of the names in the list, such as department or phone number, select the name, and then click . 526 Chapter 6 – Scan Profiles Manager How to find data in a report? ________________________________________ You can use the find feature in NTFS Security Management Suite to search for specific data in a report. To search for data in a report, just type the characters or words you want to find in the find edit box available in the report window and click on . 1. NTFS Security Management Suite performs a case insensitive search of the specified search criteria in the report. 2. The search criteria should not be enclosed within quotation marks. 3. You can use the "*" wildcard character in the search criteria. The "*" wildcard character act as a place holder for zero or more characters. However, note that you cannot use the "?" wildcard character in the search criteria. For instance, if you want to search for 'Domain' in a report. Type Domain, without quotations, in the edit box, and then click on Find Button. By default, NTFS Security Management Suite adds an asterisk as a suffix to the specified search criteria, if no wildcard character is present in it. In this case, NTFS Security Management Suite finds a match in the report for all fields that have the text Domain followed by zero or more characters, that is, Domain, Domain Controllers, Domain Admins, etc. For all the matches found, NTFS Security Management Suite highlights the corresponding columns in the grid, and scrolls the grid automatically to the first occurrence. 4. NTFS Security Management Suite finds additional occurrences of the specified search criteria instantaneously. To locate other occurrences of the same search criteria in a report you need to scroll the report grid downwards. 527 Chapter 6 – Scan Profiles Manager 528 Chapter 6 – Scan Profiles Manager Scan Profiles Manager ________________________________________ About Scan Profiles (Computers) How to create Scan Profiles (Computers)? How to manage Scan Profiles (Computers)? How to apply Scan Profiles (Computers) in NTFS Security Auditor Module? How to apply Scan Profiles (Computers) in NTFS Security Manager Module? About Scan Profiles (Users / Groups) How to create Scan Profiles (Users / Groups)? How to manage Scan Profiles (Users / Groups)? How to apply Scan Profiles (Users / Groups) in NTFS Security Auditor Module? How to apply Scan Profiles in (Users / Groups) in NTFS Security Manager Module? About Scan Profiles (Shares) How to create Scan Profiles (Shares)? How to manage Scan Profiles (Shares)? How to apply Scan Profiles (Shares) in NTFS Security Auditor Module? How to apply Scan Profiles (Shares) in NTFS Security Manager Module? 529 Chapter 6 – Scan Profiles Manager About Scan Profiles (Computers) ________________________________________ You can setup Scan Profiles to scan a subset of computers in the network and save these profiles for repeated use while generating reports (useful for repeatedly scanning and reporting on different subsets of computers). You can create Scan Profiles in one of the following ways: Selecting specific computers in the network Selecting specific Windows versions Importing list of computers from a text file Importing list of IP addresses from a text file For more information about Scan Profiles follow the links given below. How to create Scan Profiles (Computers)? How to manage Scan Profiles (Computers)? How to apply Scan Profiles (Computers)? 530 Chapter 6 – Scan Profiles Manager How to create Scan Profiles (Computers)? ________________________________________ The Scan Profile Dialog allows you to create or edit a Scan Profile. During edit operation, the name of a Scan Profile and its type cannot be modified. You can access the Scan Profile Dialog from the Scan Profiles Manager. Perform the following steps to create a Scan Profile. 1. Click New button in the Scan Profiles Manager window. The Scan Profile dialog will show up on screen. 2. Specify a name for the Scan Profile. You must give a unique name for the Scan Profile. 3. Specify how you want to create the profile by selecting appropriate profile type. You can create Scan Profiles in one of the following ways: A. Selecting computers from network I. II. Select Select computers from network option. You can type in computer name, in the format "Domain Name\Computer Name", and then click Add button to manually add it to the list. Or you may click Add From button to browse the network and select specific computers. 531 Chapter 6 – Scan Profiles Manager B. Selecting specific Windows versions i. ii. iii. Select Select specific Windows version(s) option. Select one or more Windows versions. Only computers running the selected Windows version will be included in the computer list. You may optionally select specific domains, from the list of domains, to include computers only from the selected domains. If you choose not to select any domains, then the Scan Profile includes all domains in the network. Note: This type of profile is dynamic in nature, in that the list of computers are prepared at run-time; that is at report generation time. C. Importing list of computers from a text file 532 Chapter 6 – Scan Profiles Manager i. ii. iii. iv. Select Import list of computers from text file option. Click browse ("...") button to select a file that contains the list of computers to be imported. In the "Select File" dialog that shows up, select a text (.txt) file, and then click Open. Click Import button to import the list of computers from the selected file. Note: o The text file should contain computer names in the format "Domain Name\Computer Name" (both Domain and Computer name should be a NETBIOS name) with each entry in a separate line as shown below: o Only valid entries of the form "Domain Name\Computer Name" will be imported, and invalid entries will be ignored. Please note that the domain specified will be matched with the domain name to which the computer belongs. The computer entry will be ignored either if the domain name does not match or an if error occurs retrieving the domain name. To view the list of entries imported, click Verify Imported List button. The list of computer names imported will be displayed as shown below: 533 Chapter 6 – Scan Profiles Manager o Changes to the external text file will not automatically be reflected in the Scan Profile. You need to edit the Scan Profile and re-import the updated computer list from the file. D. Importing list of IP addresses from a text file i. ii. iii. iv. Select Import list of IP addresses from text file option. Click browse ("...") button to select a file that contains the list of IP addresses to be imported. In the "Select File" dialog that shows up, select a text (.txt) file, and then click Open. Click Import button to import the list of IP addresses from the selected file. 534 Chapter 6 – Scan Profiles Manager Note: o The text file should contain valid IP addresses with each entry in a separate line as shown below: o During the import process each IP address will be translated to a corresponding computer name. Hence, only valid entries will be imported. To view the list of entries imported, click Verify Imported List button. The list of IP addresses and their corresponding computer names will be displayed as shown below: o Changes to the external text file will not automatically be reflected in the Scan Profile. You need to edit the Scan Profile and re-import the updated IP address list from the file. 4. Click OK to save the Scan Profile for later use. 535 Chapter 6 – Scan Profiles Manager How to manage Scan Profiles (Computers)? ________________________________________ Click in Configuration tab to launch the Scan Profiles Manager. The Scan Profiles Manager shows the list of Scan Profiles available. The Scan Profiles Manager allows you to perform the following operations: Create a new Scan Profile Edit an existing Scan Profile Delete a Scan Profile Preview the list of computers in a Scan Profile Create a new Scan Profile 1. To create a new Scan Profile click New 2. Follow the steps as outlined in How to create Scan Profiles? 536 Chapter 6 – Scan Profiles Manager Edit an existing Scan Profile To edit a Scan Profile click Edit button in the Scan Profiles Manager. The Scan Profile Dialog will appear on the screen which will allow you to edit the selected Scan Profile. During edit operation you can modify the computer list, however, you cannot modify the type of the Scan Profile. Delete a Scan Profile To delete a Scan Profile, select the profile you want to delete, and then click Delete button. The selected Scan Profile will be deleted permanently. Please note, that reports associated with the Scan Profile deleted may fail to run when generated. Preview the list of computers in a Scan Profile To preview the list of computers in a Scan Profile, select a Scan Profile, and then click Preview button. The computer list will be displayed in a tree view as shown below: The Preview window shows the list of domains and computers selected in the Scan Profile if the computer list was either imported or selected from the network. Whereas, if specific Windows versions were selected, then only the computers that match the selected Windows versions will show up. Furthermore, if specific domains were associated with the Scan Profile, then only the selected domains will show up, otherwise all the domains in the network will show up. The Preview window allows you to view what computers in the network will be included in the profile. 537 Chapter 6 – Scan Profiles Manager How to apply Scan Profiles (Computers) in NTFS Security Auditor Module? ________________________________________ You can apply a Scan Profile to one or more reports to restrict the list of computers during report generation. This is especially useful if you want to generate reports for a subset of computers. This page covers the following topics with regard to usage of Scan Profiles: Scan Profiles and Power Export Tool (off-line report generation) Scan Profiles and Interactive Report Generation Scan Profiles and Power Export Tool (off-line report generation) You can apply a Scan Profile to one or more reports using the Power Export Tool (for off-line generation) to restrict the domain scope and to scan and collect data for a subset of computers in the network. The report data will be collected for all computers in the applied Scan Profile. However, if the applied Scan Profile becomes unavailable during report generation (likely to happen if the Scan Profile is accidentally deleted), the report data will not be collected at all and will result in an error. Furthermore, if there are no computers to be found in the Scan Profile for a domain for which the report is being generated, then the report generation will fail as well. This is likely to happen if the domain is not included in the Scan Profile or none of the computers in the domain are running the Windows version setup in the Scan Profile. Scan Profiles and Interactive Report Generation You may also apply a Scan Profile to reports and view the data in interactive mode. The way in which a Scan Profile is applied and the data collection methodology adopted slightly differs in interactive mode from off-line report generation mode (using Power Export Tool). The data collection methodology adopted also depends on the type of Scan Profile applied (static or dynamic) to the report. For instance, if a Scan Profile is associated with multiple domains, in interactive mode, data will be collected only for computers that belong to the currently selected domain. On the other hand, if there are no computers to be found for the currently selected domain, in the applied profile, the report data will not be collected at all. This is likely to happen if the currently selected domain was not included in Scan Profile (if it is a static profile) or the Scan Profile includes a Windows version filter, say Windows XP computers only, and the domain does not have any computers running Windows XP. In addition, in interactive mode, there are differences on how Scan Profiles are applied to Domain-based Reports and Server-based Reports. Scan Profiles and Domain-based Reports In interactive mode, for domain-based reports, you can apply a Scan Profile by using the Scan Option Dialog. The report will be generated for the list of computers in the applied Scan Profile for the currently selected domain as mentioned earlier. Scan Profiles and Server-based Reports 538 Chapter 6 – Scan Profiles Manager For server-based reports, you can apply a Scan Profile by clicking the button in the report window. The Scan Profiles Manager will show up on screen, select a Scan Profile, and then click Apply button to apply the selected profile. For server-based reports, however, a Scan Profile when applied reloads the tree view, in the left pane in the report window, with the list of computers in the selected Scan Profile. After a Scan Profile is applied, you can select the desired computer in the tree view in the report window to generate the report. Click the Clear button to clear the applied profile. This will reload tree view with the list of all domains in the network. 539 Chapter 6 – Scan Profiles Manager How to apply Scan Profiles (Computers) in NTFS Security Manager Module? ________________________________________ You can apply Scan Profile (Computers) to Grant Permissions, Revoke Permissions, Copy Permissions and also Modify Permissions that involves changes to permissions for the accounts on shared folder(s)/file(s). The following steps describe on how to apply Scan Profiles (computers) in the Grant Permissions wizard. Click on button in the toolbar. The Grant Permissions window will be displayed as shown below: Click Add From Expand Select a Scan Profile (Computers) and enumerate servers in the profile to select its shared folder(s)/file(s) Select the shared folder(s)/file(s) displayed under the servers 540 Chapter 6 – Scan Profiles Manager The selected shared folder(s)/file(s) will be added to the wizard as shown below: 541 Chapter 6 – Scan Profiles Manager In the subsequent steps, select the necessary details for granting permissions for shared folder(s)/file(s) selected from Scan Profile (Computers) servers. 542 Chapter 6 – Scan Profiles Manager About Scan Profiles (Users/Groups) ________________________________________ You can setup Scan Profiles (Users/Groups) to scan a subset of users/groups present in computers and save these profiles for repeated use (useful for repeatedly scanning and reporting on different subsets of users and groups permissions on share folders). For more information about Scan Profiles (Users/Groups) follow the links given below. How to create Scan Profiles (Users/Groups)? How to manage Scan Profiles (Users/Groups)? How to apply Scan Profiles (Users/Groups)? 543 Chapter 6 – Scan Profiles Manager How to create Scan Profiles (Users/Groups)? ________________________________________ Perform the following steps to create a Scan Profile (Users/Groups). 1. Select from the Configuration tab. This action will launch the Scan Profiles Manager (Users/Groups) dialog as shown below. 544 Chapter 6 – Scan Profiles Manager 2. Click New button in the Scan Profiles Manager (Users/Groups) dialog. This action will launch the Scan Profiles (Users/Groups) dialog as shown below. 1. Enter a name for the profile. 2. Use the Browse and Select button to enumerate users/groups from servers or Scan Profiles Computers as shown below 545 Chapter 6 – Scan Profiles Manager 3. You can enter users / groups name and add to the selected account list for creating a profile. Enter the users/groups name in 'Domain\User Name' format and click the Add button to add the entered account to the list as shown below. 546 Chapter 6 – Scan Profiles Manager 547 Chapter 6 – Scan Profiles Manager 5. Click Finish to save the Users/Groups profile for future use. 548 Chapter 6 – Scan Profiles Manager How to manage Scan Profiles (Users/Groups)? ________________________________________ Click to launch the Scan Profiles Manager (Users/Groups). The Scan Profiles Manager (Users/Groups) shows the list of available profiles. The Scan Profiles Manager allows you to perform the following operations: Create a new Scan Profile (Users/Groups) Edit an existing Scan Profile (Users/Groups) Delete a Scan Profile (Users/Groups) Preview the list of users and groups in a Scan Profile (Users/Groups) Create a new Scan Profile (Users/Groups) 1. To create a new Scan Profile (Users/Groups) click New 2. Follow the steps as outlined in How to create Scan Profiles? 549 Chapter 6 – Scan Profiles Manager Edit an existing Scan Profile (Users/Groups) To edit a Scan Profile (Users/Groups) click Edit button in the Scan Profiles Manager. The Scan Profile (Users/Group) wizard will appear on the screen which will allow you to edit the selected profile. During edit operation you can modify the Users/Groups list. Delete a Scan Profile (Users/Groups) To delete a Scan Profile (Users/Groups), select the profile you want to delete, and then click Delete button. The selected Scan Profile (Users/Groups) will be deleted permanently. Please note, that reports associated with the Scan Profile (Users/Groups) deleted may fail to run when generated. Preview the list of users and groups in a Scan Profile (Users/Groups) To preview the list of users and groups in a profile, select a profile, and then click Preview button. The Preview window allows you to view what users and groups will be included in the profile. 550 Chapter 6 – Scan Profiles Manager How to apply Scan Profiles (Users/Groups) in NTFS Security Auditor Module? ________________________________________ You can apply Scan Profile (Users/Groups) to permissions reports that involves generating permissions for specific users and groups on share folders. This is especially useful, if you want to generate permissions reports for certain users and groups frequently. The following shows permissions reports that involves specific users and groups. Report Name List of permissions for specific users and groups on folders List of permissions for specific users and groups on files List of effective permissions for specific users and groups on folders List of effective permissions for specific users and groups on files Description Reports the folder permissions assigned to specific users and/or groups on a selected set of folders. Reports the files permissions assigned to specific users and/or groups under a selected set of folders. Reports the effective permissions for specific users and groups available in a set of folders. Reports the effective permissions for specific users and groups for files available in a set of folders. Scan Profiles (Users and Groups) and permission reports for specific users and groups You can apply a Scan Profile (Users/Groups) to permissions reports either using Power Export Tool (for off-line generation) or Interactive Report Generation .This option will useful, if permissions for certain Users and Groups need to be monitored frequently. Rather than searching for Users and Groups, adding then to account list and viewing their permissions. You can use the - create a subset of Users and Groups, save them as a profile, generating permissions reports for subset that of users and groups. The following shows how Scan Profiles (Users/Groups) can be applied to permission reports for specific users and groups in Interactive report generation and Power export tool. Scan Profiles (Users/Groups) and Interactive Report Generation Perform the following steps for applying Scan Profiles (Users/Groups) to permission reports in Interactive report generation Click on under Built-in Reports in the tool bar. Select any one of the permissions reports listed above and click Next to proceed. 551 Chapter 6 – Scan Profiles Manager In the next step, select the option 'Select a Scan Profiles (Users/Groups) ' as shown below. In this step the list of users and / or groups present in Scan Profile (Users/Groups) will be loaded to the selected account list as shown below. 552 Chapter 6 – Scan Profiles Manager In the succeeding steps select needed details for generating reports for selected users and groups. Scan Profiles (Users/Groups) and Power Export Tool (off-line report generation) You can apply a Scan Profile (Users/Groups) to permissions reports using Power Export Tool (for off-line generation). Click on button in the toolbar. Select any one of the permissions reports listed above and click Next to proceed. In the next step, select the option 'Select a Scan Profiles (Users/Groups)' as shown below. 553 Chapter 6 – Scan Profiles Manager In this step the list of users and groups present in Scan Profile (Users/Groups) will be loaded to the selected account list as shown below. 554 Chapter 6 – Scan Profiles Manager In the succeeding steps select needed details for generating reports for selected Scan Profile (Users/Groups). 555 Chapter 6 – Scan Profiles Manager How to apply Scan Profiles (Users/Groups) in NTFS Security Manager Module? ________________________________________ You can apply Scan Profile (Users/Groups) to Grant Permissions, Revoke Permissions and also Modify Permissions that involves changes to permissions for the accounts on shared folder(s)/file(s). The following steps describe on how to apply Scan Profiles (User/Groups) in the Grant Permissions wizard. Click on button in the toolbar. The Grant Permissions window will be displayed as shown below: Select one or more shared folder(s)/files(s) and click Next to proceed. In Select user/group accounts step, select a profile from the Scan Profile (Users/Groups) dropdown to use the users/groups added in a profile. 556 Chapter 6 – Scan Profiles Manager The list of users and groups present in the selected Scan Profile (Users/Groups) will be loaded to the wizard as shown below. 557 Chapter 6 – Scan Profiles Manager In the subsequent steps, select the necessary details for granting permissions for accounts present in the Scan Profile (Users/Groups). 558 Chapter 6 – Scan Profiles Manager About Scan Profiles (Shares) ________________________________________ You can setup Scan Profiles (Shares) to scan a subset of shares present in computers and save these profiles for repeated use (useful for repeatedly scanning and reporting on different subsets of share folders permissions). For more information about Scan Profiles (Shares) follow the links given below. How to create Scan Profiles (Shares)? How to manage Scan Profiles (Shares)? How to apply Scan Profiles (Shares)? 559 Chapter 6 – Scan Profiles Manager How to create Scan Profiles (Shares)? ________________________________________ Perform the following steps to create a Scan Profiles (Shares). 1. Select from the Configuration tab. This action will launch the Scan Profiles Manager (Shares) dialog as shown below. 2. Click New button in the Scan Profiles Manager (Shares) dialog. This action will launch the Scan Profiles (Shares) dialog as shown below. 560 Chapter 6 – Scan Profiles Manager 1. Enter a name for the profile. 2. You may type the UNC path of a folder that is not in the list, such as a folder that is not shared, and then click Add, to add it to the list as shown below. 561 Chapter 6 – Scan Profiles Manager 3. You may also import a list of UNC paths to shared and non-shared folders from a text file by using the Import button. 4. Click 'Add From' to add list of shared folders from computers as shown below. 5. You can use 'Enumerate' option to scan the entire domain and find all file shares for which the selected accounts have permissions. Click Enumerate option. The 'Select Shares' dialog will be displayed as shown below. 562 Chapter 6 – Scan Profiles Manager Select a domain and the desired accounts (say, Everyone) in order to filter the list of shares for which the specified user account (Everyone) has permissions defined. Select a domain and the desired accounts (say, Everyone) in order to filter the list of shares for which the specified user account (Everyone) has access. If you want to scan with more accounts, click 'Select more...' and then select the accounts in 'Account Selection' dialog. Once accounts selection is complete, click 'OK' in 'Account Selection' dialog. 563 Chapter 6 – Scan Profiles Manager Click 'OK' in 'Select Shares'. 5. Click OK to save the Shares profile for future use. 564 Chapter 6 – Scan Profiles Manager How to manage Scan Profiles (Shares)? ________________________________________ Click to launch the Scan Profiles Manager (Shares). The Scan Profiles Manager (Shares) shows the list of available profiles. The Scan Profiles Manager allows you to perform the following operations: Create a new Scan Profile (Shares) Edit an existing Scan Profile (Shares) Delete a Scan Profile (Shares) Preview the list of Shares in a Scan Profile (Shares) Create a new Scan Profile (Shares) 1. To create a new Scan Profile (Shares) click New 2. Follow the steps as outlined in How to create Scan Profiles? 565 Chapter 6 – Scan Profiles Manager Edit an existing Scan Profile (Shares) 1. To edit a Scan Profile (Shares) click Edit button in the Scan Profiles Manager. The Scan Profile (Shares) wizard will appear on the screen which will allow you to edit the selected profile. 2. During edit operation you can modify the Shares list. Delete a Scan Profile (Shares) To delete a Scan Profile (Shares), select the profile you want to delete, and then click Delete button. The selected Scan Profile (Shares) will be deleted permanently. Please note, that reports associated with the Scan Profile (Shares) deleted may fail to run when generated. Preview the list of shares in a Scan Profile (Shares) To preview the list of shares in a profile, select a profile, and then click Preview button. The Preview window allows you to view what shares will be included in the profile. 566 Chapter 6 – Scan Profiles Manager How to apply Scan Profiles (Shares) in NTFS Security Auditor Module? ________________________________________ You can apply Scan Profile (Shares) to permissions reports. This is especially useful, if you want to generate permissions reports for certain Shares frequently. The following shows permissions reports that involves shares profile List of Permissions Reports: Report Name List of permissions for specific users and groups on folders List of permissions for folders List of permissions for specific users and groups on files List of permissions for files List of all permissions for folders (Inherit & Explicit) List of effective permissions for users and groups on folders List of effective permissions for users and groups on files List of effective permissions for specific users and groups on folders List of effective permissions for specific users and groups on files Description Reports the folder permissions assigned to specific users and/or groups on a selected set of folders. Reports the permissions associated with a selected set of folders. Reports the files permissions assigned to specific users and/or groups under a selected set of folders. Reports the permissions associated with files under a selected set of folders. Reports the permissions for users assigned in the folders directly and inherited by means of nested groups. Reports the effective permissions for users and groups for a set of folders. Reports the effective permissions for users and groups for files available in a set of folders. Reports the effective permissions for specific users and groups available in a set of folders. Reports the effective permissions for specific users and groups for files available in a set of folders. Scan Profiles (Shares) and permission reports You can apply a Scan Profile (Shares) to permissions reports either using Power Export Tool (for off-line generation) or Interactive Report Generation .This option will useful, if permissions for certain shares need to be monitored frequently. Rather than searching for shares, adding them to list and viewing their permissions. You can create a subset of shares, save them as a profile, generating permissions reports for them. The following shows how Scan Profiles (Shares) can be applied to permission reports in Interactive report generation and Power export tool. 567 Chapter 6 – Scan Profiles Manager Scan Profiles (Users/Groups) and Interactive Report Generation Perform the following steps for applying Scan Profiles (Shares) to permission reports in Interactive report generation Click on under Built-in Reports in the tool bar. Select any one of the permissions reports listed above and click Next to proceed. In the next step, select the option 'Select a Scan Profiles (Shares) ' as shown below. In this step the list of shares present in Scan Profile (Shares) will be loaded to the selected account list as shown below. 568 Chapter 6 – Scan Profiles Manager In the succeeding steps select needed details for generating reports for selected shares. Scan Profiles (Users/Groups) and Power Export Tool (off-line report generation) You can apply a Scan Profiles (Shares) to permissions reports using Power Export Tool (for off-line generation). Click on button in the toolbar. Select any one of the permissions reports listed above and click Next to proceed. In the next step, select the option 'Select a Scan Profiles (Shares)' as shown below. 569 Chapter 6 – Scan Profiles Manager In this step the list of shares present in Scan Profile (Shares) will be loaded to the selected account list as shown below. 570 Chapter 6 – Scan Profiles Manager In the succeeding steps select needed details for generating reports for selected shares. 571 Chapter 6 – Scan Profiles Manager How to apply Scan Profiles (Shares) in NTFS Security Manager Module? ________________________________________ You can apply Scan Profile (Shares) to Grant Permissions, Revoke Permissions, Copy Permissions and also Modify Permissions that involves changes to permissions for the accounts on shared folder(s)/file(s). The following steps describe on how to apply Scan Profiles (Shares) in the Grant Permissions wizard. Click on button in the toolbar. The Grant Permissions window will be displayed as shown below: Select a profile from the Scan Profile (Shares) dropdown to use the shares added in a profile. The list of shared folder(s)/file(s) present in the selected Scan Profile (Shares) will be loaded to the wizard as shown below. 572 Chapter 6 – Scan Profiles Manager In the subsequent steps, select the necessary details for granting permissions for the shared folder(s)/file(s) present in the Scan Profile (Shares). 573 Chapter 6 – Scan Profiles Manager References ________________________________________ Frequently Asked Questions Troubleshooting How to uninstall NTFS Security Management Suite 2014 574 Chapter 6 – Scan Profiles Manager Frequently Asked Questions ________________________________________ For frequently asked questions about the product, please refer to the page Frequently Asked Questions in the website of the respective modules. NTFS Security Auditor – FAQ NTFS Security Manager – FAQ NTFS Change Auditor – FAQ 575 Chapter 6 – Scan Profiles Manager Troubleshooting ________________________________________ If and when a problem arises, please forward the following information to [email protected] to revert back to you with a solution. These files will be available where NTFS Security Management Suite 2014 is installed. Error Log File E.g., <Application Data>\NTFS 2014\NTFSSecurityManagementSuite2014ErrorLog.Log Security Management Suite Note: < Application Data> is the common area where NTFS Security Management Suite 2014 settings will be stored in the machine running NTFS Security Management Suite 2014.The <Application Data Folder> can be found from the Help -> About screen. The default path of <Application Data Folder> is as follows: a) Windows XP, Windows 2003 - C:\Documents and Settings\All Users\Documents b) Windows Server 2008, Windows Server 2012, Windows Server 2012 R2, Windows Vista, Windows 7, Windows 8, Windows 8.1 - C:\Users\Public\Documents 576 Chapter 6 – Scan Profiles Manager How to uninstall NTFS Security Management Suite 2014? ________________________________________ When you uninstall NTFS Security Management Suite 2014 through Control Panel - Add / Remove Programs applet, Windows Installer program will remove only the application files from your machine. But, the application related files created by NTFS Security Management Suite 2014 remain in the computer. In order to remove NTFS Security Management Suite 2014 worker files completely, the uninstall wizard provides a set of cleanup options to perform the cleanup operation based upon your selection. Use this wizard to cleanup the files that are created by NTFS Security Management Suite 2014 application selectively and uninstall NTFS Security Management Suite 2014 completely from the machine. 1.Launch the uninstall wizard by clicking Start -> Programs -> NTFS Security Management Suite 2014 -> NTFS Security Management Suite 2014 Uninstall Wizard. The NTFS Security Management Suite 2014 Uninstall Wizard dialog will be shown as below: Click Next to proceed. 577 Chapter 6 – Scan Profiles Manager 2. Select required cleanup options as shown below: Click Next to proceed. 578 Chapter 6 – Scan Profiles Manager 3. Confirm the cleanup and/or uninstall process. Click Finish to run cleanup and/or uninstall process. Click Cancel to close the wizard. 4. Once the file cleanup process is complete, the uninstall wizard will automatically run Windows Installer program to remove NTFS Security Management Suite 2014 application from the machine. 579