1
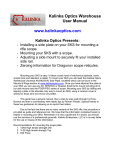
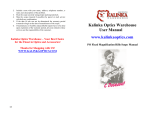
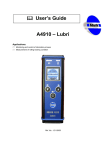
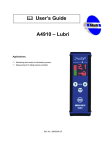
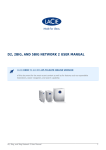
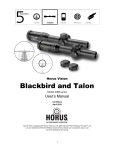
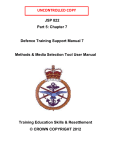
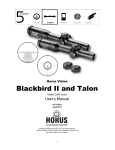
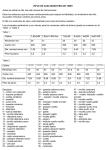
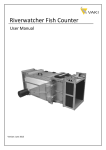
KALINKA OPTICS WAREHOUSE USER MANUAL
PSO-1M2-1 RIFLE OPTIC SCOPE ASS/VSS & SVD VERSIONS
WWW.KALINKAOPTICS.COM
PSO-1M2-1 RIFLE OPTIC SCOPE
ASS/VSS & SVD VERSIONS
TABLE OF CONTENTS
OVERVIEW
Page 2
INTRODUCTION
Page 2
GENERAL DESCRIPTION
Page 2
TECHNICAL SPECIFICATIONS
Page 3
DELIVERY SET
Page 3
OPTIONAL ACCESSORIES
Page 3
FUNCTIONAL CAPABILITIES
Page 3
SYSTEM COMPONENTS
Page 4
WINDAGE AND ELEVATION ADJUSTMENT
Page 4
RANGEFINDING
Page 5
RETICULE ILLUMINATION
Page 6
SETTING UP
Page 6
POWER SUPPLY
Page 6
MOUNTING THE SCOPE
Page 6
ZEROING THE SCOPE
Page 7
USING THE SCOPE
Page 10
AIMING
Page 10
SAFEKEEPING
Page 10
WARRANTY
©2013 kalinkaOptics Inc.
www.kalinkaoptics.com
Page 10
2
OVERVIEW
INTRODUCTION
Thank you for choosing the PSO rifle scope at Kalinka Optics! We are confident that the optic you have chosen will live up to your highest
expectations.
Please, read this instruction manual carefully before using the scope. This manual will guide you through the steps to properly install,
zero and maintain your optic for optimal performance. It also gives explicit technical information on construction and operating characteristics
of this device.
Should you have questions that have not been addressed in this manual please contact us at [email protected]. We will be happy to
assist you.
GENERAL DESCRIPTION
Background
PSO-1M2-1 (4x24) rifle scope comes out of the legendary PSO scope family world famous for its quality. These scopes are built battlefieldtough from magnesium alloy and have fully multi-coated optics. PSO is a great assault weapon scope with a military reticle providing
rangefinding and twilight aiming capabilities. All PSO scopes feature professionally ground, crystal clear mil spec optics, nitrogen filling to
prevent lens fogging, and larger diameter tubes for improved light gathering under the most severe conditions.
PSO-1M2-1 (4x24) was originally designed for SVD ammo standard and later on modified for VSS, 9x39 caliber silent sniper rifles, intended
for Russian special mission units. The VSS version scopes were first tried in the early 90-s during the First Chechen War. Since then the
scopes have been successfully used in all local conflicts in the Russian Federation by both anti-terrorist and regular Army forces. Years of
testing in battlefield conditions have proved PSO-1M2-1 to be a robust, extremely reliable and at the same time very accurate optical scope.
That is why it is still in use by military establishments of Russia and CIS.
PSO-1M2-1 is now available in both ASS/VSS and SVD versions.
Main features
The clamp will fit any rifle with the standard 14 mm dovetail side optic rail. Before attempting to mount the scope make sure that your rifle
has the correct side rail as it is crucial for proper function of the scope. A side rail may not be preinstalled on the rifle. In this case a rail of the
right type can be ordered at www.kalinkaoptics.com.
Working conditions. The scope can be used in a variety of climatic conditions with temperatures ranging from -50°C to +50°C (-58°F to
+122°F). The scope is also sealed against sand and dust as well as filled with Nitrogen to prevent fogging.
Optics. The scope is designed with extended eye relief and has a range finding capability. The reticule has a height-based rangefinder with
graduated scales for standing figure estimation that can be used at up to 400 meters distance. The reticule illumination system will ensure
target acquisition in low light conditions.
Ballistic adjustment is carried out with the windage and elevation turrets. The windage turret has a 5 cm at 100 m click, which equals to 1/2
Mil. The elevation turret is a BDC turret for either 9x39 ammo designed for ASS/VSS or 7,62x54R, SVD standard. However, a scope with
any of the above turret versions could be easily used on rifles of any other caliber. You only need to make your own ballistic card for bullet
drop compensation (BDC).
Power for the reticule illumination system is provided by two D-357, common watch button batteries, available at any store.
This PSO scope comes with Kalinka Optics "First Aid" kit containing a couple of D-357 batteries, 3V battery holder and a red LED so that you
can use the scope right from the box!
©2013 kalinkaOptics Inc.
www.kalinkaoptics.com
3
TECHNICAL SPECIFICATIONS
Magnification
Objective Aperture
Field of View
Field of View at 1000 m
Eye Relief
Eye Relief Diameter
Windage
Independent Focus
Reticule Style
Illuminated Reticule
Rangefinding Capability
Nitrogen Purged
Waterproof
Mount Type
Color
Temperature
Power Source
Battery Life
Overall Dimensions (LxWxH)
Maximum Length
(with extended blend and eyepiece)
Item Weight
4x
24 mm
6°
70 m
70 mm
6.7 mm
1/2 Mil
No
400m Simonov
Red
Yes
Yes
Yes
Universal AK, SVD
Grey
+50 to -50°C
3V (2 x D-357)
100 Hrs
260x65x130 mm
370 mm
1.3 Lb
DELIVERY SET
Optical scope w/illuminated reticule – 1
Rubber objective cap - 1
Rubber eyepiece – 1
Soft carry case – 1
Manual – 1
First aid Kit -1
o
D357 Battery -2
o
3V Battery holder - 1
o
Red LED - 1
OPTIONAL ACCESSORIES
Colored bulbs/LEDs
Light filters
Mounting plates
Rubber eyepieces
Battery holder for D-357
Batteries
Protective mounted scope covers
Lens cleaning cloth
ALL AVAILABLE AT www.kalinkaoptics.com
©2013 kalinkaOptics Inc.
www.kalinkaoptics.com
4
FUNCTIONAL CAPABILITIES
SYSTEM COMPONENTS
1 - Objective With Extendable Sun Shade
2 - Elevation Adjustment Turret
3 - Scope Body With Mount
4 - Rubber Eyepiece
5 - Battery Compartment Cover
6 - Battery Compartment
7 - Mount
8 - Reticule Illumination Bulb/LED
9 - Reticule Illumination System Switch
10 - Objective Lens Protective Cap
11 - Zero Mark
12 - Retainer Screw
13 - Windage Adjustment Turret
14 - Mounting Stopper
15 - Clamp
16 - Clamp Screw
Figure 1
WINDAGE AND ELEVATION ADJUSTMENT
The elevation turret allows the shooter to correct the bullet trajectory depending on distance from the target. The windage turret is to
compensate the transverse wind influence. It can also be used in case of aiming at a moving target.
Figure 2
Elevation
PSO-1M2-1 comes with elevation turrets of two different types: VSS/ASS (Figure 3) and SVD (Figure 4). The only difference between the
two is the scale engraved on the turret dial. The scale is given in meters of distance, where each number corresponds to 1/100th fraction of
the distance, i.e. 1 = 100m, 2 = 200m, 3 = 300m, etc.
©2013 kalinkaOptics Inc.
www.kalinkaoptics.com
5
Figure 3
Figure 4
The VSS elevation turret is A BDC turret for 9x39 ammo designed for ASS/VSS, while the SVD elevation scale is calculated for 7.62x54R
ammo used by SVD, Tigr and other similar rifles. However, regardless of the scale type you have, the scope could be easily used on a rifle of
any caliber. You only have to make your own ballistic card, which can be done with a simple on-line ballistic calculator. On the other hand,
aside from the caliber, actual bullet drop depends on many factors, such as specifics of your ammo and rifle, surrounding environment, air
temperature, etc.
Arrows on the turret black top show the direction of trajectory correction:
"ВВЕРХ" - "UP"
"ВНИЗ" - "DOWN"
Windage
The dial on the side of the scope is for adjusting for wind effects (Figure 5). The numbers in black move the reticle to the left which you would
do if the wind was blowing from right to left across your line of fire. The numbers in red are just the opposite and move the reticle to the right.
The movement direction of line of site is shown on the nut of the turret:
"ВПРАВО" - "RIGHT" Right
"ВЛЕВО" - "LEFT" Left
Figure 5
Each movement of the dial one full notch (2 clicks) is equal to 10 centimeters line of site movement at 100 meters or 1 mil, which will give
deflection of 0.3 meters at 300 meters range. Thus, shifting the aiming point by one division left or right will move the point of impact by 10cm
/ 4” for every 100m / 333 ft of the distance. The lock, which is located on the turret, allows the turret to be set in between two notches.
©2013 kalinkaOptics Inc.
www.kalinkaoptics.com
6
RANGEFINDING
Figure 6
The reticule rangefinder works by placing the target (1.7 m or 5’8” in height) between the horizontal and the top reclining line with numbers
(see Figure 6). On the reclining line locate the number closest to the point where the target touches the line. Multiply that number by 100 and
this will be the distance to the target in meters. 1meter = 1.11 yards. Range estimates can be obtained at up to 400 meters. Ones you know
the distance to the target you may set the right elevation value on the elevation turret dial.
Figure 7
The windage scale engraved on the reticule is given in Mils (Figure 7). It can be used to make horizontal adjustments or as a rangefinder as
well. The distance to the target can be determined by assuming that a 1m / 3’4” wide/long object fits between the small divisions at 100 m /
333 ft.
RETICULE ILLUMINATION
PSO-1M2-1 is equipped with a reticule illumination system. The red illuminated reticule will ensure target acquisition in low light conditions.
Illumination is provided by a simple bulb (8), which can be replaced by a LED (comes along with the scope as a compliment from Kalinka
Optics), and powered by two D-357 silver-oxide batteries. Use the ON/OFF switch (9) to turn the system on (see Figure 1).
©2013 kalinkaOptics Inc.
www.kalinkaoptics.com
7
SETTING UP
POWER SUPPLY
The scope is equipped with a reticule illumination system that uses two D-357 silver-oxide batteries. Radio Shack carries these and they are
Radio Shack # 23-105. You can also acquire batteries through our web site at www.kalinkaoptics.com.
To replace batteries remove the cover (5) from the battery compartment (6), by pressing it down and twisting it counter clockwise (see Figure
1). Install new batteries keeping the right polarity. The '+' side goes in first. Close the battery compartment. The battery compartment cover
goes in counter-intuitively. If the reticule loses its brightness over time, replace the batteries.
MOUNTING THE SCOPE
1 - Tuning screw
2 - Clamp
3 - Latching lever
Figure 8
Before mounting the scope make sure that the mount matches the side rail installed on your rifle.
If you are not careful to ensure you have the correct rail model for your scope it is possible to mount the scope on a wrong rail. While it may
seem to ‘fit’, you will encounter problems such as too much or not enough of eye relief, the scope won't hold its "zero" if removed, etc.
Finally, shooting with an improperly installed scope may cause damage due to recoil.
The scope has a nondetachable mount that will fit a regular 14 mm swallow-tail side rail placed on the left side of your rifle. The mounting
procedure consists of the following steps:
1. Loosen the clamp (2) by turning the latching lever (3) counterclockwise up to its extreme outer position (see Figure 8). When in home
position the lever is firmly locked to avoid occasional detachment of the scope. To unlock the latching lever pull it up and then turn it aside
counterclockwise.
2. Slide the scope onto your side rail moving it forward towards the barrel until it reaches the forward position. Then turn the lever clockwise
to tighten the clamp. Make sure that the lever is latched into its initial home position and won't come off spontaneously.
Clamp Adjustment
Figure 9
Grip of the clamp can be adjusted if it appears to be too tight or too loose (see Figure 9). Push the clamp (2) up off the tuning screw (1). once
the turning screw is released you may turn it using a flat screwdriver. Do it clockwise to tighten the grip or vice versa. When the required
adjustment is achieved let go the clamp so that it will lock the tuning screw in the correct position.
©2013 kalinkaOptics Inc.
www.kalinkaoptics.com
8
ZEROING THE SCOPE
General
Figure 10
Zeroing is the process of aligning the point of aim with the point of impact, so that the two become one (see Figure 10).
Point of aim: The spot where you are aiming at, denoted as the spot where the crosshairs on your reticle intersect.
Point of impact: The spot where your bullet actually impacts the target.
Thus, all we are basically doing is making sure that the bullet actually goes where we put the aiming mark, i.e. the chevron in the middle of
the reticule.
We have to keep in mind that the trajectory of a bullet is more or less an arc rather than a straight line. When a bullet runs out of steam, it
falls to the ground. This part seems fairly intuitive, but most people fail to realize that the moment the bullet leaves the barrel, it succumbs to
gravity and begins a downward trajectory. No matter how high powered the cartridge is, gravity always wins.
This fact brings us to conclusion that we must zero the rifle at a certain range, and since gravity affects the bullet, the rifle is only zeroed to
that range – any other range will require corrective input on the scope by adjusting the elevation turret. That is why first of all we should
define the preferred range to zero a rifle (and therefore zero the scope) at. Most military units zero weapons at 300 meters, but that is
impractical for civilians as there aren’t always shooting ranges with that kind of distance available.
In any case we have to follow the rule:
Zero at the range you intend to engage targets at
The safe bet for most shooters that are shooting .308 (7,62×54mm) and .30-06 (7,62×39mm) is to zero at 100 meters, as this is an easily
obtainable distance. These cartridges shoot relatively flat out to 500 yards, so there isn’t much if any adjustments that need to be made
inside those distances. Beyond those distances, simple elevation corrections are dialed in via the elevation turret on the scope.
Herewith we consider rough pre-zeroing and precise zeroing procedures. Alternatively, you can also pre-zero a scope with a laser bore
sight. This method is more convenient and accurate than pre-zeroing with a regular iron (open) sight.
Pre-Zero at home
1. Mount the scope to the rifle. Make sure it is firmly set on the side rail. It’s easy to impart errors into the scope by mounting it slightly
crooked.
2. Make sure that the scope aiming mark is centered and the rifle is unloaded. Take the gun to a place where you can see about a hundred
yards away.
3. Remove the bolt from the gun or, in the case of a semi auto, separate the upper and lower and remove the bolt carrier group. Either way,
you want to make it so that you can see through the barrel.
If construction specifics of your rifle prevent you from getting a clear view through the barrel, alternatively, for aiming you can use the iron
sight (open sight).
©2013 kalinkaOptics Inc.
www.kalinkaoptics.com
9
4. Position the gun on shooting bags or in a gun vise, or use the gun’s bipod. Securely brace the gun and point it at a target no more than
100 yards away
5. Looking inside the barrel or through the open sight of the gun, aim it at the chosen target (Figure 11).
6. Next, without touching the gun, lift your eye up to the optic scope (Figure 12). Do you see the same object? If so, is the scope centered on
this object? If it does, you got lucky. If not, carefully turn the elevation and windage turrets until the center of the reticule corresponds to the
view through your open sight or the barrel.
Figure 11
Figure 12
7. When the aiming mark points to the same spot as the open sight or the barrel does, you should finally set the adjustment turrets' dials in
the right positions, which is "0" for windage and "1" or less for elevation depending on the range you have used. If you pre-zero at short
distances less than 50 meters, we may consider the trajectory flat, which will correspond to "0" on the elevation dial.
Figure 13
Figure 14
For setting up a turret dial (elevation or windage), first, loosen the side screws on the black top (Figure 13). Don't touch the central screw and
keep the black top in the same position as it was set during the pre-zeroing procedure. Then, holding the black top in place rotate the silver
portion of the dial until it is set in the right position (Figure 14). Tighten the side screws to secure the settings.
Now you are ready to head to the range.
Zero at the range
Since the precise long-range zeroing procedure involves real shooting it is to be carried out outdoors with as little wind effects as possible.
This method can be used with much longer shooting distances like 200 or 300 meters. Nevertheless, you may want to choose a range that
appears most appropriate for your perspective targets, which is usually 100 meters.
1. Make sure the rifle is securely supported on sandbags or a bipod. Take as much of your body out of the equation as possible by not
unnecessarily touching the rifle.
2. Load the rifle, place the aiming mark on the target 100 meters away, and using all of your effort, fire off the steadiest, most careful shot
you can.
3. Note where the shot went. Was it high? Was it low? The best way to check this is by actually walking up to the target and looking at it. If
that is not possible a spotting scope or binoculars will do.
4. Carefully look through the scope and place the aiming mark on the center of the target (Figure 15).
©2013 kalinkaOptics Inc.
www.kalinkaoptics.com
10
Figure 15
5. While holding the rifle steady, turn the windage and elevation turrets so that the mark drift from the center of the target to the hole of the
shot you previously made.
6. Fire another round, aiming through the scope for the center of the target. Your shot should be dead on. If not, repeat steps 4 and 5.
7. After the scope is zeroed the adjustment turrets' dials are to be set in correct positions, which is "1" (i.e. 100 meters) for elevation and "0"
for windage. Follow the same instruction as in the pre-zeroing procedure given above in step 7.
8. Now that your rifle and scope are now zeroed for 100 meters, you may want to fire off a 3-5 shot group to make sure that the settings are
correct.
Pre-zeroing with a laser bore sight
A good laser bore sight will put you on paper. This easy-to-use product helps the sighting process go much smoother and can get a shooter
within four inches of the bull's-eye at 100 yards.
Figure 16
Bore sights generally come in two types: the ones that go into the chamber like a real cartridge and the ones that are to be attached to the
front of the barrel (Figure 16). In any case this device is needed to produce a laser beam coming strait out of the barrel. Thus, you can
conveniently see through the scope both the laser spot covering the target and the aiming mark. Adjusting the scope, you can make the two
points overlap without even taking your eye off the ocular.
Laser aiming provides more precision than an iron sight. That is why this method is considered to be more advanced in comparison to
regular pre-zeroing. Aside from using a laser spot instead of an open sight, the pre-zeroing routine is the same as described above.
Figure 17
©2013 kalinkaOptics Inc.
www.kalinkaoptics.com
11
Despite all advantages, bore sight zeroing has an obvious drawback stipulated by divergence of the strait laser beam and the declining real
bullet trajectory (see Figure 17). Therefore, the more range we have the less accuracy we get. That is the reason why bore sights won't work
well at relatively long distances. Most manuals recommend aiming at a target that is 25-50 meters away.
No matter how good your bore sighting is the final sight-in will be shooting the firearm. If you want to achieve a maximum of accuracy you
should zero your optic scope with live ammunition as described above.
Final notes
One should keep in mind that aside form precise zeroing the scope, there are other factors affecting accuracy of shooting. In addition to
weather conditions that may influence the trajectory, your zero changes any time you:
Use a sufficiently different load of ammunition than you zeroed with
Use a heavier or lighter bullet than the bullet you zeroed with
Hold the rifle differently or have a different check weld than you originally zeroed with
Have a different eye relief than you originally zeroed with
Shoot at a different range than you originally zeroed with
©2013 kalinkaOptics Inc.
www.kalinkaoptics.com
12
USING THE SCOPE
AIMING
This manual only gives very general guidelines on using and handling an optic scope. Intricacies of marksmanship go far beyond the scope
of this publication.
Most of the scope functions you may need are covered in the previous sections. Make sure that you've gone through all setup procedures
and correctly mounted the scope before you start using it.
General
While aiming you must put your eye on the optical axis of the scope so the image appears flat and without shadows on the edges. Using the
rubber eyepiece will help you to properly align your eye on the optical axis and ensure the proper eye relief. Use the extendable shade
available on some models for shooting at bright daylight conditions to prevent sunshine directly striking the objective lens and preventing
excessive glare.
Aiming and shooting at fixed targets
Adjust the elevation turret with respect to the range to the target, which would be "1" for 100m, "2" for 200m, etc., if you use ammo other than
the one the scope is intended for, figures on the elevation turret dial will correspond to different range values in accordance with your own
ballistics card.
Assuming there is no cross wind, keep the windage turret at the “0” position.
Aiming and shooting at moving targets
While shooting at moving targets it is necessary to aim ahead of the target. To determine how far the aiming point has to be taken out you’ll
need to estimate the speed of the target and the distance to it. The faster the target moves and the further the distance to it the further ahead
you’ll have to aim. Have the moving target aligned with horizontal hairs of the reticule as you are aiming.
SAFEKEEPING
Avoid hard strikes to the scope or dropping it. After using the scope in wet conditions wipe it with dry soft cloth and leave it to dry out at a
temperature not exceeding 112 F°. To protect the glass surfaces of the scope always use objective lens and eyepiece covers when the
scope is not in use. When not in use keep the scope in a dry place at room temperature with humidity not exceeding 80%.
NEVER ATTEMPT TO FIX THE SCOPE YOURSELF OR TAKE IT APART FOR
WHATEVER REASON. DOING SO WILL VOID THE WARRANTY.
©2013 kalinkaOptics Inc.
www.kalinkaoptics.com
13
WARRANTY
The scope meets or exceeds the quality standards set forth by the manufacturer and its technical specifications match those listed in this
manual.
Kalinka Optics Warehouse® offers its Unbeatable Full 12-month Factory Warranty on all products sold against defects in workmanship and
materials for one year from date of purchase. Absolutely no returns or warranty claims will be processed without a Return Authorization
Number, see the site for details. If maintenance or feasible and justifiable repairs have to be done upon expiration of the warranty period, all
costs related to these services are the responsibility of the customer.
Thanks for Shopping with US!
For further questions or additional information please contact:
KalinkaOptics Inc.
406 S Marine Blvd. Suite #2
Jacksonville, NC 28540, USA
E-mail: [email protected]
Phone: +1 (910) 989-0109
Fax: +1 (888) 817-8097
©2013 kalinkaOptics Inc.
www.kalinkaoptics.com
14