1
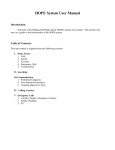
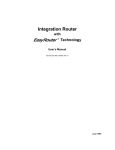
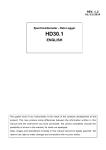
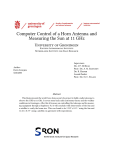
Desktop Integration Manual Version 1.1 Page 2 of 20 Contents Chapter 1 What is Desktop Integration? _____________________________ 3 1.1 What are its main benefits? ____________________________________ 3 1.1.1 New Messages __________________________________________ 3 1.1.2 Stored Messages _________________________________________ 3 1.1.3 New Calls. _____________________________________________ 3 Chapter 2 Software Installation _____________________________________ 4 Chapter 3 Software Configuration ___________________________________ 6 Chapter 4 Using the software _______________________________________ 7 4.1 New Messages______________________________________________ 7 4.1.1 Message information ______________________________________ 8 4.1.2 Character Meaning _______________________________________ 8 4.1.3 Playing messages on a telephone______________________________ 8 4.1.4 Playing messages on the PC _________________________________ 8 4.1.5 Copying Messages ________________________________________ 9 4.1.6 Deleting a Message _______________________________________ 9 4.2 Faxes ___________________________________________________ 10 4.2.1 New Faxes ____________________________________________ 10 4.2.2 Viewing a Fax __________________________________________ 10 4.2.3 Sending a Fax __________________________________________ 10 4.2.4 Copying a Fax __________________________________________ 11 4.2.4 Deleting a Fax __________________________________________ 11 4.2.5 _____________________________________________________ 11 Chapter 5 Mailbox - Configure _____________________________________ 12 5.1 General__________________________________________________ 12 5.2 Notifications ______________________________________________ 13 5.3 Personal Groups ___________________________________________ 14 5.4 Dial Forwarding____________________________________________ 15 5.5 Greetings ________________________________________________ 16 5.6 Caller ID _________________________________________________ 17 5.7 Web and SMS _____________________________________________ 19 Chapter 6 Mailbox Directory _______________________________________ 20 Desktop Integration Manual 1.1 Voice Connect 1997-2002 Page 3 of 20 Chapter 1 What is Desktop In tegration? Desktop Integration gives you full control of your mailbox - through your PC. See and/or hear all your new and stored voice, fax and e-speech messages in one place on your PC. Starting with the initial on-screen pop-up, Desktop Integration allows you to access all areas of your mailbox. From there you can view, copy and edit messages, create and edit personal groups, and keep a directory of extensions from your department, company and the telephone numbers of your regular callers. Desktop Integration has been designed primarily to help staff who are office based PC users. Although active all the time, Desktop Integration sits virtually unnoticed in the corner of the PC. It pops-up onto your screen when a new call or message arrives. It also allows you to view the contents of your mailbox from the screen. This makes deleting unwanted stored messages or tasks such as setting up or changing personal distribution groups much quicker and simpler. 1.1 What are its main ben efits? It helps users to take control of their messages from a single source in three main areas: 1.1.1 New Messages A screen pop-up notifies you when a new message (voice, fax or e-speech) has been left for you. Then without ever dialling from your phone, it lets you see or hear that message either over your PC’s speakers or listen to it over the telephone. 1.1.2 Stored Messages When you want to check back, delete or copy an old message, Desktop’ Integration’s visual format makes it much faster and easier to pinpoint the message you are interested in. 1.1.3 New Calls. Desktop Notification’s pop-up appears on your PC screen seconds before a new telephone call arrives, normally revealing the callers CLI. It even lets you set up a list of your regular caller’s details, so that their name is revealed on screen before you even speak to them! This gives you a chance to adjust your telephone greeting to suit the caller. For new and stored messages, the on-screen menu lets you see the type of message (fax, e-speech or voice) as well as status (urgent, private, conformation or reply requested). Combine these with all the other features of Desktop Integration and you’ll see why it gives you so much freedom and control over your mailbox. Desktop Integration Manual 1.1 Voice Connect 1997-2002 Page 4 of 20 Chapter 2 Software Installatio n The software will be delivered in two ways, either on a CD to take round to each PC, or in a shared folder on the voicemail PC to be accessed across the local network. Double click on the set-up file, the following screens will show. Click on yes, and next where appropriate. Desktop Integration Manual 1.1 Voice Connect 1997-2002 Page 5 of 20 If you are asked to reboot the PC, then do so before using DTI. Desktop Integration Manual 1.1 Voice Connect 1997-2002 Page 6 of 20 Chapter 3 Software Configura tion Once installed the software is configured by selecting the “setup” option from the “file” menu. This displays a setup page as shown in Fig, 01 Fig, 01 Type the mailbox number in the mailbox field, (do not enter the extension number). Type in the password in the password field, if the user wants the software to remember the password then click in the tick box, if however they want to enter it every time they use it then leave the tick box empty. Note every function in the software requires the password. Fig, 02 Click on the communications button to check that the software is communicating with the voicemail. Click on check. Fig, 03 Click on ok to this reply then ok to the communication screen. Desktop Integration Manual 1.1 Voice Connect 1997-2002 Page 7 of 20 Chapter 4 Using the software 4.1 New Messages When a message is left in the mailbox the software will pop up from the taskbar or in tray and show the number of new and old messages in the mailbox as shown in Fig, 04 The text will display as red to draw attention to the new messages. The software is designed to pop up but not interfere with any typing. The window will float above any others on the desktop until the mouse is clicked anywhere in the display area. Once clicked on, the text will turn to black and will then hover behind any used windows. Fig, 04 The display will also pop up when an incoming call is being transferred from the Auto Attendant to your extension. The telephone number calling you will be displayed, if the incoming Caller Line ID is available as shown in Fig, 05. Fig, 05 Fig, 06 Double-clicking in the display text, will show the current mailbox contents as shown in Fig. 07 also if you select mailbox followed by “View Messages” will bring you to the same screen as shown in Fig, 06. Fig, 07 Desktop Integration Manual 1.1 Voice Connect 1997-2002 Page 8 of 20 4.1.1 Message information For each message the software displays the name of the person who left the message, the Calling Line ID, the time the message was sent and the flags associated with the message. The name is only displayed when the message is sent from another mailbox in the system. Calling Line ID is given where available and is dependent on the features present on the telephone system. The flags give additional information about the content of the message and are made up of characters from the following table: 4.1.2 Character Meaning P Private message C Copied message G Group message U Urgent message N Notification requested (i.e., the person who left the message requested confirmation of delivery) R Reply requested E E-speech message T Timed message n Notification message r Reply message 4.1.3 Playing messages on a tele phone By double clicking on the text in the centre of the Desktop Integration window displays a list of messages in the mailbox. button. The screen in Fig, Highlight the required message and click on the 08 will appear. Enter the extension number of the phone that the message is to be played on and click ok. Numbers that begin with zero and are greater than six digits in length are assumed to be external telephone numbers. All other numbers are assumed to be internal. There is no need to prefix the callback number with any external access digit (commonly 9) as the voicemail system will automatically handle this. Fig, 08 When the telephone rings answer it in the usual manner and the message will automatically play. The same procedure works for stored messages. Click on the stored messages tab and then choose how the message should be played, either on the PC or over the telephone. 4.1.4 Playing messages on the P C By double clicking on the text in the centre of the Desktop Integration window displays a list of messages in the mailbox. Highlight the required message and click on the button. The message will be played through whichever software media is used on the PC to play Wav files. Desktop Integration Manual 1.1 Voice Connect 1997-2002 Page 9 of 20 The message will then be heard on the users PC through the PC speakers, as long as they have a sound card installed. 4.1.5 Copying Messages Highlight the required message and then click on the screen in Fig, 09 will appear. button. The Fig, 09 This screen enables the user to pick from a list who they want to copy the message to. To search just for other users make sure there is a tick in the Users tick box and none in the others. Users, Groups and Personal Groups are ticked by default. If the message is to be flagged with either Private, Urgent, Confirmation, or Request reply then tick the appropriate box. If the facility delayed delivery is required then click in the tick box then choose a date and time in the field next to for when it should be delivered. Once all the selections have been made click on copy. The copy button then changes to copy again and the cancel button changes to done. If no more copies are to be made then click on the done button. 4.1.6 Deleting a Message Highlight the required message and then click on the screen in Fig, 10 will appear. button. The Fig, 10 Desktop Integration Manual 1.1 Voice Connect 1997-2002 Page 10 of 20 4.2 Faxes 4.2.1 New Faxes To retrieve new faxes that have been sent to the mailbox, double click on the text in the centre of the window to show all the messages in the mailbox. Now click on the New Fax tab as shown below. Fig, 11 4.2.2 Viewing a Fax By double clicking on a fax this will display the fax on the screen of the PC, the fax display can then be printed or saved to disk. Alternatively highlight the required fax with a single left click and then click on the button. This will also show the contents of the fax on screen. 4.2.3 Sending a Fax To send the fax to a fax machine click on the screen will appear. button. The following Fig, 12 Type in the telephone number of the fax machine where the fax should be sent. Type the whole telephone number including the STD code if it is an external fax machine or type in the extension number of an internal fax machine. Numbers that begin with zero and are greater than six digits in length are assumed to be external telephone numbers. All other numbers are assumed to be internal. There is no need to prefix the number with any external access digit (commonly 9) as the voicemail system will automatically handle this. Fig, 13 Click on ok. The confirmation message in Fig, 13 will show. Desktop Integration Manual 1.1 Voice Connect 1997-2002 Page 11 of 20 4.2.4 Copying a Fax Highlight the required fax and then click on the screen will appear. button, the following Fig, 14 This screen enables the user to pick from a list who they want to copy the fax to. To search just for other users make sure there is a tick in the Users tick box and none in the others. Users, Groups and Personal Groups are ticked by default. If the fax is to be flagged with either Private, Urgent, Confirmation, or Request reply then tick the appropriate box. If the facility delayed delivery is required then click in the tick box then choose a date and time in the field next to for when it should be delivered. Once all the selections have been made click on copy. The copy button then changes to copy again and the cancel button changes to done. If no more copies are to be made then click on the done button. 4.2.5 Deleting a Fax Double click on the text in the centre of the window, to show all the messages in the mailbox. Click on the Fax tab. Highlight the required fax with a single left click. Click on the button and the following confirmation message will appear. Desktop Integration Manual 1.1 Voice Connect 1997-2002 Page 12 of 20 Chapter 5 Mailbox - Configure This option gives complete access to most functions of the mailbox. 5.1 General Fig, 15: General tab in configuration section The general tab enables the mailbox user to disable their voicemail, enable or disable call screening, do not disturb, and disable e-speech. The call screening and e-speech options can only be turned on and off if the mailbox user has been given these options by the system manager. Call screening and Do not disturb are class of service options which the system manager enables in the Voice Connector editor. Disable voicemail is a default mailbox option, and e-speech is an extra module on the Voice Connector II. E-speech is a facility of sending a copy of your email to your mailbox, and then converting it to speech so that it appears as a voice message in your mailbox. The password for the mailbox can also be changed from this screen. Desktop Integration Manual 1.1 Voice Connect 1997-2002 Page 13 of 20 5.2 Notifications Fig, 16: Notification tab This screen enables the mailbox user to edit any schedules that are already set against their mailbox by the system manager. Schedules can not be added or deleted from this screen. The schedules are the times and days that the Voice Connector II alerts a mobile or pager of a voicemail message being received in the mailbox. The schedule also denotes when a text message (SMS Notification) is sent to a mobile to alert of a voicemail message. SMS Notification is also an extra module on the Voice Connector II. The number for the call-backs or the SMS mobile can be changed by editing the “Number” field. If the number is changed make sure that the “Number type” field is set to the right option, internal or external number. The type of call-back can also be changed, amongst the options are various types of pagers, and different cellular providers for SMS. Any changes that are made, click on apply and then ok to close the screen. Desktop Integration Manual 1.1 Voice Connect 1997-2002 Page 14 of 20 5.3 Personal Groups This is a function that is allowed by the system manager to enable personal groups for a mailbox. Personal Groups enables a user to send one message to several mailboxes. These mailboxes can be a pre-defined list set up by the mailbox user. This list of mailboxes is personal to the user and no other mailbox user has access to it. The number of groups that can be set up by a user, for their mailbox, is also determined by the system manager in the class of service. Instructions on how to set up personal groups via the telephone are in the User Guide. If this function is allowed then the personal groups that are set-up can be shown here. Fig, 17: Personal groups tab The left hand list box shows all the mailbox users on the Voice Connector II. This enables the user to select anyone in the company by clicking on their name and then clicking on the add button. This will then add their name to the right hand list box. Where the member can be enabled or disabled whenever necessary. By clicking on the “Add DD” button, this will deliver the message that was recorded for the personal group, straight to a telephone number rather than a mailbox. Once this button is clicked an extra field will show, “Direct Delivery”, to enable the user to type in the telephone number. This will either be an internal extension number or an external number typed in full, including the area code. However many groups are allowed to be created by the user, they must always start at number 10. Desktop Integration Manual 1.1 Voice Connect 1997-2002 Page 15 of 20 5.4 Dial Forwarding Dial forwarding is a function associated with an extra module called VC Smart Desk. It allows a caller to dial a users mailbox via the Auto Attendant and be transferred to another number without the callers knowledge. The system manager enables this feature. Fig, 18: Dial forwarding tab The number for the caller to be diverted to is in the “Number to Dial” field. As the user types, towards the left hand side of it the “type” indicates internal, if more than five digits are typed starting with zero then the “type,” automatically changes to external. If the leading digit is not a zero then the “type” will stay as internal with no regard of the length. “Number of Attempts” is the amount of attempts the Voice Connector will try the “Number to Dial” to gain an answer. “Ring time” is how long the number will ring for before it is determined that there is no answer from that number. There are three different answer styles. None, single digit, and password. Password is the recommended type as this ensures that the caller has reached the correct destination. The password that is required is then typed in the password field. (4digits) The change button allows the Line Access password to be changed, (if the old password is known). The line access password is the password that is required for changing the external dial forward number via the telephone. Before the system allows the user to change the external number, they are asked for this password. For further information about dial forward (VC Smartdesk) please refer to the System Mangers Manual and the User Guide. Desktop Integration Manual 1.1 Voice Connect 1997-2002 Page 16 of 20 5.5 Greetings Greetings, enables the user to have two personal greetings for their mailbox. One as their standard greeting and then an alternative greeting to play at specified times and dates. Fig, 19: Greetings tab From the above example it can be seen that the alternative greeting is played from 20th July 2001 at 09:00 to 27th July 2001 at 17:00. This could be a greeting that says the user is on holiday and unable to return any calls. This greeting will then automatically replace the standard greeting for the above time scale. To use this feature, it needs to be enabled by the system manager. Once enabled there will be extra options in the Greetings menu in the mailbox. Make sure the alternative greeting has been recorded before setting dates and times for it. For help with recording greetings please refer to the user manual. Desktop Integration Manual 1.1 Voice Connect 1997-2002 Page 17 of 20 5.6 Caller ID This is a facility that enables the user to enter a personal directory. Any names and numbers in this directory are used in conjunction with SMS and email Notification. These are two separate facilities and are extra modules on the Voice Connector II. If the Voice Connector has these modules then any names and numbers that are entered in the screen will appear as part of the text message for SMS or part of the email notification. Fig, 20: Caller ID tab Following the above example, the user is left a message by Liz Scotney, the user receives a text message notifying them that they have a voicemail waiting, as part of the text, it tells the user who the message is from, picking up their name from the caller ID list. The same occurs for email notification and DTI (Desk Top Integration). This list is also used for Caller Line Identity (CLI). As mentioned earlier when the Auto Attendant transfers a call to the users extension the CLI (if enabled on the telephone system) will show on the pop up screen as shown in Fig, 21 Fig, 21 Fig, 22 Fig, 23 Desktop Integration Manual 1.1 Voice Connect 1997-2002 Page 18 of 20 To add the number being displayed, click on the “Add CLI” button, the screen in Fig, 22 will show. Type in the name of the person or company and click on ok. Now the next time they call the name and number will show as seen in Fig, 23. Fig, 24 As shown in Fig, 24 the new name now shows in the CLI list. Desktop Integration Manual 1.1 Voice Connect 1997-2002 Page 19 of 20 5.7 Web and SMS Web and SMS are extra modules for the Voice Connector II. This screen allows the user to connect to the intranet to administer and view their messages in their mailbox in web format The SMS part allows the user to send text messages to mobiles. Fig, 25: Web and SMS tab To connect to the web interface, click on the Connect now button, when the web interface launches via internet explorer there is a login page where the user has to enter their mailbox and password. The “change web password” button allows the user to change their web password, (providing they know their old one). To send a text message, type in the complete mobile number in the “Cellphone number” field, then type the required message in the box below. Under the message box is an indication of how many characters have been used and how many are left. Once the message is finished click on the “Send” button. Desktop Integration Manual 1.1 Voice Connect 1997-2002 Page 20 of 20 Chapter 6 Mailbox Directory Fig, 26 By clicking on Mailbox then “View mailbox directory” as shown in Fig, 26, the screen in Fig, 27 will show. Fig, 27: Mailbox directory This screen just shows which users have mailboxes on the Voice Connector II, and what those mailbox and extension numbers are. Desktop Integration Manual 1.1 Voice Connect 1997-2002