1
INSTALLATION INSTRUCTIONS
Note: The following instructions are for typical rear-view
application.
STSC108 CAMERA
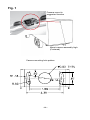
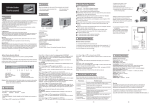
1. Attach camera bracket close to rear marker lights, centered on vehicle (see Fig. 1).
Attachment point must be sturdy enough to support camera and bracket.
2. We do not recommend mounting the camera near the lower area of the
vehicle (ex: bumper). This reduces the view of the camera and increases
the chance of physical damage to the camera.
3.
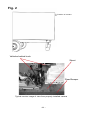
Attach camera to bracket using screws provided. Adjust angle as indicated
in Fig. 2. (Use rear bumper and back of vehicle as a reference point.)
4.
Wind deflector may be installed. This deflector is designed to reduce the
buildup of dust, dirt and moisture on the camera lens. (See Fig.3)
STSM212 MONITOR
1. Attach monitor inside vehicle in a location convenient to the driver
(ex: center of dash, overhead, or flush-mounted in dash).
2.
Attach the “duckfoot“ bracket to the dashboard or to the headliner
using self-tapping screws and/or adhesive pad.
3.
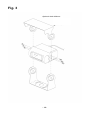
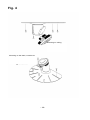
Fasten monitor to “duckfoot“ and adjust mounting angle to allow optimum driver
viewing comfort. (See Fig. 4.)
CABLE
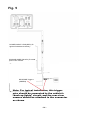
1. Be sure to position the cable properly. The male end attaches to the camera.
The female end attaches to the power/video/audio distribution harness, typically
located under the dashboard.
(See Fig. 5.)
2. Do not run the cable over sharp edges or corners. Do not kink the cable.
Keep the cable away from hot and rotating parts.
3.
Fasten all cable runs, and secure all excess cable.
-5-