1
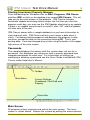
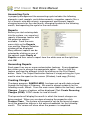
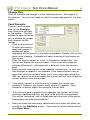
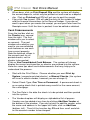
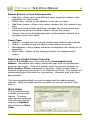
Investment Property Manager
Classic
Test Drive Manual
A brief guide to making the most
of your trial of IPM Classic
FullHouse Software, Inc.
www.fullhousesoftware.com
800.653.8428
IPM Classic Test Drive Manual
2
Overview
Investment Property Manager provides a general ledger program for
accounting, accounts payable with check writing capabilities. IPM Classic
is perfect for occupant management for income producing properties
including residential, commercial, mini-storage, home owners’ and
condominium associations.
The purpose of this guide is to familiarize you with IPM Classic’s basic
functionality and screens. It’s designed to go through in one sitting, and
takes about 20-30 minutes.
System Requirements
IPM Classic requires at least a Pentium CPU with at least 100 MB free
hard drive space, 1 GB of RAM, a printer, a fast internet connection and
Windows 95 or later.
Installing Investment Property Manager
IPM Classic can be installed from our web site,
www.fullhousesoftware.com. Follow the link to the “Download” page,
then find the link to IPM Classic, and click that. Depending on your
version of Windows and the browser you use, the dialogs that follow will
differ, but in any case “Run” the installation to install IPM Classic or
“Save” it to install later or put on a CD.
IPM Classic installs in “Demo” mode, but can be turned into either the
Unlimited or Basic licensed version by the click of a button once you’ve
purchased. If you need assistance, call FullHouse Software at
800.653.8428.
FullHouse Software, Inc
800.653.8428
www.fullhousesoftware.com
IPM Classic Test Drive Manual
3
Starting Investment Property Manager
From the desktop for Windows click on Start, Programs, IPM Classic
and then IPM, or click on the desktop icon named IPM Classic. This will
take you to the main screen of the program. IPM Classic includes
Automatic Update technology which means the first time you start the
program each day, you may see the IPM Updater checking for an update.
If there is an update and you want to install it, click “OK” and the Updater
will take care of the rest.
IPM Classic comes with a sample database so you have information to
view and work with. IPM Classic will ask you to enter a date when it
starts. For demonstration purposes and because the program is date
sensitive, accept the date on the screen by clicking OK. That’s your
posting date. It can be changed at any time using the button in the upper
right corner of the main screen.
Passwords
The sample database that comes with the system does not ask for a
password. Any database you setup can have a master password and
separate passwords for each user. For information on setting up,
modifying or deleting a password see the Users Guide installed with IPM
Classic under Help/User’s Manual
Toolbar
Main Menu
Current Settings:
Checkbook, Post Date and
Property
Status Bar
Main Screen
All program actions originate and end at the main screen. The main
screen is shown above. Explore the system by putting the mouse pointer
FullHouse Software, Inc
800.653.8428
www.fullhousesoftware.com
IPM Classic Test Drive Manual
4
over each icon and left clicking. This will help you become familiar with
the different sections of the program. Clicking on the OK or Cancel
button on the lower right corner of each window will automatically return
to the previous window.
Database Basics
IPM uses a database –like a complex spreadsheet – to contain data
about your business. IPM’s database is organized into ‘Checkbooks’ that
roughly correspond to the operating account you have at the bank. Each
Checkbook manages ‘Properties’ (or ‘Communities’ for HOAs) in IPM;
each ‘Property’ has one or more units, and each unit has one or more
‘Tenants’ . (or ‘Members’). We include a sample database with several
checkbooks already set up, with properties, units and tenants to work
with.
Selecting a Checkbook
We have four preset and different checkbooks: residential, commercial,
mini-storage and condominium and home owner associations. From the
main screen under Current Settings, located on the top right of the
screen, click on the button next to the word “Checkbook.” A window
containing all the checkbooks in this database will be displayed. Click on
the checkbook you wish to make active. A window showing all the
properties within the active checkbook will open. Click on the property
you wish to make active. A box will ask you for the system date, either
enter a new date or press the Tab key to select the date displayed.
Selecting a property
Make sure that you are in the correct checkbook. If not, change the checkbook.
Click on Checkbook under Current Settings in the right hand corner of the
screen and the Select Property window will be displayed. Click on the
desired Property. That property is now active and the Select Property
window will close.
Changing the Date
Click on Date under Current Settings in the right top corner of your
screen. The Post Date window will be displayed. Enter the new Post
Date using the MM-DD-YYYY format. The year must have four digits.
Click on OK. IF the date is more than 30 days from the previous Post
Date the system will display a warning message. If the new date is
correct click OK. If the new date is wrong click Cancel and reenter the
new date. If the year is incorrect because either; only two digits were
entered or it was outside the fiscal year, click OK and reenter the correct
Post Date. If the date is within the proper range the Post Date window
will close and the new Post Date will become effective.
FullHouse Software, Inc
800.653.8428
www.fullhousesoftware.com
IPM Classic Test Drive Manual
5
Accounting Cycle
In property management the accounting cycle includes the following
elements: cash receipts, cash disbursements, exception reports (like a
list of tenants who did not pay), management and financial reports,
charging tenants for the new month, changing the date to the following
month, and repeating the cycle for the next month.
Reports
Before you start entering data
into the system, run some test
reports to become familiar with
the extensive options
available. From the main
menu click on the Reports
icon and the Reports Selection
window will be displayed.
Many different reports can be
selected by clicking on one of
the options under Family of
Reports and then select a report from the white area on the right then
click OK.
Generating Reports
Each report has one or more customization features. Every dropdown
box allows you to choose the appropriate option. Have fun with this
feature and view the different results by clicking on the Print Report
button. Note: The Output Destination feature is simply asking you if you
want to view the report on the screen (Window), hard copy (Printer).
Creating Charges
The demo program, SAMPLE.MDB, has been set up with data entered
through the last day of February. We want to charge residents for the
following month, March. From the main menu (above the tool bar), select
Charges. A menu of options will be displayed. Click Create Recurring
Charges (EOM). ‘EOM’ stands for ‘end of month’.
The top center will display the month in which the tenant charges are
being created. When you are done choosing the properties click
Process Close. The system will proceed to set up the tenant charges,
for all the properties chosen in the active checkbook, for the following
month. This screen will close when the process is completed.
FullHouse Software, Inc
800.653.8428
www.fullhousesoftware.com
IPM Classic Test Drive Manual
6
Change Date
Click on the date and change it to the following month. See page 4 of
this manual. You are now ready to start the accounting cycle for the new
month.
Cash Receipts
To enter cash receipts
click on the Receipts
icon, third from the right
on the toolbar. The first
window to open will allow
you to choose the proper
cash account for the
receipt.
• Click on the account
to which you want to
apply the receipt. A
window will open
displaying all the tenants in the active checkbook. Double-click on the
tenant who’s paying. A window will open showing all information on
that tenant.
• Enter the check number or “cash” in the check number field. The
system will display the amount owed. If this is correct accept the
entry by hitting enter; if the payment is different, enter the amount
paid.
• Every amount received has to be “applied” somewhere – to rent, onetime charges or deposits, for example. If the amount paid is less or
more than what the resident owes, you’ll see a message telling that
IPM can “guess” at where to apply the money, but you have to put the
correct amount in the correct box.
•
If the check amount is less than what is owed, the system can
allocate it, however, you need to verify where it’s applied. If the
allocation is wrong, adjust the amounts in each field.
•
If the amount paid is greater than expected, the system will fill the
amounts expected and then ask what to do with the over payment.
You will be “locked up” until all fields add up to the total of the check.
Every penny must be accounted for!
•
After you make the necessary adjustments the system will allow you
to click on the Add Entry button. If you wish to select another tenant
click Enter More.
FullHouse Software, Inc
800.653.8428
www.fullhousesoftware.com
IPM Classic Test Drive Manual
•
•
7
When done, click on Print Deposit Slip and the system will display
the current deposits, which may be printed out and used as a deposit
slip. Click on Finished and IPM will ask you to post the receipt.
If you click Yes to post, IPM will add the entry to the resident’s ledger
and the financial transactions to the General Ledger. If you do not
want to post when you create the receipt, you can post later from the
Receipts menu. Until the item is posted, it can be edited or deleted.
Cash Disbursements
From the tool bar click on
the Checks icon, second
from the right. The first
window asks you to select
an account. The next
window asks whether you
want to use consolidated
cash balance or use cash
from current property.
Note the balance shown is
the current cash for all
posted checks, not for
checks to be posted.
Click on Use Consolidated Cash Balance. The system will always
display the current cash position as checks are entered into the system.
Here are some tips about cash disbursements that may help you to
understand the process.
•
Start with the Print Status. Choose whether you want Print by
System ( computer printed checks), or Manual Checks ( the system
will insert a check number, however you can change it).
•
Select Check Type, One Time or Permanent. A permanent check is
an on-going check that is printed every month for the same amount,
like a mortgage.
•
The Due Date is the date the check is to be printed and then posted
into the system.
•
The Vendor drop box will display an alphabetical list of payees.
Vendors can be added at any time by clicking Add New Vendor at
the bottom of the window. If you do not wish to add the vendor, enter
the name and address in the upper left fields, click on Add Item
(bottom, left). Then hit the function key F5 and then scroll and click
on the account number to be charged.
FullHouse Software, Inc
800.653.8428
www.fullhousesoftware.com
IPM Classic Test Drive Manual
8
Bottom Buttons in Cash Disbursements
• Add Item—allows up to nine different items (account numbers and
properties) for each check.
• Delete Item—allows for the deletion of any item or items.
• Add New Vendor—allows you to enter vendors into the system at any
time.
• Save and Close or Save and New—accepts the current check and
allows for the entry of another check or closes the screen.
• Cancel—the currently displayed check will be deleted, and will take
you back to the main menu.
Check Class
• Regular—vendor one time check or permanent check to be entered.
• Owner— a check to pay out equity or earnings to an owner
• Management—will compute and write management fee checks for all
properties
• Work order—allows for the writing of checks for complete work
orders.
Entering a Vendor Check Overview
Click on the Checks icon, then click on the Consolidated Cash
Balance. Accept the print status and check type, click on the drop box
arrow for the vendor. Click on a vendor, enter the amount and click on
Enter Another Check and repeat the process. After the last check is
entered, make sure your printer is on and click on Finish. The system will
automatically print the checks on your printer. Now post after they have
been printed.
You have completed both the cash receipts and the disbursements
sections. Now you might want to run reports to see the results of your
efforts.
Work Order
The unlimited version
includes a work order
feature. The work
order can be accessed
from the menu bar by
clicking on Updates,
then clicking on Work
Order.
FullHouse Software, Inc
800.653.8428
www.fullhousesoftware.com
IPM Classic Test Drive Manual
9
1. Click on Add at the bottom of the window.
2. Click on the box next to Property, a window will open showing a list
of properties. Select the property by clicking on it.
3. Click on the box next to Unit, a window will open showing a list of
units for the chosen property. Select the unit by clicking on it.
4. In the large Description box write a note about the work to be done.
5. Click on Vendor and Costs, right side of the window.
6. Click on Account Number, select the general ledger account to be
charged.
7. Click on Estimated Cost, enter a dollar amount.
8. Click on Vendor, select a vendor from the list.
9. Click on Save.
10. After making sure your print is on, click on Print Order Form. This
will create a hard copy suitable to mail with a size 9 or 10 window
envelope.
Move-in and Move-out
The system includes easy, consolidated move-in and move-out features.
These will automatically pro-rate and post a check for rent and security
deposits. It will also write a check refunding returned security deposits or
make automatic general journal entries for forfeited security deposits.
Please call for a demonstration of these features.
You can also add or delete residents by clicking Add or Delete on the
tenant screen. This applies to Checkbooks, Properties, Units and
Vendors, too!
Exiting the System
To exit the system go to the menu bar and click on File and then Exit.
The system will remind you to backup your work. Then it will take you
back to your Windows desktop.
Review
Of course this guide has only scratched the surface of the features and
functions of IPM Classic. You may have gone through the basic
accounting cycle of creating charges, receiving cash receipts, making
cash disbursements, and running reports but there’s so much more to
your business! If you would like assistance, a personal walk through, or
have any questions please feel free to call us at 800.653.8428 or email
us at [email protected]. We’d be glad to do a demo of
IPM, with absolutely no sales pressure.
FullHouse Software, Inc
800.653.8428
www.fullhousesoftware.com