1
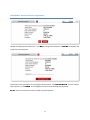
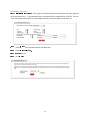
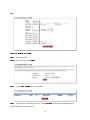
Dart Express Net
Cash Management
User Manual
Table of Contents
Logging In .................................................................................................................................................. 1
Changing Your Password........................................................................................................................... 2
Cash User Login Screen............................................................................................................................. 3
Cash Management User Single Sign On.................................................................................................... 4
Navigation ................................................................................................................................................. 5
Account Listing Page ................................................................................................................................. 6
Account Activity Options .......................................................................................................................... 7
Transactions .......................................................................................................................................... 8
Transfers ............................................................................................................................................... 9
Stop Payments ....................................................................................................................................11
Statements..........................................................................................................................................13
Cash Manager .........................................................................................................................................14
ACH..........................................................................................................................................................15
ACH Import (Optional) ........................................................................................................................20
Wires .......................................................................................................................................................21
ARP..........................................................................................................................................................23
Users .......................................................................................................................................................27
Reporting ................................................................................................................................................ 31
File Status................................................................................................................................................32
Options....................................................................................................................................................33
Logging In
Enter the ID assigned by the bank in the ID field and the last four digits of the company’s Federal Tax ID
number in the Password field. All users in your company share this ID and Password. Be sure to safely
and appropriately communicate it between your users.
Initial Sign On (for Company)
FIELD DESCRIPTIONS
I
P
D
The 12 digit number assigned by the bank during your account setup.
:
a
s
s
w
o
r
d
The last four digits of the company’s Tax ID Number (default).
:
To use this feature you must have entered an email address, Personal Question and
Personal Question answer in the Options page. Click on the link if your password becomes locked and
follow the instructions to reset your password.
R
e
s
e
t
P
a
s
s
w
o
r
d
:
PROCEDURES
Type the appropriate ID or ID Field, then click in or tab to the Password field.
Type the appropriate Password in the Password field
Click
t
S
u
b
m
i
.
1
Changing Your Password
The first time you sign on, or when your password has expired, you will be required to change your
password for security reasons. All users in your company share this initial ID & Password. Be sure to
safely and appropriately communicate it between your users.
FIELD DESCRIPTIONS
The password that has just expired or your default password if you are a new user or
have had your password reset.
C
r
r
n
e
t
P
a
s
s
w
o
r
d
:
u
E
n
t
e
y
r
o
n
r
e
w
P
a
s
s
w
o
r
d
The xxx digit password of your choice. This must contain xxx.
:
u
R
e
-
e
n
t
e
y
r
o
r
u
n
e
w
p
a
s
s
w
o
r
d
:
Re-type the xxx password from the previous field.
PROCEDURES
Type the appropriate password in the current password field, then click or tab to the next field.
Type the new xxx password of your choice, then click or tab to the next field.
Re-enter the exact xxx password that you entered in the previous field.
Click
t
S
u
b
m
i
.
2
Cash User Login Screen
Enter the Cash User ID and Password assigned by the bank. This ID is unique to each user.
FIELD DESCRIPTIONS
C
a
s
h
M
n
a
a
g
e
e
n
t
I
e
n
t
P
D
The unique ID of each Cash Management User. IDs are case sensitive.
:
m
C
a
s
h
M
n
a
a
g
e
m
a
s
s
w
o
r
d
:
The password established for your Cash User ID. Passwords are case
sensitive.
PROCEDURES
Type the appropriate User Name in the Cash Management ID field, then click in or tab to the Password
field.
Type the appropriate Password in the Cash Management Password field.
Click
o
L
g
n
i
.
3
Cash Management User Single Sign On
Upon initial login, and Cash User password change, you will be prompted to enter a new, unique Single
Sign On ID and Password. This ID and Password will be used as the signon information on all subsequent
logins. Each time you log in you will enter this information in the ID and Password fields versus the login
for the company.
4
Navigation
Note: All available modules are displayed here. Modules enabled for the user will depend on your user
access.
O
p
t
n
o
f
s
o
r
e
c
a
h
o
i
a
v
d
e
m
a
a
e
l
i
p
o
t
o
l
b
n
s
f
o
r
e
a
r
e
a
a
t
e
d
w
c
h
o
h
t
l
i
n
n
l
i
c
o
l
u
i
e
a
b
n
k
n
i
n
t
h
e
t
f
a
i
b
g
o
m
d
e
u
o
r
t
h
a
t
o
m
d
e
u
l
.
C
c
l
i
k
t
h
e
t
a
t
o
a
c
c
e
s
s
t
h
e
b
.
l
FIELD DESCRIPTIONS
M
: Access accounts and account activities, view interest rates, and order checks.
n
a
i
B
P
l
i
n
e
: Establish payees, schedule and review bill payments and bill payment history.
t
m
C
a
y
a
l
h
s
M
a
n
a
g
e
r
: Access the ACH, Wire, and ARP modules, User administration, and Reporting.
: Change PIN/Password information, email address, Account settings, default Display options,
and establish Alerts.
O
p
t
o
n
s
i
5
Account Listing Page
Note: All available fields are displayed here. Fields enabled for the user will depend on your user access.
Accounts are separated into three categories: Deposit, Loan, and Other. You will only see categories
and accounts to which you have been given access.
FIELD DESCRIPTIONS
Balance: This is the account’s <available or ledger> balance.
Status: The status of the account – New, Dormant or Closed.
Customer Summary Information: This summarizes the total dollar amount in your deposit accounts as
well as any loan accounts.
Reset Counter: Click the Reset Counter link in the Customer Summary Information section to reset the
access counter.
View: Change the number of accounts displayed per page. Select a default display setting under
Options > Display Settings.
6
Account Activity Options
Drop-Down Menu Activities
T
r
n
a
s
c
a
t
n
o
s
View transactions posted to your account, view images, and search for specific
:
i
transactions.
D
o
n
w
o
a
d
Download transaction history in different formats (Microsoft Money, Spreadsheet, etc.)
:
l
t
p
o
P
y
a
T
n
e
S
t
m
s
:
Add or view stop payments for your account.
Add, view, edit or delete account-to-account funds transfers. Transfers that have been set up
by the bank cannot be edited or deleted.
r
n
a
f
s
e
r
s
:
Displays current day information for the selected account. This information is updated
throughout the day.
C
r
r
n
e
t
D
y
a
:
u
P
r
o
r
D
y
a
Displays prior day information for the selected account. This information is updated nightly.
:
i
t
S
a
t
e
e
m
n
t
s
:
View your account statements. Statement history is available for up to <x> months.
7
Transactions
Transactions Sub-Menu Navigation Options
C
r
r
n
e
T
t
r
n
a
s
u
a
c
t
o
n
s
i
:
View recent transactions.
Download transactions in to Personal or Commercial Financial Management software, or as
a text file or spreadsheet.
D
o
n
w
o
a
d
:
l
e
a
r
c
h
Search for specific transactions that have posted to your account.
:
S
Transactions can be sorted by clicking on the column header. Columns available for sorting are Date,
Ref/Check No., Debit, and Credit.
FIELD DESCRIPTIONS
V
Change the number of transactions displayed. Select a default display setting under
Options > Display Settings.
e
w
R
a
n
g
e
:
i
8
Transfers
Transfers Sub-Menu Navigation Options
N
e
P
w
n
e
Schedule new funds transfers.
:
g
n
d
View, Edit, and Delete scheduled transfers.
:
i
H
s
t
o
y
r
View processed transfers.
:
i
PROCEDURES – Add Funds Transfer
T
r
n
a
s
f
e
r
f
s
n
d
f
s
r
o
u
T
r
n
a
s
f
e
f
r
n
d
s
t
o
y
a
O
n
e
p
t
t
T
r
s
:
i
n
a
n
o
m
s
f
e
A
r
n
o
m
t
u
:
The account that will be debited for the funds transfer.
The account that will be credited.
:
u
P
:
m
Payment options are available if you are transferring to a loan account.
The dollar amount of the funds transfer.
How often the transfer will occur. Options include One-Time, Weekly, Bi-Weekly, SemiMonthly and Monthly. (Depending on the frequency selected, additional fields will display on the page –
e.g. expiration date, day of month, etc.).
F
r
q
e
c
n
e
y
:
u
T
T
r
a
n
s
f
e
r
D
a
t
e
Enter the date that the transfer should happen.
:
Enter any descriptive information for the funds transfer. This information displays
with the transaction and on your statement.
r
a
n
s
f
e
r
M
e
o
:
m
9
PROCEDURES – Review and Confirm Funds Transfer
Review the Funds Transfer information and click
complete the transfer.
E
d
t
i
to change the information, or click
C
f
n
o
r
i
m
to
After confirmation a transfer summary and confirmation number display. Retain this information for
your records. Click
to enter another transfer of funds, or click
in the
navigation menu to review any scheduled transfers.
A
d
d
A
n
o
t
h
e
r
T
r
a
n
s
f
e
r
P
e
n
n
d
i
10
g
Stop Payments
Stop Payment Sub-Menu Navigation Options
C
r
r
n
e
: View Stop Payment placed on the selected account.
t
u
N
e
: Place a new Stop Payment on the select account.
w
PROCEDURES – Add a Stop Payment
A
d
d
t
p
o
P
y
a
e
S
C
C
m
h
e
c
k
h
e
c
k
D
a
t
e
n
o
m
P
R
e
e
e
k
r
b
t
S
r
A
c
c
n
o
u
t
:
Select the account to which you want to add the Stop Payment.
r
:
Enter the number of the check for which you are placing the stop.
Enter any remarks about the item or stop payment (e.g. lost check, duplicate).
:
m
Click
o
Enter the name of the person or company to which you issued the check.
:
a
f
Enter the dollar amount of the check.
:
u
y
a
t
m
t
Enter the date the check was issued.
:
N
u
A
e
n
u
b
m
i
to review the Stop Payment information.
11
PROCEDURES – Review and Confirm Stop Payment
Review the Stop Payment information. Click
setup of the Stop Payment.
E
d
t
i
to change the information, or
C
o
f
n
r
i
m
to complete the
Follow your bank’s procedures for verifying the Stop Payment. Click
to enter another
Stop Payment, or click
in the navigation menu to review existing Stop Payments.
A
d
d
A
n
o
t
h
e
r
t
S
C
r
r
e
n
t
u
N
O
T
E
:
You must contact your bank to revoke any Stop Payments.
12
o
p
Statements
Statement History is available for 365 days. Statements are available in three formats:
•
•
•
PDF
Text
HTML
Use the drop-down menu next to a statement to choose the viewing format. Select a different account
from the
drop-down menu to view a statement for another account.
V
e
i
w
t
S
a
t
e
e
n
t
s
f
o
r
m
13
Cash Manager
The Cash Manager tab contains all of the Cash Management functionality, including:
•
•
ACH
Wires
•
Account Recon/Positive Pay
•
User Administration
•
Reporting
•
File Status (for uploaded files)
14
ACH
PROCEDURES – Create an ACH Batch
t
e
p
1
C
:
r
e
a
t
N
e
e
B
w
a
t
c
From the main ACH Batch List page, select the company for which the batch
.
h
S
is being created.
t
e
p
2
:
B
a
c
t
H
h
e
a
d
e
r
Enter batch header information.
.
S
. There are three ways to add transactions; individually, by entering
multiple records and by using Import Records (not commonly used.)
t
S
e
p
3
C
:
r
e
a
t
e
T
r
a
n
s
a
c
t
o
n
s
i
When adding a transaction individually the user may enter addenda information (if applicable) and
search for an ABA number.
15
t
S
e
p
3
(
a
t
l
e
r
n
a
t
e
)
:
A
d
d
M
p
t
u
l
i
e
l
R
e
c
o
r
d
s
is a quick way to create transactions. It allows up to 15
records to be added at a time.
Data is limited to Credit/Debit Account, ABA, ID Number, Name, Amount and Checking or Savings
designation.
To add addenda information or use ABA lookup, first add the record here then use the
feature.
16
E
d
t
i
Transaction
t
S
e
p
4
:
I
n
t
i
a
i
t
e
B
a
t
c
h
.
Select
I
n
t
i
a
i
t
e
from the drop down menu. Initiate is only available if the batch is
in balance.
Select the effective date from the drop down box (only dates available for selection will display.)
17
: Batches already created/uploaded in Dart Express Net. Batches will remain on the system to
be used as templates.
B
a
c
t
h
s
L
C
A
H
t
i
t
a
t
s
S
R
e
a
U
y
d
p
o
e
Batch can be edited. If in balance it may also be initiated.
:
a
d
e
d
Batch has been uploaded or transactions imported.
:
l
I
n
t
a
i
P
t
c
o
Q
e
c
u
d
Batch has been sent to Financial Institution.
:
s
s
k
e
d
n
I
e
a
i
n
w
o
a
d
: Select the checkbox for balanced batches and click
e
I
n
t
i
a
i
t
e
e
S
e
l
c
t
e
d
.
: Export batch to PDF or NACHA file format.
d
l
E
t
i
: List of transactions within batch.
w
i
o
Financial institution has moved batch to ACH warehouse.
:
t
i
V
D
e
i
r
:
s
u
: Change or add transactions to the batch.
t
i
: Change transaction dollar amounts, place hold on specific transactions. This option is
commonly used when editing a payroll batch, where only the amount of the transaction changes.
Q
c
u
k
E
d
t
i
C
i
p
o
p
I
: Creates an exact duplicate of the selected batch.
y
o
r
(
t
p
o
t
n
o
m
)
a
U
p
d
a
t
e
(
o
p
Upload transactions from CSV, Tab-Delimited, Fixed Position or NACHA files.
:
l
i
t
o
i
n
)
a
l
:
Upload new dollar amount using Employee ID as matching field; will not create new
transactions.
: Remove batch from the system. If the batch is in initiated status, it will also delete batch from
Financial Institution.
D
e
e
t
e
l
: Send batch information to financial institution for processing. Initiate only displays as an
option if the batch is in balance.
I
n
t
i
a
t
e
i
18
U
p
o
a
: Allows Cash User to upload a NACHA file into Dart Express Net. File must have .ach extension.
d
l
T
: Send federal and/or state taxes (if enabled by FI) via ACH. User must already be
registered with the EFTPS to use this option.
x
a
P
y
a
e
n
t
s
m
: Displays ACH batches that have been initiated by the customer and processed by the Financial
institution. Clicking
displays the transactions within the batch.
H
s
t
o
y
r
i
V
e
w
i
: Search and display any transactions within all batches that match the search criteria. Cash User
can then edit/delete the transactions if needed.
e
a
r
c
h
S
19
ACH Import (Optional)
: If the Import Transactions option is activated, the user must populate
the format layout here. In the example below a translation table is established for a CSV file. The user
“tells” Dart Express Net which of the spreadsheet columns contain the Name, ID Number, etc.
t
e
p
1
E
:
s
t
a
t
t
e
p
2
e
p
3
S
t
e
p
4
t
e
p
5
S
S
l
b
S
r
o
w
: Click
s
I
I
p
o
r
t
p
o
r
t
m
t
a
y
o
t
u
from the Select Option drop down box.
F
e
i
T
y
p
e
.
l
for file.
p
m
r
L
m
e
I
o
m
: Select
B
p
I
i
: Select
:
h
s
S
o
r
t
.
20
Wires
PROCEDURES – Add a Wire Transfer
t
p
e
1
E
:
d
A
/
t
S
d
Choose the account for which you are adding the wire in the
.
d
i
C
r
e
a
t
e
a
n
e
w
w
r
e
i
drop-down menu.
t
e
p
2
Fill in the fields for the new wire:
:
S
C
r
•
•
•
d
c
A
t
c
e
d
r
e
d
N
t
e
u
C
r
n
o
i
t
A
c
c
o
t
A
c
c
o
i
u
n
t
n
t
N
m
i
r
b
a
e
u
C
:
m
A
d
d
r
e
s
s
The account that will receive the wired funds.
The name on the account receiving the wired funds.
The address of the Credit Account.
:
:
u
Enter the ABA number of the Financial Institution where the
Credit Account is held. Use the Search for ABA Number feature to search for the Credit FI.
R
•
e
e
c
v
e
i
n
i
g
B
a
n
k
I
n
f
o
r
a
m
t
o
n
:
i
21
f
r
o
m
e
c
e
R
g
n
t
l
S
B
A
n
a
f
A
r
o
c
e
e
e
m
v
e
h
t
i
B
g
n
i
k
n
a
f
n
I
o
r
a
i
a
c
r
f
h
o
B
A
r
A
N
e
S
t
f
n
o
m
u
i
e
i
d
s
m
r
o
p
t
b
n
o
p
w
i
i
l
p
o
a
l
t
e
l
u
a
r
l
l
e
n
a
m
i
n
g
i
.
l
•
Enter any information regarding the Wire Transfer. Comments can
include processing instructions, invoice numbers, or any other text/numeric data.
•
If the wire transfer should be saved as a template, click the checkbox for
Repetitive Wire and assign a repetitive wire code (up to 6 characters). Wires that are not
designated as Repetitive will automatically be removed from the system once transmitted and
processed.
r
W
e
f
n
I
o
r
i
R
a
t
p
e
e
t
v
t
i
/
R
e
a
i
e
r
W
i
n
o
m
r
k
s
:
m
e
/
C
o
d
e
:
i
PROCEDURES – Transmit a Wire Transfer
To transmit a wire use the
t
p
e
1
r
n
a
s
t
m
t
p
e
i
2
r
a
n
s
t
m
i
option.
Select the checkbox to the left of the wire and choose
link to the right.
:
S
T
T
Enter your Wire Password and click
:
S
T
r
a
n
s
t
m
i
T
r
a
n
s
t
m
i
e
S
e
c
t
e
l
.
Transmitted wires display on the Transmit Wires page in an Initiated Status.
r
W
e
t
i
a
t
s
S
e
: A Dart Express Net wire will be in one of the following statuses.
s
u
P
n
e
: The wire can be edited, deleted or initiated.
g
n
d
i
I
n
t
a
i
P
R
H
s
i
t
o
r
y
r
c
o
e
t
e
: Cash User has sent the wire to Financial Institution.
d
i
a
e
d
s
y
s
e
d
: Financial Institution has taken the option to process wire.
: Wire needs dollar amount added to initiate.
: View processed wires.
22
d
, or choose the
ARP
Upload issued items file to Financial Institution and work exception items.
: Cash User will decide whether to pay or return check items that do not match items in the issued
items file.
I
t
e
s
m
V
e
link allows Cash User to view more information about the item, not an image of the check.
w
i
: Cash User will browse for the issued items file to be uploaded into Dart Express Net. Cash User
can upload either a Fixed Position or CSV file. Cash User can also manually enter in items.
U
p
o
a
d
l
23
M
n
a
E
a
n
t
r
y
l
u
Enter in issued items information directly into Dart Express Net without uploading a file. On Upload
screen select Manual Entry from the Type drop down menu. Enter in the check number, issued date,
check amount and payee.
: If Cash User is uploading a Fixed Position or CSV file they will need to establish
where within their file various fields of information are contained. *Note: Item number and item
amount are required fields.
E
d
U
t
p
o
F
x
i
a
F
d
o
r
l
i
e
d
P
o
a
t
m
s
t
i
o
i
n
:
24
C
S
t
:
V
e
p
f
s
o
r
U
p
o
a
t
e
p
1
t
e
p
2
S
S
t
e
p
3
S
g
n
d
l
S
a
A
n
R
f
P
i
e
l
i
: Select type of file.
:
Browse for file. Click
: Click on
V
e
i
w
D
e
t
a
s
i
l
U
p
o
l
a
d
.
link to review items.
: Verify the item information is correct. Select
uploading another issued items file.
t
e
p
4
S
25
A
p
p
r
o
v
a
l
. A file must be approved prior to
26
Users
PROCEDURES – Set up a new Cash User
t
e
p
1
t
e
p
2
S
S
: Select
U
s
e
r
from the
s
C
a
s
h
M
a
n
a
g
e
r
tab. Click
N
C
e
w
M
U
s
e
r
.
: Complete the User Settings.
U
s
e
N
r
a
: Name of Cash User.
e
m
U
A
s
e
r
I
: Sign on for Cash User.
D
n
d
m
i
s
:
: Cannot create/edit Cash Users. Cannot change settings.
: Full administrative rights. Can create/edit Cash Users and change settings (alias,
password, email and account settings.)
: Can change Dart Express Net settings (alias, password, email and account
settings) but cannot create/edit Cash Users.
t
i
r
a
t
n
o
i
N
Y
o
e
P
s
a
r
t
a
i
l
27
V
e
: View-only authority. Cannot change any settings or Users.
w
i
: Establish a password for the Cash User. System will prompt the user to change the
password at initial login and when password is reset.
P
a
s
s
w
r
W
o
e
r
P
d
a
s
s
w
o
r
: 4-digit number needed to transmit a wire transfer to bank.
d
i
A
o
l
U
w
s
e
r
D
o
n
w
o
l
a
: Download and print prior day activity.
d
l
: If selected, user will not be able to log in. If user exceeds maximum login attempts,
this box becomes checked. Uncheck the box and click Submit to unlock the user.
H
o
U
d
s
e
r
l
E
-
A
a
m
D
r
d
r
f
s
e
e
r
r
W
D
: User’s email address. May only be modified by full administrator.
s
m
: Maximum amount Cash User can transfer between accounts per transfer.
i
: Maximum amount user can transmit per wire.
t
L
/
i
D
m
o
i
n
w
o
l
i
: Maximum amount user can initiate per day.
i
e
y
a
m
t
i
i
p
s
i
r
L
P
s
t
L
n
a
e
H
l
i
T
C
A
y
a
d
l
i
a
C
A
d
: View batch details and download batch to .PDF or NACHA format.
H
l
: Dual control setting for ACH. Allows Cash User to take multiple actions within
a batch without requiring action from a second Cash User.
F
C
A
l
u
R
e
C
H
n
o
t
r
o
l
s
l
t
c
r
t
e
B
d
a
c
t
c
A
h
i
o
k
r
w
W
C
A
h
t
p
o
a
C
A
d
n
t
a
i
D
t
C
A
e
e
t
C
A
e
p
o
r
T
t
r
: Cash User can view and work with restricted batches.
: Remove ACH batch from system.
H
l
I
s
: Send batch to Financial Institution for processing.
H
i
e
s
: Upload NACHA files into ACH.
H
l
I
e
: Create/edit ACH batches and transactions.
H
i
U
c
n
a
s
c
a
t
: Upload transaction file into system (CSV, Fixed Position, tab delimited and
n
o
m
i
NACHA).
: Upload transaction file into ACH. Will change dollar amount only for
matching transactions. Will not create new transactions.
U
p
d
a
t
e
T
r
a
n
s
a
c
t
o
n
i
28
t
S
e
p
4
: Complete the Default Settings.
T
r
n
a
s
c
a
t
n
o
q
n
I
t
a
t
e
n
e
S
u
t
r
r
n
e
t
D
B
y
a
i
a
o
r
D
B
y
a
a
t
p
o
q
n
I
u
A
p
o
d
i
d
t
S
o
w
e
f
e
r
n
P
N
e
: Enter new stop payments.
s
i
: Access bill pay module.
y
a
n
o
i
D
n
o
-
R
p
e
r
W
i
d
N
t
n
o
-
R
p
e
W
f
e
n
e
R
r
W
E
d
t
R
r
W
i
T
r
n
a
s
e
r
W
i
: Create new single wire transfers.
s
: Modify/delete single wire transfers.
s
: Create wire templates.
s
: Modify/delete wire templates.
s
i
t
m
e
i
p
e
e
i
p
e
i
e
i
r
i
D
: View balance and activity totals as of previous business day.
e
: View information on existing stop payments.
y
r
S
t
c
n
a
l
i
E
: View current balance and activity totals.
e
l
r
P
c
n
a
u
P
: View available Dart Express Net statements.
y
r
u
C
i
q
n
I
m
: View list of transactions
y
r
i
e
: Initiate wire to Financial Institution for processing.
s
i
: Dual control for wires. Allows Cash User to take multiple actions within a
wire without requiring action from a second Cash User.
C
F
r
l
u
V
W
l
e
e
n
o
w
R
p
a
t
e
o
a
d
P
o
s
k
P
o
s
i
O
A
R
p
P
t
o
i
T
r
a
n
s
f
e
r
s
e
i
n
e
P
a
: Send issued items file to Financial Institution.
y
i
v
t
W
v
t
i
r
o
: View Financial institution’s interest rates if turned on.
s
l
o
r
l
i
U
t
i
P
a
y
I
t
e
s
m
s
: Make decisions to pay/return exception items.
: Does not apply to 20/20.
: Move money between accounts.
29
O
C
r
d
e
e
t
e
p
5
c
A
t
c
e
c
k
: Reorder checks if Financial Institution has functionality turned on.
s
n
o
l
S
S
c
e
h
r
t
: Choose accounts that Cash User will have access to.
s
u
: Complete Account Settings (option must be turned on for Financial Institution).
V
e
c
A
w
c
e
s
f
s
o
c
A
r
i
E
c
n
o
u
d
t
i
A
c
c
e
s
s
g
R
i
h
t
s
t
: Select the account to work with.
: Modify Default Access Rights for account.
30
Reporting
P
r
o
r
D
a
: Displays balance information, float information and activity totals for previous business day.
y
i
C
r
r
n
e
t
D
u
a
y
: Displays balance information and activity totals for current business day.
: Displays balance information and transactions that posted to the account on the previous
business day. All accounts will display.
P
o
s
t
i
o
n
i
31
File Status
File status tab displays all files that have been uploaded into the system and the status of the upload.
This option shows both ACH and ARP files. The files drop off this list after 7 days.
32
Options
Manage email addresses and passwords, account settings, display settings, and alerts.
: Edit alias, passwords, company email address and Personal Question and Answer (used for
Password Self Reset).
P
e
r
s
o
n
a
l
33
c
A
c
n
o
u
t
: Edit account pseudo names and change the order in which accounts display on account listing
page.
D
s
p
a
l
i
A
e
l
r
t
s
y
: Edit default view settings.
: Set up Event Alerts, Balance Alerts, Item Alerts and Personal Alerts.
34
35