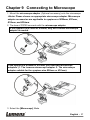
1
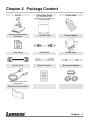
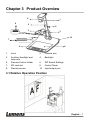
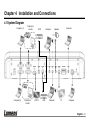
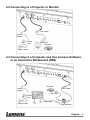
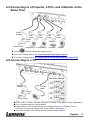
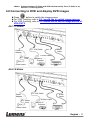
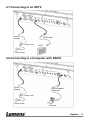
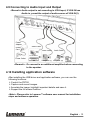
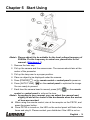
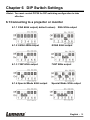
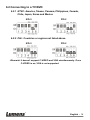
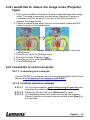
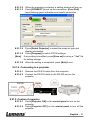
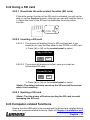
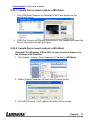
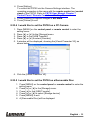
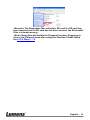
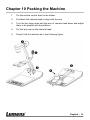
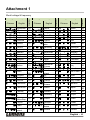
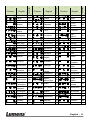
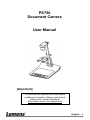
PS750 Document Camera User Manual [Important] To download the updated quick start guide, multilingual manuals, software, and drivers, please visit Lumens website at http://www.lumens.com.tw/goto.htm English - 0 Contents Copyright Information ....................................................................................... 3 Chapter 1 Precautions ..................................................................................... 4 Safety Precautions ....................................................................................... 5 FCC Warning ............................................................................................... 5 EN55022 (CE Radiation) Warning ............................................................... 5 Chapter 2 Package Content ............................................................................ 6 Chapter 3 Product Overview ........................................................................... 7 3.1 Relative Operation Position ................................................................ 7 Chapter 4 Installation and Connections ........................................................ 8 4.1 4.2 4.3 System Diagram ................................................................................. 8 Connecting to a Projector or Monitor.................................................. 9 Connecting to a Computer and Use Lumens Software or an Interactive Whiteboard (IWB) ............................................................. 9 4.4 Connecting to a Projector, 2 PCs, and a Monitor at the Same Time 10 4.5 Connecting to a TV ........................................................................... 10 4.6 Connecting to DVD and display DVD images .................................. 11 4.7 Connecting to an HDTV ................................................................... 12 4.8 Connecting to a Computer with RS232 ............................................ 12 4.9 Connecting to Audio Input and Output ............................................. 13 4.10 Installing application software........................................................... 13 Chapter 5 Start Using .................................................................................... 14 Chapter 6 DIP Switch Settings ..................................................................... 15 6.1 6.2 Connecting to a projector or monitor ................................................ 15 Connecting to a TV/DVD .................................................................. 16 Chapter 7 Control Panel/Remote Control and Setting Menu .................... 17 7.1 7.2 Functions of control panel and remote control ................................. 17 Setting Menu .................................................................................... 19 Chapter 8 Descriptions of major functions ................................................. 22 English - 1 8.1 8.2 8.3 8.4 8.5 8.6 8.7 8.8 8.9 8.10 8.11 8.12 8.13 8.14 8.15 8.16 8.17 8.18 8.19 8.20 8.21 8.22 8.23 I would like to automatically adjust the image to have best brightness and focusing performance (Auto tune)......................................................... 22 I would like to set the image source of VGA OUT2 .......................... 22 I would like to switch image sources ................................................ 22 I would like to make text clearer and photos more colorful .............. 23 I would like to zoom in /out of images .............................................. 23 I would like to use the auto focus ..................................................... 23 I would like to adjust the brightness ................................................. 23 I would like to turn on / off the lamp.................................................. 23 I would like to capture images .......................................................... 24 I would like to view captured images ................................................ 24 I would like to delete captured images ............................................. 25 I would like to automatically delete the captured images whenever it is turned off (Auto Erase) ................................................................. 25 I would like to record motion images (Record). ................................ 25 I would like to switch a part of the live image (PAN) ........................ 26 I would like to play the slides (Slide Show) ...................................... 26 I would like to view the X-ray film ..................................................... 27 I would like to compare images (PBP) ............................................. 27 I would like to resume the factory default setting (Factory Reset) ... 27 I would like to change the Start Video/Off Video .............................. 28 I would like to reduce the image noise (Projector Type) .................. 29 I would like to control projector. ........................................................ 29 Using a SD card ............................................................................... 32 Computer-related functions .............................................................. 32 Chapter 9 Connecting to Microscope .......................................................... 37 Chapter 10 Packing the Machine ................................................................... 39 Chapter 11 Troubleshooting ........................................................................... 40 Attachment 1 .................................................................................................... 42 English - 2 Copyright Information Copyrights © Lumens Digital Optics Inc. All rights reserved. Lumens is a trademark that is currently being registered by Lumens Digital Optics Inc. Copying, reproducing or transmitting this file is not allowed if a license is not provided by Lumens Digital Optics Inc. unless copying this file is for the purpose of backup after purchasing this product. In order to keep improving the product, Lumens Digital Optics Inc. hereby reserves the right to make changes to product specifications without prior notice. The information in this file is subject to change without prior notice. To fully explain or describe how this product should be used, this manual may refer to names of other products or companies, nevertheless without any intention of infringement. Disclaimer of warranties: Lumens Digital Optics Inc. is neither responsible for any possible technological, editorial errors or omissions, nor responsible for any incidental or related damages arising from providing this file, using, or operating this product. English - 3 Chapter 1 Precautions Always follow these safety instructions when setting up and using the Document Camera: 1. Do not place Document Camera in tilted position. 2. Do not place the Document Camera on an unstable trolley, stand or table. 3. Do not use the Document Camera near water or source of heat. 4. Use attachments only as recommended. 5. Use the type of power source indicated on the Document Camera. If you are not sure of the type of power available, consult your dealer or local electricity company for advice. 6. Place the Document Camera on a place that it can be unplugged easily. 7. Always take the following precautions when handling the plug. Failure to do so may result in sparks or fire: Ensure the plug is free of dust before inserting it into a socket. Ensure that the plug is inserted into the socket securely. 8. Do not overload wall sockets, extensions leads or multi-way plug boards as this may cause fire or electric shock. 9. Do not place the Document Camera where the cord can be stepped on as this may result in fraying or damage to the lead or the plug. 10. Unplug the projector from the wall socket before cleaning. Use a damp cloth for cleaning. Do not use liquid or aerosol cleaners. 11. Do not block the slots and openings in the projector case. They provide ventilation and prevent the Document Camera from overheating. Do not place the Document Camera on a sofa, rug or other soft surface or in a built-in installation unless proper ventilation is provided. 12. Never push objects of any kind through cabinet slots. Never allow liquid of any kind to spill into the Document Camera. 13. Except as specifically instructed in this User Manual, do not attempt to operate this product by yourself. Opening or removing covers may expose you to dangerous voltages and other hazards. Refer all servicing to licensed service personnel. 14. Unplug the Document Camera during thunderstorms or if it is not going to be used for an extended period, do not place the Document Camera or remote control on top of heat-emitting equipment or heated objects such as a car and etc. 15. Unplug the Document Camera from the wall outlet and refer serving to licensed service personnel when the following situations happen: If the power cable or plug becomes damaged or frayed. If liquid is spilled into it or the Document Camera has been exposed to rain or water. <Note>: Using an incorrect battery type in the remote control may result in breakdown. Follow your country’s instructions on how to dispose of used batteries. English - 4 Safety Precautions Warning: To reduce the risk of fire or electric shock, do not expose this appliance to rain or moisture. This Document Camera has a 3-wire AC line Plug. This is a safety feature to ensure that the plug will fit into the power outlet. Do not try to disable this safety feature. If the Document Camera will not be used for a long period of time unplug it from the power outlet. Note RISK OF ELECTRIC SHOCK DO NOT OPEN Note: To reduce the risk of electric shock. Do not remove cover (or back). No user-serviceable parts inside. Refer servicing to licensed service Personnel. This symbol indicates that this This symbol indicates that there equipment may contain are important operating and dangerous voltage which could maintenance instructions in this cause electric shock. User Manual with this unit. FCC Warning This equipment has been tested and found to comply with the limits for a Class A or B digital device, pursuant to Part 15 of FCC Rules. These limits are designed to provide reasonable protection against harmful interference in a residential installation. EN55022 (CE Radiation) Warning This product is intended for use in a commercial, industrial, or educational environment. It is not intended for residential use. This is a Class A product. In a domestic environment it may cause radio interference, in which case the user may be required to take adequate measures. The typical use is in a conference room, meeting room or auditorium. English - 5 Chapter 2 Package Content PS750 Quick Start Guide 4-Step Card (For download of other language versions, please visit Lumens website) Download and Safety Instruction C-Video Cable Power Adapter VGA Cable USB Cable Audio cable Power Cord Remote Control Microscope Adapter Appearance may vary with country/region Remote Control Holder English - 6 Chapter 3 Product Overview 9 6 1 2 5 3 3 10 7 8 4 1. Lens 2. Camera arm 3. 4. Backlight 5. Auxiliary floodlight and lamp arm Remote Control Holder 6. DIP Switch Settings 7. SD card slot 8. Control Panel 9. Remote sensor 10. Input/output port 3.1 Relative Operation Position Projector Computer English - 7 Chapter 4 Installation and Connections 4.1 System Diagram Computer (1) Computer (2) Projector or monitor Projector or monitor DVD LCD TV Computer DVD Computer Computer Speaker TV Computer English - 8 4.2 Connecting to a Projector or Monitor VGA Cable Power Adapter Power Cord Monitor or Projector \ Power Outlet 螢幕 \ 4.3 Connecting to a Computer and Use Lumens Software or an Interactive Whiteboard (IWB) Projector Power Adapter USB Cable VGA Cable Power Cord Power Outlet USB Cable Computer English - 9 4.4 Connecting to a Projector, 2 PCs, and a Monitor at the Same Time Power Adapter VGA Cable VGA Cable Power Cord Power Outlet VGA Cable VGA Cable (Default) Computer (1) Computer (2) Projector Monitor Press button to switch the image sources. For VGA 1 setting, refer to 8.3 I would like to switch image sources. For VGA 2 setting, refer to 8.2 I would like to set the image source of VGA OUT2. 4.5 Connecting to a TV DIP Switch Settings Power Adapter C-Video Cable Power Cord Power Outlet NTSC: U.S.A., Taiwan, Panama, Philippines, Canada, Chile, Japan, Korea, and Mexico. PAL: Countries/regions not listed above. Please adjust it to be suitable for the local voltage frequency of 50/60Hz. For the frequency in actual use, please refer to the manual. (Attachment 1) You must re-start for DIP switching configuration to take effective. English - 10 <Note>: It doesn’t support C-Video and VGA simultaneously. Once C-Video is on, VGA OUT is not supported. 4.6 Connecting to DVD and display DVD images Press button to switch the image source. For VGA 1 setting, refer to 8.3 I would like to switch image sources. For VGA 2 setting, refer to 8.2 I would like to set the image source of VGA OUT2. 4.6.1 C-Video VGA Cable Power Adapter Power Cord Power Outlet Audio Cable C-Video Cable Monitor or Projector \ DVD 螢幕 \ 4.6.2 S-Video VGA Cable Power Adapter Power Cord Power Outlet Audio Cable S-Video Cable Monitor or Projector \ 螢幕 \ DVD English - 11 4.7 Connecting to an HDTV Power Adapter HDMI Cable Power Cord HDTV Power Outlet 4.8 Connecting to a Computer with RS232 Power Adapter RS232 Adapter (Optional) Power Cord Power Outlet Computer English - 12 4.9 Connecting to Audio Input and Output <Remark> Audio output is set according to VGA input; if VGA IN has Audio in, preset the output of audio source of VGA IN(1). Power Adapter Power Cord Audio Cable Audio Cable Audio Cable TV or DVD Power Outlet Computer (1) Computer (2) Speaker <Remark>: Or connect to an additional amplifier before connecting to the speaker. 4.10 Installing application software After installing the USB driver and application software, you can use the following functions: Control the PS750. Capture and record images. Annotate the image, highlight important details and save it. Support the full screen function. <Note>: Please refer to Lumens™ software user manual for installation steps and software operation. English - 13 Chapter 5 Start Using <Note>: Please adjust it to be suitable for the local voltage frequency of 50/60Hz. For the frequency in actual use, please refer to the manual. (Attachment 1) 1. Remove the lens cap. 2. Pull up the camera and the camera arm. The camera should aim at the center of the presenter. 3. Pull up the lamp arm to a proper position. 4. Place an object to be displayed under the camera. 5. Press [POWER] on the remote control or control panel to power on. 6. Press [AUTO TUNE] on the control panel to optimize the image. You are ready to present. 7. Each time the camera head is moved, press [AF] on the remote control or control panel to refocus the lens. <Note>: According to your request, you can adjust the camera head slightly to aim at the center of the documents when the anchor of lens was reached. When using the remote control, aim at the receptor on the PS750, and press the power button. Once PS750 is turned on, the LED on the control panel will flash a few times and stay lit. Please contact your distributor if the LED is not on. English - 14 Chapter 6 DIP Switch Settings <Note>: You must re-start PS750 for DIP switching configuration to take effective. 6.1 Connecting to a projector or monitor 6.1.1 XGA 60Hz output( default values) XGA 50Hz output 6.1.2 SXGA 60Hz output SXGA 50Hz output 6.1.3 720P 60Hz output 720P 50Hz output 6.1.4 Special Mode 60Hz output Special Mode 50Hz output English - 15 6.2 Connecting to a TV/DVD 6.2.1 NTSC: America, Taiwan, Panama, Philippines, Canada, Chile, Japan, Korea and Mexico 60Hz 50Hz 6.2.2 PAL: Countries or regions not listed above. 60Hz 50Hz <Remark> It doesn’t support C-VIDEO and VGA simultaneously. Once C-VIDEO is on, VGA is not supported. English - 16 Chapter 7 Control Panel/Remote Control and Setting Menu 7.1 Functions of control panel and remote control <Note>: OSD is not available at C-VIDEO mode. [MENU] / [ENTER] / [PLAYBACK] / [ROTATE] / [PAN] / [RECORD] / [CAPTURE] / [DELETE] / [VGA] / [SLIDE SHOW] / [PBP] functions are not available on the machine panel and the remote control. <Remark> The below functions are listed alphabetically. Name Function Descriptions Operation Turn on and off the Document Camera. Remote control / Control panel ,,, Move up, down, left or right to select the needed function. Remote control / Control panel AF Auto Focus Control panel AUTO TUNE Automatically adjust the image to have the best brightness and focusing performance. Remote control / Control panel BRT+/- Manually adjust the brightness of the image. Remote control / Control panel CAPTURE Capture the image to the SD card (priority) or internal memory. Remote control / Control panel DELETE Delete the image stored in the SD card (priority) or internal memory. Remote control ENTER Enter/Activate functions. Remote control / Control panel FREEZE Freeze the current image to temporarily stay on the screen. Press again to defreeze. Remote control / Control panel LAMP Turn on / off the lamp. Control panel English - 17 MENU Activate the setting menu function/exit menu. Remote control / Control panel PAN Switch a part of the live image. Remote control PBP Display live images together with captured images. Remote control PLAYBACK Display the list of captured images. Remote control / Control panel Projector ON Turn on the projector. Control panel Projector OFF Turn off the projector. Control panel RECORD Press [Record] to record images to SD card (priority), press [Record] again to stop recording. Remote control / Control panel ROTATE Rotate the image by 0°/90°/180°/270° Control panel SLIDE SHOW Show the photos or videos stored in the SD card (priority) or internal memory in slide mode. Remote control / Control panel VGA 1 Switch between different image sources of VGA 1 Document Camera/VGA IN(1)/VGA IN(2)/DVD Remote control / Control panel VGA 2 Switch between different image sources of VGA 2 VGA Out (VGA OUT(1)) / VGA IN(1) / VGA IN(2) <Note> VGA 2 button functions only when VGA OUT2 is set to (VGA IN), and for the related setting, refer to 8.2 I would like to set the image source of VGA OUT2. Increase or decrease the image size. Control panel ZOOM +/- Remote control / Control panel English - 18 7.2 Setting Menu <Remark> Press [MENU] on the remote control or control panel to enter the setting menu; The bold underlined values in the following table are the defaults. st 1 Level Major Items Display rd 3 Level Adjustment values nd 2 Level Minor Items Auto Tune Enter Focus 0~A~Max Brightness 0~A~Max Mode Normal/Slide/Film /Microscope Photo/Text Photo/Text/Gray Night Vision On/Off Digital Zoom On/Off Slide Show Enter Slide Show Effect Storage Delay Image Quality Copy To SD Card 1. 2. 3. 4. 5. 6. 1. 2. 3. 4. 5. 6. 1. 2. 3. Off Shutter Right Down Side Open 0.5 Sec 1 Sec 3 Sec 5 Sec 10 Sec Manual High Medium Low Enter Function Descriptions Adjust the image to the optimal condition. Use the left and right arrow keys to adjust focal length on an object. Use the left and right arrow keys to adjust brightness. Use the left and right arrow keys to select the image mode. Use the left and right arrow keys to select Photo/ Text/ Gray mode. Use the left and right arrow keys to select. The night vision mode suits with darker environment. Use the left and right arrow keys to turn digital zoom on/off. Press [ENTER] to play the photos or videos stored in the SD card (priority) or internal memory. Use the left and right arrow keys to select the image switch mode. Use the left and right arrow keys to select the delay time. Select manual mode to switch images manually. Use the left and right arrow keys to select the image quality for the captured images and recorded videos. Press [ENTER] to immediately copy the data in Document Camera to the SD card. English - 19 Delete All Yes/No Format Yes/No USB Transfer Camera/Storage device Capture Capture Time Capture Interval Setting 1. Single 2. Continuous 3. Disable 1. 2. 3. 4. 5. 1. 2. 3. 4. 5. 6. 1 hr 2 hr 4 hr 8 hr 24 hr 5 Sec 10 Sec 30 Sec 1 Min. 2 Min. 5 Min. Auto Exposure On/Off White Balance Enter Projector Type DLP/LCD Volume 0~A~Max Use the left and right arrow keys to select, and then press [ENTER] to confirm the deletion of photos. Delete the image stored in the SD card (priority) or internal memory. Use the left and right arrow keys to select, and then press [Enter] to format the data stored in the SD card (priority) or internal memory. Use the left and right arrow keys to select the USB transfer mode. 1. Camera: Connecting the PS750 to view live image. 2. Storage device: connecting to the SD card (priority) or internal memory. Use the left and right arrow keys to select the video capture mode. (Single/Continuous/ Disable) Use the left and right arrow keys to set the capture time. <Note> It only works when the capture mode is set to [continuous]. Use the left and right arrow keys to set the capture interval. <Note> It only works when the capture mode is set to [continuous]. Regardless of outside environment, the machine will adjust the brightness to the optimal condition. Use the left and right arrow keys to select. Regardless of outside light or color, the machine will adjust the color to the optimal condition; Press [Enter] to activate. Use the left and right arrow keys to select the projector type and reduce image noise. Use the left and right arrow keys to adjust the volume. English - 20 VGA OUT(2) Language VGA IN / VGA Out(1) 1. Use the left and right arrow keys to select the images displayed by VGA OUT(2). 2. VGA IN: Use the [VGA 2] key on the control panel to select whether the screen images are output from VGA IN(1) or VGA IN(2). VGA Out(1): The image output is the same as the setting of VGA Out(1) 1. 2. 3. 4. 5. English Traditional Chinese German French Spanish English 繁體中文 Deutsch Français Español ……… Advanced Lock Down On/Off Auto Erase On/Off Preset Load Yes/No Preset Save Yes/No Factory Reset Yes/No ……… Use the left and right arrow keys in the Language option to select the preferred language. Use the left and right arrow keys to turn the lock down function on and off. You can set the password when [On] is selected. Use the left and right arrow keys to turn the auto erase function on and off. When [On] is selected, the saved images will automatically be deleted when the system is turned off. Read the value of the current image mode. Use the left and right arrow keys to select, and then press [ENTER] to confirm. Save the value of the current image mode. Use the left and right arrow keys to select, and then press [ENTER] to confirm. Use the left and right arrow keys to select, and then immediately press [ENTER]to activate the factory reset. English - 21 Chapter 8 Descriptions of major functions 8.1 I would like to automatically adjust the image to have best brightness and focusing performance (Auto tune) 1. Press [AUTO TUNE] on the remote control or control panel to adjust automatically. 8.2 I would like to set the image source of VGA OUT2 Press [MENU] on the remote control or control panel to enter the setting menu 1. Press [] or [] to the [Setting] menu. 2. Press [] to enter [VGA OUT2]. 3. Press [] or [] to select [VGA OUT 1/VGA IN]. 4. Press [MENU] to exit. When VGA OUT2 is set to VGA IN, 1. Press [VGA 2] on the control panel to switch between the image sources of VGA IN(1) and VGA IN(2). 8.3 I would like to switch image sources The default of image source is Live Image. Press [VGA 1] on the remote control or control panel to switch setting and PS750 will switch among the following five modes in turn: 1. Live images (default) 2. VGA IN(1) 3. VGA IN(2) 4. DVD C-Video 5. DVD S-Video <Note> VGA IN mode will start only when it is connected to input equipment. English - 22 8.4 I would like to make text clearer and photos more colorful The default of [PHOTO/TEXT] is PHOTO. Use the remote control or the control panel to change settings. [Photo] (default): for viewing photos or text with photos and will make the photos more colorful. [Text]: for viewing text files and will make the text clearer. [Gray]: for viewing black and white photos and will make the grayscale differentiation more distinct. 1. Press [MENU] to enter the setting menu. 2. Press [] or [] to select [Display]. 3. Press [] to select [Photo/Text]. 4. Press [] or [] to select [Photo/Text/Grey] (Refer to the previous section to make the most appropriate selection). 5. Press [MENU] to exit. 8.5 I would like to zoom in /out of images 1. Press [ZOOM +] on the remote control or control panel to zoom in. 2. Press [ZOOM -] on the remote control or control panel to zoom out. 8.6 I would like to use the auto focus 1. Press [AF] on the remote control or control panel. 8.7 I would like to adjust the brightness 1. Use the remote control or the control panel and press [BRT +] to increase the brightness. 2. Use the remote control or the control panel and press [BRT -] to decrease the brightness. 8.8 I would like to turn on / off the lamp The default of the lamp is ON. When using the control panel: 1. Press [Lamp] to switch ON/OFF. (in the sequence of arm lamp/backlight/OFF) English - 23 8.9 I would like to capture images 8.9.1 Setting the quality of captured images 1. Press [MENU] on the remote control or control panel to enter the setting menu. 2. Press [] or [] to the [Storage] menu. 3. Press [] to find [Image Quality]. 4. Press [] or [] to select among [High/Medium/Low]. 5. Press [MENU] to exit. 8.9.2 Setting continuous capture 1. Press [MENU] on the remote control or control panel to enter the setting menu. 2. Press [] or [] to the [Setting] menu. 3. Press [] to find [Capture]. 4. Press [] or [] to select [continuous]. 5. Press [] to find [Capture Time]; Press [] or [] to select time settings. 6. Press [] to find [Capture Interval]; Press [] or [] to select time settings. 7. Press [MENU] to exit. 8.9.3 Capturing and saving images 1. Press [CAPTURE] on the remote control or control panel. <Remark> If the capture mode is set to [continuous], press [CAPTURE] to capture images continuously, press [CAPTURE] again to exit. 8.10 I would like to view captured images <Note> Images over 8 MB, cannot be played. Whilst playing, the [Rotate] function can be activated to rotate the images. 1. Press [PLAYBACK] on the remote control or control panel to display thumbnails of all captured images. 2. Press [] or [] or [] or [] to select the thumbnail you want you view. 3. Press [ENTER] for the full-screen display of the image. 4. Press [] or [] to turn to the previous/next image. 5. Press [MENU] to exit. English - 24 8.11 I would like to delete captured images 1. Use the remote control and press [PLAYBACK] 2. Press [] or [] or [] or [] to select the thumbnail you want you delete. 3. Pressing [DELETE] will open a [Delete File] window. 4. Press [] or [] to select [Yes] (The default value is No). 5. Press [ENTER] to delete the selected photo. 6. Press [MENU] to exit. 8.12 I would like to automatically delete the captured images whenever it is turned off (Auto Erase) 1. Press [MENU] on the remote control or control panel to enter the setting menu. 2. Press [] or [] to the [Advanced] menu. 3. Press [] or [] to [Auto Erase]. 4. Press [] or [] to select [ON]. 5. Press [MENU] to exit. 6. It will automatically delete all captured photos when it is turned off. 8.13 I would like to record motion images (Record). 8.13.1. Setting the image quality 1. Press [MENU] on the remote control or control panel to enter the setting menu. 2. Press [] or [] to the [Storage] menu. 3. Press [] to find [Image Quality]. 4. Press [] or [] to select among [High/Medium/Low]. 5. Press [MENU] to exit. 8.13.2. Recording motion images 1. Press [RECORD] on the remote control or control panel to start recording videos. 2. Press [RECORD] again to stop recording. <Remark> Record sounds with the built-in microphone of the control panel. 8.13.3. Playing image 1. Press [PLAYBACK] on the remote control or control panel to display thumbnails of all videos recorded. 2. Press [] or [] or [] or [] to select files to browse. 3. Press [ENTER] for full-screen play. 4. Press [] or [] to adjust the volume of the video. <Note> When motion images are played back, the volume of English - 25 Audio Out can be controlled by up/ low arrow keys. In any other modes, you are not allowed to control volume using [] or [] key. 5. Press [] or [] to turn to the previous/next video. 6. Press [SOURCE] to exit. <Note> Only the files recorded can be played, and when live sound output is not available, additional amplifier can be connected to AUDIO OUT. 8.14 I would like to switch a part of the live image (PAN) Use Remote control: 1. Press [PAN] to enter the image pan mode. 2. Press [] or [] or [] or [] to move and view the partial enlarged images. 3. Press [PAN] to exit the partial enlarged mode. 8.15 I would like to play the slides (Slide Show) 8.15.1 Setting the slide show effect: 1. Press [MENU] on the remote control or control panel to enter the setting menu. 2. Press [] or [] to the [Storage] menu. 3. Press [] to find the [Slide Show Effect]. 4. Press [] or [] to select image switch mode between [Off / Shutter / Right / Down / Side / Open]. 5. Press [MENU] to exit. 8.15.2 Setting delay time 1. Press [MENU] on the remote control or control panel to enter the setting menu. 2. Press [] or [] to the [Storage] menu. 3. Press [] to find [Delay]. 4. Press [] or [] to select image switch mode between [0.5 Sec / 1 Sec / 3 Sec / 5 Sec / 10 Sec / Manual]. 5. Press [MENU] to exit. 8.15.3 Activating/Stopping the slide show <Note> Images over 8 MB, cannot be played. If you use the remote control or the control panel: English - 26 1. Press [SLIDE SHOW] to start playing. 2. Press [SLIDE SHOW] again to stop playing. 8.16 I would like to view the X-ray film 1. Place an X-ray film to be displayed under the camera. 2. Press [Lamp] button on the control panel to switch on the Backlight (in the sequence of arm lamp/backlight/OFF) 3. Press [AUTO TUNE] button to optimize the image. 8.17 I would like to compare images (PBP) This function will compare and contrast a live image with a captured image. C1 C2 C3 C4 C5 C6 C7 Captured Image Live Image Use Remote control 1. Press [PBP] to enter the PBP (Picture by Picture) photo selection screen. 2. Press [] or [] or [] or [] to select the file to be compared. 3. Press [ENTER] to activate image comparison. 4. Press [] or [] to move the image left or right. <Remark> Press [ENTER] to switch between the captured and live images. 5. Press [PLAYBACK] to return to image thumbnails. 6. Repeat Steps 2 ~ 4. 7. Press [MENU] to exit. 8.18 I would like to resume the factory default setting (Factory Reset) 8.18.1 Use the OSD menu 1. Press [MENU] on the remote control or control panel to enter the setting menu. 2. Press [] or [] to the [Advanced] menu. 3. Press [] to the [Factory Reset]. English - 27 4. Press [] or [] to select [Yes]. 5. Press [ENTER] to activate. 8.18.2 Use Compound Key 1. Use the remote control or control panel, and press [Enter + Auto Tune] simultaneously to restore the initial value. 8.19 I would like to change the Start Video/Off Video <Note> The file size of the Start Video/Off Video should be less than 5MB and the AVI file in H.264 compression format should be used. 8.19.1 Changing the Start Video 1. Press [ENTER] + [] on the control panel to enter Service Menu. 2. Press [] or[] to select [Pwr On] menu. 3. Press [] to [Image Select] and press [ENTER] to read the saved file. 4. Press [] or [] or [] or [] to select the picture file and press [ENTER] to apply the change. 5. Press [] to [Start Video Select] and press [] or [] to select [Default Video/ Customer Video]. 6. Press [] to [Logo Show time] and press [] or [] to modify the playback time. 7. Press [MENU] to exit. 8.19.2 Changing the Off Video 1. Press [ENTER] + [] on the control panel to enter Service Menu. 2. Press [] or [] to select [Pwr Off] menu. 3. Press [] to [Image Select] and press [ENTER] to read the saved file. 4. Press [] or [] or [] or [] to select the picture file and press [ENTER] to apply the change. 5. Press [] to [Off Video Select] and press [] or [] to select [Default Video/ Customer Video]. 6. Press [MENU] to exit. English - 28 8.20 I would like to reduce the image noise (Projector Type) 1. This function enables Document Camera to automatically clear image noise. The noise is especially obvious when Document Camera is connected to a DLP projector. You can set the DLP projector to improve the image quality. 2. If there is special noise when VGA out is connected, please set DLP option to improve the image quality. 3. Press [MENU] on the remote control or control panel to enter the setting menu. 4. Press [] or [] to the [Setting] menu. 5. Press [] to enter [Projector Type]. 6. Press [] or [] to select [LCD/DLP]. 7. Press [MENU] to exit. 8.21 I would like to control projector. 8.21.1 Connecting to a computer Connect PS750 to a computer, and for connecting method, refer to User Manual 4.8 Connecting to a Computer with RS232. 8.21.2 Installing application software 8.21.2.1 8.21.2.2 8.21.2.3 Go to Lumens website: www.lumens.com.tw/goto.htm and download the software [Projector Control]. Extract the file and then click [Setup.exe] to install. The installation wizard will guide you through the process. Please follow the on-screen instructions and press [Next] for the next step. English - 29 8.21.2.4 When the installation is completed, press [Finish] to end the installation procedure. 8.21.3 Setting procedure 8.21.3.1 Click[Start]/[Programs]/[Projector Setup] English - 30 8.21.3.2 8.21.3.3 When the procedure is started, a setting window will pop up. Press [CONNECT] to set up the connection. [Com Port] lamp flashing green indicates a successful connection. RS232 Adapter 8.21.3.4 Press [Select Projector] to select the projector type and display information. 8.21.3.5 Press [Program] to switch PS750 settings. [Note] If any setting is modified, press [Save as] to set up a “*.txt” file for setting storage. 8.21.3.6 When the setting is completed, press [Exit] to exit. 8.21.4 Connecting to a projector 8.21.4.1 8.21.4.2 Remove the RS-232 cable from the computer. Connect the RS-232 cable to the RS-232 port on the projector. PS750 PS750 RS232 Adapter 8.21.5 Control of projector 8.21.5.1 8.21.5.2 Press [Projector ON] on the control panel to turn on the projector. Press [Projector OFF] on the control panel to turn off the projector. English - 31 8.22 Using a SD card 8.22.1 Deactivate the write protect function (SD Lock) If the write protect function of the SD card is activated, you will not be able to use the Capture function, although you can still read the files in it. Adjust the Lock of the SD card to deactivate the write protect function. 8.22.2 Inserting a SD card 8.22.2.1 The screen will display [Copy to SD card] and ask if you would like to copy the files saved in the PS750 to a SD card. Press [] or [] on the control panel to select. Copy to SD Card YES NO 8.22.2.2 The screen will display as follow, once you insert an unformatted SD card: Format SD Card YES NO Press [] or [] on the control panel to select. <Note> The data previously saved on the SD card will be erased when it is formatting. 8.22.3 Ejecting a SD card <Note> Turn the power off before ejecting the SD card to avoid damaging the SD card. 8.23 Computer-related functions Ensure that the USB cable is connected and the drivers are installed before using the computer-related functions. Refer to Chapter 4 Installation and English - 32 Connections in this user manual. 8.23.1 I would like to insert a photo in MS-Paint 1. Click [File/From Scanner or Camera] in MS-Paint shown as the bottom left figure. 2. Click [Get Picture] will capture the photos of live images and insert the files in use shown as top right figure. 8.23.2 I would like to insert a photo in MS-Word <Remark> For Windows Office 2003 or later versions, please use the function with OneNote. 1. Click [Insert / Image / From Scanner or Camera] in MS-Word. 2. Select [Visual Presenter V2] and click [Custom Insert]. 3. Click [Get Picture]. It will capture the photo of live image. English - 33 8.23.3 I would like to change the setting of the PS750 and then capture a photo in MS-Word 1. Click [Insert / Image / From Scanner or Camera] in MS-Word. 2. Select [Visual Presenter V2 TWAIN] and click [Custom Insert]. 3. A window showing a live image (see below) will be displayed: English - 34 4. Press [Setting] To control the PS750 via the Camera Settings interface. The operating procedure is the same with the remote control and control panel of the PS750. Refer to PS750 User Manual Chapter 7 Control Panel / Remote Control and Setting Menu. 5. Press [Capture] to capture images in MS-Word. 6. Press [Cancel] to exit. 8.23.4 I would like to set the PS750 as a PC Camera 1. Press [MENU] on the control panel or remote control to enter the setting menu. 2. Press [] or [] to the [Storage] menu. 3. Press [] to find [USB Transfer]. 4. Press [] or [] to select [Camera]. 5. A window will be displayed, showing the [Visual Presenter V2], as shown below. 6. Click the [Visual Presenter V2]. 8.23.5 I would like to set the PS750 as a Removable Disc 1. Press [MENU] on the control panel or remote control to enter the setting menu. 2. Press [] or [] to the [Storage] menu. 3. Press [] to find [USB Transfer]. 4. Press [] or [] to select [Storage device]. 5. Press [MENU] to exit. 6. A [Removable Disc] will be displayed. English - 35 <Remark> The Removable Disc will select SD card if a SD card has been inserted, but if a SD card has not been inserted, the Removable Disc is internal memory <Note> Doing this will disable the [Capture] function. Suggest you return it to [Camera] mode after using this function. Please follow the 8.23.5 Steps 1 ~ 5. English - 36 Chapter 9 Connecting to Microscope 1 Mount the microscope adaptor (Optional accessory) onto the microscope. <Note> Please choose an appropriate microscope adapter. Microscope adapter accessories are applicable to eyepieces of Ø 28mm, Ø 31mm, Ø 33mm, and Ø 34mm. 2 The lens of PS750 connects with the microscope adapter. If the eyepiece is Ø 33mm or Ø 34mm, only one Lumens microscope adapter is needed. If the eyepiece is Ø 28mm or Ø 31mm, you need two microscope adapters. (1. The Lumens microscope adapter. 2. The microscope adapter suitable for the eyepiece size Ø 28mm or Ø 31mm). 3 Select the [Microscope] Mode English - 37 3.1. If you use the remote control or the control panel 3.1.1. Press [MENU] to enter the setting menu. 3.1.2. Press [] or [] to the [Display]. 3.1.3. Press [] to select [Mode]. 3.1.4. Press [] or [] to the [Microscope]. 4 If the image is not clear 4.1. Please adjust the focus of microscope. 4.2. Please press the control panel [AF] button to activate the auto focus. 5 Digital Zoom 5.1. If you use the remote control or the control panel 5.1.1. Press [MENU] to enter the setting menu. 5.1.2. Press [] or [] to the [Display]. 5.1.3. Press [] to select [Digital Zoom]. 5.1.4. Press [] or [] to select [On]. 5.1.5. Press [Zoom +] / [Zoom - ] <Note> Please reset to normal mode after using the microscope, otherwise, you are unable to use zoom in/out function. 1. Press [MENU] on the remote control or control panel to enter the setting menu. 2. Press [] or [] to the [Display]. 3. Press [] to select [Mode]. 4. Press [] or [] to the [Normal]. English - 38 Chapter 10 Packing the Machine 1. Put the remote control back to the holder. 2. Fold back the camera head to align with the arm. 3. Turn the two lamp arms and the arm of camera head down and adjust them to be parallel with the platform. 4. Put the lens cap on the camera head. 5. Finally, fold the machine as in the following figure. English - 39 Chapter 11 Troubleshooting This chapter describes problems you may encounter while using PS750. If you have questions, please refer to related chapters and follow all the suggested solutions. If the problem still occurred, please contact our distributors or service center. No. 1 Issues Boot without power Solutions Make sure you have plugged in the power cord. 2 No image output 1. Check the power. from the PS750 2. Check the connection, Refer to PS750 User Manual Chapter 4 Installation and Connections 3. Check the , refer to PS750 User Manual Chapter 8 Descriptions of major functions 8.3 I would like to switch image sources. 4. Check the settings for the source of the projector. For the appropriate input selection of the projector, refer to the projectors user manual. 5. Check if DIP Switch is properly set. Refer to PS750 User Manual Chapter 6 DIP Switch Settings for related settings. Probably the document is too close. Press [Zoom -] on the remote control or control panel. Or pull away the distance between document and lens, then press [AF]. Check the Auto Image setting of your projector. Please refer to the user manual of the projector. Please contact your distributor or the service center. 3 Unable to focus 4 5 The image is incomplete Forget the password for turning on 6 Lumens Document Lumens Document Camera, Lumens™ and other Camera, Lumens™ applications cannot be executed simultaneously. Please and other close the currently running applications and then execute applications cannot the application to be used. be used simultaneously 7 When the unit is Please make sure the arm lamp is set to [OFF]. For the turned on, the switch-on or -off of arm lamp, refer to PS750 User Manual auxiliary floodlight Chapter 8 Descriptions of major functions 8.8 I would English - 40 8 do not light. like to turn on / off the lamp. PS750 fails to store 1. images or react. Please make sure whether the stored data has reached the maximum storage capacity of PS750 unit or SD card. 2. Please make sure if SD card is adjusted to the data protection mode (Lock). Suggest you take out the SD card from PS750, and then adjust the SD card to the mode of Unlock. 3. Please make sure if the Capture function is set to Continuous mode or the time for capture is set to be long. For the related setting, refer to PS750 User Manual Chapter 8 Descriptions of major functions 8.9 I would like to capture images. 9 The images Press [AUTO TUNE] to automatically adjust to the optimal outputted from brightness and focal length. PS750 are too bright, dark or vague. 10 The images Please refer to the manual (Attachment 1), confirm the outputted are not voltage frequency and reset it according to Chapter 6 DIP clear, and the moire Switch Settings appears. English - 41 Attachment 1 World voltage & frequency 阿 富 汗 阿爾及利亞 安 哥 拉 安 地 瓜 阿 根 廷 澳 洲 Afghanistan Algeria Angola Antiqua Argentina Australia 澳 地 利 Austria 亞 巴 巴 孟 巴 比 百 述 哈 爾 馬 林 拉 多 時 達 加 貝 利 慕 Azores Bahamas Bahrain Bangladesh Babados Belgium Bermuda 玻 利 維 亞 Bolivia 波 札 那 Botswana 西 Brazil 巴 保 加 利 亞 Bulgaria 緬 甸 Burma 蒲 隆 地 Burundi 高 50 50 50 50 50 50 Chinese English 大 陸 哥 倫 比 亞 剛 果 哥斯大黎加 古 巴 塞 普 路 斯 China Colombia Congo Costa Rica Cuba Cyprus Czechoslov akia Dahomey Den mark Dominican Dubai Ecuador Egypt 50 捷 50 60 60 50 50 50 60 50 50 50 60 50 50 50 棉 Cambodia 50 克 達 荷 美 丹 麥 多 明 尼 加 杜 貝 厄 瓜 多 爾 埃 及 薩 爾 瓦 多 El Salvador Equatorial 赤道幾內亞 Guinea 衣 索 匹 亞 Ethiopia Faeroe 法 羅 群 島 Island 裴 濟 Fiji 芬 蘭 Finland 法 國 France French 蓋 亞 那 Guiana 50 60 50 60 60 50 Region/Country Chinese 關 石 榴 瓜地馬 幾 內 蓋 亞 海 50 夏 50 50 60 50 60 50 60 威 宏都拉 香 匈 牙 冰 印 印 伊 島 島 拉 亞 納 地 English Guam Grenada Guatemala Guinea Gayana Haiti 夷 Hawaii 斯 港 利 島 度 尼 朗 Honduras Hong Kong Hungary Ice land India Indonesin Iran Frequency English Region/Country Frequency Chinese Frequency Region/Country 60 50 60 50 50 60 60 60 50 50 50 50 50 50 50 伊 拉 克 Iraq 50 50 愛 爾 蘭 Ireland 50 島 Isle of Man 50 50 曼 50 以 色 列 Israel 50 50 義 大 利 Italy 50 50 象 牙 海 岸 Ivory Coast 50 50 牙 買 加 Jamaica 50 彭 Gabon 50 日 本 Japan 亞 Gambia 50 約 旦 Jordan 50 60 50 50 德 國 Germany 50 肯 亞 Kenya 50 中非共和國 50 迦 納 Ghana 50 韓 國 Korea 60 錫 Central Africa Rep. 蘭 Ceylon 50 科 威 特 Kuwait 50 查 德 Chad 50 直 布 羅 陀 Gibraltar Great 50 大 不 列 顛 Britain 50 黎 巴 嫩 Lebanon 50 50 希 50 賴 索 托 Lesotho 50 喀 麥 隆 Cameroon 50 加 加 拿 大 Canada 60 甘 CanaryIslan 康那利群島 d 海峽 群 島 Channel Island 比 臘 Greece English - 42 Chinese English 利 Chile 亞 Libya 堡 Luxembourg 50 格 陸 蘭 Greenland 曼 Oman 50 阿 50 巴 基 斯 坦 Pakistan 門 Macao 50 巴 拿 馬 Panama 馬得拉群島 Madeiral Majokca 馬約 卡 島 Island 50 巴 拉 馬 拉 加 西 Malagasy 50 菲 智 利 盧 比 森 澳 馬 拉 威 馬來 西 亞 馬 利 馬 爾 他 馬丁尼克島 茅里塔尼亞 模里 西 斯 Malawi Malaysia Mali Rep. Malta Martinique Mauritania Mauritius 墨 西 哥 Mexico 摩 那 哥 Monaco 蒙特色納島 Montserrat 50 秘 律 洛 哥 Morocco 奈 及 利 亞 Nigeria 挪 琉 威 Norway 球 Okinawa Chinese 60 50 60 奎 Paraguay 魯 Peru 60 泰 50 賓 Philippines 60 多哥共和國 50 50 50 50 50 50 50 國 Thailand 波 蘭 Poland 葡 蔔 牙 Portugal 波 多 黎 各 Puerto Rico 科 托 Qatar 羅 德 西 亞 Rhodesia 羅 馬 尼 亞 Romania 盧 安 達 Rwanda 沙 烏 地 Saudi 60 阿 拉 伯 Arabia 50 〞 60 50 50 50 50 50 60 50 蘇 蘭 Scotland 50 英 60 塞 內 加 爾 Senegal 50 上 伏 50 烏 拉 格 50 獅 子 山 50 史 瓦 濟 蘭 Swaziland 50 瑞 60 瑞 English 50 賴 比 瑞 亞 Liberia 50 敘 利 亞 Syria 50 大 溪 地 Tahiti R.O.C. 60 中 華 民 國 Taiwan 50 坦 尚 尼 亞 Tanzania Sierra Leone 莫 桑 鼻 克 Mozambique 50 新 加 坡 Singapore 尼 泊 爾 Nepal 50 索 馬 利 亞 Somalia South 荷 爾 Netherlands 50 南非共和國 Africa Rep. New 新蘇 格 蘭 50 西 班 牙 Spain Caledonia New 紐 西 蘭 50 斯 里 蘭 卡 Sri Lanka Zealand 尼 加 拉 瓜 Nicaragua 丹 Sudan 60 蘇 尼 日 Niger 50 蘇 利 南 Surinam 摩 Region/Country Frequency English Region/Country Frequency Chinese Frequency Region/Country 典 Sweden 士 Switzerland Togo Rep.of Tonga Trinidad Tobago Tunisia Turkey Uganda USA. 東 千 里 他 巴 突尼西 土 耳 烏 干 美 加 達 哥 亞 其 達 國 蘇 聯 USSR United Kingdom Upper 塔 Volta 國 奎 Uruguay 60 50 50 50 60 60 50 50 50 60 50 50 50 50 50 委 內 瑞 拉 Venezuela 南 Viet-Nam 50 越 Virgin 50 維爾京群島 Island Western 50 西 薩 摩 亞 Samoa 60 50 50 葉 門 亞 丁 Yeman(Aden) 50 50 葉門阿拉伯 Yemen(Arab) 60 南 斯 拉 夫 Yugoslavia Zaire Rep. 50 薩伊共和國 of 50 尚 比 亞 Zambia 50 50 50 60 50 50 50 English - 43