1
ALPHA
MICROSYSTEMS
RIGHT. FROM THE START.
ALPHA
MICROSYSTEMS
RIGHT. FROM THE START.
ALPHA
MICROSYSTEMS
RIGHT. FROM THE START.
ALPHA
MICROSYSTEMS
RIGHT. FROM THE START.
ALPHA
MICROSYSTEMS
RIGHT. FROM THE START.
ALPHA
MICROSYSTEMS
RIGHT. FROM THE START.
ALPHA
MICROSYSTEMS
RIGHT. FROM THE START.
ALPHA
MICROSYSTEMS
RIGHT. FROM THE START.
ALPHA
MICROSYSTEMS
RIGHT. FROM THE START.
ALPHA
MICROSYSTEMS
RIGHT. FROM THE START.
ALPHA
MICROSYSTEMS
RIGHT. FROM THE START.
ALPHA
MICROSYSTEMS
RIGHT. FROM THE START.
ALPHA
MICROSYSTEMS
RIGHT. FROM THE START.
AlphaXED
User’s Manual
DSM-00106-01
© 1996 Alpha Microsystems
REVISIONS INCORPORATED
REVISION
DATE
00
April 1991
01
September 1996
AlphaXED User’s Manual
To re-order this document, request part number DSO-00106-00.
This document applies to AMOS version 2.3 and later.
The information contained in this manual is believed to be accurate and reliable. However, no responsibility
for the accuracy, completeness or use of this information is assumed by Alpha Microsystems.
This document may contain references to products covered under U.S. Patent Number 4,530,048.
The following are registered trademarks of Alpha Microsystems, Santa Ana, CA 92799:
AMIGOS
AlphaBASIC
AlphaFORTRAN 77
AlphaMATE
AlphaWRITE
VIDEOTRAX
AMOS
AlphaCALC
AlphaLAN
AlphaNET
CASELODE
Alpha Micro
AlphaCOBOL
AlphaLEDGER
AlphaPASCAL
OmniBASIC
AlphaACCOUNTING
AlphaDDE
AlphaMAIL
AlphaRJE
VER-A-TEL
The following are trademarks of Alpha Microsystems, Santa Ana, CA 92799:
AlphaBASIC PLUS
AlphaDDE
inFront/am
AlphaVUE
AlphaConnect
ESP
AM-PC
DART
MULTI
All other copyrights and trademarks are the property of their respective holders.
ALPHA MICROSYSTEMS
2722 S. Fairview St.
P.O. Box 25059
Santa Ana, CA 92799
AMTEC
inSight/am
TABLE OF CONTENTS
CHAPTER 1 - INTRODUCTION
IF YOU ARE A NEW COMPUTER USER . . . . . . . . . . . . . . . . . . . . . . . . . . .
FILES AND FILE NAMES . . . . . . . . . . . . . . . . . . . . . . . . . . . . . . . . . . . . . . .
THE XED.INI FILE . . . . . . . . . . . . . . . . . . . . . . . . . . . . . . . . . . . . . . . . . . . . .
READER’S COMMENTS FORM . . . . . . . . . . . . . . . . . . . . . . . . . . . . . . . . . .
GRAPHICS CONVENTIONS . . . . . . . . . . . . . . . . . . . . . . . . . . . . . . . . . . . .
OTHER ALPHA MICRO MANUALS TO USE . . . . . . . . . . . . . . . . . . . . . . . .
1-1
1-1
1-1
1-2
1-2
1-4
CHAPTER 2 - GETTING STARTED
YOUR TERMINAL AND KEYBOARD . . . . . . . . . . . . . . . . . . . . . . . . . . . . . .
Function Keys . . . . . . . . . . . . . . . . . . . . . . . . . . . . . . . . . . . . . . . . . .
The CONTROL Key . . . . . . . . . . . . . . . . . . . . . . . . . . . . . . . . . . . . . .
The ESC Key . . . . . . . . . . . . . . . . . . . . . . . . . . . . . . . . . . . . . . . . . . .
Alpha Micro Compatible Terminals . . . . . . . . . . . . . . . . . . . . . . . . . .
USING THE XED COMMAND . . . . . . . . . . . . . . . . . . . . . . . . . . . . . . . . . . . .
Creating an AlphaXED File . . . . . . . . . . . . . . . . . . . . . . . . . . . . . . . .
Choosing a File Name . . . . . . . . . . . . . . . . . . . . . . . . . . . . . . . . . . . .
Viewing an Existing File . . . . . . . . . . . . . . . . . . . . . . . . . . . . . . . . . . .
USING ALPHAXED . . . . . . . . . . . . . . . . . . . . . . . . . . . . . . . . . . . . . . . . . . . .
Edit Mode . . . . . . . . . . . . . . . . . . . . . . . . . . . . . . . . . . . . . . . . . . . . . .
Command Mode . . . . . . . . . . . . . . . . . . . . . . . . . . . . . . . . . . . . . . . .
The HELP Command . . . . . . . . . . . . . . . . . . . . . . . . . . . . . . . . . . . . .
The SAVE Command . . . . . . . . . . . . . . . . . . . . . . . . . . . . . . . . . . . .
The Option Menu . . . . . . . . . . . . . . . . . . . . . . . . . . . . . . . . . . . . . . . .
LEAVING ALPHAXED . . . . . . . . . . . . . . . . . . . . . . . . . . . . . . . . . . . . . . . . . .
The FINISH Command . . . . . . . . . . . . . . . . . . . . . . . . . . . . . . . . . . .
The GO Command . . . . . . . . . . . . . . . . . . . . . . . . . . . . . . . . . . . . . .
The QUIT Command . . . . . . . . . . . . . . . . . . . . . . . . . . . . . . . . . . . . .
The Q! Command . . . . . . . . . . . . . . . . . . . . . . . . . . . . . . . . . . . . . . .
The RECESS Command . . . . . . . . . . . . . . . . . . . . . . . . . . . . . . . . . .
XEDIT - EDIT A NEW FILE . . . . . . . . . . . . . . . . . . . . . . . . . . . . . . . . . . . . . .
2-1
2-2
2-3
2-3
2-3
2-3
2-4
2-4
2-5
2-5
2-6
2-6
2-6
2-7
2-7
2-7
2-7
2-8
2-8
2-8
2-9
2-9
CHAPTER 3 - MOVING AROUND IN YOUR FILE
MOVING THE CURSOR ON THE CURRENT SCREEN . . . . . . . . . . . . . . .
MOVING FROM SCREEN TO SCREEN . . . . . . . . . . . . . . . . . . . . . . . . . . .
MOVING TO A PARTICULAR LINE . . . . . . . . . . . . . . . . . . . . . . . . . . . . . . .
REMEMBERING THE CURSOR LOCATION . . . . . . . . . . . . . . . . . . . . . . . .
THE SPLIT SCREEN FEATURE . . . . . . . . . . . . . . . . . . . . . . . . . . . . . . . . . .
THE PREVIOUS CHANGE FEATURE . . . . . . . . . . . . . . . . . . . . . . . . . . . . .
3-1
3-2
3-3
3-3
3-4
3-4
AlphaXED User’s Manual, Rev. 01
Page 2
CHAPTER 4 - TEXT EDITING FEATURES
INSERTING CHARACTERS . . . . . . . . . . . . . . . . . . . . . . . . . . . . . . . . . . . . .
Character Insert Key . . . . . . . . . . . . . . . . . . . . . . . . . . . . . . . . . . . . .
Character Insert Mode . . . . . . . . . . . . . . . . . . . . . . . . . . . . . . . . . . . .
Inserting a Word . . . . . . . . . . . . . . . . . . . . . . . . . . . . . . . . . . . . . . . .
INSERTING LINES . . . . . . . . . . . . . . . . . . . . . . . . . . . . . . . . . . . . . . . . . . . .
The LINE INS Key . . . . . . . . . . . . . . . . . . . . . . . . . . . . . . . . . . . . . . .
Automatic Line Insert Mode . . . . . . . . . . . . . . . . . . . . . . . . . . . . . . . .
DELETING CHARACTERS . . . . . . . . . . . . . . . . . . . . . . . . . . . . . . . . . . . . . .
Deleting a Word . . . . . . . . . . . . . . . . . . . . . . . . . . . . . . . . . . . . . . . . .
Deleting Lines . . . . . . . . . . . . . . . . . . . . . . . . . . . . . . . . . . . . . . . . . .
Restoring Deleted Text . . . . . . . . . . . . . . . . . . . . . . . . . . . . . . . . . . .
RE-ARRANGING TEXT . . . . . . . . . . . . . . . . . . . . . . . . . . . . . . . . . . . . . . . .
Breaking and Joining Lines . . . . . . . . . . . . . . . . . . . . . . . . . . . . . . . .
Centering a Line . . . . . . . . . . . . . . . . . . . . . . . . . . . . . . . . . . . . . . . .
Formatting Paragraphs . . . . . . . . . . . . . . . . . . . . . . . . . . . . . . . . . . .
REFRESHING THE SCREEN . . . . . . . . . . . . . . . . . . . . . . . . . . . . . . . . . . . .
4-1
4-1
4-1
4-2
4-2
4-2
4-2
4-2
4-3
4-3
4-3
4-3
4-4
4-4
4-4
4-4
CHAPTER 5 - BLOCK EDITING FEATURES
WORKING WITH BLOCKS OF TEXT . . . . . . . . . . . . . . . . . . . . . . . . . . . . . .
Marking Text . . . . . . . . . . . . . . . . . . . . . . . . . . . . . . . . . . . . . . . . . . .
Clearing Marks . . . . . . . . . . . . . . . . . . . . . . . . . . . . . . . . . . . . . . . . . .
Copying Text . . . . . . . . . . . . . . . . . . . . . . . . . . . . . . . . . . . . . . . . . . .
Copying and Clearing Text . . . . . . . . . . . . . . . . . . . . . . . . . . . . . . . .
The SHIFT Command . . . . . . . . . . . . . . . . . . . . . . . . . . . . . . . . . . . .
Deleting Text . . . . . . . . . . . . . . . . . . . . . . . . . . . . . . . . . . . . . . . . . . .
Moving Text . . . . . . . . . . . . . . . . . . . . . . . . . . . . . . . . . . . . . . . . . . . .
TRANSFERRING TEXT BETWEEN FILES . . . . . . . . . . . . . . . . . . . . . . . . .
Moving Text Out of Your File . . . . . . . . . . . . . . . . . . . . . . . . . . . . . . .
Moving Text Into Your File . . . . . . . . . . . . . . . . . . . . . . . . . . . . . . . . .
CUTTING AND PASTING . . . . . . . . . . . . . . . . . . . . . . . . . . . . . . . . . . . . . . .
TRANSFERRING TEXT TO AND FROM THE DISK . . . . . . . . . . . . . . . . . .
YANKING IN A PROGRAM MODULE . . . . . . . . . . . . . . . . . . . . . . . . . . . . .
5-1
5-1
5-2
5-2
5-2
5-3
5-3
5-4
5-4
5-4
5-5
5-6
5-6
5-7
CHAPTER 6 - KEYSTROKE JOURNALING
XED AND COMPUTER MEMORY . . . . . . . . . . . . . . . . . . . . . . . . . . . . . . . .
WHAT IS KEYSTROKE JOURNALING? . . . . . . . . . . . . . . . . . . . . . . . . . . .
TURNING JOURNALING ON AND OFF . . . . . . . . . . . . . . . . . . . . . . . . . . . .
WHAT HAPPENS AFTER THE EDITING IS INTERRUPTED? . . . . . . . . . .
Restoring a Journal File . . . . . . . . . . . . . . . . . . . . . . . . . . . . . . . . . . .
Erasing a Journal File . . . . . . . . . . . . . . . . . . . . . . . . . . . . . . . . . . . .
Exiting and Retaining the Journal File . . . . . . . . . . . . . . . . . . . . . . . .
6-1
6-1
6-2
6-2
6-2
6-3
6-3
AlphaXED User’s Manual, Rev. 01
Page 3
CHAPTER 7 - THE OPTION MENU
CALLING THE OPTION MENU AND RETURNING . . . . . . . . . . . . . . . . . . .
CHANGING PARAMETERS . . . . . . . . . . . . . . . . . . . . . . . . . . . . . . . . . . . . .
SEARCH AND REPLACE OPTIONS . . . . . . . . . . . . . . . . . . . . . . . . . . . . . .
BACKWARD . . . . . . . . . . . . . . . . . . . . . . . . . . . . . . . . . . . . . . . . . . .
COMPRESS . . . . . . . . . . . . . . . . . . . . . . . . . . . . . . . . . . . . . . . . . . .
SBLK . . . . . . . . . . . . . . . . . . . . . . . . . . . . . . . . . . . . . . . . . . . . . . . . .
SEARCHFOLD . . . . . . . . . . . . . . . . . . . . . . . . . . . . . . . . . . . . . . . . .
TOKEN . . . . . . . . . . . . . . . . . . . . . . . . . . . . . . . . . . . . . . . . . . . . . . .
WILDCARD . . . . . . . . . . . . . . . . . . . . . . . . . . . . . . . . . . . . . . . . . . . .
GENERAL OPTIONS . . . . . . . . . . . . . . . . . . . . . . . . . . . . . . . . . . . . . . . . . .
CHARINS . . . . . . . . . . . . . . . . . . . . . . . . . . . . . . . . . . . . . . . . . . . . . .
CONVERT . . . . . . . . . . . . . . . . . . . . . . . . . . . . . . . . . . . . . . . . . . . . .
EOLN . . . . . . . . . . . . . . . . . . . . . . . . . . . . . . . . . . . . . . . . . . . . . . . . .
INDENT . . . . . . . . . . . . . . . . . . . . . . . . . . . . . . . . . . . . . . . . . . . . . . .
MARGIN . . . . . . . . . . . . . . . . . . . . . . . . . . . . . . . . . . . . . . . . . . . . . .
MODEM . . . . . . . . . . . . . . . . . . . . . . . . . . . . . . . . . . . . . . . . . . . . . . .
MOUSE . . . . . . . . . . . . . . . . . . . . . . . . . . . . . . . . . . . . . . . . . . . . . . .
TAB . . . . . . . . . . . . . . . . . . . . . . . . . . . . . . . . . . . . . . . . . . . . . . . . . .
WIDTH . . . . . . . . . . . . . . . . . . . . . . . . . . . . . . . . . . . . . . . . . . . . . . . .
WRAP . . . . . . . . . . . . . . . . . . . . . . . . . . . . . . . . . . . . . . . . . . . . . . . .
ENTRY MODE OPTIONS . . . . . . . . . . . . . . . . . . . . . . . . . . . . . . . . . . . . . . .
COLUMN . . . . . . . . . . . . . . . . . . . . . . . . . . . . . . . . . . . . . . . . . . . . . .
COMMA . . . . . . . . . . . . . . . . . . . . . . . . . . . . . . . . . . . . . . . . . . . . . . .
COMMENT Character . . . . . . . . . . . . . . . . . . . . . . . . . . . . . . . . . . . .
DELTA ON/OFF . . . . . . . . . . . . . . . . . . . . . . . . . . . . . . . . . . . . . . . . .
DELTA Increment . . . . . . . . . . . . . . . . . . . . . . . . . . . . . . . . . . . . . . .
ENTRY . . . . . . . . . . . . . . . . . . . . . . . . . . . . . . . . . . . . . . . . . . . . . . . .
FIELD Character . . . . . . . . . . . . . . . . . . . . . . . . . . . . . . . . . . . . . . . .
FIELD ON/OFF . . . . . . . . . . . . . . . . . . . . . . . . . . . . . . . . . . . . . . . . .
FOLD . . . . . . . . . . . . . . . . . . . . . . . . . . . . . . . . . . . . . . . . . . . . . . . . .
INSERT . . . . . . . . . . . . . . . . . . . . . . . . . . . . . . . . . . . . . . . . . . . . . . .
SPACE . . . . . . . . . . . . . . . . . . . . . . . . . . . . . . . . . . . . . . . . . . . . . . . .
7-1
7-1
7-2
7-2
7-2
7-2
7-2
7-3
7-3
7-4
7-4
7-4
7-5
7-5
7-6
7-6
7-6
7-6
7-7
7-7
7-8
7-8
7-8
7-8
7-8
7-9
7-9
7-9
7-10
7-10
7-10
7-10
CHAPTER 8 - COMMAND MODE
WHAT IS COMMAND MODE? . . . . . . . . . . . . . . . . . . . . . . . . . . . . . . . . . . .
CALLING UP COMMAND MODE . . . . . . . . . . . . . . . . . . . . . . . . . . . . . . . . .
USING AMOS COMMANDS . . . . . . . . . . . . . . . . . . . . . . . . . . . . . . . . . . . . .
USING EDITING PROGRAMS WITHIN XED . . . . . . . . . . . . . . . . . . . . . . . .
8-1
8-1
8-2
8-3
CHAPTER 9 - SEARCHING FOR AND REPLACING TEXT
SETTINGS AFFECTING SEARCH AND REPLACE . . . . . . . . . . . . . . . . . . .
FINDING TEXT (SEARCH) . . . . . . . . . . . . . . . . . . . . . . . . . . . . . . . . . . . . . .
SEARCHING FROM CURSOR LOCATION . . . . . . . . . . . . . . . . . . . . . . . . .
BACKWARD SEARCHING . . . . . . . . . . . . . . . . . . . . . . . . . . . . . . . . . . . . . .
SEARCHING IN LARGE FILES . . . . . . . . . . . . . . . . . . . . . . . . . . . . . . . . . .
REPLACING TEXT . . . . . . . . . . . . . . . . . . . . . . . . . . . . . . . . . . . . . . . . . . . .
GLOBAL REPLACEMENT OF TEXT . . . . . . . . . . . . . . . . . . . . . . . . . . . . . .
9-1
9-2
9-3
9-3
9-3
9-3
9-4
AlphaXED User’s Manual, Rev. 01
Page 4
MATCHING BRACES . . . . . . . . . . . . . . . . . . . . . . . . . . . . . . . . . . . . . . . . . . 9-5
File Balance . . . . . . . . . . . . . . . . . . . . . . . . . . . . . . . . . . . . . . . . . . . . 9-5
Programming Language Context Sensitvity . . . . . . . . . . . . . . . . . . . 9-5
CHAPTER 10 - CAPTURE AND MACRO FEATURES
CAPTURING A SEQUENCE . . . . . . . . . . . . . . . . . . . . . . . . . . . . . . . . . . . . .
Executing a Captured Sequence . . . . . . . . . . . . . . . . . . . . . . . . . . . .
Adding To A Capture Sequence . . . . . . . . . . . . . . . . . . . . . . . . . . . .
REPEATING KEYSTROKES . . . . . . . . . . . . . . . . . . . . . . . . . . . . . . . . . . . .
CREATING AND USING MACROS . . . . . . . . . . . . . . . . . . . . . . . . . . . . . . .
Defining a Macro . . . . . . . . . . . . . . . . . . . . . . . . . . . . . . . . . . . . . . . .
Editing Existing Macros . . . . . . . . . . . . . . . . . . . . . . . . . . . . . . . . . . .
Using Function and Control Keys in Macros . . . . . . . . . . . . . . . . . . .
Saving a Macro . . . . . . . . . . . . . . . . . . . . . . . . . . . . . . . . . . . . . . . . .
DEFINING MACROS IN XED.INI . . . . . . . . . . . . . . . . . . . . . . . . . . . . . . . . .
Macro Files . . . . . . . . . . . . . . . . . . . . . . . . . . . . . . . . . . . . . . . . . . . .
THE MACRO MENU . . . . . . . . . . . . . . . . . . . . . . . . . . . . . . . . . . . . . . . . . . .
Macro Restrictions . . . . . . . . . . . . . . . . . . . . . . . . . . . . . . . . . . . . . . .
Macro Commands . . . . . . . . . . . . . . . . . . . . . . . . . . . . . . . . . . . . . . .
BREAK . . . . . . . . . . . . . . . . . . . . . . . . . . . . . . . . . . . . . . . . . . . . . . . .
DO and OD . . . . . . . . . . . . . . . . . . . . . . . . . . . . . . . . . . . . . . . . . . . .
IF and FI . . . . . . . . . . . . . . . . . . . . . . . . . . . . . . . . . . . . . . . . . . . . . .
SPAN . . . . . . . . . . . . . . . . . . . . . . . . . . . . . . . . . . . . . . . . . . . . . . . . .
10-1
10-1
10-2
10-2
10-2
10-3
10-3
10-3
10-5
10-5
10-5
10-5
10-6
10-6
10-6
10-6
10-7
10-7
CHAPTER 11 - SPECIAL FEATURES
INSERTING CONTROL CHARACTERS . . . . . . . . . . . . . . . . . . . . . . . . . . . .
EDIT HISTORY . . . . . . . . . . . . . . . . . . . . . . . . . . . . . . . . . . . . . . . . . . . . . . .
XED COMMAND SWITCHES . . . . . . . . . . . . . . . . . . . . . . . . . . . . . . . . . . . .
/BATCH . . . . . . . . . . . . . . . . . . . . . . . . . . . . . . . . . . . . . . . . . . . . . . .
/BIN . . . . . . . . . . . . . . . . . . . . . . . . . . . . . . . . . . . . . . . . . . . . . . . . . .
/NOJOURNAL . . . . . . . . . . . . . . . . . . . . . . . . . . . . . . . . . . . . . . . . . .
/NODISPLAY . . . . . . . . . . . . . . . . . . . . . . . . . . . . . . . . . . . . . . . . . . .
/NOYANK . . . . . . . . . . . . . . . . . . . . . . . . . . . . . . . . . . . . . . . . . . . . . .
/READ . . . . . . . . . . . . . . . . . . . . . . . . . . . . . . . . . . . . . . . . . . . . . . . .
/SUBROUTINE . . . . . . . . . . . . . . . . . . . . . . . . . . . . . . . . . . . . . . . . .
/TRACE . . . . . . . . . . . . . . . . . . . . . . . . . . . . . . . . . . . . . . . . . . . . . . .
COMPILING PROGRAMS . . . . . . . . . . . . . . . . . . . . . . . . . . . . . . . . . . . . . .
CONTEXT HELP . . . . . . . . . . . . . . . . . . . . . . . . . . . . . . . . . . . . . . . . . . . . . .
11-1
11-1
11-2
11-2
11-2
11-2
11-2
11-2
11-3
11-3
11-3
11-3
11-4
APPENDIX A - THE XED.INI FILE
CREATING AN ALPHAXED INITIALIZATION FILE . . . . . . . . . . . . . . . . . . .
Location of XED.INI . . . . . . . . . . . . . . . . . . . . . . . . . . . . . . . . . . . . . .
Search Path for XED.INI . . . . . . . . . . . . . . . . . . . . . . . . . . . . . . . . . .
INITIALIZATION FILE COMMANDS . . . . . . . . . . . . . . . . . . . . . . . . . . . . . . .
DEFAULT . . . . . . . . . . . . . . . . . . . . . . . . . . . . . . . . . . . . . . . . . . . . .
DISPLAY . . . . . . . . . . . . . . . . . . . . . . . . . . . . . . . . . . . . . . . . . . . . . .
GO . . . . . . . . . . . . . . . . . . . . . . . . . . . . . . . . . . . . . . . . . . . . . . . . . . .
A-1
A-2
A-2
A-2
A-4
A-5
A-5
AlphaXED User’s Manual, Rev. 01
Page 5
JOURNAL n . . . . . . . . . . . . . . . . . . . . . . . . . . . . . . . . . . . . . . . . . . . .
MODULE . . . . . . . . . . . . . . . . . . . . . . . . . . . . . . . . . . . . . . . . . . . . . .
START . . . . . . . . . . . . . . . . . . . . . . . . . . . . . . . . . . . . . . . . . . . . . . . .
SETTING THE TAB WIDTH (TAB :T) . . . . . . . . . . . . . . . . . . . . . . . . . . . . . .
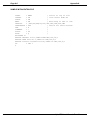
SAMPLE INITIALIZATION FILE . . . . . . . . . . . . . . . . . . . . . . . . . . . . . . . . . .
A-7
A-7
A-7
A-7
A-8
APPENDIX B - ERROR MESSAGES
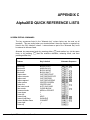
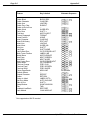
APPENDIX C - ALPHAXED QUICK REFERENCE LISTS
SCREEN EDITING COMMANDS . . . . . . . . . . . . . . . . . . . . . . . . . . . . . . . . .
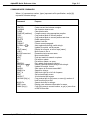
COMMAND MODE COMMANDS . . . . . . . . . . . . . . . . . . . . . . . . . . . . . . . . .
OPTION MENU SETTINGS . . . . . . . . . . . . . . . . . . . . . . . . . . . . . . . . . . . . .
INITIALIZATION FILE COMMANDS . . . . . . . . . . . . . . . . . . . . . . . . . . . . . . .
SWITCHES . . . . . . . . . . . . . . . . . . . . . . . . . . . . . . . . . . . . . . . . . . . . . . . . . .
C-1
C-3
C-4
C-5
C-5
APPENDIX D - TECHNICAL INFORMATION
TECHNICAL DEFINITIONS . . . . . . . . . . . . . . . . . . . . . . . . . . . . . . . . . . . . .
INPUT FILES . . . . . . . . . . . . . . . . . . . . . . . . . . . . . . . . . . . . . . . . . . . . . . . . .
OUTPUT FILES . . . . . . . . . . . . . . . . . . . . . . . . . . . . . . . . . . . . . . . . . . . . . . .
SEARCH KEY . . . . . . . . . . . . . . . . . . . . . . . . . . . . . . . . . . . . . . . . . . . . . . . .
FORMAT RULES . . . . . . . . . . . . . . . . . . . . . . . . . . . . . . . . . . . . . . . . . . . . .
D-1
D-3
D-3
D-3
D-4
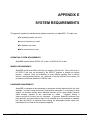
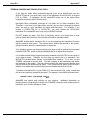
APPENDIX E - SYSTEM REQUIREMENTS
OPERATING SYSTEM REQUIREMENTS . . . . . . . . . . . . . . . . . . . . . . . . . .
MEMORY REQUIREMENTS . . . . . . . . . . . . . . . . . . . . . . . . . . . . . . . . . . . .
HARDWARE REQUIREMENTS . . . . . . . . . . . . . . . . . . . . . . . . . . . . . . . . . .
TERMINAL DRIVERS AND TRANSLATION FILES . . . . . . . . . . . . . . . . . . .
E-1
E-1
E-1
E-2
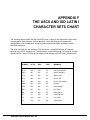
APPENDIX F - THE ASCII AND ISO LATIN 1 CHARACTER SETS
DOCUMENT HISTORY
INDEX
AlphaXED User’s Manual, Rev. 01
CHAPTER 1
INTRODUCTION
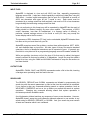
XED is a text editor, similar to and containing most of the features of AlphaVUE, tailored to the
needs of programmers. It lets you easily edit program files, and has many features to help you
with program design.
Generally, XED is used in conjunction with other Alpha Micro software. If you use XED to write
a BASIC PLUS file, for example, you’d also use COMPLP to make an executable file, and
RUNP to run it.
This manual shows you how to use XED to write a program or text file and edit it so you get the
results you want. Other manuals, listed at the end of this chapter, help you with processing
your XED files.
IF YOU ARE A NEW COMPUTER USER
This manual assumes you know the basics of the Alpha Micro Operating System
(AMOS), and understand how to log on, use accounts, and use your keyboard. If you
are unfamiliar with these subjects, you should first read the appropriate parts of the
AMOS User’s Guide.
FILES AND FILE NAMES
Your file name consists of two parts: the filename itself (which can be from one to six
characters long) and the extension that defines the type of file (which can be from zero
to three characters long). For example, your file name might be DEBIT.BP. DEBIT is
the descriptive file name, and .BP indicates it is a BASIC PLUS source file. Other
examples are STOCK.M68, GRAPH.C.
THE XED.INI FILE
The XED.INI file controls certain aspects of XED execution, and contains commands,
called parameters. For example, if the XED.INI file contains the statement DEFAULT
BP, when you tell XED to create a file, without specifying an extension, the program
assumes .BP.
AlphaXED User’s Manual, Rev. 01
Page 1-2
Introduction
Because XED lets you create your own XED.INI file, you can include the parameters
most useful to you—that’s why AlphaXED is so versatile.
However, a clear
understanding of the XED.INI file and its operation depends on a familiarity with the rest
of AlphaXED. Therefore, a complete explanation of this file is delayed until Appendix A.
READER’S COMMENTS FORM
At the back of the manual is a Reader’s Comments Form. We would appreciate it if you
would use this form to tell us what you like about the manual and/or how you think we
can improve it. Although we regularly update our documentation to reflect changes in
the software, it is your advice that contributes the most toward improving the overall
quality of the books.
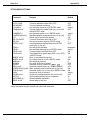
GRAPHICS CONVENTIONS
This manual conforms to the other Alpha Micro publications in its use of a standard set
of graphics conventions. We hope these graphics simplify our examples and make
them easier for you to use. Unless stated otherwise, all examples of commands are
assumed to be entered at AMOS command level.
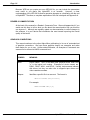
SYMBOL
MEANING
devn:
Device Name. "dev" is the three letter physical device code, and
"n" is the logical unit number. Examples of device names are
DSK0:, DSK5:, WIN1:, and MTU0:. Usually, device names indicate
disk drives, but they can also refer to magnetic tape drives and
video cassette recorders.
filespec
Identifies a specific file in an account. The format is:
devn:filename.ext[account]
For example:
DSK0:SYSTEM.INI[1,4]
AlphaXED User’s Manual, Rev. 01
Chapter One
Page 1-3
SYMBOL
MEANING
NAME
Command and option names are printed in capital letters in a
smaller type font. For example: SEARCH.
{}
Braces indicate optional elements of a command line.
example:
In the
DIR{/switch}
the braces tell you "/switch" is not required.
TEXT
Bold text in an example of user/computer communication
represents the characters you type.
TEXT
Text like this in an example of user/computer communication
represents characters the computer displays on your screen.
KEY
In our examples, the key symbol appears whenever you need to
press a key on your terminal keyboard. The name of the key you
need to press appears inside the key symbol, like this: RETURN . If you
need to press the TAB key, you would see TAB , or the ESC key,
ESC (sometimes ESC is labeled ESCAPE ).
CTRL
^
/
KEY
Indicates a control sequence you press on the keyboard. Press
CTRL and hold it down while pressing the indicated key.
This symbol in front of a capital letter means the letter is a "control
character." For example, when you press CTRL / C , it appears on
your screen as ^C.
This symbol means "halt!" It indicates an important note you
should read carefully before going further in the documentation.
Usually, text next to this symbol contains instructions for something
you MUST or MUST NOT do, so read it carefully.
This symbol means "hint." It indicates a helpful bit of information,
or a "short cut" that could save you time or trouble.
This symbol means "remember." It indicates something you should
keep in mind while you are following a set of instructions.
AlphaXED User’s Manual, Rev. 01
Page 1-4
Introduction
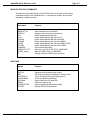
OTHER ALPHA MICRO MANUALS TO USE
These manuals, available from Alpha Micro, may help you in your use of XED:
AMOS Manuals:
AlphaVUE/TXTFMT Training Guide
User’s Guide
System Operator’s Guide
System Commands Reference Manual
Programming Manuals:
AlphaBASIC User’s Manual
AlphaBASIC PLUS User’s Manual
AlphaC User’s Manual
AlphaC Interface to the AMOS Monitor Calls
AlphaCOBOL User’s Manual
AlphaFORTRAN Compiler User’s Manual
AlphaFORTRAN Linker User’s Manual
AlphaPASCAL User’s Manual
Assembly Language Programmer’s Manual
ISAM PLUS User’s Manual
AlphaXED User’s Manual, Rev. 01
CHAPTER 2
GETTING STARTED
If you are new to using AlphaXED, this chapter introduces you to the basics and helps
you decide which other chapters to examine next. This chapter explains:
The terminal and your keyboard.
How to create a new file.
An overview of AlphaXED’s operating modes.
Exiting a file.
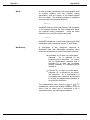
YOUR TERMINAL AND KEYBOARD
In addition to character keys, your terminal keyboard has a few keys important to
AlphaXED:
KEY NAME
RETURN
RUBOUT
PURPOSE
The RETURN key, sometimes labeled as RET, CR or ↵, corresponds
roughly to the carriage return on a typewriter. RETURN advances the cursor to
the next line. The cursor is a small marker moving along in front of each
letter as you type. Depending on the kind of terminal, it could be a
rectangle, square, triangle, or flashing line.
The RUBOUT key, sometimes labeled RUB, DELETE, or DEL, is used to
correct errors. When you press this key, the cursor moves backward one
space and erases the previous character. If your terminal has a repeat
feature, holding down RUBOUT causes the cursor to continue to move
backward, deleting each character it passes.
AlphaXED User’s Manual, Rev. 01
Page 2-2
Chapter Two
KEY NAME
PURPOSE
ARROW
Keys
←
↑
→
↓
The keys labeled with arrows move the cursor around without deleting
characters. When you press an arrow key, the cursor moves in the direction
the arrow points.
If you hold an arrow key down, the cursor continues to move without
deleting the characters it passes. When you want to correct a word or
character in the middle of a line, you can use the arrow keys to move the
cursor to the word, then make your correction. Other ways of moving the
cursor back and forth within your document are discussed in Chapter 4.
The TAB key spaces out a specific distance, which varies according to the
type of file. You can also set the TAB width.
TAB
The default TAB setting is 8 characters wide, but it acts as 1 character—you
can’t move the cursor into a tab field. If the tab is set to 8 or higher from
command mode, there is a "tab character" acting like a single space, even
though it appears to be more. You can delete this tab character by using
the CHAR DEL key. You can alter the tab stops to suit your needs.
However, if tab is less than 8, spaces are used instead of the tab character.
If tab is 9 or 10, one or two spaces are added to the tab character.
Resetting the TAB character in the XED.INI file allows you to set the width of
the tab character itself—for example, setting it to 5 would generate a tab
character 5 spaces wide but acting as a single character.
Function Keys
At the top or side of your keyboard, there may be a set of keys labelled with the letter F
and a number. These are function keys, and you use them to make use of some
AlphaXED features. Because different keyboards have different numbers of function
keys, the same function key—for example, F5 —may access different features on
different keyboards.
Throughout this manual, we refer to function keys by the name of the feature, as shown
in the AlphaXED Terminal Keyboard Reference Card—for example, MENU —and never by
number, since the number may vary from terminal to terminal.
If there aren’t any function keys on your terminal keyboard, don’t worry. You can use
any function key feature by pressing the universal key sequence for the feature.
Universal key sequences work on any terminal, and are listed in Appendix C and on the
AlphaXED Terminal Keyboard Reference Card.
AlphaXED User’s Manual, Rev. 01
Getting Started
Page 2-3
The CONTROL Key
You do certain AlphaXED operations by using the key labeled CTRL, or CONTROL.
You also use CTRL for some universal key sequences. When a key sequence requires
you to use CTRL and a character, press the keys at the same time. To do this, hold
down CTRL and press the character key once.
The ESC Key
You switch between AlphaXED’s command and editing modes by using the key labeled
ESC or ESCAPE (or by pressing MENU ).
Alpha Micro Compatible Terminals
The terminals sold by Alpha Micro have special features other terminals may not
have—features making it easier and more convenient to use AlphaXED. For example,
the NEXT SCREEN key advances the screen page, and HOME takes you to the
beginning of your file.
The information in this book assumes you are using an Alpha Micro compatible terminal.
If you do not have the keys identified in this book, see Appendix C for the universal key
sequence to do a particular feature.
USING THE XED COMMAND
To use AlphaXED, type XED followed by a file name. This can be the name of either a
new file you want to create, or an existing file you want to work with again. For example:
XED TEST.BP RETURN
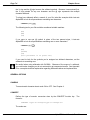
If you don’t specify a file name, XED prompts you for one:
Input file? TEST.BP RETURN
If TEST.BP doesn’t exist in your account, you are asked if you want to create it. If it
does exist, or you do create it, XED displays the file on your screen and lets you edit it.
The XED command has some options you may find useful later—they are explained in
Chapter 11. The next two sections describe what happens when you create a new file
or call up an existing one.
AlphaXED User’s Manual, Rev. 01
Page 2-4
Chapter Two
Creating an AlphaXED File
When you use the XED command with a file name which doesn’t exist in the account
you’re in, AlphaXED asks if you want to create the file. For example:
TEST.BP does not exist, do you wish it created?
To create the file, type Y RETURN . If for some reason you don’t want to create the file, just
press RETURN . When you create the file, AlphaXED displays an empty file on your screen.
The cursor is on a blank line at the top of your screen, with asterisks filling the rest of
the display. The end of an AlphaXED file is always marked by asterisks.
This is the most common way for a new file to display on your screen. If MODEM is set
ON in your XED.INI file, you may see only five asterisks on each line instead of an
entire row. You may also see a ">" symbol followed by the cursor. If you see this
symbol, press ESC and you see the display described above.
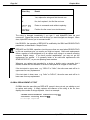
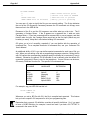
The last line of your screen is the "status line." It shows the version of AlphaXED you’re
using, the name of the file you’re in and the line you’re on, and various option settings
from the XED.INI file. For example:
XED 1.0(125) DSK2:TEST.BP. Width=78 Tab=8
CL 060 LN 00310
Choosing a File Name
Like other AMOS file names, AlphaXED file names can have up to six letters and
numbers, with an extension of from zero to three letters and numbers. In general, the
extension describes the type of file you’re creating. For example, the .TXT extension is
for a text file, while program source files may have an .M68 extension for assembly
language, .BP for AlphaBASIC PLUS, and so on.
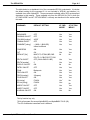
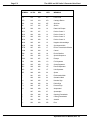
You may use any combination of letters and numbers for the name and most
combinations for the extension. However, certain extensions are restricted for use by
specific AMOS programs, and you can’t use AlphaXED to edit them:
RESTRICTED FILE EXTENSIONS
ALC
FWD
LIB
OVR
SPD
XBR
AMX
IDA
LIT
PDV
SPG
WRM
ATT
IDV
MAX
PFK
SYM
WRT
BAK
IDX
MDV
PHN
SYS
WRX
CAX
IDY
MIC
RMX
TDV
WSV
CBX
IPF
MLX
RP
TMP
CMN
JRL
MON
RPD
UNV
DVR
JRN
NDV
RUN
USM
FXO
LDF
OBJ
SBR
VUX
AlphaXED User’s Manual, Rev. 01
Getting Started
Page 2-5
If you try to create an AlphaXED file with one of these extensions, you see the message:
?Cannot XED or UNYANK file with .XXX extension.
Where XXX represents the offending extension.
Viewing an Existing File
Enter XED followed by the name of an existing file. For example:
XED MYFILE.TXT RETURN
If you don’t specify an extension—.TXT in the example above—AlphaXED refers to a
default extension list. See the discussion in Appendix A about the DEFAULT setting to
determine which extension AlphaXED assumes.
AlphaXED loads the file into memory and displays the beginning of the file on your
screen. As with the new file, the cursor is at the top of the screen, and the last line is
the status line. However, instead of asterisks, you see the first lines of the file. If the
whole file fits on one screen, you’ll see asterisks following the last line in your file.
As described in the previous section, depending on your XED.INI file settings, you may
see a different screen display. It is also possible you see the last lines of an existing file
instead of the beginning of the file.
Once your file is displayed, you can make changes, add new lines at the end, or just
look at the file. How to do all of these things is described throughout this book. If you
want technical information about the files AlphaXED can edit, see AppendixD.
USING ALPHAXED
AlphaXED has two "modes." "Edit mode" is where you add new text or change the
existing text in your file. "Command mode" lets you enter commands to change or
move around your file, view help information, leave AlphaXED, and so forth. AlphaXED
also has an options menu that lets you change editing parameters. When in command
mode, you see a prompt, >, at the cursor.
You switch between command mode and editing mode by pressing either MENU or ESC .
Press the OPTION MENU key to go to the options menu, and ESC or MENU to return to
edit mode.
AlphaXED User’s Manual, Rev. 01
Page 2-6
Chapter Two
Edit Mode
Edit mode lets you edit the text in your file. While you’re in edit mode you can add new
text to your file or change or remove existing text.
To add new text, type it. Each character you type appears at the cursor position, and
the cursor moves to the next character. When you want to go to a new line or leave a
line blank, press RETURN . At the end of the line, your typing may "wrap" to the next line, or
you may have to press RETURN , depending on how the WRAP parameter is set (see
Chapter 7).
To change existing text, you can type over it. There are also editing features to let you
insert text in the middle of existing text, delete characters, words, lines, or entire
sections of text, move text from one location to another, and so on. These features are
described in Chapters 3 through 5.
Command Mode
When you’re in command mode, you can enter AlphaXED commands to do such things
as: search for a specific word or phrase in your file, see a list of the files in your account,
copy another file into your file, leave AlphaXED, and many others.
When you’re in command mode, the cursor appears next to the command prompt, >.
To use a command, you type the command along with any parameters it requires, such
as the word to search for if you use the SEARCH command, and press RETURN . Some
commands leave you in command mode when they finish, others return you to your text
or take you back to AMOS command level. You can press CTRL / R to recall the last
command entered should you wish to execute it again. See Chapter 8 for more
information on command mode.
The HELP Command
Displays information explaining various AlphaXED features without leaving your current
file. To see a list of the topics available with HELP, in command mode, enter:
>HELP RETURN
You see a list of help topics available. To see help information on any of these topics,
type HELP, the topic you want, and press RETURN .
One of HELP’s options deserves special mention. You can use HELP to see a list of all
the features and options available in AlphaXED. To do so, type:
>HELP MENU RETURN
AlphaXED User’s Manual, Rev. 01
Getting Started
Page 2-7
This displays all the screen editing features available in editing mode.
screens list all the commands and options you can use in command mode.
Successive
The SAVE Command
As you work in an AlphaXED file it’s a good idea to use the SAVE command from time
to time. SAVE copies the file you are working with from memory to the disk without
exiting AlphaXED. Use SAVE from command mode by entering:
>SAVE RETURN
If your file is a large one, you see a series of dots letting you know it is being written to
disk. SAVE doesn’t affect the cursor location in your file. It creates or updates a
backup file (.BAK) which is described in the discussion about the FINISH command
below.
The Option Menu
The option menu lets you change parameters that affect the editing of your document.
To go to the options menu, press the OPTION MENU key. ESC or MENU returns you to
your text. See Chapter 7 for details on the things you can change.
LEAVING ALPHAXED
As you enter text into a file, or edit existing text, your input is stored in memory
(temporary storage). When you finish with an editing session, you need to tell
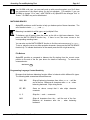
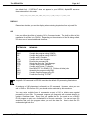
AlphaXED to write your completed file to the disk for permanent storage. Five
commands letting you exit from AlphaXED have different results:
FINISH
GO
RECESS
QUIT
Q!
Write file to disk and exit.
Write file to disk and process GO instructions.
Save editing environment, write file to disk, and exit.
Exit without writing to disk, verify if file was changed.
Exit without writing to disk, without verification.
The FINISH Command
FINISH copies the file currently in memory, called the source file, to the disk. This
command also creates a backup file, which is a copy of the file as it appeared the last
time it was saved to the disk. The backup file has the same name as the source file,
with a .BAK extension. Once both the source and backup files are recorded, AlphaXED
returns to AMOS. To use FINISH, from command mode enter:
>FINISH RETURN
AlphaXED User’s Manual, Rev. 01
Page 2-8
Chapter Two
Or, abbreviate the command by entering F.
The GO Command
GO does two things: it writes the source file to the disk (and creates a .BAK file) and
then processes the file according to instructions in your XED.INI file (or executes the
default actions for certain file extentions). For example, a GO command may compile a
BASIC program or assemble a .M68 source. You can do a series of commands with
GO—see Appendix A for details. To use the GO command, from command mode type:
>GO RETURN
The GO command can pass switches or data to a program, or parameters to a
command file. For example:
>G INVEN.TXT RETURN
Say your GO command definition for the type of file you are in calls an AlphaBASIC
PLUS program—the above command sends the file INVEN.TXT to that program for
processing.
An unsuccessful SEARCH or GLOBAL operation leaves characters in command mode
which will be picked up by GO if you do not clear the prompt line first.
The QUIT Command
QUIT abandons any changes you have made to your file since the last time it was
saved to disk. If the file has been modified, AlphaXED asks you to confirm you want to
abandon your changes. To use QUIT, from command mode enter:
>QUIT RETURN
Or, abbreviate the command by entering Q.
The Q! Command
Entering Q! in command mode exits you from AlphaXED, abandoning all editing
changes made since the last time the file was written to the disk.
Be sure you want to exit without changes before using Q!.
AlphaXED User’s Manual, Rev. 01
Getting Started
Page 2-9
The RECESS Command
Sometimes you set up special editing parameters that affect your editing session (see
Chapter 7 for more information). In some cases, it can take a bit of time to change the
default settings to set up a specific environment—RECESS saves the file to disk, exits,
and saves all your current editing parameters so they are the same the next time you
edit the file. This includes:
The cursor position.
Options settings such as auto-ins char, auto-ins line, width, tab, etc.
A capture sequence.
Macro definitions.
A marked block of text.
Exiting in this way creates a .JRL file 1 block long that stores the environment
information. .JRL files caused by an interruption in the editing session are 20 or more
blocks long.
XEDIT - EDIT A NEW FILE
The XEDIT command lets you end your current editing session and go straight to
another. The format is:
XEDIT filespec
It finishes you out of your file and executes an "XED filespec" command, putting you
directly into the next file.
AlphaXED User’s Manual, Rev. 01
CHAPTER 3
MOVING AROUND IN YOUR FILE
AlphaXED gives you various ways to move the cursor on one screen, and to move the screen
display to other parts of your file. This chapter describes:
Moving the cursor.
Moving from screen to screen.
Finding specific lines.
Marking and returning to a location.
Finding the last change you made.
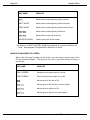
MOVING THE CURSOR ON THE CURRENT SCREEN
When you work with an AlphaXED file, you need to move easily from one place to
another on the screen. To delete a character, word, or line, or insert text, you must first
move the cursor to the place where you want to make the change. The more easily you
can move the cursor, the easier it is to make changes. To make this kind of editing
easier, AlphaXED lets you move the cursor with these keys:
KEY NAME
PURPOSE
→
Moves cursor right, character by character (to margin).
←
Moves cursor left, character by character (to margin).
↑
Moves cursor up, line by line.
↓
Moves cursor down, line by line.
AlphaXED User’s Manual, Rev. 01
Page 3-2
Chapter Three
KEY NAME
PURPOSE
Moves cursor to the beginning of the next line.
RETURN
NEXT WORD
1
Moves cursor to the beginning of the next word.
1
Moves cursor to the beginning of the previous word.
PREV WORD
SHIFT
/
←
Moves cursor to the beginning of the line.
SHIFT
/
→
Moves cursor to the end of the line.
CENTER SCREEN
1
Centers cursor line on the screen.
The behavior of NEXT and PREV WORD keys depends on a precise definition of a
"word." See Appendix D for AlphaXED’s definition of a "word."
MOVING FROM SCREEN TO SCREEN
When a file is too long to display on one screen, you need ways to see the parts of the
file not currently displayed. The keys you can use to move from screen to screen in
your file are:
KEY NAME
PURPOSE
NEXT SCREEN
Advances to the next screen of your file.
PREV SCREEN
Goes to the previous screen of your file.
Moves cursor to first line of file.
HOME
SHIFT
/
↑
SHIFT
/
HOME
SHIFT
/
↓
Moves cursor to the first line of current screen.
Moves cursor to last line of file.
Moves cursor to last line of current screen.
AlphaXED User’s Manual, Rev. 01
Moving Around in Your File
Page 3-3
MOVING TO A PARTICULAR LINE
The line number where the cursor currently rests is displayed on the bottom status line
of your screen. You can instruct AlphaXED to move the cursor to a particular line
number in your file with the LINE command. The format for the LINE command is:
LINE {+/-}number
Where {+/-} represents an optional symbol to add or subtract and number represents a
whole number. This example moves the cursor to line 5 in your file:
>LINE 5 RETURN
By including a plus or minus sign before the number, you can move the cursor that
number of lines forward (+) or backward (-) from the present location. This example
moves the cursor forward three lines:
>LINE +3 RETURN
This example moves the cursor backward seven lines:
>LINE -7 RETURN
REMEMBERING THE CURSOR LOCATION
AlphaXED lets you mark the current cursor location, move to another part of the file,
then return to the location you marked. This feature acts much like a book mark in your
file: saving your place so you don’t have to page through screens of text to find where
you left off.
You mark locations with the LABEL LINE function key and return to them by using the
LABEL GOTO function key.
You must specify a number from 0 to 9 to refer to the label. When you press LABEL
LINE, the next keystroke is reserved for the number. In this way, you can mark and go
to any of ten places in your file.
Labelled lines remain in effect until you exit the file, re-define the label number, or erase
the labelled line.
To go to a labelled location, press the LABEL GOTO key. A menu appears at the
bottom of your screen listing the labelled locations. Enter the number of the location
you wish to go to.
If you press LABEL LINE or LABEL GOTO by accident, you can press
the function.
AlphaXED User’s Manual, Rev. 01
ESC
to exit from
Page 3-4
Chapter Three
THE SPLIT SCREEN FEATURE
The SPLIT command causes the screen to be split horizontally into two windows. Each
window shows an area of the current file. The SWAP WINDOW function key toggles
the cursor between the windows. This feature lets you look at one part of your file while
editing another part, or to mark and move or copy blocks from one window to the other.
UNSPLIT causes the screen to return to one window.
A number of commands also cause the screen to return to one window (such as
FINISH, QUIT, etc). Split screens cannot be maintained by RECESSing the file.
THE PREVIOUS CHANGE FEATURE
Another AlphaXED feature continually keeps track of the last place where you made a
change—deleting a line, adding a character, and the like.
If you leave the line where you’ve made a change to edit elsewhere in your file, you can
return to where you were working by pressing the PREV CHG function key. PREV CHG
moves the cursor back to the same column and line number where you last made a
change.
AlphaXED User’s Manual, Rev. 01
CHAPTER 4
TEXT EDITING FEATURES
In AlphaXED it is an easy process to add, delete and re-arrange what you write. This
chapter describes the basic editing features you use to work with your file:
Inserting and deleting text.
Restoring deleted lines.
Re-arranging text.
INSERTING CHARACTERS
There are two principle ways to insert characters in your text: with the CHAR INS key or
using character insert mode.
Character Insert Key
The CHAR INS key creates a blank space at the cursor location by moving the entire
text line from the cursor to the end of the line over one character. Typically, if you
position the cursor at the beginning of an existing sentence and begin to type, the old
characters are replaced by the new ones. If you want to insert one or two characters
somewhere in an existing line, you can use CHAR INS to create the blank spaces, then
type the new characters.
Character Insert Mode
When you want to insert several characters or words within a line, automatic character
insert mode is more convenient than using the CHAR INS key. Some people prefer to
always use insert mode.
Pressing AUTO INS CHAR lets you switch character-insert mode on or off. When insert
mode is on, you may enter new characters without overwriting existing ones. As you
type, existing text shifts to the right, continually making room for the new characters on
the line. Using RUBOUT in character insert mode deletes the previous character, as usual,
but also shifts text on the right of the cursor back to the left to fill the gap.
AlphaXED User’s Manual, Rev. 01
Page 4-2
Chapter Four
When you use AUTO INS CHAR, the terminal beeps and the letter Q appears on the
status line to remind you character-insert mode is on. To leave character-insert mode,
press AUTO INS CHAR again. The terminal beeps and the Q disappears.
The maximum line length AlphaXED allows is 510 characters. It will not let you type or
append past the 510th character.
Inserting a Word
The WORD INS key causes a temporary character insert mode, so you can insert
characters in the middle of a line until you press SPACE BAR, TAB , or RETURN . If you only
have to insert one word, this is faster than character insert mode, since it "turns off."
INSERTING LINES
You can insert lines in your file using the LINE INS key or automatic line insert mode.
Each of these methods is described below.
The LINE INS Key
The LINE INS key causes everything to the right of the cursor on the line, and every line
below, to move down one line, without affecting text above or to the left of the cursor.
Automatic Line Insert Mode
You can insert lines without having to use the LINE INS key to make blank lines. When
you activate line insert mode with the AUTO INS LINE key, a blank line appears every
time you press RETURN . Text below the line you are entering moves down one line when
you press RETURN , a blank line is created between the line the cursor is on and the
subsequent text, and the cursor moves to the beginning of the blank line. When you
press AUTO INS LINE, the terminal beeps and displays the letter I on the status line.
To turn off line insert mode, press AUTO INS LINE again. Line insert mode won’t work
if INSERT is OFF.
DELETING CHARACTERS
There are three ways to delete characters from your AlphaXED file: typing over them,
using the CHAR DEL key, or using RUBOUT . You can type over characters if character
insert is not on—this is called "overwriting." Using the CHAR DEL key deletes the
character where the cursor rests, and moves the rest of the line one space to the left.
AlphaXED User’s Manual, Rev. 01
Text Editing Features
Page 4-3
Pressing RUBOUT once moves the cursor back one space and deletes any character it
encounters. When you use RUBOUT , text to the right of the cursor does not shift and blank
space is left unless character insert mode is on.
Deleting a Word
Using the WORD DEL key deletes characters from the cursor position to the beginning
of the next word, and contracts the entire line to fill in the gap. If the cursor is at the
beginning of a word, WORD DEL deletes the word it is on and any blanks following it. If
you are in a field of blanks, WORD DEL erases all the blanks in the field to the right of
the cursor. If the cursor is in the middle of a word, WORD DEL deletes the rest of the
word. Because part of the word remains, blanks are not removed. The WORD DEL key
does not delete tab characters. And, if you delete a word which has tabs and text
following it, that text is unaffected by the delete and remains in the same column as
before. To delete a tab, use RUBOUT or the CHAR DEL key. AlphaXED has a specific
definition for what a word is; see Appendix D for details.
Deleting Lines
There are two ways to delete lines in AlphaXED. One deletes the entire line, the other
deletes only part of a line. To delete an entire line of text, move the cursor to the line
you want deleted and press the LINE DEL key (or CTRL / Z ). The line is deleted and
subsequent text moves up to fill the gap. To delete part of a line, position the cursor
where you want deleting to begin and use CTRL / Y . CTRL / Y deletes from the cursor
to the end of the line, without shifting any text to fill the gap. To delete a block of text,
mark the block using the MARK BLOCK function key (or CTRL / P ). Then press the
BLOCK DEL key.
Restoring Deleted Text
AlphaXED lets you recover a deleted line or block of text by using the RESTORE
function key. The RESTORE feature is like a small "waste basket." You can only
restore the most recent line or text block deleted with LINE DEL or BLOCK DEL. The
line or block is restored where the line or block was.
RE-ARRANGING TEXT
You may re-arrange text in a number of ways. The next sections describe:
Breaking and joining lines
Centering a line
Formatting paragraphs
AlphaXED User’s Manual, Rev. 01
Page 4-4
Chapter Four
Breaking and Joining Lines
To break a line, position the cursor on the character or column in the line where you
want the break to appear and press the LINE INS key. The text to the right of the cursor
drops down to the next line and all subsequent text moves down to create room.
To join a line, position the cursor anywhere on the line you want to join and press
CTRL /
O . AlphaXED moves the cursor to the end of the line and adds the line of text
below the cursor onto the end of the line where the cursor is. All lines below the cursor
move up to fill the gap. If the new joined line would be longer than 510 characters,
AlphaXED does not attempt to join the line; instead, an error message appears.
Centering a Line
You can position a line of text between the left and right columns of your file by pressing
the CENTER LINE function key. This key centers the line between the column 0 on the
screen and the line length specified by the WIDTH command. See Chapter 7 for more
information about WIDTH. Any blank spaces before or after the text are ignored. The
centering feature is also available from command mode. To use it this way, position the
cursor on the line you want to center, go to command mode and enter:
>CENTER RETURN
Formatting Paragraphs
When you press the FORMAT function key, AlphaXED begins at the cursor position and
takes a set of contiguous lines up to a blank line or a line starting with a blank, TAB or
carriage return, and fills in the lines as near to the margins as will fit. Formatting begins
on the line where the cursor rests and arranges lines so no line is longer than the
maximum line length set by the WIDTH setting. See Chapter 7 for more about WIDTH.
The formatting feature is also available from command mode—position the cursor on
the line where you want formatting to begin and enter:
>FORMAT RETURN
REFRESHING THE SCREEN
You can cause your terminal screen to be re-displayed without changing the cursor’s
current position. This is useful if something outside AlphaXED sends a message to your
terminal, disrupting your AlphaXED screen display. To do so, press these keys at the
same time: CTRL / SHIFT and the atsign, @.
AlphaXED User’s Manual, Rev. 01
CHAPTER 5
BLOCK EDITING FEATURES
This chapter describes how to work with large portions of your file, not just characters,
words and lines. You’ll find information for:
Working with blocks of text
Transferring text between files, or between memory and disk
Using prototype file modules
WORKING WITH BLOCKS OF TEXT
AlphaXED makes it easy for you to move, copy or delete blocks of text—lines,
paragraphs, or larger sections of your file. The next sections describe:
Marking Text
Clearing Marks
Copying Marked Text
Deleting Marked Text
Moving Marked Text
Marking Text
Blocks of text are made up of contiguous whole lines in your file. The first step in
working with a block of text is to "mark" the block using the MARK BLOCK function key.
Place the cursor on the first line of your block, and press the MARK BLOCK key. Then
move the cursor to the last line of the block and press MARK BLOCK again. On
terminals capable of displaying in reduced intensity, the text you mark becomes shaded.
If the terminal lacks this capability, the text is still marked although it appears the same
as unmarked text. The letter "M" appears on the status line when text is marked.
AlphaXED User’s Manual, Rev. 01
Page 5-2
Chapter Five
Once text is marked you can delete, copy or move it. If you choose to move or copy the
marked block, first you must move the cursor out of the marked shaded area because
you cannot move or copy a block on top of itself.
Marking text is also used with the SBLK command to do search and replace operations
on only a selected block of text in your file. Marked text is also used with the UNYANK
command described later in this chapter.
Clearing Marks
It’s good practice to clear marks after you are through working with the marked text.
This keeps you from accidentally working with a part of your file you are already finished
with. When you clear a block, the "M" disappears from the status line. There are four
ways to remove marks you make with the MARK BLOCK key:
1.When you move or delete the block of text you marked
2.When you press the CLEAR BLOCK function key
3.When you use the COPYC (copy and clear) command
4.When you go to command mode and enter:
CLEAR RETURN
Copying Text
Once you mark a block, you can copy it to another place in your text by moving the
cursor to the desired location and pressing the BLOCK COPY function key. When you
do, the block of text is copied to the new location, without being deleted at the original
position. The duplicate text is inserted, and does not overwrite existing text.
When you copy text, the block marks are not removed, in case you want to copy the
block to another place in your file. If you are through working with this text, be sure to
clear the block marks before continuing.
You can do the same operation from command mode. Enter: COPY RETURN .
Copying and Clearing Text
The COPYC command works like COPY, except that it also clears the block markers
after doing the copy. From command mode enter: COPYC RETURN .
AlphaXED User’s Manual, Rev. 01
Block Editing Features
Page 5-3
The SHIFT Command
The SHIFT command moves a marked block of text to the right or left by a specified
number of columns, or aligns the marked text on a specified column by adding or taking
out leading blanks and tabs. The part of each marked line from the first non-blank
character is shifted (after the shift is done, the cursor is positioned at the top of the
previously marked block). You cannot SHIFT a block to the left of column zero, or so
the line becomes longer than 510 characters. The format for SHIFT is:
SHIFT mode number-of-spaces
where mode is one of three characters:
Character
Meaning
<
Shift the marked block to the left
>
Shift the marked block to the right
=
Align the marked block on the numbered column
and number-of-spaces is a number in the range 1 to 510.
To use SHIFT, press the MARK BLOCK key to mark the block of text you want to move.
Go to command mode and enter the command. For example, if you want to shift a
marked block 5 spaces to the right, enter:
>SHIFT >5 RETURN
Once a shift number has been used with < or >, you can use the BLOCK SHIFT function
key to shift a block of text that number of spaces. If no number is defined, the BLOCK
SHIFT key does not move the block.
AlphaXED uses TABs when shifting more than 4 spaces.
Deleting Text
You can delete marked text by using the BLOCK DEL function key. AlphaXED deletes
the block of text along with the block marks, and fills in the resulting gap by bringing up
any text following the deleted block. The "M" disappears from the status line. You can
do the same delete operation with a command. From command mode enter:
>DELETE RETURN
AlphaXED User’s Manual, Rev. 01
Page 5-4
Chapter Five
If you accidently delete a line you want to keep, press the RESTORE key and, if nothing
else has been deleted, the line is restored. The line is restored at the current cursor
location, however, which may not be the place it was deleted from.
Moving Text
To relocate a block of text within your document, mark the block using MARK BLOCK.
Then move the cursor to the place in your file you want to move the block to, and press
the BLOCK MOVE function key.
The text is relocated from the original position to the new one. Text following the
original position moves up to fill the gap; text following the new position moves down to
make room. "M" disappears from the status line. You can do the same move operation
with a command. From command mode enter: MOVE RETURN .
TRANSFERRING TEXT BETWEEN FILES
Besides deleting, copying, and moving blocks of text within a single file, AlphaXED can
transfer text from one file to another, saving you unnecessary retyping. The commands
are described below.
Moving Text Out of Your File
UNYANK copies a marked block of text from the current file to a new file you create for
the marked text block. Here are the steps:
1.Use the MARK BLOCK key to mark the text you want to duplicate in another file.
2.Press
ESC
or
MENU
to go to command mode.
3.Enter UNYANK followed by the file specification and press
RETURN
.
You can assign a one to six character file name to select a file for the block of text being
transferred. You can include a file extension; if you don’t, the new file’s extension is the
same as the file you are currently editing.
For example, to transfer a block of text from the current file to a new file you want to
name TEMP.TXT, mark the text with MARK BLOCK, go to command mode, and enter:
>UNYANK TEMP.TXT RETURN
If your account already contains a file with the name you specify in the UNYANK
command, AlphaXED asks you:
[file name] already exists.
Overwrite? (Y-N)
AlphaXED User’s Manual, Rev. 01
Block Editing Features
Page 5-5
If you enter a Y, the marked block overwrites the file that exists on the disk (be careful
you don’t overwrite a file you need). If you enter N, you return to the text, and no
UNYANK is done.
You can use UNYANK to copy a file to another device by including the device name and
account number as the file specification in the command. For instance, suppose you
want to UNYANK TEMP.TXT from the current file and send it to DSK2:[20,4]:
>U DSK2:TEMP.TXT[20,4] RETURN
However, the account you specify must have the same project number as the one you
are logged into; otherwise, you get a "protection violation" error. In the above example,
you must be logged onto DSK2:, somewhere in the [20,n] account series—[20,1], [20,2],
[20,3], etc.
If you want to copy to or from a device other than a "DSK" device, the driver for the
device to which you are copying (for example, MIN0:) should be loaded into user or
system memory before you use AlphaXED.
If the file name consists entirely of numbers, you must specify an extension, otherwise,
AlphaXED assumes you want to UNYANK portions of the file to or from the disk as
described later in this chapter.
If the device driver cannot be loaded, AlphaXED displays an error message.
information about device drivers, see your System Operator.
For
Moving Text Into Your File
When you need to copy text from another file into the file you are working in, use the
YANK command. Here are the steps:
1.Move the cursor to the point in the current file where you want the transferred text
to appear.
2.Go to command mode.
3.Enter YANK followed by the file specification for the file you want to copy in, and
press RETURN .
If the file name consists entirely of numbers, you must specify an extension; otherwise,
AlphaXED assumes you want to YANK portions of the file to or from the disk as
described in the next section.
For example, to copy TEMP.M68 into the current file, put the cursor where you want the
new text to begin, go to command mode, and enter:
>YANK TEMP.M68 RETURN
AlphaXED User’s Manual, Rev. 01
Page 5-6
Chapter Five
The text of TEMP.M68 is copied into the current file beginning at the cursor location,
and none of your existing text is overwritten.
If you omit the extension, AlphaXED assumes the same extension as the file you are
currently editing.
If you want to yank in a file from another device and account, you can include the device
name and account number in the command. For example, the command:
>YANK SMD2:TEMP.TXT[20,4] RETURN
copies the file TEMP.M68 from SMD2:[20,4] to the current file.
In order for this to work, however, the driver for the device from which you are yanking
(SMD2: in this case) must be loaded into user or system memory before using
AlphaXED. If not, AlphaXED displays an error message. For information on device
drivers, see your System Operator.
CUTTING AND PASTING
You can move text from one file to another by using YANK and UNYANK and an
AlphaXED feature that lets you edit two files at the same time. Edit the file you want to
transfer from, mark the block you want to move, and use UNYANK to move the block to
a junk file. For example:
>UNYANK JUNK.TXT RETURN
Now go to command mode and XED the file you want to transfer to. Go to the point in
the file you want to move the block to, and use YANK to bring in the JUNK.TXT file.
Remember to FINISH from the new file to perserve your changes.
TRANSFERRING TEXT TO AND FROM THE DISK
The YANK and UNYANK commands are also useful in two other cases:
1.If your memory partition is full when you call up the file.
2.If you run out of memory while typing.
Suppose you want to edit a file named TEST.BP, which is too large to fit completely into
memory. When you use the XED command, you see:
Insufficient space to complete transfer!
AlphaXED User’s Manual, Rev. 01
Block Editing Features
Page 5-7
This means AlphaXED could only load part of the file into memory for editing. Suppose
the first three-quarters of the file is loaded into memory, but you want to inspect the last
quarter of the file. To access the unloaded portion, you must copy the first part of the
file to the disk, delete it from memory, and load the remaining part.
If you use UNYANK without a filename, it copies all the text currently in memory to the
disk, then deletes it from memory. As the copy progresses, AlphaXED displays a period
on the screen for each 64 lines of text transferred. When the prompt re-appears, use
YANK to load more of the file from the disk into memory.
If you don’t want to delete all of what is in memory, you can specify a number of lines
with UNYANK and YANK. For example, suppose you want to copy to disk and delete
from memory only the first 100 lines of the file:
>UNYANK 100 RETURN
The first 100 lines are deleted from memory, making room for you to load 100 lines at
the end of the file. To transfer 100 new lines in from the disk, enter:
>YANK 100 RETURN
If you are entering text at the end of a file and/or you fill up the memory partition, the
terminal beeps to let you know the partition is full. To continue entering text, you must
use UNYANK, as explained above, to delete from memory part of the text currently
filling the partition. You may then return to the end of the file to continue entering text.
YANKING IN A PROGRAM MODULE
Pressing the YANK MODULE function key displays a menu of module names. By
pressing a letter key defined on this menu, you can yank in the desired file to the current
cursor location. A module can be any file that can be edited using AlphaXED.
You can design your own menu by using the MODULE command in your XED.INI file
(see Appendix A). The default list of menu items is:
Select a module:
A.
B.
C.
D.
Module Header (M68)
Module Header (BASIC)
Program Skeleton (M68)
Program Skeleton (BASIC)
AlphaXED User’s Manual, Rev. 01
CHAPTER 6
KEYSTROKE JOURNALING
This chapter discusses:
What is keystroke journaling?
How to turn journaling on and off
Restoring a journal
XED AND COMPUTER MEMORY
When you create a file, whatever you type on the keyboard is recorded in memory. If
you tell XED you want to edit a file currently on a permanent storage device, XED finds
the file and copies it into memory for editing. If your computer has a power failure or a
system hang, and you have not yet used SAVE, XEDIT, RECESS, or FINISH, the
changes since the last copy to disk are at least partially lost. The copy before changes
were made is still on the disk.
WHAT IS KEYSTROKE JOURNALING?
AlphaXED has a feature called keystroke journaling. This function saves all your
keystrokes to the disk. This means that in the event of a system crash or other problem,
you can recover your work.
Every time you press a key, XED automatically saves that instruction in a special journal
file. This file holds approximately 10,000 keystrokes, and when it fills up, the following
message displays on the bottom status line:
%JOURNALING suspended - SAVE to resume
At this point, you must save your work; otherwise, XED stops recording your
keystrokes. After you do so, the journal file is purged and journaling is reenabled.
To create the journal file, XED initially attempts to allocate a 40 block random file. If
your disk does not have enough space available, then XED tries to allocate 20 blocks.
If it cannot do that, it disables the journaling feature.
AlphaXED User’s Manual, Rev. 01
Page 6-2
Chapter Six
The journal file has a .JRL extention. It is erased whenever a QUIT, SAVE, XEDIT, or
FINISH command is used (in the case of SAVE, a new file begins with your next
keystroke).
The first part of the journal file stores the current parameters of your editing session so it
can accurately restore the keystrokes. When you exit using RECESS, this first part is
retained in the .JRL file even though the rest of the (already saved) keystrokes are
erased. In this way, you can recall the file with the same editing parameters as before.
Because AlphaXED creates a journal file based on the name of the file you are editing,
problems could result if you have two editable files in the same account with the same
name (such as ACOUNT.TXT and ACOUNT.BP). If a journal file were created for
ACOUNT.TXT, and you edited ACOUNT.BP, AlphaXED would ask you if you wanted to
restore the .JRL file. This could lead to the changes being "restored" to the wrong file.
TURNING JOURNALING ON AND OFF
Your XED.INI file can have a JOURNAL = ON/OFF command in it to set whether
journaling is active or not. You may also specify how many keystrokes will occur
between each save. Keystroke journaling can be turned off by adding the /NJ switch
when calling up XED. For example:
XED MYFILE/NJ RETURN
WHAT HAPPENS AFTER THE EDITING IS INTERRUPTED?
For some reason you couldn’t properly exit your AlphaXED file. Once the computer is
rebooted or the problem fixed, what then? The .JRL file for the file you were editing still
exists on the disk. When you call up your source file with XED, it asks you if you want
to restore the journal file, and displays the options you have. You can:
1.Restore the keystrokes you lost (you can stop any time)
2.Erase the journal file
3.Leave the journal file intact and exit to AMOS
Restoring a Journal File
If you want to restore your keystrokes, enter Y in response to AlphaXED’s question.
The journal file is "replayed," and you see the keystrokes appearing on your screen as
the file is updated. When the file is done, you can resume editing.
AlphaXED User’s Manual, Rev. 01
Keystroke Journaling
Page 6-3
If you don’t want to see all the keystrokes repeated on your screen, call up XED with the
/ND switch. For example:
XED MYFILE/ND RETURN
You may also turn off the keystroke display by specifying NODISPLAY in your XED.INI
file. AlphaXED still asks you whether to restore the journal file or not, but if you answer
YES, XED displays the number of blocks it is updating, but doesn’t show the keystrokes.
If the journal file has a lot of editing changes in it, this method is faster.
It is a good idea to SAVE the file after restoring the journal so you can start with a fresh
journal file.
You can use CTRL / C to halt the journal restore process. This lets you begin the
restore process and halt the keystrokes at any time you wish. This is only useful if the
keystrokes you want to keep were done before keystrokes you don’t wish to keep.
Erasing a Journal File
If you don’t want to keep the journal file, enter N and AlphaXED erases the file. If you
have journaling on, a fresh journal file is created for further editing.
Exiting and Retaining the Journal File
Entering Q in response to the question exits you to AMOS without changing the journal
file. Maybe you didn’t realize there was a journal file for the file you entered—if
somebody else made the changes, you might want to find out if they are important
changes before editing the file.
AlphaXED User’s Manual, Rev. 01
CHAPTER 7
THE OPTION MENU
AlphaXED’s option menu lets you change editing parameters easily. The options you
can set at this menu are mostly the same ones you can set in the XED.INI file (see
Appendix A), and affect how your editing goes. By customizing these parameters, you
can make your editing session easiest for the file you are editing. This chapter
discusses:
Calling the option menu and returning
Changing parameters
The options you can set
CALLING THE OPTION MENU AND RETURNING
To call up the option menu, press the OPTION MENU function key. When you are done
changing the menu, press MENU or ESC to return to where you were.
CHANGING PARAMETERS
There are two types of Parameters on the option menu: Boolean (ON/OFF) and
Non-boolean (which take a value). To change a Boolean parameter, use the arrow keys
to move the cursor to the parameter you wish to change, and press the SPACE BAR
until the parameter is set the way you wish it to be.
To change a Non-boolean parameter, use the arrow keys to move the cursor to the
parameter you wish to change, and enter the value you want set. The option menu
displays instructions at the bottom of the screen to help you.
AlphaXED User’s Manual, Rev. 01
Page 7-2
Chapter Seven
SEARCH AND REPLACE OPTIONS
BACKWARD
When BACKWARD is ON, the SEARCH or REPLACE commands search backwards
from the end of the file for the string (NEXT searches backwards from current cursor
position). Multi-character wildcards are not supported in backward searches, and
TOKEN, COMPRESS and SEARCHFOLD do not affect backward searches.
COMPRESS
When COMPRESS is ON (the default), the SEARCH or REPLACE commands ignore
extra spaces or tabs in the text when looking for a string. For example, if you SEARCH
for:
The third volume
and the text in your file is:
The
third volume
AlphaXED considers it as a match despite the spaces between "the" and "third." It also
finds the phrase if it spans two different lines in the text.
If COMPRESS is OFF, spaces, tabs and/or control characters are taken into account to
identify a match. In the preceding example, AlphaXED would not consider the text with
blank spaces a match for what you specified.
SBLK
SBLK tells AlphaXED whether to do search and replace operations on a block of text
you mark or on your whole file. When SBLK is ON, the SEARCH, REPLACE, and
GLOBAL commands look for the specified string only in a marked block of text. If no
block is marked, AlphaXED tells you so. When SBLK is OFF (the default), the
SEARCH, REPLACE, and GLOBAL commands cause AlphaXED to look for the string
throughout the file.
SEARCHFOLD
SEARCHFOLD tells AlphaXED to consider or ignore whether or not letters are upper or
lower case in its search for a string. When SEARCHFOLD is ON (the default),
searching/replacing commands ignore the difference between upper and lower case
letters when matching the string you specify with the strings in the file. For example, if
you use SEARCH to locate the word: "Text," AlphaXED considers "Text," "text" and
"TEXT" as valid matches.
AlphaXED User’s Manual, Rev. 01
The Option Menu
Page 7-3
If SEARCHFOLD is OFF, the only valid match would be the word with the same use of
upper and lower case. In the example, only "Text" would be a valid match for "Text".
A convenient feature when SEARCHFOLD is ON is brought out when you want to
replace one word or string with a different word or string. For example, suppose you
want to replace every instance of "print" in a file with the word, "display." When
SEARCHFOLD is ON, AlphaXED finds all instances of the string, whether characters
are upper or lower case. If the word being replaced begins with a capital letter or is all
upper case, the word replacing takes the same format. In our example, "print" is
replaced with "display," "Print" with "Display," and "PRINT" with "DISPLAY."
TOKEN
When TOKEN is ON, AlphaXED identifies a match for any search or replace operation
when both of these conditions are met:
1.The found string begins with a non-alphanumeric character, or is preceded by a
non-alphanumberic chracter, and
2.the found string ends with a non-alphanumeric character, or is followed by a
non-alphanumeric character.
This lets you search for strings bounded by special characters, such as control
characters. For example, suppose you wanted to find each time you used the pronoun I
in your file. If you search for the letter I, AlphaXED finds each I, including those in other
words containing the letter I. However, if TOKEN is ON from command mode before
the search, AlphaXED finds only the occurrences where I is isolated. The default is
OFF.
WILDCARD
With wildcard symbols, AlphaXED gives you a way to search for strings that are alike
but not necessarily identical. A wildcard symbol can represent one or more characters
in a string, so you don’t have to limit the string by identifying the specific character(s).
The wildcard characters default to:
?
*
Represents any one character
Represents one or more characters
You can choose any symbols you like to serve as wildcard characters by specifying
them either in XED.INI or in the option menu. Wildcarding affects search and replace
operations. On the wildcard line, the symbol for single characters appears first and the
symbol for multiple characters appears second. For example, if you enter:
%@
AlphaXED User’s Manual, Rev. 01
Page 7-4
Chapter Seven
the % sign and the @ sign become the wildcard symbols. Because it was entered first,
the % sign stands for any one character and the @ sign represents the multiple
character wildcard.
To show how wildcards affect a search of your file, take this example which instructs
AlphaXED to look for all parentheses containing two characters:
>SEARCH (%%) RETURN
The following text in your file would be considered suitable matches:
(RO)
(AB)
(+N)
If you were to use one @ symbol in place of the two percent signs, it instructs
AlphaXED to look for all parentheses containing one or more characters:
>SEARCH (@) RETURN
(RO)
(STOCK)
(+N)
(this procedure is of great use)
If you need to look for the symbols you’ve assigned as wildcard characters, set the
wildcards to something new.
Be careful when using wildcards with GLOBAL. Because of the scope of a wildcard,
you could make changes you do not want and/or get unexpected results. See Appendix
D for a complete technical explanation regarding wildcard matches and replacements.
GENERAL OPTIONS
CHARINS
Turns automatic character insert mode ON or OFF. See Chapter 4.
CONVERT
Defines the type of numeric conversion done by the CONVERT function key.
format is:
The
CONVERT <type-to-change><type-to-change-to>
The codes are:
AlphaXED User’s Manual, Rev. 01
The Option Menu
Page 7-5
O
D
H
F
Octal
Decimal
Hexadecimal
Floating point
For example:
CONVERT DF
causes the CONVERT function key to convert a number from decimal to floating point.
To convert a number, place the cursor on the first character of the number and press
the CONVERT key. All numeric characters from the cursor up to a blank, space, tab, or
non-numeric character are converted to the new number base. If you put the cursor on
a character not in the defined character base, an error message appears.
EOLN
Defines the character that defines the end-of-line for macro definitions and
search/replace operations. Enter the character you wish to have indicate an end-of-line.
The default is ´ (a backquote). For macro definitions and search/replace operations,
you must have a symbol to represent the carriage return that ends a line (since RETURN
indicates the end of the macro or search).
INDENT
INDENT is designed for use with structured languages like AlphaPASCAL, and makes it
easier to edit programs with indented blocks of text.
When INDENT is ON, RETURN causes the cursor to move to the first character of the next
line, regardless of the first character’s column position—which may or may not be
column zero.
Likewise, pressing SHIFT / ← to move the cursor to the beginning of the line causes the
cursor to move to the first character of the current line instead of to the first column.
Also, when you press RETURN at the end of your file, it moves the cursor to the next line
and indents the same number of spaces as the line above. If this is not the correct
number of spaces to indent the current line, you can move the cursor forward with the
SPACE BAR or TAB , or move the cursor backward by erasing spaces with RUBOUT . The
default value is OFF.
AlphaXED User’s Manual, Rev. 01
Page 7-6
Chapter Seven
MARGIN
MARGIN defines the column at which the left margin of the screen display begins. This
is useful when you have lines of text extending beyond the number of character-spaces
displayable on the screen. To view those lines, give the margin parameter a higher
value. This moves the screen "window" to the right.
For example, suppose you have lines of text 90 characters long and your terminal
screen can display only 78 at one time. An easy way to see the last 12 characters is to
change the left margin to column 12 or greater.
Using the MARGIN command only sets the AlphaXED display margin; it does not affect
the margin of printed text.
MODEM
Set MODEM ON if you are using AlphaXED over a modem—AlphaXED then operates
at a low baud rate. This may affect your screen in minor ways, including suppressing
full screen refreshes. The default is OFF, unless your computer’s baud rate is less than
2400, in which case it defaults to ON.
MOUSE
MOUSE affects how the cursor moves when you press RETURN , ↓ , or ↑ . When
MOUSE is OFF, RETURN moves the cursor to column 0 of the next line, and ↓ or ↑
move the cursor up or down one column—or to the last column if the line above or
below is shorter than the cursor position.
When MOUSE is ON, RETURN moves the cursor down one line, or to the last column if the
↓
line below is shorter than the cursor position (like ↓ does if MOUSE is OFF).
does the same, but it "remembers" the cursor position—if it comes to a line shorter than
the cursor position, it goes to the end of that line, but when it goes to the next line that is
again as long as or longer than the cursor position, it goes back to the remembered
position. This is useful if most of your program is in specific columns, and you mainly
want to work in that column. MOUSE may be set in XED.INI also.
If INSERT is ON, pressing
RETURN
creates a new line,
TAB
TAB defines the number of spaces (from 1 to 10)
pressed. The default TAB settings are:
TAB
inserts into your text when
AlphaXED User’s Manual, Rev. 01
The Option Menu
Page 7-7
LANGUAGES
TAB SPACING
Pascal, BASIC, BASIC PLUS, Fortran, C
Cobol
M68, all others
5
7
8
These defaults only apply if TAB is not defined in XED.INI or on the option menu.
If you set TAB to something less than 8, the characters inserted in your file when you
press TAB are spaces, not a TAB character. If set to 9 or 10, it is a tab character plus
one or two spaces. The actual width of the tab character can be changed in the
XED.INI file (see Appendix A).
WIDTH
The column where word wrap occurs (if wrap is on) in your file is defined by the WIDTH
number. The first column on the screen is 0, so to set an 80 column wrap, set width to
79 (this is the default). WIDTH affects four other settings or commands: MARGIN,
FORMAT, WRAP, and CENTER.
WRAP
The WRAP feature lets you type without having to watch the screen to determine when
you should press RETURN . When ON, WRAP causes a carriage return whenever the cursor
reaches the maximum line length as defined by the WIDTH parameter, described in the
next section. With the carriage return, AlphaXED creates a blank line, and the cursor
moves to the beginning of the new line.
If only part of a word has been typed when the cursor reaches the maximum line length,
all characters back to the last blank space or tab stop—all characters of the word—are
transferred to the new line created by AlphaXED.
If WRAP is OFF (the default setting), you must press
the next line.
AlphaXED User’s Manual, Rev. 01
RETURN
at the end of a line to go to
Page 7-8
Chapter Seven
ENTRY MODE OPTIONS
COLUMN
COLUMN sets the screen column where you want software code comments to begin.
Entry mode must be on for this command to work.
The default setting is 40 for all program files except AlphaBASIC (.BAS) and
AlphaBASIC PLUS (.BP) files, for which 56 is the default. To have comments begin at a
setting other than the default, supply the command with the number.
COMMA
The comma command works only in entry mode. When FIELD is ON, and the next-field
character is a space, pressing the SPACE BAR in a data field enters a blank if COMMA
is ON and the previous character is a comma. If COMMA is OFF (the default setting),
pressing the SPACE BAR advances the cursor to the next field.
COMMENT Character
AlphaXED inserts a comment character at the column position determined by the
COLUMN parameter when the cursor reaches that column. The default comment
character is semi-colon (;) for .M68 files, exclamation point (!) for .BAS and .BP files,
and is undefined for other files. Entry must be ON for this command to work. If you
want to change the comment character, enter the character you wish to use.
DELTA ON/OFF
If DELTA is ON, AlphaXED generates a new line number each time you type the FIELD
character in column 0 (see discussion of FIELD, below). Entry and insert mode must be
on for this command to work. When entry mode is on, DELTA is automatically ON if you
are editing an AlphaBASIC (.BAS) or AlphaBASIC PLUS (.BP) file. The default if you
are not in entry mode is OFF. For best results, keep in mind these hints:
Number every line of the file.
Maintain the numbers in order.
The line numbering is in multiples of the number defined in DELTA on the option
menu screen.
When the field character is pressed in column 0, the number that appears is an
increment of the number in the previous line. This can cause duplicate line
numbers if you insert a new line between lines.
AlphaXED User’s Manual, Rev. 01
The Option Menu
Page 7-9
DELTA Increment
Defines the increment of the automatic line numbering scheme. For example, suppose
you want program line numbers to appear in increments of 10—simply enter 10 in the
DELTA space. The default is 5.
ENTRY
Entry mode provides editing features especially suited for writing software code. You
can turn entry mode on from the option menu, or by pressing the AUTO INS LINE key in
edit mode.
Entry mode parameters operate according to fields AlphaXED recognizes in the
program line for program files. In the following diagram, the numbers show the default
positions of the four fields recognized for assembly language (.M68) programs.
0
|
|
|
|
|
|
label
8
16
40
|
|
comment field (40-255)
|
|
|
operand field (16-39)
|
opcode field (8-15)
field (0-7)
The default fields for BASIC (.BAS) and BASIC PLUS (.BP) programs are:
0
|
|
|
|
label
8
56
|
comment field (56-255)
|
statement field (8-55)
field (0-7)
When entry mode is ON, an I appears on the status line. You can use the COMMENT,
INSERT, SPACE, FIELD, FOLD, INDENT, and DELTA commands as editing features
for writing software code. All characters you type appear in upper case unless you use
FOLD to specify otherwise. You can turn off entry mode from the option menu or by
pressing the AUTO INS LINE key again. The default setting is OFF.
FIELD Character
The FIELD character is used when both field and entry mode are ON, to move to the
next programming field (see FIELD ON/OFF, below). The default field character is a
space for .M68 files, TAB for AlphaBASIC and AlphaBASIC PLUS, and null for other
files. To change the field character, enter the ASCII value of the character you want to
use. See Appendix F for a list of the ASCII values for numbers and characters. For
example, if you want the @ sign to be the field character, enter 64.
AlphaXED User’s Manual, Rev. 01
Page 7-10
Chapter Seven
FIELD ON/OFF
FIELD is used with entry mode to let you move easily to the next programming field. If
FIELD is ON, pressing a special keyboard character moves the cursor directly to the
next field, as shown in the diagram of fields under "Entry," above. Entry mode must be
on for this command to work. The default setting is ON.
If the cursor is in the middle of a line and you type the FIELD character (defined in
FIELD Character, above), the cursor goes to the beginning of the next field. For
example, in an .M68 file, if the cursor is at column 9 in the opcode field, pressing the
field character moves the cursor to column 16, the beginning of the operand field.
Typing the FIELD character again moves the cursor to the beginning of the comment
field. AlphaXED assumes you don’t want to edit the comment character; if you do,
simply backspace and do so. Once the cursor is in the comment field, typing the field
character has no effect except for inserting the field character in the text if it is a
printable character.
FOLD
When you are in entry mode, setting FOLD to ON causes all alphabetic characters you
type to be upper-case, regardless of how you enter them from the keyboard. The
default setting is ON. The FOLD setting doesn’t affect comment text.
INSERT
When INSERT is ON, pressing RETURN on a blank line moves the cursor down one line,
creating a new blank line as it does. The default setting is ON.
SPACE
If you want a space to be generated to the right of the comment character whenever a
comment is typed, set SPACE to ON (the default setting). Entry mode must be on for
this command to work.
AlphaXED User’s Manual, Rev. 01
CHAPTER 8
COMMAND MODE
This chapter discusses:
What command mode is
How to go to command mode
Using AMOS commands
WHAT IS COMMAND MODE?
AlphaXED can do many editing functions right on your text screen when you use the
keys on your keyboard. Other AlphaXED features let you do even more powerful
editing operations. For these, you work from AlphaXED’s command mode.
Command mode is a place to enter AlphaXED commands to do special editing
functions. You can search for strings of characters, use AMOS commands, or set
options (if you are more comfortable using command mode instead of the option menu,
many of the options can also be set from command mode).
This chapter discusses some of the things you can do from command mode. The next
chapter talks in depth about the search and replace functions.
CALLING UP COMMAND MODE
To call up command mode, press MENU or ESC . The top line on your screen is replaced
by the command mode prompt, >. The following line is used to display errors or
messages in command mode. The recognition of commands follows the sequence:
1.AMOS commands (preceded by ".")
2.Editing commands
3.Option commands
AlphaXED User’s Manual, Rev. 01
Page 8-2
Chapter Eight
4.Macro commands
5.Macro file invocations
Any command not recognized as one of the above causes an error message, and
returns you to the command prompt. The exact sequence is rarely significant, except in
the case of macros—a loaded macro definition supercedes any macro file of the same
name. Because macros come below editing commands and options, it is useless to
define a macro with the name of an editing command or an option.
The prompt is where you enter commands. Some commands return you directly to your
text, others return you to command mode. From command mode you can return to your
text by pressing MENU or ESC .
The commands you can use in command mode are listed in Appendix C, and are
explained in greater detail in various parts of this manual. The table below tells you
where more information can be found:
TYPE OF COMMAND
PLACES FOUND
Editing commands
Chapters 2 and 9
Options
Chapter 7
Macro Features
Chapter 10
XED.INI commands
Appendix A
USING AMOS COMMANDS
From command mode you can use AMOS commands. This can be useful if you don’t
want to exit your editing session just to find out information. For example, you might
want to find out the name of a file in your account. You can use AMOS’s DIR command
to display a directory listing without exiting AlphaXED. To use an AMOS command,
type a period and the AMOS command. Some examples:
>.DIR *.LST RETURN
MYFILE.LST
4
PROG.LST
10
Total of 2 files in 14 blocks
>.TIME RETURN
01:15:45 PM
AlphaXED User’s Manual, Rev. 01
Command Mode
Page 8-3
>.ERASE *.TMP RETURN
EXTRA.TMP
FARBO.TMP
Total of 2 files erased
Another useful AMOS command is TYPE, which displays a file.
There are some AMOS commands you should not use, such as MONTST, DSKANA,
etc.—any command which could cause data corruption to your currently open file, or
inconvenience other users. Programs that change the job environment, such as LOG,
should also be avoided. Also, DO NOT erase the file you are currently editing.
USING EDITING PROGRAMS WITHIN XED
The ability to use AMOS commands lets you call editing programs such as AlphaXED,
AlphaVUE, AlphaWRITE, etc. from within XED. You may be able to load more than one
file (depending on the amount of memory in your partition). If you call the file you are
currently in, it is opened for read only access (otherwise you could have a simultaneous
update problem).
AlphaXED User’s Manual, Rev. 01
CHAPTER 9
SEARCHING FOR AND REPLACING
TEXT
Two of the most useful features of command mode are the ability to search for strings of
text within your document, and to replace strings with other strings. This chapter
discusses:
Parameters affecting how searches and replacements are done.
The SEARCH command to look for text.
The REPLACE command, to substitute new text for old, case by case.
The GLOBAL command, to substitute new text for old, in all cases.
Searching for balanced braces in programs.
To make editing easier, AlphaXED can quickly locate and change characters, words, or
phrases—generically referred to as a "string"—in your text without requiring you to read
the entire file. AlphaXED has a number of commands to work with strings of text in
various ways. The string you select to find and/or replace may not exceed 78
characters. The commands discussed in this chapter can find multiple-word strings
which are on more than one line.
SETTINGS AFFECTING SEARCH AND REPLACE
The commands COMPRESS, TOKEN, SEARCHFOLD, WILDCARD, and SBLK alter
the way AlphaXED does search and replace operations (see Chapter 7 for a full
explanation). When COMPRESS is on, it condenses all instances of multiple spaces,
tabs, etc., into one space. This affects searches/replaces involving spaces. For
example, if you enter:
>S Inventory’number
AlphaXED User’s Manual, Rev. 01
10.00 RETURN
Page 9-2
Chapter Nine
because that is how the string appears in the file, the search is successful only if
COMPRESS is OFF. Otherwise, the first space after Inventory’number in your
search string matches all the five spaces between Inventory’number and 10.00 in
the file. Since another space comes next in your SEARCH command, no match is
found (1 is next in the file). If you know COMPRESS is ON, enter this command to find
the string:
>S Inventory’number 10.00 RETURN
The SEARCH, REPLACE, and GLOBAL commands can be used to replace strings
within a limited portion of the text. If you mark off a section of text using the BLOCK
MARK function key, and set SBLK to ON, the command searches for or replaces only
text within the marked block. Also, AlphaXED’s recognition of upper and lower case
letters during execution of commands is determined by SEARCHFOLD. TOKEN lets
you search for strings bounded by spaces or special characters such as control
characters—see Chapter Seven for more information.
FINDING TEXT (SEARCH)
To quickly find a certain string in your file, you can use the SEARCH command. To do
so, switch to command mode, enter SEARCH, a space, the string to be found, and
press RETURN . For example, say you want to find all instances of the string "company":
>SEARCH company RETURN
You can search for text preceded by blanks by typing the spaces on the command line.
All of the blanks, except the one typed immediately after the command name, are part of
the search string. This feature only works correctly if COMPRESS is OFF (because of
the way it affects spaces). AlphaXED switches you back to Screen mode with the
cursor on the "c" of the first "company" in the file. If SEARCHFOLD is ON, AlphaXED
ignores the difference between upper and lower case letters in a search. Otherwise, it
searches for exactly what you entered.
The search string may be a maximum of 78 characters long, and contain any characters
in the character set except RUBOUT, NULL, and CARRIAGE RETURN. Non-printable
characters must be entered in the string in image mode (using ^G). End of line (LINE
FEED) is represented by the EOLN character (default, a backquote). If you wish to
search for a literal occurence of the EOLN character, you must first set the EOLN
character to something else. The same is true of either of the two wildcard
symbols—you must change them to something else to search for them literally. For
example, if the wildcards are set to the default (?*), you must reset the wildcards in
order to search for an instance of ? in your file.
You can move the cursor to the next occurrence of the string by pressing the MATCH
NEXT function key or CTRL / X . Each time you press MATCH NEXT, the cursor
advances to the next occurrence of the string, until there are no more—then MATCH
NEXT returns you to command mode. If the string you specify is not in the file,
AlphaXED displays:
AlphaXED User’s Manual, Rev. 01
Searching For and Replacing Text
Page 9-3
String not in file
SEARCHING FROM CURSOR LOCATION
NEXT operates the same way as the SEARCH command, but it begins the search at
the current cursor location instead of at the beginning of the file.
BACKWARD SEARCHING
If the BACKWARD parameter is ON, SEARCH searches backwards from the end of the
file for the string. NEXT searches backward from the cursor position. Multi-character
wildcards are not supported in backward searches, and TOKEN, COMPRESS and
SEARCHFOLD do not affect backward searches.
SEARCHING IN LARGE FILES
If your entire file does not fit into memory, and you wish to search for a string, use
WHOLE as you would SEARCH. Once all instances of the string in the text residing in
memory are found, it saves that text to the disk and loads more of the file to continue
searching. If BACKWARD is ON, however, WHOLE only searches the file in memory.
The disadvantage of WHOLE is you must exit and re-enter the editor to return to any
text saved on disk.
REPLACING TEXT
REPLACE finds a string, and replaces it with another string. The procedure is:
1.In command mode, enter REPLACE, a space, the string of characters you wish to
replace, and press RETURN . For example:
>REPLACE Transcendental Iterations Loop RETURN
2.You see a question mark. Enter the characters you want to replace the first string:
>REPLACE Transcendental Iterations Loop
?Automatic Counting Routine RETURN
If the string is not in the file, AlphaXED tells you so and positions the cursor next to the
AlphaXED prompt.
If the string is in the file, AlphaXED transfers you to screen mode, where the cursor
rests on the first character of the first instance of the string. You then tell AlphaXED
what to do next by typing one of the following characters, or pressing one of the keys,
without pressing RETURN .
AlphaXED User’s Manual, Rev. 01
Page 9-4
Chapter Nine
Char./Key
Result
Y
Yes, replace the string and find the next one.
N
No, don’t replace it, but find the next one.
or
MENU
CTRL
/
ESC
S
Return to command mode without replacing.
Position line the cursor is on at mid-screen.
The string is changed immediately if you type Y, and AlphaXED finds the next
occurrence. Repeat the process until all strings you want changed are changed. When
done, AlphaXED returns you to command mode.
Like SEARCH, the operation of REPLACE is modified by the SBLK and SEARCHFOLD
parameters, as described in Chapter Seven.
REPLACE and GLOBAL operations involving more than one word when SEARCHFOLD
is ON can sometimes give you results you might not expect. Multi-word replacements
follow a number of rules designed to try to replace such strings in a manner reflecting
common English usage. If you have unusual capitalization, you may not get the
replacement you wanted. It is generally better to do multi-word replacements with
SEARCHFOLD OFF, so you are replacing exact matches.
Whenever you replace text preceded by a single or double quote, remember that it
matters whether the first character in the text to be replaced is in upper or lower case.
If the text starts in upper case; e.g. "HELLO" or "Hello", the entire new word will be in
upper case for every replacement.
If the text starts in lower case; e.g. "hello" or "hELLO", the entire new word will be in
lower case for every replacement.
GLOBAL REPLACEMENT OF TEXT
GLOBAL does the same thing as REPLACE, except it does not ask you whether or not
to replace each string. It simply replaces all instances of the string in the file, then
displays the number of strings replaced. Here is an example:
>GLOBAL Transcendental Iterations Loop RETURN
?Automatic Counting Routine RETURN
10 strings replaced
AlphaXED User’s Manual, Rev. 01
Searching For and Replacing Text
Page 9-5
Use GLOBAL with care; you can easily end up with errors throughout your file if there
are occurrences of the search string you do not anticipate. For example, if you use
GLOBAL to change "is" to "was," (and TOKEN is off) AlphaXED also changes "this" to
"thwas." GLOBAL may not be abbreviated.
MATCHING BRACES
AlphaXED provides a useful function to help you balance pairs of brace characters. The
set of braces include: {, }, [, ] and (, ).
Balancing is available for all file types, not just AlphaC files.
To balance a set of braces, place the cursor on the left or right brace character. Next,
press the MATCH BRACE function key. If there is one, the cursor moves to the
corresponding matching brace.
You can also use the MATCH BRACE function to find the next occurrence of a " or a ’.
To do so, place the cursor on either quotation character, then press the MATCH BRACE
function key. To indicate the direction of the search press the left or right arrow key.
File Balance
AlphaXED provides a command to balance the file starting from the current cursor
position to the end of the file (see above for details of balancing). To execute the
command enter:
>balance
RETURN
Programming Language Context Sensitvity
Be aware that the brace balancing function differs in behavior within different file types.
The following table summarizes these differences:
.BAS, .BSI
Skips all balancing characters from either Rem or ! until the
end of the line. Balances all characters after Rem or ! when
balancing backward. Skips string literals.
.BP, .BPI
Same as above, except that it also skips character
constants.
.H, .C
Skips the /* and */ comments.
.M68
Skips all characters from the ; until the end of the line.
Balances all characters after the ; when balancing
backward.
AlphaXED User’s Manual, Rev. 01
CHAPTER 10
CAPTURE AND MACRO FEATURES
This chapter describes three AlphaXED features you can use to "record" keystrokes, then play
them back again. The overall effect of these features is to reduce the amount of repetitive
typing you have to do to give AlphaXED commands. The features are:
Capturing key sequences
Repeating key sequences
Creating and using macros
CAPTURING A SEQUENCE
AlphaXED lets you "capture" keystrokes so you can "replay" them again—as many
times as you need. You may capture keystrokes from both your editing screen and
command mode. Any sequence of actions you can do in AlphaXED can be captured.
There are three basic steps in using this feature: telling AlphaXED where to start
remembering commands you type, where to stop, and when to replay the commands. A
fourth step lets you add more commands to a sequence you’ve already recorded.
Press the CAPTURE START function key and "Capture" appears on the bottom status
line as a reminder. Type the keys you want to be able to replay. You can type any
character, use editing features, even go to command mode and use AlphaXED
commands. When you are done, press the CAPTURE END function key.
Executing a Captured Sequence
To "play back" a sequence of keystrokes you have captured, place the cursor where
you want them to begin and press the CAPTURE EXECUTE function key.
The keystrokes you saved are then done, in the same order they were recorded. They
remain saved until you exit the file, or you record another sequence of keystrokes with
the CAPTURE START function key.
AlphaXED User’s Manual, Rev. 01
Page 10-2
Chapter Ten
Adding To A Capture Sequence
You might want to add keystrokes to a sequence you recorded. Though you can’t go
back re-arrange the order of the keystrokes, you can append new ones to the end. To
do so, press the CAPTURE APPEND function key and type what you want added to the
existing capture sequence. When you are done, press CAPTURE END.
REPEATING KEYSTROKES
The REPEAT function key lets you instruct AlphaXED to repeat a keystroke from one to
nine times. To use this feature, press the REPEAT function key, type the number of
times you want to repeat, then press the key you want repeated. You are allowed only
one keystroke; however, the SHIFT or CTRL keys do not count. For example, suppose
you wanted the letter "a" to appear in your file eight times:
1.Press
REPEAT
2.Type
8
3.Type
a
AlphaXED types the letter "a" eight times on the line where the cursor rests. A more
practical application may involve using REPEAT along with the CAPTURE START
function key.
Programmers may be interested to know a single keystroke may transmit more than one
character if the key has a multi-character translation specified in the AlphaXED
translation table associated with the terminal. In this case, the whole translation
sequence is repeated the specified number of times.
If you press the REPEAT key by accident, press
ESC
to exit.
CREATING AND USING MACROS
A macro lets you store a series of commands and/or keystrokes, and recall the entire
series with one command. The capture feature described at the beginning of this
chapter is a macro; but it is a limited macro because it remembers only one series of
instructions and is overwritten every time you want another series of instructions.
AlphaXED has a MACRO command which lets you store a sequence of keystroke
instructions, identified by a name. This lets you store more than just one series of
instructions and do them as you choose.
Macro definitions can be created as you work with a file and AlphaXED remembers
them until you exit. However, you can keep more permanent versions of macros by
including them in your XED.INI file, or in .MAC files. No matter how they are saved, you
follow the same steps and format for defining a macro.
AlphaXED User’s Manual, Rev. 01
Capture and Macro Features
Page 10-3
Defining a Macro
The first step in defining a macro is choosing a name. Macro names are no more than
six characters long, begin with a letter, and can be in upper or lower case. However,
macro names may not be the same as any AlphaXED command, such as SEARCH,
SAVE, and so on. Each macro can include a maximum of 510 keystrokes. You can
have as many as 20 different macro names defined at one time. The format for
MACRO is:
MACRO {name} {macro-keystrokes}
You must press RETURN to end the macro instructions. If you enter MACRO only, a menu
of current macros is displayed. If you enter only MACRO and the name, the current
keystrokes defined for that macro are displayed. For example, type this at command
mode:
>MACRO date 23 April 2000 RETURN
This macro’s name is "date" and holds the text "23 April 2000." Now, while you are in
this file, you can instruct AlphaXED to type the date you recorded—23 April 2000—at
the current cursor position. To do so, place the cursor where you want and go to
command mode, then:
>date RETURN
AlphaXED returns you to the text and inserts "23 April 2000" at the spot where you left
the cursor.
MACRO offers more than just being able to "yank" text into your file. You can use both
command and edit mode features (see the next section) as macro keystrokes, and they
can be instructions for using function or other keys on your keyboard. What’s more, you
can "save" macros by including them as commands in your XED.INI file, or on disk as
.MAC files. Then, each time you call up AlphaXED, you can use the macros you’ve
already defined without re-entering the instructions.
Editing Existing Macros
You can redefine an existing macro in the same way you defined it. Enter MACRO, the
macro name, and the new definition.
Using Function and Control Keys in Macros
You must give instructions MACRO understands as keystrokes. If you just press the
key you want, AlphaXED does that operation. Therefore, you need a way to instruct
AlphaXED you are giving it an instruction to remember, not necessarily to do now.
AlphaXED User’s Manual, Rev. 01
Page 10-4
Chapter Ten
An example: macros always begin in edit mode. So, if you want a macro to use a
command mode feature, say the SEARCH command, you must first supply the
instruction to return to command mode, which is pressing ESC .
To signal AlphaXED to remember the keystroke, you first press
press the key you want AlphaXED to remember. In this case,
AlphaXED gives is:
CTRL
ESC
/
. Then, you
. The response
G
^[
The caret bracket sequence represents the universal terminal key sequence for
ESC —the same sequence shown in Appendix C.
/ G alone doesn’t place any character on the command line—it causes AlphaXED
to interpret the next keystroke it receives as one to do later, not now. ( CTRL / G is also
used when you need to insert a control character directly in your file. See Chapter 11
for more information.)
CTRL
For each control sequence you want in your macro, except RETURN , you must press
CTRL /
G
first, then the key you want used. Using RETURN in a macro is the only exception.
is reserved as the macro terminator and is only used when you want to end the
macro. To use RETURN as part of your macro keystroke sequence, use the EOLN
character (which defaults to a backquote mark ‘). For example, suppose you want a
macro to display an account directory. To do so, you:
RETURN
1.Press
2.Type:
to go to command mode.
ESC
.DIR RETURN
To build a macro called SEE to do this for you, from command mode enter:
1.Type
MACROSEE followed by a space.
2.Press
CTRL
/
3.Press
ESC
.
4.Type:
.DIR
5.Type:
‘ RETURN
G
.
This is what your screen looks like before pressing
RETURN
:
>MACRO SEE ^[DIR‘
AlphaXED User’s Manual, Rev. 01
Capture and Macro Features
The EOLN character is the instruction to press
RETURN to see the directory after calling the macro.
Page 10-5
RETURN
. If you leave it off, you must press
Saving a Macro
Once you have defined a macro, you can save it to disk by entering the SAVEM
command in Command Mode, followed by the name of the macro to be saved. This
creates a file with the macro name and a .MAC extension.
DEFINING MACROS IN XED.INI
You can define a macro in your XED.INI file so it is available each time you call up
AlphaXED using that XED.INI. This is especially helpful if you do the same series of
operations often, and/or in many files—you don’t have to re-enter the macro for each file
because it is already defined. When a macro is defined, you can execute it in any file
that uses that XED.INI file by typing the macro name at command mode.
The format for the MACRO definition is the same when it appears in your XED.INI file as
it is when you use MACRO from command mode. MACRO in your XED.INI also follows
the typical conventions for XED.INI commands. See Appendix A for more information
about your XED.INI. Macro definitions in the XED.INI file supercede macro definitions
of the same name contained in disk files.
Macro Files
You may build files containing macro commands using the same format as above.
These files can be either created by saving a currently defined macro (using SAVEM),
or you can enter macro commands directly into a new file. As long as the file has a
.MAC extension, it can be found by AlphaXED and executed when called (assuming it is
in the correct account).
THE MACRO MENU
You can see a menu of available macro commands by entering MACRO RETURN at
command mode. The name of the macro is displayed, followed by the definition. You
are then prompted to enter the name of the macro you wish to execute, or to use
CTRL /
C
to return to command mode.
AlphaXED User’s Manual, Rev. 01
Page 10-6
Chapter Ten
Macro Restrictions
There are some restrictions on the features you can use in a macro:
You cannot use the CAPTURE key feature’s capability to start, end or append a
capture with the CAPTURE START, CAPTURE END, or CAPTURE APPEND
function keys. You can, however, execute a captured sequence using the
EXECUTE CAPTURE function key.
You cannot define a new macro command within a macro definition.
A macro can invoke another macro. However, if the other macro contains a
reference to the first macro—a recursive macro—you might become caught in an
endless loop. Be careful if you build recursive macros.
Macro Commands
There are special commands just for macro files:
BREAK
The format is:
^[BREAK "character-string"`
BREAK lets you move to the next occurence of any
of the characters included in character-string.
For example, if you wanted to move to the next plus or minus
sign, you would enter:
^[BREAK "+-"`
DO and OD
DO lets you repeat a command or series of commands.
format is:
The
DO UNTIL [conditional-expression]
[editing commands or keystroke sequences]
OD
or:
DO [decimal-number]
[editing commands or keystroke sequences]
OD
where [conditional-expression] or [decimal-number] controls the
number of times to repeat the series. The conditional expression
has the form:
AlphaXED User’s Manual, Rev. 01
Capture and Macro Features
Page 10-7
@ = [literal-string]
or:
@ != [literal-string]
@ represents the current cursor position in the
file.
!=
means
"not
equal,"
and
[literal-string] defines the test condition.
Here’s an
example of a DO expression:
DO @ = "End marker"
^L^L^D^D^L^L^Y
OD
IF and FI
Credit Granted@
IF lets you do a series of commands if a certain condition is (or is
not) true. The format is:
IF [conditional-expression]
[editing commands or keystroke sequences]
FI
The conditional expression has the same format as in DO, above.
SPAN
Works much like BREAK, above, except the character-string
defined characters to be skipped over. SPAN lets you bypass
whatever characters you define in the string and go on to the next
character found that is not in the set.
AlphaXED User’s Manual, Rev. 01
CHAPTER 11
SPECIAL FEATURES
This chapter discusses;
Inserting control characters in text
Providing an edit history for your file
Options for the XED command
INSERTING CONTROL CHARACTERS
There may be times when you need to insert a control character directly into the text of
a file or must give an instruction to use a key to the MACRO command. The CTRL / G
key sequence lets you do this. To use it, move the cursor to where you want to insert
the control character, press CTRL / G , then type the control character you want.
For example, suppose you want to put an escape sequence into a macro definition to
move the cursor to command mode. You press CTRL / G at the appropriate point in the
macro definition, followed by CTRL / [ . A ^[ appears in the text to indicate the escape
character is inserted at that point.
EDIT HISTORY
By placing a VEDIT=[nn] line in a file, you can generate an edit history for your file. This
lets you easily keep track of changes. Once the VEDIT line exists in your file, pressing
the EDIT HIST function key updates the edit history number of your program.
AlphaXED looks for the VEDIT=nnn line in your file, and adds 1 to the number it finds
there. Then it adds a comment line at the current cursor position to hold the new edit
number, the date and time of the update, and your user name. If AlphaXED cannot find
a VEDIT line in your program file, you see an error message. You can edit the VEDIT
line yourself at any time. Only the first VEDIT line in a file is modified.
AlphaXED User’s Manual, Rev. 01
Page 11-2
Chapter Eleven
XED COMMAND SWITCHES
Each option defined below can be abbreviated to a unique combination of characters.
For example, /SUBROUTINE can be /S.
/BATCH
Suppresses most screen display output. This option is especially
for use with the Task Manager’s .LOG files and reduces the
amount of unnecessary screen output recorded. For more
information about the Task Manager, see your Task Manager
User’s Guide.
/BIN
Used with binary and data files. Causes carriage returns and null
characters to be transparent—they are neither deleted on input
nor inserted on output. These characters may be inserted with
CTRL /
G .
All file extensions, including .OBJ and .LIT, may be
edited with /BIN. Even using /BIN, files not formatted with records
less than 511 characters terminated with a linefeed character still
will be difficult to edit. Also useful in certain porting situations, for
transferring files with unusual characters.
/NOJOURNAL
Turns off keystroke journalling.
/NODISPLAY
Causes a journal restore without displaying the changes to the
screen. This speeds up a large restore.
/NOYANK
This option makes it easy to add text to the beginning of a file
larger than your memory. If your file is larger than your memory
partition, using XED to see the file fills up your memory partition
and you cannot YANK information into the beginning of the file
from another file on the disk. To do so, specify the NOYANK
command option after the name of the file on the XED command
line. For example:
XED FILE1.TXT/NOYANK RETURN
AlphaXED "opens" the file without actually bringing any text into
memory. You see a field of asterisks in screen mode, just as if it
were a new file. Now you can type or YANK in any text you like.
When you have finished inserting other text, you can then bring in
as much of FILE1.TXT as memory holds by using YANK:
>YANK RETURN
Now your added text is at the front of FILE1.TXT and you can
MOVE it to another part of the text if you like.
AlphaXED User’s Manual, Rev. 01
Special Features
/READ
Page 11-3
Gives you read-only access to a file. This option lets you use
AlphaXED to see a file located on a device or in an account other
than your own. Although you can make editing changes on your
screen when the file is displayed, you can not retain those
changes. You can UNYANK text from the file. The only way to
exit a file you call up with the /R option is to use QUIT. The
format is:
XED filespec/R
/SUBROUTINE
Suppresses all screen output when a file is being loaded. With
some applications that call XED to process a file, the periods that
print on the screen are a display problem. The format is:
XED filespec/SUBROUTINE
Be aware that, since all output is suppressed, if the file does not
exist, AlphaXED still asks if you want to create the file, but the
question itself does not display. Entering a "Y" creates the file. In
other words, if you are not aware the file does not exist, the
process just seems to stop (while XED waits for a response).
/TRACE
/TRACE causes each command in AlphaXED’s initialization file to
be displayed on your screen as it is processed. You can also turn
on trace by including :T as the first line in the XED.INI file. See
Appendix A for more information about XED.INI. The format is:
XED filespec/TRACE
COMPILING PROGRAMS
AlphaXED lets you compile the program you are editing without leaving it. Enter
COMPILE at command mode and XED compiles it using the proper compiler (based on
the file extension). These files can be compiled:
COMPILER
FILE EXTENSION
Assembly
AlphaBASIC
AlphaBASIC PLUS
AlphaC
AlphaCOBOL
.M68
.BAS
.BP
.C
.CBL
AlphaXED User’s Manual, Rev. 01
Page 11-4
Chapter Eleven
The compilers resident on your computer need to be AMOS 2.0A or later versions. The
syntax is:
COMPILE {/switch}
or:
C {/switch}
You can use any switches the normal compiler accepts for the specific type of file. The
screen displays the normal information generated by the assembler or compiler. If
errors appear in the compilation, XED positions the cursor on the line of the first syntax
error. For each syntax error, the error message is displayed on the status line.
If you COMPILE an AlphaBASIC program, you will not see error message output from
the compile. AlphaBASIC PLUS and other languages display all errors.
To advance to the next error location, press the GOTO ERROR NEXT key. To go back
to the last error location, press GOTO ERROR LAST. If you try to go beyond the last
error or back past the first error, you see an error message.
The source file must be completely memory resident, and only 50 compiling errors can
be tracked. COMPILE doesn’t save your source file, but the .OBJ, .RP, or .CBJ files,
and any other normal output files will be on the disk.
If you add or delete lines within locations of syntax errors, GOTO ERROR NEXT and
GOTO ERROR LAST won’t take you to the correct lines.
The MACRO command is handy if you often compile using the same switches. See
Chapter 10.
CONTEXT HELP
A feature for .M68, .C and .BP files is context help, which gives you on-line
quick-reference documentation for certain keywords in programs. The keywords include:
AMOS Instruction set and Monitor calls for .M68 files.
AlphaC library calls and monitor-interface calls for .C files.
AlphaBASIC PLUS program statements.
To use context help, place the cursor anywhere on the keyword, or after the keyword
but before the next keyword, and press HELP . XED backtracks to the beginning of the
keyword, and displays information.
Keywords should contain only characters from A-Z, a-z, 0-9, $, _, and ’. All other
characters are considered delimiters. Press SHIFT / HELP to see a topics menu, from which
you can select information to view.
AlphaXED User’s Manual, Rev. 01
APPENDIX A
THE XED.INI FILE
AlphaXED’s initialization file controls certain aspects of AlphaXED’s execution. Although
AlphaXED has certain default values built in, much of AlphaXED’s versatility depends on the
creation and alteration of its initialization file. This appendix describes:
How to create the AlphaXED initialization file.
Kinds of initialization file commands.
Default initialization file commands.
Command settings available.
A sample initialization file.
CREATING AN ALPHAXED INITIALIZATION FILE
AlphaXED comes with an initialization file named XED.NEW located in DSK0:[7,0]. It is
named XED.NEW so it won’t overwrite an existing XED.INI file during software
installation. If you choose to use XED.NEW as your initialization file, you must rename
it to XED.INI. Or, you can create your own initialization file, either to affect only some
user accounts, or to change the options selected for your entire system. When you
create an initialization file, follow these guidelines:
The initialization file must be created using AlphaXED or AlphaVUE.
The initialization file name must be XED.INI.
You create XED.INI as you would any other AlphaXED file. Enter the commands you
want, in the required format, and FINISH from the file to keep the settings you’ve
chosen. You may add extra spaces on command lines, or indent the commands from
the left margin to make the file easier to read, as shown in the sample XED.INI later in
this appendix. You can also put comments in the file to explain what it is doing.
AlphaXED User’s Manual, Rev. 01
Page A-2
Appendix A
Location of XED.INI
You can locate an initialization file in any account on any device. The file’s location
determines whether it affects all user accounts, user accounts in one project, or a single
user account.
TO AFFECT:
PLACE XED.INI FILE IN:
All users in one account
The account
One project
Project library account [x,0]
All accounts
DSK0:[7,0]
Search Path for XED.INI
You may have several XED.INI files on your system. AlphaXED searches for XED.INI
in a specific way. It uses the first XED.INI file it finds, looking in these accounts:
1.Your current account.
2.Your project library account [project-number,0].
3.DSK0:[7,0].
If there is no XED.INI in any of these accounts, AlphaXED uses the default command
settings described later in this appendix.
Do not load XED.INI in system or user memory. It does no good, and may hang your
job.
INITIALIZATION FILE COMMANDS
There are two kinds of initialization file commands: those in the initialization file, and
those used in both the initialization file and from command mode or the option menu.
The commands which are effective only from XED.INI affect all AlphaXED editing
sessions until you change the initialization file. The commands effective from both
XED.INI and within XED temporarily change how a command works for the editing
session. When you exit, then return to AlphaXED, the command behaves as specified
in the XED.INI file.
AlphaXED User’s Manual, Rev. 01
The XED.INI File
Page A-3
The table below is an alphabetic list of the commands XED.INI understands. It includes
the default setting for the command if it is not included in XED.INI, and whether it is
available from within AlphaXED. Those commands available within XED are described
elsewhere in this manual. Those available only from the XED.INI file ("No" in both the
AT CMD MODE? and AT OPTION MENU? columns) are described in the sections after
this table.
COMMAND
BACKWARD
CHARINS ON/OFF
1
DEFAULT SETTING
AT CMD
MODE?
AT OPTION
MENU?
OFF
Yes
Yes
Yes
Yes
OFF
2
COLUMN [number]
40/56
Yes
Yes
COMMA ON/OFF
OFF
Yes
Yes
COMMENT [string]
; (.M68) ! (.BAS/.BP)
Yes
Yes
others undefined
COMPRESS
ON
Yes
Yes
CVT
OH
Yes
Yes
DEFAULT [list]
M68,TXT,LST,BAS,BP,CMD
No
No
DO,CTL,C,CBL,FOR,F77,PAS
DELTA ON/OFF
OFF (ON for BASIC & BP)
Yes
Yes
DELTA [number]
5
Yes
Yes
DISPLAY ON/OFF
ON
No
No
ENTRY ON/OFF
OFF
Yes
Yes
EOLN
Backquote
Yes
Yes
FIELD ON/OFF
ON
Yes
Yes
FIELD [number]
32(space)
Yes
Yes
FOLD ON/OFF
ON
Yes
Yes
GO [string]
FINISH
3
No
3
No
Yes
GO.ext [string]
FINISH
Yes
INDENT ON/OFF
OFF
Yes
Yes
INSERT ON/OFF
OFF
Yes
Yes
JOURNAL ON/OFF
ON
Yes
No
1
Set by function key only
2
40 for all program files except AlphaBASIC and AlphaBASIC PLUS (56)
3
The GO command at command level is different
AlphaXED User’s Manual, Rev. 01
Page A-4
Appendix A
COMMAND
DEFAULT SETTING
AT CMD
MODE?
AT OPTION
MENU?
MACRO
None
Yes
No
MARGIN [number]
0
Yes
Yes
MODEM ON/OFF
OFF
Yes
Yes
MODULE "text","fspec"
4
No
No
MOUSE
OFF
Yes
Yes
SBLK ON/OFF
OFF
Yes
Yes
SEARCHFOLD ON/OFF
ON
Yes
Yes
SPACE ON/OFF
ON
Yes
Yes
START
Home
No
No
:T
-
No
No
TAB [number]
8
Yes
Yes
TOKEN
OFF
Yes
Yes
WIDTH [number]
79
Yes
Yes
WILDCARD [string]
?*
Yes
Yes
WRAP ON/OFF
OFF
Yes
Yes
4
Default modules listed in Chapter 5.
The commands listed above are mostly discussed in Chapter 7. Those only functional
in XED.INI are discussed in the sections below.
DEFAULT
Lets you list the extensions to use when you call up AlphaXED without entering a file
extension. Using this parameter, you can tailor AlphaXED to search for the types of
files you use most often. For example, say your XED.INI file contains:
DEFAULT TXT,BP,DO,CMD,M68,CTL,INV,XED
and you call up AlphaXED with the command:
XED MYFILE RETURN
AlphaXED looks at the DEFAULT command line in the XED.INI file, and uses the
extensions listed in their order when searching for the file on the disk. In this case, it
looks first for MYFILE.TXT. If it does not find a MYFILE.TXT, it looks for MYFILE.BP,
MYFILE.DO, MYFILE.CMD, etc. If it does not find a MYFILE with any of the listed
extensions, it asks you if you want to create MYFILE.TXT (using the first extention on
AlphaXED User’s Manual, Rev. 01
The XED.INI File
Page A-5
the default list). If DEFAULT does not appear in your XED.INI, AlphaXED assumes
these extensions in this order:
M68,TXT,LST,BAS,BP,CMD,DO,CTL,C,CBL,FOR,F77,PAS,INI
DISPLAY
Determines whether you see the display when restoring keystrokes from a journal file.
GO
Lets you define the effect of entering GO in Command mode. The built-in effect of this
parameter for all files is to FINISH. Depending on the extension of the file being edited,
GO does one of several additional functions:
EXTENSION
MEANING
.BAS
.BP
.C
.CBL
.CMD
.CTL
.FOR
.F77
.INI
.M68
.PAS
.TXT
Compile the program using COMPIL.
Compile the program using COMPLP.
Compile with C compiler.
Compile with Cobol compiler.
Execute the command file.
Submit the file to the Task Manager.
Compile with Fortran compiler.
Compile with Fortran 77 compiler.
Does MONTST if in DSK0:[1,4]. Finishes all other jobs.
Assemble the program using M68.
Compile Pascal program using PC.
Format the file using TXTFMT.
A specific GO command in XED.INI overrides the default GO processing listed above.
A maximum of 100 characters is allowed in a GO command. However, since you can
call a .CMD or .DO file from GO, you should not be restricted by this maximum.
You may enter multiple lines of commands as part of GO to initiate some special
processing of your files. For example, suppose you frequently edit a certain data file to
update a customer base. Every time you update the file, you need to run a BASIC
PLUS program to print out a formatted list of current customers. You can set up a GO
sequence that runs the program when you exit the data file. Here’s what the GO
command might look like:
AlphaXED User’s Manual, Rev. 01
Page A-6
Appendix A
GO RUNP UPDATE
2
%
PRINT CUST.LST
SEND STEVE File on Printer$
;
;
;
;
Menu answer selects print
Current file used in UPDATE
Send new file to printer
Notify you it’s printing
You can use a % sign to signify the file you are currently editing. The $ sign indicates
the end of the GO sequence—necessary because the GO command can occupy more
than one line in the XED.INI file.
Placement of the $ to end the GO sequence can effect what you wish to do. The $
generates a Carriage Return. If the $ appears on a separate line, it adds an extra
Carriage Return. If your last command calls a command file or runs a program, and that
function asks for input, the Carriage Return would act as the first input (which may not
be what you want). Keep this in mind when building GO commands.
GO gives you a lot of versatility, especially if you are familiar with the operation of
command files. For a complete discussion of command files, see your Command File
User’s Manual.
An additional ability of GO is you can define special commands for each type of file you
edit. When you are editing a file with a programming language extension, exiting the file
with GO causes the corresponding language specific command to be executed (if one is
defined). Otherwise, the generic GO is executed (if one is defined), else the default GO
command is executed (if there is one for that extension). If none of these can be done,
GO merely FINISHes from the file. The specific GO commands are:
GO NAME
LANGUAGE
EXTENSION
GO.C
GO.M68
GO.BAS
GO.BP
GO.CBL
AlphaC
Assembly
BASIC
BASIC PLUS
AlphaCOBOL
.C
.M68
.BAS
.BP
.CBL
For example, say your XED.INI has this in it:
GO.BP COMPLP %0
RUNP %0$
Whenever you exit a .BP file with GO, the file is compiled and executed. This feature
lets you have a specific GO sequence for all of your programming files.
Remember that a generic GO definition overrides all specific definitions. So, if you want
to have a GO.BP definition, for example, it would not work if you had a GO TXTFMT %
command in the same .INI file.
AlphaXED User’s Manual, Rev. 01
The XED.INI File
Page A-7
JOURNAL n
Determines whether keystroke journaling is on or off when you call up a file. n is an
optional number that specifies how many keystrokes occur between disk updates. This
number defaults to 16, and should be by powers of 2—2, 4, 8, 16, 32, etc.
MODULE
Gives the YANK MODULE function key the file specifications it lists on its menu. As
many as eleven MODULE commands can be included in the XED.INI file. The format is:
MODULE "description","filespec"
For example:
MODULE "BASIC search routine","DSK0:SEARCH.BAS[7,0]"
The text description can be up to 36 characters long (anything longer is truncated), and
filespec is a standard AMOS file specification. It’s a good idea to use a full file
specification, with device and account numbers, if you want to be able to access the
modules from other accounts.
START
Determines where the cursor is when you call up a file:
START = HOME
START = END
START = COMMAND
Beginning of the file in edit mode.
End of the file in edit mode.
In command mode.
The default is HOME.
SETTING THE TAB WIDTH (TAB :T)
In the XED.INI file (only), you can set the width of the TAB character. The format is:
TAB n:T
where n is the desired tab width. When the :T is added, the TAB key enters a TAB
character of the defined width. This differs from the effect of resetting the TAB width
from Command Mode or the Options Menu (which moves the cursor the desired
amount, but fills the area with spaces).
AlphaXED User’s Manual, Rev. 01
Page A-8
Appendix A
SAMPLE INITIALIZATION FILE
START
= HOME
; Starts at top of
INSERT
= ON
; Line-insert mode
SPACE
= ON
;
WRAP
= ON
; Word wrap at end
DEFAULT
= ,TXT,BP,CMD,DO,CTL,INI,DAT,VUE,OLD,JRN
SEARCHFOLD = OFF
; Search for exact
TAB
= 8
;
COMMENT
= !
;
FIELD
= 00
;
EOLN
= @
;
WILDCARD &*
MODULE "Header File","DSK2:FORM.TXT[100,50]"
MODULE "Add Part No.","DSK2:U5.TXT[100,0]"
MODULE "Insert Customer Field","DSK2:1F.TXT[100,0]"
GO
= LAS %
$
file
ON
of line
matches
AlphaXED User’s Manual, Rev. 01
APPENDIX B
ERROR MESSAGES
The following error messages may be displayed by AlphaXED or by the Alpha Micro Operating
System to tell you that you entered an AlphaXED command incorrectly, or for some other
reason AlphaXED can’t do your request. Most of the error messages are self-explanatory, but
to avoid any possible confusion, we discuss each one.
Access denied: (AMOS error message)
This message appears if you use UNYANK to write to a device other than the one you
are logged onto and an account with a project number different from the one you are
logged into. For example, you cannot UNYANK data from DSK1:[20,1] to DSK0:[30,3].
?Blank must precede macro definition
Add a blank space and try again.
Cannot allocate random file (filespec) - (AMOS error message)
This error message occurs for various AMOS file system conditions, as indicated by the
(AMOS error message). For example, trying to edit a file on a write-protected disk,
when the device is full, and so on.
Cannot insert - line too long
Shorten or break up the line and try again.
?Cannot FINISH - File opened for read only
Enter Q! at command mode to exit.
?Cannot SAVE - File opened for read only
Enter Q! at command mode to exit.
AlphaXED User’s Manual, Rev. 01
Page B-2
Appendix B
?Cannot RECESS - File opened for read only
Enter Q! at command mode to exit.
?Cannot RECESS - There is a format mismatch in the existing .JRL file
File opened for READ ONLY.
Enter Q! at command mode to exit.
?Cannot SAVE - File opened for read only
Enter Q! at command mode to exit.
Cannot SAVE - File partially on disk
This message appears when the file you are attempting to SAVE is larger than your
memory partition. To keep the changes you’ve made so far to this file, FINISH from the
file then call it up again.
Cannot XED or UNYANK file with .XXX extension
The file has an extension that means it contains data incompatible with AlphaXED. See
Chapter 2 for a list of restricted extensions.
Cannot XED or UNYANK file with MEM: or RES: device name
Files currently located in either user memory (MEM:) or system memory (RES:) are not
available for use.
CAPTURE START, APPEND, and END sequences not allowed in macro
Remove the sequence and try again.
?Command or option keyword may not be redefined
Change the name of what you were trying to define, and try again.
?Compile not supported for source file extension
You cannot compile the type of file you are in.
Cursor in block
You tried to do a block operation with MOVE, COPY, or UNYANK when the cursor was
in the marked area of text. Move the cursor out of the block and try again.
AlphaXED User’s Manual, Rev. 01
Error Messages
Page B-3
%Cursor is not on an alphanumeric token
Place the cursor somewhere on the keyword you want defined.
?End (or start) of error list
You tried to move past the last error, or go back past the first error.
?Error in creating a RECESS file.
Check with your System Operator.
memory available.
There may be a disk problem, or not enough
?Error opening .JRL file - continuing without journaling
The journal file cannot be read. Check with your System Operator. There may be a
disk problem, or not enough memory available.
?File has no VEDIT pseudo-op
You must have a VEDIT= line in your file to generate a edit level.
?File not completely memory resident
You tried to COMPILE a file that is partially on disk (too large to fit into memory). Exit to
AMOS and compile from there, or see about increasing your memory partition size.
?Function key not implemented
The function key you pressed does not have a function at this time.
?The GO command is not allowed in the second level
You cannot go out of a file that was called from within XED (the files "above" it are still
there). FINISH out of the file.
%GO command string truncated
Your GO command contained more than 100 characters. Either shorten it, or call a
command file to execute the functions.
Input file already empty
When a file is too large to fit into memory, you can UNYANK the top portion of the file to
the disk, then YANK the last part of the file into memory. If you issue the YANK
command and the last part of the file has already been loaded into memory, this error
message lets you know the YANK command is unnecessary and has no effect.
AlphaXED User’s Manual, Rev. 01
Page B-4
Appendix B
Improper format in MODULE command
Check your syntax and try again.
%Insufficient space to store module specification
MODULE specifications cannot exceed 36 characters and the one being processed
contains more than 36.
!!Insufficient space to complete transfer!!
This message tells you there is not enough free space in memory for AlphaXED to do
the operation you requested. When you edit a file too large to fit into memory,
AlphaXED loads all that fits, then displays this message. You can edit the portion
loaded into memory and access the remaining part by using the UNYANK and YANK
commands. This message also appears if you try to YANK in a file or MOVE a block of
text when the additional text would exceed the memory capacity.
Invalid command or option (type "help comand") or missing macro file
This message is AlphaXED’s response to misspelled commands, or unrecognized
commands in command mode. Check your spelling or make sure the command is valid
and try again.
%Invalid image mode insertion character
After using CTRL / G , you cannot use
EOL character, or DEL.
CTRL
M
(Carriage Return),
CTRL
@
(Null), the
Invalid initialization command: [command]
This message appears when first calling up AlphaXED if there is an invalid initialization
command in XED.INI. Check the commands shown in the message for proper syntax,
spelling errors, etc., and correct XED.INI as necessary.
Invalid relational op in macro conditional
Check your macro definition and look for incorrect conditions.
Invalid shift count
There are syntactic errors in the SHIFT command, or you are trying to SHIFT by an
invalid amount—less than zero or more than 510.
Invalid search key
Various combinations of single and multiple wildcard characters are ambiguous. For
example, two contiguous multi-character wildcards (**).
AlphaXED User’s Manual, Rev. 01
Error Messages
Page B-5
?Invalid value for option
Check your syntax and try again.
?Joined line > 510 chars - join not done
Break up the lines so joining them together will not exceed 510 characters.
JOURNAL option not allowed
You have the file open for read-only access, therefore, journaling is not needed.
%Keyword help available; menus not installed
See your System Operator about installing the menus.
?Label must be digit 0-9
Enter a digit, or press
ESC
to get out of the LABEL or GOTO sequence.
%Label not located in XREF file
The label you are searching for was not found.
Line longer than 510 characters in file
The line you are trying to edit exceeds the maximum allowed by AlphaXED. To avoid
loss of characters, break the line so it is less than 510 characters.
?Macro conditional expression syntax error
Check your syntax and try again.
?Macro may not contain embedded macro definition
You can’t have a macro define a macro, so remove the macro definition.
Macro name must start with letter
Change the name and try again.
Macro name too long
Reduce the size and try again.
Macro syntax error - macro definition ignored
Check your syntax against the format of the macro definition to try to locate the error
and correct it.
AlphaXED User’s Manual, Rev. 01
Page B-6
Appendix B
Macro text too large
Reduce the size and try again.
%Missing quote in MODULE specification
Add the missing quote and try again.
Named macro not found
Check your syntax. Make sure you’re looking in the proper account, etc.
No block marked
This error message appears for COPY, DELETE, MOVE, SHIFT and UNYANK when no
block is marked. Mark the text and try again.
%No context help available for this keyword
The keyword you specified is not a legal one for the language you are in—check your
syntax and try again.
%No context help found for file type
You cannot get help from within your current file.
%No context help available for this keyword
There is no documentation for what you asked for. Make sure the keyword is correct for
the language you are writing in.
No restore, not enough memory to store previous deleted text
The last text you deleted was larger than AlphaXED’s ability to store it, so AlphaXED
cannot restore the deleted text. The limit depends on your user memory partition size.
%Non-alphanumeric character in macro variable name
Remove the character and try again.
?Not enough memory
This message appears when not enough memory is available to do the operation you
requested. See your System Operator about getting more memory.
?Not enough memory to perform shift
The SHIFT command may insert tabs and/or spaces in the text. If not enough memory
is available to hold the inserted spaces, SHIFT is ignored.
AlphaXED User’s Manual, Rev. 01
Error Messages
Page B-7
?Not enough memory to perform yank
This message tells you there is not enough free space in memory for AlphaXED to
perform the operation you requested. You attempted to YANK a file from another
device, and there was not enough room in your memory partition to load that file and its
device driver if necessary. The device driver must be loaded into either system or user
memory. To remedy, exit your file and increase your memory allotment, or load the
device driver into system memory.
Number not in source format
You tried to convert a number that was not in the proper format (or some non-numeric
character). If the character you have the cursor on is the one you wish to convert, then
check the CONVERT setting and make sure the first letter defines the format type as
the number the cursor is on.
ON, OFF (TRUE, FALSE) expected
Answer with ON or OFF, or T or F.
Please SAVE file - Unable to expand JOURNAL file due to memory limitation
Your journal file is full—SAVE and continue editing.
?Repeat count must be digit 1 to 9
Enter a digit, or press
ESC
to exit the repeat sequence.
Specification error
You made an error when typing the XED command line at monitor level. For example,
you specify a file name that exceeds six characters. A carat symbol (^) marks the place
on the line where the error is.
String not in file
The string you are searching for is not in your file. If you think the string should be in the
file, check the SEARCHFOLD command which affects the way these commands treat
capitalization. If SEARCHFOLD is off, AlphaXED accepts only perfect matches,
including capitalization. If SBLK is on, AlphaXED only searches in the marked block, so
check the setting of SBLK also.
There is a format mismatch in the existing .JRL file. No recovery.
You cannot recover your editing changes.
AlphaXED User’s Manual, Rev. 01
Page B-8
Appendix B
There is a format mismatch in the existing .JRL file.
You cannot recover your editing changes.
%There is no deleted text
You pressed RESTORE BLOCK, but there is nothing to restore.
?This AMOS command is not allowed
The AMOS command you tried to use could cause possible problems, and is not
allowed from within XED.
%Token too long (no keyword exceeds 24 chars
The word you put the cursor on is too long to be a keyword, and so has no help
definition.
Too many macro definitions
Reduce the number and try again.
%Type HELP COMAND for list of valid commands
You entered an invalid command. Use HELP COMAND if you need help.
Unable to fetch module
The file specification given in XED.INI for the MODULE command does not exist as an
AMOS file. Be sure the file specification you gave exists as specified.
%Uplevel edit of file with existing .TMP
Must be read-only (use /R switch).
You can’t open the same file twice for editing. Use /R to open it again.
!!WARNING - Line longer than 510 characters in file!
In AlphaXED no single line can be longer than 510 characters. Break up the line so it is
less than 510 characters.
Warning: GO command string truncated
If a GO command string exceeds 100 characters, everything following the 100th
character is ignored. Check to be sure the GO command in XED.INI is terminated by
the dollar sign ($) to signal GO’s end.
AlphaXED User’s Manual, Rev. 01
APPENDIX C
AlphaXED QUICK REFERENCE LISTS
SCREEN EDITING COMMANDS
The key sequences listed in the "Alternate key" column below can be used on all
terminals. They are useful when your terminal doesn’t have the function or special key
listed in the "Key Labeled" column. Letters shown as part of the "Alternate Key" must
be entered in the case listed.
Alternate key sequences begin by pressing either CTRL and another key (at the same
time), or by pressing CTRL and the underline character, releasing those, and then
pressing another key.
Feature
Key Labeled
Block copy
Block mark
Block move
Block shift
Capture start
Capture execute
Capture end
Capture append
Center screen
Center line
Char insert mode
Clear marks
Command mode
Cursor down
Cursor left
Context Help
Context Help Menu
Convert Number Base
Cursor right
Cursor up
BLOCK COPY
MARK BLOCK
BLOCK MOVE
BLOCK SHIFT
CAPTURE START
CAPTURE EXECUTE
CAPTURE END
CAPTURE APPEND
CENTER SCREEN
CENTER LINE
AUTO INS CHAR
CLEAR BLOCK
MENU or ESCAPE
↓
←
HELP
Shift/HELP
CONVERT
→
↑
AlphaXED User’s Manual, Rev. 01
Alternate Sequence
CTRL
CTRL
CTRL
CTRL
CTRL
CTRL
CTRL
CTRL
CTRL
CTRL
CTRL
CTRL
CTRL
CTRL
CTRL
CTRL
CTRL
CTRL
CTRL
CTRL
/
/
/
/
/
/
/
/
/
/
/
/
/
/
/
/
/
/
/
/
_
C
P
_
V
_
Z
_
K
_
P
_
X
_
A
S
_
L
Q
_
Q
[
J
H
_
H
_
[
_
G
L
K
Page C-2
1
Appendix C
Feature
Key Labeled
Alternate Sequence
Delete Block
Delete Character
Delete Line
Delete Prev Char
Delete to End of Line
Delete Word
End of Line
Find Next
Format Paragraph
Home Position
Insert Character
Insert Edit History
Insert Line
Insert Word
Join Line
Last Page
Last Syntax Error
Mark Cursor Position
Match Brace
Next Page
Next Word
Next Syntax Error
Option Menu
Previous Change
Previous Page
Previous Word
Printer Page Break
Refresh Screen
Repeat Character
Return
Return to Label
Set Entry Mode
Start of Line
Swap Window
Tab
Undelete Line/Block
Yank Module
BLOCK DEL
CHAR DEL
LINE DEL
RUBOUT
-WORD DEL
SHIFT/→
MATCH NEXT
FORMAT
HOME
CHAR INS
EDIT HIST
LINE INS
WORD INS
SHIFT/↑
SHIFT/HOME
GOTO ERROR LAST
LABEL LINE
MATCH BRACE
NEXT SCREEN
NEXT WORD
GOTO ERROR NEXT
OPTION MENU
PREV CHG
PREV SCREEN
PREV WORD
NEW LINE
-REPEAT
RETURN
LABEL GOTO
AUTO INS LINE
SHIFT←
SWAP WINDOW
TAB
RESTORE
YANK MODULE
CTRL
CTRL
CTRL
/
/
/
_
D
D
Z
-/ Y
1
/ V
CTRL /
N
CTRL /
_
Y
CTRL /
_
F
CTRL /
^
CTRL /
F
CTRL /
_
E
CTRL /
B
CTRL /
]
CTRL /
O
CTRL /
E
CTRL /
_
S
CTRL /
_
O
CTRL /
_
Y
CTRL /
T
CTRL / W
CTRL /
_
T
CTRL /
_
\
CTRL /
_
B
CTRL /
R
CTRL /
A
No alternate
CTRL / @
CTRL /
_
N
CTRL /
M
CTRL /
_
U
CTRL /
\
CTRL /
U
CTRL /
_
W
CTRL /
I
CTRL /
_
R
CTRL /
_
M
CTRL
CTRL
Not supported on AM-70 terminal
AlphaXED User’s Manual, Rev. 01
AlphaXED Quick Reference Lists
Page C-3
COMMAND MODE COMMANDS
Where: [n] represents a number, {spec} represents a file specification, and [a] [b]
represents character strings.
Command
Purpose
CENTER
CHARINS
CLEAR
COMPILE {switches}
COPY
COPYC
DELETE
FINISH
FORMAT
GLOBAL a RETURN b
GO
HELP {name}
LINE n
MACRO name text
MOVE
NEXT
QUIT
Q!
RECESS
REPLACE a RETURN b
SAVE
SAVEM
SEARCH a
SHIFT #
SPLIT
UNSPLIT
UNYANK {file} {n}
Center current line between margins.
Set character insert mode.
Clear block marks.
Compile source using appropriate compiler.
Copy marked block to current position.
Copy marked block to current position and clear.
Delete marked block.
Update & exit file.
Format current paragraph.
Auto replace each string a with string b.
Update file on disk, exit & process.
Display list of topics, or text of topic {name}.
Move cursor to line n.
Remember text macro as name.
Move marked block.
Find next match for search or replace.
Exit with no update.
Exit with no update, no query.
Exit, update, and preserve context.
Search & optional replace string a with string b.
Update file on disk, no exit.
Save macro to file macro-name.MAC
Search for string a.
Shift block right ># or left <# of spaces.
Set horizontal split screen
Join horizontal split screen
Copy marked text to {file} name, or save {n} number of
lines from this file to disk.
Search whole file for string a.
Display cross reference information for name.
Copy {file} name to current location, or get {n} more lines
of this file from disk.
WHOLE a
XREF name
YANK {file} {n}
AlphaXED User’s Manual, Rev. 01
Page C-4
Appendix C
OPTION MENU SETTINGS
Command
Purpose
Default
AUTO CHAR
BACKWARD
COLUMN n
COMMA on/off
Turn auto character insert ON or OFF.
Turn on backward searching
Set comment column at n for ENTRY mode.
Comma inserted in AlphaC field (on), or not (off)
during ENTRY mode.
COMMENT a
Set comment symbol to a in ENTRY mode.
COMPRESS on/off
Disregard spaces during search (on), or not (off).
CVT
Define type of numeric conversion
DELTA ON/OFF
Turn auto increment value ON or OFF.
DELTA n
Set auto increment value for ENTRY mode.
ENTRY on/off
Use programmer’s editing features in ENTRY
mode (on), or not (off)
EOLN a
Set end-of-line character.
FIELD a
Set next-field character to a in ENTRY mode.
FIELD on/off
Turn next-field movement ON or OFF.
FOLD on/off
Fold characters to upper case (ON), or not (OFF)
in ENTRY mode.
INDENT on/off
Move to 1st character next line.
INSERT on/off
Line insert mode on or off in ENTRY mode.
MARGIN n
Set margin to column n.
MODEM
For using XED over a modem
MOUSE
Restores cursor to column for RETURN or ↓
SBLK on/off
Searches marked block (on), or whole file (off).
SEARCHFOLD on/off Make searches case sensitive (off), or not (on).
SPACE on/off
Generate space (on), or not (off) in ENTRY mode.
TAB n
Set tabs to every n columns.
TOKEN on/off
Search for isolated character (on), or not (off).
WIDTH n
Set formatting width of text to n columns.
WILDCARD=x,y
Selects wildcard characters.
WRAP on/off
Words wrap to next line.
OFF
OFF
Varied
OFF
Varied
OFF
OH
OFF
5
OFF
backquote
Varied
ON
ON
OFF
ON
0
OFF
OFF
OFF
ON
ON
Varied
OFF
79
?*
OFF
These commands may be entered from command mode also.
AlphaXED User’s Manual, Rev. 01
AlphaXED Quick Reference Lists
Page C-5
INITIALIZATION FILE COMMANDS
Though most commands function in the XED.INI file, this list only includes those
commands unique to the intialization file. n represents a number, and a and str
represents a character string.
Command
Purpose
DEFAULT list
DISPLAY
GO
GO.C
GO.M68
GO.BAS
GO.BP
GO.CBL
JOURNAL
MODULE "A","B"
START setting
:T
Sets extensions to be assumed.
Display screen during journal recovery.
Define what happens after exit.
Define what happens after exit from C.
Define what happens after exit from M68.
Define what happens after exit from BASIC.
Define what happens after exit from BASIC PLUS.
Define what happens after exit from COBOL.
Set keystroke journaling.
Sets menu text "A" for file "B" for YANK MOD.
Start at HOME, END, or COMMAND.
Display contents of XED.INI on execution.
SWITCHES
Switch
Purpose
/BATCH
/BIN
/NODISPLAY
/NOJOURNAL
/NOYANK
/READ
/SUBROUTINE
/TRACE
Suppress most screen display output.
CR and null characters transparent. Binary mode.
Turns off display during journalling restore.
Turns off keystroke journalling.
Open without text, for large files.
Read-only acess to file.
Supress periods displayed on loading.
Display XED.INI as processed.
AlphaXED User’s Manual, Rev. 01
APPENDIX D
TECHNICAL INFORMATION
The information in this appendix supplements the more general information provided in the
chapters. The topics include:
Technical Definitions
Input Files
Output Files
Search Key
Format Rules
TECHNICAL DEFINITIONS
AlphaXED has specific technical interpretations for locations within a file, as described
in the next sections.
Beginning Of Line
Linefeed (0A hexadecimal) or beginning of file.
Blank Line
Any line which begins with a carriage return, line feed,
or control character.
End Of Line
Line feed (0A hexadecimal).
Although AlphaXED
internally ends each line with a line feed, and uses the
line feed to identify an end of line, AMOS automatically
appends a carriage return (OD hexadecimal) to each
line feed when the AlphaXED file is written to disk. If
you want other programs to process an AlphaXED disk
file, take into account each line ends with a carriage
return/line feed pair.
White Space Character
Any character with an ASCII value less than or equal to
blank (20 hexadecimal).
AlphaXED User’s Manual, Rev. 01
Page D-2
Word
Appendix D
A word is usually considered to be a lexicographic word
or number together with any adjacent trailing
punctuation; such as a period, or an isolated symbol
such as a dash. The following example is considered
as one word by the preceding definition:
Help!!!
AlphaXED finds no word break between the characters
in the example because the three exclamation points
are adjacent trailing punctuation. Using the same
definition, this is not one word but two words:
!!!Help
AlphaXED determines a word break following the third
exclamation point, making two words: "!!!" and "Help".
Word Group
A word-group is any contiguous sequence of
characters other than white-space characters which
meets one requirement in each of the following criteria:
Is preceded by at least one white-space
character.
Or, is preceded by the
beginning-of-line instruction. Or, begins
with an alphanumeric character and is
preceded by at least one non-alphanumeric character or a beginning-of-line
instruction.
Is followed by at least one white-space
character. Or, is followed by an end-of-line instruction. Or, is terminated by a
non-alphanumeric character and followed
by at least one alphanumeric character or
an end-of-line instruction.
For implementation ease, since the RUBOUT or DEL (FF
hexadecimal) removes an existing character, in and of
itself it has no status and is considered to be a
non-alphanumeric, non-white-space character.
AlphaXED User’s Manual, Rev. 01
Technical Information
Page D-3
INPUT FILES
AlphaXED is designed to view and edit ASCII text files, especially programming
language source files. It also has a limited capability to edit binary (data) files, using the
/BIN switch. It makes implicit assumptions that its input file is formatted as records of
ASCII text characters with upper bit (bit 7) equal to zero. Each record must be
terminated by a carriage return/line feed sequence, and must be 510 or less characters
long excluding the terminating carriage return/line feed.
Files not conforming to this format may still be examined by AlphaXED but the result of
editing should be checked carefully by some other method. The presence of ASCII
control characters, less than 20 hexadecimal, is a frequent cause of difficulty; in
particular, isolated carriage returns or line feeds or nulls (OO Hex) may corrupt the
screen display and/or the file content.
The presence of DEL characters (FF Hex) is also undesirable; AlphaXED tolerates them
but does not let you insert them into your file.
AlphaXED recognizes some files as binary, such as those with extensions .WRT, .MON,
etc. and disallows them as input files. As other types of binary files acquire standard
extensions, the list of disallowed extensions can be expected to grow. In general, any
file which is not a plain text file or programming language source file is not a suitable file.
While your partition size does not limit the size of file that may be edited, the largest
memory-resident file that can be edited is 16 Megabytes. Larger files must be edited a
portion at a time, using the YANK and UNYANK commands to swap the file sections to
and from the disk.
OUTPUT FILES
AlphaXED’s FINISH, SAVE, and RECESS commands rewrite a file to the disk, inserting
a carriage return preceding each line feed in the text.
SEARCH KEY
The SEARCH, REPLACE and GLOBAL commands are initiated by preprocessing the
search key with the search parameters in effect at the time the command is requested.
If you choose to alter any commands affecting search or replace operations, such as
WILDCARD, COMPRESS, and so on, do so before you request the search or replace
operations. Changing any command affecting search and replace operations in
mid-stream produces unreliable results.
A multi-character wildcard matches any sequence of one or more characters. However,
AlphaXED doesn’t accept two multi-character wildcards adjacent to one another in any
search string for SEARCH, REPLACE, or GLOBAL. And, your search key must contain
at least one character which is not a wildcard.
AlphaXED User’s Manual, Rev. 01
Page D-4
Appendix D
When a multi-character wildcard is used in a search key, an embedded occurrence of
the target can be found within another occurrence. The search algorithm is lenient in
this case and returns each embedded occurrence in turn when the MATCH NEXT
function key is pressed. Therefore, use caution when using GLOBAL on a search key
with a multi-character wildcard.
When a multi-character wildcard appears as the last character of the key, and the initial
segment of the key is matched, the wildcard is defined to match the entire portion of the
line which succeeds the found segment, provided at least one character is matched.
When a multi-character wildcard appears as the first character of the key, and the last
segment of the key is matched, the wildcard is defined to match the entire portion of the
line which precedes the found segment, provided at least one character is matched.
For example, the key "token*" matches an occurrence of the string "token" anywhere in
the line except if it occurs as the last five characters in the line.
FORMAT RULES
The format feature can also format paragraphs of M68 style comments provided the
paragraph is aligned on column one (each line of the comment must contain a
semicolon in column zero, and a non-blank, non-control character in column one). The
comment paragraph is terminated by a line that doesn’t begin with a semi-colon, or a
line which begins with a semi-colon followed by a blank or control character.
AlphaXED User’s Manual, Rev. 01
APPENDIX E
SYSTEM REQUIREMENTS
This appendix explains the hardware and software required to run AlphaXED. The topics are:
The operating system you need
How much memory you need
The hardware you need
Which terminal driver to use
OPERATING SYSTEM REQUIREMENTS
AlphaXED requires either AMOS/L 2.2 or later; or AMOS/32 2.2 or later.
MEMORY REQUIREMENTS
AlphaXED needs about 85K to edit (but not expand) a 20 block file. Most of this room is
for XED.LIT and may be decreased if the XED.LIT program is loaded into system
memory. However, since the availability of some features (reading files on foreign
devices, restoring deleted blocks, etc.) depends on having sufficient free memory, we
recommend a minimum partition of 150K be used.
HARDWARE REQUIREMENTS
AlphaXED is designed to take advantage of advanced terminal features which are fairly
standard. In order to keep the memory requirements reasonable, it is necessary to drop
support for terminals lacking these standard features, and to drop software features
which become obsolete or are superceded by others.
Terminals lacking a
clear-to-end-of-line function are not supported. In general, AlphaXED performs less
than optimally, and some features may not be available at all, on terminals of capability
less than the AM-60, in particular those lacking an addressable bottom status line,
insert/delete line or clear-to-end-of-screen capability.
AlphaXED User’s Manual, Rev. 01
Page E-2
Appendix E
TERMINAL DRIVERS AND TRANSLATION FILES
If you have an Alpha Micro compatible terminal (such as an AM-60) that uses the
ALPHA.TDV driver, you must have a copy of the translation file ALPHA.VUX in account
[7,0] on DSK0:. A translation file lets AlphaXED make use of the Alpha Micro
compatible terminal’s special function keys.
Non-Alpha Micro compatible terminals do not make use of these translation files.
Therefore, if you have a non-Alpha Micro terminal, and you have renamed its terminal
driver, be sure no .VUX translation file exists with that name. For example, if you
rename a SOROC.TDV file to ALPHA.TDV, you must disable the ALPHA.VUX
translation file or AlphaXED won’t work on your SOROC terminal.
DO NOT disable any other .VUX files—if somebody else on your system has (or ever
gets) an Alpha Micro terminal, their terminal will need the translation table.
AlphaXED decides which translation file to use by comparing the translation file name
with the terminal driver name. The terminal driver defines the terminal to the system,
giving information about the characteristics of the device.
Your operating system was shipped configured to boot up with a terminal driver program
named ALPHA.TDV, which is configured specifically for an Alpha Micro terminal.
It is possible another driver program has been renamed to ALPHA.TDV at some point in
your system’s history. Therefore, the first thing you need to do is to determine if the
ALPHA.TDV terminal driver defines a non-Alpha Micro terminal. To do this, use the
TRMDEF command at monitor level. You see a display of the parameters that define
the terminals to the system. The first column contains the terminal name and the sixth
column contains the terminal driver name. If the terminal driver name is ALPHA and it
defines a non-Alpha Micro terminal, then you must disable the ALPHA.VUX file.
To disable a translation file, log into DSK0:[7,0], and rename the file, using a name that
will never be used as a terminal driver name. For example, from AMOS command level:
RENAME XYZZY.VUX=ALPHA.VUX RETURN
AlphaXED now should work properly on your terminal. Additional information on
terminal drivers, interpreting the results of the TRMDEF command, and renaming files is
included in your System Operator’s Guide.
AlphaXED User’s Manual, Rev. 01
APPENDIX F
THE ASCII AND ISO LATIN I
CHARACTER SETS CHART
The following pages contain the ASCII and ISO Latin I codes for the characters to which they
are assigned in octal, decimal, and hexadecimal. Codes 000 through 031 decimal are
undisplayable control-characters; remaining codes represent printable characters unless
described otherwise.
The chart is divided into two sections. The first section, codes 000 through 127 decimal,
belongs to the ASCII character set. The first section, codes 000 trhough 127 decimal, plus the
second section, codes 128 through 255 decimal, both belong to the ISO Latin I character set.
SYMBOL
OCTAL
DEC.
HEX.
MEANING
NULL
000
000
00
Null (fill character)
SOH
001
001
01
Start of Heading
STX
002
002
02
Start of Text
ETX
003
003
03
End of Text
ECT
004
004
04
End of Transmission
ENQ
005
005
05
Enquiry
ACK
006
006
06
Acknowledge
BEL
007
007
07
Bell code
BS
010
008
08
Back Space
HT
011
009
09
Horizontal Tab
LF
012
010
0A
Line Feed
VT
013
011
0B
Vertical Tab
AlphaXED User’s Manual, Rev. 00
Page F-2
The ASCII and ISO Latin I Character Sets Chart
SYMBOL
OCTAL
DEC.
HEX.
MEANING
FF
014
012
0C
Form Feed
CR
015
013
0D
Carriage Return
SO
016
014
0E
Shift Out
SI
017
015
0F
Shift In
DLE
020
016
10
Data Link Escape
DC1
021
017
11
Device Control 1
DC2
022
018
12
Device Control 2
DC3
023
019
13
Device Control 3
DC4
024
020
14
Device Control 4
NAK
025
021
15
Negative Acknowledge
SYN
026
022
16
Synchronous Idle
ETB
027
023
17
End of Transmission Blocks
CAN
030
024
18
Cancel
EM
031
025
19
End of Medium
SS
032
026
1A
Special Sequence
ESC
033
027
1B
Escape
FS
034
028
1C
File Separator
GS
035
029
1D
Group Separator
RS
036
030
1E
Record Separator
US
037
031
1F
Unit Separator
SP
040
032
20
Space
!
041
033
21
Exclamation Mark
"
042
034
22
Quotation Mark
#
043
035
23
Number Sign
$
044
036
24
Dollar Sign
%
045
037
25
Percent Sign
&
046
038
26
Ampersand
’
047
039
27
Apostrophe
(
050
040
28
Opening Parenthesis
)
051
041
29
Closing Parenthesis
*
052
042
2A
Asterisk
+
053
043
2B
Plus
AlphaXED User’s Manual, Rev. 00
Appendix F
Page F-3
SYMBOL
OCTAL
DEC.
HEX.
MEANING
,
054
044
2C
Comma
-
055
045
2D
Hyphen or Minus
.
056
046
2E
Period
\
057
047
2F
Slash
0
060
048
30
Zero
1
061
049
31
One
2
062
050
32
Two
3
063
051
33
Three
4
064
052
34
Four
5
065
053
35
Five
6
066
054
36
Six
7
067
055
37
Seven
8
070
056
38
Eight
9
071
057
39
Nine
:
072
058
3A
Colon
;
073
059
3B
Semicolon
<
074
060
3C
Left Angle Bracket
=
075
061
3D
Equal Sign
>
076
062
3E
Right Angle Bracket
?
077
063
3F
Question Mark
@
100
064
40
Commercial At
A
101
065
41
Upper Case Letter
B
102
066
42
Upper Case Letter
C
103
067
43
Upper Case Letter
D
104
068
44
Upper Case Letter
E
105
069
45
Upper Case Letter
F
106
070
46
Upper Case Letter
G
107
071
47
Upper Case Letter
H
110
072
48
Upper Case Letter
I
111
073
49
Upper Case Letter
J
112
074
4A
Upper Case Letter
K
113
075
4B
Upper Case Letter
AlphaXED User’s Manual, Rev. 00
Page F-4
The ASCII and ISO Latin I Character Sets Chart
SYMBOL
OCTAL
DEC.
HEX.
MEANING
L
114
076
4C
Upper Case Letter
M
115
077
4D
Upper Case Letter
N
116
078
4E
Upper Case Letter
O
117
079
4F
Upper Case Letter
P
120
080
50
Upper Case Letter
Q
121
081
51
Upper Case Letter
R
122
082
52
Upper Case Letter
S
123
083
53
Upper Case Letter
T
124
084
54
Upper Case Letter
U
125
085
55
Upper Case Letter
V
126
086
56
Upper Case Letter
W
127
087
57
Upper Case Letter
X
130
088
58
Upper Case Letter
Y
131
089
59
Upper Case Letter
Z
132
090
5A
Upper Case Letter
[
133
091
5B
Left Square Bracket
\
134
092
5C
Back Slash
]
135
093
5D
Right Square Bracket
^
136
094
5E
Circumflex
_
137
095
5F
Underline
‘
140
096
60
Grave Accent
a
141
097
61
Lower Case Letter
b
142
098
62
Lower Case Letter
c
143
099
63
Lower Case Letter
d
144
100
64
Lower Case Letter
e
145
101
65
Lower Case Letter
f
146
102
66
Lower Case Letter
g
147
103
67
Lower Case Letter
h
150
104
68
Lower Case Letter
i
151
105
69
Lower Case Letter
j
152
106
6A
Lower Case Letter
k
153
107
6B
Lower Case Letter
AlphaXED User’s Manual, Rev. 00
Appendix F
Page F-5
SYMBOL
OCTAL
DEC.
HEX.
MEANING
l
154
108
6C
Lower Case Letter
m
155
109
6D
Lower Case Letter
n
156
110
6E
Lower Case Letter
o
157
111
6F
Lower Case Letter
p
160
112
70
Lower Case Letter
q
161
113
71
Lower Case Letter
r
162
114
72
Lower Case Letter
s
163
115
73
Lower Case Letter
t
164
116
74
Lower Case Letter
u
165
117
75
Lower Case Letter
v
166
118
76
Lower Case Letter
w
167
119
77
Lower Case Letter
x
170
120
78
Lower Case Letter
y
171
121
79
Lower Case Letter
z
172
122
7A
Lower Case Letter
{{
173
123
7B
Left Brace
|
174
124
7C
Vertical Line
}
175
125
7D
Right Brace
~
176
126
7E
Tilde
DEL
177
127
7F
Delete
ISO LATIN I CHARACTER SET
200-246
128-159
80-9F
Not assigned
247
160
A0
Required space
¡
250
161
A1
Inverted exclamation
¢
251
162
A2
Cent sign
£
252
163
A3
Pound sterling
¤
253
164
A4
Currency
¥
254
165
A5
Yen
255
166
A6
Split vertical bar
§
256
167
A7
Section symbol
¨
257
168
A8
Umlaut or Dieresis
AlphaXED User’s Manual, Rev. 00
Page F-6
The ASCII and ISO Latin I Character Sets Chart
SYMBOL
OCTAL
DEC.
HEX.
MEANING
260
169
A9
Copyright symbol
ª
261
170
AA
Ord feminine
«
262
171
AB
Left guillemot
¬
263
172
AC
Not sign
-
264
173
AD
Discretionary hyphen
265
174
AE
Registered symbol
¯
266
175
AF
Hyphen or macron
˚
267
176
B0
Ring or degree
±
270
177
B1
Plus or minus
2
271
178
B2
Raised 2
3
272
179
B3
Raised 3
'
273
180
B4
Acute accent
µ
274
181
B5
Micro
¶
275
182
B6
Paragraph or pilcrow
•
276
183
B7
Raised dot
¸
277
184
B8
Cedilla
1
300
185
B9
Raised 1
º
301
186
BA
Ord masculine
»
302
187
BB
Right guillemot
/
1/2
3/4
303
188
BC
One quarter
304
189
BD
One half
305
190
BE
Three quarters
¿
306
191
BF
Inverted question mark
À
307
192
C0
Capital A grave
Á
310
193
C1
Capital A acute
Â
311
194
C2
Capital A circumflex
Ã
312
195
C3
Capital A tilde
Ä
313
196
C4
Capital A umlaut
Å
314
197
C5
Capital A ring
Æ
315
198
C6
Capital AE ligature
Ç
316
199
C7
Capital C cedilla
È
317
200
C8
Capital E grave
É
320
201
C9
Capital E acute
1 4
AlphaXED User’s Manual, Rev. 00
Appendix F
Page F-7
SYMBOL
OCTAL
DEC.
HEX.
MEANING
Ê
321
202
CA
Capital E circumflex
Ë
322
203
CB
Capital E umlaut
Ì
323
204
CC
Capital I grave
Í
324
205
CD
Capital I acute
Î
325
206
CE
Capital I circumflex
Ï
326
207
CF
Capital I umlaut
327
208
D0
Capital Eth
Ñ
330
209
D1
Capital N tilde
Ò
331
210
D2
Capital O grave
Ó
332
211
D3
Capital O acute
Ô
334
212
D4
Capital O circumflex
Õ
335
213
D5
Capital O tilde
Ö
336
214
D6
Capital O umlaut
×
337
215
D7
Multiplication symbol
Ø
330
216
D8
O slash
Ù
331
217
D9
Capital U grave
Ú
332
218
DA
Capital U acute
Û
333
219
DB
Capital U circumflex
Ü
334
220
DC
Capital U umlaut
Y
335
221
DD
Capital Y acute
336
222
DE
Capital Thorn
ß
337
223
DF
Ess tset
à
340
224
E0
Lower case a grave
á
341
225
E1
Lower case a acute
â
342
226
E2
Lower case a circumflex
ã
343
227
E3
Lower case a tilde
ä
344
228
E4
Lower case a umlaut
å
345
229
E5
Lower case a ring
æ
346
230
E6
Lower case ae ligature
ç
347
231
E7
Lower case c cedilla
è
350
232
E8
Lower case e grave
é
351
233
E9
Lower case e acute
ê
352
234
EA
Lower case e circumflex
AlphaXED User’s Manual, Rev. 00
Page F-8
The ASCII and ISO Latin I Character Sets Chart
SYMBOL
OCTAL
DEC.
HEX.
MEANING
ë
353
235
EB
Lower case e umlaut
ì
354
236
EC
Lower case i grave
í
355
237
ED
Lower case i acute
î
356
238
EE
Lower case i circumflex
ï
357
239
EF
Lower case i umlaut
360
240
F0
Lower case eth
ñ
361
241
F1
Lower case n tilde
ò
362
242
F2
Lower case o grave
ó
363
243
F3
Lower case o acute
ô
364
244
F4
Lower case o circumflex
õ
365
245
F5
Lower case o tilde
ö
366
246
F6
Lower case o umlaut
÷
367
247
F7
Division
ø
370
248
F8
Lower case o slash
ù
371
249
F9
Lower case u grave
ú
372
250
FA
Lower case u acute
û
373
251
FB
Lower case u circumlfex
ü
374
252
FC
Lower case u umlaut
y'
375
253
FD
Lower case y acute
376
254
FE
Lower case thorn
377
255
FF
Lower case y umlaut
ÿ
AlphaXED User’s Manual, Rev. 00
Document History
Revision 00 - AMOS Release 2.2 - Printed April 1991 - New Document.
Revision 01 - AMOS Release 2.3 - Printed September 1996
Added brace matching to Chapter 9. Updated journaling in Chapter 6. Other
small corrections.
AlphaXED User’s Manual, Rev. 01
Index
Page Index-1
INDEX
.BAK files . . . . . . . . . . . . . . . . . . . . . . . . . . . . . . . .
.BAS files . . . . . . . . . . . . . . . . . . . . . . . . . . . . . . . .
.BP files . . . . . . . . . . . . . . . . . . . . . . . . . . . . . . . . .
.C files . . . . . . . . . . . . . . . . . . . . . . . . . . . . . . . . . .
.CBL files . . . . . . . . . . . . . . . . . . . . . . . . . . . . . . . .
.CMD files . . . . . . . . . . . . . . . . . . . . . . . . . . . . . . .
.CTL files . . . . . . . . . . . . . . . . . . . . . . . . . . . . . . . .
.FOR files . . . . . . . . . . . . . . . . . . . . . . . . . . . . . . . .
.INI files . . . . . . . . . . . . . . . . . . . . . . . . . . . . . . . . .
.JRL files . . . . . . . . . . . . . . . . . . . . . . . . . . . . . . . .
.LSP files . . . . . . . . . . . . . . . . . . . . . . . . . . . . . . . .
.M68 files . . . . . . . . . . . . . . . . . . . . . . . . . . . . . . . .
.PAS files . . . . . . . . . . . . . . . . . . . . . . . . . . . . . . . .
.TXT files . . . . . . . . . . . . . . . . . . . . . . . . . . . . . . . .
2-7 to 2-8
7-9, A-5
7-9, A-5
A-5
A-5
A-5
A-5
A-5
A-5
6-2
A-5
7-9, A-5
A-5
A-5
/BATCH . . . . . . . . . . . . . . . . . . . . . . . . . . . . . . . . .
/BIN . . . . . . . . . . . . . . . . . . . . . . . . . . . . . . . . . . . .
/NODISPLAY . . . . . . . . . . . . . . . . . . . . . . . . . . . . .
/NOJOURNAL . . . . . . . . . . . . . . . . . . . . . . . . . . . .
/NOYANK . . . . . . . . . . . . . . . . . . . . . . . . . . . . . . .
/READ . . . . . . . . . . . . . . . . . . . . . . . . . . . . . . . . . .
/SUBROUTINE . . . . . . . . . . . . . . . . . . . . . . . . . . .
/TRACE . . . . . . . . . . . . . . . . . . . . . . . . . . . . . . . . .
11-2
11-2
11-2
11-2
11-2
11-3
11-3
11-3
Accessing the Disk . . . . . . . . . . . . . . . . . . . . . . . .
Alpha Micro compatible terminals . . . . . . . . . . . . .
Alpha Micro manuals . . . . . . . . . . . . . . . . . . . . . . .
AlphaXED
Cursor movement . . . . . . . . . . . . . . . . . . . . . .
Exiting . . . . . . . . . . . . . . . . . . . . . . . . . . . . . . . .
Hardware requirements . . . . . . . . . . . . . . . . . .
Help menu . . . . . . . . . . . . . . . . . . . . . . . . . . . .
Memory required . . . . . . . . . . . . . . . . . . . . . . .
Terminal drivers . . . . . . . . . . . . . . . . . . . . . . . .
Using . . . . . . . . . . . . . . . . . . . . . . . . . . . . . . . .
AlphaXED initialization file . . . . . . . . . . . . . . . . . . .
AMOS commands . . . . . . . . . . . . . . . . . . . . . . . . .
AMOS version required . . . . . . . . . . . . . . . . . . . . .
Arrow keys . . . . . . . . . . . . . . . . . . . . . . . . . . . . . . .
2-7
2-3
1-4
AlphaXED User’s Manual, Rev. 01
2-2
2-7
E-1
2-6
E-1
E-2
2-5
A-1
8-2
E-1
2-2
Page Index-2
Index
ASCII values
with FIELD character . . . . . . . . . . . . . . . . . . . .
Assembly language files . . . . . . . . . . . . . . . . . . . .
AUTO INS CHAR function key . . . . . . . . . . . . . . .
AUTO INS LINE key . . . . . . . . . . . . . . . . . . . . . . .
Backup files . . . . . . . . . . . . . . . . . . . . . . . . . . . . . .
BACKWARD . . . . . . . . . . . . . . . . . . . . . . . . . . . . .
Backward searching . . . . . . . . . . . . . . . . . . . . . . .
Beginning Of Line . . . . . . . . . . . . . . . . . . . . . . . . .
Blank line . . . . . . . . . . . . . . . . . . . . . . . . . . . . . . . .
Blank spaces
Searching for . . . . . . . . . . . . . . . . . . . . . . . . . .
BLOCK COPY function key . . . . . . . . . . . . . . . . . .
BLOCK DEL function key . . . . . . . . . . . . . . . . . . .
BLOCK MOVE function key . . . . . . . . . . . . . . . . . .
Books . . . . . . . . . . . . . . . . . . . . . . . . . . . . . . . . . . .
BREAK . . . . . . . . . . . . . . . . . . . . . . . . . . . . . . . . .
Calling option menu . . . . . . . . . . . . . . . . . . . . . . . .
CAPTURE APPEND function key . . . . . . . . . . . . .
CAPTURE END function key . . . . . . . . . . . . . . . . .
CAPTURE EXECUTE function key . . . . . . . . . . . .
CAPTURE START function key . . . . . . . . . . . . . .
Capturing sequences . . . . . . . . . . . . . . . . . . . . . . .
Carriage return . . . . . . . . . . . . . . . . . . . . . . . . . . .
CENTER LINE function key . . . . . . . . . . . . . . . . . .
CENTER SCREEN function key . . . . . . . . . . . . . .
CHAR DEL key . . . . . . . . . . . . . . . . . . . . . . . . . . .
CHAR INS key . . . . . . . . . . . . . . . . . . . . . . . . . . . .
Character
Deleting . . . . . . . . . . . . . . . . . . . . . . . . . . . . . .
Inserting . . . . . . . . . . . . . . . . . . . . . . . . . . . . . .
CHARINS . . . . . . . . . . . . . . . . . . . . . . . . . . . . . . .
CLEAR BLOCK function key . . . . . . . . . . . . . . . . .
CLEAR command . . . . . . . . . . . . . . . . . . . . . . . . .
COLUMN . . . . . . . . . . . . . . . . . . . . . . . . . . . . . . . .
COMMA . . . . . . . . . . . . . . . . . . . . . . . . . . . . . . . . .
Command files . . . . . . . . . . . . . . . . . . . . . . . . . . . .
Command mode . . . . . . . . . . . . . . . . . . . . . . . . . .
Calling . . . . . . . . . . . . . . . . . . . . . . . . . . . . . . . .
File information . . . . . . . . . . . . . . . . . . . . . . . . .
SHIFT . . . . . . . . . . . . . . . . . . . . . . . . . . . . . . . .
Commands
Available from Command mode . . . . . . . . . . . .
Default settings for . . . . . . . . . . . . . . . . . . . . . .
List of initialization file . . . . . . . . . . . . . . . . . . . .
Reference lists . . . . . . . . . . . . . . . . . . . . . . . . .
COMMENT character . . . . . . . . . . . . . . . . . . . . . .
Comments
7-9
7-9
4-1
4-2
2-7
9-3
7-2, 9-3
D-1
D-1
9-2
5-2
5-3
5-4
1-4
10-6
7-1
10-2
10-1
10-1
10-1
10-1
2-1
4-4
3-2
4-2
4-1
4-2
4-1
7-4
5-2
5-2
7-8
7-8
A-6
2-6, 5-5, 8-1, 9-1, 9-4
8-1
2-6
5-3
A-3 to A-4
A-3 to A-4
A-3 to A-4
C-1
7-8
AlphaXED User’s Manual, Rev. 01
Index
Page Index-3
Character indicating . . . . . . . . . . . . . . . . . . . . .
Compress . . . . . . . . . . . . . . . . . . . . . . . . . . . . . . .
Context help . . . . . . . . . . . . . . . . . . . . . . . . . . . . .
Control characters
Inserting . . . . . . . . . . . . . . . . . . . . . . . . . . . . . .
Searching for . . . . . . . . . . . . . . . . . . . . . . . . . .
CONTROL key . . . . . . . . . . . . . . . . . . . . . . . . . . .
Control-characters
CTRL /
C
.............................
CTRL /
O
.............................
CTRL /
Y
.............................
CONVERT . . . . . . . . . . . . . . . . . . . . . . . . . . . . . . .
COPY command . . . . . . . . . . . . . . . . . . . . . . . . . .
COPYC command . . . . . . . . . . . . . . . . . . . . . . . . .
Copying in a module . . . . . . . . . . . . . . . . . . . . . . .
CTRL G . . . . . . . . . . . . . . . . . . . . . . . . . . . . . . . .
CTRL key . . . . . . . . . . . . . . . . . . . . . . . . . . . . . . . .
Cursor . . . . . . . . . . . . . . . . . . . . . . . . . . . . . . . . . .
Marking position . . . . . . . . . . . . . . . . . . . . . . . .
Movement . . . . . . . . . . . . . . . . . . . . . . . . . . . . .
Moving on the screen . . . . . . . . . . . . . . . . . . . .
Moving screen to screen . . . . . . . . . . . . . . . . .
Cut . . . . . . . . . . . . . . . . . . . . . . . . . . . . . . . . . . . . .
Data field
Command mode screen . . . . . . . . . . . . . . . . . .
Data storage . . . . . . . . . . . . . . . . . . . . . . . . . . . . .
DEFAULT . . . . . . . . . . . . . . . . . . . . . . . . . . . . . . .
Default settings
List of . . . . . . . . . . . . . . . . . . . . . . . . . . . . . . . .
Definitions . . . . . . . . . . . . . . . . . . . . . . . . . . . . . . .
DELETE command . . . . . . . . . . . . . . . . . . . . . . . .
DELETE key . . . . . . . . . . . . . . . . . . . . . . . . . . . . .
Deleting text
Characters . . . . . . . . . . . . . . . . . . . . . . . . . . . .
Lines . . . . . . . . . . . . . . . . . . . . . . . . . . . . . . . . .
Word . . . . . . . . . . . . . . . . . . . . . . . . . . . . . . . . .
DELTA . . . . . . . . . . . . . . . . . . . . . . . . . . . . . . . . . .
DELTA increment . . . . . . . . . . . . . . . . . . . . . . . . .
devn: . . . . . . . . . . . . . . . . . . . . . . . . . . . . . . . . . . .
DISPLAY . . . . . . . . . . . . . . . . . . . . . . . . . . . . . . . .
Dividing the screen . . . . . . . . . . . . . . . . . . . . . . . .
DO . . . . . . . . . . . . . . . . . . . . . . . . . . . . . . . . . . . . .
DO/OD . . . . . . . . . . . . . . . . . . . . . . . . . . . . . . . . . .
DOWN ARROW key . . . . . . . . . . . . . . . . . . . . . . .
7-8
7-2
11-4
11-1
7-3
2-3
1-3
4-4
4-3
7-4
5-2
5-2
5-7
10-4, 11-1
2-3
2-1
3-3
2-2
3-1
3-2
5-6
2-6
6-1
A-4
A-3 to A-4
D-1
5-3
2-1
4-2
4-3
4-3
7-8
7-9
1-2
A-5
3-4
10-6
10-6
3-1
EDIT HIST function key . . . . . . . . . . . . . . . . . . . . . 11-1
Edit mode . . . . . . . . . . . . . . . . . . . . . . . . . . . . . . . 2-6
Editing existing macros . . . . . . . . . . . . . . . . . . . . . 10-3
Editing features
AlphaXED User’s Manual, Rev. 01
Page Index-4
Index
Reference list . . . . . . . . . . . . . . . . . . . . . . . . . .
End of line . . . . . . . . . . . . . . . . . . . . . . . . . . . . . . .
ENTRY . . . . . . . . . . . . . . . . . . . . . . . . . . . . . . . . .
Entry mode options . . . . . . . . . . . . . . . . . . . . . . . .
CHARINS . . . . . . . . . . . . . . . . . . . . . . . . . . . . .
COMMA . . . . . . . . . . . . . . . . . . . . . . . . . . . . . .
DELTA . . . . . . . . . . . . . . . . . . . . . . . . . . . . . . .
ENTRY . . . . . . . . . . . . . . . . . . . . . . . . . . . . . . .
FIELD ON/OFF . . . . . . . . . . . . . . . . . . . . . . . . .
FOLD . . . . . . . . . . . . . . . . . . . . . . . . . . . . . . . .
INDENT . . . . . . . . . . . . . . . . . . . . . . . . . . . . . .
INSERT . . . . . . . . . . . . . . . . . . . . . . . . . . . . . .
SPACE . . . . . . . . . . . . . . . . . . . . . . . . . . . . . . .
EOLN . . . . . . . . . . . . . . . . . . . . . . . . . . . . . . . . . . .
Error messages . . . . . . . . . . . . . . . . . . . . . . . . . . .
Errors . . . . . . . . . . . . . . . . . . . . . . . . . . . . . . . . . . .
ESC key . . . . . . . . . . . . . . . . . . . . . . . . . . . . . . . . .
ESCAPE key . . . . . . . . . . . . . . . . . . . . . . . . . . . . .
Exiting AlphaXED . . . . . . . . . . . . . . . . . . . . . . . . .
Extensions . . . . . . . . . . . . . . . . . . . . . . . . . . . . . . .
C-1
D-1
7-9
7-8
7-4
7-8
7-8
7-9
7-10
7-10
7-5
7-10
7-10
7-5
B-1
2-1
2-3
2-3
2-7
1-1
FI . . . . . . . . . . . . . . . . . . . . . . . . . . . . . . . . . . . . . .
FIELD . . . . . . . . . . . . . . . . . . . . . . . . . . . . . . . . . .
FIELD command
and FOLD command . . . . . . . . . . . . . . . . . . . .
FIELD ON/OFF . . . . . . . . . . . . . . . . . . . . . . . . . . .
Fields . . . . . . . . . . . . . . . . . . . . . . . . . . . . . . . . . . .
FILE BALANCE command . . . . . . . . . . . . . . . . . .
File names . . . . . . . . . . . . . . . . . . . . . . . . . . . . . . .
File-to-file movement of text . . . . . . . . . . . . . . . . .
Filename extensions . . . . . . . . . . . . . . . . . . . . . . .
Files . . . . . . . . . . . . . . . . . . . . . . . . . . . . . . . . . . . .
Creating . . . . . . . . . . . . . . . . . . . . . . . . . . . . . .
Input . . . . . . . . . . . . . . . . . . . . . . . . . . . . . . . . .
Naming conventions . . . . . . . . . . . . . . . . . . . . .
Restricted extensions . . . . . . . . . . . . . . . . . . . .
Seeing existing . . . . . . . . . . . . . . . . . . . . . . . . .
Size . . . . . . . . . . . . . . . . . . . . . . . . . . . . . . . . . .
filespec . . . . . . . . . . . . . . . . . . . . . . . . . . . . . . . . .
Finding text . . . . . . . . . . . . . . . . . . . . . . . . . . . . . .
FINISH . . . . . . . . . . . . . . . . . . . . . . . . . . . . . . . . . .
FOLD . . . . . . . . . . . . . . . . . . . . . . . . . . . . . . . . . . .
FORMAT command . . . . . . . . . . . . . . . . . . . . . . . .
FORMAT function key . . . . . . . . . . . . . . . . . . . . . .
Function keys . . . . . . . . . . . . . . . . . . . . . . . . . . . .
Convention for names . . . . . . . . . . . . . . . . . . .
MATCH BRACE . . . . . . . . . . . . . . . . . . . . . . . .
Matching braces within different file types . . . .
Matching quotation characters . . . . . . . . . . . . .
10-7
7-9
7-10
7-10
7-9
9-5
1-1
5-4
1-1
1-1
2-4
D-3
2-4
2-4
2-5
2-6
1-2
9-2
2-7
7-10
D-4
4-4, D-4
2-2
2-2
9-5
9-5
9-5
AlphaXED User’s Manual, Rev. 01
Index
Page Index-5
General options . . . . . . . . . . . . . . . . . . . . . . . . . . .
CONVERT . . . . . . . . . . . . . . . . . . . . . . . . . . . .
MODEM . . . . . . . . . . . . . . . . . . . . . . . . . . . . . .
MOUSE . . . . . . . . . . . . . . . . . . . . . . . . . . . . . .
WRAP . . . . . . . . . . . . . . . . . . . . . . . . . . . . . . . .
GLOBAL . . . . . . . . . . . . . . . . . . . . . . . . . . . . . . . .
GO . . . . . . . . . . . . . . . . . . . . . . . . . . . . . . . . . . . . .
Defaults . . . . . . . . . . . . . . . . . . . . . . . . . . . . . .
Maximum characters . . . . . . . . . . . . . . . . . . . .
Going back to previous change . . . . . . . . . . . . . . .
Graphics conventions . . . . . . . . . . . . . . . . . . . . . .
7-4
7-4
7-6
7-6
7-7
9-4, D-3
2-8, A-5
A-5
A-5
3-4
1-2
Hardware Requirements . . . . . . . . . . . . . . . . . . . .
HELP command . . . . . . . . . . . . . . . . . . . . . . . . . .
Help menu . . . . . . . . . . . . . . . . . . . . . . . . . . . . . . .
Help, context . . . . . . . . . . . . . . . . . . . . . . . . . . . . .
HOME key . . . . . . . . . . . . . . . . . . . . . . . . . . . . . . .
E-1
2-6
2-6
11-4
3-2
IF . . . . . . . . . . . . . . . . . . . . . . . . . . . . . . . . . . . . . .
IF/FI . . . . . . . . . . . . . . . . . . . . . . . . . . . . . . . . . . . .
INDENT . . . . . . . . . . . . . . . . . . . . . . . . . . . . . . . . .
Initialization file
Commands . . . . . . . . . . . . . . . . . . . . . . . . . . . .
Location . . . . . . . . . . . . . . . . . . . . . . . . . . . . . .
Search path . . . . . . . . . . . . . . . . . . . . . . . . . . .
Input files . . . . . . . . . . . . . . . . . . . . . . . . . . . . . . . .
INSERT . . . . . . . . . . . . . . . . . . . . . . . . . . . . . . . . .
Inserting control characters . . . . . . . . . . . . . . . . . .
Inserting text
Character . . . . . . . . . . . . . . . . . . . . . . . . . . . . .
character insert mode . . . . . . . . . . . . . . . . . . . .
line insert mode . . . . . . . . . . . . . . . . . . . . . . . .
Lines . . . . . . . . . . . . . . . . . . . . . . . . . . . . . . . . .
Word . . . . . . . . . . . . . . . . . . . . . . . . . . . . . . . . .
10-7
10-7
7-5
JOURNAL . . . . . . . . . . . . . . . . . . . . . . . . . . . . . . .
Journaling . . . . . . . . . . . . . . . . . . . . . . . . . . . . . . .
Erasing .JRL file . . . . . . . . . . . . . . . . . . . . . . . .
Keystroke journaling . . . . . . . . . . . . . . . . . . . . .
Restoring . . . . . . . . . . . . . . . . . . . . . . . . . . . . .
Retaining .JRL file . . . . . . . . . . . . . . . . . . . . . .
Turning on and off . . . . . . . . . . . . . . . . . . . . . .
A-7
6-1
6-3
6-1
6-2
6-3
6-2
Keyboard . . . . . . . . . . . . . . . . . . . . . . . . . . . . . . . .
Keys
For special features . . . . . . . . . . . . . . . . . . . . .
Keystroke journaling
Erasing .JRL file . . . . . . . . . . . . . . . . . . . . . . . .
Restoring . . . . . . . . . . . . . . . . . . . . . . . . . . . . .
Retaining .JRL file . . . . . . . . . . . . . . . . . . . . . .
2-1 to 2-2
AlphaXED User’s Manual, Rev. 01
A-3 to A-4
A-2
A-2
D-3
7-10
10-4, 11-1
4-1
4-1
4-2
4-2
4-2
2-3
6-3
6-2
6-3
Page Index-6
Index
Turning on and off . . . . . . . . . . . . . . . . . . . . . . 6-2
LABEL GOTO . . . . . . . . . . . . . . . . . . . . . . . . . . . .
LABEL LINE . . . . . . . . . . . . . . . . . . . . . . . . . . . . .
LEFT ARROW key . . . . . . . . . . . . . . . . . . . . . . . .
LINE command . . . . . . . . . . . . . . . . . . . . . . . . . . .
Line counter . . . . . . . . . . . . . . . . . . . . . . . . . . . . . .
LINE DEL key . . . . . . . . . . . . . . . . . . . . . . . . . . . .
LINE INS key . . . . . . . . . . . . . . . . . . . . . . . . . . . . .
Lines
Appending . . . . . . . . . . . . . . . . . . . . . . . . . . . .
Breaking . . . . . . . . . . . . . . . . . . . . . . . . . . . . . .
Centering . . . . . . . . . . . . . . . . . . . . . . . . . . . . .
Deleting . . . . . . . . . . . . . . . . . . . . . . . . . . . . . .
Inserting . . . . . . . . . . . . . . . . . . . . . . . . . . . . . .
Length . . . . . . . . . . . . . . . . . . . . . . . . . . . . . . . .
Maximum length . . . . . . . . . . . . . . . . . . . . . . . .
Restoring . . . . . . . . . . . . . . . . . . . . . . . . . . . . .
Locating text . . . . . . . . . . . . . . . . . . . . . . . . . . . . .
3-3
3-3
3-1
3-3
2-4
4-3
4-2, 4-4
4-4
4-4
4-4
4-3
4-2
7-7
4-2
4-3
9-2
MACRO command
CTRL-G . . . . . . . . . . . . . . . . . . . . . . . . . . . . . .
MACRO commands . . . . . . . . . . . . . . . . . . . . . . . .
Defining in XED.INI . . . . . . . . . . . . . . . . . . . . . .
Restrictions . . . . . . . . . . . . . . . . . . . . . . . . . . . .
MACRO files . . . . . . . . . . . . . . . . . . . . . . . . . . . . .
MACRO menu . . . . . . . . . . . . . . . . . . . . . . . . . . . .
Macros . . . . . . . . . . . . . . . . . . . . . . . . . . . . . . . . . .
Manuals . . . . . . . . . . . . . . . . . . . . . . . . . . . . . . . . .
MARGIN . . . . . . . . . . . . . . . . . . . . . . . . . . . . . . . .
MARK BLOCK function key . . . . . . . . . . . . . . . . . .
Marking text . . . . . . . . . . . . . . . . . . . . . . . . . . . . . .
MATCH BRACE key . . . . . . . . . . . . . . . . . . . . . . .
MATCH NEXT function key . . . . . . . . . . . . . . . . . .
Maximum line length . . . . . . . . . . . . . . . . . . . . . . .
Memory . . . . . . . . . . . . . . . . . . . . . . . . . . . . . . . . .
Memory Requirements . . . . . . . . . . . . . . . . . . . . .
MODEM . . . . . . . . . . . . . . . . . . . . . . . . . . . . . . . . .
MODULE . . . . . . . . . . . . . . . . . . . . . . . . . . . . . . . .
Module Yanking . . . . . . . . . . . . . . . . . . . . . . . . . . .
MOUSE . . . . . . . . . . . . . . . . . . . . . . . . . . . . . . . . .
MOVE . . . . . . . . . . . . . . . . . . . . . . . . . . . . . . . . . .
Moving text . . . . . . . . . . . . . . . . . . . . . . . . . . . . . .
Moving the cursor . . . . . . . . . . . . . . . . . . . . . . . . .
11-1
10-2, 10-6
10-5
10-6
7-9, 10-5
10-5
10-3 to 10-4
1-4
7-6
5-1
5-1
9-5
9-2
4-2
2-7, 6-1
E-1
7-6
5-7, A-7
5-7
7-6
5-4
5-4
3-1
Naming a file . . . . . . . . . . . . . . . . . . . . . . . . . . . . .
NEXT command . . . . . . . . . . . . . . . . . . . . . . . . . .
NEXT SCREEN key . . . . . . . . . . . . . . . . . . . . . . .
NEXT WORD key . . . . . . . . . . . . . . . . . . . . . . . . .
Non-Alpha Micro Terminals . . . . . . . . . . . . . . . . . .
2-4
9-3
3-2
3-2
E-2
AlphaXED User’s Manual, Rev. 01
Index
Page Index-7
Non-boolean operations
COLUMN . . . . . . . . . . . . . . . . . . . . . . . . . . . . .
COMMENT character . . . . . . . . . . . . . . . . . . . .
DELTA increment . . . . . . . . . . . . . . . . . . . . . . .
EOLN . . . . . . . . . . . . . . . . . . . . . . . . . . . . . . . .
FIELD character . . . . . . . . . . . . . . . . . . . . . . . .
MARGIN . . . . . . . . . . . . . . . . . . . . . . . . . . . . . .
TAB . . . . . . . . . . . . . . . . . . . . . . . . . . . . . . . . . .
WIDTH . . . . . . . . . . . . . . . . . . . . . . . . . . . . . . .
WILDCARD . . . . . . . . . . . . . . . . . . . . . . . . . . .
OD . . . . . . . . . . . . . . . . . . . . . . . . . . . . . . . . . . . . .
Operating system . . . . . . . . . . . . . . . . . . . . . . . . .
Option menu . . . . . . . . . . . . . . . . . . . . . . . . . . . . .
BACKWARD . . . . . . . . . . . . . . . . . . . . . . . . . . .
Calling . . . . . . . . . . . . . . . . . . . . . . . . . . . . . . . .
CHARINS . . . . . . . . . . . . . . . . . . . . . . . . . . . . .
COLUMN . . . . . . . . . . . . . . . . . . . . . . . . . . . . .
COMMA . . . . . . . . . . . . . . . . . . . . . . . . . . . . . .
COMMENT character . . . . . . . . . . . . . . . . . . . .
COMPRESS . . . . . . . . . . . . . . . . . . . . . . . . . . .
CONVERT . . . . . . . . . . . . . . . . . . . . . . . . . . . .
DELTA . . . . . . . . . . . . . . . . . . . . . . . . . . . . . . .
DELTA increment . . . . . . . . . . . . . . . . . . . . . . .
ENTRY . . . . . . . . . . . . . . . . . . . . . . . . . . . . . . .
EOLN . . . . . . . . . . . . . . . . . . . . . . . . . . . . . . . .
FIELD character . . . . . . . . . . . . . . . . . . . . . . . .
FIELD ON/OFF . . . . . . . . . . . . . . . . . . . . . . . . .
FOLD . . . . . . . . . . . . . . . . . . . . . . . . . . . . . . . .
INDENT . . . . . . . . . . . . . . . . . . . . . . . . . . . . . .
INSERT . . . . . . . . . . . . . . . . . . . . . . . . . . . . . .
MARGIN . . . . . . . . . . . . . . . . . . . . . . . . . . . . . .
MODEM . . . . . . . . . . . . . . . . . . . . . . . . . . . . . .
MOUSE . . . . . . . . . . . . . . . . . . . . . . . . . . . . . .
Returning to text . . . . . . . . . . . . . . . . . . . . . . . .
SBLK . . . . . . . . . . . . . . . . . . . . . . . . . . . . . . . .
SEARCHFOLD . . . . . . . . . . . . . . . . . . . . . . . . .
SPACE . . . . . . . . . . . . . . . . . . . . . . . . . . . . . . .
TAB . . . . . . . . . . . . . . . . . . . . . . . . . . . . . . . . . .
TOKEN . . . . . . . . . . . . . . . . . . . . . . . . . . . . . . .
WIDTH . . . . . . . . . . . . . . . . . . . . . . . . . . . . . . .
WILDCARD . . . . . . . . . . . . . . . . . . . . . . . . . . .
WRAP . . . . . . . . . . . . . . . . . . . . . . . . . . . . . . . .
Options field
Command mode screen . . . . . . . . . . . . . . . . . .
Other reference manuals . . . . . . . . . . . . . . . . . . . .
Output Files . . . . . . . . . . . . . . . . . . . . . . . . . . . . . .
Overwriting files
with UNYANK command . . . . . . . . . . . . . . . . .
AlphaXED User’s Manual, Rev. 01
7-8
7-8
7-9
7-5
7-9
7-6
7-6
7-7
7-3
10-6
E-1
2-7, 7-1
7-2
7-1
7-4
7-8
7-8
7-8
7-2
7-4
7-8
7-9
7-9
7-5
7-9
7-10
7-10
7-5
7-10
7-6
7-6
7-6
7-1
7-2
7-2
7-10
7-6
7-3
7-7
7-3
7-7
2-6
1-4
D-3
5-4
Page Index-8
Index
Paragraph reformat . . . . . . . . . . . . . . . . . . . . . . . .
Paste . . . . . . . . . . . . . . . . . . . . . . . . . . . . . . . . . . .
ppn . . . . . . . . . . . . . . . . . . . . . . . . . . . . . . . . . . . . .
PREV SCREEN key . . . . . . . . . . . . . . . . . . . . . . .
PREV WORD key . . . . . . . . . . . . . . . . . . . . . . . . .
Previous change . . . . . . . . . . . . . . . . . . . . . . . . . .
Program files . . . . . . . . . . . . . . . . . . . . . . . . . . . . .
Programming modules . . . . . . . . . . . . . . . . . . . . .
4-4
5-6
1-2
3-2
3-2
3-4
7-9
A-7
Q! . . . . . . . . . . . . . . . . . . . . . . . . . . . . . . . . . . . . . . 2-8
QUIT . . . . . . . . . . . . . . . . . . . . . . . . . . . . . . . . . . . 2-8
RECESS . . . . . . . . . . . . . . . . . . . . . . . . . . . . . . . .
Refreshing the screen . . . . . . . . . . . . . . . . . . . . . .
REPEAT function key . . . . . . . . . . . . . . . . . . . . . .
REPLACE . . . . . . . . . . . . . . . . . . . . . . . . . . . . . . .
REPLACE command . . . . . . . . . . . . . . . . . . . . . . .
RESTORE function key . . . . . . . . . . . . . . . . . . . . .
Restoring a journal file . . . . . . . . . . . . . . . . . . . . . .
Restoring deleted lines . . . . . . . . . . . . . . . . . . . . .
Restricted extensions . . . . . . . . . . . . . . . . . . . . . .
RET key . . . . . . . . . . . . . . . . . . . . . . . . . . . . . . . . .
RETURN key . . . . . . . . . . . . . . . . . . . . . . . . . . . . .
Returning to previous change . . . . . . . . . . . . . . . .
RIGHT ARROW key . . . . . . . . . . . . . . . . . . . . . . .
RUBOUT key . . . . . . . . . . . . . . . . . . . . . . . . . . . . .
2-9
4-4
10-2
D-3
9-3
4-3
6-2
4-3
2-4
2-1
2-1, 3-2
3-4
3-1
2-1, 4-3
Sample XED.INI file . . . . . . . . . . . . . . . . . . . . . . . .
SAVE command . . . . . . . . . . . . . . . . . . . . . . . . . .
Saving editing environment . . . . . . . . . . . . . . . . . .
SBLK . . . . . . . . . . . . . . . . . . . . . . . . . . . . . . . . . . .
Screen
Line . . . . . . . . . . . . . . . . . . . . . . . . . . . . . . . . . .
Moving cursor . . . . . . . . . . . . . . . . . . . . . . . . .
Refreshing . . . . . . . . . . . . . . . . . . . . . . . . . . . .
SEARCH . . . . . . . . . . . . . . . . . . . . . . . . . . . . . . . .
Search and replace options . . . . . . . . . . . . . . . . . .
BACKWARD . . . . . . . . . . . . . . . . . . . . . . . . . . .
COMPRESS . . . . . . . . . . . . . . . . . . . . . . . . . . .
SBLK . . . . . . . . . . . . . . . . . . . . . . . . . . . . . . . .
SEARCHFOLD . . . . . . . . . . . . . . . . . . . . . . . . .
TOKEN . . . . . . . . . . . . . . . . . . . . . . . . . . . . . . .
SEARCH command . . . . . . . . . . . . . . . . . . . . . . . .
Blanks . . . . . . . . . . . . . . . . . . . . . . . . . . . . . . .
Search key . . . . . . . . . . . . . . . . . . . . . . . . . . . . . . .
Search path
Initialization file . . . . . . . . . . . . . . . . . . . . . . . . .
SEARCHFOLD . . . . . . . . . . . . . . . . . . . . . . . . . . .
Searching backward . . . . . . . . . . . . . . . . . . . . . . .
Setting edit start point . . . . . . . . . . . . . . . . . . . . . .
A-8
2-7
2-9
5-1, 7-2
3-3
3-2
4-4
D-3
7-2
7-2
7-2
7-2
7-2
7-3
9-2
9-2
D-3
A-2
7-2, 9-2
9-3
A-7
AlphaXED User’s Manual, Rev. 01
Index
Page Index-9
SHIFT command . . . . . . . . . . . . . . . . . . . . . . . . . .
SHIFT RIGHT ARROW key . . . . . . . . . . . . . . . . . .
SHIFT/HOME key . . . . . . . . . . . . . . . . . . . . . . . . .
SHIFT/LEFT ARROW key . . . . . . . . . . . . . . . . . . .
Size field
Command mode screen . . . . . . . . . . . . . . . . . .
SPACE . . . . . . . . . . . . . . . . . . . . . . . . . . . . . . . . .
SPAN . . . . . . . . . . . . . . . . . . . . . . . . . . . . . . . . . . .
Split screen . . . . . . . . . . . . . . . . . . . . . . . . . . . . . .
START . . . . . . . . . . . . . . . . . . . . . . . . . . . . . . . . . .
Status line . . . . . . . . . . . . . . . . . . . . . . . . . . . . . . .
String . . . . . . . . . . . . . . . . . . . . . . . . . . . . . . . . . . .
SWAP WINDOW function key . . . . . . . . . . . . . . . .
TAB . . . . . . . . . . . . . . . . . . . . . . . . . . . . . . . . . . . .
:T . . . . . . . . . . . . . . . . . . . . . . . . . . . . . . . . . . .
Command . . . . . . . . . . . . . . . . . . . . . . . . . . . . .
Key . . . . . . . . . . . . . . . . . . . . . . . . . . . . . . . . . .
Width . . . . . . . . . . . . . . . . . . . . . . . . . . . . . . . .
Terminal drivers . . . . . . . . . . . . . . . . . . . . . . . . . . .
Terminals . . . . . . . . . . . . . . . . . . . . . . . . . . . . . . . .
Function key names . . . . . . . . . . . . . . . . . . . . .
Text
Blocks . . . . . . . . . . . . . . . . . . . . . . . . . . . . . . . .
Copying and clearing blocks . . . . . . . . . . . . . .
Copying blocks . . . . . . . . . . . . . . . . . . . . . . . .
Deleting block . . . . . . . . . . . . . . . . . . . . . . . . . .
Editing features . . . . . . . . . . . . . . . . . . . . . . . . .
Finding . . . . . . . . . . . . . . . . . . . . . . . . . . . . . . .
Marking . . . . . . . . . . . . . . . . . . . . . . . . . . . . . . .
Moving blocks . . . . . . . . . . . . . . . . . . . . . . . . . .
Moving from file . . . . . . . . . . . . . . . . . . . . . . . .
Re-arranging . . . . . . . . . . . . . . . . . . . . . . . . . . .
Search and replace . . . . . . . . . . . . . . . . . . . . .
Searching for non-alpha-numeric . . . . . . . . . . .
TOKEN . . . . . . . . . . . . . . . . . . . . . . . . . . . . . . . . .
Transferring text
Between files . . . . . . . . . . . . . . . . . . . . . . . . . .
From the disk . . . . . . . . . . . . . . . . . . . . . . . . . .
To the disk . . . . . . . . . . . . . . . . . . . . . . . . . . . .
Translation files . . . . . . . . . . . . . . . . . . . . . . . . . . .
5-3
3-2
3-2
3-2
2-6
7-10
10-7
3-4
A-7
2-4
9-1
3-4
7-6
A-7
2-2
2-2
A-7
E-2
2-3
2-2
5-1
5-2
5-2
5-3
4-4
9-2
5-1
5-4
5-4
4-3
7-2
7-3
7-3
5-4
5-6
5-6
E-2
UNSPLIT function key . . . . . . . . . . . . . . . . . . . . . . 3-4
UNYANK . . . . . . . . . . . . . . . . . . . . . . . . . . . . . . . . 5-4 to 5-5
UP ARROW key . . . . . . . . . . . . . . . . . . . . . . . . . . 3-1
Version number . . . . . . . . . . . . . . . . . . . . . . . . . . . 11-1
Video-display terminal . . . . . . . . . . . . . . . . . . . . . . 2-1
White Space Character . . . . . . . . . . . . . . . . . . . . . D-1
AlphaXED User’s Manual, Rev. 01
Page Index-10
Index
WHOLE . . . . . . . . . . . . . . . . . . . . . . . . . . . . . . . . .
WIDTH . . . . . . . . . . . . . . . . . . . . . . . . . . . . . . . . . .
WIDTH command . . . . . . . . . . . . . . . . . . . . . . . . .
WILDCARD . . . . . . . . . . . . . . . . . . . . . . . . . . . . . .
Word
Defined . . . . . . . . . . . . . . . . . . . . . . . . . . . . . . .
Deleting . . . . . . . . . . . . . . . . . . . . . . . . . . . . . .
Inserting . . . . . . . . . . . . . . . . . . . . . . . . . . . . . .
WORD DEL key . . . . . . . . . . . . . . . . . . . . . . . . . . .
Word group, defined . . . . . . . . . . . . . . . . . . . . . . .
WORD INS key . . . . . . . . . . . . . . . . . . . . . . . . . . .
WRAP . . . . . . . . . . . . . . . . . . . . . . . . . . . . . . . . . .
9-3, D-3
4-4, 7-7
4-4
7-3, D-3
D-2
4-3
4-2
4-3
D-2
4-2
7-7
XED
/BATCH . . . . . . . . . . . . . . . . . . . . . . . . . . . . . .
/BIN . . . . . . . . . . . . . . . . . . . . . . . . . . . . . . . . . .
/NODISPLAY . . . . . . . . . . . . . . . . . . . . . . . . . .
/NOJOURNAL . . . . . . . . . . . . . . . . . . . . . . . . .
/NOYANK . . . . . . . . . . . . . . . . . . . . . . . . . . . . .
/READ . . . . . . . . . . . . . . . . . . . . . . . . . . . . . . . .
/SUBROUTINE . . . . . . . . . . . . . . . . . . . . . . . . .
/TRACE . . . . . . . . . . . . . . . . . . . . . . . . . . . . . .
Command . . . . . . . . . . . . . . . . . . . . . . . . . . . . .
Command switches . . . . . . . . . . . . . . . . . . . . .
Creating a file . . . . . . . . . . . . . . . . . . . . . . . . . .
Exiting . . . . . . . . . . . . . . . . . . . . . . . . . . . . . . . .
XED.INI file . . . . . . . . . . . . . . . . . . . . . . . . . . . . . .
Commands . . . . . . . . . . . . . . . . . . . . . . . . . . . .
Defining macros . . . . . . . . . . . . . . . . . . . . . . . .
Sample File . . . . . . . . . . . . . . . . . . . . . . . . . . . .
XEDIT . . . . . . . . . . . . . . . . . . . . . . . . . . . . . . . . . .
11-2
11-2
11-2
11-2
11-2
11-3
11-3
11-3
2-3
11-2
2-4
2-7
1-1, A-1
A-2
10-5
A-8
2-9
YANK command . . . . . . . . . . . . . . . . . . . . . . . . . . 5-5
YANK MODULE function key . . . . . . . . . . . . . . . . 5-7
Yanking in a module . . . . . . . . . . . . . . . . . . . . . . . 5-7
AlphaXED User’s Manual, Rev. 01