1
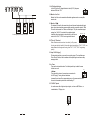
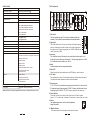
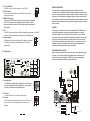
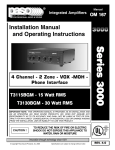
11. Zone1 VOLUME
VOLUME controls the output signal level of ZONE1.
12.LED VU-meter
This stereo 6 segment LED-meter indicates the level of the
overall output signal.
12
13.MONITOR selector
Pushing the MONITOR button down will connect the signal from amplifier
zone 1 to the monitor output. Releasing the button will then cut off the
signal connection to the monitor. The other three buttons are operated in
the same way.
ZONE 1
INSTALLATION NOTES
VOLUME
MON
1 3 11
The amplifier must be operated under appropriate conditions at all times.
This means that the installation location must provide sufficient ventilation and the
device is not exposed to direct sunlight or the direct radiation or reflection from any
heat source. When installing the loudspeaker systems, choose a location that will
not be affected by extreme and/or constant vibration or other mechanical oscillation.
Also make sure that the speakers are installed at locations that are free from dust
and /or moisture.
CAUTION
14. PL
This LED is the power indicator. When the amplifier is powered on, this LED
lights up. When the amplifier is powered off, this LED lights off.
14
15. Power switch
When the switch is set in the position ON, the unit is powered
15
on. When the switch is set in the position OFF, the unit is
powered off.
PL
ON
OFF
POWER
We strongly recommend that you leave the installation of the PL200M system to
qualified and experienced service technicians who specialize in connecting
electronic equipment. Do not take the risk of Electro-shock. To reduce this risk,
all connections should be made before connecting the amplifier to the main power
supply. Be sure that all connections are correct and that no short-circuit exists.
The overall sound reinforcement installation must be in accordance to the laws,
regulations, standards, and guidelines that are relevant and applicable in the
jurisdiction where the equipment is going to be operated.
AC POWER SUPPLY CAUTION
The Rear Panel
Monitor
Line Out
CAUTION
RISK OF ELECTRIC SHOCK
DO NOT OPEN
G
CAUTION : SHOCK HAZARD - DO NOT OPEN
RISK OF FIRE-REPLACE FUSE AS MARKED.
+
Monitor
1W 8
-
Priority
+
Tel. Paging
T
R
Line Out Bal./Unbal.
Zone 1
G
Line
G
-
+
Before using the amplifier for the first time, make sure that the appliance voltage
is correct. Only connect the amplifier to grounded outlets. Connection of the
amplifier to the main power supply (115/230Vac) has to be accomplished by
inserting the supplied cord into the corresponding socket .
Power Amp. Output
Com 4
8
25V
70V
Mic
Phantom
Line Out Bal./Unbal.
TEL
Zone
Main Power
115/230V~50/60Hz
Zone 2
Volume
AC Fuse:
110-120V: T6.3AL 250V
220-240V: T3.15AL 250V
Attention:
Afin de reduire le risque d'incendie remplacer seul par un
fusible de meme type!
-
+
Line Out Bal./Unbal.
Caution:
Replace fuse only with same and rated type!
Caution:
To reduce the risk of fire or electric shock. Do not expose
this appliance to rain or moisture. Do not remove cover.
There are no user serviceable parts inside. Refer servicing
to qualified service personnel.
G
Power Amp. Output
Com 4
8
25V
70V
Sound column
Ch.1
Phantom
Line
Ch.5
Line
Mic
Phantom
Line
Mic
Zone 3
G
-
+
Power Amp. Output
Com 4
8
25V
70V
Horn speaker
Contact
"VOICE PRIORITY"
Ch.4
Speaker
Line
Line Out Bal./Unbal.
Zone 4
G
-
+
Power Amp. Output
Com 4
8
25V
70V
Attention:
Pour reduir les risques d' incendie ou de choc electrique
ne pas exposer a la pluie ou l' humidite. Ne pas enlever
le couvercle. Aucun reglage al' interieur. Pour reparation
consulter une personne qualifiee.
Ch.3
Ch.2
Speaker
Aux.signal
Amplifier
16. Intelligent fan
The PL200M is equipped with an intelligent fan. It will only begin
to run if the temperature is above 50 degrees C, and the speed
of the fan will increase as the temperature rises.
17. AC Input
This inlet connects the unit with the main power.
18. AC fuse
The fuse protects the alternating current circuit of the unit,
and the fuse can only be replaced in the event of fuse
damage.
Recorder
16
17
18
CD player
Microphone
Mains
AM/FM tuner
Cassette recorder
4
Desk Top Microphone
9