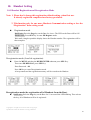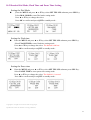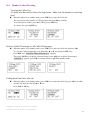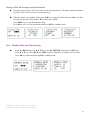
1
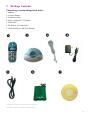
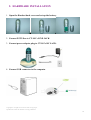
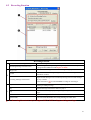
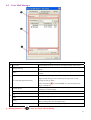
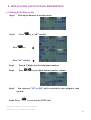
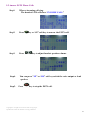
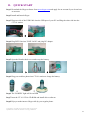
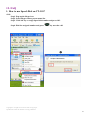
CT-101 CT-101 USB CORDLESS PHONE CT-101 CT-101 USB CORDLESS PHONE User’s Manual VERSION 0.99A Copyright©. All rights reserved. All forms of copying or reproduction of this user manual is strictly prohibited. 1 Table of Content 1. CT-101 USB CORDLESS PHONE…........………………………….……………………….…3 1.1 Descriptions & Overview……………………………….………………………….…..….…..3 2. PACKAGE CONTENTS………………………………………………………………..….……4 3. HARDWARE FEATURES……………………………………………………………….…... 5 4. HARDWARE INSTALLATION ………………………………………………………………6 5. RECOMMEND………………………………………………………………………………….7 6. SOFTWARE INSTALLATION ……………………………………………….………………9 7. SYSTEM REQUIREMENTS………………………………...…………………………….…..14 8. APPLICATION GUI FUNCTION DESCRIPTION …………………………….…………..15 9. 8.1 Voice mail Setting……………………………………………………………….……….…..15 8.2 Recording Function……………….………………………………………………..………...16 8.3 Voice mail Messages…....…………..…………………………………………….………....17 APPLICATION GUI FUNCTION DESCRIPTION…………………………………….……18 9.1 Making PSTN Phone Calls …………………………………….…………………….…..18 9.2 Answer PSTN Phone Calls ………………………………………………………………19 9.3 Making Skype Phone Calls .....…………..……………………………………….……20 9.4 Making Skype out 9.5 Redial for PSTN or Skype Phone Calls…………………………………………………22 9.6 Handset to Handset Intercom ..………………….……………………………………..23 9.7 USB Phone Mode ……………………………………………….………………………...24 9.8 Put a PSTN Phone call on HOLD……………….…..…………………………………….25 9.9 Put a Skype Phone call on HOLD ………………………………………………..…….26 Phone Calls .…………….……………….………………………21 9.10 Join to PSTN conference phone Call………………..……………….…………………...27 9.11 PSTN Call Transfer to the other Handset…………………….…………………….….28 9.12 Make PSTN and Skype Conference Call …………………………………….……….29 10. Handset Setting…………………………………….…………………………….………………..30 10.1 Registration and Degistration Mode…………..………………………….………….…….30 10.2 Dial mode, Flash Time and Pause Time Setting…………………………………………...31 10.3 Handset Caller ID setting ……………………………………………………………32 11. Quick Start……………………………………………………………………….……….……….34 12. FAQ………………………………………………………………………………………………...35 Copyright©. All rights reserved. All forms of copying or reproduction of this user manual is strictly prohibited. 2 CT-101 USB CORDLESS PHONE 1.1 Descriptions and Overview This CT-101 USB CORDLESS PHONE solution was base on a powerful USB Audio Single Chip and through external Telephony components to provide advanced solution for PC Internet soft-phone and cordless phone communication. System Block Diagram Of USB Cordless Skype Phone Solution This CT-101 USB Cordless Skype Phonesolution was directly support Skype controll on PC side and can switch between traditional PSTN phones. It support all kind of analog telephone devices and analog PBX system. User can plug in cordless phone just like general PSTN calling application and through a button switch to skype for VOIP function. You can use this kind of device for most of skype functions via cordless phone. Copyright©. All rights reserved. All forms of copying or reproduction of this user manual is strictly prohibited. 3 2 Package Contents The package contains things listed below. 1. Handset 2. Cordless Station 3. Telephone Cable 4. Power Adapter DC 9V/500mA 5. USB Cable 6. DC Battery 3.6V/600 mAh 7. CD-ROM (Driver and User Manual) Copyright©. All rights reserved. All forms of copying or reproduction of this user manual is strictly prohibited. 4 1. Hardware Features Wi-Fi friendly 2.4GHz ISM band frequency. Hopping technology. Support PSTN (Public Subscribers Telephone Network) call. Support Skype peer to peer internet call. Support Skype feature. Support Skype Phone book review on the Handset. Support 3 parties conference call conversation for Handset, PSTN and Skype. Support hands free feature on the handset unit. Support multiple handsets in a system.(Up to 6 handsets can registered) Support PSTN and Skype phone call transfer feature to other handset. Support PSTN Caller ID feature(ETSI and Bellcore 202) Support USB Audio bypass mode in order to allow HS as a wireless transceiver for MSN, Google talk, Yahoo Messenger and SIP phone PC software. Talk time around 3 hours.(New batter please charge over 15 hours) Standby Time around 120 hours. (Cordless station have to power on) Copyright©. All rights reserved. All forms of copying or reproduction of this user manual is strictly prohibited. 5 2. HARDWARE INSTALLATION 1. Open the Handset back cover and set up the battery. Æ Æ 2. Connect PSTN line to CT-101’s LINE JACK. 3. Connect power adapter plug to CT-101’s DC JACK. 4. Connect USB connector to the computer Copyright©. All rights reserved. All forms of copying or reproduction of this user manual is strictly prohibited. 6 5. Recommend : Before install USB Skype phone utility program please keep no other programs access to Skype Step1. Click Tools > Options > Privacy > Manage other program’s access to Skype 7 Step 2. Select All of the .EXE file and click Remove and OK. Copyright©. All rights reserved. All forms of copying or reproduction of this user manual is strictly prohibited. 8 6. SOFTWARE INSTALLATION The software function and setting step as follow: Step-1:Plug in CT-101 USB Cordless Skype Phone and Insert Installation CD on your CD/ DVD ROM, the program will pop up auto run information then execute setup program. Execute Setup.exe program as below: Copyright©. All rights reserved. All forms of copying or reproduction of this user manual is strictly prohibited. 9 Notification: If you have installed this program before the screen will pop-up an dialogue box to remind user and provided 3 options for selected. 1 is to fix previously software version. 2 is to re-install this software again. 3 is to remove this software. For general condition please choice 2 for continue. Step-2: Please click 「Next」for install Middleware AP. 10 Step-3:Install program will pop up a window for folder selected. If you want to choose another install path please click 「Change」button or just click 「Next」for continue. Install the program to the default path please click “Next” Click “Change” install the program to other path. Copyright©. All rights reserved. All forms of copying or reproduction of this user manual is strictly prohibited. 11 Step-4:Please Click 「Install」for beginning installation. Step-5:While you click 「Install」on step-4, the program will start to install Middleware application and then install Driver. Copyright©. All rights reserved. All forms of copying or reproduction of this user manual is strictly prohibited. 12 Step-6:After installed Middleware Application and Driver, program will pop up a window for completed and asking for launch program. Please click 「Finish」for complete and launch Middleware AP. Step-7:The Skype will display a window as below after the driver is installed. Check “Allow this PROG to use SkypeTM” and click “OK” Copyright©. All rights reserved. All forms of copying or reproduction of this user manual is strictly prohibited. 13 7. SYSTEM REQUIREMENTS To make CT-101 performing the most, make sure your PC meets the following minimum system requirements: Windows 2000 (SP1~SP4), Windows XP (SP1~SP2) Intel Pentium 4 or AMD K7 CPU above Use At least 128MB RAM (Win2000 and WinXP) At least 50 MB hard disk space Skype version 1.3.0.X and above have been installed USB 1.1 /2.0 Internet Connection (any broadband: cable, DSL, etc.) Public Service Telephone Network (PSTN) For good sound quality, please adjust your system’s H/W acceleration and Sample rate conversion quality to Full and Best. Note: 1. Before users install CT-101 Telephone Adapter software application and driver, user must make sure that CT-101 Multi-Function Skype Adapter have connected to PC system already. 2. While user completed installation procedure the system will keep on board audio priority and lock Skype to using this CT-101 device be primary audio device. 4. If your PC system has more than one USB connecting port, please remember which one is connected for install, andnext time when you plug this CT-101 Device to PC, you have to plug the same port for initialize the software driver. Copyright©. All rights reserved. All forms of copying or reproduction of this user manual is strictly prohibited. 14 8. APPLICATION GUI FUNCTION DESCRIPTION 8.1 Voice Mail Setting Voice Mail Settings 1 2 Active Voice Mail Enable Voice function. Setting Response Time User can setting how many rings to enter the voice mail box while no one answer or pick up in-coming call Maximum In-coming Message Time Maximum In-coming Message Time. User can setting and limited the voice message length in mailbox. (This function can avoid voice files out of storage size.) Voice Mail Location User can choice location or create new folder for voice mailbox. Default path is c:\program files\middleware\VM\skype User name Record User can recording own greeting message for voice mail answer response, when user click this button the record bar will showing recording time for reminding Play After greeting message recorded user can immediately playback it for confirmation Stop While user is recording or playback greeting messages click this button can stop it Playback Device User can through this function to select system playback audio device for listening greeting message Record Device User can through this function to select system record audio device for recording greeting message 3 Reset to default Click this button will setting all voice mail functions to default value ﹡ Greeting Message Setting function of Voice Mail is only for Skype In use. ﹡The Phone call from PSTN come in is use the default Greeting Message 15 8.2 Recording Function Recording Function 1 Activate Local Recording Function Enable recording function for communication record. Recording Message Location rowse User can assign recording message saving to any location. Default path is c:\program files\middleware\CR\skype User name Skype User Selected different Skype account for recording message quick search. Update Refresh all of new recording messages and update latest message to information window. 2 Recording Messages Information This window is show up caller information, record date/time and record length of each message. Users can directly moving cursor to each message for play or delete. Caller information 3 is indicated NEW recording file from Skype. Playback Device User can through this function to select system playback audio device for listening recording message. Play Selected message and click this button to play it. Stop While user is recording or playback greeting messages click this button can stop it Delete Selected message and click this button to delete it. Open Folder User can click this button for saving message as other files ﹡ 8.3 Recording Function is only for Skype to PSTN, PSTN to Skype and Skype to Skype. 16 8.3 Voice Mail Messages Voice Mail Settings Selected different Skype account for recording message quick search. 1 Skype User Messages Sorting User can pull down to select caller for messages sorting in order to quick search Update Refresh all of new messages and update latest message to information window. This window is show up caller information, record date/time and record 2 length of each message. Users can directly moving cursor to each Voice mail Messages Information message for play or delete. Caller information Skype or PSTN call.. 3 is indicated NEW voice mail messages from Playback Device User can through this function to select system playback audio device for listening voice mail message. Play Selected message and click this button to play it. Stop While playback messages click this button can stop it. Delete Selected message and click this button to delete it. Dialing While user moving cursor to message and selected it, click this button can directly dialing call to the messenger(caller) Open Folder User can click this button for saving message as other files. ﹡“Dialing function ” of is only for Skype call out dialing 17 9. APPLICATION GUI FUNCTION DESCRIPTION 9.1 Making PSTN Phone Calls Step1. Pick up the handset at standby mode. Step2. Press Press key key or “SP” soft key. Æ Press “SP” soft key Æ Step3. Press 0~9 Digits keys for telephone numbers. Step4. Press Step5. key to adjust handset speaker volume. You can press ”SP” or “HS” soft key switch the voice output or loud speaker. Step6. Press key to stop the PSTN call. Copyright©. All rights reserved. All forms of copying or reproduction of this user manual is strictly prohibited. 18 9.2 Answer PSTN Phone Calls Step1. When a incoming call ring. The handset LCD will show “INCOME CALL” Step2. Press Step3. Press Step4. You can press ”SP” or “HS” soft key switch the voice output or loud speaker. Step5. Press key or “SP” soft key to answer the PSTN call. key to adjust handset speaker volume. key to stop the PSTN call. Copyright©. All rights reserved. All forms of copying or reproduction of this user manual is strictly prohibited. 19 9.3 Making Skype Phone Calls Step1. Pick up the handset at standby mode. Step2. Press Step3. Press Step4. Press key to enter Skype contact list menu. key to select on line Skype name list. key after confirm the online Skype name on the LCD to connect the person who you like to talk. Step5. Step6. Press Press key to adjust handset speaker volume. key to stop the PSTN call. Copyright©. All rights reserved. All forms of copying or reproduction of this user manual is strictly prohibited. 20 9.4 Making Skype out Phone Calls Step1. Pick up the handset at standby mode. Press 00 then country code and area code then phone number that you Step2. want to dial. For example dial numbers " 008862123456 " Step3. Press key to connect the Skype out phone call Step4. Press key to adjust handset speaker volume Step5. You can press ”SP” or “HS” soft key switch the voice output or loud speaker. Step6. Press key to stop the Skype call. Copyright©. All rights reserved. All forms of copying or reproduction of this user manual is strictly prohibited. 21 9.5 Redial for PSTN or Skype Phone Calls Step1. Pick up the handset at standby mode. Step2. Step3. Step4. Press key to enter redial phone book list Press key to change redial list. The first indication of each list show " If first indication show " " for Skype redial list. " for PSTN redial list. PSTN Redial Skype Redial Step5. Press Press Step6. Press key or “ SP “ soft key to make PSTN call or key to make the Skype phone call. key , handset will return to standby mode. Copyright©. All rights reserved. All forms of copying or reproduction of this user manual is strictly prohibited. 22 9.6 Handset to Handset Intercom key to enter Intercom mode. Step1. Press Step2. LCD will show “ PLS SELECT HS# “ Step3. User may press Handset number for handset to handset intercom operation. For example " 4", it means intercom with handset 4. Step4. Press key, to quit from intercom and handset will return to standby mode. Copyright©. All rights reserved. All forms of copying or reproduction of this user manual is strictly prohibited. 23 9.7 USB Phone Mode Step1. User may use this mode to be a wireless headset and Mic. It can used for other application software in PC. They are MSN, Yahoo Messenger, Google talk, QQ or software type SIP phone … ect. Step2. Press Step3. Press Step4. This mode will be quit if incoming call from PSTN key then press digit “ 7 “ to enter to USB Audio mode. key to adjust handset speaker volume. or user press key. Copyright©. All rights reserved. All forms of copying or reproduction of this user manual is strictly prohibited. 24 9.8 Put a PSTN Phone call on HOLD Step1. During PSTN phone call if user want to hold the PSTN line, just simply press “ HOLD “ key . Step2. User may press Step3. If user like to get PSTN phone call back, key return back to handset standby mode. just simply press or " HS " soft key. Copyright©. All rights reserved. All forms of copying or reproduction of this user manual is strictly prohibited. 25 9.9 Put a Skype Phone call on HOLD Step1. During Skype phone call if user want to hold the Skype call, just simply . press “ HOLD “ key key return back to handset standby mode. Step2. User may press Step3. If user like to get Skype call back, just simply press key. Copyright©. All rights reserved. All forms of copying or reproduction of this user manual is strictly prohibited. 26 9.10 Join to PSTN conference phone Call Step1. CT-101 provide PSTN conference if user have more than one handset. Step2. During one of the handset in PSTN call, the other handset just key then both handset will possible join to PSTN conference call. press The LCD on both handsets will show " CONF ". Step3. To quit from the PSTN conference mode, just simply press key on the handset. Copyright©. All rights reserved. All forms of copying or reproduction of this user manual is strictly prohibited. 27 9.11 PSTN Call Transfer to the other Handset Step1. If user want to transfer a PSTN call to another handset, press “ HOLD “ key first then " PLS SELECT HS# " will be showed on the LCD. Step2. User just press the target handset number from he digit key on currently handset. Step3. If the target handset does not response to this transfer call, it will be bounce back to original handset after 30 seconds. Step4. If original handset doesn't answer to the bounce back call within 30 seconds, the PSTN call will be terminated. ﹡Please refer Chapter 10 at page30 to enable this function. Copyright©. All rights reserved. All forms of copying or reproduction of this user manual is strictly prohibited. 28 9.12 Make PSTN and Skype Conference Call Step1. If the handset is talking with PSTN and Skype separately, user may possible to make PSTN and Skype with handset in conference call together. Hold a PSTN or Skype call first. Step2. (Hold a PSTN) (Hold a Skype) Step3. OR Step4. If put PSTN on hold and press key to get Skype call on line first key to get PSTN online. If put Skype on hold press then Press then Press key to get PSTN on line first and key to get Skype online. ﹡Please refer Chapter 10 at page30 to enable this function. Copyright©. All rights reserved. All forms of copying or reproduction of this user manual is strictly prohibited. 29 10. Handset Setting 10.1 Handset Registration and Deregistration Mode Note: 1. Please don’t change this registration default setting, when first use. It already registered complete since factory produced. 2. This function only for one more Handsets Communication setting or lose the “Registration” data setting recall. Registration mode BASE unit : Press the Page key on the Base for 4 secs. The LED on the Base will be ON. Handset unit : Press SEL Key to enter HS Register mode. Wait until a long beep and the display shows the Handset number. The registration will be then complete. Deregistration mode (Local de-registration) Enter the MENU and then the DE/REGISTER submenu press SEL Key . Then enter HS DER LOC press SEL Key. Enter Password – 88. Press OK key to enter Deregistration mode. A beep sounds and the registration memory will be erased on the Handset. Deregistration mode (de-registration all of Handsets from the Base) BASE unit : Press the Page key on the Base for 10 secs until the LED blinking. Then release the key, all of Handsets will be de-registered. Copyright©. All rights reserved. All forms of copying or reproduction of this user manual is strictly prohibited. 30 10.2 Handset Dial Mode, Flash Time and Pause Time Setting Setting the Dial Mode Enter the MENU and press ▲ or ▼ key select SET TEL LIN submenu press SEL Key. Select DIAL MODE to enter Dial mode setting mode. Press ▲ or ▼ key to change the select. Press OK to confirm and press QUIT to standby mode. . Setting the Flash time Enter the MENU and press ▲ or ▼ key select SET TEL LIN submenu press SEL Key. Select FLASH TIME to enter flash time setting mode. Press ▲ or ▼ key to change the select. The default is 600 ms. Press OK to confirm and press QUIT to standby mode.. Setting the Pause time Enter the MENU and press ▲ or ▼ key select SET TEL LIN submenu press SEL Key . Select PAUSE TIME to enter pause time setting mode. Press ▲ or ▼ key to change the select. The default is 1 second. Press OK to confirm and press QUIT to standby mode.. Copyright©. All rights reserved. All forms of copying or reproduction of this user manual is strictly prohibited. 31 10.3 Handset Caller ID setting Viewing the Caller List To check who has called, follow the steps below. Make sure the handset is not being used. When the phone is in standby mode, press CID key to enter the Caller list. The screen shows the number of CID messages and press OK to confirm. To scroll between callers, press ▲ or ▼ key press SEL Key. To exit the list, press QUIT key. Delete a Caller ID message or All Caller ID messages When the phone is in standby mode, press CID key to enter the Caller list and press OK. To view the Caller ID message to be deleted by ▲ or ▼ key and press SEL Key. Press DEL key, “DELETE THIS ONE OR ALL” appears. Then press ONE key for delete current message. Press ALL key to delete all messages. “DELETE ?” appears, press OK to confirm and press QUIT to standby mode. Calling back from the Caller list When the phone is in standby mode, press CID key to enter the Caller list press OK to confirm. Scroll to the desired caller by ▲ or ▼ key. Press Talk or SP key. Copyright©. All rights reserved. All forms of copying or reproduction of this user manual is strictly prohibited. 32 Storing Caller ID messages in the Phonebook Messages shown in the Caller list can be stored in the phonebook. The phone number and name of party on the Caller list can be stored in memory. When the phone is in standby mode, press CID key to enter the Caller list press OK to confirm. Scroll to the desired caller by ▲ or ▼ key then press “SEL”. Press EDIT key to enter Phonebook setting. Press OK to save it to the phonebook and press QUIT to standby mode. 10.4 Handset Date and Time Setting Enter the MENU and press ▲ or ▼ key select DATE/TIME submenu press SEL Key. Press ▲ or ▼ key select DATE or TIME and press Digit Key to confirm your real time. Press OK to confirm and press QUIT to standby mode. Copyright©. All rights reserved. All forms of copying or reproduction of this user manual is strictly prohibited. 33 11. QUICK START Step1. Download the Skype software from www.skype.com and apply for an account if you do not have an account. Step2. Install and launch Skype. Step3. Plug one side of the USB Cable into the USB port of your PC and Plug the other side into the CT-101 station. Æ Step4. Plug PSTN line into "LINE JACK" and plug DC adapter. Æ Step5. Open the Handset back cover and set up the battery. Æ Æ Step6. Plug your cordless phone into CT-101 station to charge the battery. + = Step6. The "POWER" light will be on RED Step7. Inset the CT-101 CD in CD-ROM and install driver software. Step8. Enjoy to make/answer Skype calls by your regular phone. Copyright©. All rights reserved. All forms of copying or reproduction of this user manual is strictly prohibited. 34 12. FAQ 1. How to use Speed-Dial on CT-101? ANS: Step1. Pop-up the Skype icon. Step2. Select Skype contact person name list. Step3. Click left key to assign Speed-dial number and press OK. Step4. Dial the assigned number and press key start the call. Copyright©. All rights reserved. All forms of copying or reproduction of this user manual is strictly prohibited. 35