1
Chapter Three: Configuration and Installation
Getting the Unit Ready
Be sure to use proper static sensitive device handling procedures (use of grounded wriststrap, avoid touching internal components, etc.) when opening the unit.
•
Connecting the Serial Port
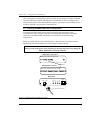
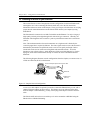
With the power off to the EDAS-1025E unit and your computer, connect the 9-pin female
end of a null-modem serial cable (Intelligent Instrumentation Part # LPA015 or equivalent)
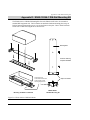
to the RS-232 serial port COM1 on the front panel of the EDAS-1025E unit (Figure 3.1).
Connect the other end to an available COM port on your computer.
•
Applying Power
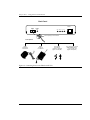
Turn on power to your computer. Next, plug the small 2-pin power adapter plug into the
power input jack on the rear panel of the EDAS-1025E unit (see Figure 3.2), then plug the
adapter pack into your AC power source. Check to see that the power-on indicator lights up.
If you are not using the power adapter supplied with the kit, please note the power supply
requirements shown in Figure 3.2. For complete power information, refer to the EDAS
Specifications sheet in Appendix B at the rear of this manual.
Note: The EDAS-1025E unit has no power switch; the power-on indicator LED on the rear
panel will light when the unit is powered.
Now, install the SYSCHECK software on your computer. Please refer to the
SYSCHECK software installation instructions in Chapter 4 before proceeding with the
configuration instructions in Section 3.1.2.
IMPORTANT NOTE: Be sure to install the latest version of SYSCHECK, that is
supplied with your current EDAS purchase, to be certain the setup procedure will be
successful. If you already have SYSCHECK installed from an earlier EDAS purchase,
install the new SYSCHECK in a different directory location than the existing one.
13