1
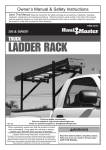
►IMPORTANT! Read and understand the owner’s manual before attempting to install or use your new DiamondBack product. Owner’s Manual Commercial Solutions Copyright 2008 DiamondBack Automotive Accessories, Inc. Page 1 Read Before Proceeding DiamondBack Automotive Accessories, Inc. is not responsible for any property damage, personal injury, or death incurred while using any DiamondBack product. Important hauling information: 1. ANY load carried above the bed rails WILL increase your truck’s center of gravity, and WILL significantly hinder your truck’s ability to maneuver, stop, and turn. Avoid sharp turns and excessive speeds as this will increase these risks. 2. Securing top loads: Failure to properly secure cargo, or hauling inappropriate cargo, may result in property damage, personal injury, or death. 3. DO NOT operate cover if roll pin has sheared. Panels may slide apart and cause injury or damage to the vehicle. See page 11 “Troubleshooting” section for roll pin replacement. 4. Cap clamps, locking rod brackets, and locking rod set-screws may become loose due to regular road vibration. Check and tighten these every time you haul with the cover. The installation and use of any rail mounted accessory may cause minor aesthetic damage to the vehicle exterior. DiamondBack makes no claims or warranties whatsoever as to a particular vehicle’s ability to support rail mounted accessories without incurring damage. The load capacity applies to the DiamondBack Truck Cover only. See vehicle manufacturer’s specifications for rail mounted accessories. Never drive without properly securing panels. Panels must be key-locked or securely strapped before vehicle is placed in motion. Unlocked panels may open during transportation resulting in personal injury, death, damage to the cover, and loss of cargo. Diamondback Automotive Accessories, Inc. is not responsible for damage resulting from unlocked panels. Never operate cover or drive vehicle without safety catch installed. See safety catch installation on page 7 of Cover Installation section. Copyright 2008 DiamondBack Automotive Accessories, Inc. Page 2 Commercial Solutions Read Before Proceeding The DiamondBack Ladder Rack supports cargo overhead while maintaining access to the DiamondBack Truck Cover. The Ladder Rack, however, has a 500 pound load capacity that should not be exceeded as well as specific directions for how to support cargo. Do not attempt to haul cargo on top of your ladder rack before reading and understanding the Ladder Rack section of the DiamondBack Owner’s Manual. Failure to properly secure cargo or hauling inappropriate cargo may result in personal injury, or death. Ladder Rack Load Capacity – DO NOT EXCEED the smaller of a 500 pound distributed load or the vehicle manufacturer’s specified load capacity for rail mounted accessories. DiamondBack Automotive Accessories, Inc. is not responsible for any property damage, personal injury, or death incurred while using any DiamondBack product. Ladder Rack Parts: (4) Powder Coated Steel Base Plates (2) Powder Coated Aluminum Cross Bars (4) Cross Bar End Caps (4) Aluminum Pipe Sockets w/Posts (4) Stake Nuts (4) 5/16”x3-1/2” Stainless Cap Screws (8) 5/16”x1” Zinc Hex Bolts (8) 5/16”x1” Stainless Carriage Bolts (16) Nylon Locknuts (16) Zinc Washers (2) 4’ Sections of X109 Weather-strip (2) 14’ Sections of X109 Weather-strip Tools Needed: Ratchet with 1/2” socket Drill with 5/16” and 3/8” bit. Hack saw or pipe cutter Small C-clamp Permanent marker 1/4” Allen wrench Installation NOTE: The DiamondBack Truck Cover must be installed prior to the Ladder Rack. 1. Start with both the cab and tailgate panel of the cover open. NOTE: The thickness of the ladder rack base plates elevate the cover panels when the cover is closed. In some cases, this height difference creates a gap in the cover’s weather-strip and may allow water to seep into the bed. 2. To avoid water from entering the bed from under the base plate, and to make up the difference in height between the bedrail and the base plate, weather-strip must be installed on the top of the bed rails prior to mounting the ladder rack base plates. 3. Clean the tops of the bed rails thoroughly with rubbing alcohol, and dry with a lint free cloth. Copyright 2008 DiamondBack Automotive Accessories, Inc. Page 3 4. Use the 14’ section of weather-strip to make a continuous gasket on the top of the bed rail from the front edge of the center panel on the passenger side. Use the two 4’ sections of weather-strip to seal from the rear edges of the center panel to the tailgate. NOTE: The weather-strip adhesive is pressure sensitive. Press firmly along its entire length to ensure proper adhesion to the bed rails. Avoid stretching the weather strip as it is applied. 5. There are (2) wide base plates and (2) narrow base plates. Because the majority of late model trucks have wider bed rails near the cab, the wide base plates are to be mounted near the cab, and the narrow plates are to be mounted near the tailgate. NOTE: To ensure proper clearance between the DiamondBack Cover panels and the vertical posts of the ladder rack, the steel base plates must be as far towards the corners of the bed as possible. 6. Place a wide base plate on the bed rail near the cab (on top of the weather-strip). With the bolt flange tight against the inside of the bed rail, slide the entire base plate as far toward the cab as possible. Temporarily secure the base plate to the bed rail using a c-clamp. 7. To check for proper clearance, open and close the cab panel slowly. The panel should clear the upright. If there is interference, make sure that the return flange on the base plate is tight with the lip of the truck bed rail. 8. Locate the center of the square stake hole on top of the bed rail and transfer this measurement to the base plate. Using a 5/16” bit, drill this mark and place the 3-1/2” button head bolt through the hole. 9. Partially thread the stake nut on the end of the bolt. 10. Tilt the base plate and stake nut forward as you insert the stake nut into the square stake hole. 11. It may be necessary to hold tension on the base plate as you tighten the stake nut bolt. 12. The inner edges of most stake holes are “hemmed.” The stake nut must “straddle” this hemmed portion. 13. Tighten the stake nut bolt completely using a 3/16” drive hex wrench. Each base plate must be secured to the top of the bedrail using the “stake nut” provided as well as two 5/16”x1” carriage bolts placed as far to the outside edges of the base plate as possible. Each base plate must also be secured to the side flange of the bedrail using two 5/16x1” hex bolts placed as far to the outside edges of the base plate as possible. See Figure 1 for ideal bolt placement. NOTE: Before drilling each hole, check the underside of the bed rail to ensure that you will have access to hold a nut with a wrench. Adjust the locations of your bolts if necessary. 14. Next, place a 5/16”x1” bolt into each hole. Use a zinc flat washer and a zinc lock nut to secure each bolt. 15. Repeat steps 6-15 for the remaining three base plates. Note that the tailgate base plates should be positioned as close to the tailgate as possible. 16. Place a pipe socket on each of the four uprights. 17. Install the front and rear horizontal cross bars by sliding them through the pipe sockets. 18. Tighten the bottom setscrew on each of the pipe sockets to secure the position of the socket on the uprights. 19. Close and lock the cover. Note that the vertical position and length of the cover locking rods may now need to be adjusted to fit under the base plates. 20. Stand behind the truck and visually inspect the rack to ensure that the crossbars are centered, and the posts are vertical. Adjust as necessary using the socket set screws. Copyright 2008 DiamondBack Automotive Accessories, Inc. Page 4 Figure 1 Using the Ladder Rack Before using the DiamondBack Ladder Rack, read and understand the proper hauling instructions below. Failure to properly secure cargo, or hauling inappropriate cargo, may result in property damage, personal injury, or death. 1. 2. 3. 4. 5. Loading the ladder rack will increase your truck’s center of gravity, and will significantly hinder your truck’s ability to maneuver, stop, and turn. Do not drive at excessive speeds, as this will increase these risks. Do not exceed the lesser of a 500 lbs distributed load, the truck’s bed rail load capacity, or the truck’s total hauling capacity including the weight and load for the DiamondBack Cover. Always secure gear in both the side-to-side and front-to-back direction. Always use a ratchet strap or other proper tie down devices while transporting a load. DiamondBack Automotive Accessories, Inc. is not responsible for any property damage, personal injury, or death incurred while using any DiamondBack product. Copyright 2008 DiamondBack Automotive Accessories, Inc. Page 5 Ladder Rack Cab Guard Parts: (1) Hinge Mounted Cab Guard (2) Rubber Washers (2) Zinc Washers (2) Fender Washers (2) 5/16” Nylon Lock Nuts (1) Lock Bracket (2) U-Bolts (for DB-LDR) (2) U-Bolts (for KM-LDR) (4) 5/16” Stainless Lock Washers (4) 5/16” Stainless Nuts Tools Needed: Ratchet with 1/2” socket Drill with 5/16” bit. Permanent marker Figure 2 Installation NOTE: For ease of installation, the DiamondBack Truck Cover and Ladder Rack must be installed prior to installation of the Ladder Rack Cab Guard. 1. Start with the cab panel of the cover in the closed and locked position. 2. Open and lock the cab guard stainless spring latch. 3. Place the Cab Guard hinge down on the cover with the stainless spring latch facing the cab window. 4. Center the Cab Guard left to right on the cab panel with the top of the Cab Guard frame resting entirely against the cab cross bar of the Ladder Rack (Figure 2). 5. Using a permanent marker, mark the location of the (2) 5/16” bolts that mount the Cab Guard hinge to the top of the cover. 6. Set the Cab Guard aside and open the cab panel of the cover. Check the underside of the cover for any hardware that may interfere with the hinge mounting holes. Relocate the holes if necessary. 7. Drill the hinge mounting holes with the 5/16” bit, and place the bolts of Figure 3 the Cab Guard hinge through the holes. 8. Place one 5/16” rubber backed washer (rubber facing the underside of the cover), one fender washer, one flat washer, and one nylon-locking nut on each bolt and tighten firmly with a 1/2” socket and ratchet. 9. With the cab panel of the cover in the closed and locked position, hinge the Cab Guard up to rest against the cab cross bar of the Ladder Rack. 10. Secure the latch plate to the cross bar using the U-bolts as shown in Figure 3. 11. Adjust the placement of the latch plate to align with the latch bolt, and tighten the U-bolts completely. Using the Ladder Rack Cab Guard The Ladder Rack Cab Guard is designed to protect the cab window of your truck while hauling with the DiamondBack Truck Cover. When the Cab Guard is not in use, it is designed to fold out of the way to allow the cab panel of the truck cover to be opened. To access cargo in the cab side of your truck bed, unlock the cab panel, release the Cab Guard spring latch and rest the Cab Guard down on the cab panel. This unique hinging feature allows you to access cargo in your bed while carrying a loaded rack overhead. Read and understand the “Proper Hauling” section of the Owner’s Manual before attempting to haul objects on top of your cover. Failure to properly secure cargo, or hauling inappropriate cargo, may result in property damage, personal injury, or death. Copyright 2008 DiamondBack Automotive Accessories, Inc. Page 6 DiamondBack Side Toolboxes Parts: (2) DiamondBack Side Boxes*** (4) 5/16”x2” Stainless Button Head Bolts (2) 5/16”x3”Stainless Button Head Bolts (4) 5/16” Rubber Washers (4) 5/16” Zinc Washers (4) 5/16” Nylon Lock Nuts Tools Needed: Ratchet with ½” socket Drill with 5/16” bit 3/16” Allen wrench Installation ***Dodge Ram Long Bed must use “Same Side Installation” shown in Figure 5. DiamondBack’s unique toolbox mounting system allows you to install up to four toolboxes (two sets) in all four corners of your bed. 1. Side boxes must be installed after the cover has been installed on the truck. 2. Hold the arm of one side box under the center panel of the cover. Make sure that the box lip is resting entirely on the bed rail of the truck, and that the rear of the box is tight against the flange of the center panel (Figure 4). 3. With the box in place, drill up through the box arm and through the center panel flange (water gutter). NOTE: Ideal hole placements are located as far to the outside of the center panel flange width as possible. (Figure 4) 4. Install two bolts with rubber washers through the center panel flange and box arm as shown in Figure 4. 5. Place one zinc washer and one 5/16” lock nut on each bolt against the box arm. 6. Using a ½” socket, tighten each bolt firmly. Do not crush the box arm. 7. Repeat this procedure for the remaining side box. BOX LIP CENTER PANEL Bedrail SIDE BOX VIEW FROM TAILGATE RUBBER WASHER (RUBBER DOWN) CENTER PANEL FLANGE CENTER PANEL BOX ARM ZN WASHER LOCK NUT VIEW FROM SIDE Figure 4 Copyright 2008 DiamondBack Automotive Accessories, Inc. Page 7 SIDE BOX RUBBER WASHER (RUBBER DOWN) CENTER PANEL FLANGE CENTER PANEL SIDE BOX (2) 5/16"x3" Bolts Figure 5 DiamondBack Tailgate Protector Parts: (1) Diamond Plate Tailgate Protector Plate (6) Stainless Steel Self Drilling Screws Tools Needed: Cordless Drill (with Phillips head screw tip) Installation 1. Tailgate protector may either be mounted using the hardware provided, or for a no drill installation, use a 3M two sided accessory tape (not included). 2. With the tailgate in the closed position, hold the tailgate protector in place. 3. Center the plate on the tailgate and verify that the plate will not interfere with any hinging or latching mechanisms as well as the inside of the truck bed and the underside of the DiamondBack Cover. 4. Mark the position of the plate on the tailgate. 5. Open the tailgate and position the tailgate protector according to the previous marks. 6. The sheet metal on the inside of the tailgate is often corrugated for strength. Make sure that you secure the tailgate protector to the points that actually contact the tailgate. Avoid placing screws or tape in bent or depressed areas. 7. Ideal screw placements are on the perimeter of the tailgate protector in all for corners, and in the center of the tailgate width. Copyright 2008 DiamondBack Automotive Accessories, Inc. Page 8 DiamondBack Rear Rack Parts: (2) Rear Rack Posts* (1) Aluminum Cross Bar (2) Cross Bar End Caps (2) Aluminum Pipe Sockets w/ Posts (6) 5/16”x1” Stainless Carriage Bolts (6) Nylon Locknuts (6) Zinc Washers (6) Zinc Fender Washers (6) Rubber Washers Tools Needed: Drill 5/16” Drill Bit 1/2” Socket Ratchet Installation 1. 2. 3. 4. 5. 6. 7. 8. 9. 10. 11. 12. Refer to the Cab Guard Owner’s Manual for HD Cab Guard installation instructions. Remove the rear cleats as shown in Figure 6. Align the base of the ladder rack post with the edge of the cover. Re-install the cleat by placing the cleat bolts through the base plate and into the cover. Once the base plate is secured by the cleat, drill the remaining mounting holes using a 5/16” bit. Figure 7 shows recommended hole placements. Depending on the cover model, it may be necessary to adjust mounting hole locations or base plate location so as to not interfere with the interior of the cover. Secure the bolt flange to the cover using the (3) stainless steel carriage bolts provided as in Figures 6 & 7. On the underside of the cover, place a rubber washer (rubber facing underside of cover), a fender washer, a flat washer, and a nylon lock nut on each carriage bolt. Tighten the lock nut until the head of the carriage bolt rests flush on the bolt flange of the rear prop. Repeat this procedure for the opposite post. Place a socket on each post and center the cross bar in the sockets. Figure 6. Tighten all four socket set screws *Note that it may be necessary to trim the rear rack posts to achieve proper clearance between cargo and cab roof. Using the HD Rear Ladder Prop The DiamondBack Rear Ladder Prop is designed to be used in conjunction with the DiamondBack HD Cab Guard to haul long objects safely above the vehicle’s cab. Read and understand the Using Your DiamondBack section of the DiamondBack Truck Cover owner’s manual before attempting to haul objects on top of the cover or prop system. Proper Hauling Techniques 1. 2. 3. 4. ALWAYS secure cargo in ALL directions. ALWAYS use ratchet straps or other proper tie down devices to safely transport loads. Check and retighten socket set screws every time you haul with the rear rack. DO NOT EXCEED THE LOAD CAPACITY OF A 350 lbs DISTIBUTED load on HD Cab Guard and Rear Ladder Prop. The DiamondBack HD Cab Guard and Rear Prop is designed to haul long objects safely above the vehicle’s cab. Read and understand the “Using the HD Rear Ladder Prop” section of owner’s manual before attempting to haul objects above the vehicle’s cab. Failure to properly secure cargo, or hauling inappropriate cargo, may result in property damage, personal injury, or death. DiamondBack Automotive Accessories, Inc. is not responsible for any property damage, personal injury, or death incurred while using any DiamondBack product. Copyright 2008 DiamondBack Automotive Accessories, Inc. Page 9 Figure 6 Figure 7 Copyright 2008 DiamondBack Automotive Accessories, Inc. Page 10 Kargo Master Pro II Ladder Rack Read Before Proceeding The Kargo Master Ladder Rack supports cargo overhead while maintaining access to the DiamondBack Truck Cover. The Ladder Rack, however, has a load capacity that should not be exceeded as well as specific directions for how to support cargo. Do not attempt to haul cargo on top of your ladder rack before reading and understanding the Kargo Master User’s Manual. DiamondBack Automotive Accessories, Inc. does not manufacture or warrant any Kargo Master Product. Refer to your Kargo Master User’s Manual for complete instructions on the safe installation and use of the Pro Series II Ladder Rack. Pro II Ladder Rack Parts: (1) Side Channels Kit (1) Legs and Bars Kit (1) ***DiamondBack Replacement Legs (1) 14’ Section of X109 Weather-strip (2) 4’ Sections of X109 Weather-strip Installation NOTE: The DiamondBack Truck Cover must be installed prior to the Pro II Rack. NOTE: The thickness of the ladder rack base plates elevate the cover panels when the cover is closed. In some cases, this height difference creates a gap in the cover’s weather strip, and may allow water to seep into the bed. 1. To avoid water from entering the bed from under the base plate, and to make up the difference in height between the bedrail and the base plate, weather-strip must be installed on the top of the bed rails prior to mounting the ladder rack base plates. 2. Clean the tops of the bed rails thoroughly with rubbing alcohol, and dry with a lint free cloth. 3. Use the 14’ section of weather-strip to make a continuous gasket on the top of the bed rail from the front edge of the center panel on the driver side, towards the cab, across the top of the bulk head, and back along the passenger side bed rail to the front edge of the center panel on the passenger side. 4. Use the two 4’ sections of weather-strip to seal from the rear edges of the center panel to the tailgate. 5. Position the weather-strip on top of the bed rails so that the when the cover is closed, the weather-strip on the underside of the cover seals against the weather-strip on the bed rails. NOTE: The weather-strip adhesive is pressure sensitive. Press firmly along its entire length to ensure proper adhesion to the bed rails. Avoid stretching the weather-strip as it is applied. 6. Install the Kargo Master Pro II Ladder Rack using the instructions provided by Kargo Master. 7. ***The DiamondBack Replacement Legs must be used in place of the standard Kargo Master Legs. The DiamondBack Replacement Legs will provide the proper height and clearance necessary to operate the DiamondBack Cover while the Kargo Master Rack is in use. 8. Install the base plates of the rack over top of the weather-strip that was previously applied to the bed rails. Copyright 2008 DiamondBack Automotive Accessories, Inc. Page 11 9. It is important to NOT tighten any of the bolts on the rack until proper clearance has been achieved between the legs of the rack and the panels of the cover. 10. To check for proper clearance, open and close each panel slowly. The panel should clear both uprights. Adjust the position of the leg on the base plate slot as needed to clear the panels. 11. Once the rack is installed, and the panels of the cover clear the uprights, tighten all rack bolts. 12. At this time, it will be necessary to readjust the locking rods of your cover. 13. Depending on the model and year of the truck, the base plates of the ladder rack will interfere with the locking rods on the cab panel of the cover. If this occurs, simply drill a 1/2” hole in the side of the ladder rack base plate for the locking rod to pass through. Cover Removal with the Pro II Ladder Rack 1. The side rails of the Pro II rack prohibit standard panel removal. In most long beds , the panel of the cover will open against the underside if the Kargo Master side rails. This means that the gas springs are not fully extended, and therefore would be extremely difficult to remove or replace. In this case, the cover must be removed in one piece. 2. In most short bed applications, the panels are small enough that they can fully open before striking the underside of the side rails. In this instance, single panels of the cover can be removed separately. 3. Pull the roll pin using pliers or vise grips. If the roll pin is damaged in removal, refer to the “Troubleshooting” section of this manual. 4. Carefully open the panel and remove the gas springs. 5. Tilt the panel open until it will clear the uprights and side rails of the ladder rack 6. Slide the panel from its hinges and set it aside. 7. To reassemble, simply slide the panel back onto its hinges and replace the roll pin. The roll pin can be pushed into the hinge pin with pliers or vise grips. Copyright 2008 DiamondBack Automotive Accessories, Inc. Page 12 Warranty DiamondBack Automotive Accessories Incorporated Limited Warranty This LIMITED WARRANTY, made by DiamondBack Automotive Accessories Incorporated, is issued to the original retail purchaser of any DiamondBack Automotive Accessories Inc. product. Warranty is not valid unless registered with DiamondBack Automotive Accessories Incorporated by the original retail purchaser. DiamondBack Automotive Accessories Inc. hereby warrants that our products will be without defect in material or manufacture for a period of (3) years after the original retail purchase date. This warranty covers gas springs, locks and locking mechanisms, weather seal, trim, and cleats. DiamondBack Automotive Accessories warrants all factory applied coatings to be without defect in adhesion for a period of (3) years following the original retail purchase of the cover. This warranty DOES NOT APPLY to Line X® franchise applied coatings, ATV package covers, or coatings damaged by abrasion due to loading or unloading materials on the cover. Diamondback Automotive Accessories, Inc. hereby warrants that our products will be without structural and manufacturing defects for a period of (3) years following the original retail purchase. This (3) year warranty covers only the structural components and does not include any parts or materials used in the workings of the cover. This warranty does not apply if structural damage is caused by overloading the cover beyond either the load capacity specified by DiamondBack Truck Accessories, or the load capacity of the truck with which the DiamondBack product is used. If the purchaser discovers that a DiamondBack Automotive Accessories Inc. product is defective in material or manufacture within the period of (3) years of purchase or is structurally defective in manufacture within a period of (3) years, that person shall contact DiamondBack Automotive Accessories, Inc. and a representative of the company will inspect the product. If a material or manufacturing defect is determined to exist, DiamondBack Automotive Accessories, Inc. shall exercise its option to either repair or replace the defective part(s). Line X adhesion repair will be provided by DiamondBack Automotive Accessories Inc. or the closest available Line X® dealer at DiamondBack Automotive Accessories Inc. discretion. Scratch or damage repairs are the responsibility of the customer and may be serviced at any authorized Line X® location. Line X® franchisee applied coatings must be returned to original franchisee for warranty service and repair. This Warranty shall be considered void if the product is shown to have been abnormally used, misused, improperly maintained, or altered in any way by anyone other than DiamondBack Automotive Accessories, Inc. This warranty does not cover damaged material or structure due to accident or misuse of the DiamondBack product. DiamondBack makes no claims or warranties whatsoever as to a particular vehicle’s ability to support rail mounted accessories without incurring damage. The load capacity of the cover applies to the DiamondBack Truck Cover only. See vehicle manufacturer’s specifications for rail mounted accessories. This Warranty is the only warranty applicable to the purchase of a DiamondBack Automotive Accessories, Inc. product. DiamondBack Automotive Accessories, Inc. hereby disclaims any and all other warranties, express or implied, including the implied warranty of fitness for a specific use. Diamondback Automotive Accessories, Inc. is not liable for any damages incurred, whether incidental or consequential, due to a breach of this Warranty. The terms of this Warranty shall not be changed in any way, by any person or party. This Warranty guarantees you certain rights. Other rights may vary from state to state. Copyright 2008 DiamondBack Automotive Accessories, Inc. Page 13