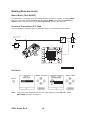
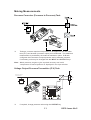
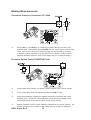
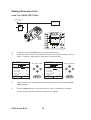
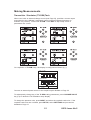
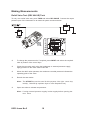
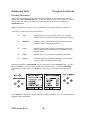
1
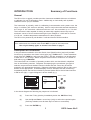
DPI 610 IS
PORTABLE PRESSURE CALIBRATOR/INDICATOR
USER GUIDE
K239
Calibrator Version
Indicator Version
Hydraulic Calibrator Version
DPI 610 IS Portable Pressure Calibrator
Software version 1.XX
© Druck Ltd. 1999
This document is the property of Druck Limited and may not, either in part or whole, be
copied or otherwise reproduced, communicated in any way to third parties nor stored in any
Data Processing system, without the express written authority of Druck Limited.
i
K239 Issue No. 2
INTRINSIC SAFETY CONDITIONS OF USE
This instrument is designed to be intrinsically safe when operated
in accordance with the BASEEFA Certification document and
schedule (see Appendix 2).
BASEEFA Certificate of Conformity No. Ex 99E2002X
BASEEFA being an Approved Certification Body, in accordance with
Article 14 of the Council Directive of the European Communities of
18th December, 1975 (76/117/EEC) certifies that the apparatus has
been found to comply with harmonised European Standards:
EN 50014: 1992
EN 50020: 1994
EEx ia IIC T4
and has successfully met the examination and test requirements
recorded in confidential report Number,
98(C)0818 (ERA Report Ref.3627/856), dated January, 1999
NOTE:
Attention is drawn to Pages 4/5 of the Certificate
of conformity for electrical connection parameters
SPECIAL CONDITION OF USE
The DPI 610 IS Series Pressure calibrator is NOT capable of
withstanding the 500V r.m.s. electric strength test between
the external connectors and the frame of the apparatus as
required by Clause 6.4.12 of EN50020 and this must be taken
into account when using the apparatus for input measurements
in a system.
K239 Issue No. 2
ii
SAFETY
The Manufacturer has designed this product to be entirely safe when operated correctly.
l
Please pay close attention to the Safety Instructions outlined on this page and
elsewhere in this manual. They have been designed to protect the user from
personal injury and the equipment from damage.
Potentially hazardous operations are indicated in the text by means of a
hazard warning triangle. Specific warnings relating to each section of the
manual are given at the beginning of that section. On the instrument, this
symbol indicates that the user should refer to the User Manual.
!
l
Please observe the installation advice and any operational limits given in this
manual.
l
This equipment must only be used for the purpose for which it was designed
Electrical Safety
The instrument is designed to be completely safe when used with options and
accessories supplied by the manufacturer for use with the instrument.
Test leads
Only use the test leads supplied with this instrument; the test leads must not be used
with any other test equipment.
Toxic Materials
No toxic materials are employed in this equipment
Repair and Maintenance
The instrument must be maintained, either by the manufacturer or a competent person.
Please refer to supplier for details of approved service agents. A list of Druck
Subsidiaries who will be able to assist and advise is given on Page 38.
Software Issue
This guide contains operating instructions for instruments with software Version 1.XX.
+-
This product meets the essential protection requirements of the relevant
EEC directives. Further details of applied standards may be found in the
product specification.
WARNING
This is a Class A product. In a domestic environment this product may
cause radio interference in which case the user may be required to take
adequate measures.
iii
K239 Issue No. 2
Specification
Pressure Ranges (Internal Transducers)
Accuracy
Combined non-linearity, Hysteresis and repeatability
70 mbar to 20 bar (Calibrator):
35 bar to 700 bar (Indicator):
70 bar to 400 bar (Hydraulic)
0.025% F.S.
0.025% F.S.
0.025% F.S.
Temperature Effects
±0.004% of reading/°C (averaged over -10° to -40°C w.r.t. 20°C)
Electrical Parameters
Voltage Inputs
Range:
Accuracy
Resolution
±30V
±0.05% rdg, ±0.004% F.S.
100mV max
Current Inputs
Range:
Accuracy
Resolution
±55mA
±0.05% rdg, ±0.004% F.S.
1mA max
Current sink
Range:
Accuracy
24 mA
±0.05% rdg, ±0.01% F.S.
Display
Size:
Reading
60x60 mm LCD Graphics
±99999, update rate 2 readings/sec
Environmental
Operating Temp.:
Storage Temp:
Calibration Temp:
-10°C to 50°C (Calibrated -10°C to 40°C)
-20°C to 60°C
21°C ±2°C
Sealing
Sealed to IP54
Physical
Size:
Weight:
K239 Issue No. 2
300 x170x140 mm
3 kg
iv
Contents
Introduction
General
Description of Procedures
Using the Guide
Summary of Functions
OPERATOR CONTROLS
DISPLAY
HARD KEY FUNCTIONS
SOFT KEYS
CURSOR KEYS
ELECTRICAL CONNECTIONS
1
1
2
3
3
3
4
5
5
6
Getting Started
Fitting Batteries
Switching On
Change Pressure Units
Voltage and Current Measurements
Typical Calibration Set-up (Pressure to Voltage)
Zero Display Reading
7
7
8
8
9
9
Making Measurements
Basic Mode (Task BASIC)
Pressure Transmitter (P-I) Task
Pressure Converter (P-P) Task
Voltage Output Pressure Transmitter (P-V) Task
Current to Pressure Converter (I-P) Task
Pressure Switch Test (P-Switch) Task
Pressure to Display (P-Display) Task
Leak Tests (Leak Test) Task
Transmitter Simulator (TX SIM) Task
Relief Valve Test (REL VALVE) Task
10
10
11
11
12
12
13
14
15
16
Advanced Task
General
Select Input
Ambient Temperature Measurement
Process Functions
Tare Process Function
Min/Max Process Function
Filter Process Function
Flow Function
% Span
Select Output
17
17
17
17
18
19
20
20
21
21
22
v
K239 Issue No. 2
Contents (Contd.)
Advanced Task (contd.)
Electrical Outputs (Loop Power)
mA Step
mA Ramp
mA Value
Define New Task
Clear Task
22
23
24
26
26
26
Memory Operations
Saving Display or Datalog
Store Operations
Recalling Stored Data
Datalog Operations
Auto Log (Timer)
Manual Logging
Recall Datalog Files
Downloading Datalog Files
Delete Datalog Files
27
27
27
27
28
28
28
29
29
30
Using Set-up
General
Contrast
Store Mode
Calibration
Settings - Select Set-up Option
Units
Define Special Units
Language
RS232
Powerdown
30
30
30
30
31
31
31
32
32
32
32
Calibration
General
Calibration Check
Calibration Adjustment
General Procedures
Using The Calibration Menu
Temperature
33
33
33
34
34
34
35
Cleaning Instructions
35
Service
Approved Service Agents
K239 Issue No. 2
36
vi
Contents (Contd.)
Appendix 1 - Hydraulic Actuator version
Introduction
Safety Instructions
Preparation for Use
Bleeding the System
Operation
Draining the Hydraulic Fluid
Flushing, replenishing or Changing the Hydraulic Fluid
37
38
38
39
40
40
41
Appendix 2 - Baseefa Certificate of Conformity
vii
K239 Issue No. 2
Notes
(This page intentionally blank)
K239 Issue No. 2
viii
INTRODUCTION
Summary of Functions
General
The DPI 610 is a rugged, portable precision instrument available either as an indicator
or calibrator for use in hazardous areas. Additionally, an intrinsically safe hydraulic
calibrator version (HC) is available.
The instrument is primarily used for calibrating instrumentation and systems over the
range -1 to 20 bar, (HC version to 400 bar). Used in conjunction with external transducers,
the range of the standard calibrator/indicator can be extended up to 700 bar.
The instrument is also capable of sinking an externally supplied current loop up to a
maximum current of 24 mA and measuring dc input voltages of ± 30V and dc currents
of ± 55 mA. Ambient temperature measurement is also provided.
The DPI 610 is powered by six alkaline C-cells and has an RS232 interface.
Important Notice
Zinc-carbon and zinc-chloride cells should NOT be used in this instrument.
Use only the battery types as shown in the Table on page 7.
Description of Procedures
In the procedures outlined in this User Guide, hard (fixed function) and soft (variable
function) key operations are shown in bold type (e.g.) TASK and F1. These statements
mean press the TASK key and press the F1 key. Soft key operations can be allocated
to both the F1 and F2 keys. Where a specific soft function is referred to it is written in
bold italics (e.g.) PROCESS.
This instrument has a number of operating modes which are described in simplified
form in the following sections. Diagrams accompanying the procedures give typical
selection sequences and shaded controls indicate that this control key should be
pressed in the appropriate sequence. Diagrams should be read from left to right, top to
bottom where appropriate. A shaded display soft box indicates that the function key
immediately below that soft box should be pressed (either F1 for the left hand soft box
or F2 for the right). A typical diagram is shown below (e.g.).
TASK: BASIC
-
VOLTAGE
PRESSURE INT
CURRENT
+
V
SELECT UNITS
OF PRESSURE
SELECT UNITS
inHg
bar
hPa
Pa
bar
PRESSURE
UNITS
In the above diagram the following key sequence is indicated.
(a)
Press the F2 key (the key immediately below the UNITS soft box).
(b)
Use the Up and Down cursor keys (only) to select the required option.
(If all keys shaded, use all these keys to select or enter data).
(c)
Press the ENTER key.
1
K239 Issue No.2
INTRODUCTION
Summary of Functions
Using This Guide
The following key symbols are used in the procedure diagrams which follow
Shaded cursor keys indicate that a combination of these four
keys, Up, Down, Left and Right should be used to (e.g.) enter an
alpha numeric value or to select a function.
Indicates the ENTER key. Used to confirm an operation or a
selection. Shading indicates key operation.
Exit key, used to clear current menu selection and return to next
menu level above current level. Used as an escape key from
current operation. Shading indicates key operation.
Hardkey (total 7). Legend beside key symbol indicates function.
Shading indicates key operation.
Maximum Instrument Ratings
The following table shows the maximum measurement input ratings of the instrument
which should not be exceeded.
PRESSURE
120% FULL SCALE
VOLTAGE
30 V d.c.
CURRENT
55 mA d.c.
Note 1: The display flashes if the input pressure, voltage or current overrange.
Note 2: Max applied voltage for external loop supply = 30V dc (see Page 8).
K239 Issue No.2
2
INTRODUCTION
Summary of Functions
OPERATOR CONTROLS (Figure 1)
These divide into two groups, the operator/display controls (shown in Figure 1) and the
pressure/vacuum generation components (Shown in Figure 2). The operator controls
and a typical display, common to all instrument versions, is shown below.
Display
max 30V
DPI 610 IS
TASK: BASIC
Electrical Measurement
Input Sockets
V
VOLTAGE
bar
PRESSURE INT
CURRENT
PRESSURE
UNITS
Cursor Keys
F1
F2
Enter Key
On/Off Key
Hard Keys
Function (Soft) Keys
Figure 1 - DPI 610 Keypad
DISPLAY
The display section of the instrument basically divides into four distinct sections. The
two main sections of the display are used to display a Measurand (input parameter) and
a Source (output parameter). The remaining sections are used as a status display area
and to define soft key functions. A typical display is shown below (e.g.),
Status display
TASK: BASIC
-
+
Measurand display
(INPUT)
VOLTAGE
Source display
(INPUT)
PRESSURE INT
Soft boxes
CURRENT
3
V
bar
PRESSURE
UNITS
K239 Issue No.2
INTRODUCTION
Summary of Functions
HARD KEY FUNCTIONS (Fig. 1)
Key
I/O
Function
This key is used to turn the instrument ON and OFF.
SETUP*
The SETUP key provides access to the instrument s general configuration
parameters which are set up to certain default parameters on delivery.
ZERO
The ZERO key can be used to zero either the selected measurand or
source display, if the display reading is within 5% of zero. Attempts to zero
a larger offset result in an error message, Zero too large,
INPUT*
The INPUT key is used to select which measurand is displayed.
Ref Page
7
31
9
18
TASK
The TASK key is used as a means of rapidly configuring the instrument for
a number of different types of external device calibration. There are twenty
task configurations available, eleven of which are pre-programmed and nine
are user definable.
10-17
OUTPUT*
The OUTPUT key is used to select which of the instrument s source outputs
is displayed.
23-26
Depending upon how the instrument s STORE mode is setup, this key is
used either to store up to 20 display screens (in SNAPSHOT mode), or to
manually log a screen in DATALOG mode.
28, 32
This key is used to recall a previously stored screen to the display.
Depending on the STORE mode set-up, operation of this key recalls eother
the snapshot of a previously stored screen or datalog file. In STORE mode,
selection displays the last screen stored. By using the cursor keys, the
operator can scroll either forward or back through memory locations.
28, 32
STORE*
RECALL*
ENTER
EXIT
The ENTER key is used either to enter data (accept entered data), or, in
conjunction with the soft keys, to accept a given selection.
2
The EXIT key operates in conjunction with all the other hard and soft keys
to exit from the current screen or menu level, to the level immediately
preceding it. To quit completely from any menu level, press EXIT until the
MEASURE/SOURCE screen is displayed.
2
* These key funtions are not available in BASIC mode
K239 Issue No.2
4
INTRODUCTION
Summary of Functions
SOFT KEYS (Fig.1)
Three soft keys, designated F1, EXIT and F2, are situated immediately below the
display as shown below. These keys have their function allocated by the instrument
software which is indicated in the bottom of the display (Voltage for F1 and Units for F2
in this example). They are used to select menu (program) options and are fully
described under the appropriate section headings.
CURSOR KEYS (Fig.1)
The cursor keys consist of a block of four keys, arranged as shown in Figure 1. They
are designated Up (Ù), Down (Ú), Left (×) and Right (Ø). In programs where options
need to be selected from a list, (e.g.) the TASK selection program, the Up and Down
cursor keys are used to highlight one of the options, from which it can be selected by
the ENTER key. In TASK mode, where more than one page of options are provided, the
Left (×) and Right (Ø) cursor keys will switch between pages.
External Interfaces under flap
Power, RS 232, External Transducer
Hard keys
Test port. Connect to unit under test.
G1/8" coupling. Use a sealing washer.
Electrical Inputs,
V, I, Switch and mA sink
Fine pressure adjustment.
Start with control screwed out
half way to allow fine adjustment
up or down.
Cursor Keys
Soft Keys F1, EXIT, F2
Release Valve.
Releases system
pressure through vent
port. Use to gradually,
or completely reduce
pressure
Vent Port
Select positive or
negative pressure
Pump, pressurises
test port and internal
sensor. Use to approximately
set output pressure
Figure 2 - DPI 610 Calibrator Controls
5
K239 Issue No.2
INTRODUCTION
Summary of Functions
ELECTRICAL CONNECTIONS
Protective cover
Close when not using connectors
External Transducer
USE
IN S R S 2 3 2
A
ARE FE
A ON
LY
RS 232
(Connect and
use in Safe Area
Only)
Temperature Sensor
Figure 3 - Electrical System Connections
Measurement inputs and Source Outputs are made via the control panel sockets as
shown below.
Input Window
max 30V
CAT II
DPI 610 IS
TASK: BASIC
Electrical Measurement
Input Sockets
INPUTS
V
VOLTAGE
OUTPUTS
bar
PRESSURE INT
CURRENT
PRESSURE
UNITS
F1
Output Window
F2
Figure 4 - Electrical Measurement Inputs/Source Outputs
K239 Issue No.2
6
Getting Started
Fitting Batteries
Cover fixing screws
Manufacturer
Type No.
Energizer
Industrial Type EN93
Energizer
E93.LR14.C.AM2
Duracell
MN1400-LR14
Varta
No. 4014 Type LR14.C.AM2
Procell
MN1400 - LR14
Six Alkaline C-cells
(Type only as Table)
Low battery indicator
TASK: BASIC
-
+
V
VOLTAGE
PRESSURE INT
CURRENT
bar
PRESSURE
UNITS
WARNING: BATTERIES MUST ONLY BE FITTED IN A SAFE AREA.
USE ONLY THE BATTERIES SPECIFIED IN THE TABLE.
Caution:
Old batteries can leak and cause corrosion. Never leave
discharged batteries in the instrument. Old batteries should be
treated as hazardous waste and disposed of accordingly.
Switching On
Press the I/O switch on the front panel and proceed as follows.
TASK: BASIC
I/O
VOLTAGE
PRESSURE INT
CURRENT
TASK: BASIC
V
CURRENT
bar
PRESSURE INT
PRESSURE
UNITS
VOLTAGE
mA
bar
PRESSURE
UNITS
The first time that the instrument is powered up, it will power up in BASIC mode with the
main screen displaying voltage in the measurand display area and pressure in the
source display area. To switch to Current as measurand, press F1 as shown. Similarly,
F1 to return to Voltage.
Note: No other keys are active in this mode and the instrument can only be
reconfigured by pressing the TASK key and selecting another mode.
7
K239 Issue No.2
Getting Started
Change Pressure Units
To change the pressure units proceed as follows. If the four units displayed are not the
units required, press TASK and select any task, other than BASIC, press SETUP and
proceed as detailed on page 31. To return to BASIC mode, press TASK and select
BASIC.
TASK: BASIC
-
inHg
bar
hPa
Pa
V
VOLTAGE
bar
PRESSURE INT
CURRENT
SELECT UNITS
SELECT UNITS
OF PRESSURE
+
PRESSURE
UNITS
In BASIC mode, the unit is configured to carry out basic Pressure to Voltage (P to V) or
Pressure to Current (P to I) tests a typical test procedures follow.
Voltage and Current Measurements
Connect the electrical input sockets as follows for voltage and current measurements.
Use the test leads provided and DO NOT push bare wires into the sockets.
Note: Max applied voltage = 30V dc, Max input current = 55mA dc
CURRENT
(FROM EXTERNAL SOURCE)
VOLTAGE
max 30V
max 30V
-
+
V
Vin
Vin
-
mA in
55mA
max
mA in
mA Sink
mA Sink
Note: Max applied voltage for external loop supply = 30V dc
K239 Issue No.2
8
55mA
max
+
Getting Started
Typical Calibration Setup (Pressure to Voltage)
Connect a device under test to the instrument as shown below.
SAFE
Ext Press. Source
(Indicator Only)
+
+
P
V
+
EXT
SUPPLY
-
-
BARRIER
SAFE
Pressure
Regulator
Max 30V
CAT II
DPI 610 IS
TASK: BASIC
V
VOLTAGE
bar
PRESSURE INT
CURRENT
PRESSURE
UNITS
F1
l
F2
General Procedure
m
Use the handpump to pressurise the system to the required level as
indicated on the display. Allow the display to settle and screw the
volume adjuster in or out as a fine adjustment to the required pressure.
Record the measurand (e.g.) Voltage, reading at each applied pressure.
Zero Display Reading
Both the input and output windows can be set to zero by operation of the ZERO key,
providing that the displayed reading is already within 5% of zero. To zero either the
INPUT (Measurand) or OUTPUT (Source) windows, proceed as follows (e.g.),
TASK: BASIC
TASK: BASIC
ZERO
VOLTAGE
PRESSURE INT
ZERO
INPUT
V
VOLTAGE
bar
PRESSURE INT
ZERO
OUTPUT
TASK: BASIC
V
bar
ZERO VOLTAGE DC ?
YES
NO
TASK: BASIC
ZERO
VOLTAGE
PRESSURE INT
ZERO
INPUT
9
V
VOLTAGE
V
bar
PRESSURE INT
bar
ZERO
OUTPUT
ZERO INTERNAL SENSOR ?
YES
NO
K239 Issue No.2
Making Measurements
Basic Mode (Task BASIC)
This instrument will power up in this mode the first time that it is used. To select BASIC
from any other task, press the TASK key and select BASIC and press the ENTER key.
BASIC mode is fully described in the Getting Started, section (see page 9).
Pressure Transmitter (P-I) Task
The transmitter is energised from an external supply via a barrier as shown below.
SAFE
Ext Press. Source
(Indicator Only)
+
+
P
I
EXT
SUPPLY
-
-
BARRIER
SAFE
max 30V
Pressure
Regulator
DPI 610 IS
TASK : P-I
SNAPSHOT MODE
CURRENT
mA
PRESSURE INT
bar
F1
F2
Set Units
Note: If the four units displayed are not the units required, press SETUP, select
SETTINGS and refer to Page 31.
K239 Issue No.2
10
Making Measurements
Pressure Converter (Pressure to Pressure) Task
USE RS2
IN SAF 32
ARE A E
ONLY
m
Testing a converter requires one pressure to be applied to the unit under
test (UUT) and another (converter output) to be measured. The additional
measurement is provided by the external transducer option. P-P task
configures the instrument to output pressure and to measure pressure.
If necessary, units may be changed with the INPUT and OUTPUT keys.
Note: Match pressure ranges to give required accuracy and avoid
overpressure. External pressure is displayed in the input window.
Voltage Output Pressure Transmitter (P-V) Task
SAFE
Ext Press. Source
(Indicator Only)
+
P
V
+
-
+
EXT
SUPPLY
-
BARRIER
SAFE
Pressure
Regulator
max 30V
DPI 610 IS
TASK : P-V
SNAPSHOT MODE
VOLTAGE
V
PRESSURE INT
bar
F1
m
F2
If required, change pressure units using the OUTPUT key.
11
K239 Issue No.2
Making Measurements
Current to Pressure Converter (I-P) Task
m
Use the Up (Ù) and Down (Ú) cursor keys to adjust the loop current to the
required value. Alternatively, press ENTER and use cursor keys to enter a finite
value. Cursor keys can then be used to nudge the output either up or down.
If required, change pressure units with INPUT key. A flashing CHECK LOOP
message indicates either an open circuit supply loop (or no external supply).
Pressure Switch Tests (P-SWITCH) Task
m
Contact state will be shown on display. When contacts close, buzzer sounds.
m
To run switch test, close vent valve and press the RUN (F1) key.
m
Using the handpump, increase the applied pressure to just below the switch
operating point. Screw the volume adjuster in until the switch operates (the
operating pressure of the switch is then written to the display).
m
Reduce pressure until the switch releases (indicated by the switch symbol). The
release pressure is then written to the display and the hysteresis displayed.
K239 Issue No.2
12
Making Measurements
Pressure to Display (P-DISPLAY) Task
P-Display is a special application of Datalog. To use this mode, select Datalog from the
Store Mode menu as detailed on Page 30. Connect the device under test to the
instrument as shown below.
Ext Press. Source
(Indicator Only)
TEST UNIT
(Dial Gauge)
Pressure
Regulator
max 30V
DPI 610 IS
TASK : P-DISPLAY
SNAPSHOT MODE
DISPLAY
bar
PRESSURE INT
CHANGE
VALUE
F1
F2
m
Press TASK and select P-DISPLAY. If required, use OUTPUT key to change
pressure units.
m
Setup a datalog file as detailed on Page 28.
Note: TRIGGER field, automatically set to KEYPRESS, cannot be changed.
m
Apply a series of test pressures to the device under test. Enter displayed
reading at each pressure and log each point (e.g.),
TASK: P-DISPLAY
LOG FILE: A1
TASK: P-DISPLAY
LOG FILE: A1
DISPLAY
DISPLAY
ENTER VALUE
TASK: P-DISPLAY
LOG FILE: A1
+
PRESSURE INT
CHANGE
VALUE
m
DISPLAY
STORE
bar
PRESSURE INT
CHANGE
VALUE
bar
PRESSURE INT
LOG
NOW
bar
STOP
LOGGING
After logging final test point, terminate as follows (e.g.),
FINAL POINT
TASK: P-DISPLAY
LOG FILE: A1
DISPLAY
STORE
PRESSURE INT
LOG
NOW
13
bar
STOP
LOGGING
K239 Issue No.2
Making Measurements
Leak Test (LEAK TEST) Task
Ext Press. Source
(Indicator Only)
EXTERNAL
SYSTEM
Pressure
Regulator
max 30V
CAT II
TASK : LEAK TEST
SNAPSHOT MODE
bar
PRESSURE INT
180
60
WAIT
DURATION
secs
secs
START PRESS
STOP PRESS
bar
bar
PRESS CHANGE
LEAK RATE
CHANGE
VALUE
F1
bar
bar/m
RUN
F2
m
If required, use the OUTPUT key to change pressure units.
m
Setup the leak test WAIT and DURATION times to the required values as shown
below. A minimum wait period of 3 minutes is recommended.
TASK : LEAK TEST
SNAPSHOT MODE
SET WAIT TIME
bar
PRESSURE INT
WAIT
DURATION
CION
180
SET DURATION
bar
PRESSURE INT
WAIT
DURATION
secs
secs
60
TASK : LEAK TEST
SNAPSHOT MODE
CION
secs
secs
180
60
START PRESS
STOP PRESS
bar
bar
START PRESS
STOP PRESS
bar
bar
PRESS CHANGE
LEAK RATE
bar
bar/m
PRESS CHANGE
LEAK RATE
bar
bar/m
CHANGE
VALUE
CHANGE
VALUE
RUN
RUN
m
Close the vent valve and pressurise the external system to the required LEAK
TEST pressure.
m
Press the RUN (F2) key to start the leak test. When completed, the bleeper
sounds and the leak test results are written to the display.
K239 Issue No.2
14
Making Measurements
Transmitter Simulator (TX SIM) Task
When used with an external voltage source (see Page 22), provides a current output
proportional to the calibrator’s measured output pressure (indicated pressure on
indicator only version). Select task TX SIM. Press EXIT to skip setup screen if
parameters are correct.
On completion of Tx SIM setup, the display is configured as follows (e.g.).
TASK : TX SIM
SNAPSHOT MODE
PRESSURE INT
OK
CURRENT
bar
mA
CHANGE
VALUE
Connect an external power source to the output loop as detailed on Page 22.
To subsequently change any of the Tx SIM scaling parameters, press CHANGE VALUE
key (F1) to obtain the TX Simulation setup display.
To change the pressure units, press INPUT and select the required scale units. If the
required scale units are not listed, press SETUP, select SETTINGS and proceed as
detailed on Page 31.
15
K239 Issue No.2
Making Measurements
Relief Valve Test (REL VALVE) Task
To carry out a relief valve test, press TASK and select REL VALVE. Connect the output
pressure port of the instrument to an external system as shown below.
m
To change the pressure units, if required, press INPUT and select the required
units by means of the cursor keys.
m
Close the vent valve and, using the handpump or external pressure supply,
apply pressure to the relief valve under test.
m
When the relief valve operates, the maximum recorded pressure indicates the
operating point of the valve.
m
Record the test results.
Note: The STORE key can be used for this purpose. Use right cursor key
initially , followed by up/down keys to enter Snapshot text).
m
Open vent valve to release test pressure.
Note: If using external pressure supply, isolate supply before opening the
vent valve.
K239 Issue No.2
16
Advanced Task
Select Input
General
Advanced task allows the user to configure the instrument to monitor one of a number
of different input measurands (Inputs) and outputs (Sources). Additionally, five process
functions, Tare, Max/Min, Filter, Flow and % Span can be applied to the input
functions.
Select Input
To select an input channel for display, select ADVANCED Task from the task menu and
proceed as follows. If, in addition to process functions, a range of units is available for
the selected channel, a UNITS soft box (actioned by the F2 function key), will be written
to the display.
The following procedure shows the method of input channel selection and the method
of changing units (e.g.),
Note: Left/right arrow keys function as page up/down keys.
Refer to pages 18 to 21 for details of process functions.
Ambient Temperature Measurement
To set up the instrument to read ambient temperature, proceed as follows (e.g.),
INPUT
SELECT INPUT
SELECT AIR
TEMPERATURE
UNITS
SELECT INPUT
AMBIENT TEMP
NO INPUT
SELECT UNITS
CELSIUS
FAHRENHEIT
PROCESS
UNITS
Note: Ensure that the temperature reading has stabilised.
17
K239 Issue No.2
Advanced Task
Process Functions
Process Functions
If required, the following process functions are available on the Measurand (INPUT)
display but only in ADVANCED task. If the instrument is in any other mode i.e. BASIC
or any other task mode, the input and output displays must first be configured in
ADVANCED task.
Note: PROCESS functions are not available to the output (SOURCE) channel.
A summary of the process functions follows.
m
Tare
Allows either the current display value or a manually
entered value to be tared off display parameter reading.
m
Max/Min
Displays running Max/Min and Present display values
simultaneously. Resettable via F1 key.
m
Filter
Applies low pass filter function to displayed parameter.
Filter characteristics (Settling time and Band) are user
programmable.
m
Flow
Applies square root function to displayed parameter.
m
% Span
Converts displayed parameter reading to a percentage
of span. Span definable via the F1 key.
Following selection of ADVANCED from the task menu, press the INPUT key. Use the
Up (Ù) or Down Ú) cursor keys to select the required input. Press the PROCESS
(F1) key and use the Left ×) or Right (Ø) cursor keys to enable the process on/off
(e.g.),
Press ENTER to switch the process ON with existing settings or F1 to change process
settings (where applicable).
K239 Issue No.2
18
Advanced Task
m
Process Functions
Tare Process Function
To set up a Tare function, enable TARE from the process menu and press F1 to
enter the Tare SETTINGS functions.
Disable TARE by entering process menu and turning the function OFF.
Note: Last TARE setting is retained and will be applied when function is
next enabled.
Tare Current Measurand Reading To tare off the current display reading,
proceed as follows (e.g.),
TASK : ADVANCED
SNAPSHOT MODE
TASK : ADVANCED
SNAPSHOT MODE
T
VOLTAGE
PRESSURE INT
MAKE READING
ZERO
V
VOLTAGE
V
bar
PRESSURE INT
bar
TARE OFF
A VALUE
SETTINGS
Tare Off An Entered Value To tare off an entered value current, proceed as follows
(e.g.),
Note: Display shows the last entered Tare Value
TASK : ADVANCED
SNAPSHOT MODE
VOLTAGE
PRESSURE INT
MAKE READING
ZERO
ENTER VALUE
TASK : ADVANCED
SNAPSHOT MODE
V
bar
TARE OFF
A VALUE
VOLTAGE
PRESSURE INT
VALUE:
10.000
NEW VALUE: _
19
V
bar
K239 Issue No.2
Advanced Task
m
Process Functions
Min/Max Process Function
To set up an input display to show min/max and present measurand reading,
enable MIN/MAX from the process menu and press F1 (SETTINGS) to provide
RESET function. The display is now reconfigured to show the max/min values
as follows (e.g.),
Reset Max/Min display at any time by pressing
the F1 key.
To quit max/min, press INPUT, select MAX/MIN
from process menu and switch the function off.
m
Filter Process Function
To apply the low pass filter to a selected measurand, enable FILTER from the
process menu and press F1 (SETTINGS) to provide access to the filter
parameters. Two settings are required, Time to Settle and Band.
To examine the current filter settings and exit without change, press the EXIT
key.
To setup procedure is as follows.
SET FILTER
SELECT VALUE
SET FILTER
TIME TO SETTLE
TIME =
2
Seconds
TIME TO SETTLE
TIME =
2
Seconds
BAND = MAX AMPLITUDE
OF NOISE TO BE
FILTERED, CHANGES
GREATER THAN BAND
BYPASS THE FILTER
BAND = MAX AMPLITUDE
OF NOISE TO BE
FILTERED, CHANGES
GREATER THAN BAND
BYPASS THE FILTER
BAND =
BAND =
1.5
% FS
CHANGE
VALUE
K239 Issue No.2
CHANGE
VALUE
20
1.5
% FS
SELECT VALUE
Advanced Task
m
Process Functions
Flow Function
To apply the flow function to a selected measurand, enable FLOW from the
process menu and press ENTER. The square root symbol is displayed beside
the measurand to indicate that the FLOW function is active (e.g.)
TASK : ADVANCED
SNAPSHOT MODE
VOLTAGE
PRESSURE INT
m
V
To cancel FLOW, press INPUT and turn function
OFF at the process menu.
bar
% Span
To convert a selected measurand display from a numerical value to a
percentage of full scale reading, enable SPAN from the process menu and
press F1 (SETTINGS) to provide access to the span definition parameters. Two
span definitions are required, Zero and Full Scale.
To leave span at current setting, press EXIT.
To define zero and full scale settings, proceed as follows.
To cancel % SPAN, press INPUT and turn function OFF at the process menu.
21
K239 Issue No.2
Advanced Task
Select Output
Select Output
To select an output channel for display, select ADVANCED mode from the Task menu
and proceed as follows. If a channel has a range of units available, a UNITS soft box
(actioned by the F2 function key), will be also be written to the display.
The following procedure shows the method of output channel selection. Note that there
are two pages of options. The second page can be obtained directly from the first by
pressing the RIGHT cursor key
OUTPUT
SELECT OUTPUT
PRESSURE INT
PRESSURE EXT
mA STEP
mA RAMP
mA VALUE
SELECT OUTPUT
SELECT OUTPUT
NO OUTPUT
UNITS
Note: Left/right arrow keys function as page up/down keys.
To change the output units (Pressure channels only), select the channel with the cursor
keys and press F2 before pressing ENTER.
Electrical Outputs (Loop Power)
All the electrical outputs, the output loop must be powered from an external supply
(current sinking).
External connections to the front panel of the instrument are shown below.
CURRENT SINKING
SAFE
max 30V
CAT II
-
Vin
mA in
55mA
max
LOAD
Ext d.c. Supply
(30V Max)
+
mA Sink
BARRIER
SAFE
K239 Issue No.2
22
Advanced Task
Select Output
mA Step
To select one of the electrical output programs, press the OUTPUT key and proceed as
follows (e.g.),
On selection of (e.g.) Linear, the output display window changes to show the selected
program of output currents (e.g.),
TASK : ADVANCED
SNAPSHOT MODE
TASK : ADVANCED
SNAPSHOT MODE
bar
PRESSURE INT
4
8
CURRENT
12
16
STOPPED
bar
PRESSURE INT
LINEAR 4-20 mA STEP
LINEAR 4-20 mA STEP
20
4
mA
8
CURRENT
RUN
12
16
RUNNING
20
mA
STOP
m
Connect an external power source as shown on Page 22.
m
Press RUN (F1) to run program. A flashing status display CHECK LOOP
indicates a fault in the external loop i.e. supply fault or open circuit.
Note: The dwell time at each step is approximately 10 seconds.
m
Press STOP (F1) when running to stop at any point. Press RUN (F1) to
resume.
23
K239 Issue No.2
Advanced Task
Select Output
mA Ramp
Press the OUTPUT key and select mA Ramp in a similar manner to that shown above.
m
Define ramp required by entering START and END current values as shown
below (e.g.),
TASK : ADVANCED
SNAPSHOT MODE
PRESSURE INT
TASK : ADVANCED
SNAPSHOT MODE
bar
ENTER VALUE
PRESSURE INT
START
OUTPUT
END
bar
ENTER VALUE
START
OUTPUT
END
STOPPED
CURRENT
mA
CURRENT
START
STOPPED
mA
START
m
Connect an external power source as shown on Page 22.
m
Press START (F1) to run the program. A status display CHECK LOOP
indicates a fault in the external loop i.e. supply fault or open circuit.
Note: The ramp cycle (min to max or max to min), is approximately 60
seconds.
TASK : ADVANCED
SNAPSHOT MODE
PRESSURE INT
TASK : ADVANCED
SNAPSHOT MODE
bar
ENTER VALUE
PRESSURE INT
START
OUTPUT
END
ENTER VALUE
START
OUTPUT
END
STOPPED
CURRENT
mA
CURRENT
START
m
bar
RAMPING
mA
STOP
Press STOP (F1) when running to stop at any point. Press CONTINUE (F1) to
resume from point of pause or RESET (F2) to return to start point.
TASK : ADVANCED
SNAPSHOT MODE
PRESSURE INT
TASK : ADVANCED
SNAPSHOT MODE
bar
ENTER VALUE
PRESSURE INT
START
OUTPUT
END
CURRENT
bar
START
OUTPUT
END
STOPPED
mA
mA
CURRENT
PAUSED
CONTINUE
RESET
STOP
K239 Issue No.2
24
ENTER VALUE
Advanced Task
Select Output
mA Value
Press the OUTPUT key and select mA Value from the Output menu. The procedure is
shown below (e.g.),
SELECT OUTPUT
PRESSURE INT
PRESSURE EXT
mA STEP
mA RAMP
mA VALUE
SELECT OUTPUT
SET LEVEL
TASK : ADVANCED
SNAPSHOT MODE
bar
PRESSURE INT
OUTPUT
NEW VALUE
CURRENT
OK
mA
m
Connect an external power source as shown on Page 22.
m
Use Up (Ù) and Down (Ú) cursor keys to adjust output current level. Whilst the
loop is made, a status display indicates OK. A status display CHECK LOOP
indicates a fault in the external loop i.e. supply fault or open circuit.
25
K239 Issue No.2
Advanced Task
Task Setup/Removal
Define New Task
To define a new task, proceed as follows.
m
Select ADVANCED from TASK menu.
m
Using the INPUT key, select the required measurand as the input display and
setup any process functions required.
m
Using the OUTPUT key, select the required measurand as the output display.
m
Press TASK and select Free. Enter new task name as follows (e.g.),
TASKS
ADVANCED
USER TASKS
SELECT USER
TASK
USER TASKS
free
free
free
free
free
USER TASKS
CO2INLET
free
free
free
free
ENTER TASK NAME
SAVE
NEW TASK
USER TASKS
CO2INLET
free
NEW TASK SAVED
TASK : CO2INLET
SNAPSHOT MODE
EXIT
VOLTAGE
V
PRESSURE INT
bar
free
SAVE
NEW TASK
CLEAR
TASK
On completion of the above procedure, the display reverts to newly setup task
as shown.
Clear Task
To clear a user defined task, select TASK and proceed as follows (e.g.),
K239 Issue No.2
26
Memory Operations
Store
Saving Display (Snapshot) or Datalog
Memory operations depend upon how Store mode has been set-up. Three options are
available None, Snapshot and Datalog. Refer to SETUP for details.
Store Operations
To store any display (menu displays excepted), press the STORE key. This saves the
current display to the next available location. Supporting text (10 characters) may be
appended. Twenty memory locations are available on a cyclic buffer. When all 20 have
been used, store operations overwrite existing locations, starting at Location 1.
TASK: ADVANCED
SNAPSHOT MODE
TASK: ADVANCED
SNAPSHOT MODE
ENTER TEXT
VOLTAGE
V
PRESSURE INT
bar
VOLTAGE
STORE
SNAPSHOT 19
TEXT :
V
bar
PRESSURE INT
Recalling Stored Data
To recall a previously stored display, press the RECALL key. This recalls the last
display saved. Press the Left (×) or Right (Ø) cursor keys to recall the previous or next
locations respectively. To exit RECALL, press the EXIT key
SELECT LOCATION
TASK: ADVANCED
SNAPSHOT 2 TEST19
RECALL
VOLTAGE
V
PRESSURE INT
bar
27
EXIT
K239 Issue No.2
Memory Operations
Datalog
Datalog Operations
Datalog is a special application of store mode which enables the calibrator to either
automatically log displays at preset time intervals or to manually log a display on
operation of the STORE key. Logged data is written to a user specified file.
To set up a datalog file, proceed as follows.
m
Select a task, other than BASIC. If using ADVANCED, set up required Source
and Output parameters.
m
Use SETUP to select Datalog from the Store Mode Menu (See Page 30).
Auto Log (Timer)
Press STORE and setup the datalog file parameters as shown below. Use CHANGE
VALUE (F1) followed by cursor keys to set field values. For Auto Log, setup TRIGGER
field to PERIODIC.
ENTER VALUE
DATA LOGGING
STORE
FILENAME :
21/02/99
DATE :
21/02/99
TIME :
12:29
TIME :
12:29
TRIGGER:
PERIODIC
TRIGGER :
PERIODIC
PERIOD :
00:05
PERIOD :
00:05
POINTS :
10
POINTS :
10
CHANGE
VALUE
START
LOGGING
CLEAR
(ANY KEY)
LOGFILE2
DATE :
CHANGE
VALUE
TASK : CO2INLET
POINT 10 OF 10
DATA LOGGING
FILENAME :
VOLTAGE
V
PRESSURE INT
bar
START
LOGGING
Manual Logging
Enter the file details as shown above and select KEYPRESS for TRIGGER field.
Screen reverts to displayed parameters showing setup file as shown below (e.g.),
DATA LOGGING
FILENAME :
LOGFILE3
FILENAME :
LOGFILE3
DATE :
21/02/99
DATE :
21/02/99
TIME :
12:29
TIME :
12:29
TRIGGER :
KEYPRESS
TRIGGER :
KEYPRESS
PERIOD :
00:05
PERIOD :
00:05
POINTS :
10
POINTS :
10
CHANGE
VALUE
m
TASK: ADVANCED
LOG FILE : LOGFILE3
DATA LOGGING
START
LOGGING
CHANGE
VALUE
VOLTAGE
V
PRESSURE INT
bar
START
LOGGING
Use a combination of STORE and LOG NOW (F1) to log events as follows.
TASK: ADVANCED
LOG FILE : LOGFILE3
TASK: ADVANCED
LOG FILE : LOGFILE3
VOLTAGE
STORE
PRESSURE INT
LOG
NOW
K239 Issue No.2
V
VOLTAGE
V
bar
PRESSURE INT
bar
STOP
LOGGING
28
Memory Operations
Datalog
Recall Datalog Files
To recall a datalog file to the display, ensure that DATALOG is selected from the
SETUP menu, proceed as follows (e.g.),
Downloading Datalog Files
WARNING: This procedure must be carried out in a SAFE area.
Connect the RS232 socket of the instrument into either the COM1 or COM2 port of the
PC. Ensure that the RS232 parameters at the PC end match those of the instrument.
The RS232 parameters of the instrument can be checked as detailed on Page 32. Set
up a file on the PC to receive the data, (e.g.) in the Windows Terminal program.
To download the file, proceed as follows.
RECALL
SELECT FILE
DIRECTORY
G23565
OUTLET16
FEEDPRESS14
FEEDPRESS11
G3459
DIRECTORY
G23565
OUTLET16
FEEDPRESS14
FEEDPRESS11
G3459
file 1 of 9
REVIEW
FILE SUMMARY
FILENAME :
G23565
DATE :
21/02/99
TIME :
15 : 00
TRIGGER :
PERIODIC
PERIOD :
00 : 10
FILE SIZE :
1792
file 1 of 9
ERASE
REVIEW
LOGGED DATA
REVIEW
FILE DETAILS
REVIEW
LOGGED DATA
TRANSMIT
FILE
Delete Datalog Files
To delete a logged file, proceed as follows. Alternatively, to delete all logged files
simultaneously, select ERASE ALL FILES (F2) at the erase screen.
29
K239 Issue No.2
Using Setup
General
SETUP mode is available in all modes except BASIC. It permits the setup of the
following instrument parameters.
l
Store Mode - None, Snapshot, Datalog.
l
Contrast.
l
Instrument Settings - Units, Language, RS232 parameters, Powerdown,
and Calibration Routines (Refer to page 33 for Calibration details).
Contrast
Select CONTRAST from the Setup Menu and proceed as follows.
SELECT OPTION
SETUP
SETUP
SELECT LEVEL
STORE MODE
CONTRAST
SETTINGS
CONTRAST
DRY CELL LEVEL
ADJUST CONTRAST
EXIT
Store Mode
Select STORE MODE from the Setup menu and select required mode as follows.
SELECT OPTION
SETUP
SETUP
STORE MODE
STORE MODE
CONTRAST
SETTINGS
SELECT OPTION
NONE
SNAPSHOT
DATALOG
DRY CELL LEVEL
Calibration
Calibration routines are password protected. Refer to Calibration Section, Page 34 for
details of use.
K239 Issue No.2
30
Using Setup
Settings - Select Setup Option
To select one of the Settings options from the Setup menu, proceed as follows.
Units
Select (pressure) Units from the Settings menu and proceed as follows.
Define Special Units
Select (pressure) Units from the Settings menu, and select Special Units and proceed
as follows.
31
K239 Issue No.2
Using Setup
Language
RS232
Select RS232 from the Settings Menu and proceed as follows.
Note: Use of the RS 232 communications interface is only permitted in a SAFE
area. The settings shown above are the default settings.
Powerdown
Select Powerdown from the Setup menu. The method of setting up the Powerdown
(Auto Power Off) function is similar to that detailed for the Backlight (Page 30).
POWERDOWN
SELECT OPTION
POWERDOWN
TIMEOUT MODE
OFF
TIMEOUT MODE
TIMER
TIMEOUT = 10 Seconds
INSTRUMENT WILL TURN
OFF AFTER TIMEOUT
PERIOD OF INACTIVITY.
ONLY VALID IN TIMER
MODE OF OPERATION
TIMEOUT = 10 Seconds
INSTRUMENT WILL TURN
OFF AFTER TIMEOUT
PERIOD OF INACTIVITY.
ONLY VALID IN TIMER
MODE OF OPERATION
CHANGE
VALUE
SELECT PERIOD
CHANGE
VALUE
POWERDOWN
POWERDOWN
TIMEOUT MODE
TIMER
TIMEOUT MODE
TIMER
TIMEOUT = 10 Seconds
INSTRUMENT WILL TURN
OFF AFTER TIMEOUT
PERIOD OF INACTIVITY.
ONLY VALID IN TIMER
MODE OF OPERATION
INSTRUMENT WILL TURN
OFF AFTER TIMEOUT
PERIOD OF INACTIVITY.
ONLY VALID IN TIMER
MODE OF OPERATION
TIMEOUT =
CHANGE
VALUE
SELECT VALUE
30
CHANGE
VALUE
If TIMER mode is selected, following a period of inactivity, the instrument will
automatically power off after the preset TIMER period.
If OFF is selected, auto power off is inhibited and once switched on, the instrument will
remain ON until it is manually switched OFF.
K239 Issue No.2
32
Calibration
General
The instrument is supplied by the manufacturer, complete with calibration certificate(s).
The re-calibration interval will depend on the total measurement uncertainty which is
acceptable for a particular application. In order that the instrument remains within the
quoted accuracy, it is suggested that it’s calibration be checked at 90 day intervals.
The DPI 610 is a very precise measuring instrument and the test equipment and
conditions of test must be suitable for the type of work. The use of a Class A
compensated deadweight tester is essential. The tests should be carried out in a
controlled environment by a competent, trained person.
If, when the accuracy of the instrument is checked, it is found to fall outside the
specification, calibration adjustment can be undertaken to compensate errors.
The manufacturer offers a comprehensive and, if required, NAMAS accredited
calibration service.
Calibration Check
At the chosen interval, the instrument readings should be compared with a known
standard. Any deviations between the instrument and the standard should be noted,
taking due account of the traceability (accuracy to a National Standard). If these
deviations exceed the published tolerance, or any other suitable chosen performance
standard, then the user may wish to carry out a calibration adjustment.
It is recommended that measurements be checked at 0, 20, 40, 60, 80 and 100% of full
scale on an ascending and descending run.
Calibration Adjustment
If the instrument is operating correctly, only zero and full scale calibration will vary. Any
excessive non-linearity or temperature effects indicate a fault. The instrument should
be returned to a qualified service agent.
33
K239 Issue No.2
Calibration
General Procedures
The following general hints are provided as a guide to calibration procedures. Full
calibration procedures are described in Druck publication number K235.
Do
Use high quality Repeatable and Linear pressure sources and allow adequate
stabilisation time before calibration (minimum 1 hour).
Conduct the calibration in a temperature and preferably, humidity controlled
environment. Recommended temperature is 21°C, ±2°C.
Use deadweight testers carefully and away from draughts.
Using the Calibration Menu
The calibration routines are selected from the Setup menu as detailed on page 31.
Enter the calibration PIN number, initially set to 4321, press ¬ and the Calibration
Menu will be displayed as follows. It is recommended that the PIN number be changed
as soon as possible.
Select the item to calibrate from the menu as shown above and follow the calibration
procedure outlined on the display. The following test equipment will be required.
Pressure Measurement Channels (Internal and External)
m
Deadweight Tester.
Voltage Ranges (5V and 30V)
m
Voltage source.
Current Inputs and Outputs
m
Digital Milliammeter.
K239 Issue No.2
34
Calibration
Temperature
m
Precision Temperature Meter.
On completion of calibration routines, exit the calibration mode by pressing the EXIT
function key.
Cleaning Instructions
Clean the case of the instrument by using a damp cloth and mild detergent.
Note: DO NOT use any solvents for cleaning purposes.
35
K239 Issue No.2
Service
Approved Service Agents
The following are approved Service Agents for Druck Instruments.
FRANCE
JAPAN
Druck SA, 19 Rue Maurice Pellerin,
92600 Asnières, France.
Druck Japan KK, Medie Corp Building 8,
2-4-14 Kichijyoji-Honcho, Musashino,
Tokyo 180, Japan.
Tel: (1) 41 32 34 64
Fax: (1) 47 93 00 48
Tel: 422 20 7123
Fax: 422 20 7155
GERMANY
UK
Druck Messtechnik GmbH,
Lessingstrasse 12, 61231 Bad Nauheim,
Germany.
Druck Ltd., Fir Tree Lane, Groby,
Leicester, LE6 OFH.
Tel: 6032 35028
Fax: 6032 71123
Tel: 0116 231 7100
Fax: 0116 231 7103
HOLLAND
USA
Druck Nederland B.V., Postbus 232,
Zuideinde 37, 2991 LJ Barendrecht,
The Netherlands.
Druck Incorporated, 4 Dunham Drive,
New Fairfield, Connecticut 06812, USA.
Tel: 203 746 0400
Fax: 203 746 2494
Tel: 1806 11555
Fax: 1806 18131
ITALY
Druck Italia Srl., Via Capecelatro 11,
20148 Milano, Italy.
Tel: 2 48707166
Fax: 2 48705568
K239 Issue No.2
36
Appendix 1
HYDRAULIC CALIBRATOR
VERSION
K239 Issue No. 2
HYDRAULIC CALIBRATOR VERSION
Operation
Introduction
This version of the DPI 610 provides manual generation of hydraulic pressure and
consists of a screw-press with a priming pump and priming isolation valve as shown
below. The bleed pipe connections are also shown in Figure A1.
LEED HOSE ASSEM LY
DOWTY WASHER
SCREWPRESS
ISOLATION VALVE
PRIMING FLUID INLET
PRIMING PUMP
LEED HOSE ASSEM LY
Figure A1 - DPI 610 HC Connections
The internal hydraulic parts are brass, stainless steel, copper, nylon and fluorocarbon
rubber (Viton). The hydraulic fluid can be either demineralised water or one of the
hydraulic fluids listed in Table A1.
Caution: Only use the fluids recommended. DO NOT mix hydraulic fluids.
ISO 3448
Viscosity
grade
Approx. SAE
Viscosity
Classification
Shell
Esso
Mobil
VG10
5W
Tellus R10
Nuto H10
Velocite No.6
Tellus T15
Tellus V15
Nuto H15
Tellus 22
Tellus R22
Nuto H22
DTE 22
Tellus V32
Nuto H32
DTE Oil Light
DTE 24
VG15
VG22
VG 32
VG 37
10W
Tellus 37
Tellus R37
Tellus T37
Tellus V37
Table A1 - Recommended Hydraulic fluids
37
K239 Issue No. 2
HYDRAULIC CALIBRATOR VERSION
Operation
Safety Instructions
WARNING
HYDRAULIC FLUID IS INJURIOUS. OBSERVE RELEVANT HEALTH AND
SAFETY PRECAUTIONS. USE APPROPRIATE PROTECTIVE BARRIERS
AND EYE PROTECTOR.
BEFORE APPLYING PRESSURE, EXAMINE ALL FITTINGS AND
EQUIPMENT FOR DAMAGE AND ENSURE THAT ALL EQUIPMENT IS TO
THE CORRECT PRESSURE RATING.
DO NOT EXCEED THE MAXIMUM WORKING PRESSURE OF THE
INSTRUMENT (INDICATED ON START-UP SCREEN AT SWITCH-ON).
Caution: Observe absolute cleanliness when using the instrument. Severe
damage can be caused if equipment connected to this instrument is
contaminated. Connect only clean equipment to the instrument. To avoid any
contamination, an external filter is recommended.
Preparation for Use
/
Fit the bleed pipe connection to the priming port using a bonded seal as shown
in Figure A1.
/
Ensure that the screwpress is wound fully in (clockwise).
/
Ensure that the isolation valve is open (fully anticlockwise).
/
Connect the device or system under test to the pressure port using a bonded
seal as shown in Figure A2.
WARNING
ENSURE THAT THE CONNECTING LINE TO THE EXTERNAL DEVICE OR
SYSTEM IS CAPABLE OF WITHSTANDING THE LINE PRESSURE TO BE
APPLIED.
Note: A bleed point must be provided on the external device.
K239 Issue No. 2
38
HYDRAULIC CALIBRATOR VERSION
Operation
Figure A2 - Priming/Test Set-up
Bleeding the System
Before any measurements can be made , the hydraulic system needs to be primed and
bled free of air. During the following operations, prepare for fluid spillage and provide a
suitable receptacle for collecting the spillage.
(1)
Prepare for use as detailed on page 39.
(2)
Fill a suitable container with the required hydraulic fluid and place the priming
inlet assembly hose into the fluid.
(3)
Open the bleed valve on the Unit Under Test (UUT). If possible, fit a hose to the
bleed point and place this in a container of the same fluid.
(4)
Using the priming pump, pump hydraulic fluid into the instrument and the
connected system. Monitor the hydraulic fluid level, ensuring that the priming
hose stays below the fluid level and is not allowed to suck in air. Top up
hydraulic fluid level as necessary.
39
K239 Issue No. 2
HYDRAULIC CALIBRATOR VERSION
Operation
(5)
Continue use of the priming pump until only hydraulic fluid and no air is expelled
from the bleed point.
(6)
Close the bleed point when the priming pump is at the bottom of its stroke (fully
pushed in) and slowly wind out the screwpress to its fullest extent to draw in
further hydraulic fluid (approx. 7cc).
(7)
Switch the instrument ON and, still using the priming pump, pressurise the
system to approximately 2 bar.
(8)
Close the isolation valve and remove the connection to the priming/fluid inlet
port.
Operation
To obtain a pressure reading, proceed as follows.
(1)
Switch the instrument ON and select the required TASK.
(2)
Rotate the screwpress clockwise to increase the applied pressure.
Note: When hydraulic fluid is compressed and flows through a restriction, there is
an increase in temperature which, in turn, has an effect on pressure. Allow
sufficient time for this pressure reading to stabilise before recording or
logging a reading.
(3)
When the test is complete, reduce the pressure in the system to zero by turning
the screwpress anticlockwise. Before disconnection of the UUT, open the
isolation valve to bleed off any residual pressure.
(4)
Remove the connection to the UUT and fit a blanking plug into the instrument’s
pressure port. Clean any spilt fluid off the instrument case.
Draining the Hydraulic Fluid
To drain the hydraulic fluid from the instrument, proceed as follows:
(1)
Turn the isolation valve fully anticlockwise. Turn the instrument onto its left hand
side (pressure port nearest to workbench). Place receptacle below the
pressure port to collect hydraulic fluid.
(2)
Drain the system by slowly winding in the screwpress and then depressing the
priming pump plunger to express any fluid remaining in the instrument.
(3)
If necessary, apply an air line to the priming fluid inlet to clear any remaining
fluid out of the instrument.
K239 Issue No. 2
40
HYDRAULIC CALIBRATOR VERSION
Operation
Flushing - Replenishing or Changing the Hydraulic Fluid
If necessary, to remove any contaminants, flush out the hydraulic system as follows.
(a)
Connect a priming hose assembly to the fluid inlet port and the pressure port as
shown below
Figure A3 - DPI 610 HC - Flushing/Filling Connections
(b)
Fill the priming fluid container with fresh hydraulic fluid of the required type.
Using the priming pump, pump fresh hydraulic fluid through the system until
clean hydraulic fluid, free of air bubbles, emerges into the container at the
output port. Discard the contaminated fluid expressed during this process.
(c)
Remove the hose located to the output port and, to prevent the ingress of any
contaminant, fit a blanking plug in its place.
(d)
Close the isolation valve and remove the priming fluid inlet hose from the
priming inlet.
(e)
Clean off any surplus oil which may have spilled onto the instrument casing.
The instrument is now ready for operation or storage. If storing, apply a label detailing
the type of hydraulic fluid contained in the instrument. For long term storage, it is
recommended that the instrument be drained and stored empty.
41
K239 Issue No. 2
HYDRAULIC CALIBRATOR VERSION
Notes
K239 Issue No. 2
42
Operation
Appendix 2
BASEEFA
CERTIFICATE OF CONFORMITY
K239 Issue No. 2