1
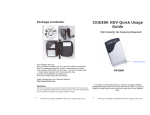
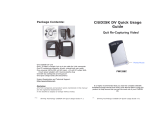
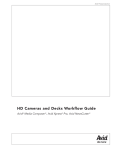
Package Contents:
• One CitiDISK HD unit
• One 1.5 meter in length 6-pin to 4-pin
iLink cable for camcorder
• One CD containing programs, drivers,
manual and user guide
• One universal 100 to 240 volt AC input,
+12 volt DC output Wall-mount power
adapter with reverse polarity plug
• One belt-clip configured carrying pouch
• One Quick Usage Guide (this document)
CitiDISK HD Quick Usage
Guide
Limited Warranty
The manufacturer guarantees that eve
not the batteries embedded inside the encl
policy is exclusive and is warranted by its manufacturers) will be
physical defects in material and workmanship under
year from the date of purchase. If the product proves defective d
warranty period, contact your manufacturer's customer support in o
obtain a Return Authorization Number.
Technical Specifications
Interface
One IEEE1394A port
Cable
Sustained
Transfer Rate
Internal Battery
One 6pin-4pin IEEE1394A standard included
16 MBytes/second
External Power
Operating
Temperature
Relative
Humidity
Storage
Temperature
Dimension
Weight
HD Recording
Capacity
P16
to 90 minutes of non-stop recording
+6V to +18V DC in
0 to 55 Centigrade
FW1256HD
95% Maximum
It is highly recommended that you read the complete
CitiDISK Installation/Usage Manual and Utility Suite
Manual before using this product to help ensure that you
get the most out of your CitiDISK HD
-22 to 65 Centigrade
10 ounces
Shining Technology CitiDISK HD Quick Usage Guide v9.0
Disclaimer
All of the companies and product names mentioned in this user guide
are the registered trademarks of their owners. All of the information
in this user guide is subject to change without notice.
P1
Shining Technology CitiDISK HD Quick Usage Guide v9.0
Do not drop, jar, bump, shock the unit, or expose to sources of
excessive vibration. Keep in mind that CitiDISK HD uses a 2.5”
hard drive, which is similar to those used in laptops. Gently
handle and carry your CitiDISK HD, especially during video
recording. If the battery is not fully charged, user must charge it
for at least 4 hours before any self-powered usage.
Technical Tips
Q: Does CitiDISK HD support HDV? What are the differences?
A: No. CitiDISK HD supports DVCPro, DVCPro50 and DVCPro HD.
DV, DVCPro
DVCPro50
DVCPro HD
HDV
Buttons, Connectors, Switch & Status Lights
Note: The following illustration describes each of the buttons of the
CitiDISK HD (FW1256HD). These three buttons serve as status
indicator lights as well.
POWER Button and
Status Light:
Solid GREEN: unit is on
Blinking GREEN: 5
minutes left in the
internal battery
External Power
In Connector:
Accepts +6V to
+18V DC power
input.
Automatically
switches off and
charges internal
battery when
plugged in
QPlay Button and
Status Light:
Solid ORANGE: Playing
last captured clip
PlayAll Button and
Status Light:
Blinking ORANGE:
Playing all captured
clips from last scene
forward or backward
P2
RECORD Button & Status Light:
Solid RED: Recording
Blinking RED: 5 minutes left in
recording capacity or not connected
Internal Battery Status Light:
G: between 50% and 100%
O: between 50% and 20%
R: below 20%
FireWire Connector:
Connects to camera or
computer
Quick Erase
Button:
Quickly
erases all
files in the
“Media”
folder
HDD Low:
Solid RED when
hard disk
recording
capacity is
below 50%
Internal Battery
Charging Light:
Bright BLUE: Charging
Dim BLUE: Charging
almost complete
Off: Charge complete
or disk accessing
Battery and Main switch:
On: PWR button is enabled
Off: PWR button is disabled
Shining Technology CitiDISK HD Quick Usage Guide v9.0
Encoder
DV
DV
DV
MPEG2
Data Rate
25 Mbps
50 Mbps
100 Mbps
~20 Mbps
Hi-Def’s
NO
NO
YES
YES
Q: What is the recording mode supported by CitiDISK HD for HVX200?
Any file size advantage by setting to 24p /24pA over 30p mode?
A: The CitiDISK HD supports all of the recording modes from HVX200
except 24pN due to such signal is not outputted to FireWire. “24p” –
2:3 pull down & “24pA” – 2:3:3:2 pull down are considered as 30p
recording, user can select “Tool”, “Remove Advanced Pull Down” in
Final Cut Pro to remove the excess frames. No. All of the
1080/60i/30/24p/24pA and 720/30p/24p/24pA recordings generate the
same file size for the same recording period.
Q: Does CitiDISK HD support P2-MXF format? What is the native video
file format supported by CitiDISK HD? What is the advantage not
setting to P2-MXF?
A: No, as the time of this usage guide release. However, user can
update the firmware once such function is released. The CitiDISK HD
supports native MOV( Final Cut Pro Quicktime ) & native AVI2( Adobe
Premier 2.0 & Canopus Edius 4.0 ). By choosing the MOV or AVI2 file
format saves the “MXFÆMOV or MXFÆAVI2” conversion time.
Q: What to prevent rendering clips in Final Cut Pro?
A: Set CiitDISK HD as “MOV” file format. Choose “DVCPro HD
1080i60”( NTSC ) or 1080i50( PAL ) for 1080 modes and “DVCPro HD
720p30” for all of the 720 modes in “Easy Setup”. Also set “Video
Play” setting in “Audio/Video” to “Digital Cinema Desktop Preview”.
Q: Is “DV Control” recording function enabled?
A: Yes in DV25 and DV50 if P2 card is inserted, but not in DV100(
1080 or 720 ). User must manually start/stop the DV100 recording by
pressing the “REC” button on the CitiDISK HD.
Q: Is this an error when all three lights blinking? Does stopping the
recording needed while swapping in & out the external battery?
A: No. This means the CitiDISK HD is waiting to be connected to
computer or HVX200. No. The external battery is hot swappable, also
the internal battery automatically kicks in when the external battery
runs low.
P15
Shining Technology CitiDISK HD Quick Usage Guide v9.0
The “Capture format” column displays the current captured
format. For example, “QuickTime” MOV is the format
User is able to change it by clicking on one of them.
There are two user-definable formats available, which are
“Canopus AVI2” and “P2-MXF”. “P2-MXF” is temporarily not
selectable.
The “Pre-Scene Loop” function will display
user wants to choose. If it’s blanked out, such function is not
supported by this hardware. Up to 6 seconds is allowed for
FW1256C & H model.
The “Continue record at tape end” is “checked” as a default
setting. Un-checking this item will force the Cit
stop recording at tape end or P2 Card is full.
The “Power off” is not checked as default
item will automatically turn off the unit 30 seconds after being
ejected from the computer or a
camera or computer.
Manufacturer Suggested Operating Steps
Shooting Video to the CitiDISK HD Simultaneously with or
without P2 Card
1. Fully charge the unit’s internal battery
2. Choose the favorable native file format for your editing
system and turn on the internal battery switch
3. Securely connect the CitiDISK HD to the camcorder or mount
the external battery/unit together with camcorder
4. Power on the camera first, select the “Recording” mode of the
camera; next, power on the CitiDISK HD unit
5. Insert the P2 Card and control the HD recording from the
camcorder’s “REC” button or manually record the video by
pressing “REC” of CitiDISK HD unit if no P2 Card is inserted
6. Play the last captured scene or play all scenes after you have
completed shooting
7. Connect to computer and copy all of the clips to the internal
hard disk for editing
8. Re-connect the CitiDISK HD to the camcorder and quick erase
all of the captured clips to re-claim the free disk space for
next usage
Shooting Video to P2 Card First Then Archiving to the
CitiDISK HD Later
1. Insert the P2 Card and record the video
2. Plug in the wall-mount power adapter to the CitiDISK HD.
3. Connect the camcorder & the CitiDISK HD, power on the
camera first, and the CitiDISK HD second
4. Set camera’s 1394( FireWire ) to “Host” mode and start the
“Copy P2 Card to Hard Disk” function. Camera may require
formatting the CitiDISK HD before copying process
5. Power off the CitiDISK HD first and camera second
Note: Need to re-format the CitiDISK HD by using Shining
Utility Program if shooting to the CitiDISK HD wanted next
time when the CitiDISK HD was formatted by camera.
P14
Shining Technology CitiDISK HD Quick Usage Guide v9.0
P3
Shining Technology CitiDISK HD Quick Usage Guide v9.0
Mounting on the Hot-shoe
• Insert the CitiDISK HD to Hot-shoe
adapter( sold separately ) and secure
the unit it on hot-shoe
• Plug in the 4-pin FireWire connector
into the camcorder iLink port.
• Tighten the FireWire cable with handle
by cable-tie.
Attaching the Unit Across Belt
• Close both unit and
external battery
compartment, and connect
the FireWire cable.
• Run the flap across belt
and tighten it up.
Mounting Between Shoulder-mount Camera
and G-/V-Mount Battery with Optional
Pocket Adapter
• Slide the CitiDISK HD into the
PCKT1256 pocket adapter (item
not included and sold separately).
• Sandwich the pocket adapter with
the unit in between the camera’s
back and the battery.
• Connect the D-Tap power cord
between unit’s external power
input and one of the D-Tap
receptacles.
P4
Shining Technology CitiDISK HD Quick Usage Guide v9.0
P13
Shining Technology CitiDISK HD Quick Usage Guide v9.0
Charging the Internal Rechargeable Battery
Charging power is drawn from the FireWire
bus power or external power adapter. A
minimum of 4 to 6 hours of charging time
is required before use.
The BLUE LED indicates battery charging is
in progress. Once the battery is fully
charged, the BLUE LED will turn off.
Turning On Internal Battery Before Usage
Turning on the battery:
Slide the main switch to ON position.
Without doing so the CitiDISK HD will not
operate.
Turning off the battery:
Slide the main switch to OFF position while in
storage or in transit so as not to drain the
battery when it’s not in use.
Powering On/Off the CitiDISK HD
Power on:
Toggle the “PWR” button (closest to the
external power adapter input) once.
When the internal battery has less than
5 minutes of power remaining, this
power status light will start to blink and
will stop recording before shutting off
the unit completely.
Power off:
Toggle the GREEN “PWR” button again.
P12
Shining Technology CitiDISK HD Quick Usage Guide v9.0
P5
Shining Technology CitiDISK HD Quick Usage Guide v9.0
Camcorder Controlled HD Recording
*** Avid DV Xpress use proprietary OMF video file format, user need to
import video files prior to editing. Either AVI2 or MOV is importable.
• Set HVX200 camera 1394 “Command” to “BOTH”
mode. Connect the FireWire cable (4-pin end) to
the camcorder. Insert a P2 card.
• Connect the FireWire cable (6-pin end) to
CitiDISK HD. Power on the camera
first, the CitiDISK HD second.
• Press “REC” button on the camcorder to start
recording. The RED button of the CitiDISK HD will
start blinking to solid RED.
• Press the “REC” button off the camcorder again to
stop recording. The RED light will go off.
*** P2-MXF & Canopus AVI2 share the same light indications, user must
use firmware uploader v1.7 or newer to exclusively select them.
Recording Video Manually
• Connect the FireWire cable (4-pin end)
to the camcorder’s iLink portt.
• Connect the FireWire cable (6-pin end) to the CitiDISK HD.
Set the camcorder to “Camera” mode.
• Press the “REC” button on the CitiDISK HD to start
recording. The “REC” light will start to flash to solid RED
indicating video recording is in progress.
• Press the “REC” button of the CitiDISK HD again to stop
recording. The RED light will go off.
Updating the CitiDISK HD Firmware
Proceed by following these steps with caution and do not
un-plug the CitiDISK DV’s power while in operation;
otherwise the firmware could be damaged.
1). Uninstall the previous version of Uploader and install the latest
“Firmware Uploader”. The firmware uploader can be found in
the CD included or downloaded from http://www.shining.com,
“Download & Support” page.
2). Connect the CitiDISK HD to your computer (Windows System
only) with the FireWire cable.
3). Turn on the CitiDISK HD. Wait for about 20 seconds.
4). Click on the “Plug-n-Play” icon at the bottom right corner of
the tool bar. Select the disk drive that you wish to eject.
The message illustrated below will appear; click on “OK” to
continue.
Archiving HD P2 Card Content
• Connect the FireWire cable (4-pin end)
to the camcorder’s iLink port.
• Connect the FireWire cable (6-pin end) to the CitiDISK HD.
• Set the camcorder to “MCR” mode. Insert a P2 Card.
• Press the “REC” button on the CitiDISK HD. “REC” light
blinks and waits to be fed.
• Select the P2 Card scene on the camcorder to start
archiving. RED light will change to solid RED indicating
recording is in progress.
• Stop DV recording by pressing the “REC” button of the
CitiDISK HD and then stop P2 card playing. RED light will
go off automatically.
P6
Shining Technology CitiDISK HD Quick Usage Guide v9.0
5). Do NOT disconnect the FireWire cable from the system. Leave
the CitiDISK HD power on. Wait for another 20 seconds until
the CitiDISK HD re-synchronizes itself to the system.
6). Double-click the “CitiDISK HD firmware uploader” icon on the
desktop to launch the program. You’ll see the following
window. On the top is the uploader version number, i.e. “v1.7”.
Current installed firmware date code will be shown at the very
bottom. Make sure the HW Rev. is “Fw1256HD(HVX200)”.
P11
Shining Technology CitiDISK HD Quick Usage Guide v9.0
HD Editing and External FireWire Hard Disk
• Disconnect the FireWire cable from the camcorder and re-connect
it to a FireWire port (4-pin or 6-pin type) equipped computer, PC
or Mac.
Editing Software
Native File
Format
Adobe Premiere Pro 2.0 **
Apple Final Cut Pro 5.0.4 in
Mac OS X **
Apple iMovie3 on Mac OS X
Apple Quick Time in
Win2000, XP and Mac OS X
Avid Xpress Pro 5.x
RawDV
RawDV
Canopus Edius Pro 4.0 **
Edirol Standalone Editing
Station
MacroSystem / Casablanca
Standalone Editing Station
MainConcept EVE
• CitiDISK HD is PLUG-and-PLAY specification compliant; no driver is
needed.
• It is recommended by the manufacturer to backup all the captured
clips to an internal or second hard disk before editing. Although
dragging unwanted video clips into “Recycle Bin” and emptying
the Recycle Bin will re-claim your hard disk space, the directory
holding the clip names will not.
Quick Erase Button and Utility Programs
RawDV
RawDV
RawDV
Matrox Axio HD **
MGI( Roxio ) VideoWave
Media100 Cinestream in
MacOS
Pinnacle Studio
Sony Vega 6.x
Ulead Media Studio and
Video Studio
P10
• Use the CitiDISK HD as an external FireWire hard disk for file
archiving, backing-up and/or other video editing functions.
Shining Technology CitiDISK HD Quick Usage Guide v9.0
• Connect the FireWire cable (4-pin end) to the
camcorder’s iLink port.
• Connect the FireWire cable (6-pin end) to the
CitiDISK HD. Set the camcorder to
“Camera” or “MCR” mode.
• Use a pencil tip or hard sharp object to press
and hold the button( right on the top of blue
charging light ) for more than 5 seconds.
The power-access light will flash in different
colors for maximum of 5 seconds.
Note: All of the files inside the “Media” folder are subject to be
erased. It is suggested by the manufacturer that you back
up the clips to an internal hard disk first and erase the clips
with the “Quick Erase” function instead of dragging them
into the Recycle Bin and emptying it later.
P7
Shining Technology CitiDISK HD Quick Usage Guide v9.0
Quick Play Last Captured Clip
• Connect the FireWire cable (4-pin end) to the camcorder.
• Connect the FireWire cable (6-pin end) to the CitiDISK HD.
• Set the camera to accepting FireWire video mode by pressing
the button beside the “MCR” text once to refresh the P2 card
content first( P2 card must be present ); and then, enter the
video playback mode by ejecting the P2 card.
• Toggle the middle “QPLAY” button to play the last captured clip
and subsequently the light will turn solid ORANGE when
playing.
• Toggle “QPLAY” button any time during playing to stop
playing immediately.
Play All Captured Clips
Jump Forward
Jump Backward
• Connect the FireWire cable (4-pin end) to the camcorder.
Windows AVI2
(Clipxxyy.avi)
• Connect the FireWire cable (6-pin end) to the CitiDISK HD.
• Set the camera to accepting FireWire video mode.
• Press and hold the middle “QPLAY” button for over 3 seconds
and the ORANGE light will start to blink.
The last captured clip will play from beginning to end first, then
it will play from beginning to end of the first recorded clip of
the “Media” folder. Additional clips will play in the sequence
they were captured.
You can reverse the order of the playback sequence by
toggling the “REC” button. The “RED” light blinks if reverse
direction is selected. Press the “REC” button again to reset to
normal order.
• Toggle the middle ORANGE button once to abort playing the
current clip and to jump forward to the next clip (Only if “RED”
light is off). It jumps backward if ” RED” light is blinking.
• Press and hold the middle ORANGE button for over 3 seconds
to stop the “PlayAll” function.
Shining Technology CitiDISK HD Quick Usage Guide v9.0
QuickTime MOV
(Clipxxyy.mov)
User Defined **
format” section.
10 seconds. Both “GREEN” &” RED” lights will go off and stay
off for 3 seconds.
information into internal memory. Both lights will blink rapidly
for approximate 10 seconds during the writing process.
normally to indicate the writing process is successful. The
CitiDISK HD is now ready to capture video using the
programmed file format. User MUST turn off the power before
programming a new format again.
Shining Technology CitiDISK HD Quick Usage Guide v9.0
Quick Play Last Captured Clip
Choosing Favorable DV Video File Format
• Connect the FireWire cable (4-pin end) to the camcorder.
• Connect the FireWire cable (6-pin end) to the CitiDISK HD.
• Set the camera to accepting FireWire video mode by pres
the button beside the “MCR” text once to refresh the P2 card
content first( P2 card must be present ); and then, enter the
video playback mode by ejecting the P2 card.
• Toggle the middle “QPLAY” button to play the last captured
and subsequently the light will turn solid ORANGE when
playing.
• Toggle “QPLAY” button any time during playing to stop
playing immediately.
Play All Captured Clips
Jump Forward
Jump Back
• Connect the FireWire cable (4-pin end) to the camcorder.
• Connect the FireWire cable (6-pin end) to the CitiDISK HD.
• Set the camera to accepting FireWire video mode.
• Press and hold the middle “QPLAY” button for over 3 seconds
and the ORANGE light will start to blink.
The last captured clip will play from beginning to end first,
it will play from beginning to end of the first recorded clip of
the “Media” folder. Additional clips will play in the sequence
they were captured.
You can reverse the order of the playback sequence by
toggling the “REC” button. The “RED” light blinks if reverse
direction is selected. Press the “REC” button again to reset
normal order.
• Toggle the middle ORANGE button once to abort playing the
current clip and to jump forward to the next clip (Only if
light is off). It jumps backward if ” RED” light is blinking.
• Press and hold the middle ORANGE button for over 3 se
to stop the “PlayAll” function.
Shining Technology CitiDISK HD Quick Usage Guide v9.0
Note: As the time of this Quick Usage Guide released, MXF file
format in the combination of P2 file folder structure are not
implemented. User is able to download the Firmware
Uploader and firmware to update once it is released.
Operate the following steps only when the external power adapter is
plugged into the unit and it is not connected to a computer or
camcorder. DO NOT turn off the unit before the sequence is
completed.
1. Look at the front panel of the CitiDISK HD.
2. Turn on the power of the CitiDISK HD. Wait until all three lights
(PWR, QPLAY & REC) start to blink.
3. Press and hold the “RED” button for over 5 seconds. Currently
stored file formats will display the light combinations illustrated
below. “Raw DV” is set as the default from the factory.
Raw DV
(Clipxxyy.dv)
Windows AVI2
(Clipxxyy.avi)
QuickTime MOV
(Clipxxyy.mov)
User Defined **
** Refer to the user manual’s “How to customize User Defined file
format” section.
4. Choose next file format by toggling the “RED” button.
5. Once the file format is determined, stop toggling and wait for
10 seconds. Both “GREEN” &” RED” lights will go off and stay
off for 3 seconds.
6. The CitiDISK HD will start writing the new file format
information into internal memory. Both lights will blink rapidly
for approximate 10 seconds during the writing process.
7. Once the file format is completed, all three lights will blink
normally to indicate the writing process is successful. The
CitiDISK HD is now ready to capture video using the
programmed file format. User MUST turn off the power before
programming a new format again.
Shining Technology CitiDISK HD Quick Usage Guide v9.0
DV Streams vs. Editing Software
The following is a table of various editing software’s native video file
formats for all of DV signal including DVCPro, DVCPro 50 & DVCPro
HD. Editing software with “**” supports DVCPro 50 & DVCPro HD.
Editing Software
Adobe Premiere Pro 2.0 **
Native File
Format
Standard AVI2
Apple Final Cut Pro 5.0.4 in
Mac OS X **
Apple iMovie3 on Mac OS X
QuickTime MOV
Apple Quick Time in
Win2000, XP and Mac OS X
Avid Xpress Pro 5.x
QuickTime MOV or
RawDV
QuickTime MOV
Canopus Edius Pro 4.0 **
Canopus AVI2
Edirol Standalone Editing
Station
MacroSystem / Casablanca
Standalone Editing Station
MainConcept EVE
RawDV
Matrox Axio HD **
Standard AVI2
MGI( Roxio ) VideoWave
Standard AVI2
Media100 Cinestream in
MacOS
Pinnacle Studio
Standard AVI2
Sony Vega 6.x
Standard AVI2
Ulead Media Studio and
Video Studio
Standard AVI2
P10
Suggested Key
Combination
RawDV
RawDV
RawDV
Standard AVI2
Shining Technology CitiDISK HD Quick Usage Guide v9.0
colors for maximum of 5 seconds.
P7
Shining Technology CitiDISK HD Quick Usage Guide v9.0
Camcorder Controlled HD Recording
*** Avid DV Xpress use proprietary OMF video file format, user need to
import video files prior to editing. Either AVI2 or MOV is importable.
• Set HVX200 camera 1394 “Command” to “BOTH”
mode. Connect the FireWire cable (4-pin end) to
the camcorder. Insert a P2 card.
• Connect the FireWire cable (6-pin end) to
CitiDISK HD. Power on the camera
first, the CitiDISK HD second.
• Press “REC” button on the camcorder to start
recording. The RED button of the CitiDISK HD will
start blinking to solid RED.
• Press the “REC” button off the camcorder again to
stop recording. The RED light will go off.
*** P2-MXF & Canopus AVI2 share the same light indications, user must
use firmware uploader v1.7 or newer to exclusively select them.
Recording Video Manually
• Connect the FireWire cable (4-pin end)
to the camcorder’s iLink portt.
• Connect the FireWire cable (6-pin end) to the CitiDISK HD.
Set the camcorder to “Camera” mode.
• Press the “REC” button on the CitiDISK HD to start
recording. The “REC” light will start to flash to solid RED
indicating video recording is in progress.
• Press the “REC” button of the CitiDISK HD again to stop
recording. The RED light will go off.
Updating the CitiDISK HD Firmware
Proceed by following these steps with caution and do not
un-plug the CitiDISK DV’s power while in operation;
otherwise the firmware could be damaged.
1). Uninstall the previous version of Uploader and install the latest
“Firmware Uploader”. The firmware uploader can be found in
the CD included or downloaded from http://www.shining.com,
“Download & Support” page.
2). Connect the CitiDISK HD to your computer (Windows System
only) with the FireWire cable.
3). Turn on the CitiDISK HD. Wait for about 20 seconds.
4). Click on the “Plug-n-Play” icon at the bottom right corner of
the tool bar. Select the disk drive that you wish to eject.
The message illustrated below will appear; click on “OK” to
continue.
Archiving HD P2 Card Content
• Connect the FireWire cable (4-pin end)
to the camcorder’s iLink port.
• Connect the FireWire cable (6-pin end) to the CitiDISK HD.
• Set the camcorder to “MCR” mode. Insert a P2 Card.
• Press the “REC” button on the CitiDISK HD. “REC” light
blinks and waits to be fed.
• Select the P2 Card scene on the camcorder to start
archiving. RED light will change to solid RED indicating
recording is in progress.
• Stop DV recording by pressing the “REC” button of the
CitiDISK HD and then stop P2 card playing. RED light will
go off automatically.
P6
Shining Technology CitiDISK HD Quick Usage Guide v9.0
5). Do NOT disconnect the FireWire cable from the system. Leave
the CitiDISK HD power on. Wait for another 20 seconds until
the CitiDISK HD re-synchronizes itself to the system.
6). Double-click the “CitiDISK HD firmware uploader” icon on the
desktop to launch the program. You’ll see the following
window. On the top is the uploader version number, i.e. “v1.7”.
Current installed firmware date code will be shown at the very
bottom. Make sure the HW Rev. is “Fw1256HD(HVX200)”.
P11
Shining Technology CitiDISK HD Quick Usage Guide v9.0
Charging power is drawn from the FireWire
bus power or external power adapter. A
minimum of 4 to 6 hours of charging time
is required before use.
The BLUE LED indicates battery charging is
in progress. Once the battery is fully
charged, the BLUE LED will turn off.
Turning on the battery:
Slide the main switch to ON position.
Without doing so the CitiDISK HD will not
operate.
7). Click on the “Upload / Upgrade Device Firmware” button.
Follow the instructions and the system will ask for the firmware
target. Select the one you just download (must be in a binary
form).
Turning off the battery:
Slide the main switch to OFF position while in
storage or in transit so as not to drain the
battery when it’s not in use.
Power on:
Toggle the “PWR” button (closest to the
external power adapter input) once.
When the internal battery has less than
5 minutes of power remaining, this
power status light will start to blink and
will stop recording before shutting off
the unit completely.
Select the file named like “FW1256HD(HVX200)-oxfw91107232006Release” as the example shown above with the “Binary”
or “bin” file extension. Click on “Open” and then “OK” to continue.
Once the upload process is completed, the CitiDISK HD will resynchronize itself to the system and both RED & GREEN lights will
blink alternately.
P12
Shining Technology CitiDISK HD Quick Usage Guide v9.0
Power off:
Toggle the GREEN “PWR” button again.
P5
Shining Technology CitiDISK HD Quick Usage Guide v9.0
Mounting on the Hot-shoe
• Insert the CitiDISK HD to Hot-shoe
adapter( sold separately ) and secure
the unit it on hot-shoe
• Plug in the 4-pin FireWire connector
into the camcorder iLink port.
• Tighten the FireWire cable with handle
by cable-tie.
Modifying Device Configuration Setting
8). Click on the “Modify device configuration setting” button.
Make sure the Hardware ID shown is “Fw1256HD” and Product ID
is “Shining CitiDISK HD”.
The configuration setting comes preset and there is usually no
need to change it except the “User Config” sub-menu.
Attaching the Unit Across Belt
• Close both unit and
external battery
compartment, and connect
the FireWire cable.
• Run the flap across belt
and tighten it up.
and G-/V-Mount Battery with Optional
Pocket Adapter
• Slide the CitiDISK HD into the
PCKT1256 pocket adapter (item
not included and sold separately).
• Sandwich the pocket adapter with
the unit in between the camera’s
back and the battery.
• Connect the D-Tap power cord
between unit’s external power
input and one of the D-Tap
receptacles.
P4
Shining Technology CitiDISK HD Quick Usage Guide v9.0
Click on “User Config” will display the next screen.
P13
Shining Technology CitiDISK HD Quick Usage Guide v9.0
The “Capture format” column displays the current captured
format. For example, “QuickTime” MOV is the format selected.
User is able to change it by clicking on one of them.
There are two user-definable formats available, which are
“Canopus AVI2” and “P2-MXF”. “P2-MXF” is temporarily not
selectable.
The “Pre-Scene Loop” function will display how many seconds
user wants to choose. If it’s blanked out, such function is not
supported by this hardware. Up to 6 seconds is allowed for
FW1256C & H model.
The “Continue record at tape end” is “checked” as a default
setting. Un-checking this item will force the CitiDISK HD unit to
stop recording at tape end or P2 Card is full.
The “Power off” is not checked as default setting. Checking this
item will automatically turn off the unit 30 seconds after being
ejected from the computer or after being left un-connected to the
camera or computer.
Shooting Video to the CitiDISK HD Simultaneously with or
without P2 Card
1. Fully charge the unit’s internal battery
2. Choose the favorable native file format for your editing
system and turn on the internal battery switch
3. Securely connect the CitiDISK HD to the camcorder or mount
the external battery/unit together with camcorder
4. Power on the camera first, select the “Recording” mode of the
camera; next, power on the CitiDISK HD unit
5. Insert the P2 Card and control the HD recording from the
camcorder’s “REC” button or manually record the video by
pressing “REC” of CitiDISK HD unit if no P2 Card is inserted
6. Play the last captured scene or play all scenes after you have
completed shooting
7. Connect to computer and copy all of the clips to the internal
hard disk for editing
8. Re-connect the CitiDISK HD to the camcorder and quick erase
all of the captured clips to re-claim the free disk space for
next usage
Shooting Video to P2 Card First Then Archiving to the
CitiDISK HD Later
1. Insert the P2 Card and record the video
2. Plug in the wall-mount power adapter to the CitiDISK HD.
3. Connect the camcorder & the CitiDISK HD, power on the
camera first, and the CitiDISK HD second
4. Set camera’s 1394( FireWire ) to “Host” mode and start the
“Copy P2 Card to Hard Disk” function. Camera may require
formatting the CitiDISK HD before copying process
5. Power off the CitiDISK HD first and camera second
Note: Need to re-format the CitiDISK HD by using Shining
Utility Program if shooting to the CitiDISK HD wanted next
time when the CitiDISK HD was formatted by camera.
P14
Shining Technology CitiDISK HD Quick Usage Guide v9.0
P3
Shining Technology CitiDISK HD Quick Usage Guide v9.0
Technical Tips
Q: Does CitiDISK HD support HDV? What are the differences?
A: No. CitiDISK HD supports DVCPro, DVCPro50 and DVCPro HD.
DV, DVCPro
DVCPro50
DVCPro HD
HDV
Encoder
DV
DV
DV
MPEG2
Data Rate
25 Mbps
50 Mbps
100 Mbps
~20 Mbps
Hi-Def’s
NO
NO
YES
YES
Q: What is the recording mode supported by CitiDISK HD for HVX200?
Any file size advantage by setting to 24p /24pA over 30p mode?
A: The CitiDISK HD supports all of the recording modes from HVX200
except 24pN due to such signal is not outputted to FireWire. “24p” –
2:3 pull down & “24pA” – 2:3:3:2 pull down are considered as 30p
recording, user can select “Tool”, “Remove Advanced Pull Down” in
Final Cut Pro to remove the excess frames. No. All of the
1080/60i/30/24p/24pA and 720/30p/24p/24pA recordings generate the
same file size for the same recording period.
RECORD Button & Status Light:
Solid RED: Recording
Blinking RED: 5 minutes left in
recording capacity or not connected
Q: Does CitiDISK HD support P2-MXF format? What is the native video
file format supported by CitiDISK HD? What is the advantage not
setting to P2-MXF?
A: No, as the time of this usage guide release. However, user can
update the firmware once such function is released. The CitiDISK HD
supports native MOV( Final Cut Pro Quicktime ) & native AVI2( Adobe
Premier 2.0 & Canopus Edius 4.0 ). By choosing the MOV or AVI2 file
format saves the “MXFÆMOV or MXFÆAVI2” conversion time.
Q: What to prevent rendering clips in Final Cut Pro?
“
HDD Low:
Solid RED when
hard disk
recording
capacity is
below 50%
Battery and Main switch:
On: PWR button is enabled
Off: PWR button is disabled
P2
Shining Technology CitiDISK HD Quick Usage Guide v9.0
A: Set CiitDISK HD as “MOV” file format. Choose “DVCPro HD
1080i60”( NTSC ) or 1080i50( PAL ) for 1080 modes and “DVCPro HD
720p30” for all of the 720 modes in “Easy Setup”. Also set “Video
Play” setting in “Audio/Video” to “Digital Cinema Desktop Preview”.
Q: Is “DV Control” recording function enabled?
A: Yes in DV25 and DV50 if P2 card is inserted, but not in DV100(
1080 or 720 ). User must manually start/stop the DV100 recording by
pressing the “REC” button on the CitiDISK HD.
Q: Is this an error when all three lights blinking? Does stopping the
recording needed while swapping in & out the external battery?
A: No. This means the CitiDISK HD is waiting to be connected to
computer or HVX200. No. The external battery is hot swappable, also
the internal battery automatically kicks in when the external battery
runs low.
P15
Shining Technology CitiDISK HD Quick Usage Guide v9.0
Package Contents:
CitiDISK HD Quick Usage
Guide
• One CitiDISK HD unit
• One 1.5 meter in length 6-pin to 4-pin
iLink cable for camcorder
• One CD containing programs, drivers,
manual and user guide
• One universal 100 to 240 volt AC input,
+12 volt DC output Wall-mount power
adapter with reverse polarity plug
• One belt-clip configured carrying pouch
• One Quick Usage Guide (this document)
Limited Warranty
The manufacturer guarantees that every CitiDISK HD including the kit but
not the batteries embedded inside the enclosure (hard disk drive warranty
policy is exclusive and is warranted by its manufacturers) will be free from
physical defects in material and workmanship under normal use for one (1)
year from the date of purchase. If the product proves defective during this
warranty period, contact your manufacturer's customer support in order to
obtain a Return Authorization Number.
Technical Specifications
Interface
One IEEE1394A port
SBP-2 and Isochronous DV type video streams
Cable
Sustained
Transfer Rate
Internal Battery
One 6pin-4pin IEEE1394A standard included
16 MBytes/second
External Power
Operating
Temperature
Relative
Humidity
Storage
Temperature
Dimension
Weight
HD Recording
Capacity
P16
Rechargeable, Lithium based battery good for up
to 90 minutes of non-stop recording
+6V to +18V DC in
0 to 55 Centigrade
FW1256HD
95% Maximum
It is highly recommended that you read the complete
CitiDISK Installation/Usage Manual and Utility Suite
Manual before using this product to help ensure that you
get the most out of your CitiDISK HD
-22 to 65 Centigrade
Width: 77mm Length: 135mm
10 ounces
FW1256HD-80(DVCPro HD)
FW1256H-100(DVCPro HD)
FW1256H-120(DVCPro HD)
Height: 24mm
~90 minutes
~110 minutes
~135 minutes
Shining Technology CitiDISK HD Quick Usage Guide v9.0
Disclaimer
All of the companies and product names mentioned in this user guide
are the registered trademarks of their owners. All of the information
in this user guide is subject to change without notice.
P1
Shining Technology CitiDISK HD Quick Usage Guide v9.0