1
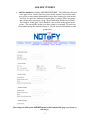
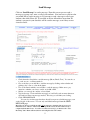
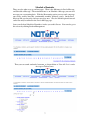
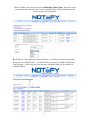
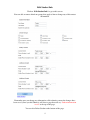
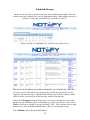
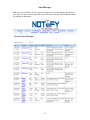
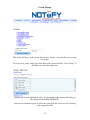
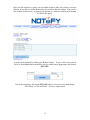
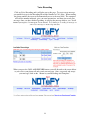
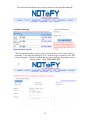
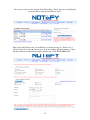
User Manual
Table of Content
2
Student Management
Search student
Download CVS file
Viewing students
Add new student
3-4
Add new student
5
Send Message
6
Default Messages
7-8
Schedule a Reminder
9
Edit Student Information
10
Scheduled Messages
11
Sent Messages
12-13 Create Groups
14-16 Voice Recording
17
Edit Your Info
18-19 Things to Remember
1
Student Management
Once you have logged into NotifyMySchool.com, the first screen you will see is the
“Student Management” screen. On this page you will be able to:
Search Student by simply clicking on the first letter of the last name of the
student you are searching.
Download CVS file containing all students and contact information by clicking
on that link at the bottom of the screen.
View all students by clicking on “View All”. Choose how many students you
would like to view on one screen by looking under “Listing per page”. You can
view All, 25, 50, or 100 students on one screen.
You will also notice that in the image above the individual contacts for each student are
displayed. If you wanted to send a single student’s contacts a message at this time, you
would just click on that students name. (This will be addressed on How to Send a
Message.)
2
ADD NEW STUDENT
Add New Student by clicking ADD NEW STUDENT. You will then be directed
to the page below. Notice you have a place for the student’s first and last name
and a place to enter contact information for up to three contacts for each student.
You may also place the student in a certain group or groups. (These are groups
that you may have previously set up. Those instructions will be covered later.)
For example, if they play Varsity Football, you can click on that option under
groups. You can add the student to as many groups as warranted. If you do not
know which groups this student belongs to, you can wait and add students to their
groups later.
Don’t forget to click on the SUBMIT button at the bottom of the page (not shown on
this image).
3
Once you click the SUBMIT button, you are directed to this page. Notice “Student
information saved” in red. You can see that the student Linda Tolbert has been added.
At this point, if you need to add another student with the same contact information as
Linda Tolbert (maybe a sibling), then click “Add Student With Same Contact Info” and
all you would have to do in the next screen, is input that students name and all the
contacts information would already be there. Or if you need to add a new student, click
on “ADD NEW STUDENT” and input their information.
4
Send Message
Click on “Send Message” to send a message. From this screen you can send a
message to a group, one, some, or all of your students. You just have to click on who
you would like to send a message to. If you want to send a message to all of your
students, then click Select All. If you click on Select All and have more than 50
students, everyone in your data base will be sent the message, even if they are not
viewed or listed.
Check the method in which to send the message (Phone, Email, Text). You can choose
to send one, two or all three methods.
• Choose the date you would like to send the message by clicking on the calendar and
picking today’s date or a date in the future.
• Choose the time in which you would like to send the message. Make sure to pay
attention to whether you want to send it out in AM or PM.
• Subject- you can type in a subject or leave blank
• Type in message. Notice under the message box, it will tell you how many characters
used and how many text messages needed. This way you can limit your wording.
• Click, SEND MESSAGE
You can also send messages that have already been preset as default messages, seen
on the left side of this screen. You can only send default messages from the SEND
•
MESSAGE page.
Most Schools choose to send Phone Calls only in emergency situations, but it is up to each
individual school. When a “Phone Call” is sent from this screen, the text will be read by a
computerized/automated voice. To send a recorded voice message, you must use the “Voice
Recording” link. Phone calls are $.10 for each call placed to each contact.
5
Default Messages
On this screen, you can change the default message, add new message and view messages
already created.
To use the Default Message option, click on Send Message link to get to this page.
Choose the default message you would like to send (The message will automatically be
entered into the subject and message body.) and click SEND MESSAGE at the bottom of
the screen. The advantage to using “Default messages” is to save time and typing.
6
Schedule a Reminder
There are also other ways to send messages. What is the difference in Send a Message
and Schedule a Message? The main difference is on Schedule a Message you can send
messages on a reoccurring basis. With the Reoccurring option you can send a message
once, daily, weekly, biweekly, semimonthly, monthly, quarterly, yearly. On the Send
Message link you can only send out a message once. Also, the default option discussed
earlier can only be utilized in the Send a Message page.
Once you click on Schedule a Reminder, it takes you to this Screen. You can also get to
this screen by clicking Student Management.
Then you can search student by last name, as shown below or View All. Let’s send a
message to Tucker Jones.
7
Click on Tucker Jones and you are now on Managing Tucker Jones. From this screen
you can send him a message once or on a reoccurring basis, edit his information, and
view messages sent to customer.
By clicking on “View Messages Sent to Customer”, it will show you the messages that
have been sent to Tucker Jones. You will be able to view up to 3 months of Previously
Sent Messages. If you need to review messages sent further back, please contact our
technical support.
8
Edit Student Info
Click on “Edit Student Info” to get to this screen.
You can add or remove him from groups that apply to him or change any of his contact
information.
Remember once you change any information, click submit to ensure the changes have
been saved. (Once you hit Submit, it will show a page that will say “Student information
saved” at the top of the page.
You can also Delete Student at the bottom of the page.
9
Scheduled Messages
On this screen you can see what messages have been scheduled in the future. The days
that have messages scheduled to go out are highlighted in blue. In December you can see
that there are messages scheduled to go out on the 12th and 14th.
When you click on a highlighted day, it will take you to this screen.
This shows you all of the messages that are scheduled to go out for that day. From this
screen you can see who will be sent a message, the time the message will be sent, the
frequency, when the message is scheduled until, the message itself, the method, and the
ability to delete one message or all the messages with the same message.
Notice on the Frequency column, Tucker Jones’s message is scheduled to go out once,
but the message for Britney Jones is scheduled to go out on a weekly basis. Also, under
Until, her message is schedule to go out until May 2, 2011. This is because she has math
tutoring every week on Monday until that date. (This is a reoccurring message.)
Under Methods, T=text, E=email and P=phone.
10
Sent Messages
This is the screen where you can view the messages for everyone that has already been
sent. You can also view messages that have already been sent for each individual student
by clicking on their name.
11
Create Groups
This screen will show you the groups that you have already set up and allow you to create
new groups.
To create a new group, simply type in the name of the group and click “Create Group”. It
will take you to the following screen.
Students are listed in alphabetical order. You just check on the students that belong to
this group and click ADD STUDENTS.
You can also rename this group or delete this group from the screen as well by clicking
on the appropriate link.
12
Once you add students to a group, you can double check to make sure you have everyone
added or if you added a student by mistake you can delete that one student. You can also
add students on this screen. A group can be deleted as a whole by clicking at the bottom
on “Delete this group”.
A group can be renamed by clicking on “Rename Group”. It goes to this screen and all
you do is delete Math club from the box and type in the correct group name and click on
RENAME.
One of the advantages of using the RENAME option, is next year you could change
“First Grade” to “Second Grade”, if you are small school.
13
Voice Recording
Click on Voice Recording and it will take you to this page. To create a new message,
you would first type in the Recording ID and the Number to Call. (Note: When entering
the phone number, the curser will automatically move to the next field.) The computer
will call the number indicated, give you some instructions, and then you record your
message. Once you have finished speaking, it will play the message back to you. It will
instruct you to press 1 to accept or 2 to re-record. It is similar to recording a message on
your voice message or answering machine.
When you press the CALL AND RECORD button, you will directed to the screen below
as you receive your phone call and record your message. Once you record and accept
your message, click on the “Return to your Recordings and Templates”.
14
You will notice that the message you just recorded is now under Recording ID.
We recommend sending a test message to yourself or one person, to make sure it is
acceptable. You do this by clicking on ‘Test” on the message you want to send. This
screen will appear. You can see below that the voice recording you wanted to send is
“school closing”. Click SEND MESSAGE.
15
Now you are ready to send out your Voice Recording. Choose the voice recording that
you would like to send out and click on “Send”.
Then you would click on who you would like to send the message to. In this case, I
choose Select All to send out a message to all of my students and their contacts. I chose
the time and date in which the message would be sent. Click SEND MESSAGE.
16
Edit Your Info
On the Edit Your Info page, you will be able to change your password, update your
information, chose your schools sign up code, and choose your automated voice. You
can test each voice by clicking on the play button beside each name. This would be the
voice that reads the message if you chose to send a “Phone call” from the Send Message
page. If sending a message out by Phone, we recommend using the Voice Recording
option, it is clearer and more personal.
Sign up Code for parents:
This is a code that your parents can use to sign up under your school to receive messages.
For a parent to sign up, they would go to www.NotifyMySchool.com and click on the
“Click here to sign up under your school” link on our home page and follow the
directions.
17
Things to Remember
Does NotifyMySchool.com require any special software or hardware?
No. You just need access to the Internet. So you can use our system from anywhere you
can access the internet.
Can Students/Parents respond to messages?
Yes. Students/Parents can respond to phone calls, text messages or emails.
Phone Calls
If your student/parent answers the phone, he or she can press “0” while the
message is playing to be routed directly to your office (remember, they will be
directed to the number that is listed as your contact number on your school’s
account). This function does not work if your student/parent accesses your
message from his or her voice mail.
Text Messages and Emails
Students/Parents respond to text messages and emails just as they would reply to
any other text message or email. Their response is then forwarded to your email address
provided in the “Edit Your Info” page.
Will my school’s name show up on Caller ID, Emails, and Text Messages?
Yes. With phone calls, your school’s name appears on the recipient’s Caller ID. Emails
are slightly different. When you sign up for our service, you chose a short name for your
school (10 characters or less) for the “from” address, for example:
“[email protected]”. Your school name and phone number always appears
at the end of all emails and text messages.
What if a Phone Call is not answered?
If a call is not answered, then the message can be recorded on an answering machine or
voice message. If there is no answering machine or voice message available, then the
call will “retry” everyone 5 minutes up to 20 minutes (which means up to 4 times), if not
answered.
When you look under Sent Messages in the “Status” column, it will tell you whether the
call was answered by a human, answered by a machine, not answered, answered by
unknown (This usually means disconnected number).
18
What does “Queued” mean when it is in the “Status” column?
It means that the sending process for that message has been initiated and is waiting to be
sent. It is like it is waiting its turn to be sent. Do not resend the message, just wait and it
will go out.
Why is it when a text message is received by a contact, it will be in the format of 1/2
or 2/2?
It just means that it took 2 text messages to send the message you have typed to go out.
Most single text messages are allowed up to 160 characters. Characters are letters,
spaces, symbols or punctuation etc. When you are typing your message, you will notice a
counter at the bottom of that box. It will approximate how many text messages it will
take to send you message. When sending a text message you want to keep it short and to
the point.
It is ok that a message takes more than one text message to send out; this is just the way it
is formatted. If you were send a text message from your phone, it may be more than one
text message that is being sent depending on the length, it just doesn’t show that when the
person you sent it to receives it.
How do I change my password?
To change your schools password, go to “Edit my Info” link and click on the
“Change my Password” that is at the top of the page highlighted in blue.
Remember to keep your password secure.
19