1
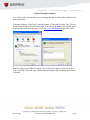
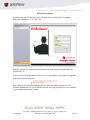
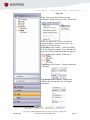
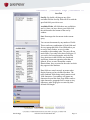
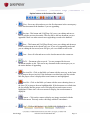
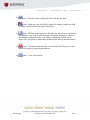
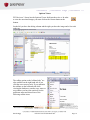
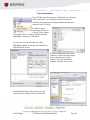
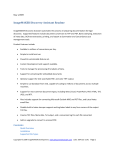
FYI Reviewer Documentation 3.1
An Easy Guide to using FYI Reviewer
Natalie Biggs
FYI Reviewer Documentation.doc
Page 1
FYI Reviewer Documentation
FYI Reviewer Installation
3
Trouble Shooting Techniques
4
FYI Reviewer Logon
5
FYI Reviewer Databases
6
Database Tab
7
Search Tab
8
Form Search
9
Tags Tab
10
Notes Tab
11
Sort Tab
12
Top Tool bar Items
13
Tools
14
Edit Tool Bar
15
Bottom Tool bar Items
16
Opticon Viewer
18
Image Tab
19
Transcripts Databases
20
Report Writer
21
Natalie Biggs
FYI Reviewer Documentation.doc
Page 2
FYI Reviewer Installation
FYI Reviewer only requires the Active X Control to be installed. You do not need any
type of Concordance or Opticon software. FYI Reviewer is a thin client /server
application.
If you receive a gray screen with an icon in the upper left
hand corner when you are trying to access the specified
site to open FYI Reviewer like, the image on the right,
you will have to add the website to the trusted sites 1 .
You should receive a pop up message or bar message in
the internet explorer window that might look like the
image below.
Right click on the bar and left click on the “Install Active X” option.
If you’re still having problems see the next page for troubleshooting techniques.
1
See next page for details on how to add the site to the trusted sites window
Natalie Biggs
FYI Reviewer Documentation.doc
Page 3
Trouble Shooting Techniques
You need to make sure that the site you are being directed to reside in the trusted sites for
Internet Explorer.
In Internet Explorer, Click Tools | Internet Options | Click on the Security Tab | Click on
Trusted Sites and then click the Sites button. You will see the trusted sites window. In the
field “Add this website to the zone:” Type http://www.dataflight.com then click ADD.
Make sure that you UNCHECK require server verification (https:// for all sites in this
zone. Click OK | Click OK again | Restart Internet Explorer and everything should work
as normal.
Natalie Biggs
FYI Reviewer Documentation.doc
Page 4
FYI Reviewer Logon
In order to log into FYI Reviewer you will need to be provided with a User name,
Password, and Server i.e.: 127.0.0.1:443.
Enter the specified user name, password and server name with port number that was
provided to you.
If you receive a message stating that the server is unreachable, or any other message that
pops up such as the following:
You will need to contact the Database provider for more troubleshooting, or your
Network Administrator to verify that the Port you are trying to gain access to is available
to you and the information is correct.
Natalie Biggs
FYI Reviewer Documentation.doc
Page 5
FYI Reviewer Databases
When you enter the User
Name, Password, and Server
info click the “Sign In” button
on the lower right hand corner
of the login box.
On the left hand side you
should see a Briefcase. Click
on the plus sign to show the
Databases that you have been
assigned and double click on
the database name to view the
data.
FYI Reviewer was built to emulate the MS Outlook feel. Your major options are located
on the left hand side. Let’s review these more in detail.
Natalie Biggs
FYI Reviewer Documentation.doc
Page 6
Database Tab
On the top you can see the Server info is listed
along with the user name logged in and the date
and time. It is recommended when you log out to
click the Logout Button.
Recent Database: Display recent database.
Snapshots: Lists snapshots
Brief Case: Houses the Databases
Available databases are Cowco and Database 2.
The next time you log in (depending if you have
Auto Restore checked) you will come back to the
last database you were in. Check to see if you have
Auto Restore Checked you can click on the drop
down arrow next to Tools | Preferences. Screenshot
below.
Concatenation: In order to concatenate these
databases you can click on the Concordance Icon
so that a check mark is placed on both DB’s.
Then you have to click the Open button with the
folder next to it. This will temporarily join the
databases so that you can Search, View, Print, Run
Reports, etc. on both DB’s.
Save Snapshots: creates file that contains the
searches you ran with the specified records you
received.
Restore Snapshots: restores the specified data
from the searches you ran and the specified records
you received.
Natalie Biggs
FYI Reviewer Documentation.doc
Page 7
Save all queries to a saved query file:
Saves the specified searches that you ran
during this session to a .QRY file. This
file is saved on your PC/Laptop.
Execute a Saved Query: Runs the
.QRY file
Clear all Searches: Clears Searches
Simple Search: Is referenced as the
Google-Like Searching feature. This
window will help you create a search
without having to know the specified
operators.
In the Review window you can see how
the search was performed.
Form Search: Concordance’s Form 2
Advanced Search: If you are familiar
with searching and using specified
operators, you can use the advance
search window.
Dictionary: Search and Add words in
the dictionary.
Field List: Shows you all the fields you
can search.
Fuzzy: Shows you words that sound like
the search term that exist within the
dictionary.
Results: Displays term and number hits
Search Tab
Natalie Biggs
2
See next page for details on Form Search
FYI Reviewer Documentation.doc
Page 8
Form Search
Form searching, or query by example, helps the beginner or infrequent user to search
without having to remember Concordance's English-like query language. You simply fill
in the blanks, and then click one of the buttons to begin the search and see the results.
Your query is converted into Concordance's search language and displayed.
The search form is somewhat limited by design to ensure that it remains simple to use.
The standard search screen allows you to enter longer queries, to use parentheses more
precisely, to review the results of each word when using wildcards, and to use a larger
range of query operators.
Filling Out the Form
Enter the words you want to retrieve in the Look for column. Use the Connector column
and add more Look for terms if you are searching for combinations of words. The first
Connector entry allows you to connect the next search you enter with the previous
query's results.
Select a field in the Where to look column if you want your search limited to a certain
field. Date and numeric fields would use the How to look column to specify the range, for
instance greater than, or equal to the date.
Click on the Search button to run your query. It will be assembled in the text window at
the bottom of the dialog box. You can edit your search in this window and run it again if
you didn't get the results you wanted.
Natalie Biggs
FYI Reviewer Documentation.doc
Page 9
Tags Tab
Tags: Tags are essential when reviewing
documents. When you tag a record, a check mark
is place on that specific tag.
When you right click on a tag you have the
specified options. You can create a new Tag,
Folder, or Personal Folder.
Tag Folders: New Feature 3 . Folders are public,
Personal folders are private. You’re the only one
that can see the Personal folder and any tags you
create in this Folder within FYI Reviewer.
Tag History: New Feature – Displays the history
of each tag.
Tag Statistics: New Feature – Displays the
statistics for each tag and users who tagged
documents.
3
All New Features are FYI Reviewer Only
Natalie Biggs
FYI Reviewer Documentation.doc
Page 10
Notes Tab
View by Notes: The following are notes I have
added to a record. In order to add a note you have
to highlight a portion of text, right click on it and
chose New Note.
The note window will appear.
You can even link external attachments but
remember unless they’re on the Network; you’re
the only one who has access.
View by Issues: The issue tags are displayed.
Issues are text level tags on the document.
Natalie Biggs
FYI Reviewer Documentation.doc
Page 11
Sort Tab
Sort By: By double clicking on one of the
available field the Sort By field will fill in with the
specified field you wish to sort.
Available Fields: All fields those are available to
sort by. Once you have chosen your fields click
the sort button at the bottom of the sort by
window.
Sort: Rearranges the documents in the current
query.
You can sort documents by any number of fields.
These can be any combination of fixed fields and
free text paragraph fields. Fixed fields allow you
to sort by date, number, or text, in either
ascending or descending order. The sort will run
much faster if you only select these field types. If
you sort by free text paragraphs, only the first
sixty characters in the first line are considered
significant, characters appearing after that are
ignored. If two or more documents contain
identical data, they are sorted in the order in which
they appear in the database.
Date fields are sorted correctly no matter what
display format you have defined for them. The
total combined fields being sorted cannot exceed
1000 characters. Concordance will ignore any
characters beyond this limit. Date fields count as
eight characters, paragraph field’s count as sixty
characters, other field types are sorted by their
defined field length. 4
4
For more information please see the user Manual.
Natalie Biggs
FYI Reviewer Documentation.doc
Page 12
Option buttons at the top of the Window
5
6
1.
Browse - Invokes the Concordance full screen browse mode. Browse
will display the current document in the current query. The screen is
automatically saved before entering this mode and restored after exiting.
2.
Table - Table view displays documents in a tabular format, similar to a
spreadsheet, with one line per record. You can choose which fields are displayed,
and their order of display, their widths, the font style used and the color. Records
can be tagged, and double clicking a record places you into Browse mode for a
full screen view.
3.
Review - The left column of the Review screen displays the query
number. The next column shows the number of occurrences and documents
retrieved in the query, followed by the query logic.
4.
All – Views all records in the entire database, same as searching 0.
5.
Edit - Edit mode allows you to edit the documents in the database. When
you enter the editor you will be editing the documents retrieved in the last query.
6.
Print - This option is enabled only when a record is displayed in Browse
view. It prints the current displayed record only.
7.
Report – There are two types of reports. Report Write 5 and Annotation
Reports. The annotation report wizard produces reports from annotations. The
report writer includes special reports for each of the annotation types.
8.
Tools 6 – Click on the tools button and you will receive the About
information for the FYI Reviewer. This is important when determining what
version you are currently using.
9.
Help – Brings you to the Dataflight Support Center website.
See following pages for more Report Writer Information
For more information on the Tools menu please see the following page
Natalie Biggs
FYI Reviewer Documentation.doc
Page 13
Tools
Click the arrow next to the Tools. Empties is to display empty fields. Split Screen
allows you to arrange the view of the Browse and table mode (Left – Right is
vertical and top – Bottom is horizontal.)
Preferences – General Most Recently used
databases are listed in
the recently folder on the Database tab.
Auto Restore brings up the last database you were
working in when you logged out. Printing wants to
know what the Date and Time format is that you wish
to use.
Searching – Default search operator can be
changed other wise ADJ. Wildcard is *,
Quotation is “and the Color of your Highlights
defaulted as Red.
Viewer – Allows you to use the internal, external
Opticon, or IPO viewer and other default options you
can change.
Viewer – Redlines- Allow you to change the
defualt color for the Redlines and the
Redacted text.
Natalie Biggs
FYI Reviewer Documentation.doc
Page 14
Edit Tool Bar
The edit tool bar appears when you click on the Edit button on the tool bar. You are
allowed to import and create Rich Tex Formatting within paragraph fields only.
1.
Font Style tool bar you can choose the type of font
for the data.
2.
Font Size – Change the size of the font
3.
Bold – Add bold to the specified font
4.
Italics – Add italics to the specified font
5.
Underline – Underline the specified font
6.
Color – Change the color of the specified data
7.
Left Align – Left align the specified data
8.
Center Align – Center align the specified data
9.
Right Align – Right align the specified data
10.
Bullet Points – Bullet point the specified data
11.
Increase indent – Increase the indent for specified data
12.
Decrease Indent - decrease the indent for specified data
Natalie Biggs
FYI Reviewer Documentation.doc
Page 15
Option buttons at the bottom of the window
1.
First - Saves any edits and moves to the first document in the current query
or the first document in the database if you are appending.
2.
Previous –This button and [Ctrl][Page Up] saves your editing and moves
back to edit the previous document. This may not be the last document you just
appended if there are other network users appending records to the database.
3.
Next – This button and [Ctrl][Page Down] saves your editing and advances
to the next document in the current query set. If you are in appending mode and
you are editing the last record, next will give you a new blank record to edit.
4.
Last – Saves all edits and moves to the last document in the current set.
5.
Go To – Document edits are saved. You are prompted for the next
document number to edit. This can be any document in the current query set, or
the entire database if appending.
6.
Previous Hit – Click on the Bulls eye button with the arrow up, or the letter
[P] to jump to the previous hit. If the document was edited since the last reindex
then the proper screen is displayed but search terms are not highlighted.
7.
Next Hit – Click on the Bulls eye button with the arrow shooting down, or
the letter [N] to jump to the next highlighted hit. If the document was edited since
the last reindex then the proper screen is displayed but search terms are not
highlighted. If there isn’t a next occurrence to display, the next document is
displayed.
8.
Camera – Click on the camera to display any image associated with the
current document. This only works with image enabled Concordance.
9.
Natalie Biggs
Copy - Click on this button to copy fields to the clipboard or to a file.
FYI Reviewer Documentation.doc
Page 16
10.
Font - Click this button to change the font of the Browse data.
11.
Fields - Brings up a list of all fields available for editing. Jump to any field
by double clicking on the field name in the list box.
12.
Ditto - The Ditto button duplicates data from any other record, or duplicates
and appends a copy of the current document. Documents and data are copied to
avoid repetitive data entry tasks. Any field or combination of fields can be
chosen. The [Ctrl][D] key combination performs quick dittos as described below.
13.
Delete - This button marks/unmark a record for deletion. Remove records
marked for deletion by packing the database.
14.
Natalie Biggs
Undo - Undo’s the last task
FYI Reviewer Documentation.doc
Page 17
Opticon Viewer
FYI Reviewer 3.0 now has the Opticon Viewer built into the active x. In order
to view the associated images you must click on the Camera button at the
bottom.
On the left you have the editing column and the right you have the image and a few tools
at the top.
The redline option on the left hand side 7 are
also available on the right hand side if you
click the arrow next to tools. If you minimize
the redlines on the left hand side while
viewing the databases, searches, tags, notes or
sort window you have the option to use the
pull down menu and choose one of the
following redline items.
7
Discussed in more detail on the next page
Natalie Biggs
FYI Reviewer Documentation.doc
Page 18
Image Tab
Fit to Width: Select this option to fit the image to the
width of the window.
Fit to Height: Select this option to fit the image to the
height of the window.
Zoom Out: Zoom in on the current selection.
Zoon In: Zoom out on the current selection.
Rotate Right: Rotate the image right from its current
orientation.
Print: Select this option to print documents or pages within
documents. This page is used to determine what to print
from the current query.
Tools
Mark zoom: You can click and drag across a section of an
image you want to zoom in on.
Rectangular Magnifier: You can click and drag across the
image to zoom in on specific sections.
Pan: Click this button to activate the Pan tool. Use this
tool to move the image if it does not take up the full screen.
Move and resize: To move a redline, select the Move tool
and then click and drag the redline you wish to move.
Highlight: Select this tool to place a highlight redline
(annotation) on the image. Place the redline by clicking
and dragging the outline of the redline onto the image.
Redact: Place the redline by clicking and dragging the
outline of the redline onto the image.
Hollow Box: box tool to place hollow box annotations on
the image.
Hollow Ellipse: Place the redline by clicking and dragging
the outline of the redline onto the image.
Solid Ellipse: Place the redline by clicking and dragging
the outline of the redline onto the image.
Text: The text font, size and color can be set by right
clicking the text annotation and selecting the appropriate
option. You can set a different font; size and color for each
text redline.
Line: Place the redline by clicking and dragging the outline
of the redline onto the image.
Note: After you place the redline onto the image, you will
be prompted to enter the text of the note.
Colors: Chose the color of the specified Redline.
Natalie Biggs
FYI Reviewer Documentation.doc
Page 19
Transcript Databases
From FYI Reviewer the only type of data that you can import
is the Transcripts. You will only be allowed to import a
transcript into a transcripts template database that has been
registered via FYI Server.
In order to import
transcripts you have to
click on Tools | Import
Transcripts | Browse to the specified Transcript |
Highlight the transcript | Click Open.
As you can see on the left hand side I have
highlighted multiple transcripts and would like to
import them all at once.
In order to import them all at once
you have to check the option in the
lower left hand corner of this
window “Save all with default
Settings” and click Save | Done.
On the left hand side of the transcript you can
click on the line number and create Note tabs.
Natalie Biggs
FYI Reviewer Documentation.doc
Page 20
Report Writer
The report layout screen is divided into four
horizontal edit areas. The top edit box is the page
header. It is printed at the top of every page. Any
text can be typed into the page header. The header
can be pulled down to give you more room for a
large header or font. There is no limit to the number of lines in the header. If you do
not want a page header, just pull it up until it disappears.
The next row of the report contains the column headers. These are printed at the top
of every page, above the data columns. As with the page header, the column headers
are resized by grabbing the window borders and pulling them up or down. There is no
limitation on the number of lines of text they can hold. Make them as large or small
as you need. Resizing one column header will resize all column headers; they are
always uniform in height.
The next row contains the data columns. These will contain the actual data printed in
your reports. The data columns are interpreted; if you place a field's name--it must be
in upper case--in the column, then that field's data ends up in the report. If you place
something like, "Data: “+ SUMMARY into the column, then the word "Data: “will
precede the text from the field named SUMMARY. Any text or function or
mathematic operator defined in the programming language can be used in a data
column. This allows you to do things like convert data to upper or lower case, print
only the first 100 characters, or calculate dates and other values in your reports.
The easy way. Two drop-down list boxes are located on the right side of the button
bar. One contains a list of every field in the database. The other contains a list of
useful functions and operators. You should always select fields from the list box. It
will automatically include necessary conversions for you, such as converting dates to
text so that they can be printed. For instance, selecting the date field DATE will
actually place dtoc(DATE) into the column. This uses the date-to-character function
to convert a numeric date into text. It's automatic, it's necessary, and it always works.
Just place your cursor into the field and make a selection from one of the list boxes.
The hard way. There is no hard way, using the list boxes described above. If you need
to type field names manually, make sure you use upper case letters. The report writer
will not recognize field names unless they are in upper case. The list boxes insert into
the active column
The page footer is located below the data column. Any text can be typed into the
footer. The footer can be pulled up or down to give you more or less room for text or
type size. Make the footer's window smaller if too much room appears between the
footer and the page numbers or dates.
Natalie Biggs
FYI Reviewer Documentation.doc
Page 21
Right Mouse Button
Click the right mouse button in any report column for a short cut to fonts, alignment,
and edit commands. The edit commands include undo, cut, copy, paste, and select all.
Stacked Fields and Other Useful Tricks
The report writer is very powerful and flexible. It can use any of the operators and
functions described in the programming language's manual. Using it you can create
some very wonderful and complex reports. There are however just a handful of
functions and operators, like the plus sign, which you will use most of the time. This
section describes the most useful ones and how to use them.
For more detailed information see the language manual's Functions by Category
section, particularly the following sections: Data Conversion, Text Manipulation and
Classification, Time, and Math. The functions are summarized there and are
described in full detail in the Concordance Functions section.
The first thing you'll probably want to do is to combine some text with a field or two.
The following example does just that. It stacks two fields in one column with titles for
data
"Date
"+dtoc(DATE)+newline()+
"Customer "+CUSTOMER
Enclose any static text in quotes. Combine quoted text and other data with the plus
sign. The newline() function forces anything that follows it onto the next available
line. Also included in the example, but not shown, are tabs. The quoted text includes
a tab character to align the two data fields--there are no spaces in the line.
Always remember to use plus signs to combine everything with everything else.
Leaving one out, or putting two plus signs in a row, are the two most common errors.
Sometimes you may have a very large field which would use a lot of paper if it were
printed. The next example uses the substr() function to print the first 200 characters of
the summary field, it "sub-strings" it.
substr(DIGEST,1,200)
The above example uses substr() to grab 200 characters, starting with the first
character. It would be really useful if we could check first to see if the brief field was
actually more than 200 characters long. Then we could append an ellipses "…" to
show that we truncated the entry, if we need to truncate it at all.
(len(DIGEST)>200?substr(DIGEST,1,200)+"…": DIGEST)
Natalie Biggs
FYI Reviewer Documentation.doc
Page 22
This example uses two new features: the len() function and the conditional operator.
The len() function determines the length of the text in any field. The conditional
operator allows us to embed if-then-else logic into a report column. The conditional
operator has the following format: (statement?true-response:false-response). The
report writer tests the statement. If it is true, the true-response is the result, otherwise
the false-response is the result. In our example the report writer determines if the
length of the digest field is greater than 200 characters. If it is, the true-response
returns the first 200 characters of the field with an ellipses appended to show that it
was truncated. If the statement is false, the entire field is printed. The parentheses
around the conditional operator are required.
Retrieve, Save, and Save As
Click on the Retrieve button--the diskette with an arrow pointing away from it--when
you want to load a report. Concordance will display the name of all reports in the
current directory. Select the saved report file, Concordance will retrieve the report
and use the new settings. Saved information includes the toolbox settings, paper,
paper source and orientation, fonts, header, column and footer contents.
Use the Save button to save the report settings to file. A report can be given any valid
file name. Concordance will automatically append the file extension .ARP to the
name you supply. This file extension designates it as a report.
Use the Save As to save the loaded report under a different filename. This is useful if
you want to create multiple reports with similar contents.
Insert Columns
Insert columns by clicking on the Insert Column button. A dialog box will appear.
Enter the number of columns to insert and click on Ok. The columns are inserted to
the left of the current column.
Delete Columns
Delete columns by clicking on the Delete Column button. A dialog box will appear.
Enter the number of columns to delete and select Ok. The columns to the right of, and
including, the current column are deleted.
Printer Setup
Natalie Biggs
FYI Reviewer Documentation.doc
Page 23
Use the Printer Setup button to bring up the printer dialog box. This dialog is
dependent upon your specific printer, but generally allows you to select paper source,
paper orientation, page size, and print quality.
Fonts
The Fonts dialog box allows you to select any typeface installed for your system. The
selected font can be assigned to any item in the report: page header, column header, a
specific column, all columns, or page footer. Click the right mouse button when
editing a column for a short-cut to font and alignment settings.
Any font can be applied to any item, but not to specific text within that item. This
means that you could print a serial number with a bar code font in one column, and
print it in the next column in text--if you have a bar code font installed for your
printer.
Left, Center, Right Justify
Text in any report column, header, or footer can be left, center, or right justified.
Place your cursor in the report item you want to justify before clicking the Alignment
button. Select the justification. Click the right mouse button when editing a column
for a short-cut to font and alignment settings.
Print Preview
Print preview shows you how your report will look when you print it. It allows you to
browse through one hundred pages of your report before printing.
Printer
When all of the report parameters have been set, click on the Green light button to
begin printing the report. To pause or stop printing, click on the cancel button
displayed on the print status dialog box.
Return to Main Menu
Click on the Backtrack button to exit the Report Writer. You will be prompted to save the
report if any changes were made.
Natalie Biggs
FYI Reviewer Documentation.doc
Page 24