1
May 1/2009
ImageMAKER Discovery Assistant Readme
ImageMAKER Discovery Assistant automates the process of preparing documentation for legal
discovery. Supported features include document conversion to TIFF and PDF, Bates stamping, extraction
of meta data, OCR text extraction, printing, and export to Summation and Concordance case
management tools.
Product Features include:
•
Scalable to millions of conversions per day.
•
Simple to install and use
•
Powerful customizable feature set.
•
Custom Development and support available.
•
Tools to manage the processing of terabytes of data.
•
Support for extracting OLE embedded documents
•
Optional support for text searchable PDF, and color TIFF output.
•
Simple to use database front end, capable of scaling to millions of documents across multiple
machines.
•
Support for most common document types, including Word, Excel, PowerPoint, PDF, HTML, TXT,
JPEG, and RTF.
•
Also includes support for converting Microsoft Outlook MSG and PST files, and Lotus Notes
email files.
•
Flexible built‐in bates stamper supports writing bates labels to any four corners of the output
TIFF file.
•
Creates TIFF files, Meta data, Txt output, and a conversion log for each file converted.
•
Add‐on upgrade to convert to scanned PDF.
Contents
Quick Overview
Installation
Supported File Types
Copyright © 2009 ImageMAKER Development. www.DiscoveryAssistant.com sales: 604 525‐2170. Page 1
Incorrect Document Extensions
Office 12 / 2007 Support
MSG and PST Handling
Handling Outlook Security issues
Support for De‐Duplication
Support for De‐Blanking
Bates Stamping
Advanced Excel Spreadsheet Processing
Support for proper DATE and TIME settings in Word and Excel
Database Format for the Discovery Assistant project
Support for Scalability
Support for Lotus Notes (NSF)
Support for PaperPort .MAX files
Forensics Tools
Support for OCR
Support for TIFF Pass‐through
Support for Scanned TIFF Files
Handling WordPerfect files using Word (WPD)
Algorithm to check for and assign duplicates
Handling Terabytes of Data
System Requirements
Handling Parent Child relationships
Exported Ranges of DOCID and BATES Numbers
Support for UTC Date/Time
Loading in a 'Selection Set'
Estimating Page Counts
Benchmarks tests on Discovery Assistant
Error Conversion Codes
Support for Conversation Topic and Conversation Index in Outlook
Setting up Discovery Assistant to do conversions running as a service
Handling Password Protected Files
Setting up Distributed Processing
Support for RAR files
Using Discovery Assistant as a preview tool
MSG Handling
Questions and Answers
Application Details
Adding a new file association
Quality Control Support in Discovery Assistant
Supported File Types
Adobe Acrobat 7.0 (PDF)
Internet Explorer (HTML)
Copyright © 2009 ImageMAKER Development. www.DiscoveryAssistant.com sales: 604 525‐2170. Page 2
.GIF and .JPG
Outlook (PST and MSG)
Outlook Express (EML and DBX)
Access Database (MDB)
Autocad (DWG, DXF and DWF)
VectorWorks (MCD)
QuickView support (converting unsupported file types)
Contact Information
Appendix
Quick Overview:
Discovery Assistant can be downloaded from
http://www.discoveryassistant.com/Download/Downloads.asp
Basic idea is the product can take any set of computer generated documents, including email, word
documents, pdf files, spreadsheets, and/or scanned documents (from hard drive, and/or CD‐Rom's), and
convert them to TIFF or PDF and associated meta‐data, suitable for importation into Case Management
software.
The product can also directly output Bates Stamped TIFF and PDF for direct production of documents for
legal discovery.
Discovery Assistant currently exports to the following Case Management systems:
Summation
DII Class I ‐ tiff and text
DII Class II ‐ source files
Concordance
IPRO‐Tech ‐ images are loadable into Ipro
Opticon ‐ images are loadable into Opticon
Comma Separated Value (CSV)
currently only supports TAB output
Ringtail
Ringtail Legal from FTI
Introspect IDX (Zantaz)
IDX file format
Some distinguishing Discovery Assistant features include:
Copyright © 2009 ImageMAKER Development. www.DiscoveryAssistant.com sales: 604 525‐2170. Page 3
•
conversion of all printable document types to TIFF or PDF.
•
emphasis on conversion speed.
•
support for removal of duplicates.
•
extraction of TEXT and metadata.
•
integrated OCR support for extracting text from scanned images.
•
proper Date/Time stamped values for macros in Word and Excel.
•
integrated Bates Stamping.
•
blank page removal
•
file management features, including a 'MOVE' capability.
•
ability to auto preview the conversion results.
•
specialized Excel formatting controls, including 'fit to pages' feature.
•
ability to identify document file types by content rather than file extension.
•
upgrade to output in color (jpeg compressed TIFF)
•
upgrade to output to postscript (color postscript) for conversion to PDF or direct printing
•
support utilities to handle the processing of Terabytes of data.
•
Export to Concordance and Summation.
•
Export to CSV, Introspect, Ringtail, IPRO.
Our company focus is to provide a high quality easy to use product. We provide quick turn‐around on
reported problems, and to offer custom development services in the event that custom features are
required ‐ ensuring that the Discovery Assistant product meets our customer's exact needs.
We are the developers of the underlying core technology used in the Discovery Assistant product, and
have been in business selling print drivers, viewers, and document conversion products since 1990.
Installion:
1. Take a quick look at the User Manual
2. Install the Microsoft .NET Framework Version 1.1 Redistributable Package
http://www.microsoft.com/downloads/details.aspx?FamilyId=262D25E3‐F589‐4842‐8157‐
34D1E7CF3A3&displaylang=en
Copyright © 2009 ImageMAKER Development. www.DiscoveryAssistant.com sales: 604 525‐2170. Page 4
Install the Microsoft .NET Framework Version 2.0 Redistributable Package (x86)
http://www.microsoft.com/downloads/details.aspx?FamilyID=0856eacb‐4362‐4b0d‐
8eddaab15c5e04f5&DisplayLang=en
OR
Install the Microsoft .NET Framework Version 2.0 Redistributable Package (x64)
http://www.microsoft.com/downloads/details.aspx?familyid=B44A0000‐ACF8‐4FA1‐
AFFB40E78D788B00&displaylang=en
(still trying to determine if we need one or both).
3.
Install Microsoft Outlook, and Lotus Notes (if required).
4.
Install the latest Microsoft Office updates:
http://office.microsoft.com/OfficeUpdate/default.aspx
5.
Install the DiscoveryAssistant application (unzip XDCAssistant.zip and run Setup.exe).
6.
Call your technical contact (Ken Davies) at ImageMAKER Development for a walkthrough
instruction.
(604) 525‐2108. Pacific Standard Time.
Quick Start Instructions:
1. Download and install the .NET runtime version from Microsoft.
http://www.microsoft.com/downloads/details.aspx?FamilyId=262D25E3‐F589‐4842‐8157‐
34D1E7CF3A3&displaylang=en
Also, confirm you have the latest Office updates from Microsoft:
http://office.microsoft.com/OfficeUpdate/default.aspx
Make sure you have installed the Office Tools \ Microsoft Office Document Imaging product
(contains the OCR engine that Discovery Assistant uses).
Also, if running Windows 2008, make sure you have downloaded and installed the Desktop
Experience (Image Viewer for Jpeg).
[To install Desktop Experience, from the Start Button, go to Administrative Tools, and click on
Server Manager. In the Features Summary section of Server Manager, click Add Features. In the
Add Features dialog, select the 'Desktop Experience’ check box, and then click Next, and Install.]
2. Unzip the Discovery.zip file and run DiscoverySetup.exe. Setup automatically installs print
drivers, Discovery Assistant.exe, PST, MSG Lotus Notes and ZIP crackers.
Copyright © 2009 ImageMAKER Development. www.DiscoveryAssistant.com sales: 604 525‐2170. Page 5
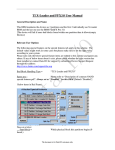
3. Select the ‘All Files’ tab in Discovery Assistant, and select ‘Scan’. Use this interface to select the
directory containing the files to be converted. After the scan has completed, you can sort the
files based on filename, full path/filename, date, size, type, or whether it is convertible or not.
4. Switch tabs to view ‘Files that can be converted’. Then use the display buttons to Queue 1, or
Queue All files for conversion
5. Switch tabs again to ‘Queued’ for conversion, and again, from the buttons choose to convert
one, or convert all files. Current suggestion is to first choose only one file to convert.
6. As the files are converted the first time, one or two dialogs may pop up. If we don’t properly
time‐out, and shut down the problem application, you can auto‐close these dialogs yourself.
There is a second application (XDCAdmin.exe) that can be used to ‘auto‐close’ these dialogs.
Details on how to auto‐train the XDCAdmin to auto‐close, auto‐shutdown, and auto‐kill follow
in the detailed notes.
(see UserManual.doc)
7. Once you have some success, and have identified what problems (if any) there are with the test
conversions, set things up to do a full conversion of all queued files.
8. Switch tabs again to ‘Converted’ and ‘Failed’. You can look at the resultant files using the
interface provided. Use this interface to investigate any errors that might have come up. We
can be useful at this phase to identify what fixes are necessary.
9. After all conversions are done, you can perform the following operations from the Converted
Files tab:
•
Deblank the output files ‐ remove blank pages from selected files.
•
Assign Bates Numbers.
•
Assign Document ID's.
•
OCR any image files (scanned PDF files).
•
Bates Stamp the resultant TIFF files.
10. Once you are done with conversions, you can export the conversion results to Concordance /
Summation / IPRO / or a comma separated value file (CSV file) for inclusion in another database,
spreadsheet or document management format.
If converting XLS files, we recommend choosing between the following settings:
11. Under Admin / Configure / Excel Settings, users have the choice to force output to a specified
number of pages (print to fit), or to print at full size. In either case the complete spreadsheet is
rendered, not just the last saved print range. Default is to print the entire spreadsheet at full
Copyright © 2009 ImageMAKER Development. www.DiscoveryAssistant.com sales: 604 525‐2170. Page 6
size.
If converting PST and MSG files, we recommend the following additional steps:
12. If you are planning on converting PST or MSG files, there may be an issue with the Outlook
security dialog. We provide a tool to automatically close these dialogs, but if there is still a
problem, The Outlook Security Dialog can be turned off permanently by opening Outlook 2007,
and choosing: Tools / Trust Center / Programmatic Access / "Never warn me about suspicious
activity".
13. Conversion will go quicker if you have the Outlook client open. This reduces the time we take
opening and closing Outlook.
14. There is tremendous variety in PST/MSG files. Our current working methodology is if you do
have a conversion failure, we can likely comment on (and fix) the problem by getting you to
send us a log files. Log files can be generated by running imgLOG.exe before loading files to be
converted.
(Start / Programs / Discovery Assistant / imgLog.exe).
To remove date headers and footers from MSG, TXT, HTML:
15. MSG files are formatted as TXT, RTF, or HTML.
For each of these file types we use a different application to do the printing.
TXT ‐> notepad
RTF ‐> Word
HTML ‐> Internet Explorer.
For Notepad and Internet Explorer, under the File/PageSetup dialog, there are header/footer
strings.
To remove headers/footers from HTML and MSG that are rendered as HTML do the following:
1. Open Internet Explorer
2. Go to File/PageSetup
3. Delete the strings in the Header and Footer edit boxes
4. Click 'ok'
5. Exit Internet Explorer
Can remove headers/footers from TXT rendered images the same way as Internet Explorer.
To Get Internet Header extraction working:
16. First make sure that Outlook CDO (Collaboration Data Objects) is installed.
Copyright © 2009 ImageMAKER Development. www.DiscoveryAssistant.com sales: 604 525‐2170. Page 7
Pre Office 2007: CDO comes standard with your Office installation, but must be selected ON to
be installed.
Office 2007: you must download and install a separate add‐on from Microsoft: Collaboration
Data Objects, Version 1.2.1
http://www.microsoft.com/downloads/details.aspx?familyid=2714320d‐c997‐4de1‐
986f24f081725d36&displaylang=en
To check if CDO is already installed, Look in the registry for: HKEY_CLASSES_ROOT\CDO.Message
And look in your system folder for: C:\WINDOWS\system32\cdosys.dll
To install CDO (Collaboration Data Objects)...
1. Get the Office installation disk.
2. Run Office Installation. As you already have Office installed, choose 'update'.
3. Select advanced...
4. Expand the Outlook distribution list, look for and enable the ‘Collaboration Data Objects'
value. Default is to change the 'x' to read 'my computer'.
5. Select OK.
6. Installation should ADD CDO, and not remove any other Office applications.
You must also turn 'Internet Headers' on from the Project Options / Outlook tab
(default is ON).
Internet headers are extracted to the .MTF file (Metadata File) during conversion. You can open
the Metadata file in the Converted tab to review the contents.
Internet headers are appended to the bottom of the metadata file.
Headers will either be marked as:
Internet Header:<UNAVAILABLE>
or:
Internet Header:...lots of data...
Note: Only messages that have been received have Internet Headers. Messages that have been
sent (and not received) have no headers.
To View the Internet Headers in Outlook, open the source MSG file (use the Open Source button
in Discovery Assistant), then select 'View Options'.
To export Internet Headers, be sure to select the INETHEADER field on (near or at bottom of the
list).
Copyright © 2009 ImageMAKER Development. www.DiscoveryAssistant.com sales: 604 525‐2170. Page 8
To convert WordPerfect Office files (WPD and WB3):
17. Quatro Pro, and Word Perfect require some simple setup before doing any conversion of those
file formats.
Fix is to open the application, and load a sample file (can create a simple file if you want to).
Next, make sure that the default printer is the ImageMaker XDC Service1 driver, do a print, and
then do a file save.
Leave these applications open, but minimized, or reduce the window footprint to a smaller
portion of the screen.
See comments further on down about using Word to handle WordPerfect files.
To get Lotus Notes support working:
18. At startup, Discovery Assistant looks for Notes.exe in the \program files\Lotus\Notes\ directory.
It then forces a 'path' change to the local logged in user to make sure that the lotus directory is
part of the system path in order for the dll's to work. (No idea why Lotus does not do this as
part of its own installation).
If you've just recently installed Lotus Notes, then you need to re‐install Discovery Assistant to
set the path information.
Support for OCR:
19. To enable Discovery Assistant to use the Microsoft Office 2003 OCR engine (recommended), first
confirm that OCR is working by running the Microsoft Office Tools / Microsoft Office Document
Imaging product. Open a TIFF file, and then choose OCR to confirm the OCR engine is working.
Support for Search:
20. Full text search can be done either before conversion, or after conversion. See notes on
dtSearch (end of this file). Requires that you separately download dtSearch from the dtSearch
website.
Support for Distributed Processing:
21. Discovery Assistant allows multiple machines to be controlled from a master machine to provide
faster throughput for job conversions.
To set up Distributed Processing, see notes near the end of the file entitled: “Setting up
Distributed Processing".
Support for Searchable PDF:
22. To get searchable PDF working, you need to do the following:
Copyright © 2009 ImageMAKER Development. www.DiscoveryAssistant.com sales: 604 525‐2170. Page 9
1. Install a Postscript print driver onto your machine. Recommendation is to install an HP
LaserJet PS, or Apple LaserWriter (either color or B&W). Can do this by doing an Add
Printer from the Printer's dialog.
2. Download and install the Discovery Assistant Postscript update from
http://www.discoveryassistant.com/Download/Downloads.asp.
3. When installing the postscript update, you will be prompted to download and install
GhostScript and GhostView ‐ two open source products that convert Postscript to PDF.
4. Re‐start Discovery Assistant and re‐queue files for conversion. When converting,
choose 'Postscript' as the output file type.
5. review, bates stamp, and export as Searchable PDF.
Note: if the input file is a scanned image, the output file will also come out as a scanned image.
The only way to get text out of a scanned image is to convert to TIFF, then use Discovery
Assistant to OCR it.
Switching from Demo to Release:
23. If you have processed documents in DEMO mode, and have now licensed the product, and want
to export files, you need to:
1. From the Project menu item, select 'remove temp files'.
2. Re‐queue the converted files, and re‐convert. This removes the demo stamp.
Avoiding memory problems:
24) Make sure the following aren't running:
•
Google Desktop. Turn this off as it consumes vast amounts of CPU.
•
Microsoft Office tablet service (WISPTIS.EXE). Turn this off as it eats memory like crazy on every
file open command. (CiceroUIWndFrame message crash)
Supported File Types (quick overview):
Discovery Assistant supports file formats based on file extension.
To check for an associated application for any given extension, you can:
1. Try to open the file by double clicking on the file icon
2. Try printing the file by dragging the file over onto a printer icon.
Discovery Assistant also lists associated files:
Copyright © 2009 ImageMAKER Development. www.DiscoveryAssistant.com sales: 604 525‐2170. Page 10
1. Use the DA_Sysinfo application to list supported file types.
2. Use the Discovery Assistant / Admin / Configure / Document types to modify supported file
types.
If you still can't figure out the owner application:
Check file extension at http://filext.com.
If you want to add support for a new file type, first ensure that the appropriate application is installed.
As long as that application registers a 'PrintTo' or 'Print' file association, we should be able to convert
the file content to TIFF and TXT.
Here are the steps to take to add a new file association:
1.
First thing is to check if file extension type has a 'print' or 'printto' association. Can do this by
right clicking on the file, and seeing if thereis a 'print' menu item. You can also try dragging the
file from Windows Explorer onto a printer icon, and seeing if it prints.
Discovery Assistant lists all print and printto associations in the output generated by DA_SysInfo
(installed in the ImageMAKER Discovery Assistant program group).
We use the registered file associations first before looking for other ways to print. Associations
are normally registered as command line strings. You can interactively review and modify review
file associations by opening Windows Explorer, and choosing Tools / Folder Options / File Types.
2. Sometimes the owner application supports printing from the command line, but doesn't
properly register that fact. Applications may require you to activate a 'register' button before it
sets the file associations.
For example, Internet Explorer requires you to select Internet Options /Programs / Reset Web
Settings.
3. If there is no registered application, and you don't know what application opens the file type,
then you can search the file type extension database: http://filext.com for the proper
application. Acquire the application, and register the file associations (step 1 or 2).
4. If there is no file association for the file type, but you know of an application that supports this
file type, then there are a number of things you can do: (all of which are somewhat messy ‐ but
permanent).
•
from Windows Explorer, manually add the file type.
•
from Discovery Assistant / Admin / Documents, add the file type
•
run "DA_Sysinfo xyz‐txt" where 'xyz' is the new type, and 'txt' is the equivalent file
type.
Copyright © 2009 ImageMAKER Development. www.DiscoveryAssistant.com sales: 604 525‐2170. Page 11
Then, stop, and re‐start Discovery Assistant, and do a re‐check on that file type.
If you want a one time solution:
•
from the Discovery Assistant non‐convertible tab, use Assign Type.
5. In some cases, we do custom development to support the file type in question. Custom file
types that we've written converters for include zip, pst, msg, eml, doc, xls, ppt, and pdf.
6. If the application supports Open, but does not have a command line Print capability, you might
still be able to get things working using a macro recorder.
Suggested product: Macro Expert ‐ http://www.macro‐expert.com/buyall.htm
Incorrect Document Extensions:
Discovery Assistant will also detect and handle file types named with an incorrect extension. For
example, if a Word Document has an extension ".BAK" , Discovery Assistant will detect and treat that file
type extension as ".DOC".
File types that we can identify using binary contents is:
Microsoft Excel
Ami Pro
WordPro
Freelance
Word
Word 2007
Write
Word Perfect
Lotus 1‐2‐3
Microsoft PowerPoint
Microsoft Project
Microsoft Outlook
Microsoft Outlook Express
Calendar
Bitmap File
PNG File
JetForm Data
Sound Wave
Postscript
EDIFACT document
PKZIP arkivfil
G3/G4/ect. Tiff
Pfs:
Windows Works
Winworks dokument
.xls
.sam
.lwp
.prz
.doc
.docx
.wri
.wpd
.wk3
.ppt
.mpp
.msg
.eml
.cal
.bmp
.png
.dat
.wav
.ps
.edi
.zip
.tiff
.wpd
.wpl
Copyright © 2009 ImageMAKER Development. www.DiscoveryAssistant.com sales: 604 525‐2170. Page 12
RTF
Adobe Illustrator
Adobe Acrobat
MaXware support form
Action Multimedia Player
“Pretty Good Privacy”, RSA encrypted files
DES encrypted files
CorelDRAW
JPEG
GIF
HTML
OLE 2 Compound document
XML Compound Documents (Office 2007)
Microsoft Office Binder document
.rtf
.ai
.pdf
.msu
.acp
.asc
.des
.cdr
.jpg
.gif
.htm
Office12 / Office 2007 support
The URL for the Office 2007 compatibility pack is
http://www.microsoft.com/downloads/details.aspx?FamilyId=941b3470‐3ae9‐4aee‐8f43‐
c6bb74cd1466&displaylang=en.
If you add in the compatibility pack, you should be able to open and process Office 12 documents:
(PPTX, DOCX, XLSX) running no an Office 2003 or Office 2000 machine.
MSG and PST handling.
Discovery Assistant excels at handling MSG and PST file formats.
Some things to do to ensure your system is running efficiently:
1. The Outlook Security Dialog can be turned off permanently by opening Outlook 2007, and
choosing: Tools / Trust Center / Programmatic Access / "Never warn me about suspicious
activity".
2. If you are having any troubles scanning a PST file, there is a Microsoft validation tool that can be
used to repair PST files:
1. Exit Outlook if it is running.
2. Double‐click Scanpst.exe, located at drive:\Program Files\Microsoft Office\OFFICE12.
3. In the Enter the name of the file you want to scan box, enter the name of the .pst or .ost
file that you want to check, or click Browse to search for the file.
4. To specify the scan log options, click Options, and then click the option that you want.
5. Click Start.
Copyright © 2009 ImageMAKER Development. www.DiscoveryAssistant.com sales: 604 525‐2170. Page 13
3.
If you've installed Office XP, be sure to disable the Speech and Handwriting Recognition
software, as this eats system resources. To disable, go to:
1. "Control Panel"
2. "Add/Remove Programs"
3. "Microsoft Office," click on the "Change" button
4. Browse to "Office Shared Features," "Alternative User Input," and select for Speech and
Handwriting Recognition (both) "Not available" from the drop‐down box.
Very neat trick:
To extract multiple MSG files from a PST file for testing, debugging, message ordering etc...
1. Open Outlook mailbox
2. Sort messages
3. Select multiple messages, and then from the outlook menu, choose 'copy'.
4. Open Windows Explorer and create a new directory.
5. Select 'paste'.
6. The files are written to the output directory in the same order as they are listed in Outlook.
7. To then convert these files, 'drag' the msg files from the Explorer interface into the 'All Files' tab
of Discovery Assistant. Message order will be maintained.
Handling Outlook Security issues.
The Outlook Security Dialog can be turned off permanently by opening Outlook 2007, and choosing:
Tools / Trust Center / Programmatic Access / "Never warn me about suspicious activity".
More details at: http://msdn2.microsoft.com/en‐us/library/bb226709.aspx ‐ "Code Security Changes in
Outlook 2007 ‐ MSDN Library / Office Development / 2007 Microsoft Office System / Outlook 2007 /
Technical Articles".
Support for DeDuplication
Many file sets contain multiple copies of the same file. The de‐duplication feature is designed to spot
these duplicate files, and ensure that only one copy is converted.
Duplicates are identified by a unique Hash Value, that is calculated for every file, message, and
attachment at time of import.
Copyright © 2009 ImageMAKER Development. www.DiscoveryAssistant.com sales: 604 525‐2170. Page 14
For message files, the hash value is based on the 'text' content of the email message, not the binary
contents of the MSG file. The MSG binary file may contains additional unique information related to
how it's stored in the PST file. The binary file will also contain all the binary attachments. (ie we don't
hash the MSG file, but the extracted TEXT portion only).
If two files have the same hash value, then we do a binary comparison just to be sure the files are both
equal (one last final check). If the files do not compare, then the hash value is modified to include an
extension.
Every file in the project is marked 'true' if there is a duplicate. (see 'Local Duplicate' column in AllFiles).
At any time before conversion, you can also link projects to a 'global' project, and can identify global
duplicates this way. One advantage of 'global' deduplication is it will differentiate between 'primary',
and 'secondary' duplicate. (Local deduplication will flag primary and duplicate as both being duplicates).
The de‐duping feature is controlled from the Options / De‐duping tab.
Settings are as follows:
•
skip local duplicates when converting
•
skip global duplicates when converting
•
don't skip children unless parent is skipped
•
if duplicate is NOT skipped, then copy output files rather than converting.
Normal default is to enable the top three choices. The forth choice is OFF, and skipped (duplicate) files
are not copied to the converted directory.
Explanation of settings:
•
Skip Duplicates means that if it is a duplicate, we don't process any further.
•
Skip Global Duplicates means that if it is a global duplicate, don't process any further.
•
Don't skip children unless parent skipped means that parent and all other children must also be
a duplicate before we bother skipping that whole email chain.
•
Copy Duplicates means that we copy the resultant TIFF files from a previous converted copy.
•
Saves the time for duplication, but does not save on drive space.
User Example:
1. User chooses a list of files to convert. Discovery Assistant loads the list into memory, creating a
unique hash code for each file scanned. As files are added, they are compared to the list of
Copyright © 2009 ImageMAKER Development. www.DiscoveryAssistant.com sales: 604 525‐2170. Page 15
existing hash codes already generated. If there is a hash‐code match, then both the source and
the potential duplicate are binary compared (ensuring an exact match).
2. At time of conversion, if the file is a duplicate, and has already been converted, then we ignore
(and duplicate again), skip (don't convert), or 'copy' over the duplicated TIFF file rather than do
the conversion again.
3. User selects a range of files to Export to one of the common formats. If the selected list
contains a duplicate, and the de‐duplicate setting is set to 'linked', then we create an entry for
the file in the output list, but point backwards in the list to the TIFF and META data of the
original file.
entry 1, tiff file 1, meta file 1, text file 1
entry 2, tiff file 2, meta file 2, text file 2
entry 3, tiff file 1, meta file 1, text file 1
entry 4, tiff file 4, meta file 4, text file 4
<‐‐‐‐‐ duplicate of entry 1
The XML files keep track of what files are skipped at time of conversion. (these are marked as skipped
instead of converted). The XML file can be exported as a MDB or XLS file for documentation purposes.
Support for DeBlanking removal of blank pages.
Discovery Assistant defaults to print the entire spreadsheet, not just the last defined range. When
printing the entire spreadsheet, it is possible that blank pages will be produced.
After conversion, from the Converted Tab, users can select 'deBlank' to remove blank pages.
Deblanking goes through each page and looks for black bits in a 10x10 cell grid. If there are more than
200 black bits in any cell, then the page is not blank.
If blank pages are discovered...
Discovery Assistant update the MetaData to indicate what pages have been removed, and creates a
'cleaned' and 'removed' output file.
User can then look at the 'cleaned' file, and the 'removed pages' file to confirm that we've not made any
mistakes. Cleaned + removed = total
Bates Stamping
To ensure that the Bates Stamp does not obscure any important information:
1. Confirm that the ImageMAKER XDC Service1 printer has the proper unprintable region margins
set.
Copyright © 2009 ImageMAKER Development. www.DiscoveryAssistant.com sales: 604 525‐2170. Page 16
In most cases it doesn't make much difference as most business documents do not print right to
the edge. However, if you are converting image files (TIFF / fax / JPEG pictures / etc.) the
converting application may print right to the border edge.
To check/change the printer borders, go to the printers dialog, and select the print properties
for the ImageMAKER XDC Service1 printer. In the Device Settings tab, look for and set the
unprintable regions. Recommend a border of .25 inches. It may be useful to set the top margin
to 0, and the bottom margin to .5 in order to get more room for the bates stamp.
2. Convert from the 'Queued' directory tab, to the 'Converted' directory tab.
Confirm that the output images have a white space border.
3. Set up the Bates Stamp. Margins are defined in the setup area.
BatesStamp the output.
4. Review the resulting files.
5. To print the resulting TIFF images to a hard copy printer, you have two choices:
1. Print to edges
2. Scale to fit the printable region.
If you are looking to get the Bates Labels as tight to the outside printable region as possible, then you
can set the imgview.exe application (what we use to print TIFF files) to 'print to edge'. To do this, open
one of the tiff files in imgview.exe by double clicking on the thumbnail imagein Discovery Assistant.
Then choose menu / Options / Print to edge, and close the imgview application.
Bates stamping images with no image scaling or compression:
If you are looking to Bates Stamp TIFF images without any additional scaling, then the conversion from
'queued' to 'converted' must be run through our imgview.exe application AND the setting 'print to edge'
must be set on. To make the imgview.exe application the default TIFF print application, from the same
imgview.exe options menu, select 'set as default viewer'. Then stop and re‐start discovery assistant to
pick up the new file association. You can confirm what the current default viewer is by doing a 'view
source'.
Advanced Excel Spreadsheet Processing:
Under the Admin / Configure / Excel tab, the user can set up the following preferences:
Orientation: Default / portrait / landscape
Scale:
Default
Copyright © 2009 ImageMAKER Development. www.DiscoveryAssistant.com sales: 604 525‐2170. Page 17
Fit‐To (pages wide / pages high)
Zoom To (% of normal size)
Show Comments: Default / None / at end of sheet / as displayed on sheet
Page Order: Default / Down then over / Over then down
Print Quality: Default / 200/300/400 dpi.
Paper Size: Default / Standard paper sizes.
Turn headers/footers off.
Print just the last saved print range, or the whole spreadsheet.
Set all worksheets to active before converting
Clear print area before converting (print all cells)
Scale:
To limit the number of pages when printed, suggest setting the default size to Fit to 1 page wide,
10 pages high. Special case printing can then be done based on the thumbnail output images
produced.
If you have wide varieties of Excel spreadsheets, some with lots of pages, others with only a few
pages, our recommendation is to print excel at less than 100% size. Things still look very good at
75% scaling. Can easily go as low as 50% scaling. This reduces the number of pages, and gives
you a better chance that you get more meaningful information on each page.
Print Area:
Default is to print entire spreadsheet, not just the print area. When printing all cells, need to
look for and remove blank pages afterwards.
Set all Worksheets to Active:
Default is to set all sheets to print. Otherwise, print only the active sheets.
Disable Macros, Re‐calculate:
Macros and auto‐recalculate are disabled.
Currently in testing:
Ability to unhide cells, columns, rows, extract formulas as part of the MetaData, set column
width.
Copyright © 2009 ImageMAKER Development. www.DiscoveryAssistant.com sales: 604 525‐2170. Page 18
Support for proper DATE and TIME settings in Word and Excel.
Word and Excel contain macros and functions that return the 'current' date and time. The expectation is
that these date/time values are properly set when the user creates, prints, or saves a work document.
When submitting a document into discovery, the date/time printed in the TIFF image has to match the
date/time the document was last accessed.
Discovery Assistant solution to the date/time problem is to set the system date/time to the document's
last saved date/time before doing the conversion. To enable this feature, go to the Admin/Configure
screen.
There you will see the following:
IMPORTANT: Some document headers and footers will render the current date and time. If you
need this to reflect the LastWrite time of the file being converted, check the box below.
Warning: This option may have unpredictable effects on the system and other applications
X Reset System Time to file LastWrite Time before conversion.
The only 'unpredictable effect' we can currently think of is that the Discovery Assistant application is
'killed' during conversion, and does not re‐set the system date/time back to current. This can easily be
solved by going into the Control Panel Date/Time applet, and re‐setting the system time.
The visible indication that we are changing the system time can be seen when the computer time value
changes in the bottom right hand corner of the computer's task bar. We always make sure to set the
time back to the exact correct value by keeping track of (and accounting for) the elapsed time since
changing the system clock value.
DataBase Format for the Discovery Assistant project:
Quick background on our database structure is as follows:
Discovery Assistant uses XML as the data storage format. Records are read into memory, manipulated
in memory, then saved every 100 or so conversions, or when the user closes the file. Otherwise, all
database activity is done in‐memory, using .NET controls.
The advantage of running the database completely in memory is speed. Things that traditionally take a
long time using a transaction based database run 1000's of times faster in a 'memory loaded' database.
Traditional time consuming activities include:
•
Generating and re‐viewing different data views of the same data set.
•
Changing a status value for each record in the database (queued status, bates number,
document ID)
•
Operations that add 1000's of records at a time.
Copyright © 2009 ImageMAKER Development. www.DiscoveryAssistant.com sales: 604 525‐2170. Page 19
Other advantages of the XML format are:
1. Universal format can be converted to any other format with a wide variety of available tools.
2. .NET controls work with XML natively.
3. Very compact way of storing variable length data.
4. Can be read/searched by humans using a simple text editor.
5. Can be repaired if corrupted by an external process/activity (like power failure during a file
save).
6. Can be manually edited by a text editor is users want to a general search and replace.
The disadvantages of having the data stored in memory are:
•
takes up memory (best to limit projects to 500,000 record items or less).
•
if the application crashes, you lose data back to the 'last saved' version. (need to save after
major activity).
•
Can't multiplex access to the same data from more than one machine. (currently not an issue).
Our rule of thumb is to limit project sizes to 1 or 2 gigs per project, to a maximum of 100,000 to 200,000
items.
If you have data sets bigger than 200,000 items, or larger than 2 gigs in size, then best to break the data
down into multiple projects, possibly spread across multiple machines.
Another rough rule of thumb: A single machine running Discovery Assistant can process on average 1
gig of data per day.
For really large projects (Terabytes in size):
We provide an Access Database (MDB) tool we call TeraBite, that enumerates all the files in a given
directory tree or server share, then creates a database containing that list of files to process. The
database list can then be written out as multiple text based Load List for further processing by Discovery
Assistant. Load List contents are defined by a maximum number of files, or maximum cumulative file
size. Load Lists are serially processed by the service provider in batches across multiple computers. As
loads are completed, they are exported out to a format suitable for review by the customer. This way
data flows through the process in chunks, and delivery of the first chunk can happen in a single day (or
less) after start of conversion.
Copyright © 2009 ImageMAKER Development. www.DiscoveryAssistant.com sales: 604 525‐2170. Page 20
Support for Scalability
Additional conversion machines can be added to improve overall throughput.
Large conversion requests can be broken down into a set of smaller jobs, each of which is run on a
different computer.
To ensure that each computer has the same conversion settings, we recommend saving the
DiscoveryAssistant.xml file, and the HKLM\Software\Imagemaker registry settings, and then duplicating
these two files across the various machines.
The discoveryAssistant.xml file (installed in the same directory as the discoveryAssistant.exe file)
\program files\imagemaker\discovery assistant\discoveryAssistant.xml
Contains all the global project settings (and is text readable).
The remaining settings (that control document formatting) are saved in the registry. You can export the
hive HKLM\Software\ImageMAKER to a .REG file, and use this as the other settings file.
To match a second machine's settings:
•
install Discovery Assistant
•
copy over the DiscoveryAssistant.xml file
•
double‐click on the saved imageMAKER.reg file
Support for Lotus Notes (NSF)
Discovery Assistant supports loading Lotus Notes NSF files natively.
Before installing Discovery Assistant, make sure you have Lotus Notes client version installed first.
(we've tested using Lotus Notes Domino Designer 6.0.3).
If Discovery Assistant is already installed, install Lotus Notes, then re‐install Discovery Assistant.
At startup, Discovery Assistant looks for Notes.exe in the \program files\Lotus\Notes\ directory. It then
forces a 'path' change to the local logged in user to make sure that the lotus directory is part of the
system path in order for the dll's to work. (No idea why Lotus does not do this as part of its own
installation).
If you've just recently installed Lotus Notes, then you need to re‐install Discovery Assistant to set the
path information.
Download site for Lotus Notes client:
http://www‐128.ibm.com/developerworks/downloads/
Lotus Notes®, Domino Designer, and Domino Administrator clients V8 or later.
Copyright © 2009 ImageMAKER Development. www.DiscoveryAssistant.com sales: 604 525‐2170. Page 21
Here is the direct link to the notes client: (these link names change over time)
http://www.ibm.com/developerworks/downloads/ls/lsndad/?S_TACT=105AGX28&S_CMP=DLM
AIN
Lotus Notes Metadata
Type: Lotus Notes Document
ID:B0DB4E68D9BF457B86256FBA00621AE9
From: CN=Helmuth X Fendel/OU=LAKE/OU=CORP/O=ABBOTT
To:CN=Giorgio
Martellino/OU=ADDITN11/OU=ADD_ITL_HUB/OU=ADD_EURO_HUB/OU=ADD_HUB/O=ADD/C=US@ABB
OTT;"Karrer, Roberto (INT'L)" <Roberto.Karrer@ace‐ina.com>
Cc:Bryan.Willcox@ace‐ina.com;CN=Charles M
Santora/OU=LAKE/OU=CORP/O=ABBOTT@ABBOTT
Bcc:
Subject:Re: Sibutramina ‐ Privileged & Confidential
Sent:2002‐04‐10 10:23:54
Received:2002‐04‐10 10:23:56
Date Modified:2005‐03‐04 09:51:34
Date Created:2005‐03‐04 09:51:34
Date Accessed:2005‐03‐04 09:51:34
Size:18255
Importance:1
Priority:1
Mood:0
PreventCopying:0
ReturnReceipt:0
IsSentByAgent:0
Number of Attachments:0
Body: Message Contents
EndBody:
Known Problems:
On some NSF files, we have troubles extracting attachments. Fix seems to be to stop, then re‐
start Discovery Assistant, then re‐import the NSF file (or do a re'check if already imported).
Alternate solution:
Convert Lotus Notes messages to PST
http://www.lotus‐notes‐export.com/XitNotes.asp
Problem #2
Copyright © 2009 ImageMAKER Development. www.DiscoveryAssistant.com sales: 604 525‐2170. Page 22
A user with appropriate Access Control List (ACL) rights receives the following error when
attempting to open a local replica of a database:
"The database has local access protection and you are not authorized to access it locally."
Solution
This will occur in cases where a user other than the current user created the local replica. This
occurs because the Notes client has a default security setting to encrypt local replicas. This
setting is accessed via File ‐> Security ‐> User Security ‐> Notes Data ‐> Databases. To create
local replicas that are not encrypted, select "Do not locally encrypt" rather than the default
"Locally encrypt using".
Alternate Solution:
Switch to the user supplied Notes id file (filename.id); then open the datbase enter the
password, and go to File/Access Control, set everything to Manager; then
File/Application/Properties/Encryption Settings and checked the "do not encrypt" box; and then
compacted the database.
Related information
How to Determine Which Databases Are Encrypted
Encrypting PAB causes error 'Unable to create location'
Error Accessing Server Database "This Database Has Loca
http://www‐1.ibm.com/support/docview.wss?rs=0&uid=swg21088323
Problem #3
If you encounter problems, run the Logger (red button on top right of Discovery Assistant
application). You can then email us the log contents for further analysis.
example problem:
[08‐06‐27 11:35:47 AM DA::OpenNsfDatabase()]
System.Runtime.InteropServices.COMException (0x80040154): COM object with CLSID
{5FB98ACD‐8EAA‐4E2D‐A980‐9B1C678B8C4D} is either not valid or not registered.
possible resolution:
1. From DOS prompt, type 'path'. Make sure that the path contains a pointer to the
nnotes.dll file (c:\program files\lotus\notes\NNOTES.DLL)
Copyright © 2009 ImageMAKER Development. www.DiscoveryAssistant.com sales: 604 525‐2170. Page 23
2. re‐register the nsfCracker.dll: regsvr32 "c:\Program Files\Imagemaker\Discovery
Assistant\NSFCRACKER.DLL"
Make a note of any reported problems registering the DLL.
If installing on Vista, make sure DOS is running in Admin mode. (right click on Command prompt,
and choose Admin).
Problem #4
Notes error: "You must supply the bulk decryption key in order to extract this file object."
Resolution:
The Encrypt incoming mail field is set to Yes in the Mail section of the user's Address Book entry.
Once this was changed to “No” the problem is resolved.
Problem #5
You attempt to read newly‐encrypted mail (i.e. with a new key) with an old backup ID file that
does not contain the new key, and the following error occurs:
"Specified Private Key Does Not Exist."
Additionally, if an encrypted message has an attachment and you attempt to open it with an old
backup ID, the message above is generated and an empty message with the attachment is
displayed. If you then try to launch or detach the attachment, the following error occurs:
"You Must Supply the Bulk Decryption Key in Order to Extract This File Object
<path\filename>)".
or (in Notes 4.6x):
"The encrypted data has been modified or the wrong key was used to decrypt it: Could not
detach to file <path\filename>
or (in Notes 5.x):
"You cannot access portions of this document because it is encrypted and you do not have any
of the keys: Could not detach to file <path\filename>
This issue only occurs if an old ID is being used. To avoid the issue, use a current ID.
The fact that the error messages could be more descriptive has been reported to Lotus Quality
Engineering.
Possible Resolution:
Copyright © 2009 ImageMAKER Development. www.DiscoveryAssistant.com sales: 604 525‐2170. Page 24
This issue might occur when a user's ID has been updated with a new Public key, and the user is
using an older version of their ID which contains the old Public Key. A user can initiate the
updating of their Public key by using the menu options: File, Tools, User ID, More Options, New
Public Key. The ID will then need to be recertified.
Support for Novel GroupWise
Unfortunately, we currently do not support GroupWise directly.
However... there is a product that might be able to help with migration:
http://www.transend.com/products_transend_migrator.asp
There is a special Transend Migrator Forensic Edition license for use in forensic environments for
eDiscovery. One license per workstation allows the conversion of an unlimited number of data
files/mailboxes. Please contact us for more information on Transend Migrator Forensic Edition.
Transend Corporation,
225 Emerson Street, Palo Alto, CA 94301
Phone: 650‐324‐5370
Converts Messages/Folders, Attachments, Archives, Address Books, Calendars and Tasks Between
Virtually All Email Systems/Clients. Includes support for:
Lotus Notes
Outlook/Exchange (server or .pst file)
Outlook MSG Files
GroupWise (5.5+ for GW Archives)
IMAP4 Server
HTML
Eudora
Netscape/Mozilla/Thunderbird
AOL
CompuServe 2.0+
Outlook Express
Pegasus
Notework
ExpressIT (Native and SMTP)
cc:Mail
DaVinci 3.0+
MHS/SMF‐70
Calipso Archive
Transport File (Transend proprietary format)
Sun One (via IMAP)
Pop Server
http://www.transend.com/supported_mail_systems.asp
Copyright © 2009 ImageMAKER Development. www.DiscoveryAssistant.com sales: 604 525‐2170. Page 25
Support for PaperPort .MAX files
If you have the Paperport application installed, and it supports printing MAX files, then Discovery
Assistant supports converting MAX files to TIFF. (tested and works).
CommandLine: <D:\Program Files\ScanSoft\PaperPort\PPPAGEVW.EXE /p
z:\web_test_files\5pages.max">
Forensics Tools:
OST ‐> MSG Advanced Exchange Recovery. http://www.exchange‐recovery.com/. $600
PST ‐> MSG Aid4Mail http://www.aid4mail.com
hard drive usb write protect.
Logicube Hard Drive & Media Duplication
http://www.logicube.com/logicube/pressreleases/writeprotect.asp
Support for OCR
Discovery Assistant now supports a native OCR feature. The default is to use Microsoft Office 2003
MODI control if available, otherwise, uses a SimpleOCR package shipped with Discovery Assistant.
Microsoft MODI OCR uses the OmniPage SDK engine from Nuance software (and is our current best of
breed recommendation). To confirm you have MODI installed, run Microsoft Office Document Imaging
application, load a TIFF file, and select 'OCR'. The application will install OCR if not already installed.
Discovery Assistant extracts text from documents during the conversion process. Extraction is extremely
accurate as the text is generated by the print driver during the print process.
If source documents are scanned images though, there is no text extraction when printing. In this case,
you can manually OCR those documents you would like the text from by selecting the OCR button in the
Conversion Tab.
Fixes:
OCR was not successful (no text was found) on one or more pages.
http://support.microsoft.com/kb/918215/en‐us
Support for TIFF Passthrough
To speed up the processing of scanned TIFF documents... if the source documents are already in the
proper format (scanned B&W, standard dpi), then processing can be sped up by selecting 'Enable no‐
Print convert on images'. You can select this flag from the Admin / Configure screen.
If this flag is set, then Discovery Assistant does not print the image, but creates an exact copy of the
source image ready for further processing. formatted (standard dpi, and scanned in B&W)
Copyright © 2009 ImageMAKER Development. www.DiscoveryAssistant.com sales: 604 525‐2170. Page 26
Support for Scanned TIFF Files
For Discovery Assistant to properly fill in the Custodian / Box / Folder information at time of export, the
scanner operator must save the original TIFF files according to the following rules:
1. Each Custodian gets their own output directory. An example custodian would be John Smith.
2. Within the custodian directories are subdirectories that correspond to each of the boxes. ie: if
John Smith's documents come in three boxes, then there are three BOX folders in the John
Smith directory.
c:\...\John Smith\Box1
c:\...\John Smith\Box2
c:\...\John Smith\Box3
3.
Within the box directories are the folder names. If a folder contains multiple folders, then
those names are appended. ie: if Box1 contains 3 folders: January, February, March, and the
January Folder contains two sub folders: Invoices, Receipts ‐ then the output scanned TIFF files
will be placed in the following directories:
c:\...\John Smith\Box1\January\*.tif
c:\...\John Smith\Box1\January‐Invoices\*.tif
c:\...\John Smith\Box1\January‐Receipts\*.tif
c:\...\John Smith\Box1\February\*.tif
c:\...\John Smith\Box1\March\*.tif
Discovery Assistant then uses the following logic to automatically generate the Custodian / Box / Folder
export information:
1. TIFF filename, "c:\...\%1\%2\%3\filename.tif" is broken back into the following sub‐directories:
sub directory %1 is Custodian name
sub directory %2 is Box name
sub directory %3 is folder name
This way, no one has to hand‐code any information.
The Discovery Assistant operator checks that the scanner folder is correct when adding files into the
project (checks that the scanner operator has done their job). If there is any confusion as to where
documents came from, they can be immediately traced back to the original folder by using the displayed
source path name. The source path name is reduced to Custodian / Box / Folder at time of export.
If at some later date the Discovery Assistant operator is processing a PST file, or multiple folders of data,
then the same rules apply when extracting the Custodian, Box, and Folder. (ie: everything is consistent
moving forward).
Copyright © 2009 ImageMAKER Development. www.DiscoveryAssistant.com sales: 604 525‐2170. Page 27
Handling WordPerfect files using Word: (WPD)
If installing WPD support for the first time in Word, you may need to install the WPD plug‐in.
Next, you need to set up a file association for WPD files. Easiest way to do this is to right‐click on a WPD
file, then associate Microsoft Word with that file type. (Open association).
Next, to get print and printto file associations established, easiest way to do this is to run the
DA_Sysinfo.exe application and use it to copy across the DOC file associations. \program
files\imagemaker\discovery assistant\DA_Sysinfo.exe wpd‐doc
To switch to using WordPrintTo to handle WordPerfect, go to Discovery Assistant Admin / Configure /
Documents, and go to .DOC to get the over‐ride settings.
The Override setting for WPD will look something like:
"C:\Program Files\ImageMaker\Discovery Assistant\WordPrintTo.exe" /pt "%1" "%2" "%3" "%4"
Copy these same settings to the WPD entry in the Documents dialog.
Calculation of MD5 Hash code to detect duplicates:
Under Options / De‐Duping, users can set the following values:
Hash Code Sample Size(KB) 100 (set to 0 for entire file)
On conversion:
•
Ignore Duplicates (process as usual)
•
Skip Duplicates
•
Copy Duplicates
•
Link Duplicates
(don't convert)
(copy the TIFF file from previous conversion) <‐‐‐‐ recommended
(point to the TIFF file from previous conversions
Hash codes are generated when the file is first entered into the database. To speed things up, users can
set hash code generation to just the first K bytes of a file. Default is 100K.
Duplicates are generated as files are added to the database. If a duplicate is found, the duplicate file,
and the file being added are both marked as 'duplicate'.
Email files are binary files with unique index values within them (MessageID). To compare if emails are
duplicates, we extract and check only the text contents of the message.
Algorithm to check for and assign duplicates:
For each new file being processed:
If Message File, then extract message body (as text).
Copyright © 2009 ImageMAKER Development. www.DiscoveryAssistant.com sales: 604 525‐2170. Page 28
Calculate MD5 hash code for first (x) bytes of file. (multiple of 1K)
Convert hash code to a string
Loop until Done:
Search existing database for first matching MD5 hash code.
If no matching MD5 hash code
Add new hash code.
Done
Else
Binary compare the two matching files.
If files match
Mark both as duplicates.
Done
Else
Add a character extension to the hash value to make it unique, and loop
End Loop
Handling Terabytes of Data:
We rate our product at a gig per day per machine. 1 gig of data averages out to approximately 70,000
pages, and about 5 gigs of storage space. Actual conversion speeds are rated at 3,500 pages per hour of
straight conversion (20 hours a day), plus an additional 4 hours a day to handle the other house‐keeping
tasks, like file import / de‐duplication / deblanking / bates labeling / exporting etc.
In addition to straight conversion is the time to:
•
Set up the machines and install all appropriate software.
•
Quality control review of output data.
•
Exception handling.
•
Trouble‐shooting.
The Discover Assistant operating philosophy is that if you want to convert Terabytes of data, you need
multiple‐Terabytes of storage space and lots and lots of computers.
Copyright © 2009 ImageMAKER Development. www.DiscoveryAssistant.com sales: 604 525‐2170. Page 29
To handle terabytes of data requires:
•
Enumerating what files are to be converted using our TeraBite application.
•
Breaking the project down into 1 or 2 gig Batch files.
•
Optionally run a global 'de‐dup' check
•
Process the Batch files across multiple machines.
•
Export the resultant files back into a case management system for additional processing
Assuming each GIG of data yields approximately 70,000 tiff pages, rough estimates as to time to process
the data are as follows:
Pages per TeraByte:
70,000 pages per gig * 1000 gigs = 70,000,000 pages
Computer time to process a TB (assumes an average of 1 second per page):
70,000,000 * 1/60 = 1,200,000 minutes
20,000 hours or approximately 1000 days.
Standard outsourcing prices per TB (3 cents a page):
70,000,000 * .03 = $200,000
If you had 100 computers on‐site processing the data, 1TB would take 10 days to process.
With two operators running the machines, costs to do a TB would be:
$20K amortization of computers (10% of $200,000 worth of equipment)
$20K amortization of software (10% of $200,000 worth of ImageMAKER, Office, etc)
+ $10K for operator costs
$50K
If you were to outsource the same job to a third party (at preferred rates), expected costs would be:
$200K
System Requirements:
Windows 2000, Windows XP, Windows 2003 (client, server, or WTS).
1 gig of ram.
Copyright © 2009 ImageMAKER Development. www.DiscoveryAssistant.com sales: 604 525‐2170. Page 30
30+ gigs of hard drive space (for output files).
Microsoft Office, Acrobat, IE6, and any other file type application pre‐installed.
Preferred Computer Configuration:
3 Gig memory
Dual 64 bit AMD 2 GHz processor running Windows XP
200 GIG hard drive.
Gigabyte network cable
Discovery Assistant comfortably handles the conversion of up to 100,000 files per project. For example,
if you have one million files to convert, then our recommendation is to break them down into 10
separate projects.
Sample Hard Drive requirements:
3.3 Gigs NSF file
expands to:
15284 files.
9 Gigs of source files
13 Gigs of TIFF/Text/Metadata
Handling Parent Child relationships:
When we load in PST / MSG/ ZIP files, we keep track of all parent/child relationships between the
related files.
Specialized parent/child relationships handling is done at:
•
Queuing for conversion.
•
Assigning doc id's and bates numbers
•
Time of export
•
User interface can identify parent / child / sibling of any item in the queue.
In addition, there are a number of metadata fields designed explicitly to identify ranges of
parent/children.
Copyright © 2009 ImageMAKER Development. www.DiscoveryAssistant.com sales: 604 525‐2170. Page 31
Current methodology for handling parent/children we first load the parent, then we enumerate each of
the children, assigning sequential FileID numbers as we go along. Next we process the children's
attachments, assigning FileID's as we move along, and so forth until the message is processed. We then
go onto the next message.
'Child next' order turned OFF is how we load the files into Discovery Assistant.
0(0‐6)
|
‐‐‐‐‐‐‐‐‐‐‐‐‐‐‐‐‐‐‐‐‐‐‐‐‐‐‐‐‐‐‐‐‐‐‐‐‐‐‐‐‐‐‐‐‐‐‐‐‐
|
|
|
|
|
|
1(0‐6) 2(2‐9*) 3(0‐6) 4
5 6(6‐12*)
|
|
‐‐‐‐‐‐‐‐‐‐‐‐‐‐‐‐‐
‐‐‐‐‐‐‐‐‐‐‐‐‐‐‐‐‐‐‐‐‐
|
|
|
|
|
|
7 (8‐15*) 9
10
11 12(6‐12*)
|
‐‐‐‐‐‐‐‐‐‐‐‐‐‐‐‐‐
|
|
|
13 14 15
'Child next' order turned ON is how we assign Bates Numbers, Document ID's in preparation for export.
0(0‐15)
|
‐‐‐‐‐‐‐‐‐‐‐‐‐‐‐‐‐‐‐‐‐‐‐‐‐‐‐‐‐‐‐‐‐‐‐‐‐‐‐‐‐‐‐‐‐‐‐‐‐
|
|
|
|
|
|
1
2
9
10
11
12
|
|
‐‐‐‐‐‐‐‐‐‐‐‐‐‐‐‐‐
‐‐‐‐‐‐‐‐‐‐‐‐‐‐‐‐‐‐‐‐‐
|
|
|
|
|
3
4
8
13
14
|
‐‐‐‐‐‐‐‐‐‐‐‐‐‐‐‐‐
|
| |
5
6 7
|
15
Assumptions:
1. There is only one parent, everything else is a child.
2. every child has the same parent (0), and all files have the same range (0‐15).
3. when we hit a PST file, that breaks the cycle. PST files are not parents. If a msg file contains a
PST file, then we don't keep track of children.
Copyright © 2009 ImageMAKER Development. www.DiscoveryAssistant.com sales: 604 525‐2170. Page 32
4. The diagram contains items, and range values in brackets. Any range value with an asterix in it is
an incorrect 'child next' grouping.
Parent Child relationships are reported in the export files through the following MetaTags:
(Summation example)
@ATTACHRANGE
"filename" based
@C GROUPRANGE
"filename" based
@C BATESGROUPRANGE "bates number" based
@C BEGATTACH
"filename" based
@C ENDATTACH
"filename" based
Where "filename" can be any combination of DocID, FileID, Title, Bates Number etc. (naming scheme).
If your original files are all named by their DOCID's, and you want to preserve that information at time of
export, then set "filename" to %TITLE% in the naming scheme, and all exported files, and file ranges
(except for BATESGROUPRANGE) will be based on the original filenames.
Exported Ranges of DOCID and BATES Numbers:
DocID Export fields for Summation:
Parent: DOCID_00016
Attachments DOCID_00017‐DOCID_00022
@ATTACH DOCID_00017; DOCID_00018; DOCID_00019; DOCID_00020; DOCID_00021; DOCID_00022
@ATTACHRANGE DOCID_00017‐DOCID_00022
@C BEGDOC DOCID_000160001
@C ENDDOC DOCID_000160002
@C GROUPRANGE DOCID_00016‐DOCID_00022
@C BEGATTACH DOCID_00016
@C ENDATTACH DOCID_00022
Bates export fields for Summation:
Test Data:
Parent: NTR00033‐NTR00034
first attachment NTR00035‐NTR00035
last attachment: NTR00041‐NTR00053
@BATESBEG NTR00033
@BATESEND NTR00034
@C BATESGROUPRANGE NTR00033‐NTR00053
@C BATESGBEG NTR00033
@C BATESGEND NTR00053
Copyright © 2009 ImageMAKER Development. www.DiscoveryAssistant.com sales: 604 525‐2170. Page 33
Note: @ATTACHRANGE and @ATTACH are the only export field that list JUST the attachments. All other
fields include the mail message and attachments within the range.
Support for UTC Date/Time
All dates are UTC based (coordinated universal time), but expressed in the local time zone of the
machine that is doing the conversion.
Here are the exceptions:
•
All files have a Created, Modified and Accessed date stored in UTC format. These date/times
are displayed in local time by the machine that is accessing them. For example, if the files are
written to a hard drive in London at 9:00 AM (Local time is UTC‐0), and that hard drive is then
read in Vancouver (Local Pacific time is UTC ‐8), the time stamp will be reported as 1:00 AM.
•
If files are 'copied' to another directory or filename, then the Create and Last accessed dates of
the new file will change to today's date and time.
•
If files are 'zipped', then 'unzipped', the Created Date, and Last Accessed Date will be set to
today's date/time. Only modified date will be retained. Same goes for RAR compressed files ‐
when uncompressed, only the 'modified' date will be correct.
•
Email received/sent date/time values are stored UTC, and reported in local time.
•
Word / Excel / Powerpoint, Acrobat store the following additional UTC dates in their MetaData:
Date Created
Date Last Printed
Date Last Saved
When we extract these date/times, we use these values to over‐ride the operating system values for
Created/Modified.
Note: most simple file types (such as TXT, HTML, JPEG) have operating system date/time values for
Created, Modified and Accessed, and do not contain any embedded Date/Time Metadata.
Loading in a 'Selection Set'
Discovery Assistant supports two different selection sets: Document ID, and FileID. (FileID's are
internally assigned numbers. Document ID's are user defined strings).
To define a selection set, create a TEXT file containing the FileID's, or DocumentID's, one file per line in
the text file, then use the 'select' button to load that file in.
Items in file list are marked 'selected'.
Practical use:
Copyright © 2009 ImageMAKER Development. www.DiscoveryAssistant.com sales: 604 525‐2170. Page 34
1. Do a first pass‐through to produce converted documents.
2. Assign DocumenID, and export DocumentID with data set.
3. Customer reviews data, and provides you with a list of DocID's to produce.
4. Load selection set in 'converted' tab.
5. Assign Bates Numbers to selection set. Choose 'child recursive' to get children.
6. Sort on Bates Numbers, and select only those that have been assigned bates numbers. Parents
of children are identified by 'bates range'.
7. Select which files you want to bates stamp.
8. Bates Stamp 'selected' files and export OR Export unstamped Selected files.
Estimating Page Counts
If you convert to TIFF, and then use the 'summary report' on the all files tab, you get a CSV file
containing formatted information about:
•
file types
•
number of pages per file
•
total size of files by type
•
number of files converted / passthrough / failed /skipped.
If you don't want to invest time converting the files, BUT still want an estimated page count (for billing
purposes), then queue the data for MetaData conversion only. Then convert (metadata only).
Discovery Assistant then estimates page count based on file size if the count is not already included in
the metatata.
Values used to 'estimate' bytes per page, broken down by file type, are stored in the registry at:
HKLM\Software\ImageMAKER\DiscoveryAssistant\Settings\PageCountEstimates. If you do change these
values, you need to stop/re‐start Discovery Assistant for them to take effect. These values are also
stored in the setup.ini file, and re‐set at installation time.
Actual values for TIFF files are calculated.
Metadata values for Word and PDF are used if available.
Copyright © 2009 ImageMAKER Development. www.DiscoveryAssistant.com sales: 604 525‐2170. Page 35
All other file types are defaults at 10,000 bytes per page.
Some file types (like zip, nsf, pst, msg) are estimated at 1 page per.
Benchmarks tests on DiscoveryAssistant:
Benchmark processing:
On a 2 Ghz system, converting a mix of doc / xls / pdf / html / msg files (with or without
attachments), our rated speed is one page per second.
Hardware Recommendations:
Because file conversion is a diskbound process the greatest determining factor for performance
is file access speed. The greatest performance increase will be realized by moving input files to
a local hard drive and have output files written to a local hard drive. All applications such as
Word, Excel, Acrobat, etc. also need to be accessed from the local drive.
Multi‐processor machines are not recommended. I don't believe the performance increase
would be significant especially in relation to hardware cost.
Available memory is a factor (more memory means less swapping to disk). 512mb or greater
recommended.
Processor speed is a factor. 1.8G or greater recommended.
Specifics:
Test Suite:
235 documents approx. 3,000 pages.
Compaq 1.8G P4 512mb ram
Mix of Word, Excel, PowerPoint, PDF, HTML, Text
TIF G4 300dpi
45 pages per minute
TIF G4 200dpi Windows Fast Dithering
120 pages per minute
Apple LaserWriter 16/600 PS PostScript 220 pages per minute
600dpi
Larger documents (more pages per document) produce more dramatic differences.
Word Document test only on a Pentium 4 2.6 Ghz
Tested 7 WORD files (simple graphics, lots of text) with the following page sizes:
3, 71, 3, 5, 16, 3, 204
3.2 GHZ machine, no hyper‐threading. Lots of memory and big hard drive.
Output DPI
Output Format
Pages per Minute
Page Per Minute without the last File
Copyright © 2009 ImageMAKER Development. www.DiscoveryAssistant.com sales: 604 525‐2170. Page 36
300
G4
84
300
G3
87
300
G3
257
200
G4
150
200
G3
150
200
G3
332
* dithering set to Windows Fast Dither
70
70
206*
130
130
270*
Basic trend:
Speed is greatly enhanced by setting the default dither output to 'Windows Fast Dither'
(image quality can be slightly compromised).
More graphically complicated files take longer to convert.
The higher the output resolution, the slower the conversion.
Additional processing for MSG and PST results in slower conversion.
There is a slight performance penalty for saving in G4 format.
The Windows Fast Dither uses a reduced memory area for conversion, and 'dithers' the text and
graphics to B&W as they are being written to the surface. The Error Diffusion Dithering method
dithers the whole image when it is being written to file (and can take up significantly more
memory).
As you increase the dpi (dots per inch) of the output file, the speed to create each page goes up.
At 200 dpi, the page contains 3.7 million pixels.
At 300 dpi, the page contains 8.4 million pixels.
Current installation default is 300 dpi and 'Windows Fast Dither' set to on.
Error Conversion Codes:
‐1
‐2
‐3
‐4
‐5
‐6
‐7
‐8
‐9
‐10
‐11
"General error",
"Job cancelled",
"ShellExec call failed",
"Control Dialog communication failed",
"Pipe not found",
"Connect timeout",
"Bad UNC name",
"Path too long",
"Remote request requires UNC names for input and output files",
"Timeout total time",
"Timeout job start",
Copyright © 2009 ImageMAKER Development. www.DiscoveryAssistant.com sales: 604 525‐2170. Page 37
‐12
‐13
‐14
‐15
‐16
‐17
‐18
‐19
‐20
‐21
‐22
‐23
‐24
‐25
‐26
‐27
‐28
‐29
‐30
‐31
‐32
‐33
‐34
‐35
‐36
‐37
‐38
‐39
‐40
‐41
‐42
‐43
‐44
‐45
‐46
‐47
‐48
"Timeout first page",
"Timeout next page",
"Timeout max pages exceeded",
"Input file zero length",
"Timeout waiting for print queue to clear",
"No suitable printer available",
"Specified printer does not exist",
"File association does not exist",
"PrintTo command does not exist",
"Print command does not exist",
"Input file does not exist",
"Output path does not exist",
"Disk corrupted",
"Spooler Restarted",
"Unable to set DEMO stamp",
"Timeout waiting for exclusive access to document type",
"Timeout waiting for available printer",
"Could not set default printer",
"Print aborted",
"Aborted from Print Manager",
"Memory allocation failed",
"Disk write failed (probably disk full)",
"Disk write failed (probably file access)",
"Page too long to make into landscape mode",
"Unknown file type specified for output",
"Unknown file type",
"Generic FAX write error",
"Print aborted from control dialog",
"Unable to read from named pipe",
"Terminated by parent application",
"Cannot find named pipe",
"Error calling 16‐bit MFX",
"Error pipe closed (likely means driver timed out)",
"Shell execute failed",
"Create process failed",
"Output file type unsupported",
"Failed to restart spooler"
Support for Conversation Topic and Conversation Index in Outlook:
All internally generated 2003 Outlook email contains a "Conversation Topic" and "Conversation Index"
value.
As email is routed back and forth, the index value is incremented with additional characters. In a sorted
list of Topic values and index values, the longest index value is the last email in the chain.
Idea is lawyers can reduce the amount of data by producing only the last item in the chain AND the
unique attachments in previous emails (draft attachments).
Copyright © 2009 ImageMAKER Development. www.DiscoveryAssistant.com sales: 604 525‐2170. Page 38
Note: Once an email leaves the office (transmitted as MIME), the index and topic values are lost.
Details: The PR_CONVERSATION_INDEX property is used in conjunction with the
PR_CONVERSATION_TOPIC property to allow a conversation thread to be followed.
ConversationIndex property ‐ the first 22 bytes are the same for all messages in the thread. Each
message adds 5 bytes to the conversation index of its parent message.
Note however that ConversationIndex property is broken in all versions of Outlook except 2003
Microsoft MSDN reference:
http://msdn2.microsoft.com/en‐us/library/ms527425.aspx
For more information on conversations, see Tracking Conversations.
http://msdn2.microsoft.com/en‐us/library/ms528947.aspx
Setting up Discovery Assistant to do conversions running as a service:
1. Confirm that Discovery Assistant is working correctly, then shut down Discovery Assistant.
2. Run XDCLauncher in the \program files\ImageMAKER\Discovery Assistant directory. This will
start up a system tray application in the bottom right hand corner of the screen.
3. Right click on XDC Launcher system tray item, and select 'run as a service'. You will be prompted
for a user login name and password. You need to provide a valid login user name and password.
Conversions must happen as a logged in user. (Applications can't seem to print to a print driver
in the 'system account'. Not sure why this is.).
4. If you do want to change or review the service, go to Services Manager (can run services.msc
from the run command, or you can go into Control Panel / System / Services). Locate the
XDCService, and right click to select properties. From the Log On, you can re‐set the username,
password. From the General tab, you can manually start/stop the service.
5. Restart Discovery Assistant, and try converting some files that previously converted. Files will
convert, but you won't see any screen activity.
6. Everything should work. Note, because we are opening documents, the machine will be busy.
Also, if you are converting Word, Excel, or Acrobat file types, you can't be using Word, Excel, or
Acrobat.
7. Should there be any conversion problems, you need to stop Discovery Assistant, switch back to
using xdcService in normal mode, then re‐convert to try and determine the problem.
8. At any time, you can also run imglog.exe and the XDC Admin to get more logging information on
conversion progress.
Copyright © 2009 ImageMAKER Development. www.DiscoveryAssistant.com sales: 604 525‐2170. Page 39
Handling Password Protected Files:
If the file is password protected, our current default behavior is to time out waiting for the application to
print. We then kill the application. The default timeout value is 30 seconds. If there are a lot of
password protected files, then conversion is going to go very slowly.
Failed files can be 'moved' to another directory, and then set up for password cracking. Our
understanding is that cracking a password can take multiple hours per file, and not something to try in
real time.
Some password protected files will put up a user dialog, prompting for a password. The operator can
enter the password at this point. This would include entering passwords for RAR and ZIP files (at time
of import), or passwords for XLS, PDF, and DOC (at time of conversion).
There is limited specialized code to handle the automation of passwords for XLS handling. If the
password for all your XLS files is the same, then you can enter the password as a registry value, and
Discovery Assistant will use that password on all password projected XLS files. The registry location is
HKLM\Software\ImageMAKER\ExcelPrintTo\Settings ‐ "password=".
Note: there are a number of 3rd party applications designed to handle password detection and cracking
for: Excel, Access, Word, RAR, PDF, Outlook.
Detection:
http://www.ozgrid.com/Services/find‐protected‐files.htm
Cracking:
http://www.ozgrid.com/Services/access‐password‐recover.htm
Setting up Distributed Processing:
If you have two or more machines with Discovery Assistant installed, then you can set these machines
up in a master/slave architecture to drive conversion speed.
1. Install Discovery Assistant on each machine
2. Test conversions of multiple type of files to ensure everything is installed
3. For Distributed processing to work, all machines must be logged in as the same user. Slave
server machines cannot be Windows XP home, and need to be upgraded to Pro.
Machines should be able to access each other's shared drives, and should all have the same
date/time setting.
To synchronize times settings, you may need to designate the Master machine as the time
source. Can do this from DOS prompt as follows: net time \\computername /set
Copyright © 2009 ImageMAKER Development. www.DiscoveryAssistant.com sales: 604 525‐2170. Page 40
4. On the Slave machine, run the XDCAdmin program. Under Configure, set the HUB machine to
the name of the Master machine.
You can confirm that the connection worked, because in the log display for XDCAdmin, you
should see:
[02/06/08 16:40:37]Successfully connected to registry on machine: MASTER
[02/06/08 16:40:37]Successfully added pipe name \\SLAVE\pipe\ImageMaker XDC
Service1 to registry
[02/06/08 16:40:37]Successfully connected to registry on machine: MASTER
[02/06/08 16:40:37]Successfully added machine name SLAVE to registry
Do this same exercise for every Slave machine you want to control through the Master.
Current recommendation is that you then 'stop' the XDCAdmin program, (stopping the
XDCService.exe application), and then go over to the Master machine to try a connection.
5. On the Master machine and run Discovery Assistant. Discovery Assistant will try to connect to
registered slave machines (servers) at start‐up. To see what servers are active, go to Options /
Servers, and hit the Manage Servers button. Servers should be listed in the display dialog with
their current status.
Note: under the Options / Servers dialog, you can also manage the list of available Slave
machines. Best for now to do it from each Slave though, as this ensures that the xdcService.exe
application is properly running.
6. Queue up files to convert on the Master machine, and start the conversion process.
Notes:
Error:
Unable to connect to server [SLAVE].
Fix:
Check if SLAVE has a firewall enabled. Need to disable the firewall.
Error:
Unable to establish connection from server to SLAVE to local machine for reporting events.
Probable cause is insufficient permissions.
Fix:
Stop Discovery Assistant on MASTER.
Copyright © 2009 ImageMAKER Development. www.DiscoveryAssistant.com sales: 604 525‐2170. Page 41
Start up xdcAdmin on SLAVE. Confirm in task manager that there is only one xdcService running.
Then re‐start Discovery Assistant on MASTER.
Error:
XDC Server on machine [SLAVE] was unable to provide a share point. Try rebooting that
machine.
Fix:
You may have to manually create a Server\share on the slave machine. Possibility is that
XDCService did not have the proper permissions to create the share.
To do so, map C:\Program Files\ImageMaker\Discovery Assistant\StagingArea to
"XDCServerShare" on the slave machine.
Setting up a permanent Server Share:
When the xdcService application runs on the slave machine, it sets up a
\\machine\XDCServerShare that can be accessed by the Master.
The share maps to the StagingArea sub‐directory in the installation directory.
Default share maps to: "C:\Program Files\ImageMaker\Discovery Assistant\StagingArea".
Normally when XDCService starts up, it creates the share, then when it exists, it removes the
share. If the share already exists before startup, then it leaves the share there on exit.
Setting up and configuring DCOM:
There is a whole tutorial on setting up and using DCOM between machines with different
login's. Also, there is a way to do DCOM across domains.
http://www.opcactivex.com/Support/DCOM_Config/dcom_config.html
There's a utility called DCOMCNFG.EXE that you can also use to set up DCOM settings.
Support for RAR files:
Support has been added for the following RAR file types:
•
standard RAR
Copyright © 2009 ImageMAKER Development. www.DiscoveryAssistant.com sales: 604 525‐2170. Page 42
•
password protected RAR ‐ prompts for password
•
multi‐part Rar: Looks for additional RAR files with extensions:
o
filename.part1.rar
o
filename.part2.rar
o
filename.part3.rar
Using Discovery Assistant as a preview tool:
Discovery Assistant has been designed mainly as a eDiscovery Processing tool. It imports source files
and exports formatted data that can be loaded in to a case management package ready for discovery.
We recognize that the higher up you cull data in the chain, the less processing there needs to be done
closer to production.
Typical requirements of a preview tool are to review source documents and tag them as:
Privileged, Non Privileged, Responsive, Non‐responsive.
Only responsive non‐privileged documents are produced as TIFF files to the other side.
I believe that in the context of Discovery, the Preview process can be performed using one of the
following scenarios:
Using just Discovery Assistant:
1. Import files into Discovery assistant
2. Open each document one at a time, then assign flags based on content.
Requires a lot of individual steps to flag each item, slow and cumbersome, can't be distributed.
A slightly more refined approach:
1. Use a separate tool to extract files into source files within a directory.
2. Use QuickView Plus type tool to review source files and mark with tags.
3. Import the responsive source files into Discovery Assistant for processing.
Risk of losing the parent/child relationships and polluting the metadata.
How some of our other customers do it:
1. Import all files into Discovery Assistant.
2. Process MetaData only, assign DocID, and export Source only.
Copyright © 2009 ImageMAKER Development. www.DiscoveryAssistant.com sales: 604 525‐2170. Page 43
3. Export to Summation / Concordance / Ringtail hosted review tool (load file).
4. Review documents in Summation / Concordance / Ringtail application (includes an integrated
search and source file viewer).
5. Multiple users can review/categorize/tag documents.
6. When done, a file list of Document ID's is produced.
7. Back in Discovery Assistant, select files using the DocumentID list, and queue only those ID's that
are selected.
8. Produce TIFF files from selected documents.
Requires importing a lot of data into Discovery Assistant / Summation / Concordance / Ringtail.
The ultimate solution we're working towards:
•
Crack input files into source files + metadata and load into SQL library.
•
Use an integrated SQL interface to perform searches through SQL stored metadata ‐ and assign
tags.
•
Use an integrated dtSearch to perform searches through indexed source files ‐ and assign tags.
•
Use an integrated QuickReview tool to review indexed source files and assign tags.
•
Process selected files as necessary (to TIFF/Text)
•
Export source + TIFF + TEXT + metadata into DiscoveryAssistant file for final review, and export
to load file.
These features are currently only available through hosted services (Still not built yet as an end‐user
application).
MSG Handling (under the hood):
At time of import of PST or MSG files, the following takes place:
1. Message contents and Message metadata are extracted to the projectname.tmp directory in
TXT format.
2. MD5Hash value is calculated based on the TXT message contents.
At time of conversion, the following takes place:
1. If the metadata file has been deleted, Metadata is re‐generated.
Copyright © 2009 ImageMAKER Development. www.DiscoveryAssistant.com sales: 604 525‐2170. Page 44
2. Message contents are extracted to HTML, RTF, or TXT, and converted using one of the
registered converters, and saved in the projectname.cnvt directory as .TIF and .TXT. Log
information is saved as .LOG. If the metadata file already exists in the tmp directory, it is copied
over from there and then deleted.
If you re‐queue a file for conversion, all four related files in the projectname.cnvt directory are deleted,
including the metadata file.
If you go to the AllFiles tab, and hit 're‐check', metadata and extracted text information is regenerated in
the projectfile.tmp directory, and the MD5‐Hash value is re‐generated.
If you select 'Project / Remove Temp Files' from the menu, all temp files for the entire project are
deleted.
If you get a message 'problem generating metadata for item...', what we recommend is to save the
project, stop Discovery Assistant, re‐open the project, and re‐check that file (re‐check button).
Questions and Answers
http://discoverassistant.com/QandA.asp
Application Details:
Clustered‐server support:
Discovery Assistant currently supports single machine conversion, and a simple client/server
configuration (client controls the server).
Support for clustered‐server support, with many client machines connected to many server
machines is currently in development and should be ready for testing Oct 2004.
Doc current dates
One way we can solve the 'cur date' issue is to look at the source document date (date last
modified), then set the system date to that date before doing the conversion. User must specify
that is what they want. We would then change the date back to the saved date on completion.
Backend Database used:
Currently using an XML data representation. Can migrate to using a MDB file (Microsoft
database format). If the user is contemplating managing large data sets, then we need to look
at substituting a MDB file with a SQL type interface.
Format of Exported Data:
Currently output to Summation DII type 1 formatted file.
MetaData includes the email subject, address, and message body.
Copyright © 2009 ImageMAKER Development. www.DiscoveryAssistant.com sales: 604 525‐2170. Page 45
MetaData files are formatted as follows:
Name:SAMPLE ZIP.ZIP
Size:39 KB
Type:WinZip File
Modified:11/11/2003 3:15 AM
Attributes:A
Additional information for MSG files
Type:Outlook Mail Item
From:Ken Davies
To:Jian Huang (E‐mail)
Cc:(null)
Bcc:(null)
Subject:Test Message
Sent:08/30/04 12:50:34
Received:08/30/04 12:50:34
Number of Attachments:0
Body:
... details in message body, formatted as either TXT, RTF or HTML
Modify Date
‐ date email message was last replied to, or moved into folder
Create Date
‐ date email message was stored to the folder.
Sent Date/Time ‐ date/time message was sent. (GMT).
Received Date/Time ‐ date/time message was received (GMT)
To export email that was sent/received within a specified time period:
1. Process as Metadata only.
2. Export metadata: FileID, Modify date, SentDate and Received Date to a CSV file
Be sure to select 'use parent Sent and Received date/time for attachments in the 'More Export'
options
3. In a spreadsheet, create a column based on following:
Received date if it exists.
Sent date otherwise
Modify date otherwise
4. Sort the new column in Excel
5. Save as a FileID list and 'formatted date' (YYYYMMDD)
6. Import the list ‐ User Fields ‐ assign from CSV.
Copyright © 2009 ImageMAKER Development. www.DiscoveryAssistant.com sales: 604 525‐2170. Page 46
7. Sort the user field to identify what files fall within the date range in question.
8. Re‐process just those files.
Adding a new file association:
To create a file association for a file that you can open, but cannot print:
1. go to Admin / Configure / Document,
2. select the 'greyed' matching file type extension (.xyz)
3. select Modify, choose 'over‐ride', and put in the override print command.
To create a brand new file association:
1. go to Admin / Configure / Document,
2. Select 'new'.
3. In the New dialog, choose 'CopyFrom' to grab default settings similar to your file type (for
example, file type XYZ may be close to how you currently handle TXT)
4. Modify the settings, and save.
Support for .JPG:
On some systems there may not be a default browser for .JPG files.
Quick fix is to run imgview.exe (Start / ImageMAKER Discovery Assistant / Imgview) From the menu
Options, choose 'set as default viewer', then select JPEG as one of the files we handle.
Go back to unconvertible tab, and do a re‐check. files should be automatically moved over to
convertible.
Imgview.exe handles most JPEG formats. However, if there is a problem with Imgview, you can switch
to using Internet Explorer to handle the printing:
To force Internet Explorer: go into the Discovery Assistant / Admin / Configure / Documents tab.
Look for HTML, do a modify, check what the PrintTo command is. Should look something like:
rundll32.exe %SystemRoot%\System32\mshtml.dll,PrintHTML "%1" "%2" "%3" "%4"
Can then go to JPG (which is now pointing to or ImgView.exe application), hit Modify, select the
'override default command' then paste in the rundll32 command above into the 'Override Cmd' text
edit box.
Copyright © 2009 ImageMAKER Development. www.DiscoveryAssistant.com sales: 604 525‐2170. Page 47
Support for GIF:
We use the native installed application on your computer to handle printing GIF files.
Normally, the XP Windows Picture and Fax Viewer can print these files.
On Windows XP and Windows 2003, the Windows Picture and Fax Viewer can do the job. To set the
default, go into explorer, do a search for GIF, then open a GIF. At that point, the file association will be
set. Can then do a re‐check from Discovery Assistant, and the GIF files will be convertible. Same
process for JPEG.
On a Windows 2000 machine, run the Imaging For Windows application, and set the menu item: Tools /
General Options ‐ open images in Imaging.
Support for LZW compressed TIFF:
Our standard IMGVIEW.EXE application handles converting most TIF, DCX, BMP and JPEG formats.
To set imgview as the default viewer (conversion application), run imgview.exe, then select Options /
Set default viewer.
If you need conversion support for LZW compressed TIFF, then need to revert to standard Microsoft
viewers. This is the same process for any version of Windows:
Basic idea is to:
1. Open Discovery Assistant, and select Admin.
2. From Admin, select Config / Documents tab
3. From the file type list, highlight .TIF, then select the Modify button.
4. Set the following check‐boxes on:
AutoKill application if timeout occurs
Override default PrintTo command
set the Override Cmd to be (substitute the correct system directory)
WinXP:
rundll32.exe F:\WINDOWS\system32\shimgvw.dll,ImageView_PrintTo /pt "%1"
"%2" "%3" "%4"
Win2000:
"C:\Program Files\Windows NT\Accessories\ImageVue\KodakPrv.exe" /pt "%1"
"%2" "%3" "%4"
Under Win2000, you also have the option of running Imaging For Windows, then selecting Tools /
General Options / Open images in Imaging.
Copyright © 2009 ImageMAKER Development. www.DiscoveryAssistant.com sales: 604 525‐2170. Page 48
Support for iCalendar and vCalendar File Formats (ICS / VCS):
Discovery Assistant includes native ICS / VCS formatting support.
Support for Microsoft Office Document Imaging (MDI):
Need to install Microsoft Office Document Imaging 2003 (or higher).
Product only has a 'Print' file association. Requires that we simulate PrintTo by setting the default
printer to be the Discovery Assistant print driver (Controlled through Discovery Assistant).
"D:\Program Files\Common Files\Microsoft Shared\MODI\11.0\MSPVIEW.EXE" /p "%1"
Quality Control Support in Discovery Assistant:
Users import files into Discovery assistant from three main sources:
Directories on hard drives (or CD Roms).
PST files.
ZIP files.
These files are then listed in Discovery Assistant under the following tabs:
All Files
Non Convertible
Convertible
Queued
Converted
Failed
Stamped.
During the conversion process, files are moved from the 'all files' category through to the 'stamped'
category through a series of steps. Each tab contains a subset of the 'all files' list ‐ representing the
stage at which the conversion process has reached for those files. For various reasons, not all files make
it over to the stamped directory ‐ and this is where the auditing features become important.
Audit features implemented in Discovery Assistant ensure that users can confirm that "files in" == "files
out". These features include:
1. Sort by Field Heading:
Copyright © 2009 ImageMAKER Development. www.DiscoveryAssistant.com sales: 604 525‐2170. Page 49
Lists can be sorted by name, modify date, type, and size. For email attachments we substitute
'subject' for the name, and 'received date/time' for the modify date. (There currently isn't a
'from' column heading).
Because documents come from different sources / different directories, users have the ability to
specify a filter before reviewing the list. Filters can be turned ON or OFF. With a filter set to ON,
the displayed list contains only those files that match the filter criteria. Typically the filter
criteria is defined as: 'comes from this folder or sub‐folder', or is part of the following ZIP or PST
file.
For example, users can set the filter to include only files from a certain PST file, or PST file folder,
or Zip file. Then users sort by name / date / type, consistent with how Explorer / WinZip /
Outlook works, and can then compare files that are listed in Discovery Assistant with files that
are listed in Outlook/Explorer/Winzip using the exact same sort order.
2. View native file
At any point in the process, users can 'click' on the displayed file, and see it in the native
application. If the file is in a ZIP or PST file, it is automatically extracted first in order to be
displayed.
3. View converted file, meta data, and txt contents.
Converted files can be viewed as TIFF, TXT, or meta‐data only.
4. Reporting provisions:
At any point, the current 'list' can be exported to another format for further processing.
Currently these formats include: Summation DII file types, comma separated value, and XML.
Supported File Types:
Discovery Assistant supports any file type for which there is a Print or PrintTo file association. To
confirm what file types are supported, go to the Discovery Assistant / Admin / Configure / Documents
tab.
This provides a list of documents that are supported on the machine you are converting on.
For certain file types listed below, there are additional setup instructions that you can follow to tweak
the behavior.
To identify the filetype, we match the document against the signature stored in the fassoctable.txt file.
Copyright © 2009 ImageMAKER Development. www.DiscoveryAssistant.com sales: 604 525‐2170. Page 50
We check contents first. if we recognize contents, then we return 'content type'. If we don't recognize
content, then we return 'document extension type' If the file type is included in the 'Strict' section, then
we only return that type if we recognize the contents.
The current advantage of how things work is that if we don't recognize the file, then the extension is
used by default.
Not in Strict List:
WordFile.DOC ‐ return DOC
WordFile.xxx ‐ we force to DOC
WordFile
‐ we force to DOC
* Unknown.doc ‐ we don't know what it is, so call it DOC
In strict List:
WordFile.DOC ‐ return DOC
WordFile.xxx ‐ we force to DOC
WordFile
‐ we force to DOC
* Unknown.doc ‐ we don't know what it is, so call it UNKNOWN
Not in Table:
WordFile.DOC ‐ return DOC
WordFile.xxx ‐ return xxx
WordFile
‐ return unknown
Unknown.doc ‐ return DOC
Microsoft Excel:
There are a number of custom settings for Excel. To configure Excel printing, Goto Admin / Configure
/ Excel Options to set the following:
Set all worksheets to active before printing
Clear print area before converting (print all cells)
Clear headers
Clear Footers
Orientation
Scale / Fit To.
Comments
Order
Print Quality
Paper Size
Copyright © 2009 ImageMAKER Development. www.DiscoveryAssistant.com sales: 604 525‐2170. Page 51
Advanced:
Un‐hide hidden worksheets before printing.
Un‐hide hidden cells, columns, and rows.
Export formulas to text file.
Clear print area (prints entire sheet, not just specified area)
Macros (never run)
Recalculation (on demand)
Column Widths (set each cell individually)
Column Width threshold
Row Heights (set all cells on sheet at once)
Grid Lines (force disabled).
Excel can print some extremely large TIFF files (1000's of pages). Normally this isn't a problem unless
there happens to be a lot of grey scale (dithering) in the image. If the image size exceeds 2Gigs, then
Discovery Assistant has problems handling the image. To get file sizes down for grey scaled large XLS
files, need to set the printer dithering (printer properties / General Tab / Printing Preferences /
Advanced / Color Mode to: 'Color ‐ Dither from 256 colors', and Dither Pattern to: Big 2x2 (5 shades).
Adobe Acrobat 7.0: (PDF)
Need to set the default 'Comments and Forms' settings in the Acrobat print dialog to:
Document and Markups.
Previous setting was:
Document and Stamps
This is a global setting. From now on you will get Markups (like signatures and highlights). I guess that
means though ‐ you will no longer get stamps.
To get different sized pages (legal and letter) need to do the following:
•
Open Acrobat (either Acrobat 6.0 or Acrobat 7.0)
•
Open a PDF file.
•
Under File / Print menu item, open Print Dialog
•
In Print Dialog, set
•
o
Page Scaling: Fit to Paper
o
Choose Paper Source by PDF page size.
o
Print to any printer (ImageMAKER xxx is fine).
Close Acrobat
Copyright © 2009 ImageMAKER Development. www.DiscoveryAssistant.com sales: 604 525‐2170. Page 52
To get all pages the same size, turn off 'choose paper source by PDF page size'.
To turn 'flatten' off (speeds up conversion), open a PDF file, then from the File / Print Dialog, under
'advanced', choose 'print as image'. (Acrobat 8.0).
To turn 'autoupdates' off:
Under the Edit menu, select 'updates', and toggle the following:
•
do not automatically check for critical updates ON
•
Display notification dialog at startup OFF
•
Display installation complete dialog OFF
[HKEY_CURRENT_USER\Software\Adobe\Acrobat Reader\7.0\Updater]
"iUpdateFrequency"=dword:00000000
"bShowInstCompDialog"=dword:00000000
"bShowNotifDialog"=dword:00000000
Our method of printing (to Acrobat 8) is as follows:
•
start and stop Acrobat for each document
•
use Print rather than 'Print To' when printing documents
•
use the DDE Print method, not commandline method.
Known problem issues with Acrobat that we handle are:
•
if we don't shut Acrobat down, then it leaks memory.
•
user must make sure Acrobat does not prompt for software updates.
•
odd sized pages (Legal, A4, etc) get cut off when printing to letter sized paper.
•
some documents print with garbled text.
Internet Explorer: (HTML)
Under Page Setup, need to remove the header and footer.
Also, in the same dialog, best to increase the left and right margins to as wide as possible (avoids
anything getting cut off when printed).
Under the Tools / Internet Options / Advanced / Printing section, set the 'Print background colors and
images' value to ON.
Copyright © 2009 ImageMAKER Development. www.DiscoveryAssistant.com sales: 604 525‐2170. Page 53
.GIF and .JPG
Windows XP default viewer for .GIF and .JPG is the Windows Picture and Fax viewer.
To set up this viewer as the default, need to use Windows Explorer to find one of these images (Gif or
Jpg), then double‐click on the file to open it. This forces the viewer to register itself. Stop and re‐start
Discovery Assistant to register the new supported file types.
Outlook: (PST, MSG)
Discovery Assistant supports all Outlook Items that are stored in message folders.
Discovery Assistant does not do Contacts at the moment.
Here is the definitive list of Outlook items we handle:
MailItem
ApptItem
ContactItem
DistListItem
JournalItem
MeetingItem
NoteItem
PostItem
ReportItem
TaskItem
TaskRequestAcceptItem
TaskRequestDeclineItem
TaskRequestItem
TaskRequestUpdateItem
Attachment
If the PST file has any corruption in it, we only get out partial data, and this can lead to problems,
possibly at time of export.
To check for PST problems, we've included code to identify any corrupt messages at time of scan. Any
identified corrupt files are moved to the 'failed' folder, and a dialog box is displayed on completion of
scan indicating the problem.
We've found that if you then subsequently 'move' these failed messages out of the PST file, either into
another PST file, or save as MSG files, that Outlook does a fairly good job of fixing the corruption, and
they generally convert and export properly from there.
You can check for PST problems using scanPst.exe (see comments in scanpst.hlp).
On our machine, the EXE is in: "C:\Program Files\Common Files\System\Mapi\1033\NT" Note: Make a
copy of the PST file before using the scan tool. The scan tool modifies the PST file, and information can
be deleted.
Copyright © 2009 ImageMAKER Development. www.DiscoveryAssistant.com sales: 604 525‐2170. Page 54
Outlook Express: EML and DBX
DBX files can be imported from a Store Directory into Outlook Express. EML files can be dragged in from
Explorer into a folder.
To convert EML and DBX files:
1.
Drag / copy / load the separate EML files into your Outlook Express application.
Can organize into folders, place them in the in‐box, etc.
2. Export to Outlook by going through File / Export / Messages. Can choose all folders, or select
which folders to export. These files will then end up in those same folders in your Outlook
mailbox.
OR...
Close Outlook Express, then from Outlook, do an 'File Import / Import Internet Mail and
Addresses'. This will go out and look for Outlook Express mailboxes to import.
3.
Save these folders as a PST file, and then load the PST file into Discovery Assistant.
At some point in the future we'll look at doing native EML support. We've done some
prototypes that use CDO, and can do the required enumeration of data items, but it's messy.
Access Database (MDB)
To process Access dadabase files (MDB), best to do the following:
1. download and install the Stand‐alone TIFF print driver from
http://www.discoveryassistant.com/Download/Downloads.asp
2. do a passthrough of the Access file.
3. create an access report that can print out the data.
4. In the QC module, manually print the Access database (using the Access Report format) to the
stand‐alone TIFF print driver. Replace the place‐holder with the TIFF file.
If you have 100's of access reports that need to be automated, then provide us with the specifics, and
we'll work with you to define an automated solution.
Autocad: (DWG DXF and DWF)
First Choice: 45 day evaluation period, after which you need to pay $99
ABViewer from Cad Soft Tools.
ABViewer is the quick CAD viewer and converter. As a multi‐purpose application ABViewer
advanced functions for dragging, zooming and centering images.
Copyright © 2009 ImageMAKER Development. www.DiscoveryAssistant.com sales: 604 525‐2170. Page 55
has
CAD file formats DWG, DXF, HPGL, SVG and CGM supported.
http://www.cadsofttools.com/en/products/abviewer.html
1. From Windows Explorer, choose Tools / Folder Options / File Types, and look for DWG.
2. If it's there, delete the entry
3. Select NEW
4. For File Extension, type in DWG
5. In the 'Details for DWG Extension' section, select 'Advanced',
In the 'choose icon' section, select Browse, and look for the application: "D:\Program
Files\ABViewer 5\ABViewer.exe"
6. Select 'New', and add the following:
Action: Open
Application Used: "D:\Program Files\ABViewer 5\ABViewer.exe" "%1"
(quotation marks required)
7.
Select 'New' and add the following:
Action: Print
Application used: "D:\Program Files\ABViewer 5\ABViewer.exe" /p "%1"
(quotation marks required)
8.
Repeat steps above for any additional file formats.
Supported formats include:
•
AutoCAD DXF
•
AutoCAD DWG
•
HPGL
•
EMF Enhanced Windows Metafile
•
WMF Windows Metafile
•
CGM Computer Graphics Metafile
•
SVG Scalable Vector Graphics
Copyright © 2009 ImageMAKER Development. www.DiscoveryAssistant.com sales: 604 525‐2170. Page 56
•
EPS Encapsulated Postscript Images
•
RPF Alias/Wavefront images
•
SGA SGI Images
•
and many more...
9. Close Windows Explorer, Open Discovery Assistant.
10. Open a DWG file using ABViewer.
11. To close the 'Trial' dialog that comes up, From Discovery Assistant / Admin / Config /
AutoClose, select ADD.
Drag the magnifying glass out of the box, and drag over the AbViewer 'Trial' dialog
(whole dialog has a black box around it).
12. To ensure the graphics lines are all printed, In the Start / Settings / Printer Properties
dialog for "ImageMaker XDC Service1", in the general tab, under 'preferences /
advanced', set the image render options / color mode to "Color ‐ error diffusion
dithering"
2nd Choice:
Auto‐Vue from Cimmetry Systems http://www.cimmetry.com $500 for release version.
demo version sets up with no user changes.
places a watermark on the image.
3rd Choice:
Download and install the Autocad Volo® View 3 Viewer:
start page:
http://usa.autodesk.com/adsk/servlet/index?siteID=123112&id=3239384
or direct download:
Copyright © 2009 ImageMAKER Development. www.DiscoveryAssistant.com sales: 604 525‐2170. Page 57
http://usa.autodesk.com/adsk/servlet/item?siteID=123112&id=4424149
"Turn your design reviews into an efficient electronic process with Volo® View 3, the high‐
performance digital design review tool from Autodesk. Get the information to everyone who
needs it—even those without access to the originating software such as AutoCAD® or Autodesk
Inventor®."
Three things you then need to do to get things working:
1. set the ImageMaker XDC Service1 as the default printer.
2. Add a 'PrintTo' file association for .DWG .DXF and .DWF (Do this by copying the
contents of 'Print'). Can get to this from the Windows Explorer application /
tools / folder options / file types.
3. In the Admin dialog, under Configure / AutoClose, ADD an entry, and train it to
'close' the VoloView print dialog.
Other viewers that support Viewing and Printing:
Microsoft Viso can open and view autocad drawings. May or may not be able to print to the
default printer (still to be investigated).
Solid Works has a free downloadable DWG/DXF.SolidWorks viewer(eDrawings Viewer).
http://www.solidworks.com/pages/products/edrawings/viewer.html
VectorWorks .MCD
Note: To download the VectorWorks 12.5 viewer: http://www.nemetschek.net/downloads/index.php
Need to open a .MCD file, and manually print once to the 'ImgMaker Batch Converter'. Then close the
application. This sets the following registry value:
HKCU\software\Nemetschek\VectorWorks 12\Preferences
Previously Used Printer: [need to set this to 'ImageMaker XDC Service1']
Copyright © 2009 ImageMAKER Development. www.DiscoveryAssistant.com sales: 604 525‐2170. Page 58
QuickView support (converting unsupported file types)
Quick View Plus 8 from Avantstar / Stellent can be used to print file types for which you do not already
have an application viewer installed. For example, quickView can be used to view/print TXT files that
have a non TXT file extension ‐ such as .INI, .XML, and .REG.
To set up a Quick View fil;e association, go to the Admin Dialog / Configure / Documents, and select a
document type. If the document extension is not there, you need to add it.
From the Modify Dialog, select the following settings:
AutoKill application if timeout occurs.
Allow only one conversion at a time for this document type.
Simulate PrintTo by using Print and temporarily changing default printers.
Override default PrintTo command
Override Cmd:
"C:\Program Files\quick view plus\Program\qvp32.exe" ‐bprn "%1"
(need to substitute proper application directory).
If the file type extension does not exist, then you must go into Windows Explorer, and do the following:
1. From Tools / Folder Options / FileTypes, select ADD
2. Add the filetype '.123'. Can associate this filetype with QuickView.
3. Edit the 'Advanced' section, and add a 'Print' association.
Can associate the filetype with QuickView.
If these instructions do not make sense, go and look at the FileType association settings for .TXT.
4. Do this for all missing filetypes.
5.
Go back to DiscoveryAssistant / Admin / Configure / Documents, and do a re‐fresh list.
Should now see these filetypes.
6.
Can now 'edit' the file association information.
The file PrintTo override is set up in the registry as follows (one for each supported file type):
[HKEY_LOCAL_MACHINE\SOFTWARE\ImageMaker\xdc\DocumentTypes\.reg]
"AutoKill"=dword:00000001
"UseShellExec"=dword:00000000
Copyright © 2009 ImageMAKER Development. www.DiscoveryAssistant.com sales: 604 525‐2170. Page 59
"UseOverride"=dword:00000001
"OverrideCmd"="\"C:\\Program Files\\quick view plus\\Program\\qvp32.exe\" ‐bprn \"%1\""
"Exclusive"=dword:00000001
"SimulatePrintTo"=dword:00000001
For more info on downloading and installing Quick View:
http://www.avantstar.com/stellent/intradoc‐
cgi/idc_cgi_isapi.dll?IdcService=SS_GET_PAGE&ssDocName=QuickViewPlusOverview
Contact Information
For additional sales and technical information, contact:
ImageMAKER Development Inc.
Sales: Toll Free (866) 525‐2170 or (604) 525‐2170 [email protected]
Support: (604) 525‐2108 [email protected]
Fax: (604) 520‐0029
Web: www.imgmaker.com
Appendix A: Export Format Notes
Export Naming Conventions:
Exported files can be named using any combination of the following:
%ProjectID%
%FileID%
%TITLE%
%SHORT_TITLE%
%EXT%
%BATESSTART%
%BATESEND%
%PAGE
%BATES%
%DOCID%
ASCII_STRING
Three letter project ID
Internal file ID
Original file name(includes parent if zip/msg/eml)
Guaranteed 32 char unique name
Original file extension
Starting bates sequence for file
Ending bates sequence for file
Page number
Bates number for page
User assigned document ID
Any ASCII string
Export File Formats:
Export Directory Structure Options:
If we take a set of source files,
Source Files
custodian1\list.doc
custodian2\Folder1\sample.pdf
Assigned Name
file1
file2
Copyright © 2009 ImageMAKER Development. www.DiscoveryAssistant.com sales: 604 525‐2170. Page 60
custodian2\Folder2\sales.xls
custodian3\Box1\Folder3\january.doc
custodian3\Box1\Folder3\february.doc
custodian3\Box1\Folder3\march.doc
file3
file4
file5
file6
Will get the following directory exports:
Flat:
‐‐‐‐‐‐‐‐‐
|‐‐‐Output
| File1.tif
| File2.tif
| File3.tif
| File4.tif
| File5.tif
| File6.tif
|
| File1.txt
| File2.txt
| File3.txt
| File4.txt
| File5.txt
| File6.txt
|‐‐‐Source
File1.doc
File2.pdf
File3.xls
File4.doc
File5.doc
File6.doc
Mirror:
‐‐‐‐‐‐‐‐‐
|‐‐‐Custodian1
| |‐‐‐source
| | File1.doc
| File1.tif
| File1.txt
|
|‐‐‐Custodian2
| |‐‐‐Folder1
| | |‐‐‐source
| | | File2.pdf
| | file2.tif
Copyright © 2009 ImageMAKER Development. www.DiscoveryAssistant.com sales: 604 525‐2170. Page 61
| | file2.txt
| |
| |‐‐‐Folder2
|
|‐‐‐source
|
| File3.xls
|
file3.tif
|
file3.txt
|
|‐‐‐Custodian3
|‐‐‐Box1
|‐‐‐Folder3
|‐‐‐souce
| File4.doc
| File5.doc
| File6.doc
File4.tif
File5.tif
File6.tif
File4.txt
File5.txt
File5.txt
Bates:
‐‐‐‐OUTPUT
| ‐‐‐‐Bates_file1
| | File1.tif
| ‐‐‐‐Bates_file2
| | File2.tif
| ‐‐‐‐Bates_file3
| | File3.tif
| ‐‐‐‐Bates_file4
| | File4.tif
| ‐‐‐‐Bates_file5
| | File5.tif
| ‐‐‐‐Bates_file6
|
File6.tif
‐‐‐‐SOURCE
| ‐‐‐‐Bates_file1
| | list.doc
| ‐‐‐‐Bates_file2
| | sample.pdf
| ‐‐‐‐Bates_file3
| | sales.xls
| ‐‐‐‐Bates_file4
| | january.doc
| ‐‐‐‐Bates_file5
Copyright © 2009 ImageMAKER Development. www.DiscoveryAssistant.com sales: 604 525‐2170. Page 62
| | february.doc
| ‐‐‐‐Bates_file6
| | march.doc
‐‐‐‐TEXT
| ‐‐‐‐Bates_file1
| | File1.txt
| ‐‐‐‐Bates_file2
| | File2.txt
| ‐‐‐‐Bates_file3
| | File3.txt
| ‐‐‐‐Bates_file4
| | File4.txt
| ‐‐‐‐Bates_file5
| | File5.txt
| ‐‐‐‐Bates_file6
File6.txt
Vol/Box
‐‐‐‐VOL0001
‐‐‐‐BOX0001
| |‐‐‐‐source
| | File1.doc
| | File2.pdf
| File1.tif
| File2.tif
| File1.txt
| File2.txt
|
|‐‐‐BOX0002
| |‐‐‐‐source
| | File3.xls
| | File4.doc
| File3.tif
| File4.tif
| File3.txt
| File4.txt
|
|‐‐‐BOX0003
| |‐‐‐‐source
| | File5.doc
| | File6.doc
| File5.tif
| File6.tif
| File5.txt
| File6.txt
Copyright © 2009 ImageMAKER Development. www.DiscoveryAssistant.com sales: 604 525‐2170. Page 63
Summation DII notes:
Classifications of DII Files
Summation created a batch load file format and protocol that service bureaus can use to facilitate the
processing and delivery of eDiscovery that will be loaded into a Summation case. Service bureaus can
provide eDiscovery using three different types of DII files:
* Class I DII file ‐ This class is geared toward traditional paper discovery service bureaus that scan paper
documents and use Optical Character Recognition (OCR) technology on the resulting imaged documents.
Also, in this model, e‐mail messages and electronic documents (received in either in paper or native,
electronic format) are converted or petrified by a service bureau to TIFF or PDF image formats, and the
text and metadata are extracted. When loaded into a Summation case, the image information is loaded
into the ImgInfo table, the full‐text is loaded into the ocrBase, and generated metadata is loaded into
the Core Database. The difference between a Class I DII file and a DII file prepared for previous versions
of Summation is the ability of the Class I DII file to more easily maintain the parent/child relationships of
compound documents.
* Class II DII file ‐ This file is geared toward forensic‐oriented service bureaus that extract or parse
metadata and e‐mail message information for loading into designated Summation Core Database fields.
Native electronic files are copied to the eDocs repository specified in the case directory structure. Once
the files are copied and the data loaded, the user can take advantage of Summation's multi‐file format
index, search, and retrieval functions to produce electronic documents in their native formats. These
Class II DII file attributes will allow users to narrow or winnow down a collection of electronic data, such
as e‐mail messages, to only disclose relevant non‐privileged data to the requesting party. The Class II DII
file also facilitates the preservation of the parent/child relationships of compound documents.
* Class III DII file ‐ This file is a combination of the Classes I and II DII file formats.
The above DII load file classes give Summation users the ultimate flexibility for applying the varying
formats and protocols used to acquire, process, deliver, and deploy digital information underlying
litigation, regulatory compliance, and risk management.
Note: The above DII load file formats are also acceptable formats to deliver electronic data that will be
loaded into CaseVault, the litigation hosting service and subsidiary of Summation Legal Technologies.
CaseVault can be used as a winnowing platform for cases that include large volumes of electronic data.
Once the set is culled and reduced, the electronic data can be loaded into a Summation system for
additional review and case preparation.
Note:
Tokens can be longer than 8 characters, but fields cannot be. For example, the @ATTACHRANGE token is
11, but it populates the ATTRANGE field, which is only 8. Custom tokens have to be under 8 because the
fields they populate are limited to 8 chars in size.
Copyright © 2009 ImageMAKER Development. www.DiscoveryAssistant.com sales: 604 525‐2170. Page 64
ImageMAKER custom defined additional fields in the Summation Export DII file:
@C FILENAME calendar.zip
@C FILEPATH Z:\Web_test_files\calendar.zip
@C ISDUP True
@C DUPPATHS C:\test\test.HTM; C:\test\testcopy.htm.
@C PGCOUNT 10
Details:
FILENAME ‐ name of file at time of conversion.
FELEPATH ‐ original source path for file (when being converted).
PGCOUNT ‐ number of pages in the converted file.
Default is 1 if record not defined in data set.. or defaults to last value defined if not defined in a
FileID record.
If files are exported single page per file, then this value indicates total number of exported
pages for the source file.
PgCount is already defined as a custom data field in the Summation
database.
ISDUP ‐ defines whether the record has any other duplicates in the exported data set.
This information is used when reviewing the data ‐ and indicates that there are other copies of
the same information elsewhere in the data set. (Field name lengths are limited to 8 chars).
Supported values are 'True' and 'False'
DUPPATHS ‐ lists the 'filePath' source file names that are in the duplicate set.
This value lists source filenames of the duplicate files, not DocIDs' and gives an immediate
indication as to where the duplicate data is stored. FilePaths are separated by a '; ' character
pair (Semicolon/space).
If there are no duplicates, then the character string 'NA' is required.
Sample DII File:
; Summation DII Class I File
; Created on 7/20/2005 2:55:29 PM
; Created by DiscoveryAssistant version 3.2 build 1095
; Copyright © 2004,2005 ImageMaker Development Inc.
;
Copyright © 2009 ImageMAKER Development. www.DiscoveryAssistant.com sales: 604 525‐2170. Page 65
; Machine Name: BLAISE
; Project Path: F:\Work\TEST.xml
; Project Name: TEST
; Project ID: TM
@FULLTEXT DOC
@T 0000038
@DOCID 0000038
@MEDIA eDoc
@APPLICATION WinZip File
@C FILENAME calendar.zip
@C FILEPATH Z:\Web_test_files\calendar.zip
@C PGCOUNT 1
@C ISDUP False
@C DUPPATHS NA
@ATTACH 0000039; 0000040; 0000041; 0000043; 0000044; 0000045; 0000046; 0000047; 0000048;
0000049; 0000050; 0000051; 0000052; 0000053
@ATTACHCOUNT 14
@DATESAVED 7/21/2005
@DATECREATED 7/21/2005
@D @I\
0000038.tif
@T 0000039
@DOCID 0000039
@MEDIA eMail
@MSGID
@C PGCOUNT 1
@C ISDUP True
@C DUPPATHS Z:\Web_test_files\calendar.zip\calendar.pst\Personal Folders\Tasks\a second task
request.msg;C:\imgmaker\temp1\a second task request.msg
@SUBJECT a second task request
@EMAIL‐BODY separate task item in a separate task list.
@EMAIL‐END
@ATTACHCOUNT 0
@PARENTID 0000038
@D @I\
0000039.tif
Available MetaData Fields for Summation:
@C BEGDOC: Export file title of first page
@C ENDDOC: Export file title of last page
@APPLICATION: Name of creating application
@C ATTCOUNT: Count of attachments
@ATTACH: List of export file titles of attachments
@ATTACHRANGE: Range of export file titles of attachments
Copyright © 2009 ImageMAKER Development. www.DiscoveryAssistant.com sales: 604 525‐2170. Page 66
@C GROUPRANGE: Range of export file titles that belong as a group. e.g. an email and it's
attachments or a zip file and its contents
@C BATESGROUPRANGE: Range of Bates Numbers that belong as a group. e.g. an email and it's
attachments or a zip file and its contents
@C BEGATTACH: Export file title of first page of group. e.g. an email and it's attachments or a zip file
and its contents
@C ENDATTACH: Export file title of last page of group. e.g. an email and it's attachments or a zip file
and its contents
@C ATTTITLE: File title of attachment
@FROM: Document author
@BATESBEG: Beginning Bates number
@BATESEND: Ending Bates number
@C BATESGBEG: Beginning Bates number for group. e.g. an email and it's attachments or a zip file
and its contents
@C BATESGEND: Ending Bates number for group. e.g. an email and it's attachments or a zip file and
its contents
@BCC: Blind Carbon Copy recipient
@CC: Carbon Copy recipient
@C DACOMMNT: Discovery Assistant PassThru comment
@DATECREATED: Source document creation date
@TIMECREATED: Source document creation time
@DATERCVD: Email received date
@TIMERCVD: Email received time
@DATESAVED: Source document modified date
@TIMESAVED: Source document modified time
@DATESENT: Email sent date
@TIMESENT: Email sent time
@C DATEACC: Source Document Last Access Date
@C TIMEACC: Source Document Last Access Time
@C DOCTITLE: Document Title
@C DUPPATHS: Source document paths of duplicate items
@EMAIL‐BODY: Body of email
@C FILEEXT: Source file extension
@C FILEPATH: Source file path
@C XSFPATH: Exported source file path
@C FTITLE: Source file title
@C FILENAME: Source file name (including extension)
@C FTYPENAME: Source file type name
@FOLDERNAME: Email parent folder name
@FROM: Email From address
@C HASHCODE: MD5 hash code value for source document
@C ISDUP: True/False is duplicate
@C ITEMID: Discovery Assistant file ID
@MSG: Email message ID
@C PGCOUNT: Output file page count
@PARENTID: Export file title of parent item
@C SFTITLE: Short file title
@C SIZEDISK: Source file size on disk
Copyright © 2009 ImageMAKER Development. www.DiscoveryAssistant.com sales: 604 525‐2170. Page 67
@STOREID: Message store identifier
@C STORNAME: Message store source file name
@SUBJECT: Email subject
@TO: Email To address
@C ITEMINDX: Item Index
@C INETHDR: Internet Header
@C DOCID: Document ID
@C ALTRCALW: Alternate Recipient Allowed
@C AUTOFWD: Auto Forwarded
@C BILLINFO: Billing Information
@C CATEGOR: Categories
@C COMPNIES: Companies
@C DATEDFDL: Deferred Delivery Date
@C TIMEDFDL: Deferred Delivery Time
@C DELAFSUB: Delete After Submit
@C DATEEXP: Expiry Date
@C TIMEEXP: Expiry Time
@MULTILINE HTMLBODY: HTML Message Body
@C IMPRTNCE: Importance
@C MSGCLASS: Message Class
@C MSGMLG: Message Mileage
@C NOAGING: No Aging
@C DLVRPTRQ: Originator Delivery Report Requested
@C OLINTVER: Outlook Internal Version
@C OLVER: Outlook Version
@C RDRECREQ: Read Receipt Requested
@C RCVBYNAM: Received By Name
@C RCVBENAM: Received On Behalf Of Name
@C RCPREPRO: Recipient Reassignment Prohibited
@MULTILINE REPRECIP: Reply Recipients
@C SAVED: Saved
@C SENSI: Sensitivity
@C SENT: Sent
@C SNTBENAM: Sent On Behalf Of Name
@C SUBMTTED: Submitted
@READ: Message read y/n?
@C UNREAD: UnRead
@C VOTOPT: Voting Options
@C VOTRESP: Voting Response
@C GLBLPRM: 'Yes' if this is the first occurance of this item in the global table.
@C GLBLCNT: Count of occurances of this item in the Global Project table.
@C SRCCUSTOD: Source Custodian. Obtained from third to last directory name in source file path.
@C SRCBOX: Source Box. Obtained from second to last directory name in source file path.
@C SRCFOLDER: Source Folder. Obtained from last directory name in source file path.
@C DATEPRNT: Source Document Last Print Date
@C TIMEPRNT: Source Document Last Print Time
Copyright © 2009 ImageMAKER Development. www.DiscoveryAssistant.com sales: 604 525‐2170. Page 68
Concordance Export File Format:
Source documents are to be generated into single page TIFF files, single page TXT files, and a meta‐data
file.
Meta data and the single page TXT file are then combined to create a single DAT file per page for import.
Each data file is assigned a unique ID (Bates Number).
Concordance imports all the DAT files from a given directory into the database.
The list of image files is listed in the .LOG file. There is a unique TIFF file for each DAT file crated. The
image files are imported all at the same time through the Opticom Viewer interface.
Detailed Requirements:
Create the following files:
1. multi‐line .DAT files containing information for each page of each file.
2. multi‐line .LOG file containing a list of tiff images (OPTICOM Load images) that are associated
with each defined page.
.DAT File Description:
The .DAT file contains file meta data, with the exported text as the last field.
Export fields for the data are defined in the 'export fields' section (below).
Sample data are also provided in the 'sample data' data section (below).
The .DAT file contains a single comma delineated list of fields.
But... Rather than using the common notation
"field1","field2","field3"
notation, fields are delineated by substituting decimal 20 for ',', and decimal 254 for '"'.
Decimal 20 and decimal 254 are explicitly defined to NOT occur in any imported text.
Newline values in the imported text are modified to be decimal 174.
.DAT File Sample:
The sample data:
to:Ken Davies
from:Sales
Subject:The year ahead
Text: A long discussion about the year ahead.
Looking forward to your comments.
Call me if you want to do lunch.
Copyright © 2009 ImageMAKER Development. www.DiscoveryAssistant.com sales: 604 525‐2170. Page 69
becomes:
(245)Ken Davies(245)(20)(245)Sales(245)(20)(245)The year ahead(245)(20)(245)A long discussion
about the year ahead(174) Looking forward to your comments.(174) Call me if you want to do
lunch.(174)(245)
where the values in brackets (245) (20) (174) are decimal byte values in the data stream.
The data fields in this example are pre‐defined to be "to","from","subject","text".
.DAT file fields:
Field Name
STARTPAGE
ENDPAGE
DATE
DOCTYPE
TITLE
AUTHOR
AUTHORORG
RECIPIENT
RECIPORG
CC
SUMMARY
CONDITION
ATTACH_TYPE
LEAD_DOC
ATTACHMENTS
PRIMARYDATE
PAGES
CCORG
ATT
ATTORG
OCR1
OCR2
OCR3
OCR4
OCR5
RENUMBER
ISSUE
DISC_STATUS
SOURCE_FILE_NAME
SOURCE_FILE_SIZE
Sample Data
00010002
00010002
20041219
Doc extension
Untitled
Simmons;RC / McMurrian;HP
Cole Evans and Peterson
McCorman;SL
Cowco
“”
“”
“”
“”
“”
“”
19831220
3
“”
“”
“”
*** 0010002 **** …. contents of page…
“”
“”
“”
“”
161
“”
“”
C:\fname.doc
104456
Populated
YES
YES
YES [Date Accessed/Sent Date]
YES [SourceFile Ext]
YES [Title from MetaData]
YES [Author/From:from MetaData]
NO
YES [To: from MetaData]
NO
YES [Cc: from MetaData
NO
NO
NO
NO
NO
YES [Date Created]
YES
NO
NO
NO
NO
NO
NO
NO
NO
NO
NO
NO
YES
YES
Hyperlinked Source documents:
Copyright © 2009 ImageMAKER Development. www.DiscoveryAssistant.com sales: 604 525‐2170. Page 70
XSPATHNAME .\SOURCE\TST00002.msg
TIFF file destination:
XIPATHNAME
OUTPUT
XIFILENAME
TST00002.tif
.LOG file Sample:
00010001,Data,E:\DATABASE\COWCO\001\00010001.TIF,Y,,,
00010002,Data,E:\DATABASE\COWCO\001\00010002.TIF,,,,
00010003,Data,E:\DATABASE\COWCO\001\00010003.TIF,,,,
00010004,Data,E:\DATABASE\COWCO\001\00010004.TIF,Y,,,
00010005,Data,E:\DATABASE\COWCO\001\00010005.TIF,,,,
00010006,Data,E:\DATABASE\COWCO\001\00010006.TIF,,,,
00010007,Data,E:\DATABASE\COWCO\001\00010007.TIF,Y,,,
00010008,Data,E:\DATABASE\COWCO\001\00010008.TIF,Y,,,
00010009,Data,E:\DATABASE\COWCO\001\00010009.TIF,Y,,,
00010010,Data,E:\DATABASE\COWCO\001\00010010.TIF,,,,
00010011,Data,E:\DATABASE\COWCO\001\00010011.TIF,,,,
.LOG file fields:
Field 1: "Production Number" ‐‐ This is a text field which contains the "Production" or "Control" or
Bates number for that page of the document. It is a unique value and is the load file "key".
Field 2: "Volume ID" ‐‐ This is also a text field. It should contain the Volume ID of the CD on which the
images are delivered.
Field 3: "Full DOS Path" ‐‐ This is a text field containing the full DOS path to the image file.
Field 4: "Document Break" ‐‐ This is a text field. If this particular image is the first page of a document,
this field should contain a "Y" (Yes).
Field 5: "Folder Break" ‐‐ This is a text field. It's fairly rarely used but if used is intended to work just
like Document Break, i.e. it would contain a "Y" if this is the first page of a new folder
Field 6: "Box Break" ‐‐ This is a text field. Also rarely used but intended to work like Doc and Folder
Break...would contain a "Y" if this is the first page of a new box.
Field 7: "Pages" ‐‐ This is a text field although it contains numeric data. If this is the first page of a new
document, "Document Break" will contain a "Y" and this field will show the number of pages for the
document. (This field is a "nice to have" as after the images are loaded, Opticon will calculate the
number of pages based on the database.)
Contents of import directory for an 11 page file:
00010001.dat
00010001.tif
Copyright © 2009 ImageMAKER Development. www.DiscoveryAssistant.com sales: 604 525‐2170. Page 71
00010002.dat
00010002.tif
00010003.dat
00010003.tif
00010004.dat
00010004.tif
00010005.dat
00010005.tif
00010006.dat
00010006.tif
00010007.dat
00010007.tif
00010008.dat
00010008.tif
00010009.dat
00010009.tif
00010010.dat
00010010.tif
00010011.dat
00010011.tif
images.opt
IPRO LFP Export File Format:
(source: http://www.ediscovery.org/litigation‐support/technical‐standards_4_02_IPRO.htm)
To convert from Opticon format, download iConvert from http://www.IproCorp.com. (free)
Example 1: Single Page .TIF files
IM,MSC00014,D,0,@MSC001;IMAGES\ 00\ 00;MSC00014.TIF;2
IM,MSC00015,,0,@MSC001;IMAGES\ 00\ 00;MSC00015.TIF;2
IM,MSC00016,D,0,@MSC001;IMAGES\ 00\ 00;MSC00016.TIF;2
IM,MSC00017,,0,@MSC001;IMAGES\ 00\ 00;MSC00017.TIF;2
Example 2: Multi Page .TIF file
IM,MSC00014,D,1,@MSC001;IMAGES\ 00\ 00;MSC00014.TIF;2
IM,MSC00015,,2,@MSC001;IMAGES\ 00\ 00;MSC00014.TIF;2
IM,MSC00016,D,1,@MSC001;IMAGES\ 00\ 00;MSC00016.TIF;2
Note: Because the files are multi‐page, the entire bates range (or image key range) must point to the
same .TIF file. As example, MSC00014 contains both "14" and "15". Therefore, to view page 15, the
computer must display MSC00014.TIF.
The following provides a breakdown of the fields:
Copyright © 2009 ImageMAKER Development. www.DiscoveryAssistant.com sales: 604 525‐2170. Page 72
IM
Import code identifier (Importing New Page/Image database record)
MSC00014
The image key/document id number
D
Document designation; only designate the first page of each document.
0
Offset to the Tiff file. Always 0 for single page tiff files. When creating Multi‐Page Tiff files, this number
will increment for the pages within the file. (If there is an 11 page document, the offset would start at 1
and end at 11 and the next tiff file would start over at 1.
@MDEMO
CD volume name
IMAGES\00\00
Directory path on the CD for the image
MSC00014.TIF
Filename for the image.
;2
Tells IPRO the Types* of image file, e.g. tiff, PDF
*Supported Image Types and their specification in the LFP file are:
1. Type 1 is for IPRO Tech image from DOS‐Based version, still supported (.IMG)
2. Type 2 is for Standard single and multiple page black & white or color TIFF (.TIF)
3. Type 3 is for IPRO Tech stacked TIFF (.STF)
4. Type 4 is for Color image (.BMP, .PCX, .JPEG or .PNG)
5. Type 5 is for black & white .PDF
6. Type 6 is for Color .PDF
7. Type 7 is to Auto‐detect the .PDF type, e.g. Color or Black & White
RINGTAIL Support
Exporting to RingTail:
1. Export to Ringtail from Discovery Assistant.
Copyright © 2009 ImageMAKER Development. www.DiscoveryAssistant.com sales: 604 525‐2170. Page 73
2. Load the CSV file into the Ringtail Flat File converter to convert to MDB, then run it through the
Validator.
Reference Docs: (these seem to overlap)
CaseBook_Data_Standards_Manual_v602r5.pdf
Ringtail Legal Data Standards Manual v2[1].1.2.pdf
Tools Provided by FTI Ringtail
1. Data Standards Manual: outlines the Ringtail load file
2. Flat File Converter: a tool used to convert a flat‐file database to a Ringtail load file; and
3. Validator: a tool used to verify the integrity of a Ringtail load file.
NO load file should be loaded to Ringtail without first being run through this free tool.
To access these free tools, browse to our support website http://support.ftiringtail.com . From there,
click the button to LOGIN AS GUEST, then access the Downloads tab.
Ringtail Flat file converter Notes:
The validator does not understand Office 2007. You need to run on an Office 2003 machine.
Time fields are not supported in Ringtail. Any time fields should be set to TEXT. Boolean fields are TEXT.
We don't currently convert to T/F.
MAIN tab:
ImageMAKER field name Ringtail
‐‐‐‐‐‐‐‐‐‐‐‐‐‐‐‐‐‐‐‐‐‐‐‐‐‐‐‐‐‐‐‐‐‐
Main_Document_ID Document_ID User assigned Document ID
Main_Document_Date Document_Date Source document create date, otherwise received date,
otherwise sent date (in that order)
Main_Document_Time ??? Source document create time, otherwise received time, otherwise sent time
(in that order)
Main_Document_Type Document_Type Source file type name
Main_Title_docTitle Title Document Title
Main_Title_DocSubject Descripiton Email/Document subject
Main_Host_Reference Host_Reference Export file title of parent item
0 Estimated
Notes:
use "0" for Estimated (all dates are exact)
There are no time fields in Ringtail
Copyright © 2009 ImageMAKER Development. www.DiscoveryAssistant.com sales: 604 525‐2170. Page 74
PAGES tab:
ImageMAKER field name Ringtail
‐‐‐‐‐‐‐‐‐‐‐‐‐‐‐‐‐‐‐‐‐‐‐‐‐‐‐‐‐‐‐‐‐‐
Pages_Page_Start Page_Start Export file title of first page
Pages_Page_End Page_End Export file title of last page
Pages_Image_File_Name ??
Export file name [image] with extension.
.tif Page_Extension
Pages_Num_Pages Total_Number_of_Pages
??? Page_Range
Notes:
choose 'Use Page Range' (not 'Use Image_File_Name') when matching fields.
use ".tif" for Page_Extension.
Missing:
no values for Page_Range. Suggest using Pages_Num_Pages.
PARTIES tab:
ImageMAKER field name
Ringtail type: to, from, between, cc, bcc, userDefined
‐‐‐‐‐‐‐‐‐‐‐‐‐‐‐‐‐‐‐‐‐‐‐‐‐‐‐‐‐‐‐‐‐‐
Parties_People_From_Author Document author
Parties_People_From_LastAuthor Last Document author
Parties_People_From_Sender Email From address
Parties_People_To Email To address
Parties_People_CC Carbon Copy recipient
Parties_People_BCC Blind Carbon Copy recipient
Notes:
assigned to 'people'
one to many
delimiter is the ';' character (semicolon).
no concatenate string
LEVELS tab:
ImageMAKER field name Ringtail
‐‐‐‐‐‐‐‐‐‐‐‐‐‐‐‐‐‐‐‐‐‐‐‐‐‐‐‐‐‐‐‐‐‐
Levels_Levels Fields Level Fields [1‐10] Export file path (image)
EXTRAS tab:
Copyright © 2009 ImageMAKER Development. www.DiscoveryAssistant.com sales: 604 525‐2170. Page 75
ImageMAKER field name Ringtail (BOOL DATE NUMB PICK TEXT MEMO UTEXT UMEMO)
‐‐‐‐‐‐‐‐‐‐‐‐‐‐‐‐‐‐‐‐‐‐‐‐‐‐‐‐‐‐‐‐‐‐
Extras_ALTRCPALLOW TEXT(T/F) Alternate Recipient Allowed
Extras_APPLICATION_NAME TEXT Name of creating application
Extras_ATTACHLIST TEXT List of export file titles of attachments
Extras_ATTACHMENTRANGE TEXT Range of export file titles of attachments
Extras_ATTACHMENTSCOUNT NUMB Count of attachments
Extras_ATTACHTITLE TEXT File title of attachment
Extras_AUTOFWD TEXT(T/F) Auto Forwarded
Extras_BATESBEG TEXT Beginning Bates number
Extras_BATESBEGGROUP TEXT Beginning Bates number for group. e.g. an email and it's attachments or
a zip file and it's contents
Extras_BATESEND TEXT Ending Bates number
Extras_BATESENDGROUP TEXT Ending Bates number for group. e.g. an email and it's attachments or a
zip file and it's contents
Extras_BATESGROUPRANGE TEXT Range of Bates Numbers that belong as a group. e.g. an email and
it's attachments or a zip file and it's contents
Extras_BEGATTACH TEXT Export file title of first page of group. e.g. an email and it's attachments or a
zip file and it's contents
Extras_BILLINFO TEXT Billing Information
Extras_BODY MEMO Body of email
Extras_CATEGOR TEXT Categories
Extras_CNVINDEX TEXT Conversation Index
Extras_CNVTOPIC TEXT Conversation Topic
Extras_COMPANIES TEXT Companies
Extras_DACOMMENT TEXT Discovery Assistant PassThru comment
Extras_DEFDLVDATE TEXT(T/F) Deferred Delivery Date
Extras_DEFDLVTIME TEXT(T/F) Deferred Delivery Time
Extras_DELAFTSUB TEXT(T/F) Delete After Submit
Extras_DLVRPTREQ TEXT(T/F) Originator Delivery Report Requested
Extras_DOCTEXT MEMO Document Text
Extras_DUPPATHS TEXT Source document paths of duplicate items
Extras_ENDATTACH TEXT Export file title of last page of group. e.g. an email and it's attachments or a
zip file and it's contents
Extras_EXPIRYDATE DATE Expiry Date
Extras_EXPIRYTIME TEXT(HMS) Expiry Time
Extras_EXPORTDATE DATE Export start date
Extras_EXPORTEDSOURCEFILEPATHNAME TEXT Exported source file path
Extras_EXPORTTIME TEXT(HMS) Export start time
Extras_FILEACCESSDATE DATE Source document Last Access Date
Extras_FILEACCESSTIME TEXT(HMS) Source document Last Access Time
Extras_FILECREATIONDATE DATE Source document creation date
Extras_FILECREATIONTIME Source document creation time
Extras_FILEDISPLAYNAME TEXT Source file title
Extras_FILEEXTENSION TEXT Source file extension
Extras_FILEMODIFYDATE DATE Source document modified date
Extras_FILEMODIFYTIME TEXT(HMS) Source document modified time
Copyright © 2009 ImageMAKER Development. www.DiscoveryAssistant.com sales: 604 525‐2170. Page 76
Extras_FILENAME TEXT Source file name (including extension)
Extras_FILEPATHNAME TEXT Source file path
Extras_FILEPRINTDATE DATE Source document Last Print Date
Extras_FILEPRINTTIME TEXT(HMS) Source document Last Print Time
Extras_GLOBALCOUNT NUMB Count of occurrences of this item in the Global Project table.
Extras_GLOBALPRIMARY TEXT(T/F) 'Yes' if this is the first occurrence of this item in the global table.
Extras_GROUPRANGE TEXT Range of export file titles that belong as a group. e.g. an email and it's
attachments or a zip file and it's contents
Extras_HASHCODE TEXT MD5 hash code value for source document
Extras_HTMLBODY MEMO HTML Message Body
Extras_IMPORTANCE TEXT Importance
Extras_INETHEADER TEXT Internet Header
Extras_ISDUP TEXT(HMS) True/False is duplicate
Extras_ITEMID TEXT Discovery Assistant file ID
Extras_ITEMINDEX NUMB Item Index
Extras_LASTSAVEDDATE DATE Source document Last Saved date
Extras_LASTSAVEDTIME TEXT(HMS) Source document Last Saved time
Extras_MSGCLASS TEXT Message Class
Extras_MSGID TEXT Email message ID
Extras_MSGMLG TEXT Message Mileage
Extras_NOAGING TEXT(T/F) No Aging
Extras_OBJECTSIZE NUMB Source file size on disk
Extras_OLINTVER TEXT Outlook Internal Version
Extras_OLVER TEXT Outlook Version
Extras_PAGECOUNT
NUMB Number of pages in TIFF file
Extras_PARENT TEXT Email parent folder name
Extras_PARENTCREATIONDATE DATE Parent document create date
Extras_PARENTCREATIONTIME TEXT(HMS) Parent document create time
Extras_PARENTMODIFYDATE DATE Parent document modified date
Extras_PARENTMODIFYTIME TEXT(HMS) Parent document modified time
Extras_PARENTRECEIVEDDATE DATE Parent email received date
Extras_PARENTRECEIVEDTIME TEXT(HMS) Parent email received time
Extras_PARENTSENTDATE DATE Parent email sent date
Extras_PARENTSENTTIME TEXT(HMS) Parent email sent time
Extras_RCPREASSPROHIB BOOL Recipient Reassignment Prohibited
Extras_RCVBYNAME TEXT Received By Name
Extras_RCVONBEHALFNAME TEXT Received On Behalf Of Name
Extras_RDRECREQ TEXT(T/F) Read Receipt Requested
Extras_READ TEXT(Y/N) Message read y/n?
Extras_RECEIVEDDATE DATE Email received date
Extras_RECEIVEDTIME TEXT(HMS) Email received time
Extras_REPLRECIPS TEXT Reply Recipients
Extras_REVNUM TEXT Last Document author
Extras_SAVED BOOL Saved
Extras_SENSITIVITY TEXT Sensitivity
Extras_SENT TEXT(T/F) Sent
Extras_SENTDATE DATE Email sent date
Extras_SENTTIME TEXT(HMS) Email sent time
Copyright © 2009 ImageMAKER Development. www.DiscoveryAssistant.com sales: 604 525‐2170. Page 77
Extras_SHORTFILETITLE TEXT Short file title
Extras_SNTONBEHALFNAME TEXT Sent On Behalf Of Name
Extras_SOURCELABEL TEXT Source volume label
Extras_SOURCEPAGECOUNT TEXT Source document page count
Extras_SRCBOX TEXT Source Box. Obtained from second to last directory name in source file path.
Extras_SRCCUSTOD TEXT Source Custodian. Obtained from third to last directory name in source file
path.
Extras_SRCFOLDER TEXT Source Folder. Obtained from last directory name in source file path.
Extras_STOREID TEXT Message store identifier
Extras_STORENAME TEXT Message store source file name
Extras_SUBMITTED TEXT(T/F) Submitted
Extras_UNREAD TEXT(T/F) UnRead
Extras_VOTINGOPT TEXT Voting Options
Extras_VOTINGRESP TEXT Voting Response
Notes:
All fields are one‐to‐one
dtSearch: Notes on Searching using dtSearch
One of the problems with using dtSearch is it doesn't do NSF. Second problem is how to extract the
responsive files from a PST while keeping all the metadata, and parent/child relationships intact.
Current solution is to:
1. Load files into discovery, use the COPY button to write files back out numbered by FileID,
dtSearch the fileset.
2. Use the 'mark' and 'select' buttons
3. Use the 'user field' button to keep track of what search strings were used to find these files.
OR
1. Convert all the files
2. Search the 'projectname.cnvt' directory TXT files
3. Use the 'mark', 'select' and 'user field' buttons to track responsive files.
To Download and install dtSearch:
http://www.dtsearch.com/download.html file: dtSearchEval750.exe
cost: $200 to buy, 1 month free evaluation.
Quick guide to converting and searching:
Copyright © 2009 ImageMAKER Development. www.DiscoveryAssistant.com sales: 604 525‐2170. Page 78
1. SETUP: import files into Discover Assistant.
2. SEARCH SOURCE: dtSearch the source files.
3. SEARCH TIFF/TEXT: dtSearch the converted project files.
4. EXPORT: load dtSearch selection set, and export msg files that contain search items.
SETUP: Import files into Discovery Assistant
a. Create a Discovery Assistant project, and add in one or more NSF/PST/Folder
directories. Contents of imported email and documents are enumerated. Global and
Local duplicates are identified at this point.
b. If you want to search source files, you can do so by exporting a 'copy' of each file (using
the 'Copy' button) to a separate search directory. Copied files are identified by their
fileID.
c. If you want to search converted files, you can do so by queuing the files for conversion,
then converting.
d. When converting files, user options should be: skip local duplicates, don't skip children
unless parent is skipped.
e. [will remove this restriction at a later date]
On completion of conversion, remove the NSF and PST records from the converted tab.
Can queue these for re‐conversion to get them out of the way. (Note: Don't delete
from project).
f.
if your files contain images, and you want text from those images, select OCR, and in
the dialog, select 'OCR only those items without text'.
Note: requires that 'Microsoft Office Imaging' 2003 or 2007 is installed. We use the
Microsoft provided OCR engine to do the text extraction. (Can install this from the
Office installation disks ‐ under Tools). Re‐save project.
g. sort on FileID, assign Document ID's (string: %COUNT1%) and save the project.
h. f your files contain spreadsheets, there is a good chance there are blank pages that
should be removed. To remove blank pages, select: DeBlank. Re‐save project.
SEARCH SOURCE: dtSearch the source files.
Copyright © 2009 ImageMAKER Development. www.DiscoveryAssistant.com sales: 604 525‐2170. Page 79
a. From the All Files tab, select 'copy' All. Select a destination directory using the browse
button. Best to choose somewhere that has a lot of available space.
Copied files are named same as the FileId, with the proper extension.
b.
Use dtSearch to search the source files. See comments below (Search Tiff/Text) for
how to proceed. Basic idea is to generate a list of files to be queued for conversion,
without having to convert all the other files.
SEARCH TIFF/TEXT: dtSearch the converted project files.
a.
use dtSearch to index the project.CNVT directory ‐ *.TXT files only. (need to exclude
.mtf, .tif, .log files)
b.
Enter one or more search terms in DT_Search to create individual search results.
enable stemming, phonic spelling, and fuzzy search to find similar words. (can check
results using Browse Words button)
For individual search terms: save each result as a project_searchterm.CSV.
For all search terms: save 'all strings' search result as project_all.CSV.
Save search results by choosing "File / Save As" ‐ choose CSV format.
Generate a report by choosing "Search / search report".
c. When done, open the project_all.CSV file, select Column E (display name), and copy to
clipboard
d. Open Notepad, paste the clipboard into Notepad, then do a search and replace:
[abc] first 3 letters replaced with nothing [].
[F.tif.txt] replaced with nothing [].
delete header line, and blank line at end of file.
Save as project_all.txt in the project
Notes on using dtSearch:
dtSearch evaluation copy can be downloaded from:
http://www.dtsearch.com/download.html
Stemming: searches grammatical variations of the words in your search request. For
example, with stemming enabled a search for apply would also find applies.
Copyright © 2009 ImageMAKER Development. www.DiscoveryAssistant.com sales: 604 525‐2170. Page 80
Phonic: search finds words that sound similar to words in your request, like Smith and
Smythe.
Fuzzy search: sifts through scanning and typographical errors. Fuzziness adjusts from 1
to 10 depending on the degree of misspellings. (Try starting with 3.)
Synonym search: tells dtSearch to use a thesaurus to find synonyms of words in your
search request.
dtSearch provides three ways to perform synonym searching:
Check the User thesaurus box to find synonyms that you have defined in your
own thesaurus.
Check the WordNet thesaurus box to find synonyms using the WordNet concept
network included with dtSearch.
Check the WordNet related words box to find related words from the WordNet
concept network.
EXPORT: Load dtSearch selection set, and export files:
a. Go back to Discovery Assistant, same project, go to the converted tab, Select 'Select /
by FileIDList', and select the project_all.txt file.
b. From the Converted tab, do the following:
Select / Parent of selected items
Select / Children of selected items
Select Mark / Selected
You can choose 'User Fields' to assign a text string to selected items. One use for this
feature is to define what search term was used to select the record.
Save project.
This ensures that we are exporting any file that matches a string (has the string in it)
PLUS it's parent, PLUS any siblings of that file.
At any point from now on, you can choose 'Select / Marked Items' and get back the
items to export as a selection set.
At any point, you can also 'sort' on the left hand column (marked) to see what items are
marked.
Copyright © 2009 ImageMAKER Development. www.DiscoveryAssistant.com sales: 604 525‐2170. Page 81
If for what ever reason you have incorrectly marked items, and want to start over,
choose Select / Marked Items, then, Toggle Mark / Selected. This will clear all marked
items.
c.
To export the selected items:
Choose 'Select / Marked Items', sort on Document ID, and then Export / Selected.
Naming convention is "%ProjectID%.%DOCID%.%PAGE%"
Other settings are:
Destination ‐ location that files are going to be exported to.
Format ‐ choose Summation DII Class I
Note: Press options to choose metadata fields to export Directory Structure ‐ flat is
recommended
Other files to include ‐ select Text files.
Whew! You are now done....
Internal notes: ImageMAKER optimizations.
We will be making code changes to remove the following steps:
Load: item 3: will not have to remove NSF or PST
Search: item 3 and 4: will not have to create a TXT file (will use CSV directly)
Export: item 2: will simplify the selection and marking functionality.
Next step will be to integrate dtSearch engine directly into Discovery Assistant.
Embedded Files: XML, PDF, and OLE linking and Embedded files support:
Discovery Assistant extracts embedded files from OLE containers (DOC, XLS, PPT) ML containers (DOCX,
XLSX, PPTX), RTF files, and in development:PDF files. (Early January 2008).
Supported Microsoft Office formats include: Office 95, Office 97, Office 2000, Office XP, Office 2003, and
Office 2007.
Linked files are noted (in the warnings), but not extracted or enumerated.
Basic extraction logic is as follows:
•
determine if the file is an XML or OLE container type, RTF, or PDF.
•
do a quick check to see if there are embedded files.
Copyright © 2009 ImageMAKER Development. www.DiscoveryAssistant.com sales: 604 525‐2170. Page 82
•
if there are embedded files, attempt to extract the files from the native document.
•
if there is a failure condition, convert the document to Office 2007 format (zipped XML) using
the Office 2007 migration tool, and the re‐attempt to extract.
Discovery Assistant uses two tools provided by Microsoft to help with extraction:
Microsoft Office 2007 Compatibility Pack:
http://www.microsoft.com/downloads/details.aspx?FamilyId=941b3470‐3ae9‐4aee‐8f43‐
c6bb74cd1466&displaylang=en
Microsoft Office 2007 Migration Tool:
http://www.microsoft.com/downloads/details.aspx?familyid=13580cd7‐a8bc‐40ef‐8281‐
dd2c325a5a81&displaylang=en
These tools must be installed in order for everything to work correctly. The Options / Embedded tab
contains links to both of these tools.
When downloading and installing the MigrationPlanningManager.exe tool, you need to specify an
installation directory. Then, after installation, from the Options / embedded tab / Settings, specify the
installation directory.
Other notes:
In the Options/ Embedded / Settings tab, you can also specify the prefix used for all extracted
files. Current default is EMB_1, EMB_2, and EMB_3 (represents different types of embedded
files). After loading in your file set into Discovery Assistant, if you sort on name, you should be
able to group all the extracted embedded files.
You can conditionally turn file handling off for certain file types by selecting the file type from
the Settings dialog, then hit the modify button.
Speed / Size of files.
For optimum speed and size, best to convert everything to B&W G4 TIFF.
When exporting to different file types, here are some of the speed/size metrics.
46,462 pages, 4592 tiff files, exported as:
TIFF (G4)
Scanned PDF
24 bit LZW
1.1 GB
1.5 GB
3.0 GB
20 minutes (doesn’t require reading/writing the files)
2 hours (uses 8 bit Flat compression)
4.5 hours
Copyright © 2009 ImageMAKER Development. www.DiscoveryAssistant.com sales: 604 525‐2170. Page 83