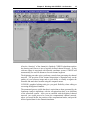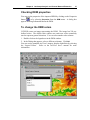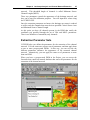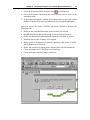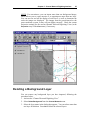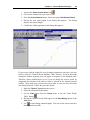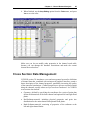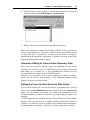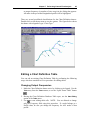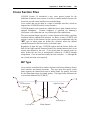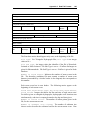
1
NATIONAL CENTER FOR COMPUTATIONAL HYDROSCIENCE AND ENGINEERING One-Dimensional Channel Network Model CCHE1D Version 3.0 – User’s Manual Technical Report No. NCCHE-TR-2002-02 Dalmo A. Vieira and Weiming Wu School of Engineering The University of Mississippi University, MS 38677 January 2002 NATIONAL CENTER FOR COMPUTATIONAL HYDROSCIENCE AND ENGINEERING Technical Report No. NCCHE-TR-2002-02 One-Dimensional Channel Network Model CCHE1D Version 3.0 – User’s Manual Dalmo A. Vieira Research Associate Weiming Wu Research Assistant Professor Document Revision Number: 51 The University of Mississippi January 2002 Contents CHAPTER 1 Introduction 1 Purpose 2 Applicability Statement 2 About CCHE1D 2 Background 2 Flow and Sediment Transport Modules 3 Integration and Support Software 4 Engineering Applications 4 New for Version 3.0 5 CCHE1D Programs 5 How to Use This Document 6 Related Documents 7 CHAPTER 2 Working with CCHE1D – An Overview 9 Introduction 10 Defining Channel Networks 11 Introduction 11 Performing Landscape Analysis 12 Digitizing a Channel Network 13 Contents ii Defining the River Geometry and Other Data 15 Computational Mesh Generation 16 Watershed Modeling 16 Performing Hydraulic and Sediment Transport Computations 17 CHAPTER 3 Installing and Starting CCHE1D 18 Hardware and Software Requirements 19 Installation Procedure 19 CCHE1D files and programs 19 CCHE1D ArcView Extension File 20 CCHE1D Case Data Folder 20 The C1DDATA Environment variable 21 Starting CCHE1D 22 To Create a New CCHE1D Project 22 To Open an Existing CCHE1D Project 23 Some Notes 23 Using CCHE1D 24 CCHE1D Data Directory 24 CCHE1D Project 25 How to Move a CCHE1D Project to Another Location 25 Recommended Usage Behavior 27 CHAPTER 4 Landscape Analysis and Channel Network Extraction 28 Introduction 29 Importing a DEM 29 To import a DEM file 29 Checking DEM properties 31 Contents iii To change the DEM colors 31 To create a new DEM colormap 32 Pre-Processing a DEM 32 Smoothing 32 Treatment of Depressions 33 Treatment of Flat Areas 33 The Pre-Processed DEM 34 Channel Network Extraction 34 How the channel network is extracted 34 Extraction Parameter Sets 35 Extracting the Channel Network 40 Watershed Delineation 42 Identifying the Watershed of Interest 42 Specifying the Watershed Outlet 42 Creating a Computational Channel Network 44 Channel Network Properties 45 Creating a Computational Channel Network 45 The CCHE1D Network Database 45 Introduction 45 Channel Network Logical Organization 46 Database Tables 47 CHAPTER 5 Channel Network Digitizing Interface 49 Introduction 50 Creating a Digitized Channel Network 51 Importing a Background Layer 52 Deleting a Background Layer 55 Digitizing a Channel Network 56 Contents iv Creating a Digitized Channel Network theme 56 Digitizing a Channel Network 56 Validating a Channel Network 62 Showing and Hiding Reach Numbers 62 Importing a Channel Network 63 Creating a Computational Channel Network 63 CHAPTER 6 Channel Network Analysis Introduction Creating the Channel Network Window Defining Channel Reach Lengths 64 65 66 67 Introduction 67 Editing Channel Reach Lengths 67 Cross Section Data Management 69 Cross Section Geometry Sediment Data Management 70 78 Introduction 78 Sediment Size Classes Definition 79 Bed Sediment Data 80 Bank Sediment Data 82 Hydraulic Structure Management 84 Importing Hydraulic Structure Data 84 Adding a Hydraulic Structure 85 Editing Hydraulic Structure Data 86 Removing a Hydraulic Structure from the Channel Network 86 Removing All Hydraulic Structures from the Channel Network 86 Computational Mesh Generation Introduction 87 87 Contents v Automatic Generation 87 Manual Generation 88 CHAPTER 7 Performing Channel Flow Analysis 93 Introduction 94 The CCHE1D Channel Network Model 94 Specifying Simulation Parameters and Options 95 Specifying Output Options 96 Creating a Chart List 96 Editing a Chart Definition Table 98 Importing a Chart List 99 Removing a Chart List from the View 99 Displaying an Existing Chart List 100 Specifying Simulation Options 100 Simulation Parameters 100 Boundary Conditions File Type 101 Boundary Conditions File 102 Downstream Boundary Condition Type 103 Baseflow Computation Method 104 Flow Model Wave Type 104 Sediment Transport Computations 105 Monitor Points Output File Type 105 Chart Definition Table 106 Output Variables 106 Specifying Sediment Calculation Options 108 Sediment Transport Capacity Equation 108 Bank Stability Analysis 109 Bed Load Adaptation Length 109 Suspended Load Adaptation Coefficient 109 Wash Load Adaptation Length 110 Contents vi Mixing-Layer Thickness 110 Minimum Value for Mixing-Layer Thickness 110 Bed Material Porosity 110 Wash Load Size Classes 110 Starting the Flow Simulation 111 Running CCHE1D on the Local Computer 111 Running CCHE1D on a Remote Server 112 Visualizing Model Results 114 Using Text Files 115 Using Database Files 115 Charting Simulation Data Using Microsoft Excel 115 CHAPTER 8 Support for Watershed Analysis 118 Introduction 119 SWAT Watershed Model 119 Checking SWAT-GRASS settings 120 Starting SWAT-GRASS 121 Simulating Watershed Processes 121 AGNPS Watershed Model 122 APPENDIX A References 123 APPENDIX B Hydraulic Structure Input Data 125 Bridge Crossings 126 Culverts 128 Drop Structures 138 Measuring Flumes 139 APPENDIX C Data File Formats 141 Contents Digital Elevation Model Files vii 142 ArcInfo ASCII Grid 142 GRASS ASCII Grid 143 “RAW” ASCII Grid 143 Cross Section Files WZ Type Bed Sediment Files 144 144 148 Spatially Constant Distribution 148 Spatially Varied Distribution 149 Bank Sediment Files 151 Sediment Size Classes Definition Files 154 Hydraulic Structures Files 155 Boundary Conditions Files 157 Upstream Boundaries (Flow Discharges) 157 Downstream Boundary (Downstream Stage File) 165 Baseflow Files 167 Colormap Files 170 APPENDIX D Output Variables 171 CHAPTER 1 Introduction Welcome to CCHE1D Channel Network model. CCHE1D is a model for hydrodynamics and sediment transport in channel networks. CCHE1D encompasses several aspects of the modeling of a watershed system, but emphasis is given to the modeling physical processes of the channels, such as free-surface flow hydraulics, stream sedimentation and erosion, and bank stability analysis. This manual is the primarily piece of documentation on how to use the CCHE1D software package in the modeling of a watershed system. For detailed information on the technical aspects of the model, please consult the companion Technical Manual and other publications listed at the CCHE1D’s web site. Contents Purpose Applicability Statement About CCHE1D How to Use This Manual Related Documents Chapter 1 Introduction 2 Purpose The purpose of this manual is to provide users of CCHE1D with the information necessary to use the modeling components and auxiliary tools effectively. This manual explains how to use CCHE1D in the modeling of a Watershed System. The topics in the manual follow the order tasks and operations usually take place during the modeling process. The manual assumes the user has no previous experience with CCHE1D, and gives stepby-step instructions for each operation. A separate document entitled “CCHE1D Quick Start Guide” may be a better manual for first time users. We recommend that you install CCHE1D on your computer and then read the Quick Start Guide thoroughly, following the procedures on your computer. This manual does not cover the assumptions and methodology employed in the development of the modeling components. For detailed information on the theoretical background of the models, implementation procedures, and program structure, please refer to the publications listed under Related Documents. Applicability Statement This manual applies to CCHE1D version 3.0. It updates and supersedes any previous version of this manual. CCHE1D 3.0 requires the ArcView GIS version 3.0 ~ 3.3. Please install update patches for ArcView 3.x, available from the Environmental Systems Research Institute, at http://www.esri.com/. CCHE1D does not work with ArcView 8.x or 9.x. About CCHE1D Background The CCHE1D modeling software was developed at the National Center for Computational Hydroscience and Engineering (NCCHE) of the University of Mississippi. The model was development in support of the Demonstration Erosion Control (DEC) Project, an interagency cooperative effort among the US Army Corps of Engineers (COE), the Natural Resources Conservation Service (NRCS) and the Agricultural Research Service (ARS) of the US Department of Agriculture. As an experimental project, COE and NRCS installed a system of control structures, including low and high drop structures, bank stabilization works, levees, flood retarding structures and rise pipe structures, to reduce watershed and channel erosion, and have monitored Chapter 1 Introduction 3 and measured flow discharge, stage, and sediment yield. NCCHE, in cooperation with the USDA-ARS National Sedimentation Laboratory (NSL), developed the flow and sediment routing computer models DWAVNET (Diffusive WAVe model for channel NETworks, Langendoen, 1996) and BEAMS (Bed and Bank Erosion Analysis Model for Streams, Li et al., 1996; Zhang and Langendoen, 1997) as tools for the assessment of the performance of erosion control structures and Best-Management Practices (BMPs). The original models evolved to become CCHE1D, a more general model that can be applied to a wider range of flow and sedimentation studies. Flow and Sediment Transport Modules Since 1998, a new one-dimensional numerical model for flow and sediment transport in channel networks has been developed at the NCCHE, replacing DWAVNET and BEAMS. The new model, renamed CCHE1D, includes the diffusive wave and the dynamic wave model, which solves the full Saint Venant equations. The new sediment transport model adopts a nonequilibrium transport approach and uses a coupled procedure to calculate nonuniform sediment transport, bed changes, and bed material sorting. Several new features were added to make the model applicable to a wider range of practical engineering problems. The new CCHE1D model also has a more sophisticated graphical interface with a large number of new features. The CCHE1D flow model simulates unsteady flows in channel networks using either the diffusive wave model or the dynamic wave model, taking into account the different characteristics of the flow in the main channel and in the flood plains of a compound channel. The model also considers the influence of hydraulic structures, including culverts, measuring flumes, bridge crossings, and drop structures. The flow model can be used with or without sediment transport calculations. CCHE1D calculates the transport of non-uniform sediment in rivers and streams using the non-equilibrium transport model. It computes deposition and sedimentation amounts with the corresponding geometrical change of channel cross sections, size composition of bed material (including sorting and armoring processes), and bank erosion and channel widening processes. CCHE1D provides multiple options for the computation of sediment-related processes. For example, sediment transport capacity can be calculated by four formulas (SEDTRA module, modified Ackers and White’s, modified Engelund and Hansen’s, Wu et al’s formula). Other parameters such as bedmaterial porosity, non-equilibrium adaptation length, wash-load size range, and mixing-layer thickness, can be calculated by different existing formulas, as well. The implementation of these multiple options allows the user to choose the most appropriate formulas for particular real-life problems, and allows the model to be applied to a wider range of situations. Chapter 1 Introduction 4 Integration and Support Software CCHE1D includes a series of tools that are aimed at facilitating the integration of modeling of channel processes to a watershed-scale study. CCHE1D includes a complete graphical user interface (GUI) that is designed to simplify its use and guide the user through the simulation process. The interface is a part of a “Control Module” that also includes a database management system, and facilities such as mesh generation, data format conversion filters, and data interpolation. CCHE1D also includes a current version of the landscape analysis model TOPAZ (TOpographic PArameteriZation, Garbrecht and Martz, 1995), which analyzes a Digital Elevation Model (DEM) to extract a channel network and the corresponding subcatchments. This new version of CCHE1D has also extensive modifications in the facilities for data input and output, where more options are given for the specification of boundary conditions and other user-supplied data, and for the output and visualization of simulation results. CCHE1D is under continuous development, and new features and improvements to existing capabilities are underway. Engineering Applications CCHE1D version 3.0 incorporates a large number of modifications and additions, which allow the model to be applied to a wider range of engineering problems. CCHE1D was developed taking into account the integration of channel flow modeling with upland processes (watershed) modeling, and a series of features were added to facilitate this integration. CCHE1D’s powerful sediment transport routines allow the application of the model to both long and short-term sedimentation studies. The model can be applied to the determination of sediment yield and channel morphological evolution, and it is especially useful in the evaluation of in-channel and upland remedial measures. Its channel network capability allows the study a watershed as a whole. When coupled with watershed modeling, CCHE1D can be a very useful tool in the analysis of watershed-wide sedimentation problems, especially in agricultural regions. The support for in-stream hydraulic structures, such as grade control structures, flumes and culverts, makes the model attractive to those interested in evaluating the effects of such structures in the sedimentation process. The hydrodynamic model is general and accurate, and can be applied to a large variety of unsteady flow studies, from a single-reach, single-storm simulation, to a complex network of channels, where thousands of hydrographs are used. Chapter 1 Introduction 5 New for Version 3.0 CCHE1D has gone through a major revision and improvement program, which culminated with the release of version 3.0 of the modeling system. All parts of the system have been modified to implement new features and improve on existing ones. The ArcView graphical interface has been redesigned. It now allows for a more natural flow of operations, and gives the user more flexibility when defining the simulation domain and prescribing input data. The CCHE1D interface now contains the new “Channel Digitizing Module,” which allows the user to sketch channel network based on reference images, such as maps or photographs. The Landscape Analysis module, in which a channel network is created based on digital elevation data, has been also upgraded. It now utilizes the newest version of the program TOPAZ, which has improved algorithms and more efficient computer code. Data conversion operations are performed by independent, optimized programs written in Fortran 90 and C languages. The “Channel Network Analysis” module has been updated, and it now works with channel networks created by either the “Landscape Analysis” or by the new “Channel Digitizing” modules. New mesh-editing capabilities and visualization options have been added. The Channel Flow and Sediment Transport model has been entirely revised. The flow model now accepts channel cross sections of any shape, and it is not limited to prismatic channels anymore. Sediment transport computations can be performed for sediment classes whose number and characteristics are entirely defined by the modeler. The model has been extensively tested for laboratory and real-life applications. Currently, the model is limited to subcritical flows (although local supercritical conditions are allowed). Because some of the new features of version 3.0 are still under development and testing, it is recommended that users visit the CCHE1D web page at http://www.ncche.olemiss.edu/cche1d for current news and updates. CCHE1D Programs The CCHE1D channel network modeling system is a large software package that includes several programs, most of them developed at the NCCHE. The core of the package is the channel flow and sediment transport model that performs the unsteady, continuous simulations. Another large program is the landscape analysis model TOPAZ. Other programs include the graphical interface and the visualization components, the mesh generator, database manager, and a collection of tools for data conversions and transfers. Chapter 1 Introduction 6 However, these programs were designed to work in the background, and a typical user of the model should not have to worry about them. The CCHE1D ArcView extension, entirely programmed in the Avenue language, manages all programs of the system. All other programs are called by the CCHE1D ArcView extension. The table below lists some characteristics of the most important programs developed at the NCCHE. Program Name Programming Languages Number of Routines Source Code Lines* Main Tasks cche1d.exe Fortran 77-90/ C 220 41044 Unsteady flow model with in-stream hydraulic structures, non-uniform, non-equilibrium sediment transport model, bank erosion, and bank stability analysis. cche1d.avx Avenue 248 42495 Operations Control, Database Management, Graphical Interface, Mesh Generation, Data conversions and transfers (ArcView Extension) tpz2c1d.exe Fortran 90/ C 59 7956 Conversion of output from TOPAZ to the CCHE1D relational database. c1drst.exe Fortran 90/ C 9 2132 Conversion of raster data files among several formats. net2shp.exe Fortran 90/ C 9 2840 Conversion of TOPAZ’s accumulated drainage area map to a CCHE1D shapefile. cche1dgeoref.avx Avenue 25 1845 CCHE1D’s Image geo-referencing extension. Associates an image to a known coordinate system. * – Includes comment and non-executable lines How to Use This Document This manual shows you how to install CCHE1D in your computer, and how to use CCHE1D in the simulation of the channel processes of a watershed. As mentioned before, it is recommended that you read the “CCHE1D Quick Start Guide” before continuing with this manual. In Chapter 2, you will learn what you can do with CCHE1D. That chapter quickly demonstrates all CCHE1D capabilities and tools, so that you will understand how CCHE1D can help you. We believe it is a good idea to see how the program works by using it. Chapter 3 guides you through the installation and setup procedure, and describes the basic procedures to start using CCHE1D on your computer. Chapters 4 to 8 give a more Chapter 1 Introduction 7 comprehensive view of all operations and procedures, and it is where you will learn about all you can do with CCHE1D. Chapter 4 shows all aspects of the Landscape Analysis module. It shows you how to generate a channel network and the corresponding subwatersheds from a single source of data: a matrix of ground elevation data called Digital Elevation Model, or DEM. Chapter 5 shows another convenient method to create channel networks, in which you can simply “draw” the channels on screen, using a digital map, photograph, or any other image as reference. This should be you method of choice if you intend to simulate just a couple of channels or if you do not have good elevation data for your watershed. Chapter 6 describes the Channel Network Analysis Module. You will learn how you enter supplemental data such as channel cross-sections and hydraulic structure data. You will see how you can use CCHE1D to transform the channel network you digitized or extracted from a DEM into a computational mesh for the channel flow and sediment transport models. In Chapter 7, you will find out how to perform channel flow simulations. You will see how to specify parameters and options and how to execute a flow and sediment transport simulation with CCHE1D. You will learn how to specify the output data from the model, and how to visualize results. You can then review the examples of the Quick Start Guide, where CCHE1D is applied in the simulation of unsteady flow in real watersheds. You will learn CCHE1D very quickly, and soon you will be applying it to solve your own problems. Appendix A contains a list of references. Appendix B describes the input data for the supported hydraulic structures. Appendix C documents the format of all input files CCHE1D requires. Related Documents The documentation of CCHE1D is separated into publications designed to fulfill the needs of different audiences. If you are new to CCHE1D, you may want to start with the publication “One-Dimensional Channel Network Model CCHE1D – Quick Start Guide,” which gives a quick overview of the CCHE1D program through a series of example applications. The present document, the CCHE1D User’s Manual, is the main documentation on the use of the CCHE1D software, and it is primarily for users who will apply CCHE1D to the simulation of a channel–watershed system. For a more technical discussion of the CCHE1D Channel Network Model, and for guidance on the modeling of flow and sediment transport in channels, please consult the “One-Dimensional Channel Network Model CCHE1D – Technical Manual.” Chapter 1 Introduction 8 For a more detailed description of the implementation of the CCHE1D interface programs, the report CCHE1D – Control Module Technical Manual is also being updated for CCHE1D version 3.0. In addition, the CCHE1D web site (http://www.ncche.olemiss.edu/cche1d) lists a series of publications that discuss the development, testing, and application of the model. CHAPTER 2 Working With CCHE1D – An Overview This chapter will illustrate how a complete CCHE1D simulation session works, so you can quickly familiarize yourself with the software. You will follow the main steps of the watershed and channel routing analysis, discovering how CCHE1D simplifies the tasks and guides you through the process. CCHE1D uses the Geographical Information System ArcView® to provide a convenient graphical user interface. If you are already familiar with ArcView, you just have to learn about the new functionality CCHE1D provides. Otherwise, you may consider reading and performing the exercises of the Quick Start Tutorial in “Using ArcView GIS,” the user’s manual that came with your copy of ArcView. Contents Starting CCHE1D Creating Channel Networks Entering Data Performing a Channel Network Analysis for a Watershed Program Capabilities and Limitations Chapter 2 Working with CCHE1D – An Overview 10 Introduction CCHE1D is an integrated package of landscape analysis, watershed and channel network, hydraulic and sediment transport modeling. CCHE1D is composed of several modeling components, tied together by a control module that provides a Graphical User Interface (GUI) and manages all data sets and operations. CCHE1D uses the Geographic Information System ArcView as a front-end interface. CCHE1D is an Extension to ArcView that provides the needed functionality. When the CCHE1D Extension is active, a set of menus and buttons is appended to the standard ArcView interface. These controls let you perform all operations related to CCHE1D. The GUI is very dynamic. Menus and buttons only appear when they are needed. They are tied to the type of operation you are performing. The interface is composed of three groups of controls: a menu bar at the top, a line of buttons, and a second line of special buttons called Tools. Usually, the buttons correspond to entries of the menu bar. They provide a more convenient way of accessing the most frequently used options. The tools have a special behavior: only one tool is active at a time. A tool requires your interaction on a map or on a table for the operation to take effect. When you start to work with CCHE1D, a new Project is created. A Project is the collection of all data related with a particular watershed study. It contains interactive maps, tables, and images. CCHE1D distinguishes several types of maps and tables. They are called Documents. Usually, a set of specialized functions is available for each type document. Chapter 2 Working with CCHE1D – An Overview 11 You will use CCHE1D to perform different types of analyses and operations that will generate new data, including database tables, maps, and images. The CCHE1D Project file does not store the data, which are stored in separate files. The CCHE1D Project stores only references to these files. However, it stores data related to all operations you perform, to keep track of the analyses you make and the new files that are created in the process. When you finish a session of CCHE1D, you should save the Project file, so you can continue your work later. The Project file has the extension .apr. The remainder of this chapter will give you a tour of the CCHE1D functionality. It follows the order a channel analysis work is carried out, introducing all the important features of CCHE1D. Defining Channel Networks Introduction CCHE1D is an unsteady-flow hydrodynamic model for channel networks. Its graphical interface is designed to facilitate the process of creating a suitable channel network for the simulation, and to help the modeler provide the data that describe the channel properties. The model can be applied to a single channel, or to a network of hundreds of channel links. In addition, CCHE1D can be used in conjunction with a watershed model, which would provide the required boundary conditions (inflows and sediment loads), or stand-alone, which inputs provided by the user. CCHE1D provides two methods that can be used to create a channel network that represents the study area. You must decide which method to use based on the type of input data you have available, the type of study, the size and complexity of the computational domain, and other factors. The first method, here called “Landscape Analysis,” uses terrain elevation data to define a network of channels that approximate the real channels of a watershed. If a Digital Elevation Model (DEM) is available for the area to be studied, CCHE1D can automatically extract a channel network based on the given elevation data. This method is convenient for complex channel networks, and it is very advantageous if the CCHE1D simulation is to be coupled with a watershed (rainfall-runoff-erosion) simulation. The second method for the creation of a channel network is by digitizing the channels based on a map, photograph, satellite imagery, or any image or illustration that could be scanned into a computer file. In this method, you can delineate the channels by simply following the reference image with the mouse (“heads-up digitizing”). CCHE1D algorithms convert the drawing into a logical description of the channel network. If the image is referenced to a Chapter 2 Working with CCHE1D – An Overview 12 known coordinate system, all distances, such as channel lengths, can be also inferred from the digitizing procedure. The CCHE1D Image Geo-referencing Extension can be used to associate a reference image to a known coordinate system. You can simply enter the coordinates for a couple of points, or you can use an already referenced map, GIS, or image layer as reference. Performing Landscape Analysis If CCHE1D is being used as part of a watershed-wide numerical analysis, the first task is to define a network of channels and subdivide the watershed into smaller regions, according to the distribution of channels within the watershed. CCHE1D is capable of creating both the channel network and the corresponding subwatersheds automatically. It uses the model TOPAZ (TOpographic PArameteriZation, Garbrecht and Martz, 1995), and all it needs is a Digital Elevation Model that contains the watershed you are interested in studying. A Digital Elevation Model (DEM) is a matrix of equally spaced ground elevation values describing the terrain topography. You can control the final appearance of the channel network (channel density, minimum channel lengths, and subwatershed areas) by specifying the values for two calibration parameters: The minimum length of source channels (channels without tributaries). The minimum upstream drainage area necessary to maintain a permanent channel. Either you can use the same values of these two parameters for the entire DEM, or you can specify up to five regions within the DEM with different parameter values. After the initial computations are performed, CCHE1D displays a map with all the channels extracted from the DEM. In most cases, the DEM will cover more than one watershed. You can use this map to identify the watershed of interest and specify the location of its outlet. Once the channels and subwatersheds are defined, CCHE1D builds the CCHE1D Network Database. The database stores all information about channels and subwatersheds, and it is made of tables. Each table stores the properties of a certain entity such as nodes, reaches, and subwatersheds. Some tables store indices that are used to establish relationships with other tables of the database. Chapter 2 Working with CCHE1D – An Overview 13 When the channel extraction and subwatershed delineation process is concluded, CCHE1D displays the channel network within the selected watershed. From here, you would create a computational channel network, in which you would define the position of the computational nodes and provide geometry, hydraulic structure, and sediment-related data. Digitizing a Channel Network A convenient alternative to the “Landscape Analysis” procedure is to simply “draw” a channel network in the CCHE1D interface, and then provide geometrical data, such as channel lengths, cross section geometry, etc. CCHE1D has a “Channel Network Digitizing Interface,” which allows you to create a channel network of any level of complexity in minutes. You can display any reference image on-screen, and use it as a background for while you define the position of the channels with the mouse. Aerial photographs, satellite imagery, digital maps, or any other scanned image can be used as reference. Once you have the channels visible on screen, you can simply active the digitization tool and follow the channels with your computer mouse. Chapter 2 Working with CCHE1D – An Overview 14 After the “drawing” of the channels is finished, CCHE1D algorithms analyze the drawing and convert it into a logically defined channel network. If your reference image is associated with a known coordinate system, CCHE1D will automatically use real-life distances for each channel segment. The digitizing procedure gives you better control when generating the channel network. The precision of the channel disposition is dependent only on the quality of your reference image and on your ability to visually recognize the channels and mark their location using the computer mouse. CCHE1D’s graphical editing tools give you good flexibility when editing or correcting the digitized channels. The automated process yields data that is equivalent to those generated by the Landscape Analysis algorithms, with the exception that there is no definition of the watershed contour. After you are satisfied with the digitized channel network, you would proceed to create the computational channel network, where you would define the position of the computational nodes, and provide all the required data for the channel simulation. Chapter 2 Working with CCHE1D – An Overview 15 Defining the River Geometry and Other Data After you have a channel network defined, you must provide data to describe the geometry of channels, hydraulic roughness, and sediment data, if sediment transport is to be considered. CCHE1D has a unified “Channel Analysis Module” that works with channel networks created from DEM’s or digitized through its graphical interface. A new interactive map, simply named Channel Network (followed by a number) provides the interface and graphical tools that will guide you and help you during the process. The new window appears with you select the Create Computational Network option of the Channel-Network menu. NOTE: CCHE1D 3.0 integrates all editing capabilities into a single window simply called “Channel Network.” This window replaces the Computational Channel Network and the Hydraulic Structures Manager windows of previous versions of CCHE1D. You can create as many Channel Networks as wish, inside a single project. Channel Cross-Section Data Now that you have finished the channel network creation process, you can start to enter information about the channel cross sections. You must define the cross section geometry through a series of points of known elevations, which may include optional floodplains. Bed and bank sediment properties are considered as part of cross sectional data. You can also specify variable hydraulic roughness across the channel and floodplains. CCHE1D version 3.0 allows you to define cross sections of arbitrary shapes. You do not have to enter cross section information for all nodes in the network, but CCHE1D requires that you provide data for all nodes at the beginning and end of every channel link. CCHE1D will supply the information for the remaining nodes using interpolation. Cross Section Interpolation CCHE1D has sophisticated interpolation routines that can generate synthetic cross section geometries at locations where measurements are not available. The interpolation routines preserve the overall shape of the cross sections, considering the location of the channel banks, and the geometry of the floodplains. The programs establish “master cords” that connect the key points of the cross section, such as bank toes and overbank stations. The interpolation routines also consider the geometry of in-stream structures. Hydraulic Structures CCHE1D supports the modeling of flow and sediment transport through four types of structures: culverts, bridge crossings, drop structures and measuring flumes. You can add hydraulic structures to the channel network through the interactive map of the graphical interface, or by defining their location and Chapter 2 Working with CCHE1D – An Overview 16 properties in a data file. Complete property editing tools are also available in the graphical interface. Computational Mesh Generation After you have entered the cross section data and the eventual hydraulic structures, you can start the process of creating a computational mesh for the flow and sediment transport models. CCHE1D provides automated tools to help you during the process. Auto-generating a Channel Network CCHE1D’s Channel Network Analysis module inspects the channel network and determines improvements to create a computational network that is adequate to the flow routing model. This analysis module consists of a series of pre-defined rules, tuned to the simulation models of CCHE1D, which determine the number and location of new nodes to be added to the channel network. You can ask CCHE1D to create the computational network for you by choosing the Autogenerate option of the Channel-Network menu. CCHE1D will display the new nodes with a different color, so you can identify which nodes were added by the automatic procedure. Editing the Channel Network The GUI of the Channel Network window has a series of tools that allow you to interactively add or remove nodes to the computational network. You can just click at the point where you want to insert a node, and CCHE1D will take care of everything. You can enter the cross section data for the new node, or you can let CCHE1D use its interpolation routines to supply the needed information. Similarly, you can remove nodes added interactively or by the Autogenerate function. However, you cannot remove whole channel links or certain types of nodes, such as channel junctions and subwatershed inflow locations. Watershed Modeling CCHE1D was designed to be independent of the watershed model used for the rainfall-runoff simulations. You can use models such as SWAT – Soil and Water Assessment Tool, or AGNPS-2000, for example, for the modeling of watershed processes and the determination of water and sediment runoff of naturally delineated subwatersheds. SWAT and AGNPS are continuous time, distributed parameters models that simulate hydrology, erosion, and water quality processes. Chapter 2 Working with CCHE1D – An Overview 17 Currently, the interface to the watershed model SWAT is made through the Blackland SWAT-GRASS interface (Srinivasan et al, 1996). The SWATGRASS program uses the GRASS GIS to perform all the spatial analyses and extract properties for each subwatershed. Input data for SWAT consists of the DEM, subwatershed map, land-use map, soil map, and data about climate and agricultural practices. CCHE1D automatically exports the DEM and Subwatershed raster maps. It also helps the user in specifying the additional data layers. CCHE1D then starts the SWAT-GRASS command-line interface, from which you can control the simulation of the watershed processes. SWAT will output a time series of water and sediment runoff for each subwatershed, which will be used as boundary conditions for the channel flow and sediment transport computations performed by CCHE1D. CCHE1D has not been tested with newer versions of SWAT, which includes an ArcViewbased graphical interface. You are expected to convert output results from SWAT to the watershed-based boundary conditions data format of CCHE1D. If you decide to use AGNPS, you can use the channel network and subwatershed data generated by CCHE1D directly in the AGNPS simulation. The procedures for channel network generation in both models should be identical. CCHE1D now can import the simulation results of AGNPS directly, and use them as boundary conditions for the channel simulations. Performing Hydraulic and Sediment Transport Computations When you are satisfied with the channel network displayed in the Channel Network Window, you can perform flow routing and sediment transport simulations. The GUI has a menu labeled Simulation, from which you can enter the required information and control the simulation runs. CCHE1D reduces the amount of information you have to supply. It needs only the following: Control Parameters and model options; Boundary Conditions File; Definition of Output Data. CCHE1D provides a sophisticated and interactive system for the specification of the model output data. Because a long-term continuous simulation of flow and sediment transport can generate a large amount of output data, CCHE1D lets you specify, before you start the simulation, what charts you want to see when the computer run is finished. Then you can import the results file into your favorite plotting package to visualize the results. CHAPTER 3 Installing and Starting CCHE1D This chapter discusses the hardware and software requirements needed to run CCHE1D and describes how to install and set up CCHE1D on your system. This chapter also describes the several methods to start the CCHE1D graphical interface and modeling system, and how to setup a case study for the analysis of channel flow and sedimentation processes. In addition, this chapter presents some general guidelines regarding the use of the CCHE1D software. Chapters that follow will discuss each phase of the modeling process in detail. Contents Hardware and Software Requirements Installation Procedure Starting CCHE1D Using CCHE1D Chapter 3 Installing and Starting CCHE1D 19 Hardware and Software Requirements CCHE1D is a collection of FORTRAN and C programs that are managed by a Graphical User Interface for the ArcView GIS system, which is programmed in a proprietary objected-oriented language called Avenue. CCHE1D uses ArcView to perform many tasks. ArcView is not used merely as an interface. All database management and channel analysis operations are performed within ArcView. CCHE1D requires ArcView version 3.0a or later and it does not require any of ArcView extensions, such as Spatial Analyst or Dialog Designer. CCHE1D is distributed in the form of executable programs for the Microsoft Windows operating system. However, CCHE1D programs can be compiled for most systems, including most Unix variants. To this date, CCHE1D was not tested on Macintosh systems. Hardware requirements for CCHE1D are the same as those for ArcView 3.x. Because CCHE1D and ArcView must run simultaneously, it is recommended that a minimum of 128 MB of RAM be available for good overall performance. Installation Procedure CCHE1D files and programs CCHE1D is distributed as a single, self-extracting file named cche1d-v3xxxx.exe which contains the programs and pertinent data for the installation of CCHE1D on Windows 95, NT 4.0, 98, Me, and 2000 systems. CCHE1D has not yet been tested on Windows XP, however, all recommendations for Windows 2000 systems should apply. CCHE1D uses ArcView during the installation process, thus the installation of the programs will fail if ArcView is not present or if it has not been installed correctly. To install CCHE1D on your system, double-click on the cche1d-v3xxxx.exe file icon, and follow the instructions for the installation. By default, CCHE1D installs its programs in a folder named C:\NCCHE\CCHE1D. You can override this setting by providing a new folder using the Browse button, when prompted. Make sure you take note of the new folder because you will need it later. Do not install the software in locations that contain spaces in their names (e.g. C:\Program Files) because ArcView is not fully compliant with Microsoft Windows standards, and it may have problems accessing files in folders that contain spaces in their path. Chapter 3 Installing and Starting CCHE1D 20 Because the program is updated frequently, please read the detailed installation instructions that are available with the distribution of the software for the most up to date installation information. For Unix systems, follow the instructions provided with the CCHE1D file distribution. CCHE1D ArcView Extension File The CCHE1D installation program places the CCHE1D extension file cche1d.avx in the location defined by the environment variable AVEXT. Usually, this location is set by ArcView to be AV_GIS30\ARCVIEW\EXT32. Alternatively, ArcView allows extensions to be installed into a user-defined folder. If you want to install it in a user-dependent folder, you can do so, as long as you set the environmental variable USEREXT to the folder where you installed the file. Keep in mind that if you choose this alternative, the CCHE1D installation programs will not be able to update or uninstall the software. The user will be responsible for managing the installed versions in use. See the ArcView documentation for more details. CCHE1D Case Data Folder For CCHE1D version 3.0, the use of a “Case Data Folder” is optional, but it is a convenient method to organize CCHE1D data sets and avoid problems accessing data later. If such folder is defined, CCHE1D will store the data for each test case into a directory structure under this folder, by default. The Case Data Folder can be created either before or after the installation of the program. For new users of CCHE1D, it is recommended that such folder be created. If more than one user shares your computer, your system administrator can decide if CCHE1D-related data will be stored into a separate folder for each user, or if all users will share the same folder. Do not use spaces in the path to this folder (e.g. C:\My Documents\Cche1d) because ArcView has problems dealing with file names that contain spaces. To setup the CCHE1D Case Data Folder, follow these two steps: 1. Create a folder on the location you decide to store all CCHE1D test case data. Do not use spaces in the name or path to this folder. 2. Define an Environment Variable (named C1DDATA) to indicate CCHE1D to use that folder as the default location for test case data. You can override this location and choose a different one when creating new test cases. Chapter 3 Installing and Starting CCHE1D 21 The C1DDATA Environment variable In order to define a folder as CCHE1D’s default Case Data Folder, you must set the environment variable C1DDATA, before you create a new Test Case. Please follow the instructions below, according to the operating system of the computer you are using. Note that if this variable is set incorrectly, CCHE1D will simply ignore this setting. Windows 2000 systems On Windows 2000 systems, open the Windows Control Panel and doubleclick on the Systems icon. Select the Advanced tab, and then Environment Variables button. Add the following variable: C1DDATA Cche1dDataDir where Cche1dDataDir is a directory that will contain all your CCHE1D test cases, for example C:\Projects\Rivers\Modeling. When you use CCHE1D in the simulation of a watershed/channel system, CCHE1D stores the information created during the simulation into a directory structure under the Cche1dDataDir directory. This directory may be unique for each user. Your system administrator may help you setup different values for each user. Windows NT 4.0 systems On Windows NT systems, open the Windows Control Panel and double-click on the Systems icon. Select the Environment tab and add the following variable: C1DDATA Cche1dDataDir where Cche1dDataDir is a directory that will contain all your CCHE1D test cases, for example C:\Projects\Rivers\Modeling. When you use CCHE1D in the simulation of a watershed/channel system, CCHE1D stores the information created during the simulation into a directory structure under the Cche1dDataDir directory. This directory may be unique for each user. Your system administrator may help you setup different values for each user. Windows 95/98/98SE systems On these Microsoft Windows systems, you must add the following line to the autoexec.bat file: set C1DDATA=Cche1dDataDir where Cche1dDataDir is a directory that will contain all your CCHE1D test cases, for example C:\Projects\Rivers\Modeling. When you use CCHE1D in the simulation of a watershed/channel system, CCHE1D stores the information created during the simulation into a directory structure under the Cche1dDataDir directory. Chapter 3 Installing and Starting CCHE1D 22 Unix Systems Environment variables are usually defined in a file that is read during login (.login, .profile, .cshrc, etc). Usually the variables are set with the setenv command, as follows: setenv C1DHOME InstallDir setenv C1DDATA Cche1dDataDir where InstallDir is the CCHE1D installation directory. Cche1dDataDir is a directory that will contain all your CCHE1D test cases. When you use CCHE1D in the simulation of a watershed/channel system, CCHE1D stores the information created during the simulation into a directory structure under the Cche1dDataDir directory. This directory can be different for each user of the same computer. Starting CCHE1D As stated before, CCHE1D requires ArcView GIS program version 3.0 or later to work1. In a more strict sense, ArcView must be started first, and then the CCHE1D extension should be activated to enable the CCHE1D functionality. For version 3.0, however, a new automated system has been implemented, which allows CCHE1D to be started as any Windows program. To Create a New CCHE1D Project To start CCHE1D to create a new test case, you can start CCHE1D like any other windows program: 1. Double-click on the CCHE1D icon on your Windows desktop. If you do not see the icon, use the Start Menu as usual for any Windows program. CCHE1D is the Programs/NCCHE group. On newer versions of Windows, the CCHE1D icon is also available from the task bar, usually at the bottom of the desktop. 2. You will see ArcView starting, and then the CCHE1D banner is displayed. You will then be prompted to enter a “Project Case Name.” You can navigate your computer and define a location for the new CCHE1D project, if desired. Otherwise, simply provide a short case name (not more than eight characters) and press OK. 1 You can use the CCHE1D channel flow and sediment transport model directly from command-line, provided you supply all the input data according to the specifications in the appendices of this manual. Chapter 3 Installing and Starting CCHE1D 23 If you prefer to start ArcView first, or if you already have ArcView running, you can start CCHE1D by enabling its Extension: 1. In ArcView’s File menu, select Extensions. You must have ArcView’s main window (the “Project” window active to see this option). 2. Scroll down the list of extensions available on your computer, and select CCHE1D. A black checkmark appears. Press the OK button. If you cannot see the CCHE1D extension in the list, the software was not installed correctly. Make sure the extension file cche1d.avx is installed in the proper directory. 3. If there is already an ArcView project opened, the CCHE1D banner is displayed, and you are prompted to enter a “Project Case Name.” You can navigate your computer and define a location for the new CCHE1D project, if desired. Otherwise, simply provide a short case name (not more than eight characters) and press OK. 4. If there is no project open, use the “New Project” option of the File menu. The CCHE1D banner is displayed, and you are prompted to enter a “Project Case Name.” You can navigate your computer and define a location for the new CCHE1D project, if desired. Otherwise, simply provide a short case name (not more than eight characters) and press OK. 5. Save the new ArcView project, as usual. To Open an Existing CCHE1D Project You can open an existing CCHE1D project simply by double-clicking the ArcView Project file icon. The ArcView file has extension .apr and is located inside the folder with the same name (without the extension). On Windows systems, the icon also appears in the “Documents” or “Recent Documents” part of the Windows Start menu. Alternatively, you can start ArcView and use the Open Project option of the File menu. Some Notes CCHE1D cannot work unless you provide the case name. If you cancel the creation of the test case, the project is closed, but the extension remains active. Simply use the “New Project” option to create a new CCHE1D Project. Once a case name is defined, CCHE1D creates a directory with the same Case Name at specified location. The default value for this location is given by the environmental variable C1DDATA, which was also defined at the time of the software installation. If that variable was not defined, CCHE1D follows ArcView rules for the location of new files. It is very important to always save the ArcView project. If you are already familiar with ArcView you know that ArcView project files (extension .apr) Chapter 3 Installing and Starting CCHE1D 24 do not store the data such as tables, graphics, etc., but only references to other files in the computer system. If you forget to save the project file, references to the files may be lost. You can save the CCHE1D–ArcView project files in any location in your computer. However, due to some limitations of ArcView handling file names under Windows systems, it is recommended that you avoid: 1. Saving the project files in network-mounted storage devices; 2. Saving files with spaces anywhere in the path to the file (e.g. C:\My Documents\CCHE1D\myprj.apr). ArcView does not open project files that contain a space anywhere in the path to the file. 3. Saving files where the path is likely to change. If you receive a message saying that any environmental variables are not defined, you can do so at the moment the new project is created. However, it is important that you or the systems administrator for you computer review the installation procedure, because these variables should be correctly defined before you start using CCHE1D. Using CCHE1D CCHE1D Data Directory A CCHE1D simulation uses and generates a large amount of data that cannot be stored in a single file. A complete simulation requires the user to provide several types of data. Each step of the analysis generates additional data that must be stored. A typical CCHE1D project that includes sediment transport could contain about 100 data files. CCHE1D projects that require more than 50 MB of storage are not uncommon. Luckily, CCHE1D’s control module manages most of the data operations, and the user does not have to worry about database operations and intermediate data files. Since the CCHE1D interface works under the ArcView GIS, it must comply with the requirements of that software and it is subject to some limitations ArcView imposes. If you are already familiar with ArcView, you know that all user actions are saved to an “ArcView Project” file, but the bulk of the data such as maps and tables are stored into separate files. This Project file stores references to the files that contain the data. For each new project you start, CCHE1D will create a directory (or folder as they are called under Microsoft Windows) where all the data will be stored. This directory is called the Case Directory, and it is shown on the title bar of the application. This directory contains the ArcView Project file and several subdirectories that help organize the data files CCHE1D creates. Chapter 3 Installing and Starting CCHE1D 25 A common problem with this approach is that if one of the files is deleted or if it is moved to another location in the computer hard disk, problems will arise when the Project is opened for use again. In order to minimize the problem, CCHE1D follows a procedure that is common in GIS applications, where the user is encouraged to keep all data under a pre-defined directory (folder) structure. For this reason we recommend that you define a CCHE1D Data directory (C1DDATA). It is highly recommended that you keep a CCHE1D project in the same location during its existence. Moving or deleting files can lead to problems, and the CCHE1D will malfunction if some of the data is lost. CCHE1D Project Being a customized ArcView application, a case study performed with CCHE1D is equivalent to any ArcView project. Thus, familiarity with ArcView, although not required, is a plus. CCHE1D does not disable any of the ArcView functions. You can use most of the ArcView functionality concurrently with CCHE1D. Only a few features are blocked because CCHE1D programs require some properties remain unchanged during the existence of the project. Remember to save your project file frequently, before and after important or time-consuming operations. If you use the program but you fail to save the project when you are done, data will be lost. CCHE1D version 3.0 now automatically saves the project file after important, automated operations are performed, but you are still responsible for saving the project frequently. Because CCHE1D is a complex program, an important amount of data is saved to the Project file. If this data is lost, recovery can be difficult. How to Move a CCHE1D Project to Another Location Although not recommended, it is often necessary to move the CCHE1D files to another location on your computer or to a different computer. Like any other ArcView project, you may have to manually edit the project (.apr) file in order to update new file paths inside the project file. CCHE1D does not have any extra requirement when moving projects. Therefore, if you are experienced with ArcView projects, you should not have any problem. Follow these general guidelines when moving a CCHE1D project: 1. Copy the whole directory structure to another location. Start from the top directory, the one that has the same name as the Test Case and the .apr file. 2. Make a backup copy of the .apr file. Chapter 3 Installing and Starting CCHE1D 26 3. Open the .apr file in any text editor, such as Notepad, Wordpad, or similar program. If possible, avoid Notepad and choose a better editor because Notepad is too slow and the .apr files are usually large. 4. Observe that the .apr file contains hardcoded paths to each of the data files referenced by the project. You must update each and every occurrence of these file names. Edit the path to each file, substituting the old value for the new, correct ones. For example, if the “BlueRiver” project and directory was originally created inside the folder C:\Projects\Modeling\MyCases\ and you are moving the BlueRiver directory inside D:\Reports\Data you should see inside the .apr file lines like: Path: "c:/projects/modeling/mycases/blueriver/extrnet1/blueriver_nodes.dbf" or S: "c:\\projects\\modeling\\mycases\\blueriver\\simul\\blueriver_mp_df.txt" You must edit every occurrence of this type of data line to match the new location of the files. Therefore, the lines above should be changed to: Path: "d:/reports/data/blueriver/extrnet1/blueriver_nodes.dbf" and S: "d:\\reports\\data\\blueriver\\simul\\blueriver_mp_df.txt" Note that there are many instances similar to those above, and every one should be updated, but a couple of search and replace operations should be sufficient. 5. Double-click the edited .apr file and check if the project opens correctly. If a file path is wrong, CCHE1D will not be able to find that file, and a dialog will popup so you can specify the correct location for that file. If CCHE1D continues to ask for many files, you must have made a mistake. Cancel everything, do not save the new project, and review the file editing. If the file paths are edited correctly, the project file should open and work correctly. If you are moving the project to another computer, ensure that both CCHE1D and ArcView are correctly installed. If you had other ArcView extensions active (intentionally or accidentally) in the original computer, but these extensions are not available in the new computer, you will be prompt for their location. You can press Cancel when prompted. Chapter 3 Installing and Starting CCHE1D 27 Recommended Usage Behavior This section summarizes some good practices that will help managing the operation of the program and its data. Set the CCHE1D Data Directory to a hard disk mounted on your computer. Make sure the directories where you plan to store CCHE1D data contain no spaces in their names. This is a limitation of ArcView that may cause problems when trying to access files. Avoid network-mounted disks. Set it to a folder that is unlikely to change. If the computer supports a multi-user environment, consider a separate data directory for each user, making sure the Environment Variables are set accordingly. Decide where you are going to store the project files and be consistent. Remember that to each Project file corresponds a directory (folder) in the C1DDATA directory. When you delete a project file, remember also to delete the corresponding directory structure. Also, avoid storing project files in directories that contain spaces in their names (e.g. C:\My Documents\My CCHE1D Projects). ArcView may fail to open the project if there are spaces somewhere in the path to the file or in the file name itself (e.g. “Blue River.apr”). Assign clear, meaningful Case names. It is also a good idea to save your project with the Case name to clarify the relation between project and data directory. Do not add extraneous data to CCHE1D documents (Views, Tables, etc). Avoid modifying the main Channel Network Views (most damaging actions are already blocked), since they can interfere with the behavior of the interface. If you want to add data that is not required by CCHE1D do so by creating standard views and tables. Do not delete components created by CCHE1D from the Project. If you delete a View or a Table from the project, CCHE1D could malfunction. Do not move or delete files inside the Case data directory. The only files you can remove are simulation results inside the simul subdirectory. Do not activate ArcView extensions that are not necessary for the CCHE1D simulation. Activating extensions uses precious memory and computer resources, and slows down the system. CHAPTER 4 Landscape Analysis and Channel Network Extraction In the chapter “Working with CCHE1D – An Overview,” you were introduced to the CCHE1D modeling system. You saw how CCHE1D performs several tasks, and how it enforces a welldefined sequence of actions so that the graphical interface can guide you and help you along the way. This chapter will take you through the process of Landscape Analysis and Channel Network Extraction, where you will learn how to create a channel network from a Digital Elevation Model, or DEM. Alternatively, you can proceed to the next chapter, “Channel Network Digitizing Interface,” to learn how to create a channel network by digitizing the position of channels displayed on the computer screen. Contents In this chapter you will learn how to: Import and Pre-process a DEM. Extract a channel network Define a watershed Chapter 4 Landscape Analysis and Channel Network Extraction 29 Introduction This chapter describes the CCHE1D’s implementation of a method to create channel networks and define the corresponding drainage basins based on the analysis of elevation data, in the form of a Digital Elevation Model (DEM). CCHE1D utilizes an external program called TOPAZ for the spatial analysis, but it provides a complete graphical interface for this procedure. Although several other programs are used in this procedure, all tasks are managed from the CCHE1D interface, which controls the external programs. After a channel network is defined, CCHE1D converts the results from the spatial analysis into a relational database that stores all the relevant information. This database will be automatically updated during the whole simulation processes, so that you do not have to worry about complex data preparation operations that take place behind the scenes. Importing a DEM In order to create a channel network with the corresponding subwatersheds, you must have a Digital Elevation Model (DEM) imported into the CCHE1D Project. CCHE1D supports the following formats for the DEM file: ArcInfo ASCII File – This file is usually created with the command GRIDASCII in Arc-Info or exported as ASCII raster from ArcView, but you can create a file in this format using a text editor or by using a program you wrote for this purpose. GRASS ASCII File – You can export a DEM from GRASS GIS using the command r.to.ascii. The file is similar to the ArcInfo ASCII file, except for the header information. RAW ASCII File – Similar to the formats above, except there is no header at the beginning of the file. You must provide the required data in a separate file, or interactively, via the CCHE1D interface. For a complete description of the file formats, please refer to Appendix C. To import a DEM file 1. Make sure the CCHE1D extension is active. Select the Project window by clicking on it. 2. Choose the option Import DEM from the Channel Network menu. 3. In the dialog that appears, select the type of DEM file that corresponds to the file you have, and click OK. 4. A file selection dialog appears. Browse the directory structure to find the directory that contains the file you want to import. By default, the dialog shows only files with extension .dem. If your file has a different Chapter 4 Landscape Analysis and Channel Network Extraction 30 extension, select ‘All Files (*.*)’ to see all the files in the selected directory. 5. Double click on the file you want to import. 6. If you are importing a file in RAW format (no header), you will be asked if you will provide the additional information interactively or through a CCHE1D header file. The header file contains coordinates, cell size, and other data normally present in the file header. This option can be used to directly import DEMs prepared for the landscape analysis model TOPAZ. If you choose to provide the data interactively, a dialog will appear so you can type in the data. CCHE1D will import the DEM file and display it on a window. The DEMs you import are named “Raw DEM” followed by a number. They appear in the Project window, under the icon DEMs . You may import up to 9 DEMs into a project. You cannot access the DEM elevation values from this window. Therefore, you cannot query of modify the DEM from within CCHE1D. You can use the ArcView Network Analyst® Extension for this purpose. Chapter 4 Landscape Analysis and Channel Network Extraction 31 Checking DEM properties You can see the properties of the imported DEM by clicking on the Properties button , or by selecting Properties from the DEM menu. A dialog box appears showing information about the DEM. To change the DEM colors CCHE1D creates an image representing the DEM. The image has 256 predefined colors. The default color scheme uses earth tone colors commonly used to represent ground elevations. You can select another color scheme: 1. Double-click on the legend area in the DEM window. 2. In the Dialog that appears, select a different colormap. Click OK. You can use the standard ArcView’s imagery display capabilities by selecting the ‘Legend Editor.’ Refer to the ArcView user’s manual for more information. Chapter 4 Landscape Analysis and Channel Network Extraction 32 To create a new DEM colormap You can create your own colormap to display DEMs within CCHE1D. Create a file containing 256 entries of Red, Green, and Blue (RGB) triplets that identify each color in the colormap. CCHE1D will map the elevations to the specified colors. You must copy the file to the CCHE1D installation directory tree, inside the directory lib/colormaps. Consult Appendix C to learn about the format of the colormap file. Pre-Processing a DEM Once you have a DEM imported, you can Pre-Process the DEM. Preprocessing is required because a channel network cannot be extracted from a DEM if the it contains depressions without an outlet for the surface flow. Pits and depressions must be filled to the elevation of their local outlets. Flat areas in the DEM are usually due to its limited vertical resolution, and may lead to flow paths that deviate from the actual conditions. Flat areas are eliminated by imposing a relief that is based on the terrain configuration of the surrounding areas. You can control some options and parameters of the pre-processing. The preprocessing algorithms modify the elevation of some DEM cells. Therefore, the final appearance of the extracted channel network may vary, depending on the options used. You may wish to try the different options and verify their influence in the extracted channel network. CCHE1D uses the landscape analysis model TOPAZ (TOpographic PArameteriZation) to pre-process the DEM and extract the channel network. For information about the algorithms, assumptions and limitations of the model please see Garbrecht and Martz, 1995. After you import a DEM, select Pre-Process from the DEM menu. A series of dialog boxes will ask you about all the pre-processing options and parameters. When you are finished selecting the options, CCHE1D will call TOPAZ to pre-process the DEM. Smoothing You may want to smooth the DEM before pre-processing it. Smoothing is accomplished by performing a weighted-average in a moving 3 by 3 cell window. You may specify different weights for the central cell, the crosscells and the diagonal cells. In addition, the smoothing procedure can be repeated several times by specifying the number of passes. To smooth the DEM: 1. Click Yes when the smoothing option dialog appears. Chapter 4 Landscape Analysis and Channel Network Extraction 33 2. In the dialog that follows, enter the number of smoothing passes and the weights for the center cell, cross-cells and diagonal cells. Valid values are integers in the range 0 to 100. Treatment of Depressions TOPAZ’s depression analysis algorithm identifies and delineates all closed depressions in the DEM. It assumes all depressions are spurious and it essentially modifies the DEM by increasing elevations within a depression to a level where an outlet can be defined. There are, however, two approaches used in accomplishing the depression filling. According to user's choice, the depressions can be either entirely filled until the lowest depression outlet is found, or existing narrow blockages are breached, so that an outlet is created. The first option models the natural formation of ponds. The water fills the depression until a certain elevation is reached. An outlet is found and the water reassumes its flow downstream. The second option assumes that as in nature depression features are often breached (valleys, gullies), but the breach is too narrow to be registered by the coarse resolution of the DEM. The breaching option avoids the filling of large areas, which can be the result of poor DEM definition due to its resolution or inherent errors. To select the depression treatment option: 1. From the drop-down menu, select either: Fill Depressions Entirely Breach Narrow Blockages 2. If you opt for breaching narrow depressions, specify the breaching length to either one or two cell widths in the dialog that follows. Treatment of Flat Areas TOPAZ eliminates flat areas inherent to the DEM and those created by depression filling by increasing the elevation of selected cells by very small increments. The algorithm assumes that these areas are not flat in nature, and they are the result of the low vertical resolution of the DEM, which is typically one foot or one meter. The elevations within the flat area are inferred from the rising and falling terrain surrounding it. The purpose of this treatment is to eliminate ambiguity when defining flow lines across these areas. The flow is forced to take the shortest path, flowing away from rising terrain, towards the flat area outlet. This algorithm is always applied, and there are no options or calibration parameters. Chapter 4 Landscape Analysis and Channel Network Extraction 34 The Pre-Processed DEM When the DEM is pre-processed, a new window is displayed, showing the elevations of the modified DEM. You can use the colormap to compare the new ground elevations with those of the original (raw) DEM. You cannot access the individual elevation values from this window. Each pre-processed DEM is named “Processed DEM” followed by a number. The name appears at the top of the window, and in the Project Manager window, under the icon DEMs. You can have 10 processed DEMs within a CCHE1D project. You can verify the options used in the pre-processing phase by using the Properties option of the DEM menu, or by using the button when a preprocessed DEM window is selected. In addition, the main menu bar shows a menu labeled Channel Network. You will use them in the next step of the analysis of the watershed system: the extraction of a channel network. Channel Network Extraction How the channel network is extracted After a DEM is pre-processed to eliminate sinks and flat areas, you can use CCHE1D to extract all channels from the DEM. The channel network extraction algorithms of TOPAZ use only the DEM and two user-defined parameters to define all channels and subwatersheds. CCHE1D provides a convenient interface to guide you in defining the parameters. The process of channel network extraction is entirely based on the analysis of raster maps. First, the DEM is scanned, and for each cell, the direction of the steepest downward slope to an adjacent cell is determined. The information is stored in another raster map. Then another algorithm determines the upstream drainage area for each of the raster cells. Starting at the DEM borders and cells that do not receive inflow from their neighbors, flow paths are traced and the drainage area for each cell is accumulated. The resulting raster already shows all the potential channels. However, most channels are very short and do not have upstream drainage area large enough to provide run-off to form a real, permanent channel. Therefore, there is a need of specifying what the minimum drainage area to form a channel should be. This value is a function of soil characteristics, vegetation cover, terrain slope, and climatic conditions. This minimum area value is called Critical Source Area (CSA), and you must define it. The numerical processing of the DEM can produce channels that are very short in length. They may represent valley indentations, and in most cases are gully outlets and other features not normally considered as part of a channel Chapter 4 Landscape Analysis and Channel Network Extraction 35 network. This threshold length of channels is called Minimum Source Channel Length (MSCL). These two parameters control the appearance of the drainage network, and they can be used for calibration purposes. You will input their values using the CCHE1D GUI. Once the extraction parameters are known, the drainage area raster is reduced to reflect only the channels that meet the user-specified Critical Source Area and Minimum Source Channel Length. At this point you have all channels present in the DEM that satisfy the conditions you specified through the set of CSA and MSCL parameters. There is no definition of watersheds, only channels. Extraction Parameter Sets CCHE1D helps you define the parameters for the extraction of the channel network. You can create one or more sets of parameters, and then apply them to one or more pre-processed DEMs. In this way, you can see how the different parameters influence the appearance of the extracted channel network. Alternatively, you can apply the same set of parameters to more than one DEM. When you have a pre-processed DEM in the Project, you can access the functions that control an internal database that stores the parameters for the extraction of the channel network. Chapter 4 Landscape Analysis and Channel Network Extraction 36 Select a Processed DEM window. From the menu labeled Channel-Network, choose the option Extraction Parameters. You will see a drop-down menu that displays options to add, remove, edit, or view a set of parameters. You will use these to define the parameters. Later, you will use one of these sets to extract the channel network. The same set of parameters should be applied to regions of uniform drainage properties. If the DEM covers an area with different drainage characteristics, the landscape must be subdivided into regions of similar properties. The user should provide a raster file the same size of the DEM, whose values identify the distinct regions. Adding a Parameter Set CCHE1D will guide you through the process of creating a set of parameters to control the channel extraction process. CCHE1D displays several dialog boxes where you define all the options and parameters. To create a parameter set: 1. Select a Processed DEM window. Choose Parameters from the ChannelNetwork menu. 2. In the dialog that appears, choose Add a Parameter Set. 3. Enter a name for the parameter set you will create. The name can be of any length, but a maximum of 30 characters is recommended. You will use this name to identify the parameter set later. 4. A new dialog will be displayed: Chapter 4 Landscape Analysis and Channel Network Extraction 37 Spatially Constant means that you are going to specify a single pair of CSA and MSCL values for the entire DEM. Spatially Varied means that you are going to subdivide the DEM into regions, and you will specify different pairs of CSA and MSCL values for each of those regions. 5a. If you have chosen the Spatially Constant option, you may enter the values for the extraction parameters in the dialog that follows. Critical Source Area – CSA: The minimum drainage area in hectares to form a permanent channel. A smaller value will generate a denser channel network. The network will show more channels. A greater value will reduce the number of channels in the network. Since they have a greater drainage area, the channels represented in the network correspond to the larger channels of the watershed. Minimum Source Channel Length – MSCL: The minimum length of the channels in the network. The extraction algorithms may create many very short channels, sometimes with length of the size of a DEM raster cell. You can eliminate these small channels by specifying a minimum channel length. CCHE1D provides default values for both parameters. Since these parameters are a function of the watershed characteristics, use the default values as a starting point. The pictures below shows two channel networks extracted from the same DEM. The first network was extracted with a CSA value of 7.02 hectares. Chapter 4 Landscape Analysis and Channel Network Extraction 38 The second one was extracted with a CSA value of 15.00 hectares. The MSCL was the same for both channel networks: 130 meters. 5b. If you have chosen the Spatially Varied option, you will be asked the number of areas with distinct parameter values you want to define for the DEM. Choose a number of regions between 2 and 5, then press OK. CCHE1D will display a dialog box for each of the regions you will create. Enter the values for the CSA and MSCL parameters for each of these regions. After you entered the parameters for all regions, the following message will be displayed: Parameter Distribution Raster File: Import Create Chapter 4 Landscape Analysis and Channel Network Extraction 39 Choose Import and press OK. The option to interactively create a parameter distribution file is not yet available for this version of CCHE1D. You can create this file using any GIS program, or create it yourself with a text editor or a simple custom-made program. You can learn about the format of this file in Appendix C. In the dialog that will appear, select the format for the raster file you are going to import, then press OK. Select the raster file that describes the regions you are specifying. You can navigate the directory tree by clicking on the directory names, on the right-hand side of the dialog. Double-click on the raster file you want to use. Note: The parameter distribution raster file must have the same number of rows and columns of the DEM raster you are going to use to extract the channels. 5. In the dialog that follows, choose the minimum Strahler Order of the channels to remain in the network. If 1 is chosen, no channels are removed. If 2 is the number selected from the GUI, first order channels will be eliminated and the lowest channel order in the network will be 2. CCHE1D uses the Strahler channel ordering system to classify the channels. In this system, channels without a tributary are classified as of order one. When two channels of the same order meet at a junction, the channel downstream of the junction is said to be one order higher that the incoming channels. If a junction has incoming channels of different Strahler orders, the channel downstream of the junction has the same order of the incoming channel with the higher order. You can remove lower order channels from the network after it is extracted from the DEM. The distinction between using this option and selecting higher values for the extraction parameters is that lower-order channels are still considered when defining the subwatersheds. The number of subwatersheds is consistent with the original number of channels in the extracted network. Since often the flow in lower-order channels is relatively small, its routing by the channel flow model can be regarded as unnecessary, and will be carried out by the watershed model. In order to save computing time and resources, you can remove some channels from the network. Note that the outflow of the subwatersheds Chapter 4 Landscape Analysis and Channel Network Extraction 40 corresponding to the removed channels is still considered as point inflows to the channel network. 7. A dialog will inform you that you finished creating a parameter set. Editing a Parameter Set You can edit a parameter set at any time. You can change any of the parameter values. CCHE1D will display the current values in the input fields. Just edit the desired fields in the dialogs that appear. To edit a parameter set: 1. Select a Processed DEM window. From the Channel-Network menu, choose Parameters. 2. Choose Edit a Parameter Set in the dialog that follows, and then press OK. 3. Select one of the existing sets from the list, and then press OK. 4. Inform if you want to convert the set being edited from Spatially Varied to Spatially Constant, or vice-versa. 5. Modify the values you want in the dialogs that appear. Press OK to confirm the values displayed on the dialog. Press Cancel to abort editing. Note that Cancel refers to the current dialog. Data entered in previous dialogs were considered as valid edits to the set. You can verify the contents of your Extraction Parameter Set using the option View Existing Set from the Parameters entry of the Channel-Network menu. Removing a Parameter Set You may want to discard a parameter set you created: 1. Choose Remove Existing Set in the dialog that appears after you choose Parameters from the Channel-Network menu. 2. Select the set using the name you gave when the set was created, then press OK. 3. Confirm the removal in the dialog that follows. Viewing a Parameter Set To view the contents of a parameter set, you should: 1. Choose Parameters from the Channel-Network menu, then select the option View Existing Set in the dialog that appears and press OK. 2. Press OK when finished. Extracting the Channel Network After you have defined at least one set of parameters for the extraction of the channel network, you can use the option Extract Channels to perform the extraction operation. Chapter 4 Landscape Analysis and Channel Network Extraction 41 1. Select the Processed DEM from which you want to extract the channel network. 2. Choose Extract Channels form the Channel-Network menu. 3. In that dialog that appears, choose a parameter set using the name you gave when it was created. Press OK. 4. Confirm the launch of the extraction operation in the dialog that follows. CCHE1D calls the TOPAZ-DEDNM module to analyze the DEM and extract the channel network. When the operation is complete, CCHE1D displays the channel network in its raster form. You can see the individual raster cells that form all the channels that met the conditions imposed by the extracted parameters CSA and MSCL. You must now identify the watershed of interest in the displayed image, and select the position of the watershed outlet. Chapter 4 Landscape Analysis and Channel Network Extraction 42 Watershed Delineation Identifying the Watershed of Interest When the extraction of the channel network is finished, CCHE1D will display the Watershed Outlet Selection map. The map shows the raster cells that represent all channels in the area covered by the DEM. Most likely, the map will show channels that belong to more than one watershed. You can use this map to identify the watershed you want to analyze. You must then specify the location of the watershed outlet. Specifying the Watershed Outlet Once you locate on the Watershed Outlet Selection window the watershed you want to study, you must specify the location of the watershed outlet. 1. Make the Watershed Outlet Selection window active by clicking on it. 2. Use the Zoom and Pan tools to locate the raster cell you want as the watershed outlet. Zoom in so you can see the individual cells. Chapter 4 Landscape Analysis and Channel Network Extraction 3. Select the Watershed Outlet Selection Tool 43 by clicking on it. 4. Click on the square representing the raster cell you want to select as the watershed outlet. 5. In the dialog that appears, confirm the location (shown in row and column numbers from the north and west boundaries) by pressing the OK button. Once you specify the outlet, CCHE1D will restart TOPAZ to perform the following tasks: Delineate the watershed that drains to the location you selected. Discard all channels that do not belong to that watershed of interest. Define all channels and subwatersheds within the watershed of interest. Eliminate lower-order channels, if so required. Define nodes at beginning of channels, junctions, and points of inflow where channels were removed. Define the connectivity among nodes, channel links, and subwatersheds. Create and export the CCHE1D Network Database. Create and export auxiliary images, tables, etc. Chapter 4 Landscape Analysis and Channel Network Extraction 44 The Watershed Outlet Selection window is closed after you select the watershed outlet, but it remains in the Project, under the icon Channels . You can open it again to modify the position of the watershed outlet, for the same extracted network. A new window labeled Extracted Channel Network will appear and show the channel reaches and nodes of the extracted network. Associated with the new window are new menus and buttons that will allow you to manage the input of data needed for the flow and sediment transport simulations. The subwatersheds that correspond to the network channels are displayed in another window. CCHE1D uses different colors to identify the subwatersheds. You can double-click the legend area of the window to open the ‘Legend Editor’ and modify the colors CCHE1D used in the map. As part of the channel extraction process, two auxiliary maps are created and stored within the Project. They are not automatically displayed on screen, but can be accessed using the Project window. To display the maps you should: 1. Make the Project window active by clicking on it. 2. Select the icon labeled Rasters 3. You will see two documents listed in the Project window: Flow Paths. The Flow Paths map shows the direction of flow for each raster cell. This map is converted from a raster file TOPAZ creates to extract the channel network. Using the flow direction for each cell, CCHE1D creates lines showing flow paths for the entire surface of the watershed. Channel Raster Cells. The Channel Raster Cells map contains all cells that compose the channels within the watershed, regardless of the eventual removal of lower-order channels. 4. Select the map you want to open and press the Open button in the Project window, or double-click on the name of the map. When the landscape analysis is finished, CCHE1D creates a new database to store the information about the channel, nodes, and subwatersheds. Additional data needed for the flow and sediment transport simulations will be added to this database. The database is automatically imported into the CCHE1D Project. Creating a Computational Channel Network After you select the watershed outlet, CCHE1D displays the Extracted Channel Network window. This window shows a channel network in which you can see several types of nodes (source, junctions, watershed outlet, etc.). This channel network is the starting point for the creation of the Chapter 4 Landscape Analysis and Channel Network Extraction 45 Computational Channel Network you will be using for your channel flow and sediment transport simulations. Channel Network Properties Use the Properties option of the Channel-Network menu to see a history of the creation process of a channel network. Using this option, you can know how the channel network was created. CCHE1D displays a list of all important properties and parameters related to the current channel network. Because you may have several DEMs, several pre-processing options, and a combination of several input parameters, you may not know exactly how you created the channel network you see. Use the Properties option for this purpose. You can also use the button, as a shortcut. Creating a Computational Channel Network The Extracted Channel Network is an intermediate step in the creation of the computational network for the channel model. It is always stored within the project, in the Channels group . A Computational Channel Network is a modification of the Extracted Channel Network, in which you enhance the description of the channels and provide supplemental data for the simulations. You can create many Computational Channel Networks from a single Extracted Channel Network. To create a Computational Channel Network, use the Create Computational Network option in the Channel-Network menu. Chapter 6, Channel Network Analysis, describes how to proceed with the creation of computational channel networks. The CCHE1D Network Database Introduction The Landscape Analysis module of CCHE1D consists of a series of algorithms applied to data sets stored in raster format. These rasters are large arrays containing integer values that represent a certain characteristic for each quadrilateral cell. This method of storage is efficient when the information is continuous, such as a DEM, where for each cell there is a known elevation value. When it comes to a channel network, for example, the number of cells necessary to represent the channels is rather small compared to the total dimension of the raster array. Besides, a raster array cannot easily store Chapter 4 Landscape Analysis and Channel Network Extraction 46 logical information, such as for example the connectivity between nodes and channel reaches. For these reasons, once the channel extraction procedure is finished, all the relevant information is converted into a relational database. This database is composed of many tables that store data related to a certain entity. The Node table, for example, stores the node coordinates, the relationship among nodes, and a series of indices that relates this table to other tables in the database, hence the denomination “relational.” This model of storage provides an efficient method to retrieve and correlate information, and reduces the amount of storage requirements. The creation of this database is made within the channel extraction module, for computational efficiency. The database consists of a series of seven tables, which describe the channel network and the corresponding subwatersheds. The database is designed so that more tables can be added to describe information not yet available at the time that the database is created. Channel cross section data and hydraulic structure data such as for culverts and drop structures, are good examples. As output from the channel network extraction and watershed delineation process, six relational tables are created to logically represent the channel network, the subwatersheds, and all the pertinent data. Channel Network Logical Organization Nodes and Channels The channel network is logically organized into the following entities: “Nodes,” “Reaches,” “Links,” and “Channels.” A “Node” is a point in the network that represents a special feature. They mark beginning and end of channel segments, the location of channel junctions, point inflow, and hydraulic structures. They may also represent points in a computational mesh that represents the channel network, where flow and sediment transport variables will be computed. The remaining entities indicate segments of channel. A “Reach” is any channel segment between two nodes. Logically, each Reach has a Node at each end. It has properties such as length and slope, and has a graphical representation: a line segment used in constructing the network maps. A “Link” is a logical entity, whose main purpose is to organize the numerical computation of flow in the network. A Link can assume two types: a container of Reaches or a representation of single hydraulic structure. A “Channel” represents the natural division of the network into channels. The presence of hydraulic structures does not affect its logical definition. When the channel network is extracted from a DEM, Channels and Links are Chapter 4 Landscape Analysis and Channel Network Extraction 47 identical. Only when hydraulic structures are added to the network they will differ. Only Nodes and Reaches have “visible” representations that are displayed in maps. For a more detailed explanation about the logical entities of a CCHE1D channel network, please consult the publication “CCHE1D – Control Module Technical Manual.” Subwatersheds and Incremental Areas The definition of subwatersheds is performed by TOPAZ, which identifies the drainage area for each channel segment in the network. Subwatersheds should correspond to the segments called Channel, as defined above. However, the extracted network may have its lower-order channels removed. The removal of channels does not affect the definition of the subwatersheds, so there will be more subwatersheds than Channels. The difference is exactly the number of channels that were removed from the network. The removal of channels creates additional nodes in the network. They represent the drainage area of the subwatershed associated with the removed channel. The nodes provide a location where the outflow of this subwatershed is to be taken into account during the flow and sediment transport simulations. In CCHE1D, a subwatershed encompasses the drainage areas from the rightand left-hand sides of the channels, including the raster cells occupied by the channel itself. TOPAZ separates the contributing areas into Left, Right, Channel, and Source areas, so that a better description of the terrain and its properties can be used in the rainfall-runoff simulation. For the routing of flow and sediment, however, it is more convenient to subdivide further each subwatershed along the channel, in order to have a better distribution of inflows into the channels. A database table keeps the relationship between CCHE1D and TOPAZ subwatersheds. CCHE1D divides the subwatersheds into portions called Incremental Areas. Incremental Areas are drainage areas that correspond to Reaches, the segments of channel between two nodes. The purpose of incremental areas is mainly computational. They provide easy means of subdividing the outflow from a subwatershed among all nodes of its channel. When the network is extracted from a DEM, Incremental Areas coincide with the Subwatersheds, except for first Strahler order channels. First order channels have two incremental areas: one that encompasses the region that drains into the node at the beginning of the channel (the Source node), and a second area that represents the drainage downstream of that point, down to the node at the subwatershed outlet. Database Tables All data describing the channel network and its subwatersheds are stored into seven tables. All tables can be opened for viewing. They can be accessed Chapter 4 Landscape Analysis and Channel Network Extraction 48 from the Project window, under the icon Database . Each table is named according to the convention: Extracted Channel Network: + name + Database Table. The following figure illustrates how the tables describe the channel network topology. CHANNEL NETWORK TOPOLOGY Channel Link Reach Node Incremental Area CCHE1D Subwatershed TOPAZ Subwatershed Database Record Relationships One to One One to Many One to Zero or One CHAPTER 5 Channel Network Digitizing Interface In the previous chapter, you learned how to create a channel network from digital elevation data. This chapter shows how you can create a similar channel network by simply sketching it with the computer mouse, using a map, photograph, or any other image as reference. CCHE1D provides a series of tools that help you define the channel network, and its algorithms automatically convert your “drawing” into a database that contains the necessary data to define the channel network for the computer models. Contents Introduction Importing a Background Digitizing a Channel Network Validating a Channel Network Creating a Computational Channel Network Chapter 5 Channel Network Digitizing Interface 50 Introduction CCHE1D now includes a “Channel Network Digitizing Module” that allows you to create a channel network by simply “drawing” it with the mouse and your computer screen. You can use any image (photographs, scanned maps, etc.) or any GIS coverage (shapefiles, grids, etc.) as reference while you digitize each channel you see in the picture. If you have a good aerial photograph, for example, you can use the digitizing interface to get an accurate representation of the channels. If you know the coordinates of a few points visible in your image, you can use CCHE1D’s Image Geo-referencing Utility to associate your image with a known coordinate system. When you digitize the channels, the real-life dimensions can be directly used in your simulation. Even if you do not have good quality imagery to use as reference, the Channel Network Digitizing Module is extremely useful when creating channel networks. From a single straight channel to a complex channel network with hundreds of links, the CCHE1D digitizing interface allows you to create a working channel network in minutes. You can simply sketch some channels and provide the measurements yourself. In either case, CCHE1D algorithms analyze your drawing and convert it to a complete CCHE1D channel network, creating all the required data entries in the CCHE1D database. The main disadvantage of this method when compared with the “Landscape Analysis” procedure of the previous chapter is that channel digitizing does not give you the watershed delineation maps and other data useful to watershed modeling. However, you can still use watershed model results in conjunction with digitized channel networks. You should simply supply the watershed simulation results in one the data formats described in the Boundary Conditions Files section of Appendix C – Input Data Files. All features of the CCHE1D interface work with channel network created with both the “Landscape Analysis” and the “Channel Digitizing” methods. This chapter discusses the process of creating a CCHE1D channel network using the Channel Network Digitizing Module. Chapter 5 Channel Network Digitizing Interface 51 Creating a Digitized Channel Network CCHE1D provides a specialized window with a number of tools that allow you to create a digitized channel network. Having the Project Window active (the Project Window is the main ArcView window, where you can see all the documents of the project), follow the procedure below: 1. Choose the Digitize Channel Network option from the Channel-Network menu. 2. Answer if you want to add a background layer. If you answer Yes, you will be prompted for the type of layer, and for the data file that contains the background theme. Go to the next section of this manual to learn about importing background layers. 3. Answer if you want to start the channel digitizing procedure now or if you want to do it later. Chapter 5 Channel Network Digitizing Interface 52 Importing a Background Layer You can import a background layer (an image, a feature theme, or a grid theme) to use as reference when digitizing channel networks. The use of a background layer is not required, but it is recommended. If you have access to any type of imagery that displays your watershed and channels of interest, you should benefit from it when defining your channel network. You can use any image format supported by ArcView GIS. You can use images in about a dozen different formats, and you can import layers created by other GIS and CAD systems. Because ArcView is modular, and many of its features are distributed through independent extensions, you may have to buy, install, or at least, activate such extensions before importing a background layer. CCHE1D will ask you if you want to activate any of the extensions already installed on your computer. Besides the obvious advantage of having a visual reference for digitizing, the use of background layer allows you to create a channel network whose Chapter 5 Channel Network Digitizing Interface 53 dimensions match those of the real world. For that to happen, you must ensure your image is georeferenced, that is, there is a known relationship between the image and a known coordinate system. Many images are distributed with georeferencing information attached. Some images have this information inside the data file (GeoTiff, for example), but it is common to have image files accompanied by a small data file called the “world file,” which contains the coordinates of the image edges in a pre-defined coordinate system. CCHE1D provides a simple, add-on utility called the CCHE1D Image Georeferencing Extension, that allows you to use ArcView to create the georeferencing data. This utility uses the “world file” approach, which allows most image data files to be associated with a coordinate system you choose. NOTE: If you want to use a georeferenced image, make sure the image already has the necessary referencing data BEFORE you import into CCHE1D. To import a background image into CCHE1D, follow the procedure below: 1. Activate the “Channel Network Digitizing View.” This type of document can be found in the Channels group in the Project Window. 2. Select Import Background from the Channel-Network menu. 3. Select a File Type in the dialog that appears. The current options are Image, Feature (shapefile), Grid, and CAD File. CCHE1D will enable the Spatial Analyst and CAD Reader extensions, if they are available in your computer. 4. If you selected Image, you will be asked if you want to enable any of the image support extensions. Some file formats require the activation of an extension module so that ArcView can read them. Answer Yes to see a list of available extensions currently installed on your computer. 5. Select the file that contains the background layer you want to import. Chapter 5 Channel Network Digitizing Interface 54 Depending on the type of the file you plan to import, you may have to enable an extension. For image files, you do not need an extension if your files are in one the formats below: BMP BSQ, BIL and BIP Sun rasterfiles Controlled Image Base (CIB) ERDAS GRID IMPELL Bitmaps (Run-length compressed files) TIFF, TIFF/LZW compressed You need to load specialized extensions in order to be able to import the following file formats: ARC Digitized Raster Graphics (ADRG) and Compressed ARC Digitized Raster Graphics (CADRG) IMAGINE JPEG MrSID National Image Transfer Format (NITF) TIFF 6.0 Consult the ArcView documentation if you have your data in a format not listed above. Chapter 5 Channel Network Digitizing Interface 55 NOTE: For convenience, you can import more than one background image, which allows you to create mosaics or to superimpose more than one layer. You can turn on and off the display of each layer, as well as determine the order the images are displayed. The images must be georeferenced to the same coordinate system, or they will not display correctly. Check the current Projection settings for the current Channel Network Digitizing View (in the Properties entry of the View menu), if necessary. Deleting a Background Layer You can remove any background layer you have imported, following the procedure below: 1. Activate the “Channel Network Digitizing View.” 2. Select Delete Background from the Channel-Network menu. 3. Select the layer name in the dialog that appears. You can select more than one layer for deletion. Press OK to delete the selected layers. Chapter 5 Channel Network Digitizing Interface 56 Digitizing a Channel Network Creating a Digitized Channel Network theme In order to start digitizing a channel network, you must first create an empty Digitized Channel Network theme. 1. Select the desired “Channel Network Digitizing View.” 2. Use the New Channel Network option of the Channel-Network menu. A new theme named “Digitized Channels” will appear. You cannot create more than one Digitized Channel Network in a digitizing view. You must delete the channel network using the Delete Channel Network option of the Channel-Network menu. The digitized channel network is displayed with thin lines of a randomly selected color. You can edit the line thickness and line color by doubleclicking on the Digitized Channels theme legend. Digitizing a Channel Network The first thing to keep in mind while digitizing a channel network is that your “drawing” will be converted into a logically defined channel network, with nodes and channel reaches organized into a pre-defined numbering system required by the CCHE1D flow and sediment transport models. This conversion process is entirely automatic, but it requires that you follow a couple of “rules” when digitizing the channels. If one of these rules is broken, the channel digitizing algorithms will not understand how to put together your channel network The rules are simple and easy to understand, but if you ignore them, the CCHE1D algorithms will not be able to create the computational channel network the model requires. New tools are currently under development to guide you and help you identify errors when digitizing the channel network. “Heads-up digitizing”, where you see the results on you computer screen, requires patience and attention. With a bit of practice, you will be able to create accurate channel networks, with a minimal amount of errors. You should practice with a small channel network, paying attention on how to define channel junctions. The Channel Digitizing Tool You will “draw” each channel of your network using the “Digitize Channel” . The behavior of this tool is modeled after similar drawing tools of tool ArcView and other drawing packages. In order to digitize a channel: Chapter 5 Channel Network Digitizing Interface 57 1. With a Channel Network Digitizing View active, verify if the Channel Network is already open for editing: if the theme visibility button for the “Digitized Channels” theme is surrounded by a dashed line, you can start editing. Otherwise, select the Start Editing Network option of the ChannelNetwork menu. 2. Make sure the “Digitized Channels” theme is active, and then click on the “Digitize Channel” tool to activate it. 3. Click on the map with the left mouse button, at the point you want to start digitizing a channel. 4. Move the mouse to the location where you want to define the next point in the channel (always downstream of the preceding point). Click again with the left mouse button. 5. Proceed to the next point. 6. Double-click the left mouse button to end the channel line. 7. To stop editing, select the Stop Editing Network option of the ChannelNetwork menu. Channel Digitizing Rules Just by following the instructions of the previous section, you will be able to define a single-channel and continue the process of creating the input data for the channel simulation. In order to create a channel network, however, you must follow a couple of basic rules, so that CCHE1D can understand how the Chapter 5 Channel Network Digitizing Interface 58 channels interconnect and then generate the input data for the flow and sediment transport model. Rule 1: Always digitize the channels in the downstream direction. Start from the upstream boundary point, and follow the channel downstream. CCHE1D will not be able to determine the position of channel junctions if you digitize a channel upstream. Rule 2: Always digitize the main channel of the watershed system first. Identify what is the longest and largest channel of your system, and digitize that channel first. Then digitize the main tributaries, leaving the smaller channels for last. Rule 3: When digitizing a tributary, always overshoot and cross the main channel to define the junction point. This is, perhaps, the most import rule, and the main source of undetermined channel networks. When approaching the end of a tributary, make sure you always overshoot and cross the receiving channel so that the point the two lines cross each other become the junction point. The overshoot will be automatically deleted by the digitizing tool. Breaking any of these rules will result in undetermined channel networks, where channels do not connect to each other in an acceptable way. Although some editing can correct most problems, sometimes it is hard to identify the source of errors. Main Editing Tools Several editing tools can be used during the channel digitizing process. Some tools are standard ArcView tools you may already be familiar with, and some are particular to CCHE1D’s channel digitizing module. This section describes the most useful tools, but it does not cover all the resources available for editing. Zoom and Pan While digitizing, it is usually necessary to zoom-in into a particular region to better see the details present in the background layer. A close-up view also increase the accuracy when positioning the points that describe the channels. and Pan tools at any moment. Just remember You can use the Zoom tool to continue the channel to click again on the “Digitize Channel” digitizing. However, the most convenient feature is the possibility of zooming and panning while digitizing: 1. At any moment, click and hold on the right mouse button to pop-up a menu. 2. Select the desired function (zoom-in, zoom-out, pan). Release the mouse button. Chapter 5 Channel Network Digitizing Interface 59 Using this procedure is necessary when digitizing long channels, which do not fit in the window when zoomed-in. Adding, Moving, and Removing Digitized Points After you finish digitizing a channel segment, you can go back and edit its internal points to improve the quality of the digitizing. Sometimes it is very difficult to follow channels accurately; therefore, you should use this procedure to improve your network. 1. Make sure the “Digitized Channels” is open for editing. 2. Activate the “Vertex Editing” tool . The cursor will change to a white triangular arrow. 3. Click on the channel segment you want to edit. You should see each digitized point marked with a square. 4. To add a point: move the cursor over the channel line. When you see the cursor change from an arrow to a “encircled plus-sign,” click with the left mouse button. A new point will be added. 5. To move a point: move the cursor over a digitized point. When you see the cursor change from an arrow to a cross, click with the left mouse button, hold, and move the cursor to another position. You will see the new position of the channel segments while you move the mouse. Release the button at the desired location. 6. To delete a point: move the cursor over a digitized point. Press the Delete key on your keyboard. Chapter 5 Channel Network Digitizing Interface 60 You can undo the last editing operation by clicking the right mouse button to bring the pop-up menu. Select Undo Feature Editing. Alternatively, you can press CTRL-Z, or use Undo Feature Editing from the Edit menu. TIP: When digitizing channels, get first a rough approximation of the channel planform, but locate channel junctions with precision. You cannot edit the position of channel junctions. Save the digitized lines, and then use the editing tools to add detail to the digitized lines. Add more points where necessary, and move existing ones to match the reference image better. Chapter 5 Channel Network Digitizing Interface 61 Deleting a Channel from the Channel Network NOTE: This tool is currently under development. It will allow you to select a channel reach and delete it from the channel network. Meanwhile, current users can remove a channel segment successfully if they have basic knowledge of shapefile editing within ArcView, which is very user-friendly and mimics popular drawing software. If you remove a tributary, you must restore the receiving into a continuous channel segment. When you add a tributary, the receiving channel is split at the location of the junction. After removing a tributary, you must combine the two segments into a single segment to “undo” the channel split. Otherwise, the analysis algorithm will detected the location of the former junction, but one channel would be missing. Chapter 5 Channel Network Digitizing Interface 62 To manually remove a tributary: 1. Start editing the Digitized Channel Network. 2. Use ArcView’s “Pointer” tool to select the channel segment to be removed. 3. Use the Delete Features option of the Edit menu, or simply press the Delete key. 4. Carefully identify and select the two channel reaches of the receiving channel, upstream and downstream of the junction with the channel you , and select one of the just removed. Activate the “Pointer” tool channel segments. Hold the Shift-key and click on the other segment. The selection markers (black squares) should encompass both segments. 5. Use the Union Graphics option of the Edit menu. 6. Stop editing, save the changes, and then use the Validate Channel Network option of the Channel-Network menu to see if it reports any errors. If the Validate function reports any error, visually inspect the channel network for channel segments that are not correctly “attached” to the channel network. Contact the model developers for an updated version of the CCHE1D interface or to get instructions on how to solve a particular problem. Validating a Channel Network CCHE1D provides a tool that performs a preliminary inspection of the channel network and detects eventual errors. The validation algorithms try to assemble a logical description of the network, considering flow direction, location of channel confluences, etc., based on the array of points you created during the digitizing process. Channel network validation is the first step used to check if the digitized network conforms to the requirements of the channel model. After you finish editing a channel network, stop editing and save your changes. You can then use the Validate Channel Network option of the Channel-Network menu to see if it reports any errors. NOTE: This tool is still under development, and in its current stage, it does not report exactly where the problem is and how to remedy it. Please consult the model developers for an updated version of the interface. Showing and Hiding Reach Numbers As part of the process of channel network validation, CCHE1D establishes a computational sequence in which the flow and sedimentation equations will be solved by the model. This sequence is used in creating and numbering computational nodes and channel reaches. Chapter 5 Channel Network Digitizing Interface 63 You can display the reach numbers by selecting the Show Reach Numbers option of the Channel-Network menu. To remove the reach numbers, use the Hide Reach Numbers option that appears at the same position in the menu. Importing a Channel Network If you already have a digitized channel network, for example, inside another CCHE1D project, and you want to use it in the current project, you can use the Import Channel Network option of the Channel-Network menu: 1. Activate the Channel Network Digitizing View 2. Select Import Channel Network in the Channel-Network menu. 3. In the dialog that follows, navigate your computer and find the desired channel network. Digitized channel networks are stored in folders named diginetX, where X is a sequence number. Channel network files have the suffix _digit in their names. 4. Press OK to import the file. You cannot import a new channel network if you already have a channel network present in the current Channel Network Digitizing Window. Delete the old network first, and then use the import function. Digitized channel network files are named according to the following convention: casename_digit.shp, where casename is the name you provided when you started a CCHE1D project. Digitized networks are in shapefile format, therefore, a single channel network is saved into three files, with extensions shp, shx, and dbf. You must always keep the three files together, or CCHE1D will not be able to import the channel network. Creating a Computational Channel Network When you have finished digitizing you network, you can then proceed to the creation of a Computational Channel Network, which is an enhanced description of the channels for the numerical simulations. You can create many Computational Channel Networks from a single Digitized Channel Network. Computational Channel Networks are stored in the project, in the Channels group . To create a Computational Channel Network from your digitized network, use the Create Computational Network option, in the Channel-Network menu. CHAPTER 6 Channel Network Analysis In the previous chapters, you saw the process of creating a basic channel network, either by extracting it from a DEM, or by interactively digitizing it, based on a map or photograph. Now you will learn how CCHE1D helps you create the computational network you will use in the flow and sediment transport simulations. CCHE1D can create the computational channel network automatically for you. However, you can define the position of the computational nodes using the CCHE1D graphical interface. CCHE1D will continuously display the changes in the network in a special window. In this chapter, you will also learn how to input supplemental data, such as cross section information, and the location and specifications of hydraulic structures. Contents Introduction Defining Channel Reach Lengths Cross Section Data Management Sediment Data Management Hydraulic Structure Management Computational Mesh Generation Chapter 6 Channel Network Analysis 65 Introduction In this section, you will learn how to prepare the input dataset for the channel flow routing and sediment transport simulations. CCHE1D provides many features to help the user prepare the input data for the flow routing and sediment transport simulations. The input data for the simulation models can be classified into three categories: Channel Network Definition – Describes the channel network elements, such as channel segments, nodes, location of hydraulic structures, subwatersheds, etc. Supplemental Data – Includes all the data that is not a part of the channel network description, such as channel geometry data, hydraulic structure characteristics, bed and bank material description, etc. Simulation Parameters – Comprises user-defined options and parameters for the numerical simulations. CCHE1D is able to automatically create the channel network and the corresponding subwatersheds. It also creates a logical description of all the network elements and their mutual relationships. The simulation models, however, usually require a more detailed topological schematization of the simulation domain. This spatial discretization depends on characteristics of the numerical analysis methods. For the flow simulation, the channel network is represented by one-dimensional channel segments and by nodal points. The simulation models impose certain conditions for the number, size, and distribution of these elements. CCHE1D is designed to automatically define a computational mesh that adequately describes the channel network, ensuring that the numerical simulation will meet the minimum requirements of accuracy and stability. When a channel network is created, it has already defined all the channel segments and some nodal points. The nodal points represent special features in the network, such as channel junctions, points of inflow, structure locations, etc. For the numerical analysis, however, more nodes are necessary to adequately describe the characteristics of the simulation domain. CCHE1D provides capabilities for the addition of nodes to the channel network. CCHE1D performs an analysis of the network layout and selectively adds nodes to improve the computational mesh characteristics. This analysis considers the length of channel segments, the positioning of hydraulic structures, and channel cross-section properties. Therefore, to begin the channel network analysis, cross-section and hydraulic structure data must be available. CCHE1D provides a convenient interface for entering, editing, checking, and visualizing the input data. CCHE1D tries to minimize the input work by performing some tasks automatically. Chapter 6 Channel Network Analysis 66 Creating the Channel Network Window The Extracted Channel Network and the Channel Network Digitizing windows have a menu labeled Channel-Network where the entry Create Computational Network can be found. Selecting it produces a new map window where the computational mesh will be created. To create the computational network: 1. Select the Extracted Channel Network window or the Channel Network Digitizing window that contains the channel network you want to use in the simulations. 2. Choose Create Computational Network, from the Channel-Network menu. A new window appears, showing a replica of the channel network you had selected. This channel network displayed in this window will be the starting point for the supply of cross section, hydraulic structures, and sedimentrelated data. It will also allow you to generate the computational network to be used by the flow and sediment transport model. You can use the option Properties from the Channel-Network menu to display information about the present channel network. CCHE1D traces the properties back to the network extraction process, and displays which DEM was used, what were the pre-processing options, and all the parameters Chapter 6 Channel Network Analysis 67 concerning the channel network extraction. You can also thee the channel network properties by clicking on the corresponding button: . The Channel Network window presents four menus that contain most of the tool available for providing supplemental data, creating the computational mesh, and controlling the channel simulation. The following sections will discuss each of these tools in detail. Defining Channel Reach Lengths Introduction The first task you should perform when you start creating the computational channel network is to review the channel configuration you already have, and ensure all channels describe adequately the real-life situation you want to model. One of the main sources of errors is the use of incorrect channel lengths. If you created your channel network through the “Landscape Analysis” procedure, by analyzing elevation data, you must understand that the channel network is simply an approximation of reality, given by mathematical algorithms. The channels in real-life may differ considerably. The quality of the channel network extraction is entirely dependent on the quality of your DEM. Because DEMs do not have high resolution, the extracted channels do not consider channel meandering, for example. If you created the channel network by digitizing it from an image, the errors depend on the scale of the reference image, image distortions, the precision of the digitizing process (in part, a function of your patience), and the accuracy of the geo-referencing process that associates positions in the image to a location of known coordinates. CCHE1D provides a tool that allows you to edit the length of each channel segment in the network. When you create the computational channel network, the lengths are those computed from the DEM analysis or from the digitizing procedure. Editing Channel Reach Lengths You can use two different procedures to edit channel reach lengths. In both cases, the image displayed in the channel network window will not change. Only the length value stored in the CCHE1D database is relevant to the flow and sediment transport model. To edit the length of channel reach interactively, follow these steps; Chapter 6 Channel Network Analysis 68 1. 2. 3. 4. Activate the Select Channel Reach tool . Click on the channel reach you want to edit. From the Channel-Network menu, choose the option Edit Selected Reach. Provide the new reach length in the dialog that appears. The dialog displays the current length. 5. Confirm the editing operation in the dialog that appears. If you want to edit the length for several channel segments at one time, you may prefer to edit the “Channel Reach Database Table” directly. Keep in mind that contiguous channel segments may not appear in sequence in the database table. Therefore, always double-check to see if you are editing the correct record by comparing the selection in the table to what is selected in the channel network window. Also, make sure you have the correct table, in case you have more than one channel network. Follow the procedure below: 1. Make the Channel Network window active. 2. Select the Channel Reaches theme. 3. Use the Table option from the Theme menu, or use the “Open Theme . Table” button 4. Having the Channel Reach Table open, use the Start Editing option of the Table menu. 5. Use to start editing channel lengths. You can see the selected reach in the map and in the table. Chapter 6 Channel Network Analysis 69 6. When finished, use the Stop Editing option from the Table menu, and press Yes to save the edits. Make sure you do not modify other properties in the channel reach table, because you can damage the database associations and make the current channel network useless. Cross Section Data Management CCHE1D version 3.0 introduces a new and more general system for definition of channel data that, combined with an improved graphical interface, permit a better description of the channel properties, potentially increasing the quality of the numerical simulations. Channel properties are given at certain locations along the channels, usually where surveys have been conducted. In CCHE1D cross section data include: Geometry: defined by specifying the coordinates for a series of points that define the dimensions of the main channel and optional left and right flood plains. Bed Sediment material: including physical properties and grain size distribution for the main channel and optional flood plains. Bank Sediment material: consisting of properties of the sediment at the left and right channel banks. Chapter 6 Channel Network Analysis 70 Bed sediment data are not required, unless you want to perform simulations that include sediment transport and channel morphology changes. Bank sediment data are required for bank stability analysis. Usually, field data are available only at a limited number of sites, but the model requires cross section data at every computational node, where the flow and sediment transport equations are solved. CCHE1D’s cross section management module will help you generate all the input data the model requires. A series of sophisticated interpolation routines generate synthetic cross sections with all the data, including geometry, bed and bank sediment properties, and hydraulic roughness. The minimum requirement is that you provide these properties at the beginning and end of every channel link (a tributary, or a channel segment between tributaries). Of course, the more data you provide, the more accurate the description of the natural characteristics of the channel. You should let CCHE1D use its interpolation programs only when and where data are not available, and not as a timesaving feature. Cross Section Geometry In order to define the geometry of the channels for the computer simulation, you must create one or more input data files that contain the geometric characteristics of the channels at several locations of the channel network. Channel geometry is defined by a series of distance-elevation points. Distances are considered normal to the flow at the particular cross section. For each cross section, a variable number of points can be used. The minimum number of points is four, if there are no floodplains and eight if both floodplains are present. Usually, a number between eight and twenty points is adequate for the description of any cross section shape. You must also indicate the location within the cross section where the channel banks start and end, that is, the points that define the bank toes, and the points that divide the main channel from the floodplains. Besides the actual geometry, hydraulic roughness is also part of the CCHE1D cross section. You specify roughness through Manning’s coefficients, which may vary across the channel. CCHE1D also allows the specification of regions of the cross section where there is no flow. It is a convenient means of modifying the cross section shape, as in the simulation of construction work, or making the model ignore regions where flow velocities are negligible, etc. As stated before, CCHE1D uses interpolation to supplement surveyed cross section data, so you are not required to specify the channel geometry for every node in the network. However, you must provide the channel geometry at the beginning and at the end of each channel link. Chapter 6 Channel Network Analysis 71 The current version of CCHE1D requires you to specify the cross section geometry in data files, whose format is described in detail in Appendix C. You can decide if all your cross sections are given in a single data file, or if you want to group those in several files. If you want to change the geometry for a particular node, or add new cross section data, you can simply create a new file and use the cross section import option. The new data will override any previous definition. Importing Cross Section Geometry Data You can use the Import option of the Cross-Section menu to specify the name of a file containing the cross section geometry data. This file may contain the cross section data for any number of nodes. The Cross Section data files must match the computational channel network you have prepared. Usually, the cross section files should be created after you have the basic channel network defined. Of course, you can modify the channel network, and CCHE1D will take care of updating the data, using its interpolation routines when necessary. A good practice is to provide the cross section data after a basic channel network is defined. If the channel network was created from a DEM through the “Landscape Analysis” process already described in this manual, you can prepare the cross section file(s) for that network configuration. Refinements to the network can be made a posteriori. Note that some modifications to the channel network can cause a mismatching between the nodes of the network and the data in the cross section file. However, you can always edit the data, or in the worst-case scenario, delete everything and import the cross section data files again. Node Number versus Node ID Code When you create a file containing cross section geometry, you must establish the connection between a cross section survey and a node in the channel network. For that you would usually use the “Node Numbers.” Node Numbers are automatically defined by CCHE1D. They are used by the model when solving the flow and sediment transport equations, and are defined according to some rules imposed by the numerical scheme. They are in sequence, starting from tributaries from the left bank at the downstream end of the watershed. The watershed outlet always has the highest node number. All model output data are referenced by node numbers You should not worry about the node numbers, since they are automatically generated by the CCHE1D interface. After you have defined a channel network, you can see the node numbers by using the Show Node Numbers option of the Channel-Network menu, when the Channel Network view is selected. The disadvantage of using node numbers is that, if you modify the channel network by adding or removing nodes before you import an already prepared Chapter 6 Channel Network Analysis 72 cross section file, the channel geometry may be associated to an incorrect node. As a compromise, you have the option of associating the surveyed cross sections to “Node ID Codes.” Node ID codes are used by the CCHE1D interface only. Node ID codes are simply indices used in database-related operations, and there is no guarantee of sequence or continuity. The advantage is that these numbers are immutable, and they remain valid while a particular node is not removed from the channel network. You can see the Node ID Codes in the Nodes database table, which can be opened using the tool while the Nodes theme is selected. When importing a file, you can specify if the association between survey data and nodes is to be established via “Node Numbers” or “Node ID Codes.” For now, it is more convenient to use Node Numbers when creating data files. Note that the same data file can be imported with either Node Number or Node ID Code association. The reason why the CCHE1D now offers the Node ID Code option is that when a channel network is digitized or extracted from a DEM the two numbers coincide, representing the same node. Therefore, if you have modified the channel network before importing the cross section data files, you can still do so, by choosing the Node ID Code option. This way, the geometry data sets will be associated according to the numbering that existed before you start editing the channel network. A practical example near the end of this Manual will clarify the two options. To import cross section data from a file If you have the cross section data in a data file, be sure the file matches the extracted channel network you have before attempting to import the file. 1. Select the Channel Network window. 2. Select the option Import from the Cross-Section menu. 3. In the dialog that appears, select Geometry and press OK. Chapter 6 Channel Network Analysis 73 4. In the dialog that follows, specify if the reference numbers in the data file should be interpreted as Node Numbers or Node ID Codes. 5. Specify a file name in the File Selection dialog that follows. When cross sections are imported from a file, CCHE1D verifies each one for errors and inconsistencies. Currently, CCHE1D checks for a limited number of errors that may be introduced. If any errors are found, a message is displayed and the operation is interrupted. You must correct the errors in the original data file and then import it again. Interactive Editing of Cross Section Geometry Data Due to the new and more complex system for definition of cross section geometry, the current version of CCHE1D does not yet support interactive data editing, as in version 2.0. A new spreadsheet-like interface will be developed for future updates of the CCHE1D interface. However, you can modify cross sectional properties by simply creating a small data file with the new geometry, or by editing the database tables directly, as shown in the next section. Editing the Cross Section Geometry Data Tables If you want to modify the cross section data for a particular node, you may want to use the Start Editing Table option, available from the Cross-Section menu. To edit records in the table, you should first understand how the CCHE1D database is organized; otherwise, you may damage that part of the database. CCHE1D implements a relational database, where all data are stored in tables. Because each cross section has a variable number of points that define its geometry, it is necessary to use two tables to store all data (a table cannot have a variable number of columns). Therefore, you may need to edit two tables. Chapter 6 Channel Network Analysis 74 This section describes two different editing operations, which can be used as a demonstration for more elaborated editing tasks. Modifying the coordinates of a single cross section point Suppose you realize a single point in a certain cross section has a wrong elevation value. You can easily change this value by locating it in the right table, and then typing in the correct value. 1. Select the Channel Network window. 2. Choose Start Editing Table in the Cross-Section menu, and then select Geometry in the dialog that follows. 3. Choose Cross Section ProfileTable (CP) in the dialog that follows. 4. A table will appear containing the point coordinates of all cross sections. Now you must identify the cross section point you want to edit. 5. Select the Channel Network window, activate the Channel Reaches theme, and use the “Open Theme Table” button . 6. Activate the Select Node tool , and click on the desired node. Notice the corresponding records in the Node and Cross Section Profile Tables are also highlighted. 7. Choose the cell-editing tool . Click on the value you want to edit. Use the Tab key to move horizontally to different fields of the same cross section record. Use the Enter key to move vertically in the table. Chapter 6 Channel Network Analysis 75 8. When you finish editing the data, click again on the Channel Network window to make it active. 9. Choose Stop Editing Table from the Cross-Section menu. 10. Confirm your edits by typing Yes in the dialog that appears. Deleting a single point of a certain Cross Section Deleting a cross section point is a type of operation that requires editing two data tables. First, you must edit the Cross Section ProfileTable (CP) to remove the record that contains the point to be removed. Then, you must edit the Cross Section Table (CS) to update the information about the changed profile of that cross section. The procedure follows like the previous example. However, you cannot simply remove a record (line) from the Cross Section ProfileTable. Note that the third column of this table is named “Point Index.” This index is used so that the model knows the sequence for each point of the cross section. Index 1 is the left-most point of the cross section. If you remove one point, the remaining points to the right the removed point must have their indices reduced by one. Therefore, you may have to edit several records in the Cross Section ProfileTable. By inspecting the Cross Section Table (CS), you will see that the removal of a single point may have a large impact in the record for the cross section you are editing. You must alter the total number of points of the cross section, and it is likely that the indices that mark the bank toe and overbank positions will also change by one, depending on the type of cross section shape and on the location of the removed point. For example, if you removed a point at the main channel, the indices for the right bank toe and right overbank point would be reduced by one, while the indices for the left overbank and bank toe would remain unchanged. Although the process is simple and quick for a user with good understanding of the cross section format and the corresponding database entries, it may not be convenient for a beginner. For this reason, creating a small data file with new cross section geometry, by cutting and pasting from another file or by following the instructions in Appendix C, may be the easiest and safest method to update cross section data. Checking for Nodes with Missing Geometry Data CCHE1D provides a handy tool to verify which nodes require specification of cross section geometry, but still do not have cross section data record assigned to them. To view these nodes: 1. Make the Channel Network window active. 2. Choose the option Show Missing from the Cross-Section menu. 3. Choose Geometry in the dialog that follows. Chapter 6 Channel Network Analysis 76 All nodes that still require definition of cross section geometry will be highlighted in a different color (bright red, by default). Cross Section Geometry Visualization Options A series of new visualization is available with CCHE1D 3.0. You can plot the cross section profile, plot the cross section outline in plan view, on the Channel Network window, and use different markers to identify cross sections according to type, origin, shape, etc. Plotting Cross Section Geometry CCHE1D has a simplified support for plotting cross sections. The purpose of these plotting tools is not to generate high-quality plots, but to provide a quick and convenient sketch of the cross section shape to help you locate potential errors. To plot the profile of a cross section: 1. Make the Channel Network window active. 2. Activate the Select Node tool . 3. Click on the desired node. 4. Choose the option Plot Selected from the Cross-Section menu. You can use the button , instead of using the menu. Chapter 6 Channel Network Analysis 77 You can plot the cross section downstream of the current node by using the button. If a node does not have yet a cross section defined, a warning message appears, allowing you to continue to the next node downstream. Displaying the Cross Section Plan View You can plot the plan view of each cross section in the Channel Network window. Simply use the Display Plan View from the Cross-Section menu. To hide the plan view, use Hide Plan View from the same menu. Once the plan view is visible, you can edit the legend of the “Cross Section” theme of the Channel Network window. Double-click on the legend and chose a new option. Removing All Cross Section Geometry Data You can remove all the cross section geometry data for a certain channel network. To remove all cross section geometry data: 1. Make the Channel Network window active. 2. Choose the option Delete All from the Cross-Section menu. 3. Choose Geometry in the dialog that appears. This option does not remove the sediment data assigned to the current channel network. Exporting Cross Section Geometry Data You can export the cross section geometry data from a Channel Network to a text file similar to those used to import cross section data into CCHE1D. Please see Appendix C – Data File Formats for more information. The current version supports cross section data in the WZ format. To export cross section geometry data: 1. Make the Channel Network window active. 2. Choose the option Export from the Cross-Section menu. 3. Specify if only user-supplied data will be included in the exported file, or if data for all nodes (including interpolated cross sections) should be output. 4. Specify if channel reach lengths should be included in the output file. The current length of the channel reach immediately downstream of a node will be used, and 0.0 is used for nodes at the end of channel links. Otherwise, 0.00 is used for all nodes. 5. Specify an output file name in the dialog that follows. Chapter 6 Channel Network Analysis 78 Sediment Data Management Introduction In CCHE1D, sediment-related data is managed in a manner similar to that used for cross section geometry data. Therefore, the graphical user interface treats sediment data as part of the cross sectional (or nodal) data. In fact, all functions discussed in the previous section are also available for channel bed and bank sediment data. You can import data files, edit the tables directly, and use the information tools. However, you have a more complete set of editing tools, which allow you to enter or edit bed sediment data directly from the interface, through a series of specialized dialogs. CCHE1D requires that bed and bank sediment data be furnished at the beginning and end of each channel link. All source nodes require sediment data. At confluences, where three nodes share the same location, sediment data must be provided for the three nodes, that is, the end of each tributary channel, and the node at the beginning of the receiving channel downstream. Bed sediment data is required only if sediment transport computations will be performed. If no channel bank sediment data are entered, the bank erosion and stability analysis procedures of CCHE1D will be disabled. Bank erosion and mass failures can be important sources of sediment in some watershed systems. You must use your engineering expertise to judge their relative importance, before “simplifying” the problem by ignoring the bank erosion process. Both channel bed and bank sediment data are described by the grain size composition and a number of other parameters. The sediment size composition is given as percent fractions for a number of sediment classes you must also define. These sediment classes will be used by the sediment transport module of CCHE1D, which requires that the both the bank and bed sediment compositions be defined using the same set of classes. In this way, it is possible to correctly transfer sediment eroded from the banks to the channel bed, where the sediment is transported further or deposited. Of course, you must first define the sediment size classes you are going to use in the computations, and then provide the fractions for each of these classes at the different locations of the domain. The definition of these classes must be done with extreme care, and previous experience with modeling of sediment transport is usually required. Note that these classes should be able to handle sediment sizes present both in the channel bed and in the banks. The interface, however, does not enforce the order you use to define the sediment size classes and the size fractions at the several nodes. You can provide the sediment size classes, the bed sediment data, and the bank sediment date in any order. Just be sure they are compatible and well defined. Chapter 6 Channel Network Analysis 79 Sediment Size Classes Definition Older versions of CCHE1D used a predefined set of nine classes, ranging from silt, to sand, to gravel. These built-in classes were somewhat limited because in some cases better simulation results could be obtained if more classes were used. Furthermore, the user would have to carefully convert sediment survey data (sieve curves) to the CCHE1D size classes. Starting with version 3.0, CCHE1D allows you to define your own sediment size classes, with a maximum number of classes set to 20. Of course, you may want to assume the sediment to be uniform in size, and define a single class. Sediment size classes are defined by three diameters, and the specific gravity for each class. You should define the “Representative Diameter,” and the upper and lower limits for each class. There are several definitions of representative diameter suggested in the literature. CCHE1D lets you decide how the representative diameter is defined. Please consult the CCHE1D Technical Manual to understand exactly how this diameter is used in the sediment transport equations. Importing the Sediment Size Classes Definition To define the sediment size classes, prepare a data file following the instructions present in the section of Appendic C: Sediment Size Classes Definition Files. After you have created this file, follow the procedure below: 1. Select the Channel Network window. 2. Select the option Import from the Cross-Section menu. 3. In the dialog that appears, select Sediment Size Class Definition and press OK. 4. Specify a file name in the File Selection dialog that follows. For a complete description of the file format, please consult the Appendix C. Removing the Sediment Size Classes Definition You can discard the Sediment Size Class Definition table for a certain channel network by following the procedure below: 1. Make the Channel Network window active. 2. Choose the option Delete All from the Cross-Section menu. 3. Choose Sediment Size Class Definition in the dialog that appears. This option does not remove the bed and bank sediment data assigned to each node of the current channel network. Chapter 6 Channel Network Analysis 80 Bed Sediment Data For the supply of channel bed and bank sediment data, you can still create data files outside the CCHE1D interface and use the Import functions, but if you prefer, you can simply type the required properties in the dialogs. Usually, a combination of both methods is the best way to go. Importing Bed Sediment Data The procedures available for providing bed sediment data mirror those available used in the input of cross section geometry, which were already explained. If you have the bed sediment data in a computer file, be sure the file matches the channel network you have before attempting to import the file. In addition, data in this file must be compatible with the Sediment Size Class Definition you are going to use in the sediment transport computations. 1. Select the Channel Network window. 2. Select the option Import from the Cross-Section menu. 3. In the dialog that appears, select Bed Sediment and press OK. 4. Specify a file name in the File Selection dialog that follows. For a complete description of all data formats for bed sediment data, please read Appendix C. Entering Bed Sediment Data You can input bed sediment data interactively using the tools available from the GUI associated with the Channel Network window. You can select a node and then enter the required data through a dialog. To enter data in this manner, you should: 1. Make the Extracted Channel Network window active by clicking on it. 2. Click on the Select Node tool . 3. Click on the node you want to select. If selected, the color of its symbol button or use should change. To remove the selection, click on the the option Clear Selected Features from the Theme menu. If you select a junction, a new dialog will pop-up. You must specify for which node you want to enter data. There are three nodes at a junction. They represent the end of the incoming channels, and the beginning of the outgoing channel, downstream of the junction. You must provide bed sediment information for all three nodes. 4. From the Cross-Section menu, choose Add at Selected Node. A new dialog will appear. Choose the Bed Sediment option. Chapter 6 Channel Network Analysis 81 5. A data entry dialog follows. Enter the sediment properties as prompted. Press OK when ready, and continue the data entry in the dialogs that follow. 6. Press OK to confirm the data entry, or Cancel to abort the operation. Editing Bed Sediment Data You can modify the bed data for any node in the network, using the interactive editing capabilities. Follow the steps below: 1. Make sure the Channel Network window is active. 2. Click on Select Node tool . 3. Click on the node you want to select. The color of the node symbol changes when the node is selected. To clear a selection, use the button or the option Clear Selected Features from the Theme menu. If you selected a junction, specify for which node at the junction you want to edit the cross section properties. 4. From the Cross-Section menu, choose Edit at Selected Node, and then Bed Sediment in the dialog that follows. A new dialog will appear. Retype the values for the data fields you want to modify. CCHE1D displays the current value for each field. Use the Tab key to move from one field to the next. 5. Press OK to confirm the editing, or Cancel to abort the operation. Editing the Bed Sediment Data Table CCHE1D provides access to the Bed Sediment Table for editing of more than one record at a time. However, this procedure is not recommended unless you are experienced with CCHE1D and you understand how the database is designed. For efficiency, CCHE1D stores only unique records. A single record may store information that is shared by many nodes in the network. By directly editing the table, you may introduce unwanted modifications to the database. Also, be reminded that the Bed Sediment database table is associated with the Sediment Grain Distribution table through a series of indices. If there is a mismatched index, the tables may become unusable. If you still want to edit the table, use the Start Editing Table option, available from the Cross-Section menu, and specify Bed Sediment in the dialog that appears. To edit records in the table, follow the directions of the section Editing the Cross Section Geometry Data Tables. Do not add or remove records. Do not edit the index fields. Chapter 6 Channel Network Analysis 82 Checking for Nodes with Missing Bed Sediment Data CCHE1D provides a handy tool to verify which nodes require specification of bed sediment properties, but still do not have bed sediment data assigned to them. To view these nodes: 1. Make the Channel Network window active. 2. Choose the option Show Missing from the Cross-Section menu. 3. Choose Bed Sediment in the dialog that follows. All nodes that still require definition of bed sediment properties will be highlighted in a different color. Removing All Bed Sediment Data You can remove all bed sediment data for a certain channel network by following the procedure below: 1. Make the Channel Network window active. 2. Choose the option Delete All from the Cross-Section menu. 3. Choose Bed Sediment in the dialog that appears. This option does not remove the bank sediment data assigned to each node of the current channel network, or the sediment size classes definition table. Bank Sediment Data For the specification of bank properties and sediment data, CCHE1D provides the same functions available for the management of bed sediment data. All the functions are essentially similar, but they are described here for completeness. Importing Bank Sediment Data The methods for providing bank sediment data are essentially similar to those available for the management of bed sediment data. You can provide the information on channel bank material by preparing a data file with a text editor. You can also import a database file containing the data. Please read Appendix C to learn about the options and formats for bank sediment data. If you have the bank sediment data in a data file, be sure the file matches the extracted channel network you have before attempting to import the file. 1. Select the Channel Network window. 2. Select the option Import from the Cross-Section menu. 3. In the dialog that appears, select Bank Sediment and press OK. 4. Specify a file name in the File Selection dialog that follows. Chapter 6 Channel Network Analysis 83 Entering Bank Sediment Data You can input channel bank sediment data interactively. You can select a node and then enter the required data through a dialog. To enter data in this manner, you should: 1. Make the Channel Network window active by clicking on it. 2. Click on the Select Node tool . 3. Click on the node you want to select. 4. From the Cross-Section menu, choose Add at Selected Node. A new dialog will appear. Choose the Bank Sediment option. 5. Data entry dialogs follow. Enter the requested information. 6. Press OK to confirm the data entry, or Cancel to abort the operation. Editing Bank Sediment Data You can modify the bank data for any node in the network, using the interactive editing capabilities. Follow the steps below: 1. Make sure the Extracted Channel Network window is active. 2. Click on the Select Node tool . 3. Click on the node you want to select. 4. From the Cross-Section menu, choose Edit at Selected Node, and then Bank Sediment in the dialog that follows. A new dialog will appear. Retype the values for the data fields you want to modify. CCHE1D displays the current value for each field. Use the Tab key to move from one field to the next. 5. Press OK to confirm the editing, or Cancel to abort the operation. Editing the Bank Sediment Data Table CCHE1D provides access to the Bank Sediment Table for editing of more than one record at a time. However, this procedure is not recommended for inexperienced users. The Bank Sediment table is also associated with the Sediment Size Fractions database table. Editing of this table may introduce errors and may render the data table unusable. If you still want to edit the table, use the Start Editing Table option, available from the Cross-Section menu, and specify Bank Sediment in the dialog that appears. To edit records in the table, follow the directions of the section Editing the Cross Section Geometry Data Tables. Do not add or remove records. Do not edit the index fields. Chapter 6 Channel Network Analysis 84 Checking for Nodes with Missing Bank Sediment Data CCHE1D provides a handy tool to verify which nodes require specification of bank sediment properties, but still do not have bank sediment data assigned to them. To view these nodes: 1. Make the Channel Network window active. 2. Choose the option Show Missing from the Cross-Section menu. 3. Choose Bank Sediment in the dialog that follows. All nodes that still require definition of bank sediment properties will be highlighted in a different color. Removing All Bank Sediment Data You can remove all bank sediment data for a certain channel network by following the procedure below: 1. Make the Channel Network window active. 2. Choose the option Delete All from the Cross-Section menu. 3. Choose Bank Sediment in the dialog that appears. This option does not remove the bed sediment data assigned to each node of the current channel network, or the sediment size classes definition table. Hydraulic Structure Management CCHE1D provides special tools to help you specify the location of and enter data about hydraulic structures. CCHE1D allows you to: Import a file containing data for one or more hydraulic structures. Interactively select the location for a hydraulic structure and provide the necessary data. Edit data related to an existing structure. Remove a selected hydraulic structure from the channel network. Remove all hydraulic structures from the channel network. The Hydraulic Structure functions are available when the Channel Network window is active. Importing Hydraulic Structure Data You may choose to create a data file containing the data pertinent to one or more hydraulic structures. All the necessary information should be contained in this file. All types of structures can be included, in no particular order. You must provide the coordinates of the location of the structure in the same coordinate system in use by the Channel Network window. It should be the Chapter 6 Channel Network Analysis 85 same coordinate system of the Digital Elevation Model from which the channel network was extracted, or the coordinate system used when digitizing the channel network. A drawback of this method is that the coordinates must coincide with the location of the channel. You can use the zoom-in feature of the Channel Network window to get the coordinates of a point in the channel network with precision, and then use them in the structures data file. You cannot add hydraulic structures at confluences or at the beginning of channels. The only exception is the watershed outlet, where measuring flumes are acceptable. If you try to import a structure, and there is already another structure at that location, CCHE1D will give an error message. Therefore, you cannot modify hydraulic structure properties by importing a new data file. You still can import hydraulic structure files at any time, provided there is no previous structure, confluence, or other special features at the location of the new structures. The format for the hydraulic structure data file is described in detail in Appendix C. To import hydraulic structures from a data file: 1. Make the Channel Network window active. 2. Choose Import from the Hydraulic-Structure menu. 3. In the dialog that appears, navigate the directory tree and select the file containing hydraulic structure data. 4. Double-click on the file name to select the file. Adding a Hydraulic Structure Perhaps the most convenient method of inserting hydraulic structures in the channel network is to use the interactive tool in the Channel Network window. 1. Zoom-in on the part of the channel network where you want to insert a hydraulic structure. 2. Select the Add Structure tool by clicking on it. 3. Click on the location you want to insert a structure. 4. Confirm the insertion by choosing Yes in the dialog that follows. 5. In the dialog that appears, choose Yes if you want to provide the characteristics of the hydraulic structure now. You can specify the data later. 6. If you chose Yes in the previous dialog, choose the type of the structure from the drop-down menu. 7. Enter data for all the required fields. All fields must be completed. For explanation on the meaning of each data entry, please refer to Appendix B. Chapter 6 Channel Network Analysis 86 After you specify the data for the structure, the node is represented on the map by a special symbol, according to the structure type. The legend on the lefthand side of the map shows the meaning of the symbol. If you add a structure but do not enter the data, the structure is marked with a symbol indicating the type is unknown. Editing Hydraulic Structure Data You can edit the data of any hydraulic structure in the channel network. To edit the data for a structure: 1. Make the Channel Network window active. 2. Choose the Select Structure tool . 3. On the channel map, click on the structure you want to edit. A message confirming the selection is displayed. 4. Choose Edit at Selected from the Hydraulic-Structure menu. 5. Inform if you want to change the current type of the hydraulic structure. If you choose yes, select a new type for that structure in the dialog that follows. 6. Edit the fields you want. Use the Tab key to move from one field to the next. 7. Press OK to confirm the editing. Removing a Hydraulic Structure from the Channel Network You can remove any hydraulic structure from the channel network. remove a structure: 1. Make the Channel Network window active. 2. Choose the Remove Structure tool To . 3. On the channel map, click on the structure you want to remove. 4. Confirm the removal by pressing OK in the dialog that appears. Removing All Hydraulic Structures from the Channel Network You can remove all bed sediment data for a certain channel network by following the procedure below: 1. Make the Channel Network window active. 2. Choose the option Delete All from the Cross-Section menu. Chapter 6 Channel Network Analysis 87 3. Choose Bed Sediment in the dialog that appears. This option does not remove the bank sediment data assigned to each node of the current channel network, or the sediment size classes definition table. Computational Mesh Generation Introduction The numerical flow routing in a channel network requires a well-defined set of computational nodes. A channel network, as extracted from a Digital Elevation Model or digitized through the CCHE1D interface has very few nodes. The nodes only identify the beginning of channels and channel junctions. Furthermore, the spatial distribution of these features makes the resulting network inadequate for numerical computations. The flow model imposes restrictions on channel lengths and on the uniformity of their distribution in the network. The presence of confluences and hydraulic structures significantly affects the length of channel reaches. The channel network, as extracted from a DEM, shows great variations in reach lengths. In order to have a channel network that is suitable for the numerical computations, many new nodes have to be defined. CCHE1D has a Channel Network Analysis module that inspects the channel network and determines improvements to create a computational network that is adequate to the flow routing model. This analysis module consists of a series of pre-defined rules, tuned to the simulation models of CCHE1D, which determine the number and location of new nodes to be added to the channel network. CCHE1D provides tools to orient the user through this process of computational grid generation. Besides the automatic procedure with the built-in rules, CCHE1D lets you add or remove nodes interactively, by simply clicking on the channel network map. This way, you can fine tune the computational mesh, and add nodes at points of interest, such as for example locations where measurements are available. Automatic Generation Built-in Rules The current version of CCHE1D has a set of rules that analyze the channel network. They determine where extra nodes should be added in order to create a computational mesh that satisfies the accuracy and convergence requirements of the channel model. Chapter 6 Channel Network Analysis 88 The first rule to be applied is the verification of variations in flow crosssectional area. For locations where the flow area changes significantly, CCHE1D adds extra nodes, so that the variation in area is reduced to acceptable values. CCHE1D analyzes all channels to determine if the lengths of channel reaches are reasonably uniform. A large variation in the length of successive computational reaches can negatively affect the quality of the numerical simulations. CCHE1D adds nodes to the network to make the distribution of reach lengths more uniform. Finally, CCHE1D inspects the neighborhood of channel junctions and hydraulic structures. Specialized algorithms compute the flow properties at these locations, and CCHE1D makes sure the computational network satisfies some special requirements. Auto-generating the Computational Network To let CCHE1D create a computational channel network using the built-in rules: 1. Make the Channel Network window active by clicking on it. 2. From the Channel-Network menu, choose Autogenerate. 3. Confirm to start the automatic generation of the computational network. CCHE1D will analyze the channel network and add the nodes it considers as necessary. You will see new nodes appearing, while the process continues. The channel network map shows the new nodes identified by a different symbol. The legend on the left-hand side of the map shows the new node type “Auto Added.” Note: If you want to manually specify the position of a new node, you should do that before you use the Auto-generate function. CCHE1D will consider the position of the added node, as well as its cross section geometry, when creating new computational nodes in the Auto-generate analysis. This is especially important if you specify the cross section properties for the manually added nodes. Manual Generation CCHE1D provides an interface that allows you to interactively add or remove nodes of the computational network. You can use the Add Node tool to insert a node at a point of special interest to you, such as a location where you want to have the flow properties computed, for example. You can also use this tool to improve the computational mesh, in case the algorithms of CCHE1D create a computational mesh that you consider inadequate at a certain location of the computational domain. Similarly, Add Nodes tool lets add several nodes at the selected reach. You can use the Remove Node Chapter 6 Channel Network Analysis 89 tool , if your experience with numerical models tells you a node previously added is no longer necessary. Adding a Node to the Channel Network You can add nodes either before or after the Auto-generate procedure. To add a node to the computational network: 1. Make sure the Channel Network window is active. 2. Activate the Add Node tool . 3. Zoom-in to the region where you want to add a node. 4. On the channel network map, click at the location you want the node inserted. 5. If CCHE1D displays a message indicating it cannot identify the channel to insert a node, zoom-in even further on the location of the new node to specify the node location with greater precision. 6. Confirm the location of the new node in the dialog that follows. Nodes created at user specified locations are identified by a distinct symbol on the channel network map. The map legend shows the node type “User Added.” Adding Several Nodes to a Channel Reach You can add several nodes at a channel reach (in between two existing nodes) using the Add Nodes tool. The new nodes are inserted at equal distances. To add a number of nodes to a channel reach: 1. Make sure the Channel Network window is active. 2. Activate the Add Nodes tool . 3. Zoom-in to the region where you want to add a node. 4. On the channel network map, click at the reach where you want insert nodes. 5. If CCHE1D displays a message indicating it cannot identify the channel to insert a node, zoom-in even further on the location of the new node to specify the node location with greater precision. 6. Enter the number of nodes to be added to the current reach. Nodes will be added at equal distances. Removing a Node from the Channel Network You can remove nodes that were previously added, either manually, or by the Autogenerate function. Note that you cannot delete source nodes (at the beginning of channels), confluence nodes, and nodes that receive inflow from subwatersheds, in case your channel network was created through the Chapter 6 Channel Network Analysis 90 “Landscape Analysis” procedure. In addition, you cannot remove hydraulic structures using this tool. To remove a node to the computational network: 1. Make sure the Channel Network window is active. 2. Activate the Remove Node tool . 3. Zoom-in to the region where you want to remove a node. 4. On the channel network map, click at the node you want to remove. 5. If CCHE1D displays a message indicating it cannot identify a single node, zoom-in even further. 6. Confirm the removal of the node in the dialog that follows. Adding a Background Layer to a Channel Network You can one or more images, feature themes (shapefile or grid), or a CAD layers to the channel network to use as a reference layer for mesh editing or visualization. The data layer must be referenced to the same coordinate system used to generate the channel network, otherwise it may not display correctly. To add a background layer to a channel network: 1. Make sure the Channel Network window is active. 2. Choose Import Background from the Cross-Section menu. 3. Select a File Type in the dialog that appears. The current options are Image, Feature (shapefile), Grid, and CAD File. CCHE1D will enable the Spatial Analyst and CAD Reader extensions, if they are available in your computer. 4. If you selected Image, you will be asked if you want to enable any of the image support extensions. Some file formats require the activation of an extension module so that ArcView can read them. Answer Yes to see a list of available extensions currently installed on your computer. Chapter 6 Channel Network Analysis 91 5. Select the file that contains the background layer you want to import. Depending on the type of the file you plan to import, you may have to enable an extension. For image files, you do not need an extension if your files are in one the formats below: BMP BSQ, BIL and BIP Sun rasterfiles Controlled Image Base (CIB) ERDAS GRID IMPELL Bitmaps (Run-length compressed files) TIFF, TIFF/LZW compressed You need to load specialized extensions in order to be able to import the following file formats: ARC Digitized Raster Graphics (ADRG) and Compressed ARC Digitized Raster Graphics (CADRG) IMAGINE JPEG MrSID National Image Transfer Format (NITF) TIFF 6.0 Consult the ArcView documentation if you have your data in a format not listed above. Chapter 6 Channel Network Analysis 92 NOTE: For convenience, you can import more than one background image, which allows you to create mosaics or to superimpose more than one layer. You can turn on and off the display of each layer, as well as determine the order the images are displayed. The images must be georeferenced to the same coordinate system, or they will not display correctly. Check the current Projection settings for the current Channel Network Digitizing View (in the Properties entry of the View menu), if necessary. Deleting a Background Layer You can remove any background layer you have imported, following the procedure below: 1. Activate the Channel Network view. 4. Select Delete Background from the Channel-Network menu. 5. Select the layer name in the dialog that appears. You can select more than one layer for deletion. Press OK to delete the selected layers. CHAPTER 7 Performing Channel Flow Analysis In the previous chapters, you learned how to create a computational channel network and how to input all the necessary data for a flow simulation. This chapter shows you how to enter options and parameters for the simulation of flow and sediment transport in the channel network you created. In this chapter, you will specify all the run parameters and data files and you will learn how to perform the flow and sediment transport simulations using the CCHE1D channel network model. You will also learn how to specify how output data are saved, and how to inspect and visualize the results of the simulation. Contents Introduction Specifying Simulation Parameters and Options Specifying Visualization Options Starting the Flow Simulation Exporting Visualization Data Charting with Microsoft Excel Chapter 7 Performing Channel Flow Analysis 94 Introduction The simulation of flow and sediment transport in a network of channels requires the assembly of a large database. The database includes data from various sources, including the output of other modeling components, which is stored using different techniques, such as tables, raster images, and vector graphics. The exchange of information between modeling programs implies resource-consuming data format conversions. Another hurdle is the fact that the output of one modeling component does not usually provide all the input requirements of another. Extra effort must be spent in complementing the necessary information so that two or more programs can be used simultaneously or sequentially. CCHE1D simplifies the modeling task since it controls the flow of information among the models, guiding you through the process of data preparation and substantially reducing the amount of data you have to handle. CCHE1D eliminates the tedious task of gathering data describing the channel network. Channel and subwatershed characteristics can be readily extracted from a Digital Elevation Model. CCHE1D can create the computational mesh automatically. It defines all nodal points and more importantly, the logical relationships between the basic watershed elements: nodes, channel reaches, and subwatersheds. You have seen that CCHE1D also helps in the input of additional data such as cross sections, channel roughness, and hydraulic structure characteristics. It does not only provide a convenient interface with graphical feedback, but it integrates the new data to the existing database. CCHE1D takes care of logically connecting the new data to the various watershed elements. CCHE1D organizes all data so that they are readily available for the simulation models. Data format conversions and consistency checks are part of the process. The CCHE1D relational database is gradually built so that all information is consistent, correct, and complete. For the simulation of flow routing in a channel network using CCHE1D, it suffices to provide the boundary conditions and a couple of parameters. CCHE1D provides the graphical user interface to guide you through this process. The CCHE1D interface controls the simulation models, performing all data input automatically. The CCHE1D Channel Network Model The CCHE1D channel network model computes unsteady flows using either the Dynamic or Diffusion Wave approaches. The model is able to account for the influence of in-stream hydraulic structures. CCHE1D calculates nonequilibrium, non-uniform sediment transport and the resulting channel bed Chapter 7 Performing Channel Flow Analysis 95 changes and bed material sorting. The model also simulates channelwidening processes through bank erosion and stability analysis algorithms. It offers four sediment transport capacity formulas and a variety of methods for the computation of parameters such as bed material porosity, mixing layer thickness, movable bed roughness coefficient, and the adaptation length for non-equilibrium transport, which allows the model to be applicable to a wider range of real-life problems. The use of CCHE1D requires a certain level of expertise from the part of the user. In fact, the user of this program is the real “modeler” who must describe a physical domain in such a way that a numerical solution of the flow and sediment transport equations is stable and accurate. Before applying the model to the study of any flood and/or transport study, one must read the CCHE1D Technical Manual carefully to understand how CCHE1D models the physical phenomena, and especially to become familiar with the assumptions and limitations that are present in the model. Although the CCHE1D model has been considerably improved in order to handle a large variety of flow conditions that typically occur in nature, there could be situations where the underlying hypotheses of the model were not satisfied, and the model could yield inaccurate or even erroneous results. It is responsibility of the user to employ this sophisticated tool in a reasonable, scientifically sound way. The CCHE1D interface certainly facilitates the use of the model, but engineering sense is still required. The CCHE1D interface and control module have functions that help eliminate most errors in data preparation. However, if a channel model run is interrupted due to an error, the problem is usually related to inconsistency in the input data. The user must be particularly careful when specifying boundary and initial condition data, to ensure they are physically reasonable and fully compatible with the channel network used in the study. Pay special attention to the node and subwatershed numbers. Specifying Simulation Parameters and Options When you are satisfied with the network created in the Channel Network window, the flow routing simulations can begin. Of course, you must have the flow (and optionally sediment) inflows to use as boundary conditions for the simulation. The interface also asks for a set of parameters and options that control the flow and sediment transport computations. The Channel Network window has a menu labeled Simulation, from which all operations are controlled. Before you specify the detailed options of a simulation run, you must think about what type of output you want to have when the simulation is complete. Because a channel network simulation of unsteady flow can generate hundreds of megabytes of output data, CCHE1D does not provide a “standard” data output. Instead, CCHE1D lets you decide what type of data it Chapter 7 Performing Channel Flow Analysis 96 will write to disk for analysis. It requires you to plan ahead so that the output of simulation results is efficient and adequate for your analysis. Because the output options are very important for a successful analysis, CCHE1D provides a series of tools that help you tailor the output according to your needs and preferences. Once that is taken care of, you can specify the rest of the options and start the simulation run. Specifying Output Options CCHE1D provides a very powerful system for the specification of the type and frequency of output of results from the channel model. The system allows the user to choose which variables will be output, for which nodes, and at which frequency. You will define a series of Monitor Points, locations at which data from the numerical simulation will be saved. The system is designed so that you can simply specify the charts you want to see when the simulation has ended. CCHE1D provides four basic types of charts: Nodal Time Series; Longitudinal Profiles; Cross Sectional Profiles; Sediment Size-Class Data. An interactive, map-based interface allows you to click at map locations to define the output for that particular node or channel reach. You start the procedure by creating a “Chart Definition List.” This list is in fact a part of the CCHE1D database that is automatically connected to a map layer for easy editing and visualization. A single chart list can contain the definition of an unlimited number of datasets, from which charts can be easily created. You can create, edit, import and export any number of chart lists. Creating a Chart List A Chart Definition List stores the definitions for output datasets from which charts (x-y plots) can be prepared after the simulation is complete. Create a new chart list following the steps below: 1. To create a new Chart List, use the option Create Chart List from the Simulation menu. 2. Note that a new map layer (theme) appears in the Channel Network window. Click on “Chart Definition 1” on the map legend to activate that theme. Note also that two new tools are now active: . These tools will be used to add nodes or longitudinal profiles to the chart list. Chapter 7 Performing Channel Flow Analysis 97 3. Select the “Add Node to Chart List” tool and then click on any node. You will be prompted to select a data type that will correspond to the selected node. The options are: Nodal Time Series Cross Section Geometry Sediment Size Class Data Nodal Time series will create a dataset in which a set of variables will be created for that node. You will decide in a moment which variables and at which output frequency. Cross Section geometry creates a dataset that allows you to plot the cross section geometry at a defined time frequency. Sediment Size Class Data creates a dataset that contains some properties related to each of the bed sediment size fractions, for that node, also at a user-defined frequency. 4. Enter the output frequency for this output dataset, in number of time steps. You just added that particular node to the output list. Just before you start a simulation run, you will define which variables to output. 5. You can define several nodes at once by using the specifying longitudinal profiles along which data are saved according to your requirements. Select the “Add Profile to Chart List” tool to create a new profile dataset. 6. Click on the node where you want the profile to start (upstream end). A large light blue circle marks the initial node. 7. Click on a node where you want your profile to end. NOTE: the second node must be downstream of the first node, following the flow path determined by the channels. The second node may be in a different channel link, provided there is direct path between the two nodes. Provide Chapter 7 Performing Channel Flow Analysis 98 an output frequency (in number of time steps) in the dialog that appears. All nodes in the prescribed longitudinal profile will be highlighted. There are several predefined classifications for the Chart Definition themes. Double-click on the theme name to see the options. The figure below shows the theme with a legend of type “Chart Type.” Editing a Chart Definition Table You can edit an existing Chart Definition Table by performing the following steps, which are standard ArcView procedure for editing tables. Changing Output Frequencies 1. Make the Chart Definition theme active by clicking on its legend. Use the Table entry from the Theme menu, or use the “Open Theme Table” button . 2. Having the Chart Definition Database Table open, use the Start Editing option of the Table menu. 3. Use to start editing table cells. NOTE: You are allowed to change only the Frequency field using this procedure. If a node belongs to a Profile chart, be sure you change the frequency for ALL nodes of that profile. Chapter 7 Performing Channel Flow Analysis 99 4. When finished, use the Stop Editing option from the Table menu, and press Yes to save the edits. Removing Nodes from Chart List You can remove some nodes from the chart list, provided you follow a couple of rules: 1. Edit the theme itself, and not only its table, as in the previous subsection. 2. If you plan to remove a profile, be sure to remove all its nodes. Follow the steps below to edit the Chart List theme. 1. Select the Chart Definition theme you want to edit. 2. Use the Start Editing option of the Theme menu to start editing the theme. 3. Carefully select the graphics representing the nodes you want to remove. 4. Use the delete key to remove nodes from the chart list. 5. When finished, use the Stop Editing option from the Table menu, and press Yes to save the edits. Importing a Chart List You can import an existing Chart List into the current project by performing the following steps: 1. Activate the Import Chart List entry from the Simulation menu. 2. Browse you computer and look for Chart Definition files. They are named <projname>_md_<number>.shp and are always stored in the simul subdirectory inside the CCHE1D case directory, which is always displayed at the top of the ArcView window. Choose the table you want to import. NOTE: Make sure the Chart List you are importing is compatible with the current channel network. NOTE: If the chart list is already present in the current project but not displayed in the channel network view, follow the instructions of the section Displaying an Existing Chart List. Removing a Chart List from the View To remove a Chart List from the Channel Network view: 1. With the Channel Network view active, select Remove Chart List from the Simulation menu. 2. Select the desired Chart List from the list that appears. 3. Confirm the removal by pressing OK. NOTE: The chart list remains inside the CCHE1D project. You can display it again following the steps of the section Displaying an Existing Chart List. Chapter 7 Performing Channel Flow Analysis 100 Displaying an Existing Chart List If you already have a Chart List inside the CCHE1D project, you can display it in the Channel Network view using the Display Chart List entry from the Simulation menu: 4. With the Channel Network view active, select Display Chart List from the Simulation menu. 5. Select the desired Chart List (identified by number) from the list that appears. NOTE: Only chart lists that are already present in the CCHE1D project appear in the list. To import a chart list into the project, see the section Importing a Chart List. Specifying Simulation Options You will use the General Parameters entry of the Simulation menu to define the options and parameters for the flow simulation. CCHE1D will display a series of dialogs where you can enter or modify the current or default settings. All parameters must be defined. You can view and modify your settings at any time using this same menu option. The older selection is always displayed, with few exceptions. Default choices are marked with an asterisk after option name: The simulation parameters are the same for all Channel Network windows of your CCHE1D project. If you have more than one channel network, be advised that changes you make to simulation parameters also affect the other channel networks. Always review all the parameters before you start a new simulation run. Be careful when specifying which Chart List must be used for each run. This following section will explain all options in the order they are asked. Simulation Parameters To start the specification of parameters and options, having the Channel Network selected, click on General Parameters in the Simulation menu. Chapter 7 Performing Channel Flow Analysis 101 A series of small dialogs will appear. You must cycle through all options to ensure changes take effect. First, you will be asked to supply the parameters for the next run of CCHE1D. A data input dialog is displayed, where you are required to provide two numbers: Number of Storm Events to Simulate. This is the number of storm events for which the simulation will be performed. This maximum value for this number is the total number of storm events present in the Boundary Conditions file, which you must also provide. The Boundary Conditions file is usually the output of a rainfall-runoff simulation performed by a watershed processes model. You can also provide the inflow hydrographs based on measured data or other hydrologic method. Time Step Size. This is the time step size in minutes to be used by the CCHE1D flow and sediment transport model. This value must obey the requirements imposed by the numerical scheme employed by CCHE1D. Please consult CCHE1D’s technical manual for more information on how to determine an adequate time step size for your simulation. After you provide both numbers, press OK to continue. You will now specify the type of Boundary Conditions file you are going to supply. Boundary Conditions File Type You must specify the type of Boundary Conditions file you are going to supply to the flow and sediment routing models. CCHE1D supports different types of input files so that you can use the most convenient method for your particular case. The boundary condition files contain a series of hydrographs (and optionally sediment data) for several nodes or subwatersheds, for one or more storm events. Chapter 7 Performing Channel Flow Analysis 102 Boundary Conditions files are grouped into two distinct types: Triangular Hydrographs Time-Discharge Hydrographs Triangular Hydrographs describe a storm event through a series of maximum and minimum discharges that occur at specified times. In summary, for each node or subwatershed where inflow is specified, a base discharge, a peak discharge, a time to reach the peak discharge, and the total duration of the hydrograph is given. Time-Discharge hydrographs allow the specification of inflow hydrographs of any shape by providing a succession of time-discharge pairs at each point of inflow. CCHE1D uses linear interpolation to determine inflow discharges at the various time instances of the simulation. Both types support the specification of inflow either using node numbers or subwatershed numbers. The latter is useful in case an integrated WatershedChannel analysis in being performed with the help of a rainfall-runoff model. Appendix C – Data File Formats contains detailed information on how to prepare the boundary condition files. Boundary Conditions File After you inform of which type your boundary conditions file is, you must specify the name and location of that file. Use the file selection dialog that appears to browse your computer and select the Boundary Conditions file you want to use. Press OK to go to the specification of the type of the downstream boundary condition. Boundary condition files usually have the extension .bc or .txt, but any extension can be used. Chapter 7 Performing Channel Flow Analysis 103 If you already had specified a boundary conditions file, CCHE1D will show the name of the file and ask if the same file should be used for the current simulation run. Downstream Boundary Condition Type The numerical solution of the flow equations requires you to specify a boundary condition at the downstream end of the channels. In the case of CCHE1D channel networks, a water level must be specified at the watershed outlet. Channel reaches that end at a junction are automatically taken care by CCHE1D’s internal computational methods. There are three options to choose from: Open downstream boundary User-specified stage time-series User-specified constant stage User-specified stage-discharge curve The first option is an automatic procedure that is useful in case stage information is not available. CCHE1D implements a non-reflective downstream boundary condition that adjusts the water level at the watershed level according to current flow conditions. Alternatively, you can specify a time-series of stages, if that data are available. If this option is chosen, you must provide a data file containing time-stage pairs, from which CCHE1D will derive the stage at different times via interpolation. See Appendix C – Data File Formats for information on how to prepare such file. Chapter 7 Performing Channel Flow Analysis 104 If your channel network ends at a location where the water surface elevation is fairly constant, such as a reservoir, you can specify the water surface elevation, in meters, in the dialog that follows. Baseflow Computation Method The numerical solution of the flow equations requires you to specify initial conditions (discharges and stages) for every node in the computational network. CCHE1D provides an efficient method in which constant baseflow discharges are given or assumed, from which steady water surface profiles can be computed using the Standard-Step Method. CCHE1D steady water surface profiles also consider the hydraulics of in-stream structures, and the mathematical background is essentially similar to that employed by steady flow one-dimensional models such as HEC-RAS, for example. There are two options to choose from: Automatic; User-specified discharges; The first option is an automatic procedure that determines discharges for each channel reach based primarily on drainage areas. The method was developed for small watersheds in Northern Mississippi, and it is not expected to be accurate or even adequate for any watershed configuration. The method is provided as a tool for preliminary model runs. The best method is to specify baseflow amounts for each source channel (channel segments that do not have tributaries). CCHE1D can automatically determine the discharge at the remaining channels by accumulating given flow rates. See Appendix C – Data File Formats for information on how to prepare a baseflow file. Flow Model Wave Type CCHE1D implements two distinct wave models for the computation of unsteady flows. The diffusion wave model is a simplified approach, which can be about 10% faster to execute, may be more stable in some cases, but can yield less accurate results in some situations. The dynamic wave model solves the complete Saint-Venant equations, and it is applicable to a wider Chapter 7 Performing Channel Flow Analysis 105 range of flow conditions. Results can be expected to be more accurate, although the diffusion wave model is able to produce similar accuracy for a large variety of river flows. Please consult CCHE1D’s Technical Manual for more information on the choice of the wave model. Sediment Transport Computations If your case contains sediment data, you will be prompted if the sediment transport computations are to be performed in the current run of the model. You can choose to disable the sediment transport simulation, even if you have provided the sediment data. This option is useful in the first runs of a simulation case. Disabling sediment transport will significantly reduce the total simulation time. You may want to simulate a rigid bed condition first, and verify if the input data are correct, if the computational mesh is satisfactory, etc. To disable sediment transport computations, simply answer No in the dialog that appears. If you have not provided sediment related data, CCHE1D informs you that sediment computations are automatic disabled. Monitor Points Output File Type The simulation model generates a huge amount of data that simply cannot be stored. That is why you are asked to create the Chart Lists where variables representing flow, bed characteristics, and channel geometry properties will be stored for nodes you select, at the time intervals you determine. CCHE1D saves the output data into text files, which can be directly imported into plotting or spreadsheet programs such as Microsoft Excel, Tecplot, etc. CCHE1D writes one file for each Nodal Time Series, Longitudinal Profile, Cross Section Geometry, or Sediment Size Class Dataset chart defined in the list. Files are written in the simul directory, inside the Case directory that is displayed at the title bar of the interface window. File names are built according to the following convention: Nodal time series: <casename>_mp_run<N>_ts_<Node>.txt Cross section geometry time series: <casename>_mp_run<N>_cs_<Node>.txt Chapter 7 Performing Channel Flow Analysis 106 Longitudinal Profile time series: <casename>_mp_run<N>_prf_<NodeUS>-<NodeDS>.txt Sediment Size Class Data: <casename>_mp_run<N>_sz_<Node>.txt Chart Definition Table After the type of chart is defined, you must choose which Chart List you are going to use for the current run. Note that you can create several lists that contain different output options. You can also import lists and modify them to suit your needs. Keep in mind the chart lists are based on node numbers, which change with modifications of the computational mesh. Output Variables You have defined which types of plots you would like to see when the simulation is complete (time series, longitudinal profiles, etc.). Now you must define what variables you would like to plot. A series of variable lists are presented, according to your definitions of the chart list. Initially a list of variables available for Nodal Time Series is displayed. Note that these variables will be saved for all nodes for which you requested a timeseries chart. The frequency for each chart will vary according to the specifications contained in the chart list, but the same variables will be output for all charts. Select the variables from the list, using the SHIFT key while clicking, to select more than one variable. Chapter 7 Performing Channel Flow Analysis 107 You can use different variables for your Longitudinal Profiles charts from those save for the Time Series charts. A separate list is displayed if the Chart List contains profile charts. If sediment transport is enabled, the lists of variables contain also data related to sediment and channel morphology. For Sediment Size Class related data, a list with different variables, all related to sediment transport, is displayed. For a complete list of the available variables, refer to Appendix D – Output Variables. Chapter 7 Performing Channel Flow Analysis 108 This concludes the prescription of options for the CCHE1D channel network model. The simulation does not start until you select Start Channel Simulation in the Simulation menu. See the next section for information on sediment transport related options and parameters offered by CCHE1D. Specifying Sediment Calculation Options If sediment data has been previously provided, CCHE1D you have access to a series of options related to the simulation of sediment transport and bank stability analysis. Use the entry Advanced Parameters to change these options. For all parameters, there is also a default option (marked with a *) that is adopted unless you explicitly modify it through the interface dialogs. Because CCHE1D is under continuous development, options under this category change from time to time. Please contact NCCHE for support in case this manual does not correspond exactly to your copy of CCHE1D. Please read carefully the CCHE1D Technical Manual to find out about the meaning of each option, to learn how to use them, and to understand the impact they may have on the computed sediment transport and morphological changes. Sediment Transport Capacity Equation CCHE1D offers four different sediment transport capacity equations you can choose from: Modified Engelund-Hansen Modified Ackers and White Wu et al., 1998 SEDTRA Module (Laursen, Yang, Meyer-Peter and Müller) Chapter 7 Performing Channel Flow Analysis 109 If you select the SEDTRA module, you must enter a value for the parameter x for the determination of the diameter used in the determination of incipient motion conditions. The default value for x is 0.5. If the Wu et al. formula is used, you must define a value for the coefficient χ that accounts for vegetation effects. The default value is 1.0, meaning no correction for the presence of vegetation. Please consult the CCHE1D Technical Manual for detailed information on the implementation of the above equations. Keep in mind that each equation will yield different results, and not all equations may be applicable to a particular problem. Bank Stability Analysis After you choose a sediment transport capacity equation, you can disable the Bank Erosion and Stability Analysis of CCHE1D. If it is disabled, CCHE1D will not compute bank erosion and potential bank mass failures. Bed Load Adaptation Length The bed load adaptation length is one of the most important parameters in the numerical computation of sediment transport using the non-equilibrium approach. The method used to define this parameter can affect the magnitude of transport that occurs in a channel, and it can influence the numerical stability of the solution. Please consult CCHE1D’s Technical Manual for a discussion on this parameter. Currently, CCHE1D offers four approaches for the determination of the adaptation length: Function of Alternate Bar Length Function of Dune Height Function of Reach Length User-specified value. The default option is “Function of Alternate Bar Length.” Suspended Load Adaptation Coefficient The Suspended Load Adaptation Coefficient α, which is used to calculate the adaptation length, can be determined by either: Armanini and di Silvio Method (1998), or User-specified value The default option for this parameter is a constant value of 0.5. Please consult the CCHE1D Technical Manual for more information on the subject. Chapter 7 Performing Channel Flow Analysis 110 Wash Load Adaptation Length You may specify a value for this parameter. The default is length is infinitely large, which is specified by its inverse value, zero. Mixing-Layer Thickness CCHE1D offers four approaches for the computation of the mixing-layer thickness. Related to Dune Height Related to Grain Size Related to Flow Depth Constant Value Again, consult the Technical Manual for detailed information on the subject. Minimum Value for Mixing-Layer Thickness You can adjust the minimum value for the mixing layer thickness in case you have selected one of the automated procedures for its determination, in the previous dialog. Bed Material Porosity CCHE1D provides three options for the determination of the porosity of the bed material: Komura and Simmons (1967) Han and Wang (1981) User-specified value Wash Load Size Classes CCHE1D provides two methods to define which sediment size classes are considered as wash load: Automatic (function of Suspension Number) User-specified number of size classes This concludes the entry of options and parameters for the simulation models. Remember that the simulation does not start until you choose Start Channel Simulation from the Simulation menu. Chapter 7 Performing Channel Flow Analysis To edit any 111 of the parameters you entered, simply click the Advanced Parameters option again. The dialogs will show the values you provided before. Edit the desired fields and press OK in each dialog. Starting the Flow Simulation Once you have all parameters, input files, and options defined as explained in the previous sections, you can start the flow simulation. CCHE1D will use the channel network as displayed in the Channel Network window. CCHE1D will gather the necessary data and transfer them to the simulation models. The CCHE1D flow and sediment transport model can be run locally, on the same computer where the interface is being used, or remotely on the NCCHE computer server. The NCCHE Data Transfer Utility transfers the data between your computer and the NCCHE server, and controls the simulation. If you would like to use the NCCHE server free of charge, contact NCCHE for an access account. Running CCHE1D on the Local Computer After you have defined a Chart List, provided the necessary boundary condition files and defined all options and parameters, you are ready to start a simulation on your computer, just following these steps: 1. Make the Channel Network window active. 2. Click on Start Channel Simulation (Local Computer) in the Simulation menu. 3. Confirm the launching of the simulation programs by clicking Yes in the dialog that follows. CCHE1D will review all input data before starting the model. Depending on the changes made to the channel network, this step may take a few minutes while CCHE1D updates its database. CCHE1D will then start the channel modeling components to perform the simulation according to the parameters you defined. A console window will be displayed, where you can see the status, warning or error messages issued by the models. You cannot perform any operation within CCHE1D interface while the channel model is running. The console window will disappear and you will regain control when the simulation is completed. When the simulation is finished, you will have the simulation results available. You can then proceed to inspect your results. Chapter 7 Performing Channel Flow Analysis 112 Running CCHE1D on a Remote Server Starting a Remote Simulation To perform a simulation on the NCCHE server assigned to you, follow these steps: 1. Make sure you have a live Internet connection. 2. Make the Channel Network window active. 3. Click on Start Remote Server Simulation in the Simulation menu. CCHE1D will prepare all input files and then start the NCCHE’s Data Transfer Utility. This program performs the following tasks: Manages the Internet connection with the NCCHE server, and authenticates the user; Transfers input files from your computer to the NCCHE server; Starts the simulation run on the NCCHE server; Queries the status of the computer run (queued, started, percentage of completion, finished, etc.); Transfers model results (output files) back to your computer. All operations are performed with your explicit consent. The CCHE1D interface determines what are the files to be transferred, and the Data Transfer Utility will work only with these files. Chapter 7 Performing Channel Flow Analysis 113 To start a new run: 1. Make the Data Transfer Utility window active. 2. Press the Setup Connection button to establish a connection to the NCCHE server. 3. Provide your Username and Password in the dialog that follows. Make sure Remote NCCHE Server is selected, if you are outside the NCCHE Chapter 7 Performing Channel Flow Analysis 114 computer domain. Only users within the NCCHE computer network should select the option Local NCCHE Server. 4. Press the Upload Files button to transfer the input files to the server. 5. Press the Start New Simulation button to start the simulation on the remote server. After you start the simulation, you may exit the Data Transfer Utility. You can also close the CCHE1D interface. The simulation will continue on the server. Every time you use the Start Remote Server Simulation option, a run number is incremented, allowing you to save files from different simulations within your project, for easy comparison. Checking the Status of a Remote Simulation To check the status of a simulation, stop it, or download output results, use the Start Data Transfer Utility option of the Simulation menu. Do not use the Start Remote Server Simulation option until a previous run has finished, and you have downloaded the results to your computer. You can check the status of the run at any time, by pressing the Check Progress button in the Data Transfer Utility. If you just start the utility, use the Setup Connection button to re-enter you Username and Password. If you realize you made a mistake, you can interrupt the simulation using the Stop Simulation button. When the simulation is complete, you can request that the simulation results be transferred back to your computer. Use the Download Files button to retrieve the output data. You should be able to download output files before the run is finished, but these files will be incomplete. After you verify the simulation results are safe on your computer, you should delete all data files present on the NCCHE server by pressing the Remove Files From Server button. Storage space is limited, and all CCHE1D users share it. As an act of courtesy, please remove the data files from the NCCHE server as soon as possible. Visualizing Model Results Limitations of the plotting capabilities of ArcView (such as a maximum of 50 data points) do not allow CCHE1D to plot visualization results within the CCHE1D-ArcView interface. CCHE1D 1.0 and 2.0 provided support for database (dbf) files, but because of performance issues with large datasets, the support for database files has been discontinued. Chapter 7 Performing Channel Flow Analysis 115 Using Text Files For larger cases, or when you want the data saved at high frequencies, saving each plot to a separate text file is the more efficient and convenient method to save and visualize CCHE1D results. CCHE1D creates a file for each chart you have defined in the selected Chart List. The files are stored inside the directory named simul, inside the Case directory. Files are named according to the following convention: <casename>_run<N>_ts_<Node>.txt for time series data <casename>_run<N>_cs_<Node>.txt for cross section geometry data <casename>_run<N>_sz_<Node>.txt for data related to each sediment size class. <casename>_run<N>_prf_<NodeUS>-<NodeDS>.txt for longitudinal profiles These files contain simulation results organized into columns. Each variable selected in the interface is stored as a column of data. The first columns contain simulation time and date information. Each line contains the values of the selected variables at a certain instant in time. The first line of the file contains the name of the variable that corresponds to each column. Spreadsheet and plotting programs can directly open this file. Tab characters separate values in the same line. These files can be imported by virtually all visualization and graphing packages, as well as spreadsheet programs. Using Database Files The current version does not support anymore model output in database files. Transfers of data for charting using the Dynamic Data Exchange (DDE) protocol is no longer supported because database queries and data transfers via DDE slowed down the plotting procedure, and the preparation of plotting files with thousands of points would take several minutes. Charting Simulation Data Using Microsoft Excel This section summarizes the basic procedure for plotting using Microsoft Excel, using the example described in the CCHE1D Quick Start Guide. You can follow the steps describe below to create a chart in minutes. We are going to show how to open this file into the electronic spreadsheet program Microsoft Excel, and plot time-series results. 1. In Microsoft Windows, use the Windows Explorer to browse your computer to the simul folder where the results are stored. 2. Locate a Time Series data file (e.g. efr1_mp_run1_ts-40.txt). Chapter 7 Performing Channel Flow Analysis 116 3. Click with the right mouse button, and choose the “Open With…” option. On Windows 95/98/NT, you may have to press the SHIFT key for this option to appear in the menu. Choose Microsoft Excel from the list that appears. Excel should open, displaying the contents of the data file. 4. Alternatively, if you have Excel already running, you can simply Open the output file (select Text Files as file type in the Excel dialog). Excel should display the “Text Import Wizard.” Choose “Delimited” in the first panel. Click “Next.” Make sure “Tab” is select as the delimiter, in the next panel. Click “Finish” to complete importing the file. 5. Once the file is open, you should see a single numeric value in each Excel cell. If all contents appear in the first column of the spreadsheet, try importing the file again. You can now select data to plot and use Excel charting options to quickly create your time series plots. The fastest method is described here: 1. Select columns “Sim_Time” and “Discharge” by clicking on the labels at the top (hold the CTRL key to select the second column). 2. Click on the Chart Wizard icon, in the Excel toolbar, or choose Chart from Excel’s Insert menu. 3. In the dialog that follows, select “XY (Scatter) as chart type. Choose a subtype and click “Next.” 4. Edit chart options or press “Finish” to see your chart. Chapter 7 Performing Channel Flow Analysis 117 Note that CCHE1D does not impose any limitation on the creation of charts. You have the choice of plotting different variables in the same chart, or time instances of the same variable along the profile, for any range you choose. You can also combine results from different worksheets, simply by selecting the desired worksheet when specifying plot ranges. You can also combine different data sets by importing worksheets from another workbook. You can use Excel’s on-line help to get more information on charts, or you can refer to one of the many books on the subject to get familiar with all the possibilities Excel offers. CHAPTER 8 Support for Watershed Analysis This chapter discusses some features inside CCHE1D that support watershed simulations. Watershed models such as SWAT or AGNPS can be used to compute surface runoffs that are employed as boundary conditions for the CCHE1D channel analysis model. The watershed models are not distributed with CCHE1D. You must have Blackland GRASS and SWAT installed on your computer to use some features of this chapter. Newer versions of CCHE1D can directly use the output of AGNPS as boundary conditions. Contents Introduction SWAT Watershed Model Checking SWAT-GRASS settings Starting SWAT-GRASS Simulating Watershed Processes Chapter 8 Support for Watershed Analysis 119 Introduction Early versions of this modeling system envisaged a tight integration with watershed modeling, which would include a common interface from which the whole procedure could be managed. Some tools were built into CCHE1D as an initial step toward that goal. Recently, the Landscape Analysis part of the CCHE1D was updated to improve compatibility for those users who elect the watershed model AGNPS as their watershed-modeling tool. Newer versions of CCHE1D are capable of importing results from AGNPS directly. SWAT Watershed Model SWAT – Soil and Water Assessment Tool, is a comprehensive modeling system for the computation of water, sediment and pollutant runoffs from primarily agricultural watersheds. Support for SWAT was included in CCHE1D version 2.0. However, these tools were designed to work with an older interface for the SWAT model, which was based on GRASS GIS. More recently, a modern and powerful graphical interface for SWAT has been developed, and users should give preference to that tool. In order to use SWAT simulation results with CCHE1D, you must convert the output results to one of the data formats supported by CCHE1D. Currently, there is no conversion utility to perform this task automatically; therefore, familiarity with both SWAT and CCHE1D is required in order to perform this task. Although somewhat outdated, the functionality of this section is still present in CCHE1D. SWAT can be used along with the CCHE1D environment to simulate rainfall-runoff and erosion processes. SWAT can estimate water and sediment runoffs for each natural subwatershed, as defined by the Landscape Analysis programs described in Chapter 4. These values are in turn used as boundary conditions for the numerical simulation of in-channel transport and erosion–deposition phenomena. SWAT utilizes a GIS interface to infer a large number of properties for each of the subwatersheds. Currently, GRASS GIS is necessary for these operations. CCHE1D integrates SWAT into its system by providing means of starting the SWAT-GRASS GIS interface, and transferring data available to CCHE1D to that program, simplifying its use. CCHE1D cannot provide all the necessary data for the SWAT watershed simulation. You must provide what CCHE1D cannot supply. In addition, you must be familiar with SWAT and its GRASS interface in order to perform the watershed simulations. Chapter 8 Support for Watershed Analysis 120 This section assumes you are familiar with the SWAT-GRASS interface. For information on SWAT-GRASS programs and documentation, contact the Texas Agricultural Experiment Station, Blackland Research Center, Temple, Texas. On-line information is available at http://www.brc.tamus.edu/swat for SWAT, and http://brcsun15.tamu.edu/blgrass/ for Blackland GRASS. Checking SWAT-GRASS settings CCHE1D provides a simple mechanism to check if the SWAT-GRASS settings are compatible with the settings stored by CCHE1D. CCHE1D attempts to automatically transfer data to the SWAT-GRASS system, in order to facilitate starting the watershed simulation process. Similar to CCHE1D, SWAT and GRASS require the data for a simulation to be stored into a pre-defined directory structure. Those programs will search for data that is stored at that specific location. You must specify those storage directories from the SWAT-GRASS interface. CCHE1D can inquire and find out what those settings are. You will know, from the CCHE1D interface, if your SWAT-GRASS settings are compatible with your current CCHE1D settings. CCHE1D will not attempt to modify these settings, since they may affect the correct operation of the SWATGRASS system. After the completion of the Landscape Analysis section, open the Extracted Network n: Subwatersheds window. Use the Grass Database Defaults option of the Watershed menu. You will see a report containing the values of SWAT-GRASS default location variables. If values are not available, you may not have SWAT-GRASS installed correctly on your system. Try to start the Blackland GRASS interface and then set the variables according to the instructions for SWAT-GRASS, then try again. This option should display the contents of the following GRASS variables: GISBase, GISDBase, Location, Mapset. Important: In order to start a simulation with SWAT-GRASS, you must first use that program to define the Location and Mapset variables, which contain the physical location where the new data will be stored. CCHE1D will use these settings to export data to the SWAT-GRASS system. The Grass Database Defaults option is provided as a convenient means for checking the GRASS variables. You cannot modify SWAT-GRASS setting from the CCHE1D interface. Chapter 8 Support for Watershed Analysis 121 Starting SWAT-GRASS The first time you want to start SWAT-GRASS for a watershed simulation, you must do it outside the CCHE1D interface. Please verify the documentation on SWAT-GRASS, and initialize the system by defining the Database Default values, using the GRASS interface. Having the default location variables defined in the SWAT-GRASS program, you can use CCHE1D to prepare the SWAT simulation for you. 1. Check if the SWAT-GRASS variables are correct, using the Grass Database Defaults option of the Watershed menu. 2. Use Run SWAT option to start Blackland GRASS, and follow the instructions. Depending on whether it is the first time you try to start SWAT, CCHE1D will try to export data already available to the SWAT-GRASS system. Currently, CCHE1D exports the Digital Elevation Model (DEM), and the Subwatershed raster map. CCHE1D also inquires about Soil and Land Use raster maps. CCHE1D will try to move the maps to the required locations. Currently, the CCHE1D to SWAT export functions require that all data be available in GRASS ASCII format. Future versions will support the conversion from additional formats. 3. When the SWAT-GRASS interface appears, open a shell window, using the SWAT Shell option from the SWAT menu of the SWAT-GRASS program. 4. In the window that appears, type c1dswat.bat. For the versions of SWAT-GRASS tested with CCHE1D, it is necessary to include the .bat extension when typing the command. The program c1dswat.bat should take care of importing the available data into SWAT-GRASS. Please use the GRASS functionality to verify if the imported data layers are available and correct. Note that the CCHE1D functionality that starts SWAT-GRASS is aimed at facilitating the data transfer process. You can use the SWAT-GRASS system independently of the CCHE1D interface. Simulating Watershed Processes For the simulation of watershed processes using SWAT, please refer to the “SWAT/GRASS Interface Users Manual” (Srinivasan et al., 1996). SWAT requires a collection of raster maps, and additional data that is stored in a relational database and other data files. The simulation of watershed process is a complex, time-consuming procedure. The SWAT-GRASS interface tries to guide the modeler through the process Chapter 8 Support for Watershed Analysis 122 by outlining the main tasks and by using the GRASS GIS to provide spatial analysis capabilities. Currently, there is no ArcView interface for SWAT model. CCHE1D attempts to export the data available within the CCHE1D project, and then starts the SWAT interface developed for the GRASS GIS. Preparation of input data and control of the watershed model are performed exclusively by that interface. A new version of SWAT is being developed, which is able to export runoff data in the format employed by CCHE1D. Current public releases of SWAT do not contain the capability of directly exporting data to the CCHE1D channel models. Please contact the CCHE1D developers for the latest information. AGNPS Watershed Model At the time this manual was written, new tools for a better integration with AGNPS were being development. CCHE1D now uses a version of TOPAZ that is fully compatible with AGNPS, so that channel networks and subwatersheds created through the CCHE1D interface can be immediately used by the AGNPS programs. In addition, the CCHE1D channel network flow and sediment model is now able to directly import and convert the output of a AGNPS simulation, and use the computed water and sediment runoffs as boundary conditions for the channel simulation. The chapter, “Performing Channel Flow Analysis” discusses this option in more detail. APPENDIX A References Ackers, P. and White, W.R. (1973) Sediment transport: A new approach and analysis, J. of Hydraulics Division, ASCE, Vol. 99, No. Hy11, pp. 2041-2060. Armanini, A. and di Silvio, G. (1988) A one-dimensional model for the transport of a sediment mixture in non-equilibrium conditions, J. of Hydraulic Research, Vol. 26, No.3. Arnold, J.G., Allen, P.M., Bernhardt, G. (1993) A comprehensive surface-groundwater flow model, Journal of Hydrology, 142, 47–69. Engelund, F. and Hansen, E. (1967) A monogragh on sediment transport in alluvial streams. Teknisk Vorlag, Copenhagen, Denmark. Environmental Systems Research Institute, Inc., ESRI (1996a) Using ArcView GIS, ESRI, Redlands, California. Environmental Systems Research Institute, Inc., ESRI (1996b) Avenue. Customization and Application Development for ArcView, ESRI, Redlands, California. Garbrecht, J. and Martz, L.W. (1995) An automated digital landscape analysis tool for topographic evaluation, drainage identification, watershed segmentation and subcatchment parameterization, Report No. NAWQL 95-1, National Agricultural Water Quality Laboratory, USDA, Agricultural Research Service, Durant, Oklahoma. Komura, S. and Simmons, D.B. (1967) River-bed degradation below dams, J. Hydr. Div., ASCE, 93(4), pp. 1-13 Langendoen, E.J. (1996) Discretization diffusion wave model, Tech. Rep. No. CCHE-TR96-1, Center for Computational Hydroscience and Engineering, The University of Mississippi. Langendoen, E.J. (1997) DWAVNET: Modifications to Friction Slope Formulation and Solution Method, Tech. Rep. No. CCHE-TR-97-1, C Center for Computational Hydroscience and Engineering, The University of Mississippi. Appendix A References 124 Meyer-Peter, E. and Müller, R. (1948) Formulas for bed-load transport, Report on Second Meeting of IAHR, Stockholm, Sweden, 39-64. Srinivasan, R., Byars, B.W., Arnold, J.G (1996) SWAT/GRASS Interface Users Manual, version 96.2, Texas Agricultural Experiment Station, Blackland Research Center, Temple, Texas. Vieira, D.A., Langendoen, E.J., Bingner, R.L. (1997) FRAME – A Modeling Environment for Watershed Processes, In Proc. Conference on Management of Landscapes Disturbed by Channel Incision, Oxford, MS, 709-715. Vieira, D.A. (1997) FRAME – Control Module Technical Manual, Tech. Rep. No. CCHE-TR-97-7, National Center for Computational Hydroscience and Engineering, The University of Mississippi. Vieira, D.A., Langendoen, E.J., Bingner, R.L. (1998) The FRAME Project: Integrating Watershed and Channel Processes Modeling Using GIS Technology, In Proc. Eighteenth Annual ESRI’s User Conference, San Diego, CA, on CD-ROM. Vieira, D.A., Langendoen, E.J., Bingner, R.L. (1998) FRAME – An Integrated Modeling System of Channel and Landscape Processes, In Proc, First Interagency Hydrologic Modeling Conference, Las Vegas, NV. Vieira, D.A., Wu, W., Khan, A., and Wang, S.S.Y. (2000) Channel Network Routing of Flow and Sediment in Agricultural Watersheds, Watershed Management 2000, American Society of Civil Engineers, Reston, VA. Vieira, D.A., Wu, W., and Wang, S.S.Y. (2001) Modeling of Sedimentation Processes in Channel Networks, In Proc., 7th Federal Interagency Sedimentation Conference, Reno, NV, (accepted for publication). Wu, W. and Vieira, D.A. (2000) One-dimensional channel network model CCHE1D 2.0 – Technical manual, Tech. Rep. No. NCCHE-TR-2000-1, National Center for Computational Hydroscience and Engineering, The University of Mississippi. Wu, W., Vieira, D.A., and Wang S. S. Y. (2000) New capabilities of the CCHE1D Channel Network Model, In Proc. ASCE’s 2000 Joint Conference on Water Resources Engineering and Water Resources Planning and Management, Minneapolis, MN. Wu, W., Wang, S.S.-Y. and Jia, Y. (2000) Nonuniform Sediment Transport in Alluvial Rivers, accepted for publication by IAHR Journal of Hydraulic Research. Zhang, Y., Langendoen, E.J. (1998) An Introduction to BEAMS, Tech. Rep. No. CCHETR-98-2, Center for Computational Hydroscience and Engineering, The University of Mississippi. APPENDIX B Hydraulic Structure Input Data This appendix describes the data required for the modeling of hydraulic structures in a channel network. CCHE1D supports four types of structures: Bridge Crossings, Culverts, Drop Structures, and Measuring Flumes. This section explains how the physical characteristics of the structures are described in the model. It discusses the meaning of each property, and the selection of values for parameters and coefficients. Contents Bridge Crossings Culverts Drop Structures Measuring Flumes Appendix B Hydraulic Structure Input Data 126 Bridge Crossings Bridge Opening Bridge Pier 1 Side Slope Opening Invert Pier Width Opening Bottom Width The following are the required entries to define the geometry of these types of structures: Upstream Bridge Invert: This entry specifies the elevation of the channel invert at the upstream side of the bridge. Bridge pier loss coefficient: This entry specifies the drag coefficient to be used in calculating pier losses in the momentum equations. The following pier loss drag coefficients can be used: Square piers 2.00 Semi-circular piers 1.33 Bridge pier shape coefficient: This entry specifies the pier shape coefficient, K, for use in Yarnell’s energy equation for Class A flow. Typical pier shape coefficients are given in the following table: Pier Description Semicircular nose and tail Twin-cylinder piers with diaphragm Twin-cylinder piers without diaphragm 90° triangular nose and tail Square nose and tail Illustration Pier Shape Coefficient 0.90 0.95 1.05 1.05 1.25 Appendix B Hydraulic Structure Input Data 127 Bridge opening side slopes: This entry is used to specify the side slopes of the trapezoidal channel under the bridge. It represents the number of horizontal units for each vertical unit in the channel side slope. Bridge opening bottom width: This entry specifies the total bottom width of bridge opening. Any bottom width obstructed by bridge piers should be included in this value. The pier width obstruction will be subtracted out during the analysis. Bridge pier width: This entry specifies the total width of obstructions (piers). NOTE: For better results, always supply the channel geometry at the computational nodes upstream and downstream of a hydraulic structure. Appendix B Hydraulic Structure Input Data 128 Culverts CCHE1D supports both pipe and box culverts. The following are the required entries to define the geometry of these types of structures: Number of culverts in a cross section: This data entry allows you to specify the number of identical culverts that exist at the cross-section. All culverts must be identical; they must have the same cross-sectional shape, upstream invert elevation, downstream invert elevation, roughness coefficient, and inlet shape. Length: The culvert length is measured along the centerline of the culvert. The culvert length is used to determine the slope of the culvert. Rise or diameter: This entry specifies the inside diameter of a pipe culvert, or the inside height of a box culvert. Span: Specifies the inside width of the box culvert. For a pipe culvert, this value corresponds to the inside diameter. Most box culverts have chamfered corners on the inside. These chamfers are ignored by the special culvert method in computing the cross sectional area of the culvert opening. Some manufacturers’ literature contains the true cross-sectional area of each size box culvert, considering the reduction in area caused by the chamfered corners. If you wish to consider the loss in area due to chamfers, then you should reduce the box culvert opening width. You should not reduce the box culvert height, because the program uses the culvert height to determine the submergence of the culvert inlet and outlet. Culvert Height Upstream, Downstream Culvert Invert Culvert Opening Width Box culvert cross-section Appendix B Hydraulic Structure Input Data 129 Pipe Culvert Diameter Upstream, Downstream Culvert Invert Pipe culvert cross-section Downstream invert: Specifies the culvert invert elevation at the downstream opening. Culverts with adverse (negative) slopes are not allowed. Therefore, the downstream invert elevation must be equal to, or less than, the upstream invert elevation. Upstream invert: Specifies the culvert invert elevation at the upstream opening. The upstream invert elevation must be equal to, or greater than, the downstream invert elevation. Downstream superelevation: This entry is the difference between the downstream culvert invert and the immediate thalweg elevation (see figure). Upstream superelevation: This entry is the difference between the upstream culvert invert and the immediate thalweg elevation (see figure). Surface roughness (Manning’s): Specifies the Manning’s roughness coefficient to be used in friction loss calculations. Entrance loss coefficient: Specifies the culvert entrance loss coefficient to be used to compute the head loss at the culvert entrance. NOTE: For better results, always supply the channel geometry at the computational nodes upstream and downstream of a hydraulic structure. Appendix B Hydraulic Structure Input Data 130 Upstream Culvert Invert Section View Downstream Culvert Invert Upstream Superelevation Downstream Superelevation Upstream Thalweg Downstream Thalweg Longitudinal View The following table lists some suggested values for culvert entrance loss coefficients. Type of Culvert and Design Entrance Reinforced Concrete Pipe Culvert Projecting from fill, socket pipe end Projecting from fill, square cut pipe end End-section conforming to fill slope Mitered to conform to fill slope Concrete Pipe with Headwall or Headwall and Wingwalls Socket end of pipe Rounded entrance Square cut end of pipe Corrugated Metal Pipe Headwall, square edge Headwall and wingwalls, square edge End-section conforming to fill slope Mitered to conform to fill slope Projecting from fill (no headwall) Box Culvert (headwall parallel to embankment-no wingwalls) Rounded edges Square edge on three edges Box Culvert (wingwalls at 30o to 75o to barrel) Rounded crown edge Square edge crown Box Culvert (wingwalls at 10o to 25o to barrel) ke 0.20 0.20 0.50 0.70 0.10 0.10 0.50 0.50 0.50 0.50 0.70 0.80 0.20 0.50 0.20 0.40 Appendix B Hydraulic Structure Input Data 131 Type of Culvert and Design Entrance ke Square edge crown Box Culvert (wingwalls parallel to culvert) Square edge crown 0.50 0.70 Entrance loss coefficients, ke, for pipe and box culverts (Bureau of Public Roads, 1958) Chart number and Scale number: These entries specify the chart number and scale number. The FHWA chart number and scale number refer to a series of nomographs published in 1965 by the Bureau of Public Roads (now called the Federal Highway Administration). These nomographs allowed the inlet control headwater to be computed for different types of culverts operating under a wide range of flow conditions. These nomographs, and others constructed using the original methods, were published in 1985 (FHWA, 1985). The following tables list the FHWA chart and scale numbers for pipe culverts and box culverts. For Pipe Culverts: Description Chart Number Scale Number Concrete Pipe Culvert Square edge entrance with headwall (see figure) 1 1 Groove end entrance with headwall (see figure) 1 2 1 3 Headwall (see figure) 2 1 Mitered to conform to slope (see figure) 2 2 Pipe projecting from fill (see figure) 2 3 3 1 3 2 Groove end entrance, pipe projecting from fill (see figure) Corrugated Metal Pipe Culvert Concrete Pipe Culvert, Beveled Ring Entrance Small bevel (see figure) b/D = 0.042 a/D = 0.063 c/D = 0.042 d/D = 0.083 Large bevel (see figure) b/D = 0.083 a/D = 0.125 Appendix B Hydraulic Structure Input Data 132 c/D = 0.042 d/D = 0.125 FHWA chart and scale numbers for pipe culverts (FHWA, 1985) Culvert inlet with headwall and wingwalls (FHWA Chart 1 and Chart 2) Culvert inlet mitered to conform to slope (FHWA Chart 2) Appendix B Hydraulic Structure Input Data Culvert inlet projecting from fill (FHWA Chart 1 and Chart 2) c b a D = diameter Culvert inlet with beveled ring entrance (FHWA Chart 3) d 133 Appendix B Hydraulic Structure Input Data 134 For Box Culverts: Description Box Culvert with Flared Wingwalls (see figure) Wingwalls flared 30o to 75o Wingwalls flared 90o to 15o Wingwalls not flared (sides extended straight) Box Culvert with Flared Wingwalls and Inlet Top Edge Bevel (see figures) Wingwall flared 45o, inlet top edge bevel = 0.43D Wingwall flared 18o to 33.7o, inlet top edge bevel = 0.083D Box Culvert, 90o Headwall, Chamfered or Beveled Inlet Edges (see figure) Inlet edges chamfered ¾ inch Inlet edges beveled ½ in/ft at 45o (1:1) Inlet edges beveled 1 in/ft at 33.7o (1:1.5) Box Culvert, Skewed Headwall, Chamfered or Beveled Inlet Edges (see figure) Headwall skewed 45o, inlet edges chamfered ¾ Inch Headwall skewed 30o, inlet edges chamfered ¾ Inch Headwall skewed 15o, inlet edges chamfered ¾ Inch Headwall skewed 15o to 45o, inlet edges beveled Box Culvert, Non-Offset Flared Wingwalls, ¾ Inch Chamfer at Top of Inlet (see figure) Wingwalls flared 45o (1:1), inlet not skewed Wingwalls flared 18.4o (3:1), inlet not skewed Wingwalls 18.4o (3:1), inlet skewed 30o Box Culvert, Offset Flared Wingwalls, Beveled Edge at Top of Inlet (see figure) Wingwalls flared 45o (1:1), inlet top edge bevel = 0.042D Chart Number Scale Number 8 8 8 1 2 3 9 1 9 2 10 10 10 1 2 3 11 1 11 2 11 3 11 4 12 12 12 1 2 3 13 1 Appendix B Hydraulic Structure Input Data Wingwalls flared 33.7o (1:5:1), inlet top edge bevel = 0.083D Wingwalls flared 18.4o (3:1), inlet top edge bevel = 0.083D 13 3 13 4 FHWA chart and scale numbers for box culverts (FHWA, 1985) Headwall Side Bevel, b Bevel Angle 90 degres B Plan view D/12 min. Section view Top Bevel, d Bevel Angle D Inlet side and top edge bevel with 90o headwall (FHWA Chart 10) Angle of wingwall flare Plan view of box culvert Flared wingwalls (FHWA Chart 8 and Chart 9) 135 Appendix B Hydraulic Structure Input Data D/12 min. Section view Top Bevel, d Bevel Angle D Inlet top edge bevel (FHWA Chart 9) Skew Angle Headwall B Plan view Side Bevel, b Inlet side and top edge bevel with skewed headwall (FHWA Chart 11) 136 Appendix B Hydraulic Structure Input Data 137 Flared Wingwall Equal Flare Angles B Plain view D/12 min. Section view D Non-offset flared wingwalls (FHWA Chart 12) Flared Wingwall Equal Flare Angles B Plain view Wingwall Offset D/12 min. Section view Top Bevel, d Bevel Angle D Offset flared wingwalls (FHWA Chart 13) NOTE: For better results, always supply the channel geometry at the computational nodes upstream and downstream of a hydraulic structure. Appendix B Hydraulic Structure Input Data 138 Drop Structures The following are the required entries to define the geometry of drop structures: Bottom Width: Specifies the bottom width of the drop structure. Loss Coefficient: A coefficient used to compute head losses at the drop structure. Length: The drop structure length is measured along the centerline of the structure. Side Slopes: This entry is used to specify the side slopes of the trapezoidal channel in the structure. It represents the number of horizontal units for each vertical unit in the structure side slope. Upstream Invert: This entry specifies the elevation of the channel invert at the entrance of the structure. NOTE: For better results, always supply the channel geometry at the computational nodes upstream and downstream of a hydraulic structure. Upstream invert 1 Side slope Bottom width Appendix B Hydraulic Structure Input Data 139 Measuring Flumes The following are the required entries to define the geometry of these types of structures: Surface Roughness: Specifies the Manning’s roughness coefficient to be used in friction loss calculations. Length: The measuring flume length is measured along the centerline of the structure. Compound Cross Section: This entry specifies if the measuring flume cross section is composed or not. Use 1 (one) for compound cross sections and 0 (zero) for triangular cross sections. Triangular Section Compound Section Upstream Invert Elevation: Specifies the invert elevation at the upstream end of the measuring flume. Measuring Section Elevation: Specifies the elevation of the flume invert at the measuring section. Downstream Superelevation: This entry is the difference between the downstream flume invert and the immediate thalweg elevation. Upstream Superelevation: This entry is the difference between the upstream measuring flume invert and the immediate thalweg elevation. Number of Segments in Rating Curve: Number of segments in the Discharge vs. Flow Depth curve. This entry must be a number between 1 and 4. For each measuring flume, a Discharge Vs Flow Depth Curve must be given. The curve is an exponential function of the form Error! Objects cannot be created from editing field codes. and may be split into up to four segments. For each segment in the Rating Curve the three parameters below must be provided: Break Point Depth: A depth that defines the ending point of a segment in the rating curve. Coefficient: Value of the coefficient in the exponential function. Exponent: Value of the exponent in the exponential function. Appendix B Hydraulic Structure Input Data 140 Discharge Q4 Q3 Q2 Q1 h1 h2 h3 h4 Depth h1 Break Point First Segment h2 Break Point Second Segment h3 Break Point Tird Segment h4 Break Point Fourth Segment Discharge vs. Flow Depth NOTE: For better results, always supply the channel geometry at the computational nodes upstream and downstream of a hydraulic structure. APPENDIX C Data File Formats This appendix describes the formats for the input files used by CCHE1D. Examples of these files are given in the distribution of the CCHE1D software. These files are used to help the user provide input data for the model. All files described here are imported via the CCHE1D ArcView interface. Contents Digital Elevation Model Files Cross Section Geometry Files Bed Sediment Files Bank Sediment Files Sediment Classes Definition Files Hydraulic Structures Files Boundary Conditions Files Baseflow Files Colormap Files Appendix C Data File Formats 142 Digital Elevation Model Files ArcInfo ASCII Grid GIS files can be created using the GIS software ArcInfo or ArcView, which can convert the data from files in other formats such as the USGS DEM file. In ArcInfo, use the GRIDASCII command to export the grid to an ASCII file. In ArcView, use the Export Grids Option in the File Menu. You can also create this type of file using a text editor, following the specifications below. The ASCII Grid files are composed of two parts: the header and the cell values. The header has the following parameters that can be written in any order: ncols: Total number of columns in the DEM. nrows: Total number of rows in the DEM. xllcorner: East-West coordinate for the lower left corner of the DEM. yllcorner: North-South coordinate for the lowest left corner of the DEM. cellsize: Size of the DEM cell. nodata_value: The value assigned to cells for which there is no data available. The cell elevation values are written immediately after the header. The values are given in a row-oriented fashion starting from the upper left corner cell. The elevation values are integer numbers separated by spaces or the end-ofline characters. The following is an example of a DEM in ArcInfo ASCII Grid format: ncols 4 nrows 5 xxllcorner 231435 yyllcorner 3790995 cellsize 30 nodata_value –9999 100 105 110 96 98 100 104 98 98 102 102 99 102 103 104 102 100 99 101 101 IMPORTANT: The CCHE1D 2.0 releases of August 2000 or earlier require DEM files be written with a single elevation value per line, due to programmatic restraints of the program frmxtr. Newer versions do not have this limitation. Appendix C Data File Formats 143 GRASS ASCII Grid DEM files can also be manipulated using the public domain GRASS GIS. Raster files can be exported with the command r.out.ascii to create a text file. The ASCII file contains a header and the cell values. The header has the following parameters that can be written in any order: north: North edge of the DEM south: South edge east: East edge west: West edge cols: Number of columns in the DEM. rows: Number of rows in the DEM. The cell elevation values are written immediately after the header. The values are given in a row-oriented fashion starting from the upper left corner cell. The elevation values are integer numbers separated by spaces or the end-ofline characters. The following is an example of a DEM in ArcInfo ASCII Grid format: north: 3797055.00 south: 3790995.00 east: 240675.00 west: 231435.00 rows: 202 cols: 308 100 105 110 96 98 100 104 98 98 102 102 99 ......... ......... “RAW” ASCII Grid The RAW ASCII grid format was implemented in CCHE1D to directly support the format for input of DEMs to the model TOPAZ. It consists of a text file containing an array of elevation values, row-first order, written as one value of elevation per line starting at the top left corner (Northwest). There is no header information, but you will be prompt to provide some data about the DEM. Appendix C Data File Formats 144 Cross Section Files CCHE1D Version 3.0 introduced a new, more general system for the definition of channel cross sections, in which a variable number of points can be used to provide a more detailed cross sectional shape. Cross section data can be input in a single or multiple data files, which are imported into CCHE1D from its Avenue interface. CCHE1D channel cross-sections are subdivided into a main channel and two optional floodplains. Channel roughness is specified via Manning’s coefficients, with values that can vary within each of the subdivisions. The cross sectional shape is given by a series of points which define a position coordinate and the channel bed elevation. In future versions, CCHE1D will support a variety of data formats, but the current version implements only the “WZ” type, in which points are defined by a distance across the channel (considered normal to the flow) and by a elevation value. Regardless of input file type, CCHE1D requires that the Source Nodes, the End of Link Nodes and the Junction Nodes of the channel network have cross section data defined by the user. Cross section data for internal nodes are either defined by the user or automatically defined by CCHE1D through interpolation. Cross section files usually have the extension .cs, although the use of such extension is not required. WZ Type Cross sections are defined by a number of points with known distances from a local reference and known elevations. The user must also specify which points separate the channel bed from its banks (Bank Toe points), and what are the flood plains edges (Overbank points). The figure below illustrates the cross section definition for CCHE1D. Left flood plain Right flood plain ∆xj LFP edge RFP edge nj j Left bank toe j+1 Main channel Right bank toe Appendix C Data File Formats 145 Cross section point distances start from the left bank or floodplain. All distances must be in meters. Overbank and Bank Toe points are defined as indices, considering the left-most point as index 1. In the previous figure, four points that define the cross section shape would have the following indices: Left overbank point (left floodplain edge): 6; Left bank toe point: 8; Right bank toe point: 13; Right overbank (right floodplain edge): 15. The total number of point in the example above is 20. NOTE 1: Although a large number of points could be used in defining the cross sectional geometry, it is recommended that the user do not use more than 20 points per cross-section. This number should be sufficient to define the main geometric features, and the use of more points will considerably increase the computational time, without increasing the quality of the simulation. NOTE 2: Because of the current bed stability algorithms implemented into CCHE1D, it is not recommended that many points be added at the channel banks (between the overbank and bank toe points). A single extra point near the middle of the channel bank should suffice. Complex bank shapes, with multiple slopes, can degrade the quality of the bank stability analysis. File Format Although the cross section file format has been designed to be flexible and convenient, it is not a free-format file, and the user should carefully follow the specification given in this section. Use spaces to separate the several fields. There is no rigid definition for column widths, so the number of spaces used as separation is not relevant. The number of entries per line must be obeyed. If a required number is missing, or if there are extra data, errors will occur when the file is imported by CCHE1D. You can insert comment lines at the beginning of the file, or in between data sets. Blank lines are also accepted. You can also add comments at the end of data lines. Comments must start with the characters “#” or “!” The first non-comment entry in the WZ cross section file must be the identifying tag: CROSS SECTION BY NODES that identifies the file as a cross section file. This string is not case-sensitive. Appendix C Data File Formats 146 The second entry must be the file type identifier: WZ After that, any number of cross sections can entered in the file. Note that is not necessary to explicitly specify the number of cross sections the file contains. Each cross section data record should be written in the following format. Node Number Channel Reach Length Number of Points in Cross Section Index of Left Overbank Index of Left Bank Toe Index of Right Bank Toe W-Coordinate Z-Coordinate Manning’s Roughness Flow Blockage Flag --- --- --- --- --- --- --- --- W-Coordinate Z-Coordinate Manning’s Roughness Flow Blockage Flag (point 1) (point N) Index of Right Overbank Each set of data for each cross section must be written in N+2 data lines, where N is the total number of points in the current cross section. The first line contains the Node Number and the length of the channel reach immediately downstream of this section. The node number is used to assign this data set to a certain node in the channel network. See the User Manual for the explanation on the distinction between “Node Numbers” and “Node ID Codes” before importing a cross section file. In You must have the channel network already defined before you define this value. If Channel Reach Length is given as 0.00 (zero), the channel reach length will be that determined by the CCHE1D interface when the channel network was created. Use this entry to override values determined by the interface (from graphics or from the DEM). You can specify measured reach length values, which should be more accurate than those obtained by the CCHE1D interface. The second line contains the five numbers. The first number is the number of points in the current cross section. The remaining are the indices that give the location of the Overbank and Bank Toe points that define the three regions of the cross section. These values should be carefully specified so that the correct cross section shape is used by the model. A number of lines equal to the number of cross section points specified in line 2 should follow. Each of these lines should contain four numbers, which are the distance across the channel, the elevation, a Manning’s roughness coefficient for the segment to the right of the current point, and a flow blockage flag. Appendix C Data File Formats 147 The flow blockage flag must be the integer numbers 1 or 0. The number 1 indicates flow is allowed in the segment to the immediate right of the current point. If the value 0 is used the flow model will not allow flow through that part of the cross section. Negative values can be used for cross-section coordinates, and the cross section records do not have to be in any particular order. However, the node numbers must be present in the channel network. Spaces should be used to separate numbers. The number of spaces between numbers is irrelevant. Appendix C Data File Formats 148 Bed Sediment Files CCHE1D provides an alternative method for entry of bed sediment data: you can prepare a file with the bed sediment data for the channel network, instead of using the GUI tools. A variable file format allows you to specify the data without having to create a large data file with a text editor. CCHE1D 3.0 does not currently support dbf files for bed sediment data, which will be reintroduced later. Bed Sediment files usually have the extension .sb, although the use of such extension is not required. The Bed Sediment ASCII file was designed to offer flexibility. There are two variants of the same file, which are identified by certain keywords. The format for these files is flexible, but they are not free-format files. You can enter comment lines by placing either a # or a ! at the beginning of the line. In addition, at any data line, everything following these special characters is considered a comment. Blank lines are also disregarded. Spatially Constant Distribution You can specify a single set of properties, and CCHE1D will assign this set of properties to all nodes of the channel network. The file must contain the tag BED SEDIMENT as its first non-comment entry. The second non-comment line must contain the tag SPATIALLY CONSTANT The third non-comment line must be the number of sediment size classes. This number must match the number of size classes defined in the Sediment Size Classes Definition file. BED SEDIMENT SPATIALLY CONSTANT No. SIZE CLASSES Cross Section Type Bed_Porosity Fraction Class 1 Fraction Class 1 Fraction Class 1 Non-Erodibility_Flag Fraction Class 2 Fraction Class 2 Fraction Class 2 Max_Erosion_Depth ------------------- Fraction Class N Fraction Class N Fraction Class N The Cross Section Type indicates the type of geometry, and it is a string that can assume of the values: MC – Main Channel Only; MCLF – Main Channel and Left Floodplain; MCRF – Main Channel and Right Floodplain; Appendix C Data File Formats 149 MCLFRF or MCRFLF – Main Channel, Left and Right Floodplains. Bed Porosity is given in non-dimensional form. The Non-Erodibility Flag is used to suppress erosion for a certain cross section. A value of 1 indicates the cross section is erodible. Use 0 (zero) if the cross section is of rigid bed. The Maximum Erosion Depth allows the specification of a non-erodible sub-surface. It is given as a distance relative to the initial channel bed, and it represents the maximum erosion depth allowed below the initial thalweg elevation. Use a large number for unlimited erosion. The last three lines are the sediment size fractions for the Main Channel, Left Floodplain, and Right Floodplain. Note that the last two lines should be present according to the cross section type defined in the fourth line. Spatially Varied Distribution If the bed sediment properties vary across the channel network, you can use the “SPATIALLY VARIED” version. In this variant form, data are specified for nodal points. You do not have to specify properties for all nodes in the network. However, you are required to specify properties for nodes of type: Source (code 0) Junctions (code 2) End of Channels (code 3) The format is similar to the Spatially Constant version, except several sets of bed properties are specified, with node number preceding each set. The following is the data file format specification. The first three non-comment lines should contain the identifying tags and the number of sediment size classes used in this file, which should match the number defined in the Sediment Size Classes Definition file. BED SEDIMENT SPATIALLY VARIED Number of Size Classes For each cross section: Node Number Bed_Porosity Fraction Class 1 Fraction Class 1 Fraction Class 1 Cross Section Type Non-Erodibility_Flag Fraction Class 2 Fraction Class 2 Fraction Class 2 Max_Erosion_Depth ------------------- Fraction Class N Fraction Class N Fraction Class N Appendix C Data File Formats 150 Please see the section on the Spatially Constant Bed Sediment file for explanation on each entry of this file. Below is an excerpt of a Bed Sediment file, spatially varied, with cross sections without floodplains. # # # # # # # # # # GOODWIN CREEK WATERSHED BED SEDIMENT DATA STANDARD 9 SEDIMENT SIZE CLASSES CHANNEL NETWORK: CCHE1D 3.0, 81 NODES, 136 SUBWATERSHEDS MODIFIED FROM VERSION 2.0, REVISED SEP 2000 OCTOBER 2000 CONVERTED TO VERSION 3.0 FORMAT; AUGUST 2001 # FILE IDENTIFIERS: BED SEDIMENT SPATIALLY VARIED ! Identifies file type (Do not modify this line) # Identifies spatial distribution of bed properties 9 ! Number of sediment size classes used 1 0.400 0.000 MC 1 0.000 !BED 10 – source 9999.990 0.041 0.232 0.083 0.064 0.094 0.252 0.234 0.400 0.000 MC 1 0.000 !BED 10 – end 9999.990 0.041 0.232 0.083 0.064 0.094 0.252 0.234 0.400 0.000 MC 1 0.000 !BED 10 – source 9999.990 0.041 0.232 0.083 0.064 0.094 0.252 0.234 0.400 0.000 MC 1 0.000 !BED 10 – end 9999.990 0.041 0.232 0.083 0.064 0.094 0.252 0.234 0.400 0.000 MC 1 0.000 !BED 14 – source 9999.990 0.025 0.226 0.100 0.064 0.098 0.251 0.236 3 4 5 6 Appendix C Data File Formats 151 Bank Sediment Files CCHE1D provides a flexible data format for the supply of Bank Sediment properties. Bank sediment data are easily specified using one of the four variants of ASCII files CCHE1D supports. Similar to the Bed Sediment data, you can specify a single set that will be applied to all nodes, or you can provide data on a node-to-node basis. There is the additional option of determining if the properties of the left and right channel banks differ or not. The format for these files is flexible, but they are not free-format files. You can enter comment lines by placing either a # or a ! at the beginning of the line. In addition, at any data line, everything following these special characters is considered a comment. Blank lines are also disregarded. Spatially Constant Distribution The first non-blank, non-comment line must be the file identifier BANK SEDIMENT If you want to specify the same set of parameters for all nodes, specify SPATIALLY CONSTANT as the second non-comment line in the data file. The third non-comment data line must have either of the following characters: BANKS EQUAL or BANKS DIFFER If you choose BANKS EQUAL, the set will have parameters that are valid for both banks. If you use “BANKS DIFFER” the set will have separate entries for the left and right channel banks. The fourth data line must contain the number of sediment size classes used to describe the sediment size composition, and it must match the value defined in the Sediment Size Classes Definition file. Bank sediment data are then given in two data lines if BANKS EQUAL has been specified. The properties will be applied to both the left and right banks. If BANKS DIFFER has been specified, four lines of data are necessary. The first two lines are the properties for the left bank, while the remaining lines describe the bank in the right-hand side of the channel. In summary, the data file should have the following format: Appendix C Data File Formats 152 BANK SEDIMENT SPATIALLY CONSTANT BANKS EQUAL or BANKS DIFFER Number of Size Classes Bulk Density Critical Shear Stress Porosity Shear Stress Coefficient Cohesion Friction Angle Fraction 1 Fraction Class 2 --- --- --- Fraction Class N Class where: Bulk Density indicates the bank sediment Bulk Density, Critical Shear Stress indicates the Critical Shear Stress applied to bank erosion, Porosity indicates the bank material porosity, Shear Stress Coefficient indicates the Shear Stress Coefficient, Cohesion indicates the Cohesion Coefficient, Friction Angle indicates the Friction Angle Coefficient, and Fraction Class 1 to Fraction Class 9 are percent fractions for each of the sediment classes. Spatially Varied Distribution If the bank sediment properties vary across the channel network, you can use the “SPATIALLY VARIED” keyword and provide data for several nodes in the network. You are not required to provide data for all nodes, but you must enter data for all nodes of type: Source (code 0) Junctions (code 2) End of Channels (code 3) The format is similar to the Spatially Constant version, except several sets of bank properties are specified, with node number preceding each set. The general file format in the following page. Appendix C Data File Formats 153 BANK SEDIMENT SPATIALLY CONSTANT BANKS EQUAL or BANKS DIFFER Number of Size Classes Node Number Bulk Density Critical Shear Stress Porosity Shear Stress Coefficient Cohesion Friction Angle Fraction 1 Fraction Class 2 --- --- --- Fraction Class N Class An excerpt of the data file for Goodwin Creek, distributed with CCHE1D, which uses the keyword “BANKS EQUAL” is given below as an example. This file is distributed with CCHE1D, and should be in the tutorial directory of the program distribution. # # # # # # # # # # GOODWIN CREEK WATERSHED BED SEDIMENT DATA STANDARD 9 SEDIMENT SIZE CLASSES CHANNEL NETWORK: CCHE1D 3.0, 81 NODES, 136 SUBWATERSHEDS MODIFIED FROM VERSION 2.0, REVISED SEP 2000 OCTOBER 2000 CONVERTED TO VERSION 3.0 FORMAT; AUGUST 2001 # FILE IDENTIFIERS: # Properties Vary from node to node; # Properties for Right and Left Banks are the same: BANK SEDIMENT SPATIALLY VARIED BANKS EQUAL 9 !File Type Identifier !Properties vary from node to node !Left and Right Banks share the same properties !Number of sediment size classes 1 2000.0 4.50 0.42 1.10 32000.0 20.0 0.391 0.211 0.177 0.160 0.018 0.027 0.015 0.001 0.000 3 2000.0 4.50 0.42 1.10 32000.0 20.0 0.391 0.211 0.177 0.160 0.018 0.027 0.015 0.001 0.000 4 2000.0 4.50 0.42 1.10 32000.0 20.0 0.391 0.211 0.177 0.160 0.018 0.027 0.015 0.001 0.000 5 2000.0 4.50 0.42 1.10 32000.0 20.0 0.391 0.211 0.177 0.160 0.018 0.027 0.015 0.001 0.000 6 2000.0 4.50 0.42 1.10 32000.0 20.0 0.391 0.211 0.177 0.160 0.018 0.027 0.015 0.001 0.000 Appendix C Data File Formats 154 Sediment Size Classes Definition Files The Sediment Classes Definition Table (SD) must be provided by the modeler. It contains the definition of the variable number of sediment classes used by CCHE1D. The number of size classes must match the number of size fractions specified in the Bank and Bed Sediment Tables. The Sediment Classes Definition file usually uses the extension .sd, although the use of the extension in the file name is not required. You can enter comment lines by placing either a # or a ! at the beginning of the line. In addition, at any data line, everything following these special characters is considered a comment. Blank lines are also disregarded. The first, non-blank, non-comment line must be the tag SEDIMENT CLASS DEFINITION For each sediment size class, a line must be entered containing the Representative Diameter, the Lower Limit Diameter, the Upper Limit Diameter, and the Specific Gravity for each sediment size class. CCHE1D will define a sediment size class for each line present in this file. Note that all bed and bank sediment data must be provided according to the number of classes defined in this file. The general format of this file is: SEDIMENT CLASS DEFINITION Representative Diameter Lower Limit Diameter Upper Limit Diameter Specific Gravity Note that all diameters should be given in millimeters. Below is an example of a sediment class definition file that uses 9 classes. # # # # # # # # GOODWIN CREEK WATERSHED SEDIMENT SIZE CLASSES DEFINITION This file defines 9 size classes, which are based on those originally used by the SEDTRA module of CCHE1D SEDIMENT CLASS DEFINITION # Repres_Diam 0.0160 0.0400 0.1270 0.4580 1.2970 2.8280 5.6570 13.4540 33.3630 Lower_Limit 0.0100 0.0250 0.0650 0.2500 0.8410 2.0000 4.0000 8.0000 22.6270 ! String that identifies file type Upper_Limit 0.0250 0.0650 0.2500 0.8410 2.0000 4.0000 8.0000 22.6270 50.0000 Spec_Gravity 2.6500 2.6500 2.6500 2.6500 2.6500 2.6500 2.6500 2.6500 2.6500 #---------------------- End of File ------------------------------ Appendix C Data File Formats 155 Hydraulic Structures Files The Hydraulic Structure File is used to supply data for several structures, in a manner similar to the cross section geometry and sediment data files. Otherwise, it may be easier to use the Add Structure tool of the graphical user interface. In this file, the user can specify data for the four different types of structures supported by CCHE1D: bridge crossings, culverts, drop structures and measuring flumes. The Hydraulic Structures File is in ASCII format. The order of the structures in the input file is not important. See the Appendix B for a complete description of the required data for each structure, the meaning of each property and values for parameters and coefficients. The following is an example of a Hydraulic Structure File: 2 !----> Total Number of hydraulic structures ! ! ! HYDRAULIC STRUCTURES DATA FILE REVISED: September, 1997 THIS FILE: November 20, 1997 ! ! ! ! ! ! THIS IS NOT A FREE-FORMAT FILE. FIRST LINE OF THIS FILE MUST CONTAIN THE TOTAL NUMBER OF HYDRAULIC STRUCTURES COMMENTS START WITH AN EXCLAMATION MARK, BLANK LINES ARE ALLOWED NO COMMENT OR BLANK LINES ALLOWED WITHIN DATA ENTRIES OF THE SAME STRUCTURE STRUCTURE DATA ENTRIES MUST BE IN THE CORRECT ORDER ! TEMPLATE FOR BRIDGE CROSSINGS ! ============================= ! ! ! ! ! ! ! ! ! ! BRIDGE No. X - COMMENTS bridgecrossing !Structure Type xxxxxx.xx !X-Coordinate xxxxxxx.xx !Y-Coordinate xx.xx !Upstream bridge invert x.xx !Bridge pier loss coefficient x.xx !Bridge pier shape coefficient x.xx !Bridge opening side slopes x.xx !Bridge opening bottom width x.xx !Bridge pier width ! TEMPLATE FOR DROP STRUCTURES ! ============================ ! ! ! ! ! ! ! ! ! DROP STRUCTURE No. 1 - COMMENTS dropstructure !Structure Type xxxxxx.xx !X-Coordinate [ST_XC] xxxxxxx.xx !Y-Coordinate [ST_YC] xx.xx !Drop Structure Bottom Width [DR_DRBW] x.xx !Drop Structure Loss Coefficient [DR_DRLC] x.xx !Drop Structure Length [DR_DRLN] x.xx !Drop Structure Side Slopes [DR_DRSS] xx.xx !Drop Structure Upstream Invert [DR_ELDIU] ! CULVERTS Appendix C Data File Formats ! ======== ! CULVERT No. 1 - NEAR STATION 6 culvert !Structure Type 236640.00 !X-Coordinate 3795720.00 !Y-Coordinate 8 !Chart number 1 !Scale number 0.25 !Entrance loss coefficient 0.012 !Surface roughness (Manning's) 1 !Number of culverts in a cross section 24.84 !Length of culvert 2.44 !Rise or diameter of culvert 1.83 !Span of culvert 90.15 !Downstream culvert invert 90.30 !Upstream culvert invert 0.15 !Downstream superelevation 0.15 !Upstream superelevation ! MEASURING FLUMES ! ================ ! MEASURING FLUME No. 1 - At the waterhsed outlet measuringflume !Structure Type 231600.00 !X-Coordinate [ST_XC] 3791700.00 !Y-Coordinate [ST_YC] 4 !Number of segments in rating curve [MF_NOSG] 0.055 !Break point 1st segment [MF_BPQH1] 35.749 !Coefficient 1st segment [MF_CFQH1] 2.583 !Exponent 1st segment [MF_EXQH1] 0.100 !Break point 2nd segment [MF_BPQH2] 23.000 !Coefficient 2nd segment [MF_CFQH2] 2.431 !Exponent 2nd segment [MF_EXQH2] 1.252 !Break point 3rd segment [MF_BPQH3] 16.886 !Coefficient 3rd segment [MF_CFQH3] 2.297 !Exponent 3rd segment [MF_EXQH3] 99.999 !Break point 4th segment [MF_BPQH4] 17.946 !Coefficient 4th segment [MF_CFQH4] 2.025 !Exponent 4th segment [MF_EXQH4] 0.012 !Surface Roughness (Manning's n) [MF_MANN] 8.5344 !Length of flume [MF_STATLN] 1 !Compound cross section [MF_ICMP] 67.0560 !Elevation upstream invert [MF_ELSIU] 66.8853 !Elevation measuring flume [MF_ZST] 0.00 !Downstream Superelevation [MF_SEDS] 1.00 !Upstream Superelevation [MF_SEUS] 156 Appendix C Data File Formats 157 Boundary Conditions Files Upstream Boundaries (Flow Discharges) CCHE1D provides two groups of data files for the supply of flow discharge boundary condition data, which translate into several types because of their flexible options. The flow and sediment transport models require the prescription of flow discharges and sediment loads at several nodes. You must specify these discharges and loads for all “source nodes”, that is, nodes at the beginning of every channel. You can also specify them for interior nodes, except for nodes at channel junctions and at hydraulic structures. Watershed-Oriented versus Node-Oriented The specification of boundary conditions can be either watershed-oriented or node-oriented. The watershed-oriented approach is useful if the boundary conditions come from a rainfall-runoff simulation. Usually the watershed model estimates daily triangular hydrographs as well as sediment loads from a storm event for each subwatershed. CCHE1D can assign the outflow of the several subwatersheds to the corresponding nodes in the channel network. CCHE1D combines several hydrographs if more than one subwatershed contributes to a certain node. CCHE1D also distribute the outflow among several nodes, in case of long subwatersheds that are drained by a channel present in the channel network. CCHE1D defines Incremental Areas for each subwatershed, based on the position of the computational nodes along the channel that drains the subwatershed in question. In the node-oriented approach, the boundary conditions data are directly referenced to nodes in the channel network. This approach is more convenient for simpler channel networks, or when the information comes from field measurements or other hydrologic method. In this approach, the user-given values are directly enforced to nodes in the network. You can see the section “How to create a boundary conditions file” in this chapter for more information on how the CCHE1D node numbering system works. Triangular Hydrographs versus Time Series The CCHE1D channel network model requires that the boundary conditions (flow discharge at upstream ends and water level at the watershed outlet) be known at any time instance of the simulation. For that purpose, CCHE1D supports two methods for the specification of time-dependent discharges: triangular hydrographs and time series. Triangular Hydrographs assumes the discharge at a certain location varies linearly with time. A typical flood hydrograph is described by a “Base Flow Discharge” and a “Peak Discharge,” both in cubic meters per second. The Appendix C Data File Formats 158 Discharge specification also requires a Time to Peak Discharge, and the Total Duration of the storm, both in hours. The figure below illustrates a typical triangular hydrograph. Peak Disch Base Flow Time to Peak Duration Time Discharge This format is useful if daily amounts must be converted to continuous hydrographs. The time series approach requires the specification of discharges at known time instances. Linear interpolation is used to determine the discharge value at any time. The figure below illustrates the approach. Q2 Q4 Q1 T1 T2 T3 T4 T3 Tn Time Appendix C Data File Formats 159 CCHE1D Data Files The current version of CCHE1D supports only text files (standard ASCII character set). File formats of version 1.0 (watershed-oriented, text and unformatted files) are no longer supported. Those formats were legacy of older versions of NCCHE models, and were too limited to be of practical use with newer versions of CCHE1D. The newer CCHE1D Upstream Boundary Conditions files (often identified by the extension .bc) can be a combination of the major file type groups described above. You can create input files of the following types: Triangular Hydrographs, Watershed-Oriented Triangular Hydrographs, Node-Oriented Time Series, Watershed-Oriented Time Series, Node-Oriented Triangular Hydrograph Files The triangular hydrograph discharge boundary condition file is composed of a header followed by blocks of water and sediment inflow data. Although the file format is flexible, it is not a free-format file. Data must be written according to these specifications. File lines are used as basis for the separation of entries. If the format requires all data to be input in a single line, do not split that line. Conversely, if a data element must appear in a new line, ensure there is a proper line separation. Although there are differences in the definition of line termination between Unix and Windows platforms, the user should not worry about that, provided file transfers between the two platforms perform the necessary conversions. CCHE1D accepts comment lines, which are identified by the ‘#’ character at the beginning of the line. Comments can added to any data line. The program ignores characters that follow the ‘#’sign. Blank lines are allowed. The Triangular Hydrograph file format is shown in the next page. The file header contains three required entries: File Type Code, File Subtype Code, and Number of Storm Events. The first two entries identify the type of file. A storm event is a collection of simultaneous hydrographs The highlighted data block in the diagram corresponds to each storm event, that is, the block is repeated for each storm event in the data file. Each storm event may have several hydrographs (time-dependent inflow at different points of the channel network). The minimum number of hydrographs in a “storm event” equals to the number of upstream open boundaries (source channels) in the channel network. The last line in the “storm event” data block is in fact a series of lines in the same format. Each line describes an inflow hydrograph at a certain location of the channel network. Appendix C Data File Formats 160 # Optional comment or blank lines File Type = 4 File Sub Type Number of Storm Events # Optional comment or blank lines Storm Year Storm Month Storm Day Storm Minute Storm Hour Storm Second Number of Inflow Points Number of Sediment Size Classes Time Unit Water Discharge Unit Sediment Load Unit Maximum Hydrograph Duration Reserved Entry Reserved Entry # Optional comment or blank lines Inflow point ID Base Flow Discharge Peak Discharge Time to Peak Duration Load Sediment Class 1 Load Sediment Class 2 .. Load Sediment Class N The first three entries should appear only once, at the beginning of the file. File Type: For Triangular Hydrograph files, File Type is an integer value set to 4. File Sub Type: An integer value that identifies if the file is WatershedOriented or Node-Oriented. File Sub Type is set to 1 if inflow discharges are given for Subwatersheds. File Sub Type is set to 2 if inflow is given for Node Numbers. Number of Storm Events: Indicates the number of storm events in the file. The boundary conditions file must contain a number of storm event datasets (surrounded by a thicker border in the diagram) that corresponds to this number. Each storm event has its own header. The following entries appear at the beginning of each storm event. Storm Year, Storm Month, Storm Day, Storm Hour, Storm Minute, Storm Second: Integers that define the date and time of each storm event. For inflow given as triangular hydrographs, hydrographs at all locations start simultaneously, and time is computed started at the date and time given. Number of Inflow Points: The number of inflow points given in the file, for the current storm event. Number of Sediment Size Classes: The number of sediment size classes used to describe the sediment load for the current storm event. Note Appendix C Data File Formats 161 that this number may be smaller than the number of size classes used in the computation. However, the class definitions must match so that sediment loads are correctly assigned as boundary conditions for the solution of the transport equation. If input for smaller diameter classes is zero, make sure to add 0.00 for each size classes without sediment load. Time Unit: Integer identifying the unit for time variables. For triangular hydrograph files it applies to the variables Time to Peak and Duration. The acceptable values are: 1 seconds 2 minutes 3 hours Discharge Unit: Integer that identifies the unit for water discharge variables. For triangular hydrographs it applies to Base Flow Discharge and Peak Discharge. 1 Cubic meters per second (m3/s) Water Sediment Load Unit: Integer that indicates the unit for sediment load. Currently, the only supported value is: 1 Kilograms (total mass for the triangular hydrograph) Maximum Hydrograph hydrographs. Set to 1. Duration: Not applicable for triangular Reserved Entry: Reserved for implementation. Set to 1. Hydrograph Records: Each storm event must contain a number triangular hydrographs that corresponds to the value given in the variable Number of Inflow Points. All data for a certain triangular hydrograph must be given in a single line. You cannot split the data into more than one line, or the file will not be read correctly. Each triangular hydrograph record contains the following variables: Integer that identifies either the node or the subwatershed to which the current hydrograph corresponds. If File Sub Type is 1, this variable should be a valid subwatershed number. If File Sub Type is 2, this entry should contain a node number. Inflow Point ID: Base Flow Discharge: Floating-point number that specifies the Base Flow Discharge, in water discharge units, of inflow to particular node or from a particular subwatershed. A value of 0.00 can be specified. Peak Discharge: Floating-point number that contains the peak discharge for the triangular hydrograph, in water discharge units. This value can be set to 0.00 to indicate there is no inflow that corresponds to the current node or watershed. Time to Peak: Floating-point number that indicates the time, in Time Units, for the occurrence of the Peak Discharge, from the beginning of the storm event. Appendix C Data File Formats 162 Duration: Floating-point number that contains the Duration of the hydrograph, in Time Units. Load Sediment Class 1: Floating-point number containing the total sediment load for the hydrograph, in Sediment Load Units, that corresponds to the sediment size class number one, used in the simulation. Use 0.00 if there is no inflow that corresponds to this class. Load Sediment Class N: Sediment load for sediment size class N, where N is the Number of Sediment Size Classes given in the header of the storm event. It may not be equal to the number of size classes used in the simulation. Note that if there is no inflow for Size Class Number 2, for example, you must enter 0.00 so that the sediment loads are not assigned in error. Input of the hydrograph sediment load CCHE1D allows you to specify sediment loads for any number of sediment classes. The sediment transport model converts the supplied mass in kilograms into discharges (mass fluxes) in cubic meters per second. However, each size class is defined according to the Sediment Size Classes Definition file. You are responsible for ensuring the sediment loads specified in these boundary condition files are compatible with the sediment size classes used by the model during the simulation. Time Series Hydrograph Files In situations where a watershed rainfall-runoff simulation was not carried out, or for simpler channel networks, or for situations where measure data are available, it may be more convenient to specify the inputs directly for each node. In the current version, time series hydrographs are only Node-Oriented. Watershed-oriented time series are not supported. Time-series boundary conditions files are essentially similar to the Triangular Hydrograph files described in the previous section. The following diagram describes the format of the file. Again, this file is not a free-format file, although it is flexible to allow for comment and blank lines. The first three entries should appear only once, at the beginning of the file. File Type: For Time Series files, File Type is an integer value set to 3. File Sub Type: An integer value stating the file is Node-Oriented. File Sub Type is always set to 2 for time series files (inflow discharges are given for computational nodes) Number of Storm Events: Indicates the number of storm events in the file. The boundary conditions file must contain a number of storm event datasets (surrounded by a thicker border in the diagram) that corresponds to this number. Appendix C Data File Formats 163 # Optional comment or blank lines File Type = 3 File Sub Type = 2 Number of Storm Events # Optional comment or blank lines Storm Year Storm Month Storm Day Storm Hour Storm Minute Storm Second Number of Inflow Points Number of Sediment Size Classes Time Unit Water Discharge Unit Sediment Load Unit Maximum Hydrograph Duration Reserved Entry Reserved Entry # Optional comment or blank lines Time 1 Node Number Water Discharge Load Sediment Class 1 Load Sediment Class 2 …. Load Sediment Class N Water Discharge Load Sediment Class 1 Load Sediment Class 2 …. Load Sediment Class N …… Time T Node Number Each storm event has its own header. The following entries appear at the beginning of each storm event. Storm Year, Storm Month, Storm Day, Storm Hour, Storm Minute, Storm Second: Integers that define the date and time of each storm event. This is the starting date for the simulation of the storm event. Number of Inflow Points: The number of inflow points given in the file, for the current storm event. Number of Sediment Size Classes: The number of sediment size classes used to describe the sediment load for the current storm event. Note that this number may be smaller than the number of size classes used in the computation. However, the class definitions must match so that sediment loads are correctly assigned as boundary conditions for the solution of the transport equation. If input for smaller diameter classes is zero, make sure to add 0.00 for each size classes without sediment load. Time Unit: Integer identifying the unit for time variables. For triangular hydrograph files it applies to the variables Time to Peak and Duration. The acceptable values are: 1 seconds 2 minutes Appendix C Data File Formats 3 164 hours Water Discharge Unit: Integer that identifies the unit for water discharge variables. For triangular hydrographs it applies to Base Flow Discharge and Peak Discharge. 1 cubic meters per second (m3/s) Sediment Discharge Unit: Integer that indicates the unit for sediment load. Currently, the only supported value is: 1 cubic meters per second (m3/s) 2 kilograms per second (kg/s) Maximum Hydrograph Duration: Contains the duration of the longest of the hydrograph in this storm event. This will be used to signal the end of input corresponding to a storm event and to compute the duration of the simulation to ensure the complete storm is routed through the channel network. Reserved Entry: Reserved for future implementation. Set to 1. Discharge Records: Each storm event contains sets of discharges that are made of a line containing a Time followed by Number of Inflow Points lines that contain water discharges and sediment loads at that time, for each of the inflow points. Note that you can have any number of time-discharges sets, but each set must contain the same number of inflow points. Use zeros if there is no inflow at a particular node. Inflow Load Sediment Class 1: Floating-point number containing the sediment load, in Sediment Load Units, that corresponds to the sediment size class number one, used in the simulation. Use 0.00 if there is no inflow that corresponds to this class. Load Sediment Class N: Sediment load for sediment size class N, where N is the Number of Sediment Size Classes given in the header of the storm event. It may not be equal to the number of size classes used in the simulation. Note that if there is no inflow for Size Class Number 2, for example, you must enter 0.00 so that the sediment loads are not assigned in error. How to create a boundary conditions file Creating a boundary conditions file for a channel network is not hard, since CCHE1D has all the necessary data organized into its database. Use the following procedure to gather the data about the channel network and the corresponding subwatersheds: 1. Locate, in the Channel Network window, all source nodes. You can use CCHE1D to add node numbers to the channel network map, or use any of ArcView’s standard features to query the database, join tables, create customized legends, etc. One of the easiest ways is to use the Identify tool Appendix C Data File Formats 165 . Zoom-in on the node of interest, select the tool, and click on the source node. Write down the values of the fields “Node ID” and “CCHE1D Node Number.” For example, for the first tributary near the watershed outlet, the source node has CCHE1D Node Number equal to 1, and the Node ID is also equal to 1. 2. Repeat step 1 for each source node, or any node for which you would like to specify inflow. 3. In the Project window, select the Database icon . Look for the table entitled “Channel Network #: Subwatershed Database Table,” then click the Open button. Look for the total number of records in this table, which can be seen in a data field in ArcView’s main menu, just below the line of buttons. The first number is the number of records currently selected, and the second number is the total number of records in the table, that is, the total number of subwatersheds. Write down that second number. 4. Click the name of the field “DS Nd ID” to select it. This column contains ID numbers for all nodes located at the outlets of subwatersheds. Click the Sort Ascending option in the Field menu, or use the corresponding button. Now you have the table sorted according to the node IDs that receive inflow for subwatersheds. 5. Locate node IDs in the “DS Nd ID” column that correspond to each node ID you wrote down in step 1. Note that for many nodes there is more than one record. Some nodes receive the contribution from more than one subwatershed, and each record (line) in the table represents a subwatershed. Write down the “CCHE1D No.” of these subwatersheds. For example, if for the Node ID equal to 1 you see two records, whose CCHE1D watershed numbers are 129 and 130, this means that the outflow of both subwatersheds are combined and prescribed as inflow at node 1 of the channel flow model. If you already have the inflow hydrograph at that location, you can prescribe it as the outflow of either watershed. Assuming you have the values for the triangular hydrographs (Base Flow, Peak Discharge, Duration, and Time to Peak Discharge), you are ready to create the Boundary Conditions File. Using any text editor, create a file according to the format given at the beginning of this section. Downstream Boundary (Downstream Stage File) CCHE1D requires that a value of water surface elevation (stage) be given at the downstream end of the channel network (the watershed outlet). There are several ways of providing this condition. The most convenient method is to let CCHE1D handle the downstream boundary using an automatic, non-reflective boundary condition. You can specify that in the graphical user interface. Appendix C Data File Formats 166 If a measuring flume is placed at the watershed outlet, CCHE1D will utilize its characteristics to determine the water level as a function of the current discharge. Downstream Stage Time Series In some cases, it is necessary to specify the water surface elevation as a function of time, according to known information. CCHE1D allows you to create a data file that contains a time series of water surface elevations. The Downstream Stage Time Series file can be used only in the simulation of single storm events. Multiple storm event simulations are not supported. The file Downstream Stage Time Series file must attend the following specification: # Optional comment or blank lines File Type Code = 1 Maximum duration # Optional comment or blank lines Simulation Time 1 Water Surface Elevation (Stage) ……… Simulation Time n Water Surface Elevation (Stage) File Type Code: an integer indicating the file type, always set to 1. Maximum Duration: Floating-point containing the maximum duration, in seconds, for which stage information is given. If the storm event is longer than the given maximum duration, the last provided value of stage is kept constant until the simulation ends. Simulation Time: Floating-point containing the simulation time, in seconds, for the current given stage. Water Surface Elevation (Stage): Floating point containing elevation value, in meters. Stage-Discharge Curve Another method for the specification of water stage at the watershed outlet consists in specifying a Stage-Discharge curve. During the simulation of a hydrograph, CCHE1D will enforce a water surface elevation as a function of the current discharge through the outlet boundary. You can construct a curve by specifying any number of pairs of stage-discharge values. The Stage-Discharge Curve file must attend the following specification: Appendix C Data File Formats 167 # Optional comment or blank lines Number of Stage-Discharge Points # Optional comment or blank lines Water Discharge Water Surface Elevation (Stage) ……… Water Discharge Water Surface Elevation (Stage) Number of Stage-Discharge Points: Integer indicating the number of Stage-Discharge points used to describe the rating curve. Water Discharge: Floating-point containing the water discharge, in cubic meters per second, for the current given stage. Water Surface Elevation (Stage): Floating point containing elevation value, in meters. Baseflow Files CCHE1D provides several methods for the definition of Baseflow, a small water discharge that is always maintained in the channels. One of the options consists in specifying base flow discharges for each of the channels of the network You can use the file described in this section to specify what is the baseflow discharge for each channel. You should give a discharge only for “Source Channels,” that is, channels that do not receive inflow from other tributaries. CCHE1D will compute the baseflow discharge for channels that have tributaries by accumulating the given discharges of the source channels. The channels are identified by the “Computational Sequence” number, found in the Channel Links Database Table, in the Database group. This way, the baseflow file can be used for different configurations of the Channel Network The following table describes the format for the baseflow file. Appendix C Data File Formats 168 # Optional comment or blank lines File Type Code = 1 Water Discharge Unit = 1 Number of Source Channels # Optional comment or blank lines Channel Number 1 Baseflow Discharge ……… Channel Number n Baseflow Discharge File Type Code: an integer always set to 1. Water Discharge Unit: an integer always set to 1, discharges in cubic meters per second (m3/s). Number of Source Channels: Number of source channels in the channel network. These are channels that do no have other channels at their upstream end (no tributaries). These channels always have a node with code 0 at the upstream end (see Nodes Database Table). These entries are followed by Number of Source Channels lines containing: Channel Number: Equal to the Computational Sequence field in the Channels Database Table. Baseflow Discharge: Floating-point number indicating the Baseflow Discharge for the current channel. A simple method to help the visualization of the numbering sequence is given below. The method uses standard ArcView capabilities, therefore, you can consult the ArcView documentation to learn more about using database tables and map labels. 1. Open the Channel Reaches and the Channel Links Database Tables. 2. Join the Channel Links Database Table to the Channel Reaches Database Table using the field “US ND ID” as common field: i) select the field by clicking on its name on the two open tables; ii) Make the Channel Reaches Database Table active by clicking on its top bar; iii) choose Join from the Table menu. The Channel Links Database Table should close automatically, and all its fields should appear inside the Channel Reaches Database Table, added to the right of the original fields. Make sure you join the Channel Links table to the Channel Reaches table, and not the other way around. Search the ArcView on-line help for “joining tables” if you need help here. Appendix C Data File Formats 169 Now, open the Channel Network map, and make the Channel Reaches theme active. 4. Go to the Theme menu, and choose the option named Auto-Label. 5. A new dialog appears. Choose the field to be used when labeling. Using the drop-down box and select “Comp Seq,” that is, the Computational Sequence used by the model. Press OK. If you do not see that field in the list, make sure you had the Channel Reaches theme selected before you used the Auto-Label option, and that the table join was made correctly. The map should show numbers indicating the order which link should be computed. Use these numbers when creating the Baseflow file. 3. Appendix C Data File Formats 170 Colormap Files You can specify a new color scheme for displaying DEMs within CCHE1D. Colors are specified using RGB (red, green and blue) values. The colormap file consists of 256 RGB triplets that define the colors to be assigned to the different elevations. The first triplet defines the color for the lowest elevation in the DEM; the 256th entry defines the color for the highest elevation. The colormap file must contain exactly 256 lines. The file must have the extension .map and must be copied into the CCHE1D installation directory tree, in the colormaps directory. APPENDIX D Output Variables This appendix lists the properties computed by CCHE1D that can be selected for output, as well as their units. CCHE1D does not have a “standard” output file. Instead, you are free to select which variables you want to save to file during and at the end of the simulation. Appendix D Output Variables Variable Name (interface) Water Discharge Stage Flow Area Average Water Depth Froude Number Friction Slope Top Width Roughness Coefficient Channel Thalweg Elevation Maximum Water Discharge Maximum Stage Total Sediment Transport Rate Total Sediment Concentration Bed Material D50 Bed Material D90 Bed Mixing Layer Thickness Bed Sub-surface Layer Thickness Cross Sectional Bed Area Change Accumulated Cross Sectional Bed Area Change Volumetric Sediment Yield for Storm Event Accumulated Volumetric Sediment Yield (All Storm Events) Sediment Yield from Bank Erosion for Storm Event 172 Name in header of output file Discharge Stage Flow_Area Aver_Water_Depth Froude_Number Friction_Slope Top_Width Roughness Thalweg Max_Disch_Hydr Max_Stage_Hydr Sed_Disch Sed_Conc Bed_D50 Bed_D90 Bed_MixLyr_Thick Bed_SbsLyr_Thick Bed_Area_Change Bed_Acc_Area_Change Units m3/s m m2 m Non-dimensional Non-dimensional m (Manning’s n) m m3/s m m3/s 0.0 – 1.0 mm mm m m m2 m2 Sed_Yld_Hydr m3 Sed_Yld_Acc m3 Bank_Sed_Yld_Hydr m3