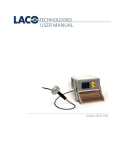
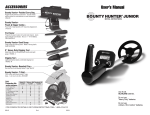
1
2-YEAR LIMITED WARRANTY
This product is warranted against defects in materials and workmanship under normal
use for two years from the date of purchase to the original owner.
Damage due to neglect, accidental damage or misuse of this product is not covered
under this warranty. Decisions regarding abuse or misuse of the detector are made
solely at the discretion of the manufacturer.
Proof of Purchase is required make a claim under this warranty.
Liability under this Warranty is limited to replacing or repairing, at our option, the
metal detector returned, shipping cost prepaid to Fisher Labs. Shipping cost to Fisher
Labs is the responsibility of the purchaser.
OPERATING MANUAL
CW20
Hand Held
Metal Detector
®
To return your detector for service, please first contact Fisher Labs for a Return
Authorization (RA) Number. Reference the RA number on your package and return
the detector within 15 days of calling to:
Fisher Research Labs, Inc.
1465-H Henry Brennan Dr.
El Paso, TX 79936
Phone: 915-225-0333 ext.118
Warranty coverage does not include the cost of transporting the detector back to an
owner who is located outside of the United States of America.
Fisher Research Labs does not warrant suitability for a specific purpose, and shall in no
event be liable for any direct, incidental, or consequential damages.
2-YEAR LIMITED WARRANTY
This product is warranted against defects in materials and workmanship under normal
use for two years from the date of purchase to the original owner.
Damage due to neglect, accidental damage or misuse of this product is not covered
under this warranty. Decisions regarding abuse or misuse of the detector are made
solely at the discretion of the manufacturer.
Proof of Purchase is required make a claim under this warranty.
Liability under this Warranty is limited to replacing or repairing, at our option, the
metal detector returned, shipping cost prepaid to Fisher Labs. Shipping cost to Fisher
Labs is the responsibility of the purchaser.
To return your detector for service, please first contact Fisher Labs for a Return
Authorization (RA) Number. Reference the RA number on your package and return
the detector within 15 days of calling to:
Fisher Research Labs, Inc.
1465-H Henry Brennan Dr.
El Paso, TX 79936
Phone: 915-225-0333 ext.118
Warranty coverage does not include the cost of transporting the detector back to an
owner who is located outside of the United States of America.
Fisher Research Labs does not warrant suitability for a specific purpose, and shall in no
event be liable for any direct, incidental, or consequential damages.
OPERATING MANUAL
CW20
Hand Held
Metal Detector
®
COMFORT
GRIP
OPERATOR DETECTION ALERTS
INTERFERENCE ELIMINATION FEATURES
• Audio Alert – High Pitch Sound
• Vibration Alert
• LED Target Indicator - Red
• 3 Operating frequency selections to eliminate
electromagnetic interference from other devices
Body Scanning for the Detection of
Metal Objects
Always test the detector before operation. Sweep the detector across a known
metal object, and verify detection with audio, vibratory, and visual feedback.
Motion is Required: The metal detector must be IN MOTION,
MOMENTARY LOW OPERATION
• Minimizes Interference from
environmental metal objects
• Can eliminate signals from very
small metal objects
POWER SUPPLY
• Requires (1) 9-Volt battery
(not included)
• Low Battery LED indicator
OPERATING FREQUENCY
7.1 kHz
DETECTOR FEATURES
1. Quick-Change Battery Compartment
Use a coin or screwdriver to open compartment.
Insert circular cam lock and twist to secure in closed position.
2. All-Metal Detection
Detects all types of metals.
Will not detector non-metallic objects or weapons that do not contain metal.
3. Momentary Low Detection
While holding down the "Momentary Low" switch, the detection range will be reduced.
a) Very small metal objects, such as the metal rivets sewn into clothing, will not be
detected beyond a range of one inch from the object.
COMFORT
GRIP
OPERATOR DETECTION ALERTS
INTERFERENCE ELIMINATION FEATURES
• Audio Alert – High Pitch Sound
• Vibration Alert - Silent Operation
• LED Target Indicator - Red
• 3 Operating frequency Selections to eliminate
Electromagnetic interference from other devices
sweeping across the target area, to detect
the presence of metal.
The subject should stand upright, with arms and legs extended.
Sweep the detector over the subject, with a smooth, even motion, about one inch from the body.
Avoid making physical contact between the subject and the detector.
Press and Hold the "Momentary Low" switch to eliminate interference from the metal bars in
floors, or from very small metal objects, such as rivets or zippers sewn into clothing.
CAUTION: Use in the MOMENTARY LOW mode will desensitize the detector.
Use the Momentary Low switch only after the detection of metal, and the
verification of the absence of a larger metal object
Scanning Personnel in security situations should be properly trained and supervised.
This detector will not detect non-metallic objects.
Body Scanning for the Detection of
Metal Objects
Always test the detector before operation. Sweep the detector across a known
metal object, and verify detection with audio, vibratory, and visual feedback.
MOMENTARY LOW OPERATION
• Minimizes Interference from
environmental metal objects
• Can eliminate signals from very
small metal objects
Motion is Required: The metal detector must be IN MOTION,
POWER SUPPLY
• Requires (1) 9-Volt battery
(not included)
• Low Battery LED indicator
OPERATING FREQUENCY
7.1 kHz
sweeping across the target area, to detect
the presence of metal.
The subject should stand upright, with arms and legs extended.
DETECTOR FEATURES
1. Quick-Change Battery Compartment
Use a coin or screwdriver to open compartment.
Insert circular cam lock and twist to secure in closed position.
2. All-Metal Detection
Detects all types of metals.
Will not detector non-metallic objects or weapons that do not contain metal.
3. Momentary Low Detection
While holding down the "Momentary Low" switch, the detection range will be reduced.
a) Very small metal objects, such as the metal rivets sewn into clothing, will not be
detected beyond a range of one inch from the object.
Sweep the detector over the subject, with a smooth, even motion, about one inch from the body.
Avoid making physical contact between the subject and the detector.
Press and Hold the "Momentary Low" switch to eliminate interference from the metal bars in
floors, or from very small metal objects, such as rivets or zippers sewn into clothing.
CAUTION: Use in the MOMENTARY LOW mode will desensitize the detector.
Use the Momentary Low switch only after the detection of metal, and the
verification of the absence of a larger metal object
Scanning Personnel in security situations should be properly trained and supervised.
This detector will not detect non-metallic objects.
Power Switch with Momentary Low
The Power switch has 2 "ON" positions and a forward "OFF" position.
The detector is OFF with the switch in the "UP" position
The detector is ON with the switch in the "MIDDLE" position
Momentary
Low
OFF
The detector is in MOMENTARY LOW operation with the switch
ON
held in the "DOWN" position.
While holding down the "Momentary Low" switch, the detection range will be reduced.
a) Very small metal objects, such as the metal rivets sewn into clothing, will not be
detected beyond a range of one inch from the object.
b) Large environmental metal objects, such as the metal reinforcing bars in floors,
will not be detected beyond a range of several inches.
Upon release of the "Momentary Low" switch, the detector will return to Normal Operation
b) Large environmental metal objects, such as the metal reinforcing bars in floors,
will not be detected beyond a range of several inches.
Upon release of the "Momentary Low" switch, the detector will return to Normal Operation.
4. Silent Operation
Position the Silent/Audio switch in the "Silent/Vibrate" position and:
a) The detector will NOT emit the High-Pitch tone upon the detection of metal objects.
b) The vibrator will activate upon the detection of a metal object, and the "Target"
LED indicator will illuminate.
5. Operating Frequency Selection
Chose from two alternate operating frequencies in the event of electromagnetic
interference from other electronic devices.
6. Low Battery Indication
When battery needs to be replaced, Low Battery LED will illuminate.
7. Visual Target Response
Red LED flashes when a metal object is located
LED Indicators
• The GREEN light indicates that the detector is ON
• The YELLOW light indicates LOW BATTERY
• The RED light indicates the detection of a metal object
8. Comfort Hand Grip
Green
Red
Yellow
First Time Operation
To Operate the Detector,
1) Install the Batteries
a. Use a 9-volt ALKALINE battery only (battery not included)
b. Install battery with correct polarity
(align "+" on detector housing with "+" on battery)
c. The battery cover opens and closes with a coin or screwdriver
2) Set the On switch to "ON"
"ON" is the middle position
3) Select Audio or Vibrate Mode
4) Sweep the Detector over the target area.
Detector must be IN MOTION to detect metal
Batteries
Use 9-Volt ALKALINE battery only (battery not included)
Low Battery Alert
The Yellow LED indicator light will illuminate and remain illuminated before the batteries
are discharged to the point at which the detector has lost any of its metal detecting
range.
In order to guarantee maximum detection at all times, replace battery as soon as yellow
light illuminates.
The detector will continue to operate, at a lower sensitivity, after the Low Battery
Indicator is illuminated. Replace batteries as soon as possible after the indicator
illuminates.
If you plan to store the CW20™
for several days or more,
remove the battery.
5) Read this manual for proper training in the detection of metal objects
“+” Polarity Side for Battery
+
●
Battery
Chamber
First Time Operation
To Operate the Detector,
1) Install the Batteries
a. Use a 9-volt ALKALINE battery only (battery not included)
b. Install battery with correct polarity
(align "+" on detector housing with "+" on battery)
c. The battery cover opens and closes with a coin or screwdriver
2) Set the On switch to "ON"
"ON" is the middle position
3) Select Audio or Vibrate Mode
4) Sweep the Detector over the target area.
Detector must be IN MOTION to detect metal
YELLOW LED
Low Battery
Indicator
Batteries
Use 9-Volt ALKALINE battery only (battery not included)
Low Battery Alert
The Yellow LED indicator light will illuminate and remain illuminated before the batteries
are discharged to the point at which the detector has lost any of its metal detecting
range.
In order to guarantee maximum detection at all times, replace battery as soon as yellow
light illuminates.
The detector will continue to operate, at a lower sensitivity, after the Low Battery
Indicator is illuminated. Replace batteries as soon as possible after the indicator
illuminates.
If you plan to store the CW20™
for several days or more,
remove the battery.
5) Read this manual for proper training in the detection of metal objects
“+” Polarity Side for Battery
+
●
Battery
Chamber
YELLOW LED
Low Battery
Indicator
First Time Operation
To Operate the Detector,
1) Install the Batteries
a. Use a 9-volt ALKALINE battery only (battery not included)
b. Install battery with correct polarity
(align "+" on detector housing with "+" on battery)
c. The battery cover opens and closes with a coin or screwdriver
2) Set the On switch to "ON"
"ON" is the middle position
3) Select Audio or Vibrate Mode
4) Sweep the Detector over the target area.
Detector must be IN MOTION to detect metal
Batteries
Use 9-Volt ALKALINE battery only (battery not included)
Low Battery Alert
The Yellow LED indicator light will illuminate and remain illuminated before the batteries
are discharged to the point at which the detector has lost any of its metal detecting
range.
In order to guarantee maximum detection at all times, replace battery as soon as yellow
light illuminates.
The detector will continue to operate, at a lower sensitivity, after the Low Battery
Indicator is illuminated. Replace batteries as soon as possible after the indicator
illuminates.
If you plan to store the CW20™
for several days or more,
remove the battery.
5) Read this manual for proper training in the detection of metal objects
“+” Polarity Side for Battery
+
●
Battery
Chamber
First Time Operation
To Operate the Detector,
1) Install the Batteries
a. Use a 9-volt ALKALINE battery only (battery not included)
b. Install battery with correct polarity
(align "+" on detector housing with "+" on battery)
c. The battery cover opens and closes with a coin or screwdriver
2) Set the On switch to "ON"
"ON" is the middle position
3) Select Audio or Vibrate Mode
4) Sweep the Detector over the target area.
Detector must be IN MOTION to detect metal
YELLOW LED
Low Battery
Indicator
Batteries
Use 9-Volt ALKALINE battery only (battery not included)
Low Battery Alert
The Yellow LED indicator light will illuminate and remain illuminated before the batteries
are discharged to the point at which the detector has lost any of its metal detecting
range.
In order to guarantee maximum detection at all times, replace battery as soon as yellow
light illuminates.
The detector will continue to operate, at a lower sensitivity, after the Low Battery
Indicator is illuminated. Replace batteries as soon as possible after the indicator
illuminates.
If you plan to store the CW20™
for several days or more,
remove the battery.
5) Read this manual for proper training in the detection of metal objects
“+” Polarity Side for Battery
+
●
Battery
Chamber
YELLOW LED
Low Battery
Indicator
Power Switch with Momentary Low
The Power switch has 2 "ON" positions and a forward "OFF" position.
The detector is OFF with the switch in the "UP" position
The detector is ON with the switch in the "MIDDLE" position
Momentary
Low
OFF
The detector is in MOMENTARY LOW operation with the switch
ON
held in the "DOWN" position.
While holding down the "Momentary Low" switch, the detection range will be reduced.
a) Very small metal objects, such as the metal rivets sewn into clothing, will not be
detected beyond a range of one inch from the object.
b) Large environmental metal objects, such as the metal reinforcing bars in floors,
will not be detected beyond a range of several inches.
Upon release of the "Momentary Low" switch, the detector will return to Normal Operation
b) Large environmental metal objects, such as the metal reinforcing bars in floors,
will not be detected beyond a range of several inches.
Upon release of the "Momentary Low" switch, the detector will return to Normal Operation.
4. Silent Operation
Position the Silent/Audio switch in the "Silent/Vibrate" position and:
a) The detector will NOT emit the High-Pitch tone upon the detection of metal objects.
b) The vibrator will activate upon the detection of a metal object, and the "Target"
LED indicator will illuminate.
5. Operating Frequency Selection
Chose from two alternate operating frequencies in the event of electromagnetic
interference from other electronic devices.
6. Low Battery Indication
When battery needs to be replaced, Low Battery LED will illuminate.
7. Visual Target Response
Red LED flashes when a metal object is located
LED Indicators
• The GREEN light indicates that the detector is ON
• The YELLOW light indicates LOW BATTERY
• The RED light indicates the detection of a metal object
8. Comfort Hand Grip
Green
Red
Yellow
Body Scanning for the Detection of
Metal Objects
Always test the detector before operation. Sweep the detector across a known
metal object, and verify detection with audio, vibratory, and visual feedback.
Motion is Required: The metal detector must be IN MOTION,
sweeping across the target area, to detect
the presence of metal.
The subject should stand upright, with arms and legs extended.
DETECTOR FEATURES
1. Quick-Change Battery Compartment
Use a coin or screwdriver to open compartment.
Insert circular cam lock and twist to secure in closed position.
2. All-Metal Detection
Detects all types of metals.
Will not detector non-metallic objects or weapons that do not contain metal.
3. Momentary Low Detection
While holding down the "Momentary Low" switch, the detection range will be reduced.
a) Very small metal objects, such as the metal rivets sewn into clothing, will not be
detected beyond a range of one inch from the object.
COMFORT
GRIP
OPERATOR DETECTION ALERTS
INTERFERENCE ELIMINATION FEATURES
• Audio Alert – High Pitch Sound
• Vibration Alert - Silent Operation
• LED Target Indicator - Red
• 3 Operating frequency Selections to eliminate
Electromagnetic interference from other devices
Sweep the detector over the subject, with a smooth, even motion, about one inch from the body.
Avoid making physical contact between the subject and the detector.
Press and Hold the "Momentary Low" switch to eliminate interference from the metal bars in
floors, or from very small metal objects, such as rivets or zippers sewn into clothing.
CAUTION: Use in the MOMENTARY LOW mode will desensitize the detector.
Use the Momentary Low switch only after the detection of metal, and the
verification of the absence of a larger metal object
Scanning Personnel in security situations should be properly trained and supervised.
This detector will not detect non-metallic objects.
Body Scanning for the Detection of
Metal Objects
Always test the detector before operation. Sweep the detector across a known
metal object, and verify detection with audio, vibratory, and visual feedback.
MOMENTARY LOW OPERATION
• Minimizes Interference from
environmental metal objects
• Can eliminate signals from very
small metal objects
Motion is Required: The metal detector must be IN MOTION,
POWER SUPPLY
• Requires (1) 9-Volt battery
(not included)
• Low Battery LED indicator
OPERATING FREQUENCY
7.1 kHz
sweeping across the target area, to detect
the presence of metal.
The subject should stand upright, with arms and legs extended.
DETECTOR FEATURES
1. Quick-Change Battery Compartment
Use a coin or screwdriver to open compartment.
Insert circular cam lock and twist to secure in closed position.
2. All-Metal Detection
Detects all types of metals.
Will not detector non-metallic objects or weapons that do not contain metal.
3. Momentary Low Detection
While holding down the "Momentary Low" switch, the detection range will be reduced.
a) Very small metal objects, such as the metal rivets sewn into clothing, will not be
detected beyond a range of one inch from the object.
Sweep the detector over the subject, with a smooth, even motion, about one inch from the body.
Avoid making physical contact between the subject and the detector.
Press and Hold the "Momentary Low" switch to eliminate interference from the metal bars in
floors, or from very small metal objects, such as rivets or zippers sewn into clothing.
CAUTION: Use in the MOMENTARY LOW mode will desensitize the detector.
Use the Momentary Low switch only after the detection of metal, and the
verification of the absence of a larger metal object
Scanning Personnel in security situations should be properly trained and supervised.
This detector will not detect non-metallic objects.
2-YEAR LIMITED WARRANTY
This product is warranted against defects in materials and workmanship under normal
use for two years from the date of purchase to the original owner.
Damage due to neglect, accidental damage or misuse of this product is not covered
under this warranty. Decisions regarding abuse or misuse of the detector are made
solely at the discretion of the manufacturer.
Proof of Purchase is required make a claim under this warranty.
Liability under this Warranty is limited to replacing or repairing, at our option, the
metal detector returned, shipping cost prepaid to Fisher Labs. Shipping cost to Fisher
Labs is the responsibility of the purchaser.
To return your detector for service, please first contact Fisher Labs for a Return
Authorization (RA) Number. Reference the RA number on your package and return
the detector within 15 days of calling to:
Fisher Research Labs, Inc.
1465-H Henry Brennan Dr.
El Paso, TX 79936
Phone: 915-225-0333 ext.118
Warranty coverage does not include the cost of transporting the detector for an owner
who is located outside of the United States of America.
Fisher Research Labs does not warrant suitability for a specific purpose, and shall in no
event be liable for any direct, incidental, or consequential damages.
NOTE TO FOREIGN COUNTRY CUSTOMERS
This warranty may vary in other countries, check with your distributor for details.
Factory warranty follows the channel of distribution.
Warranty does not cover shipping costs.
MCW20
042309