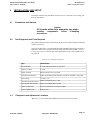
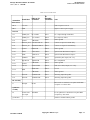
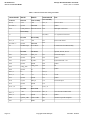
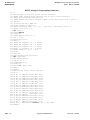
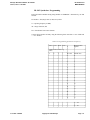
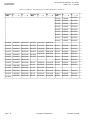
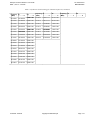
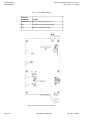
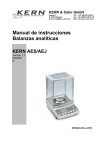
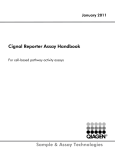
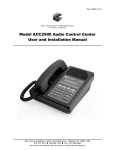
1
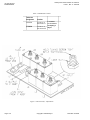
Issue 1, Rev. C: 12/10/96
RL-903 Receiver
RL-903 900-MHz Receiver
USER MANUAL
PN 9110.00148
(old part number = 916-0903-001)
RELEASED
Specifications subject to change without notice
Copyright ©1996 Glenayre
All rights reserved. No part of this work may be reproduced or copied in any form or by
any means - graphic , electronic, or mechanical, including photocopying, recording,
taping, or information-retrieval system - without written permission of Glenayre.
Print Date: 12/05/96
Copyright © 1996 Glenayre
Glenayre Document Number: 9110.00148
Issue 1, Rev. C: 12/10/96
RL-903 Receiver
Document Change Record
Document Change Record
Issue:
Date:
Changes:
1
08/31/94
none, original
Issue:
Date:
Changes:
1
12114/95
new format
Issue:
Date:
Changes:
1; Rev. C
12/10/96
minor corrections, added schematics
Copyright © 1996 Glenayre
Print Date: 12/05/96
RL-903 Receiver
Table of Contents
Glenayre Document Number: 9110.00148
Issue 1, Rev. C: 12/10/96
Table of Contents
1
GENERAL ................................................................................................................1-1
1-1
1 .1
Manual Scope
1 .2
Applicable Documents .................................................................................... 1-1
1 .3
Manual Sections
1 .4
About Glenayre................................................................................................1-2
1.5
1-1
1-3
1.4.1
Product Warranty Infomation
1.4.2
Service Warranty Information .......................................................... 1-3
Regulatory-Authority Compliance .................................................................. 1-3
1 .5.1
FCC
1-3
1 .5.2
Industry Canada
1-3
2
SPECIFICATIONS..................................................................................................2-1
3
DESCRIPTION........................................................................................................3-1
4
3.1
Introduction
3-1
3 .2
Physical Description
3-1
3.3
Simplified Block-Diagram Description .......................................................... 3-1
INSTALLATION AND SETUP .............................................................................4-1
4.1
Precautions and Hazards................................................................................. 4-1
4.2
Test Equipment and Tools Required ...............................................................4-1
4.3
Component and Adjustment Locations ........................................................... 4-1
4.4
Installation
4-2
4.4.1
Inspection
4-2
4.4.2
Power Requirement .......................................................................... 4-2
4.4.3 Input-output
4.4.4
4.5
5
6
4-2
Internal Test Points, Switches, and Jumpers .................................... 4-2
4-2
Ultimate Disposition
OPERATION ........................................................................................................... 5-1
5.1
Front-Panel Controls and indicators ............................................................... 5-1
5.2
Operating Instructions .....................................................................................5-1
THEORY OF OPERATION .................................................................................. 6-1
6 .1 PS/2
6.2
Print Date: 12/05/96
Connections
6-1
Board
6 .1.1
Power Supply
6-1
6 .1.2
Audio Amplifier
6-1
RF Amplifier/First Mixer ................................................................................6-1
Copyright © 1996 Glenayre
Page: -i
Glenayre Document Number: 9110.00148
Issue 1, Rev. C: 12/10/96
RL-903 Receiver
Table of Contents
6.3
6.4
6.5
7
8
9
Synthesizer and VCO Block-Diagram Description ........................................ 6-1
6-2
6.3.1
VCO
6 .3.2
PLL Synthesizer ............................................................................... 6-2
6.3.3
Reference Oscillators ........................................................................ 6-2
6 .3.4
Programming Logic .......................................................................... 6-2
IF Board...........................................................................................................6-4
6.4.1
IF Amplification and FM Detection ................................................. 6-4
6 .4.2
Audio Processing .............................................................................. 6-4
6 .4.3
Squelch and RSSI ............................................................................. 6-4
6.4.4
Fault Reporting................................................................................. 6-5
6.4.5
Keying
6-5
Line Driver Circuit (optional) (IF board)........................................................ 6-5
MAINTENANCE ..................................................................................................... 7-1
7 .1
Test Conditions ................................................................................................7-1
7.2
Power Supply (PS/A board unless noted) ....................................................... 7-1
7.3
Local Oscillator Setup (synthesizer board, unless noted) ............................... 7-1
7.4
VCO Tuning (synthesizer board unless noted) ............................................... 7-2
7.5
RF and IF Tuning (IF board unless noted) ...................................................... 7-2
7.6
Squelch and RSSI Adjustment (IF board unless noted) ..................................7-6
7.7
Audio Level Adjustment (IF board unless noted) ........................................... 7-9
CHECKOUT AND TROUBLESHOOTING ........................................................ 8-1
8.1
Power Supply (PS/A board unless noted) ...................................................... 8-1
8.2
Audio (IF board unless noted) .........................................................................8-1
8.3
Synthesizer, Frequency, and Reference Oscillator ......................................... 8-2
8.4
RF, IF, and Squelch (IF board unless noted) ..................................................8-2
REMOVAL AND REINSTALLATION ................................................................9-1
9.1
Access to Internal Assemblies........................................................................ 9-1
9.2
PS/A Board......................................................................................................9-2
9 .3
IF Audio Board................................................................................................9-2
9.4
VCO Board ......................................................................................................9-2
9 .5
RF Board Assembly ........................................................................................ 9-3
10 FIGURES.................................................................................................................10-1
Page: -ii
Copyright ©1996 Glenayre
Print Date: 12/05/96
.
RL-903 Receiver
List of Figures
Glenayre Document Number: 9110.0014 8
Issue 1, Rev. C: 12/10/96
List of Figures
Figure 3-1
Receiver Isometric Front View ................................................................... 3-3
Figure 3-2
Receiver Rear View .....................................................................................3-4
Figure 3-3
Top View of Internal Assemblies ................................................................3-5
Figure 3-4
Receiver Functional Diagram ......................................................................3-6
Figure 5-1
Front-Panel Controls and Indicators ........................................................... 5-3
Figure 6-1
Synthesizer Functional Diagram ................................................................. 6-3
Figure 7-1
Synthesizer Controls and Indicators ............................................................7-4
Figure 7-2
Test Setup .................................................................................................... 7-9
Figure 7-3
Programming Synthesizer Frequency....................................................... 7-12
Figure 7-4
RF Assembly - Adjustments..................................................................... 7-16
Figure 7-5
IF Board Controls and Indicators .............................................................. 7-19
Figure 7-6
PS/A Board Controls and Indicators .........................................................7-20
Figure 10-1 Interface Board 265-0305-002 Assembly and Schematic ......................... 10-1
Figure 10-2 IF Audio Board Schematic........................................................................ 10-2
Figure 10-3 Front End Schematic..................................................................................10-5
Figure 10-4 VCO Board Schematic ...............................................................................10-6
Figure 10-5 PS/A Board Schematic ...............................................................................10-7
Print Date: 12/05/96
Copyright © 1996 Glenayre
Page: -iii
Glenayre Document Number: 9110.00148
Issue 1, Rev. C: 12/10/96
RL-903 Receiver
List of Figures
Page: -iv
Copyright © 1996 Glenayre
Print Date: 12/05/96
RL-903 Receiver
List of Tables
Glenayre Document Number: 9110.00148
Issue 1, Rev. C: 12/10/96
List of Tables
Table 1-1
Applicable Documents .................................................................................1-1
Table 1-2
Manual Sections ...........................................................................................1-2
Table 2-1
Specifications
Table 4-1
Test Equipment Required ............................................................................4-1
Table 4-2
I/O Connections...........................................................................................4-3
Table 4-3
Internal Connections among Assemblies .................................................... 4-4
Table 5-1
Front-Panel Controls and Indicators ........................................................... 5-2
Table 7-1
VCO Controls and Indicators...................................................................... 7-3
Table 7-2
RSSI Levels................................................................................................. 7-7
Table 7-3
RSSI Levels when Receiving
a Signal from Link Transmitter ...................................................................7-8
Table 7-4
Programming Synthesizer Frequency ....................................................... 7-11
Table 7-5
Synthesizer Switch Settings for Common Frequencies ............................ 7-13
Table 7-6
RF Board Controls .....................................................................................7-16
Table 7-7
IF Board Controls and Indicators ..............................................................7-17
Table 7-8
PS/A Board Controls ................................................................................. 7-20
Print Date: 12/05/96
2-1
Copyright ©1996 Glenayre
Page: -v
RL-903 Receiver
List of Tables
Page: -vi
Glenayre Document Number: 9110.00148
Issue 1, Rev. C: 12/10/96
Copyright © 1996 Glenayre
Print Date: 12/05/96
1.1
Manual Scope
This manual presents the RL-903 900-MHz-range receiver. It contains information
concerning the overall operation of the front end, IF board, VCO, and power supply. The
optional tone board is treated in a separate manual.
Models in the series include:
• RL-903R, link repeater receiver, which passes the signal to a link transmitter
• RL-903XC, receiver for use by an external control device.
The above models may be narrowband, for 2.5-kHz-deviation systems, or wideband, for
5-kHz-deviation systems. Any of these combinations may have the line driver (LD) option,
which provides a balanced output for telephone lines. The LD option may also be a separate
model.
1.2
Applicable Documents
Other manuals, in addition to this manual, may be required for complete paging-site documentation. Refer to Table 1-1 for a list of applicable documents, their part numbers, and a
brief description of each.
1.3
Manual Sections
Refer to Table 1-2. This table lists the sections in this manual, and provides a brief description of the content of each section.
Print Date: 12/05/96
Copyright © 1996 Glenayre
Page: 1-1
RL-903 Receiver
GENERAL
1.4
Glenayre Document Number: 9110.00148
Issue 1, Rev. C: 12/10/96
About Glenayre
Questions regarding the equipment or this manual should be directed to:
U.S.A.
Glenayre Customer Service - RF
One Quintron Way
Quincy, Illinois 62305-3726
Phone: (217) 223-3211
Fax: (217) 223-3284
CANADA
Glenayre Customer Service - RF
1450 Kootenay Street
Vancouver, B.C.V5K 4R1
Phone: (604) 293-1611
Fax: (604) 293-4301
UNITED KINGDOM
Glenayre Electronics (UK) Ltd.
Unit 3, Challenge House
Sherwood Drive
Milton Keynes, HERTS MK3 6DP
Phone: 44 (908) 644-642
Fax: 44 (908) 644-643
SINGAPORE
Glenayre Electronics PTE.
Block 5012 Ang Mo Kio Avenue 5
Industrial Park 2 Unit 05-03/04
Singapore 2056
Phone: (65) 4811828
Fax: (65) 4812838
Page: 1-2
Copyright © 1996 Glenayre
Print Date: 12/05/96
RL-903 Receiver
GENERAL
Glenayre Document Number: 9110.00148
Issue 1, Rev. C: 12/10/96
1.4.1
Product Warranty Information
Glenayre warrants to the original purchaser that Glenayre products are free from defects in
material or workmanship for a period of twelve months from the original invoice date,
subject to the provisions herein. Glenayre will repair or replace at its option, FOB our
factory, free of charge within one year from the date of shipment, any component, assembly
or subassembly of our manufacture found to be defective under conditions of normal use.
The unit, if repaired, will be returned to its original specifications. Failures caused by unauthorized modifications, force majeure, lightning, physical, environmental, or electrical
damage including use with incompatible equipment are specifically excluded from this
warranty. Glenayre disclaims any and all liability for loss or other damage whether direct,
consequential or of any nature whatsoever, resulting from product failure.
This warranty is in lieu of all other warranties expressed or implied and covers only those
items manufactured by Glenayre. Equipment supplied by, but not manufactured by
Glenayre, is subject only to any warranty offered by the manufacturer of said equipment.
1.4.2
Service Warranty Information
Return of a defective item must be authorized by Glenayre prior to shipment. A Return
Authorization number can be obtained from Glenayre Customer Service. When requesting
a Return Authorization number, give the serial number of the unit. A description of the fault
should accompany the unit on its return and the RA number must be shown on labels
attached to the item(s). The cost of shipping to Glenayre is to be paid by the customer.
Shipping from Glenayre will be prepaid by the customer, and shipped via surface mail. If
express shipping is required, the unit will be shipped collect.
Any repair service performed by Glenayre under this limited warranty is warranted to be
free from defects in material or workmanship for ninety days from the date of repair. All
other terms of this limited warranty apply to the service warranty.
1.5
Reaulatorv-Authoritv Comoliance
1.5.1
FCC
This device complies with part 15 of the FCC Rules. Operation is subject to the condition
that this device does not cause harmful interference.
1.5.2
Industry Canada
This device complies with RSS-210 of Industry Canada. Operation is subject to the
following two conditions:
this device may not cause interference, and
this device must accept any interference, including interference that may cause undesired
operation of the device.
Print Date: 12/05/96
Copyright © 1996 Glenayre
Page: 1-3
Glenayre Document Number: 9110.00148
Issue 1, Rev. C: 12/10/96
RL-903 Receiver
GENERAL
Page: 1-4
Copyright © 1996 Glenayre
Print Date: 12/05/96
RL-903 Receiver
SPECIFICATIONS
Glenayre Document Number: 9110.00148
Issue 1, Rev. C: 12/10/96
2
SPECIFICATIONS
Table 2-1, Specifications, lists the specifications of the receiver. All receiver tests were
performed per the ANSI/EIA-603/1992 standard, "Land Mobile FM or PM Communications Equipment Measurement and Performance Standards, " approved October 27, 1992,
and dated February 1993.
Table 2-1 Specifications
characteristic (unit of
measurement)
specification
frequency range (MHz)
922-960 (in special cases, to 902) in bands as
follows: 900-920, 920-940, 940-960
modulation acceptance (kHz)
wideband, +/-7.0
narrowband, +/-5.0
sensitivity (uV for 12-dB SINAD)
wideband, 0.35,
narrowband, 0.35
sensitivity (uV for 20 of quieting)
wideband, 0.5
narrowband, 0.5
channel spacing (kHz)
narrowband, 12.5
wideband, 25
adjacent-channel rejection (dB of rejec- wideband, -80
narrowband, -75
tion: wideband, 25 kHz; narrowband,
12.5 kHz)
alternate-channel rejection (dB of rejec- wideband, -85
tion, wideband, 50 kHz; narrowband,
narrowband, -80
25 kHz)
intermodulation (dB)
wideband, -80
narrowband, -75
spurious response (dB)
wideband, -100
narrowband, -100
maximum squelch sensitivity, TIGHT
(carrier) squelch (dBm)
wideband, -65
narrowband, -65
minimum squelch sensitivity, NORMAL (noise) squelch (dBm)
wideband, -113
narrowband, -113
speaker output
distortion (percent)
5 or better
hum and noise (3-kHz deviation with wideband, -40
narrowband, -40
1-kHz tone) (dB)
output power (W)
Print Date: 12/05/96
1.5
Copyright © 1996 Glenayre
Page: 2-1
Glenayre Document Number: 9110.00148
Issue 1, Rev. C: 12/10/96
RL-903 Receiver
SPECIFICATIONS
Table 2-1 Specifications (continued)
characteristic (unit of
measurement)
specification
audio response, 3(X) to 3000 Hz (dB) -1, +8, from nominal 750-usec deemphasis
curve
flat audio output
max distortion at 1 kHz, 2/3
modulation (percent)
wideband, 1.5
narrowband, 2.5
hum and noise (dB to 3 kHz)
wideband, -50
narrowband, -50
frequency response (dB with respect
to 1000 Hz)
wideband, +/-1
narrowband, +/-1
phase linearity (max degrees of
deviation from RL-900
wideband, +/-10
narrowband, +/-10
line driver
Page: 2-2
output level (dBm)
-15 to +5 (normally 0 dBm)
max frequency response variation
from 1000 Hz (dB)
wideband, +/-0.5
narrowband, +/-0.5
input power
10.6 to 29 Vdc at less than 2 A, 3 A peak
operating temperature range (degrees
centigrade)
-30 to +60
storage temperature (degrees centigrade)
-40 to +85
relative humidity, noncondensing
5 to 95 percent
altitude (ft)
to 10,000 (3050 m)
chassis dimensions
3.5 in (9 cm) high x 19 in (48 cm) wide x 8 in
(20.3 cm) deep. excluding front and rear projections
chassis weight
5.7 lb (2.6 kg)
FCC ID
BFL RL-903
Copyright ©1996 Glenayre
Print Date: 12/05/96
RL-903 Receiver
SPECIFICATIONS
Glenayre Document Number: 9110.00148
Issue 1, Rev. C: 12/10/96
characteristic (unit of
measurement)
specification
tone board
(optional, not used in determining above specifications)
keytone notch filter
center frequency (Hz)
2875 or user-selectable
notch depth (dB) below full
modulation
25
-1-dB bandwidth at 2875 Hz (Hz)
2835 to 2915
keytone decoder
Print Date: 12/05/96
frequency (Hz)
2875 or user-selectable
sensitivity (dB)
32 below +1- 3 kHz deviation or better
turn-on time (ms)
200
hold time (ms)
100
Copyright © 1996 Glenayre
Page: 2-3
RL-903 Receiver
SPECIFICATIONS
Page: 2-4
Glenayre Document Number: 9110.00148
Issue 1, Rev. C: 12/10/96
Copyright ©1996 Glenayre
Print Date: 12/05/96
Glenayre Document Number: 9110.00148
Issue 1, Rev. C: 12/10/96
3.1
RL-903 Receiver
DESCRIPTION
Introduction
The receiver may be used in three types of applications or in various combinations:
• link repeater receiver for link transmitter (R).
• link receiver with external control (XC) for paging transmitter.
Additionally, in combination with any of these, it may be used as a monitor receiver with
line driver (LD) suitable for telephone lines.
3.2
Physical Description
The receiver is normally mounted in a standard rack and requires two rack units.
Table 2-1 includes physical characteristics. These are the main assemblies:
• RF board
• IF board
• VCO assembly/synthesizer board
• power supply/audio amplifier (PS/A)
• interface board attached to the rear of the chassis (not used in some configurations).
Additional components may need to be installed in order to enable the line driver output.
For views of the receiver, refer to Figure 3-1, Receiver Isometric Front View, Figure 3-2,
Receiver Rear View, and Figure 3-3, Top View of Internal Assemblies. An optional tonecontrol board may be used and is mounted on the IF board.
3.3
Simplified Block-Diagram Description
Refer to Figure 3-4, Receiver Functional Diagram. The RL-903 is a self-contained receiver
capable of covering the range of paging and link frequencies between 922 MHz and 960
MHz. Channel spacing is 12.5 or 25 kHz. The radio has a synthesized local oscillator. The
receive frequency is set in 6.25-kHz steps by a selection of DIP switches. The electronic
tuning range is approximately one MHz before manual (coarse) oscillator retuning is
required.
The 900-MHz signal enters at the rear of the chassis and is routed to the RF assembly,
where it is amplified and mixed to produce a 45-MHz IF signal.
An internal or external reference oscillator furnishes the reference for the synthesizer. The
VCO output is routed to mixer Ul on the RF assembly. For a description of the synthesizer
and VCO, refer to Paragraph 6.3, Synthesizer and VCO Block-Diagram Description.
IF amplifiers Q5 and Q6 amplify the first IF signal and make up any losses caused by the
insertion loss of the IF filters. FM detector chip U2 is the second mixer and quadrature
detector for the receiver. Its output includes the recovered audio and a signal-strength
indicator which are passed to the audio and squelch circuitry.
Print Date: 12/05/96
Copyright © 1996 Glenayre
Page: 3-1
RL-903 Receiver
DESCRIPTION
Glenayre Document Number: 9110.00148
Issue 1, Rev. C: 12/10/96
The audio_dc signal is dc-coupled all the way from the quadrature detector to J1. The
audio_ac signal is filtered to produce standard transmitter audio. This signal may be routed
through the optional tone board to produce a logic indication if a control tone is detected
and to optionally notch out the control tone to a transmitter (tone is normally not notched).
For a discussion of the tone board, refer to its manual. See Table 1-1.
An external delay device or other type of audio processor may be spliced into the audio
path, depending on jumper settings. See Table 7-7, IF Board Controls and Indicators.
The received-signal-strength indicator is a dc voltage which gives a relative indication of
the signal strength.
The R tone-controlled link receiver reserves a segment of the audio passband (normally a
narrow band centered on 2875 Hz) for control purposes. The presence of a tone at that
frequency causes the keyline to the transmitter to become active. The R receiver can be set
up to notch the control tone out of the audio passband, but the R receiver normally passes
the control tone, along with the rest of the audio passband.
Refer also to the system theory of operation of the associated transmitter for additional
discussion. Refer to the tone-control manual (see Table 1-1 for part number) for a discussion of the operation of the tone board.
Some systems require more extensive control than that offered by tone keying. In such
cases, an external device uses the receiver audio and squelch status to control the associated
transmitter. Refer to the control device's manual for additional discussion.
An external 600-ohm, balanced output may be used for sending remotely monitored audio
over telephone lines. This feature may be used at the same time as the previously mentioned
features. Additional components may need to be installed on the RF board in order for this
feature to be enabled.
The received-signal-strength indicator (RSSI) is a dc voltage which gives a relative indication of the signal strength.
There are two types of squelch which may be used:
• noise squelch (NORMAL) for normal reception and
• carrier squelch (TIGHT) for reception in areas of high RF density.
The power supply uses switching techniques to provide a stable output voltage despite wide
variations in the input. The board also provides the audio amplifier for the chassis-mounted
speaker.
Page: 3-2
Copyright © 1996 Glenayre
Print Date: 12/05/96
RL-903 Receiver
DESCRIPTION
Glenayre Document Number: 9110.00148
Issue 1, Rev. C: 12/10/96
Print Date: 12/05/96
Copyright ©1996 Glenayre
Page: 3-3
RL-903 Receiver
DESCRIPTION
Page: 3-4
Glenayre Document Number: 9110.00148
Issue 1, Rev. C: 12/10/96
Copyright © 1996 Glenayre
Print Date: 12/05/96
RL-903 Receiver
DESCRIPTION
Glenayre Document Number: 9110.00148
Issue 1, Rev. C: 12/10/96
Print Date: 12/05/96
Copyright © 1996 Glenayre
Page: 3-5
RL-903 Receiver
DESCRIPTION
Page: 3-6
Glenayre Document Number: 9110.00148
Issue 1, Rev. C: 12/10/96
Copyright © 1996 Glenayre
Print Date: 12/05/96
RL-903 Receiver
INSTALLATION AND SETUP
Glenayre Document Number: 9110.00148
Issue 1, Rev. C: 12/10/96
4
INSTALLATION AND SETUP
This manual contains setup information for the receiver. For a broader view of setup, refer
to the system manual.
4.1
Precautions and Hazards
Caution
PC boards within this assembly use staticsensitive
components.
Follow
IC-handling
precautions.
4.2
Test Equipment and Tools Required
Most internal adjustment can be performed with the receiver chassis pulled forward and
with the lid removed.
The receiver's RF and l.o. sections should not need realignment unless poor operation is
indicated or if the receive frequency has been changed by more than one MHz. Table 4-1,
Test Equipment Required, shows required test equipment for setup. Common hand tools are
also required.
Table 4-1 Test Equipment Required
4.3
item
characteristic
service monitor
to 1 GHz, IFR model 1200S or equivalent
frequency counter
to 1 GHz
digital voltmeter
Beckman model 330 or equivalent
audio distortion analyzer
capable of measuring audio distortion to 3000 Hz, Sinadder or equivalent
power supply
+12 Vdc at 3 A
(optional) spectrum analyzer
capable of displaying up to 1 GHz
(optional) RF millivoltmeter
capable of reading 0 dBm at 1 GHz
QPN 263-0305-002
receiver I/O board for accessing I/O signals
slotted alignment tool
Johanson 8777
Component and Adjustment Locations
Figure 3-3, Top View of Internal Assemblies, shows the locations of pc boards.
Print Date: 12/05/96
Copyright © 1996 Glenayre
Page: 4-1
RL-903 Receiver
INSTALLATION AND SETUP
4.4
Glenayre Document Number: 9110.00148
Issue 1, Rev. C: 12/10/96
Installation
4.4.1
Inspection
Refer to the system manual for inspection information.
4.4.2
Power Requirement
The receiver, when used as a component of a paging site, draws its power from system
wiring.
4.4.3
Input/Output Connections
Figure 3-2, Receiver Rear View, shows the locations of rear-mounted I/O connectors, and
Table 4-2, I/O Connections, lists I-o connectors and describes their functions.
Normally the receiver is delivered as part of an entire paging system and has already been
installed in a rack, with all connections already made, except for connections to equipment
that was not installed in the rack before shipment. If I/O connections are required, refer to
the system-interconnect diagram and other instructions in the system manual.
4.4.4
Internal Test Points, Switches, and Jumpers
Refer to Figure 7-4, RF Assembly - Adjustments. Table 7-6, RF Board Controls, lists RF
board controls.
Refer to Figure 7-1, Synthesizer Controls and Indicators. Table 7-1, VCO Controls and
Indicators, lists VCO/synthesizer controls and indicators.
Refer to Figure 7-5, IF Board Controls and Indicators. Table 7-7, IF Board Controls and
Indicators, lists IF board controls and indicators.
Refer to Figure 7-6, PS/A Board Controls and Indicators. Table 7-8, PS/A Board Controls,
lists PS/A board controls.
Tone board adjustments are discussed in the tone board manual (see Table 1-1 for part
number).There are no indicators on the tone board.
4.5
Ultimate Disposition
Caution
This equipment may contain hazardous materials.
Check with the local EPA or other environmental
authority before disposing of this equipment.
Page: 4-2
Copyright © 1996 Glenayre
Print Date: 12/05/96
RL-903 Receiver
INSTALLATION AND SETUP
Glenayre Document Number: 9110.00148
Issue 1, Rev. C: 12/10/96
Table 4-2 I/O Connections
connection
board label
I/O
assembly
connection
label on I/O
schematic
note
PS/A board
TB 1-2
10.6-30V
positive input to receiver
TB1-1
GND
negative return to power supply
IF board
J1-1
AUDIO_DC
DC AUDIO
TB2-1
U6-1 output through 1000-ohms
J1-2
AUDIO_AC
AC AUDIO
TB2-2
U5-8 output (tx audio)
J1-6
ground
GROUND
TB2-3
chassis ground
J1-5
DELAY_OUT TO EXT DELAY
TB2-4
connects to input of external delay
J1-4
DELAY_IN
FROM EXT DELAY TB2-5
connects to output of external delay
J1-11
ground
GROUND
TB2-6
chassis ground
J1-10
LINE+
LINE OUT+
TB2-7
optional 600-ohm balanced output +
J1-15
LINE-
LINE OUT-
TB2-8
optional 600-ohm balanced output -
J1-3
TXKEY*
KEY
TB3-1
optional keyline output, LO = key
J1-8
SQUELCH
SQUELCH
TB3-2
HI = unsquelched
J1-13
ground
GROUND
TB3-3
chassis ground
J1-14
FAULT
FAULT IND
TB3-4
fault (out of lock) output, LO = okay
J1-12
RSSI
RSSI IND
TB3-5
see text
GROUND
TB 3-6
chassis ground
J1-7
interlock
INTERLOCK
TB3-7
internally jumpered together
J1-9
interlock
INTERLOCK
TB3-8
internally jumpered together
RF input
RF IN
RF-board J1 is attached to rear-panel female BNC
receptacle via a short cable.
external reference input
EXT REF
P3 on synthesizer is attached to rear-panel BNC
receptacle by short cable.
RF Assembly
J1
synthesizer
assembly
P3
ground stud
Print Date: 12/05/96
Attach to common cabinet ground.
Copyright © 1996 Glenayre
Page: 4-3
Glenayre Document Number: 9110.00148
Issue 1, Rev. C: 12/10/96
RL-903 Receiver
INSTALLATION AND SETUP
Table 4-3 Internal Connections among Assemblies
connection #1
label #1
label #2
connection #2
note
IF board
IF board
VCO assembly
VCO assembly
P3-1,2
+12V
+12V
P1-1, -2
power to VCO
P3-3 thru -7
ground
GROUND
P1-3
ground
P3-8
LOCK_DETECT OUT-OF-LOCK
P1-8
fault input to IF board
P2 (cable)
1.o. injection to first mixer
power to RF board
RF assembly
J3
IF board
RF assembly
P3-1, -2
+12V
+12V
P1-1
P3-3 thru -7
ground
GROUND
P1-2
P5
45-MHz input
IF OUTPUT
J2
IF board
tone board
P6-1
from_tone
audio_out
J2-1
tone audio output
P6-2
ground
ground
J2-2
ground
P6-3
keytone*
keytone*
J2-3
keytone detected = LO
P6-4
ground
ground
J2-4
ground
P6-5
voting_tone
voting_tone
J2-5
n/u
P6-6
ground
n/c
J2-6
ground
P6-7, 8
n/c
n/c
J2-7,-8
P7-1, 2
+12v
+12
J1-1, -2
12 Vdc
P7-3
ground
ground
J1-3
ground
P7-4
to_tone
audio_in
J 1-4
tone audio input
P7-5
ground
ground
J1-5
P7-6, 7, 8
n/c
n/c
J1-6, 7, 8
IF board
PS/A board
P8-1, 2
+12v
+12v to receiver
P2-1, -2
12-Vdc source for RF board
P8-3, 4
ground
ground
P2-3, -4
ground
P8-5
speaker_audio
speaker audio
P2-5
connects to speaker amplifier
P8-7
n/c
disable
P2-7
Page: 4-4
IF connection from RF assembly
optional, J5 front, J4 rear
Copyright ©1996 Glenayre
Print Date: 12/05/96
RL-903 Receiver
INSTALLATION AND SETUP
Glenayre Document Number: 9110.00148
Issue 1, Rev. C: 12/10/96
Table 4-3 Internal Connections among Assemblies (continued)
connection #1
label #1
label #2
connection #2
P8-8
de-emph
de-emphasis
P2-8
--
--
J1
chassis
SW 1
Print Date: 12/05/96
note
see I/O table
PS/A board
SW1
connection to front-panel on/off switch
P1
connection to front-panel speaker,
P1-1=hot, P1-2=ground
Copyright © 1996 Glenayre
Page: 4-5
Glenayre Document Number: 9110.00148
Issue 1, Rev. C: 12/10/96
RL-903 Receiver
INSTALLATION AND SETUP
Page: 4-6
Copyright ©1996 Glenayre
Print Date: 12/05/96
RL-903 Receiver
OPERATION
Glenayre Document Number: 9110.00148
Issue 1, Rev. C: 12/10/96
5.1
Front-Panel Controls and indicators
Figure 5-1, Front-Panel Controls and Indicators, shows the locations of operator controls
and indicators. Table 5-1, Front-Panel Controls and Indicators, describes their functions.
5.2
Operating Instructions
The receiver operates in an unattended manner during normal system operation. Refer to
the system manual and the maintenance section of this manual for maintenance action,
including setup.
Print Date: 12/05/96
Copyright © 1996 Glenayre
Page: 5-1
Glenayre Document Number: 9110.00148
Issue 1, Rev. C: 12/10/96
RL-903 Receiver
OPERATION
Table 5-1 Front-Panel Controls and Indicators
control or
indicator
function
(PS/A board)
SW1
I - on
0 - off
VOLUME R27
adjusts front-panel speaker level
(IF board)
POWER D21
(green)
on indicator
SQUELCH S2
selects noise squelch, test (open), or carrier squelch
NORMAL - noise squelch
TEST - open squelch
TIGHT -carrier squelch
TIGHT
SQUELCH R81
(4-turn pot) adjusts carrier-squelch threshold level
(4-turn pot) adjusts noise-squelch threshold level
NORMAL
SQUELCH R80
SQUELCH
D14 (green)
indicates unsquelched when lit
LINE OUT R57 (optional 4-turn pot) adjusts level of line audio option at J2-10, -15
LINE OK HI
green - optional line output J2-10, -15 (TB2-7, -8) at or above 0 dBm
D15 (red, green) red - line output too high (+2 dBm) (see Paragraph 7.7)
REMOTE/ DIS/ REMOTE - allows remote keying
KEY S 1
DIS - disables remote keying
KEY - keys output line locally
KEYLINE D11
(green)
when lit, indicates TXKEY line J2-3 (TB3-1) is active
(synthesizer/VCO)
FAULT D1
(red)
Page: 5-2
when lit, indicates synthesizer fault; fault output J1-14 (TB3-4 active (HI) at same time
Copyright © 1996 Glenayre
Print Date: 12/05/96
RL-903 Receiver
OPERATION
Glenayre Document Number: 9110.00148
Issue 1, Rev. C: 12/10/96
Print Date: 12/05/96
Copyright © 1996 Glenayre
Page: 5-3
Glenayre Document Number: 9110.00148
Issue 1, Rev. C: 12/10/96
RL-903 Receiver
OPERATION
Page: 5-4
Copyright © 1996 Glenayre
Print Date: 12/05/96
RL-903 Receiver
THEORY OF OPERATION
Glenayre Document Number: 9110.00148
Issue 1, Rev. C: 12/10/96
The dual-conversion, synthesized, narrowband FM receiver covers 922 to 960 MHz. The
optional tone board provides tone decoding and keying logic. The optional line driver
circuit supplies receiver audio to telephone lines.
Table 4-3, Internal Connections among Assemblies, shows the interconnections among
assemblies.
6.1
PS/A Board
Figure 7-6, PS/A Board Controls and Indicators, shows a view of the pc board.
6.1.1
Power Supply
Table 2-1, Specifications, lists the electrical requirement for input power. Refer to
Figure 10-5, PS/A Board Schematic. Unregulated power entering from TB1-2 is fused by
pc-board-mounted F1 and is controlled by front-panel-mounted SW1. Switch converter U1
and associated components provided filtered, regulated power (approximately 15.1 Vdc) to
the input of linear voltage regulator U2, which supplies twelve volts to the rest of the unit.
6.1.2
Audio Amplifier
Op-amps in U4 amplify and deemphasize the audio supplied to speaker driver U3. Frontpanel VOLUME control R27 controls the speaker level.
6.2
RF Amplifier/First Mixer
Figure 7-4, RF Assembly - Adjustments, shows a view of the assembly. Refer to Figure 103, Front End Schematic. The RF input is at rear-mounted BNC connector J1 on the left of
the back of the chassis, as viewed from the rear. The desired signal is passed by helical
filters L2, L3, L4, L7, L8, and L9 and is amplified by Q1 while undesired signals are attenuated. The RF output is matched by L10 to one input of mixer U1. The l.o. signal from the
synthesizer arrives at SMB receptacle J3 and is passed to the second input of mixer U1. The
output of mixer U1 is a 45-MHz IF signal which exits the RF board at J2. Receptacle J4 is
used with a network analyzer in the factory for tuning the front end.
6.3
Synthesizer and VCO Block-Diagram Description
Figure 7-1, Synthesizer Controls and Indicators, shows a view of the pc board. The synthesizer tunes in 6.25-kHz steps to accommodate the channel spacing of 12.5 or 25 kHz. Refer
to Figure 6-1, Synthesizer Functional Diagram and Figure 10-4, VCO Board Schematic.
Print Date: 12/05/96
Copyright © 1996 Glenayre
Page: 6-1
RL-903 Receiver
THEORY OF OPERATION
6.3.1
Glenayre Document Number: 9110.00148
Issue 1, Rev. C: 12/10/96
VCO
The VCO oscillates at the first l.o. injection frequency. The active element in the circuit is
Q6, whose output is fed to buffer Q5 through a two-dB pad for isolation. The output of Q5
goes to the front end assembly for use as the local oscillator signal for the mixer and to U12
for use by the synthesizer to maintain phase lock. Capacitor C46 centers the VCO control
voltage at TP1.
6.3.2
PLL Synthesizer
A portion of PLL U8 compares the phase difference between the internally divided
frequencies which are fed to it from the reference oscillator and the VCO. The phase difference causes an error voltage which feeds back to keep the VCO frequency phase-locked.
The feedback signal is passed through a low-pass filter to suppress 6.25-kHz components
and is fed to VCO varactor D2 for fine (electronic) frequency adjustment and is also fed,
via buffer U13A, to TP1 for alignment purposes.
6.3.3
Reference Oscillators
On-board reference oscillator U11 or an external high-stability reference can be used,
depending on the setting of JR1. Oscillator Ull operates at 12.8 MHz. The external oscillator may be 10 or 12.8 MHz, depending on JR3. Refer to Table 7-1, VCO Controls and
Indicators.
6.3.4
Programming Logic
Astable multivibrators U7A and U7B are triggered if an out-of-lock or reset condition
exists. Multivibrator U7-12 resets four-bit BCD counters U1 and U2 while multivibrator
U7-4 starts clock U6 to trigger the counters. The counter output is input to GAL IC U3,
which is programmed to provide the reference-divider sixteen-bit data and serially clock it
into synthesizer U8, through the clock and data outputs. An enable pulse is outputted from
the GAL to latch the reference-divider data. A control bit and the two most-significant bits
of the programmable divider for channel selector are also clocked in after the enable pulse.
The data which is latched into registers U4 and U5 from user-programmable DIP switches
Si and S2 is essentially shifted through GAL U3 to synthesizer U10 to provide the final
sixteen bits for the programmable divider. The enable line is then reactivated to latch in the
data.
When the synthesizer is out of lock, red FAULT LED D2 is lit, and U9-1 goes LO to provide
a lockout* status report for the board. The status signal appears at P1-8 and to IF board P38, where it becomes the LOCK_DETECT signal. On the IF board the LOCK_DETECT
signal is inverted and appears at rear IF-board connector J1-14 (TB3-4) as the FAULT
output (HI=out of lock).
Page: 6-2
Copyright ©1996 Glenayre
Print Date: 12/05/96
Glenayre Document Number: 9110.00148
Issue 1, Rev. C: 12/10/96
Print Date: 12/05/96
RL-903 Receiver
THEORY OF OPERATION
Copyright © 1996 Glenayre
Page: 6-3
RL-903 Receiver
THEORY OF OPERATION
6.4
Glenayre Document Number: 9110.00148
Issue 1, Rev. C: 12/10/96
IF Board
Figure 7-5, IF Board Controls and Indicators, shows a view of the pc board. Table 7-5, IF
Board Controls and Indicators, lists the signal-flow options which can be altered by
changing the position of internal jumpers. Refer to Figure 10-2, IF Audio Board Schematic.
6.4.1
IF Amplification and FM Detection
The 45-MHz IF signal from the front-end assembly is arrives at P5. Crystal filter F3 shapes
the bandpass to accept the appropriate FM modulation, nominally +/-5 kHz or +/- 2.5 kHz,
and to provide some adjacent-channel selectivity.
First IF amplifier buffers the signal between F3 and Fl. Second IF amplifier Q6 buffers the
signal between F1 and U2, which provides mixing, IF amplification, limiting, and FM
detection.
Ceramic filter F2, between the IF amplifier and limiter sections of U2, provides additional
adjacent-channel selectivity. The FM detector section of U2 use 455-kHz quadrature coil
L5 to produce audio at U2-9 and a received-signal-strength-indicator (RSSI) voltage at
U2-13.
6.4.2
Audio Processing
Buffer U3-14 supplies audio to pot R51, which is used to set the audio level at audio_dc
J1-1 (TB2-1) and audio_ac J1-2 (TB2-2). (Refer to Paragraph 7.7 for adjustment.) Audio
phase polarity is controlled by JR9 through JR12. Refer to Table 7-7. Buffers U6-8 and U67 provide additional filtering.
Audio may be routed to an external delay device and then returned, depending on the
settings of jumpers. Audio may also be routed to the optional tone board, also depending
on the settings of jumpers. Refer to Table 7-7. Audio output to the transmitter is present at
rear-panel J1-2 (TB2-2).
The optional line driver circuit may be driven by either squelched or unsquelched audio,
depending on the setting of jumpers. Refer to Table 7-7 and Paragraph 6.5.
6.4.3
Squelch and RSSI
In order to provide reliable squelch in harsh RF environments there are two types of
squelch. carrier squelch (TIGHT) squelch and (NORMAL) noise squelch. Carrier squelch
is triggered by the signal strength, and noise squelch, the type of squelch common to most
FM receivers, is triggered by the relative amount of high-audio-frequency intensity in the
received signal.
Front-panel SQUELCH switch S2 selects the type of squelch used.
• When S2 is set to TIGHT, squelch is under the control of carrier squelch.
• When S2 is set to TEST, squelch is disabled, enabling the audio path.
• When S2 is set to NORMAL, only noise squelch is used to determine squelch status.
Page: 6-4
Copyright © 1996 Glenayre
Print Date: 12/05/96
RL-903 Receiver
THEORY OF OPERATION
Glenayre Document Number: 9110.00148
Issue 1, Rev. C: 12/10/96
Green front-panel SQUELCH LED D14 lights whenever the receiver is unsquelched.
Front-panel NORMAL SQUELCH control R80 adjusts the sensitivity of noise squelch.
Front-panel TIGHT SQUELCH control R81 adjusts the sensitivity of carrier squelch.
Refer to Paragraph 7.7 for adjustment.
The RSSI signal from U2 goes to dc amplifier U6-1 and comparator U7-7. The RSSI
voltage is available at rear-panel J1-12 (TB3-5) for external equipment.
6.4.4
Fault Reporting
A condition which causes the receiver's PLL circuitry to go out of lock, causes the lockdetect signal at P3-8 to go LO. The fault causes a HI at Q2-drain and rear-panel J1-14
(TB3-4) for reporting to external equipment. During a fault, D5 causes the receiver to be
squelched.
6.4.5
Keying
The receiver must use the optional tone board for keying. Green front-panel KEY LINE
LED D11 lights whenever the keyline is active. The front-panel key switch works as
follows:
• S 1 set to REMOTE. A keytone* LO from the tone board at P6-3 is passed, via front-panel
KEY switch S1, to U7 and Q4. A LO to the paging or link transmitter is passed to rearpanel txkey* J1-3 (TB3-1). The receiver must be unsquelched in order for the keyline to
become active.
• S1 set to DIS. Keying is disabled.
• S1 set to KEY. The txkey* output is active (LO).
6.5
Line Driver Circuit (optional) (IF board)
Refer to Figure 3-4, Receiver Functional Diagram. The line out audio input at front-panel
LINE OUT control R57 is amplified by op-amp U8-1 and drives transformer T1, whose
balanced output exits the chassis at rear-panel J1-10 and -15 (TB2-7, -8). Comparators
U8-7 and U8-8 control front-panel HIGH and OK D15. Refer to Paragraph 7.7 to adjust
level.
Print Date: 12/05/96
Copyright © 1996 Glenayre
Page: 6-5
RL-903 Receiver
THEORY OF OPERATION
Page: 6-6
Glenayre Document Number: 9110.00148
Issue 1, Rev. C: 12/10/96
Copyright © 1996 Glenayre
Print Date: 12/05/96
RL-903 Receiver
MAINTENANCE
Glenayre Document Number: 9110.00148
Issue 1, Rev. C: 12/10/96
This section explains the setup and use of the receiver.
7.1
Test Conditions
Refer to Figure 3-2, Receiver Rear View, and Figure 7-2, Test Setup. For all RF and audio
tests, when input power is required, supply a 10-30-Vdc power supply capable of supplying
three amperes to rear-mounted TB 1 as follows: 10.6-30V TB 1-2 (on right) to (+), GND
TB1-1 (left) to (-). A standard test signal consists of an RF carrier supplied to RF INPUT
J1 at a level of -47 dBm, modulated by a 1000-Hz tone at +1-3-kHz (+/-1.5 kHz for narrowband) deviation. Figure 7-2 illustrates how test equipment is to be attached.
7.2
Power Supply (PS/A board unless noted)
Perform the following procedure to check the power supply operation. Note that the power
supply output is fixed.
Power Supply Check
7.3
1.
Check that input power (28 Vdc or within range of specifications) is supplied to rearmounted TB1-2 (10.6-30V) and ground TB1-1 (GND).
2.
Turn on front-panel power switch. Front-panel POWER LED (IF board) should light.
3.
Check that input power is present at D4-cathode (near right-rear corner of pcb).
4.
Check voltage at red TP1. Voltage should be 11.5 to 12.5 Vdc.
5.
Check voltage at red TP2. Voltage should be 14.5 to 15.5 Vdc.
Local Oscillator Setup (synthesizer board, unless noted)
Perform the following procedure whenever it becomes necessary to set the receive
frequency. If an external oscillator is normally used when the receiver is in an equipment
rack, set JR1 to 2-3 and remove (set movable jumper so that it makes no electrical connection) JR3. An internal reference oscillator must be present before the procedure can be
performed. Restore jumpers to normal operating positions when done. Figure 7-1, Synthesizer Controls and Indicators, shows synthesizer controls and indicators.
Synthesizer Programming Procedure
1. Determine required receive frequency. If the frequency is listed in Table 7-5, Synthesizer Switch Settings for Common Frequencies, use appropriate switch settings. Otherwise, calculate hexadecimal and binary values of A and N and switch settings by
using BASIC program listed with Figure 7-4, Test Setup, or use formula with calculator.
2.
Print Date: 12/05/96
Set segments of DIP switches Si and S2, as required by results of step 1. Note that 1
= off = up and 0 = ON = down.
Copyright ©1996 Glenayre
Page: 7-1
Glenayre Document Number: 9110.00148
Issue 1, Rev. C: 12/10/96
RL-903 Receiver
MAINTENANCE
7.4
3.
Install and remove JR4 to reset synthesizer. Once synthesizer frequency is programmed, front-panel red FAULT LED should be off. If it is on, coarse tuning of
VCO may be necessary. Refer to VCO tuning procedure. If FAULT LED is off, proceed to next step.
4.
Apply standard test signal at newly programmed frequency. If test signal is heard,
programming new frequency was successful.
5.
Connect frequency counter to VCO output SMA connector that goes to RF board J2.
Frequency should be receive frequency minus 45 MHz. If 1.o. frequency is off by
more than 10 kHz, check programming steps.
6.
To precisely set reference frequency, slowly adjust U6 trim cap (if using internal reference oscillator) while checking detected audio for minimum distortion (done as part
of RF and IF Tuning Procedure).
7.
Once l.o. frequency is changed and verified, check VCO voltage using VCO Adjustment Procedure.
8.
(optional) Measure l.o. injection level with spectrum analyzer or RF millivoltmeter;
level should be 15 to 17 dBm.
VCO Tuning (synthesizer board unless noted)
Perform the following procedure whenever a major change in receive frequency has been
effected or when it is necessary to check performance, especially if the FAULT LED is lit.
Even if the FAULT LED is off, a centered voltage results in improved performance over
temperature extremes and yields improved phase-noise performance.
VCO Adjustment Procedure
7.5
1.
Refer to Figure Figure 7-1.
2.
Check control voltage at TP1 (near S1). Voltage should be 5-7 Vdc.
3.
If necessary, adjust C46 to bring control voltage into range.
RF and IF Tuning (IF board unless noted)
Apply standard test signal and reduce generator level to check that receiver meets minimum
sensitivity listed in Table 2-1, Specifications. If specifications are met, tuning is not recommended. Refer to Figure 7-4, RF Assembly - Adjustments, and Figure 7-5, IF Board
Controls and Indicators. Unless noted, references are to the IF board. Attach test equipment
as shown in Figure 7-2.
Second-Local-Oscillator Adjustment Procedure
Note
Hint: If sensitivity is low, and there is question whether the trouble lies
in the RF section or the IF section, inject a 45-MHz signal into IF board
P5 and adjust the 45-MHz and 455-kHz circuits. The 12-dB SINAD at
P5 should be -116 dBm or better.
Once proper operation of the IF section is validated, concentrate on the RF section and local
oscillator.
Page: 7-2
Copyright © 1996 Glenayre
Print Date: 12/05/96
RL-903 Receiver
MAINTENANCE
Glenayre Document Number: 9110.00148
Issue 1, Rev. C: 12/10/96
RF and IF Tuning Procedure
Note
Hint: You may prefer to use the RSSI output at RF board J1-12 (TB3-5),
rather than tuning for maximum sensitivity by ear.
1.
Attach RF signal generator to rear-panel antenna input J1. Set generator to receive
frequency. Modulate with 1000-Hz tone at +1- 3.0-kHz deviation (+/-1.5-kHz for
12.5-kHz-spaced channels). Set level to -47 dBm.
Note
This is the standard test signal standard test signal.
2.
Set front-panel SQUELCH switch to TEST.
3.
Adjust speaker audio level with VOLUME control to suit user preference.
Caution
The RF front-end adjustments should be tuned for
a relatively flat response characteristic, not for
peak response. Do not perform steps 4 through 8
unless this is an emergency repair. The factory
setup procedure requires a spectrum analyzer. Call
Glenayre for assistance in replacing the assembly
or in performing the alignment. Alignment should
not be necessary unless a major change in
frequency has taken place.
4.
Refer to Figure 7-4. Loosen lock nuts on RF assembly resonators L2, L3, L4, L7, L8,
and L9.
5.
Reduce signal generator input as required. Using hex wrench, adjust resonators in sequence for maximum sensitivity. Repeat this step until no further improvement is noted.
6.
Adjust RF resonators L2, L3, L4, L7, L8, and L9 for signal peak. While holding resonators firmly with hex wrench, tighten all lock nuts to prevent further resonator
movement. Constantly check that receiver sensitivity has not been degraded by inadvertent movement of resonators or stress to mechanical assemblies.
Caution
Do not overtighten lock nuts.
7.
Print Date: 12/05/96
Passband ripple tends to he additive when all adjustments are made to cause a peak
response at a single frequency. To ensure that passband ripple does not degrade performance due to temperature drift, set synthesizer to 3 MHz above carrier frequency
and set signal generator accordingly. Response should be within 2.5 dB of performance at carrier frequency.
Copyright ©1996 Glenayre
Page: 7-5
RL-903 Receiver
MAINTENANCE
Glenayre Document Number: 9110.00148
Issue 1, Rev. C: 12/10/96
8.
Repeat sensitivity check at 3 MHz below carrier frequency. Set synthesizer and signal
generator back to carrier frequency when done. Be sure to have front-end adjustment
performed by factory personnel as soon as possible.
9.
Refer to Figure 7-5. On IF board, adjust Ll, L3, L5, L7, and L8 for maximum sensitivity. Repeat this step until no further improvement is noted.
10. (narrowband receiver only) Adjust C51 for maximum sensitivity.
11. Place audio analyzer probe at ac_audio line, J1-1 (TB2-1).
12. Adjust L5 for minimum distortion with 100-Hz audio signal.
13. Set signal generator level to -47 dBm and restore audio frequency to 1000 Hz. Distortion may be minimized by slightly detuning L1, L3, and L7 for minimum distortion,
as observed on distortion analyzer. Use audio oscillator and distortion analyzer to
measure distortion at 1000 Hz and adjust for best overall distortion. Do not detune
components more than 1/4 turn.
14. Adjust second l.o. at C52 for minimum distortion. If using internal reference oscillator, adjust trim cap on U6 for minimum distortion. Do not detune more than 1/4 turn.
15. Restore jumpers and controls to normal positions.
7.6
Squelch and RSSI Adjustment (IF board unless noted)
The following procedure sets TIGHT squelch for normal operation.
TIGHT Squelch Adjustment Procedure
1.
Set signal generator level for the desired signal quality (typically 30 dB SINAD, approximately -100 dBm).
2.
Set front-panel SQUELCH switch to TIGHT to enable carrier squelch.
3.
Set front-panel TIGHT squelch control so that signal is barely squelched. (If signal
cannot be squelched, leave control completely cw. This is highly unlikely.) Frontpanel SQUELCH LED should go on and off, depending on squelch status.
The following procedure sets NORMAL squelch. Perform the procedure after completing
the TIGHT squelch procedure.
NORMAL Squelch Adjustment Procedure
Page: 7-6
1.
Set signal generator level for desired signal quality (typically 12 dB SINAD, approximately -116 dBm).
2.
Set front-panel SQUELCH switch to NORMAL to enable noise squelch.
3.
Adjust front-panel NORMAL SQUELCH control to barely squelch receiver. Verify
level. UNSQUELCH LED4 should go on and off, depending on squelch status.
4.
Set front-panel SQUELCH switch to TIGHT.
Copyright © 1996 Glenayre
Print Date: 12/05/96
Glenayre Document Number: 9110.00148
Issue 1, Rev. C: 12/10/96
RL-903 Receiver
MAINTENANCE
The following procedure checks the approximate RSSI indication for various RF input
levels.
RSSI Level Observation Procedure
1.
Set front-panel SQUELCH switch to TEST.
2.
Connect voltmeter to J1-12 (TB3-5).
3.
Set RF input level to -30 dBm. RSSI level should at least 4.9 Vdc.
4.
Set RF level to -76 dBm. RSSI level should be at least 3.0 Vdc.
5.
Turn RF input level off. RSSI level should be less than 0.7 Vdc.
Fill out Table 7-2, RSSI Levels, to chart the signal-strength intensity with RSSI voltage.
Note
The RSSI level is a good indicator of signal levels. Periodically record
the RSSI level while the receiver is receiving the desired signal. Use
Table 7-3, RSSI Levels when Receiving a Signal from Link Transmitter,
as an example. The record will show unplanned variations in the quality
of the signal path.
Table 7-2 RSSI Levels
RF input (dBm)
Print Date: 12/05/96
RSSI voltage (Vdc)
RF input (dBm)
-120
-84
-117
-81
-114
-78
-111
-75
-108
-72
-105
-69
-102
-66
-99
-63
-96
-60
-93
-57
-90
-54
-87
-51
Copyright © 1996 Glenayre
RSSI voltage (Vdc)
Page: 7-7
Glenayre Document Number: 9110.00148
Issue 1, Rev. C: 12/10/96
RL-903 Receiver
MAINTENANCE
Table 7-3 RSSI Levels when Receiving
a Signal from Link Transmitter
Page: 7-8
receiver model
receive frequency (MHz)
serial number
date
RSSI level (Vdc)
note
Copyright ©1996 Glenayre
Print Date: 12/05/96
RL-903 Receiver
MAINTENANCE
Glenayre Document Number: 9110.00148
Issue 1, Rev. C: 12/10/96
7.7
Audio Level Adjustment (IF board unless noted)
Perform this procedure only after RF and squelch adjustment procedures have been
performed. Refer to Figure 7-5, IF Board Controls and Indicators.
IF-Board Audio Level Adjustment Procedure
1.
Set SQUELCH switch to TEST to allow audio path to be turned on. Place audio voltmeter at J1-2 (TB2-2) and ground.
2.
Apply standard test signal. Set modulation to +/-3.0 kHz for 5-kHz systems or to
+/-1.5 kHz for 2.5-kHz systems.
3.
Adjust R51 so that ac-coupled voltmeter reads 1Vp-p. Continue with the line audio
procedure, if necessary.
Line Audio Level Adjustment Procedure
This circuitry is optional and is used in LD models.
1.
Perform this procedure after the preceding procedure is completed.
2.
Adjust front-panel LINE OUT R57 so that front-panel LINE OK HI D15 is lit green
with modulation from standard test signal. Note that LED flickers to green and red
during normal operation. Line output level is approximately 0 dBm. Red occurs at
approximately +2 dBm.
Figure 7-2 Test Setup
Print Date: 12/05/96
Copyright © 1996 Glenayre
Page: 7-9
RL-903 Receiver
MAINTENANCE
Glenayre Document Number: 9110.00148
Issue 1, Rev. C: 12/10/96
BASIC Listing for Programming Synthesizer
90 CLS
100 REM program to calculate RL-903 receive frequency
110 PRINT "This program helps calculate the Si and S2 switch settings."
120 PRINT "for the RL-903 synthesizer."
130 PRINT "Enter the receive frequency (MHz). Press Ctrl-Scroll Lock to exit."
140 INPUT D
150 IF D>1100 OR D<870 THEN 130
160 H=INT(((D-864.2)*160)+0.5)
( exactly"; ((H+138272!)/160);")."
165 PRINT "Frequency (MHz) is "; D;",
170 PRINT " Hex value is ";
175 HH$ = HEX$(H)
180 PRINT HEX$(H)
185 GOSUB 500
190 PRINT "Binary value is ";
200 FOR I = 1 TO 4
210 PRINT HI$(I);"I";
220 NEXT I
230 PRINT "Si segments 1-4 = "; HR$(4)
240 PRINT "Si segments 5-8 = "; HR$(3)
250 PRINT "S2 segments 1-4 = "; HR$(2)
"
260 PRINT S2 segments 5-8 = "; HR$(1)
270 PRINT "NOTE: 0 = ON, 1 = off"
280 PRINT
290 GOTO 130
500 REM calculate hex and binary
510 HH$ = "0000"+HH$
520 HH$ = RIGHT$(HH$,4)
530 FOR I=1 TO 4
535 B$=MID$(HH$,I,1)
540 GOSUB 700
550 HI$(I) = A$: HR$(I) = RR$
560 NEXT I
570 RETURN
700 REM look up binary values from hex
710 A$="."
"
720 IF B$ = "0" THEN A$ = "0000":RR$ = "0000
=
=
730 IF B$ "l" THEN A$="0001":RR$ "1000"
=
740 IF B$="2" THEN A$="0010":RR$ "0100"
=
=
"
750 IF B$ "3" THEN A$="0011":RR$ "1100
="
=
="
760 IF B$ 4" THEN A$ "0100":RR$ 0010 "
"
770 IF B$ = "5" THEN A$ = "0101":RR$ =" 1010
=
780 IF B$="6" THEN A$="0110":RR$ "0110"
790 IF B$="7" THEN A$="0111":RR$ = "1110"
800 IF B$="8" THEN A$="1000":RR$="0001"
810 IF B$="9" THEN A$="1001":RR$ = "1001"
820 IF B$ = "A" THEN A$ = "1010":RR$ =" 0101 "
=
="
"
830 IF B$ = "B" THEN A$ "1011":RR$ 1101
=
840 IF B$="C" THEN A$="1100":RR$ "0011"
"
850 IF B$ =" D" THEN A$="1101":RR$ =" 1011
=
860 IF B$="E" THEN A$="1110":RR$ "011l"
"
870 IF B$ =" F " THEN A$ = "1111":RR$ =" 1111
=
="
"; B$: STOP
880 IF A$
." THEN PRINT "000000ps, B$
890 RETURN
Page: 7-10
Copyright ©1996 Glenayre
Print Date: 12/05/96
RL-903 Receiver
MAINTENANCE
Glenayre Document Number: 9110.00148
Issue 1, Rev. C: 12/10/96
RL-903 Synthesizer Programming
Enter and run the BASIC listing using BASIC or GWBASIC. Alternatively, use this
formula:
hex number = hex(int(((fc 864.2)*160)+0.5)) where
fc = operating frequency in MHz,
int = integer function, and
hex = hexadecimal conversion function
Convert the hex number to binary using the following chart. Note that 0 = ON = blank and
1 = off = filled in.
Table 7-4 Programming Synthesizer Frequency
4or8 3or7 2or6
lor5
E
SlorS2switch
segment
hex value
decimal value
0
0
1
1
2
2
3
3
4
4
5
5
6
6
7
7
8
8
9
9
A
10
B
11
C
12
D
13
E
14
F
15
setting of above switch segment
8
4
2
1
-1 — off
-0 — ON
Print Date: 12/05/96
Copyright © 1996 Glenayre
Page: 7-11
RL-903 Receiver
MAINTENANCE
Glenayre Document Number: 9110.00148
Issue 1, Rev. C: 12/10/96
Note
Some switch manufacturers may construct and label their switches
differently. If the correct frequency is not programmed, try setting all
switch segments to the opposite setting.
Figure 7-3 Programming Synthesizer Frequency
Page: 7-12
Copyright ©1996 Glenayre
Print Date: 12/05/96
RL-903 Receiver
MAINTENANCE
Glenayre Document Number: 9110.00148
Issue 1, Rev. C: 12/10/96
Table 7-5 Synthesizer Switch Settings for Common Frequencies
frequency Si
(MHz)
1.............. 8
32
1 .............. 8
frequency S1
(MHz)
1.............. 8
32
1 .............. 8
frequency Si
(MHz)
1 .............. 8
82
1.............. 8
928.0125
01000111
11100100
931.2125
01000111
10010100
932.00625
10000110
01010100
928.0375
01100111
11100100
931.2375
01100111
10010100
932.01875
11000110
01010100
928.0625
01010111
11100100
931.2625
01010111
10010100
932.03125
10100110
01010100
928.0875
01110111
11100100
931.2875
01110111
10010100
932.04375
11100110
01010100
928.1125
01001111
11100100
9313125
01001111
10010100
932.05625
10010110
01010100
928.1375
01101111
11100100
9313375
01101111
10010100
932.06875
11010110
01010100
928.1625
01011111
11100100
9313625
01011111
10010100
932.08125
10110110
01010100
928.1875
01111111
11100100
9313875
01111111
10010100
932.09375
11110110
01010100
928.2125
01000000
00010100
931.4125
01000000
01010100
932.10625
10001110
01010100
928.2375
01100000
00010100
931.4375
01100000
01010100
932.11875
11001110
01010100
928.2625
01010000
00010100
931.4625
01010000
01010100
932.13125
10101110
01010100
928.2875
01110000
00010100
931.4875
01110000
01010100
932.14375
11101110
01010100
9283125
01001000
00010100
9321.5125
01001000
01010100
932.15625
10011110
01010100
9283375
01001000
00010100
931.5375
01101000
01010100
932.16875
11011110
01010100
928.8625
01010110
00010100
9315625
01011000
01010100
932.18125
10111110
01010100
928.8875
01110110
00010100
931.5875
01111000
01010100
932.19375
11111110
01010100
928.9125
01001110
00010100
931.6125
01000100
01010100
932.20625
10000001
01010100
928.9375
01101110
00010100
931.6375
01100100
01010100
932.21875
11000001
01010100
928.9625
01011110
00010100
931.6625
01010100
01010100
932.23125
10100001
01010100
928.9875
01111110
00010100
931.6875
01110100
01010100
932.24375
11100001
01010100
931.7125
01001100
01010100
932.25625
10010001
01010100
931.0125
01000011
10010100
931.7375
01101100
01010100
932.26875
11010001
01010100
931.0375
01100010
10010100
931.7625
01011100
01010100
932.28125
10110001
01010100
931.0625
01010011
10010100
931.8125
01000010
01010100
932.29375
11110001
01010100
931.0875
01110011
10010100
931.8375
01100010
01010100
932.30625
10001001
01010100
931.1125
01001011
10010100
931.8625
01010010
01010100
932.31875
11001001
01010100
931.1375
01101011
10010100
931.8875
01110010
01010100
932.33125
10101001
01010100
931.1625
01011011
10010100
931.9125
01001010
01010100
932.34375
11101001
01010100
931.1875
01111011
10010100
931.9375
01101010
01010100
932.35625
10011001
01010100
931.9625
01011010
10010100
932.37875
10111001
01010100
931.9875
01111010
10010100
932.38125
10111001
01010100
Print Date: 12/05/96
Copyright © 1996 Glenayre
Page: 7-13
Glenayre Document Number: 9110.00148
Issue 1, Rev. C: 12/10/96
RL-903 Receiver
MAINTENANCE
Table 7-5 Synthesizer Switch Settings for Common Frequencies (continued)
frequency S1
(MHz)
1.............. 8
S2
1..............8
frequency SI
(MHz)
1 .............. 8
$2
1 .............. 8
frequency S1
(MHz)
1 .............. 8
52
1 .............. 8
932.39375
11111001
01010100
932.40625
10000101
01010100
932.41875
11000101
01010100
932.43125
10100101
01010100
932.44375
11100101
01010100
932.45625
10010101
01010100
932.46875
11010101
01010100
932.48125
10110101
01010100
932.49375
11110101
01010100
941.00625
10000000
00001100
941.38125
10111100
00001100
941.01875
11000000
00001100
941.39375
11111100
00001100
956.2625
01010001
10011100
941.03125
10100000
00001100
941.45625
10010010
00001100
956.2875
01110001
10011100
941.04375
11100000
00001100
941.46875
11010010
00001100
956.3125
01001001
10011100
941.05625
10010000
00001100
941.48125
10110010
00001100
956.3375
01101001
10011100
941.06875
11010000
00001100
941.49375
11110010
00001100
956.3625
01011001
10011100
941.08125
10110000
00001100
956.3875
01111001
10011100
941.09375
11110000
00001100
952.0125
01000111
01101100
956.4125
01000101
10011100
941.10625
10001000
00001100
952.0375
01100111
01101100
956.4375
01100101
10011100
941.11875
11001000
00001100
952.0625
01010111
01101100
941.13125
10101000
00001100
952.0875
01110111
01101100
959.8625
01010011
11011100
941.14375
11100000
00001100
952.1125
01001111
01101100
959.8875
01110011
11011100
941.15625
10011000
00001100
952.1375
01101111
01101100
959.9125
01001011
11011100
Page: 7-14
Copyright © 1996 Glenayre
Print Date: 12/05/96
RL-903 Receiver
MAINTENANCE
Glenayre Document Number: 9110.00148
Issue 1, Rev. C: 12/10/96
Table 7-5 Synthesizer Switch Settings for Common Frequencies (continued)
frequency S1
(MHz)
1.............. 8
S2
1 .............. 8
frequency $1
(MHz)
1..............8
$2
1.............. 8
941.16875
11011000
00001100
952.1625
01011111
01101100
941.18125
10111000
00001100
952.1875
01111111
01101100
941.19375
11111000
00001100
952.2125
01000000
11101100
941.20625
10000100
00001100
952.2375
01000000
11101100
941.21875
11000100
00001100
952.2625
01010000
11101100
941.23125
10100100
00001100
952.2875
01110000
11101100
941.24375
11100100
00001100
952.3125
01001000
11101100
941.25625
10010100
00001100
9523375
01101000
11101100
941.26875
11010100
00001100
941.28125
10110100
00001100
941.29375
11110100
00001100
94130625
10001100
00001100
941.31875
11001100
00001100
94133125
10101100
00001100
941.34375
11101100
00001100
94135625
10011100
00001100
94137875
10111100
00001100
Print Date: 12/05/96
Copyright ©1996 Glenayre
frequency SI
(MHz)
1 .............. 8
82
1 .............. 8
Page: 7-15
Glenayre Document Number: 9110.00148
Issue 1, Rev. C: 12/10/96
RL-903 Receiver
MAINTENANCE
Table 7-6 RF Board Controls
reference
designator
function
L2/L3/L4
resonators on
helical filter #1
L7/L8/L9
resonators on
helical filter #2
CAUTION
See text before
attempting to
adjust.
Figure 7-4 RF Assembly - Adjustments
Page: 7-16
Copyright © 1996 Glenayre
Print Date: 12/05/96
RL-903 Receiver
MAINTENANCE
Glenayre Document Number: 9110.00148
Issue 1, Rev. C: 12/10/96
Table 7-7 IF Board Controls and Indicators
reference
designato
r
function
Print Date: 12/05/96
C51, L l,
L3, L7, L8
IF tuning and filter matching
L5
quadrature coil
C52
second l.o. fine-tune
Copyright ©1996 Glenayre
Page: 7-17
RL-903 Receiver
MAINTENANCE
Glenayre Document Number: 9110.00148
Issue 1, Rev. C: 12/10/96
Table 7-7 IF Board Controls and Indicators (continued)
reference
designato
r
function
D21
(green)
POWER - indicates power supply on when lit
D11
(green)
KEY - tx key
D14
(green)
SQUELCH - indicates unsquelched when lit
D15 (red;
green)
green - line output J1-8, -9 at or above preset level
red - line output above preset level see text) (optional)
R5
voting tone level (not used)
R51
audio level to IF board
R57
LINE OUT - line audio level (optional)
R80
NORMAL - noise squelch
R81
TIGHT - carrier squelch
S1
KEY/DISable/REMOTE switch
S2
SQUELCH select
JR3/JR4
3 - line audio on, ignores squelch logic
4 - line audio controlled by squelch logic
JR5/JR6
6 - voting tone disabled (movable jumper not required
5 - voting tone enabled
JR7/JR8
8 - tone board bypassed or used in link-transmitter configuration
7- tone board audio path enabled, paging-transmitter
configuration
JR9/JR10/
JR11/JR12
10, 11 - true audio phase
9,12 - inverted audio phase
JR13/JR14
14 - delay processor bypassed
13 - delay processor enabled
JR15/JR16
16 - flat, ac-coupled audio fed to J1-2 (TB2-2)
15- deemphasized, ac-coupled audio fed to J1-2 (TB2-2)
Shaded items are accessible from the front panel.
TP1
detected audio
TP2
RSSI
Shaded items are accessible from the front panel.
Page: 7-18
Copyright © 1996 Glenayre
Print Date: 12/05/96
RL-903 Receiver
MAINTENANCE
Glenayre Document Number: 9110.00148
Issue 1, Rev. C: 12/10/96
Figure 7-5 IF Board Controls and Indicators
Print Date: 12/05/96
Copyright ©1996 Glenayre
Page: 7-19
Glenayre Document Number: 9110.00148
Issue 1, Rev. C: 12/10/96
RL-903 Receiver
MAINTENANCE
Table 7-8 PS/A Board Controls
reference
designator
function
VOLUME R27
adjusts front-panel speaker level
SW1
controls power input to power supply
SW2
jumper to enable speaker audio
Figure 7-6 PS/A Board Controls and Indicators
Page: 7-20
Copyright © 1996 Glenayre
Print Date: 12/05/96
Glenayre Document Number: 9110.00148
Issue 1, Rev. C: 12/10/96
RL-903 Receiver
CHECKOUT AND TROUBLESHOOTING
Refer to the system manual to isolate a fault to a piece of equipment. Use this section to
isolate a fault to an assembly. If the receiver does not function correctly, perform the procedures listed in this section to determine the problem. Keeping records of performance of
this receiver is helpful. Use Table 2-1, Specifications, to determine the expected sensitivity
of the receiver. Refer to Figure 3-3, Top View of Internal Assemblies, to locate the
assemblies.
8.1
Power Supply (PS/A board unless noted)
Check power supply output and delivery to pc assemblies in this procedure.
Figure 7-6, PS/A Board Controls and Indicators, provides a view of the pc board.
Dc Power Checks
8.2
1.
Check that input power (28 Vdc or within range of specifications) is supplied to rearmounted TB 1.
2.
Turn on front-panel power switch. Front-panel POWER LED IF board D21 should
light.
3.
Check that fuse is okay.
4.
Check voltage at TP2. Voltage should be 14.5 to 15.5 Vdc.
5.
Check voltage at TP1. Voltage should be 11.5 to 12.5 Vdc.
6.
Refer to Figure 7-5. Check voltage at IF-board P7-1 and -2. Level should be same as
in previous step.
7.
Refer to Figure 7-1. Check voltage at VCO-board U10-output (U10 is next to reference assembly U11; output is at leg toward corner). Level should be 4.75 to 5.25 Vdc.
Audio (IF board unless noted)
This procedure verifies that the audio section is functioning properly. Refer to Figure 7-5,
IF Board Controls and Indicators.
Audio Checks
Verify that the audio section is working in order to more easily troubleshoot RF and IF
problems.
Print Date: 12/05/96
1.
Set SQUELCH switch S2 to TEST. Be sure that SQUELCH LED D14 is lit, indicating open squelch.
2.
Apply standard test signal to receiver. Note that RSSI voltage at J1-12 (TB3-5) can
indicate status of RF and IF stage even if audio section is not functioning.
3.
Verify that installation of jumpers is correct. Refer to Table 7-7, IF Board Controls
and Indicators. Be sure that R51 is not turned completely down.
4.
If receiver uses tone board, temporarily disable tone board path by setting JR7/JR8 to
JR8.
Copyright © 1996 Glenayre
Page: 8-1
RL-903 Receiver
REMOVAL AND REINSTALLATION
Glenayre Document Number: 9110.00148
Issue 1, Rev. C: 12/10/96
Remove all power from the equipment before performing any of the following procedures.
Note
Unless otherwise noted, the reinstallation of assemblies is obvious from
reading the procedure for removal.
Caution
When reattaching plugs onto pc boards, be certain
to observe correct polarity and alignment.
Note
The VCO board contains internal switches which are used to
program the receive frequency.
'
The IF board contains jumpers which characterize its operation.
The IF board may be wideband or narrowband.
The TONE board contains switches which determine its decoding
and notch frequency.
If you replace one or more of these boards or the entire receiver, ensure
that the replacement is configured the same as the original.
9.1
Access to Internal Assemblies
Perform the following procedure to gain access to the controls on internal assemblies or to
remove or install them.
Accessing Internal Assemblies
Print Date: 12/05/96
1.
Remove all input power from cabinet.
2.
Slide receiver mostly out of rack by removing screws which hold front panel to rails
and pulling forward to gain access to rear.
3.
Mark and disconnect wires and connectors which are connected to rear of chassis.
4.
If interface board is part of station wiring, leave it connected to station wiring and disconnect it from rear of receiver by unscrewing retaining screws from standoffs.
5.
Pull off removable portion of TB 1 (some versions). If not needed for troubleshooting,
leave connected to system wiring.
6.
Complete removal of receiver from rack.
7.
Remove cover by loosening appropriate screws, pulling up on front of top cover, and
sliding cover toward rear.
8.
Place receiver on test bench and make provision for standard test setup. See Figure 72, Test Setup.
Copyright © 1996 Glenayre
Page: 9-1
Glenayre Document Number: 9110.00148
Issue 1, Rev. C: 12/10/96
RL-903 Receiver
REMOVAL AND REINSTALLATION
Removing Receiver Rear Panel
9.2
1.
Continue disassembly if removal of major internal assemblies is required. Removal of
rear panel is required for some assemblies.
2.
Disconnect BNC cable plug from front-end (RF assembly) and VCO/synthesizer receptacles.
3.
Remove 4 screws which hold receiver back and remove rear panel.
PS/A Board
PS/A Board Removal
9.3
1.
Remove rear panel.
2.
Mark and remove connectors for electrical connections. Observe polarity of P2.
3.
Record arrangement of hardware and remove hardware holding IC heat sinks to side
of chassis.
4.
Remove screws holding pc board to chassis and lift up and toward rear.
IF Audio Board
IF Board Removal
9.4
1.
Remove rear panel.
2.
Mark and remove connectors for electrical connections. Observe polarity of connectors.
3.
Remove tone board if required.
4.
Remove screws holding pc board to chassis and lift board up and toward rear.
VCO Board
VCO Board Removal
Page: 9-2
1.
Mark and remove power and signal connectors. Note polarity of connectors.
2.
Remove rear panel or BNC feedthrough to allow pc board clearance.
3.
Use nutdriver to remove shield.
Copyright ©1996 Glenayre
Print Date: 12/05/96
RL-903 Rece
REMOVAL AND REINSTALLATI
Glenayre Document Number: 9110.00148
Issue 1, Rev. C: 12/10/96
4.
Use nutdriver to remove nuts holding pc board to shock-mounting pegs. Hold bott
of mounting screws with screwdriver from bottom, if necessary.
5.
Lift board up and toward rear.
6.
Record positions of jumpers and programming switch if new board is to be install
7.
Replace shield and fasten with hardware, as appropriate.
Note
Be certain that no loose hardware, such as springs, is lost while the VCO
is out of its mounting.
9.5
RF Board Assembly
RF Board Assembly Removal
1.
Mark and remove power and signal connectors. Note polarity of connectors.
2.
Remove rear panel or BNC feedthrough to allow pc board clearance.
3.
Remove screws which hold pc board to chassis.
4.
Remove pc board by carefully lifting up.
Note
Be certain that the new RF board is tuned to the correct range if you are
replacing the front end assembly.
Print Date: 12/05/96
Copyright © 1996 Glenayre
Page: 9-3
RL-903 Receiver
REMOVAL AND REINSTALLATION
Page: 9-4
Glenayre Document Number: 9110.00148
Issue 1, Rev. C: 12/10/96
Copyright © 1996 Glenayre
Print Date: 12/05/96
Glenayre Document Number: 9110.00148
Issue 1, Rev. C: 12/10/96
RL-903 Receiver
FIGURES
Figure 10-1 Interface Board 265-0305-002 Assembly and Schematic
Print Date: 12/05/96
Copyright © 1996 Glenayre
Page: 10-1
Glenayre Document Number: 9110.00148
Issue 1, Rev. C: 12/10/96
RL-903 Receiver
FIGURES
Figure 10-2 IF Audio Board Schematic
Page: 10-2
Copyright © 1996 Glenayre
Print Date: 12/05/96
RL-903 Receiver
FIGURES
Glenayre Document Number: 9110.00148
Issue 1, Rev. C: 12/10/96
Figure 10-2, IF Audio Board Schematic (continued)
Print Date: 12/05/96
Copyright © 1996 Glenayre
Page: 10-3
Glenayre Document Number: 9110.00148
Issue 1, Rev. C: 12/10/96
RL-903 Receiver
FIGURES
Figure 10-2, IF Audio Board Schematic (continued)
Page: 10-4
Copyright © 1996 Glenayre
Print Date: 12/05/96
RL-903 Receiver
FIGURES
Glenayre Document Number: 9110.00148
Issue 1, Rev. C: 12/10/96
Figure 10-3 Front End Schematic
Print Date: 12/05/96
Copyright © 1996 Glenayre
Page: 10-5
Glenayre Document Number: 9110.00148
Issue 1, Rev. C: 12/10/96
RL-903 Receiver
FIGURES
Figure 10-4 VCO Board Schematic
Page: 10-6
Copyright © 1996 Glenayre
Print Date: 12/05/96
RL-903 Receiver
FIGURES
Glenayre Document Number: 9110.00148
Issue 1, Rev. C: 12/10/96
Figure 10-5 PS/A Board Schematic
Print Date: 12/05/96
Copyright © 1996 Glenayre
Page: 10-7
Glenayre Document Number: 9110.00148
Issue 1, Rev. C: 12/10/96
RL-903 Receiver
FIGURES
Page: 10-8
Copyright © 1996 Glenayre
Print Date: 12/05/96
RL-903 Receiver
Glenayre Document Number: 9110.00148
Issue 1, Rev. C: 12/10/96
A
A
F
assemblies, main 3-1
audio
checks 8-1
external processing 6-4
filtering 6-4
level adjustment 7-9
level R51 6-4
phase polarity 6-4
fault 6-2
reporting 6-5
fax number 1-2
FCC 1-3
Figure 4-2
first mixer 6-1
fm detection 6-4
frequency
range 2-1
front end assembly 9-3
Front End Assembly Removal 9-3
front panel
controls and indicators 5-1, 5-2
view 3-3, 5-1, 5-3
B
BASIC listing 7-10
block diagrm 3-1
C
carrier squelch
adjustment 7-6
ceramic filter 6-4
channel spacing 3-1
chassis
dimensions 2-1
removing from equipment rack 9-1
weight 2-1
control tone 3-2
controls
IF board 4-2
PS/A board 4-2
RF board 4 2
VCO 4-2
crystal filter 6-4
D
Dc Power Checks 8 1
DOC 1-3
documents,, applicable 1-1
G
Glenayre 1-2
1/0 board
assembly 10-1
schematic 10-1
I/O connections 4-3
IF
amplifier 6-1, 6-4
tuning 7-2
tuning procedure 7-5
IF amplifier
sensitivity check 8-2
troubleshooting 8-2
IF board
audio level adjustment procedure 7-9
controls and indicators 7-17, 7-19
removal and reinstallation 9-2
IF board 4-2
VCO board 4-2
Industry Canada 1-3
input power 6-1
inspection 4-2
interface board 3-1
internal connections 4-4
Print Date: 12/05/96
Copyright © 1996 Glenayre
Page: index-1
Glenayre Document Number: 9110.00148
Issue 1, Rev. C: 12/10/96
RL-903 Receiver
J
Q
JR1 7-1
JR3 6-2, 7-1
JR4 7-2
quadrature detector 6-4
K
rear panel
connections 4-3
removing 9-2
received-signal-strength indicator 3-2
Receiver RF Sensitivity Checks 8-2
reference oscillator 6-2
setup 7-1
regulated power 6-1
regulatory compliance 1-3
Removing 9-2
RF
tuning 7-2
RF amplifier
troubleshooting 8-2
RF and IF Tuning Procedure 7-5
RF board
controls 7-13, 7-17
removal and reinstallation 9-3
tuning procedure 7-5
RF input 6-1
RF INPUT J1 7-1
RSSI
description 3-2
from U2 6-5
level 7-7
level observation and recording 7-7
levels when receiving a signal from link transmitter 7-8
operation 6-4
R
keying
front-panel KEY switch Si 6-5
KEY LINE LED 6-5
L
Line Audio Level Adjustment Procedure 7-9
line driver
adjustment 7-9
audio selection 6-4
enabling 3-2
function 3-1
operation 6-1, 6-5
option 1-1
specifications 2-1
link repeater 3-1
link repeater receiver 1-1
local oscillator setup 7-1
M
manual part numbers 1-1
models, receiver 1-1
N
narrowband 1-1
noise squelch
adjustment 7-6
NORMAL Squelch Adjustment Procedure 7-6
notch 3-2
notch tone 3 -2
P
power supply 7-1
Power Supply Adjustment 7-1
PS/A board
checkout 8-1
controls 7-20
removal and reinstallation 9-2
Page: index-2
Copyright © 1996 Glenayre
Print Date: 12/05/96
RL-903 Receiver
Glenayre Document Number: 9110.00148
Issue 1, Rev. C: 12/10/96
S
S
T
selectivity 6-4
sensitivity check 8-2
specifications 2-1
squelch
adjustment 7-6
carrier 6-4
checks 8-2
noise 6-4
noise adjustment 7-6
normal adjustment 7-6
switch S2 6-4
tight adjustment 7-6
troubleshooting 8-2
standard test signal 7-5
synthesizer
BASIC listing for programming 7-10
channel spacing 6-1
checkout 8-2
controls and indicators 7-3, 7-4
DIP switch settings for common frequencies 713
DIP switches 7-12
functional diagram 6-3
PLLsynthesizer
steps 6-2
programming 7-11
programming procedure 7-1, 7-11
reference oscillator 6-2
reset 7-2
steps 3-1
tuning steps 6-1
VCO 6-2
VCO board removal and reinstallation 9-2
VCO tuning fault
LED 7-2
TB1 7-1
telephone number 1-2
test equipment 4-1
test setup 7-9
TIGHT Squelch Adjustment Procedure 7-6
tone board
check 8-2
connections 4-2
operation 6-1
specifications 2-1
tone keying 3-2
tuning range 3-1
Print Date: 12/05/96
V
VCO board
removal and reinstallation 9-2
volume control 6-1
W
warranty 1-3
wideband 1-1
Copyright © 1996 Glenayre
Page: index-3
RL-903 Receiver
W
Page: -4
Glenayre Document Number: 9110.00148
Issue 1, Rev. C: 12/10/96
Copyright © 1996 Glenayre
Print Date: 12/05/96