1
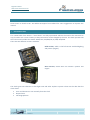
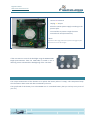
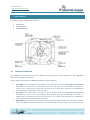
737NG CLOCK V3.1 USER MANUAL Ref: MAN-SGGSRR-09-003 Date: November 2012 Ed.: 02 ©2005-2013 Sismo Soluciones. All Right Reserved Flight Simulators www.sismo-soluciones.com INDEX 1 Preliminary notes....................................................................................................................................... 3 2 Introduction ............................................................................................................................................... 3 3 Installation ................................................................................................................................................. 4 4 Maintenace ................................................................................................................................................ 5 5 Functionality .............................................................................................................................................. 6 5.1 6 7 TIME/DATA Configuration ......................................................................................................................... 7 6.1 Elapsed Time ...................................................................................................................................10 6.2 Chronograph Function ....................................................................................................................11 Available Products ...................................................................................................................................12 7.1 8 TIME/DATE Function ......................................................................................................................... 6 Pictures ...........................................................................................................................................13 FAQ ..........................................................................................................................................................14 02 USER MANUAL 737NG CLOCK V3.1 User Manual - 737NG Clock V3.1 - Ed02.docx MAN-SGGSRR-09-003 2 Flight Simulators www.sismo-soluciones.com 1 PRELIMINARY NOTES Sismo wants to thank to Mr. Jan Willem Severijnen from Holland for some suggestions to improve this manual. 2 INTRODUCTION This 737NG Clock from Sismo is "stand alone" and fully operational without the need to be connected to any I/O card or PC. It uses a battery to keep time and it can be changed by the user. The clock operates like the real one and includes the modes: MAN/UTC, DAY/MO/YR, ET/CHR, RUN/HLD. There are two different versions available: Gold Version, which is the full version with backlighting and pointer (engine). Silver Version, which does not include a pointer and engine The clocks give time reference to the flight crew and other airplane systems. These are the data that the clock shows: Time and date UTC or set manually from the clock. Elapsed time. Chronograph time. 02 USER MANUAL 737NG CLOCK V3.1 User Manual - 737NG Clock V3.1 - Ed02.docx MAN-SGGSRR-09-003 3 Flight Simulators www.sismo-soluciones.com CAUTION! Keep hands out of the PCBs (backpanels) while the 737NG Clock is switched ON 3 INSTALLATION It’s not required any special driver or software installation. Only it’s necessary to connect it to its respective power supplies (not included). There are 2 options to supply the clock: A) If the 737Clock is NOT going to be dimmed with an extra “dimming circuit” for backlight (RECOMMENDED: clock will work and backlight will switch ON without to be dimmed) 1- Connect directly a 12V DC power supply to the available 12V black connector placed on the backpanel of the 737NG Clock. - Locate the 12V Black Connector (or C12V) - Place the 12V DC power supply into the connector C12V - Leave the jumper U8 plugged B) If the 737Clock is going to be dimmed with an extra “dimming circuit” for backlit (NOTE: The 12V supply of section A is also needed) 1- Connect the 12V DC power supply to the available green 12V terminals placed on the backpanel of the 737Clock. This will give the enough power supply to make the clock works. 02 USER MANUAL 737NG CLOCK V3.1 User Manual - 737NG Clock V3.1 - Ed02.docx MAN-SGGSRR-09-003 4 Flight Simulators www.sismo-soluciones.com - Locate 12V terminal - Unplug U8 Jumper - Place the 12V DC power supply according to the positive pole. - You need also to power trough the C12V terminal with 12V.(See section A) *Note: Pay attention when plug positive with (+) without changing the poles, otherwise the clock can be damaged. 1 2 2 1 2 1 2 2 If the user wants to control the backlight using the MAIN PANEL Bright potentiometer from the PRM CBC, he needs to use a dimming circuit to dimmed the backlighting of the 737 Clock 4 MAINTENACE The unique maintenance of this element is to replace the battery when it’s empty. This component keeps the information about time and date introduced by the user. The type/brand of this battery has to be CR2032 3V. It’s a standard battery that you can buy in any store of your city. 02 USER MANUAL 737NG CLOCK V3.1 User Manual - 737NG Clock V3.1 - Ed02.docx MAN-SGGSRR-09-003 5 Flight Simulators www.sismo-soluciones.com 5 FUNCTIONALITY The clock has got 3 fundamental functions: 5.1 TIME/DATE ELAPSED TIME CHRONOMETER TIME/DATE FUNCTION The TIME/DATE push button controls the different modes the clock can be switched to. The TIME/DATE function has 4 modes of operation. All the relating information to TIME/DATE appears in the top display. UTC TIME: This information is extracted in the real plane from the GPS(GLOBAL POSITIONING SYSTEM) but as this unit it is Stand-Alone, the UTC hour must be set manually and saved in a memory for its posterior use. Once the UTC hour is set, it will not be necessary to re-establish it until the battery of lithium becomes run down. UTC DATE: this information is extracted in the real plane from the GPS(GLOBAL POSITIONING SYSTEM) but as this unit it is Stand-Alone, the UTC date must be set manually and saved in a memory for its posterior use. Once the UTC date is set, it will not be necessary to re-establish it until the battery of lithium becomes run down. MAN TIME: this information is extracted in the real plane from the clock but as this unit it is StandAlone, the MAN hour (local time) must be set manually and saved in a memory for its posterior use. 02 USER MANUAL 737NG CLOCK V3.1 User Manual - 737NG Clock V3.1 - Ed02.docx MAN-SGGSRR-09-003 6 Flight Simulators www.sismo-soluciones.com 6 The MAN hour must be set according to the geographic zone where the clock is going to be used. Once the MAN hour is set, it will not be necessary to re-establish it until the battery of lithium becomes run down. MANDATE: this information is extracted in the real plane from the clock but as this unit it is StandAlone, the MAN date (local date) must be set manually and saved in a memory for its posterior use. The MAN date must be set according to the geographic zone where the clock is going to be used. Once the MAN date is set, it will not be necessary to re-establish it until the battery of lithium becomes run down. TIME/DATA CONFIGURATION To configure TIME/DATE in any of its 4 modes only it is necessary to follow a few very simple steps that are detailed below: Note: Proceed first to change the UTC TIME and UTC DATE before to change the MAN TIME and MAN DATE. Otherwise, the data of MAN TIME and MAN DATE will vary. UTC TIME: for setting the UTC hour it is necessary to follow the next steps: 02 USER MANUAL 737NG CLOCK V3.1 User Manual - 737NG Clock V3.1 - Ed02.docx MAN-SGGSRR-09-003 7 Flight Simulators www.sismo-soluciones.com 1. The clock must be set for showing the information (in the top display) corresponding to TIME UTC. To do that correctly, press TIME/DATE until you can visualize that TIME is switched on and DAY, MO and YR are switched off. UTC must also be switched on. 2. Push at the same time the buttons RESET+CHR (first RESET and later CHR, otherwise we will activate the Chronometer mode). This step is used for putting the clock in configuration mode. Then, the hour digits will start to blink. 3. Modify the hour digits with the +/- push-buttons and stop when you have the correct hour UTC. 4. After that, push SET and the minutes digits will start to blink. 5. Make the same operation of to adjust the digits with the +/-push-buttons. 6. Once this operation is finished, return to push again SET and the information of the UTC TIME will store in the system. UTC DATE: for setting the UTC date it is necessary to follow the next steps: 1. The clock must be set for showing the information (in the top display) corresponding to DATE UTC. To do that correctly, press TIME/DATE until you can visualize that DAY, MO and YR are switched on and TIME is switched off. UTC must also be switched on. 2. Push at the same time the buttons RESET+CHR (first RESET and later CHR, otherwise we will activate the Chronometer mode). This step is used for putting the clock in configuration mode. Then, the hour digits will start to blink. 3. Modify the DAY digits with the +/- push-buttons and stop when you have the correct day UTC. 4. After that, push SET and the MONTH digits will start to blink. 5. Make the same operation of to adjust the digits with the +/-push-buttons. 6. After that, push SET and the YEAR digits will start to blink. 7. Make the same operation of to adjust the digits with the +/-push-buttons. 8. Once this operation is finished, return to push again SET and the information of the UTC DATE will store in the system. MAN TIME: for setting the UTC hour it is necessary to follow the next steps: 1. The clock must be set for showing the information (in the top display) corresponding to TIME MAN. To do that correctly, press TIME/DATE until you can visualize that TIME is switched on and DAY, MO and YR are switched off. MAN must also be switched on. 2. Push the SET buttons. This step is used for putting the clock in configuration mode. Then, the hour digits will start to blink. 3. Modify the hour digits with the +/- push-buttons and stop when you have the correct hour MAN. 4. After that, push SET and the minutes digits will start to blink. 5. Make the same operation of to adjust the digits with the +/-push-buttons. 6. Once this operation is finished, return to push again SET and the information of the MAN TIME will store in the system. 02 USER MANUAL 737NG CLOCK V3.1 User Manual - 737NG Clock V3.1 - Ed02.docx MAN-SGGSRR-09-003 8 Flight Simulators www.sismo-soluciones.com MAN DATE: for setting the MAN date it is necessary to follow the next steps: 1. The clock must be set for showing the information (in the top display) corresponding toDATE MAN. To do that correctly, press TIME/DATE until you can visualize that DAY, MO and YR are switched on and TIME is switched off. MAN must also be switched on. 2. Push the SET buttons. This step is used for putting the clock in configuration mode. Then, the hour digits will start to blink. 3. Modify the DAY digits with the +/- push-buttons and stop when you have the correct day UTC. 4. After that, push SET and the MONTH digits will start to blink. 5. Make the same operation of to adjust the digits with the +/-push-buttons. 6. After that, push SET and the YEAR digits will start to blink. 7. Make the same operation of to adjust the digits with the +/-push-buttons. 8. Once this operation is finished, return to push again SET and the information of the MAN DATE will store in the system. 02 USER MANUAL 737NG CLOCK V3.1 User Manual - 737NG Clock V3.1 - Ed02.docx MAN-SGGSRR-09-003 9 Flight Simulators www.sismo-soluciones.com 6.1 ELAPSED TIME The ELAPSED TIME function shows the time of flight, but it must be initiated by the user. The information of the ELAPSED TIME appears in the lower display. When ELAPSED TIME is selected, the led ET together with the mode of operation RUN or HLD which depend on the functionality for the clock will be switched on. The hours and minutes are shown in the display but not for the seconds. Si se vuelve a presionar el pulsador ET se inicia la cuenta de nuevo volviendo a iluminarse el LED RUN y se apaga HOLD. To initiate the ELAPSED TIME mode it is necessary to push once the ET push-button. After that, the time will start to count and the LED RUN is switched on. If we return to push the ET push-button, the ELAPSED TIME will stop and the LED HOLD is switched on and LED RUN is switched off. If the ET push-button is again pushed, it begins again to count returning the LED RUN to on and HOLD to off. If we push the RESET push-button when the count is active (RUN to on), a reset of the counter will be done returning all the digits to zero and initiating a new count. Otherwise, if we push the RESET push-button when the ELAPSED TIME is with HOLD to on, this reset will make a reset of the ELAPSED TIME showing all the digits to zero and switching off the lower display 5 seconds later. All the leds related to ELAPSED TIME will also be switched off. The function ELAPSED TIME is secondary to the system, that is tos ay that if being selected the ELAPSED TIME we also push the CHR function (Chronometer), all the information of the ELAPSED TIME will disappear 02 USER MANUAL 737NG CLOCK V3.1 User Manual - 737NG Clock V3.1 - Ed02.docx MAN-SGGSRR-09-003 10 Flight Simulators www.sismo-soluciones.com from the lower display for showing the information of the chronometer. The ELAPSED TIME continues working on the second plane and when the chronometer is removed, the ELAPSED TIME function returns to show its information in the lower display. Note: as ELAPSED TIME mode works in the real plane, you only need to dial in the display the hours and minutes (ELAPSED TIME has not seconds). 6.2 CHRONOGRAPH FUNCTION To activate the Chronometer function, we must push the CHR push-button, so a count is initiated showing the minutes in the lower right display and the seconds by means of a gyratory needle over the sphere of the clock (only available in GOLD Version). The CHR led will also be switched on. If we push again the CHR push-button, the count will stop. If we return to push the CHR push-button, a reset of the chronometer will be done switching off the lower display and doing that the needle of the second-hand goes to its initial position in the minor possible time. This function has priority over the ELAPSED TIME. If the information that appears in the lower display is the ELAPSED STOLE data, this information will disappear and the information of the Chronometer will appear. But it is important to know that the information of the ELAPSED TIME is not lost, it only continues working on the second plane. Once the Chronometer is deactivated, the information of the ELAPSED TIME returns to be shown in the lower display. 02 USER MANUAL 737NG CLOCK V3.1 User Manual - 737NG Clock V3.1 - Ed02.docx MAN-SGGSRR-09-003 11 Flight Simulators www.sismo-soluciones.com Note: in the function CHRONO, the SILVER Version has not got needle to show the seconds, then CHR mode can only visualize the minutes and hours. 7 AVAILABLE PRODUCTS 737NG Clock is commercialised in two different lines: Gold Version, which is the full version with backlighting and pointer (engine). Silver Version, which does not include a pointer and engine. Prices and further info in: www.sismo-soluciones.com 02 USER MANUAL 737NG CLOCK V3.1 User Manual - 737NG Clock V3.1 - Ed02.docx MAN-SGGSRR-09-003 12 Flight Simulators www.sismo-soluciones.com 7.1 PICTURES 02 USER MANUAL 737NG CLOCK V3.1 User Manual - 737NG Clock V3.1 - Ed02.docx MAN-SGGSRR-09-003 13 Flight Simulators www.sismo-soluciones.com 8 FAQ # Each time the Clock is switched OFF, the time must be set again Once the Time is set the first time, it must keep the Time saved even if it is switched off from power supply. The Clock saves and keeps the time through the round battery installed on the Clock, and this functionality will not work if the battery run out. This issue will be solved by changing the battery for a new one. After to change the battery, the Chrono will work again. # The Chrono does not work The battery is also used to make the Chrono runs, and this functionality will not work if the battery run out. This issue will be solved by changing the battery for a new one. END OF DOCUMENT 02 USER MANUAL 737NG CLOCK V3.1 User Manual - 737NG Clock V3.1 - Ed02.docx MAN-SGGSRR-09-003 14