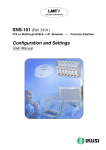
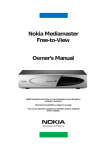
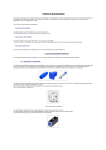
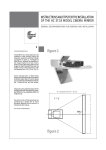
1
CONTENTS
TABLE OF CONTENTS
1 - Introduction............................................................. p. 2/3
2 - Your twin digital receiver......................................... p. 4/7
3 - The remote control ................................................. p. 8/9
4 - Using the remote control - Main menu................... p. 10/11
5 - Control the TV2/VCR output................................... p. 12
6 - Connection and first-time use ................................ p. 13/15
7 - Reception adjustment ............................................ p. 16
8 - Channel scan .......................................................... p. 17/18
9 - Programme lists...................................................... p. 19/20
10 - Electronic Programme Guide ............................... p. 21/23
11 - Parental lock and Smart card ............................... p. 24
12 - Multi-function timer .............................................. p. 25
13 - Technical characteristics ...................................... p. 26
1
Puma_s_pace_uk_text.indd
1
18/05/2003, 23:20
1
INTRODUCTION
INTRODUCTION
Thank you for choosing the Pace Twin Digital Satellite Receiver. Please follow the
instructions in this manual carefully to enjoy all the advantages of digital TV. We
advise following the user instructions and recommendations supplied with your Twin
Receiver, especially for first-time use. Your Twin Receiver fully complies with international DVB (Digital Video Broadcasting) standards. It is compatible with televisions
and VCRs equipped with a standard SCART connector, also UHF, composite video
or S-Video connectors.
RECOMMENDATION
Your Twin Receiver’s packaging includes cardboard and plastic which can be recycled
to protect the environment.
Storage
If your Twin Receiver is not used directly after purchase, it can be stored in its original
packaging, in a cool dry place, at a temperature between -6°C and +50°C. Before
use, wait until your Twin Receiver has reached room temperature.
Maintenance
To clean your Twin Receiver, dust with either a clean dry cloth, or one that has been
slightly dampened with distilled water. Never use detergents of any kind. Before
cleaning, always disconnect the power from your Twin Receiver and unplug the aerial
and satellite leads.
DISCLAIMER
Information in this manual is correct at the time of going to print. Channel availability
is subject to signal coverage and may change at the discretion of the broadcaster.
Reception of these channels may depend on the type and condition of existing
satellite equipment and installation.
If your satellite equipment needs upgrading, we recommend that this is carried out
by a professional installation engineer.
COPYRIGHT NOTICES
This document is copyrighted and may not, in whole or part, be copied, photocopied,
reproduced, translated or reduced to any electronic or machine-readable form without
prior consent in writing from Pace Micro Technology plc. © Pace Micro Technology
2002.
are trademarks of Pace Micro Technology plc.
Pace® and
2
Puma_s_pace_uk_text.indd
2
18/05/2003, 23:20
1
INTRODUCTION
USING EQUIPMENT SAFELY
Your Twin Receiver has been manufactured to meet international safety standards,
but you must take care to operate it safely.
It is important that you read these safety instructions. If you have any doubts about
the installation, operation or safety of your Twin Receiver, please contact your
dealer.
WARNING
Remember that contact with AC mains can be lethal or can cause severe electric
shock. To avoid the risk of electric shock:
Never remove the top cover from your Twin Receiver. There are no userserviceable parts inside, but
there are some high-voltage live parts.
Make sure all electrical connections are properly made.
Do not connect any equipment to the mains supply until you have properly connected all the other
leads.
Disconnect the mains lead from the mains wall socket before you disconnect any equipment from
your Twin Receiver.
Never push anything into holes, slots or other openings in the case (except a viewing card into the
slot provided, and only when you are requested to do so).
CAUTION
Do not use or store your Twin Receiver in hot, cold, damp or dusty places.
Do not block the ventilation holes of your Twin Receiver. Leave a gap of at least 10cm above and
around it to allow for adequate ventilation. Never stand it on soft furnishings.
Do not put anything on your Twin Receiver which might drip or spill into it. Never stand objects filled
with liquids, such as vases, on top of your TV Recorder.
Do not place your Twin Receiver in an unventilated cabinet or on top of a unit which emits heat (e.g.
a VCR).
Never place naked flame sources, such as lighted candles, on top of your TV Recorder.
Do not pick up or otherwise move your Twin Receiver while it is connected to the mains supply. If you
want to move your Twin Receiver, first disconnect it, then wait at least 30 seconds before continuing.
3
Puma_s_pace_uk_text.indd
3
18/05/2003, 23:21
2
PUMA
Smart card reader
(chip upside)
Power supply indicator
GREEN : in function
RED : standby
ORANGE light :
digital signal
detected on
the antenna for
TV1
Optional smart card reader (chip
upside)
4
Puma_s_pace_uk_text.indd
4
18/05/2003, 23:21
2
YOUR TWIN DIGITAL RECEIVER
Record button
GREEN light : digital
signal detected on
the antenna for
TV2/VCR
Remote control activation
indicator (infrared)
Navigator
Menu
OK/List button
TV2/VCR Menu
Standby button
5
Puma_s_pace_uk_text.indd
5
18/05/2003, 23:21
2
PUMA
Electrical supply
to connect to
the mains (90/240
volts - 50/60 Hz
Terrestrial antenna
output to connect
to TV or video
recorder
Terrestrial
antenna input
Composite
Video
RCA plugs to connect
to the Hi-Fi system.
If you have a Surround
sound Hi-Fi, the spatial
effects will be restored
(if the programme is in
Surround stereo sound).
"S-VHS" outlet for an S-Video (Y/C)
inlet television / Videoprojector
or a S-VHS / Hi-8 video recorder.
• Terrestrial antenna connection
(optional remodulator)
The remodulator allows the channel
received by satellite to be added to
the channels received by the UHF/VHF
network to link PUMA to a remote
television. A channel is chosen using the
Configuration/Television menu. Use the
same channel number on your television. The PUMA is preconfigured with
channel 36.
• Analogue audio connections
For stereo sound, use a stereo Cinch
cable to link the Cinch audio connectors (AUDIO L/R) to the stereo Hi-Fi
system.
6
Puma_s_pace_uk_text.indd
6
18/05/2003, 23:21
th
2
YOUR TWIN DIGITAL RECEIVER
Scart plug
(TV2/VCR)
to connect to
the second TV or
the VCR
Scart plug (TV)
to connect to the
television set.
Peripheral sockets
for computer
system link (serial),
for future
applications.
S/PDIF digital audio output.
Remove the cover before use.
Satellite antenna A input
Satellite antenna B input
Satellite antenna A output
Satellite antenna B output
• Digital audio connection
• Connecting the satellite signals
You can connect your PUMA to
a Hi-Fi or Home-Cinema system with an
optical fibre cable via the S/PDIF socket.
This will give you access to digital quality
sound.
Connect the "INPUT" to the satellite
dish, using a coaxial cable with a F
plug. If there is no F plug fitted on the
cable: isolate the cable as shown in the
diagram below and carefully screw it
onto the cable until it stops. While
fitting the plug, make sure there
is no contact between the outer
metal strap and the core, to prevent
a short-circuit.
IMPORTANT: the S/PDIF socket is
protected by a dust cover.
Remove the cover before plugging in
the optical fibre cable connector. Keep
the cover in a safe place for future use.
The cover is designed to protect the
socket from dust.
7
Puma_s_pace_uk_text.indd
7
18/05/2003, 23:21
3
PUMA
Some keys of the receiver's remote control give access to settings and
configuration menus.
2
3
def
[
For some settings, you
simply need
to press directly
on the remote
control keyboard
(keys 0 to 9)
These keys are also
used for characters like
in a mobile..
1
abc
4
5
6
ghi
jkl
mno
7
8
9
pqrs
tuv
wxyz
0
Freeze
List
Guide
The "Guide" key
displays the details
of the current
programme and gives
access to the
Electronic Programme
Guide (up to 8 days
information).
P
OK
In the menu, these
keys are used to scroll
up and down some
screen-pages.
Pressing the Up key
when viewing TV will
give you access to
technical informations
on the two current
programmes.
P
1
P
A
G
E
2
+
V
O
L
-
Audio
Menu
These keys are used
to navigate in the
menus.
key can be
The
used to return to the
television mode.
However, the receiver
remains in use
(possibility to record
a satellite programme
while watching
a
"terrestrial"programme
on the TV set).
8
Puma_s_pace_uk_text.indd
8
18/05/2003, 23:21
3
THE REMOTE CONTROL
To put your PUMA into, or take it out
of standby
2
1
To switch between TV1 and TV2/VCR
modes
To change channel
[
1
To enter on-screen numbers as such
as Parental code
9
To enter on-screen letters as such as
fovourite list name
Menu
To display / close the Main menu
wxyz
To return to the previous selection or
screen (without saving any changes)
P
To change channel up or down
To select the previous of next itm in a
list or on-screen menu
OK
Red function key in the menu
P
To switch the sound on/off
P
To select favourite list
Green function key in the menu
To move to the left and the right
through on-screen menus, lists or
items
OK
P
To switch between Radio and TV
modes
Yellow function key in the menu
P
List
To display the on-screen channel list
To confirm a selection
OK
To display the on-screen channel list
Blue function key in the menu
P
+
V
O
L
To change the volume of main TV
Guide
To display the TV schedule (EPG)
Audio
To access to the audio configuration
(audio channels, subtitling) of the
current programme
-
P
A
G
E
To select the source of the main
TV between your PUMA and the
auxilliary input
To change page up or down in a list or
text if more than one page is available
To display/close the on-screen
record control list
Press the Up key to open the technical
information page
To create a mult-function timer event
from the EPG
0
Freeze
To freeze or release the frame
9
Puma_s_pace_uk_text.indd
9
18/05/2003, 23:21
4
USING THE REMOTE CONTROL
All the functions of your PUMA
receiver can be accessed using the
remote control.
The main uses are :
1. Daily use
- Programme selection on TV1 and
TV2/VCR
- Favourite lists selection
- Sound adjustment on TV1
- Display of information on current
programme and Electronic Programme
Guide (EPG).
- Parental code activation/deactivation
- Multi-function Timer programming for
TV2/VCR
2. Occasional use
- Selection of the favourite programmes
and organisation into named lists for
an easy and personalised access.
- Updating of the programmes broadcast.
- Updating parental lock
3. Installation configuration
This configuration must be made during
the first installation of your receiver, or
after any equipment modification (dish,
LNB, positioner, switch, TV).
Your receiver comes with very complete
software. To keep up with any technology or operator-based developments,
new functional capabilities can be developed. New versions of the software
could be made available. For better
service, these new versions are available
via selected satellites.
DAILY USE
With your receiver, you can access a
large number of programmes available
via satellite, by creating personalised
programme 'lists". Chapter 8 describes
this list function in depth.
Programme selection
The navigator gives you access to all the
programmes. When you change channels, a banner appears at the bottom of
the screen displaying the channel name,
current list name and channel number
from the list. The P P buttons are used
to change channel in the current list.
buttons are used to change the
The
current list. The name of the selected
list appears at the bottom-right of the
screen. After first installation, two lists
are available : “All” and “Free” for channels without conditional access (FTA,
or Free-To-Air). You can also select
a channel by pressing its number on the
digital keypad.
Programme lists
By pressing the OK or the List button,
the complete list will appear on the
screen. Use the P P buttons to go to the
buttons to
previous/next line, or the
go to the previous/next page. The
buttons are used to change the current
list.
Sound volume adjustment
Use the Vol+ and Vol- buttons to adjust
button
the sound volume. Use the
to mute the sound temporarily.
A pictogram appears on the screen.
Press this button again to restore
sound.
10
Puma_s_pace_uk_text.indd
10
18/05/2003, 23:21
4
MAIN MENU
Main menu
Your TV lists
Your radio lists
Channel list
Configuration
Parental lock
Record control
Programmes information
Language
Electronic Programme Guide
To access the Electronic Programme
Guide, press the Guide button. This
function is detailed in chapter 10.
guration menu.
Chapter 9 describes “Your TV lists”,
“Your Radio lists” and “Channel list”
functions.
Choice of language
A number of programmes are broadcasted with several different simultaneous sound tracks. You can view the
available languages and choose one by
pressing the Audio button.
The “Configuration” function is detailed
in chapters 6, 7 and 8.
CONFIGURATION MENU
The Programme information screen is
described in chapter 10.
button to access the other
Press the
menu functions. The menu is very easy
to use. The following chapters explain
a certain specific points to enable you
to use all the power and flexibility of the
PUMA.
Menu
The P P buttons are used to go up or
left or right. Press the OK
down,
button to validate your choice and/or
open the next screen. Press the
button to return to the previous screen.
Press the Menu button to leave the confi-
The "Parental lock" and “Smart card”
functions are described in chapter 11.
The Record control is described in
chapter 12.
LANGUAGE MENU
The “Language” menu is always at the
bottom of the list. It is therefore easy
to find even if your PUMA was
configured with an unknown language.
After selecting a new language, wait
a few seconds to allow the PUMA
to reinitialise.
11
Puma_s_pace_uk_text.indd
11
18/05/2003, 23:21
5
CONTROL THE TV2/VCR OUTPUT
TV2/VCR SCART OUTPUT
If you want to view the current output
from the TV2/VCR SCART, on a TV
connected to the TV SCART, press the
) button.
TV1/TV2 (
1
2
The picture on your TV screen will
change to show what is currently being
output from the TV2/VCR SCART of
your Twin Receiver.
Note: You cannot view interactive
services or digital text on the output
from the TV2/VCR SCART.
The picture appears in a small window,
together with an information banner at
the bottom of the screen, which displays
the channel number, channel name and
current list name.
While you are viewing this screen, you
can affect the output from the TV2/VCR
SCART as follows:
• display the on-screen list, by pressing
the List button. Use the P P buttons
to go to the previous/next channel
in the list. You can also use the
buttons to display a different list.
Press the OK button to change to the
selected channel.
• change channel by pressing the Ch +
and Ch – buttons.
• display information about the current
channel by pressing the Info button
(see Now & Next Programme Information on page 24).
To return to viewing the current output
from the TV SCART, press the TV1/TV2
) button again.
(
1
2
IMPORTANT NOTE
The transponders of a satellite are broadcasted to different frequencies. Due to
technological constraints these frequencies are grouped in two bands : low
band and high band. Ther is also two
ways to transmit the signal : with a verticalt or an horizontal polarity.
Therefore, a standard LNB can receive
only transponders which have the same
band and polarity :
• low band + horizontal polarity; or
• low band + vertical polarity; or
• high band + horizontal polarity; or
• high band + vertical polarity.
If you use a standard LNB your Twin
Receiver will not be able to receive two
programmes with different characteristics. In that case, your Twin Receiver will
inform you that the programme is not
currently available with the following
pictogramme :
In order to fully enjoy yoir Twin Receiver,
ask your installer to provide you with
a twin LNB or a Dual Twin LNB if you
want to receive two satellites.
If a programme cannot be displayed due
to conflicting selection, the following
image will be displayed :
12
Puma_s_pace_uk_text.indd
12
18/05/2003, 23:22
6
CONNECTION
and first-time use
Although designed for installers,
this section will give you a clearer
understanding of how your receiver
operates. Read the “Recommendations” section carefully.
Please also read carefully the "important note" in the previous page.
CONNECTING THE TWIN RECEIVER
RECEIVER (see drawing in chapter 2)
• Connecting the satellite signal(s)
Connect the "Input(s)" to the satellite
dish, using a coaxial cable with a F plug.
If there is no F plug fitted on the
cable: isolate the cable as shown in the
diagram below and carefully screw it
onto the cable until it stops.
While fitting the plug, make sure there
is no contact between the outer metal
strap and the core, to prevent a shortcircuit.
receiver using a Scart cable (Scart plug
VCR/AUX)
• Connecting a second TV
You can connect a second TV :
- using the UHF/VHF output of the
remodulator. With this connection, you
can connect a second TV several
tens of metres away from the receiver.
Connect this TV set to the "TV output"
using a VHF/UHF cable.
- using an Audio/Video 2.4 GHz transmitter. With this connection you can
control some functions of your Twin
Receiver with a second handset.
Contact your dealer and/or installer.
• Connecting to a terrestrial antenna
This connection allows you to receive
terrestrial TV programs on the second
television. Connect the terrestrial
antenna to the "ANT input" using a
VHF/UHF cable.
• Audio connection
If you want to send the sound to a Hi-Fi
sound system, connect the RCA Cinch
audio connectors and the Hi-Fi system
with a Cinch cable.
If you don't have two cables to
connect to your Twin Receiver, use the
loopthrough cable provided with your
Twin Receiver to connect Output A to
Input B.
• Connecting a TV and VCR
Connect the receiver (Scart plug) and
the television set with the Scart cable. If
your TV set is in stereo, the scart cable
will provide you with stereo sound.
Also connect your video recorder to the
• Digital audio connection
You can also connect your Twin Receiver
to a Home-Cinema system with an
optical fibre cable via the S/PDIF socket.
This will give you access to digital
quality sound.
IMPORTANT: the S/PDIF socket
is protected by a dust cover
13
Puma_s_pace_uk_text.indd
13
18/05/2003, 23:22
6
CONNECTION
and first-time use
Antenna
Double Twin LNB DiSEqC
Hotbird
P
P
Astra
OK
SWITCHING ON THE TWIN RECEIVER
RECEIVER
Turn on the television. Select an "AV" or
"AUX" program (refer to the television
instructions). Plug in the Twin Receiver
receiver, which then initialises (INIT). The
XSAT logo will then appear on the television. If your receiver has not yet been
configured, it will display a series of
screens to guide you through the initial
configuration. If your receiver goes into
standby mode when turned on, either
press the button on the front or on the
remote-control.
TWIN RECEIVER RECEIVER
CONFIGURATION
When first turned on, your Twin Receiver
receiver will guide you through the configuration, by displaying the necessary
menus.
Save
Local Time configuration
To configure local time, the difference
between local time and Greenwich
Mean Time (GMT) has to be indicated.
In the United Kingdom, select GMT+1
during the summer and GMT in winter.
Installation configuration
Installation is summarised in detail on
only one screen.
First select your own configuration
buttons. Standard confiusing the
gurations are:
- Standard LNB : use of one dish with
one LNB ; allows you to receive one
satellite. Potential conflicts.
- Tone Burst monobloc double head :
only one dish with a monobloc double
head to receive two close satellites
(e.g: Astra and HotBird in Europe).
Potential conflicts
14
Puma_s_pace_uk_text.indd
14
18/05/2003, 23:22
6
CONNECTION
and first-time use
- Twin Standard LNB Tone Burst : use of
one dish with one LNB ; allows you to
receive one satellite. No conflicts.
- Twin Standard LNB DiSEqC : use of
one dish with one LNB ; allows you to
receive one satellite. No conflicts.
- Twin Tone Burst monobloc double
head : only one dish with a monobloc
double head to receive two close
satellites (e.g: Astra and HotBird in
Europe).. No conflict.
- Twin DiSEqC monobloc double head :
only one dish with a monobloc double
head to receive two close satellites
(e.g: Astra and HotBird in Europe).. No
conflict.
- DiSEqC 2 inputs + standard LNB :
two LNB (one or two dishes) with
a DiSEqC switch, allows you to receive
two satellites.
A number of other configurations with
one or two switch levels are also
available.
Use the buttons P+/P- to move vertically, to configure each level of the
installation, from the satellite(s) received
to the Twin Receiver.
To modify the configuration of an item,
select it with the navigator keys and
press .
or button to save
Use the blue
the configuration.
OK
OK
15
Puma_s_pace_uk_text.indd
15
18/05/2003, 23:22
7
ADJUSTING RECEPTION
Your PUMA makes it easy to control
the quality of the reception and helps
you to point your dish in the direction
of a satellite.
However, we recommend that initial
settings are carried out by a professional, who will have all the equipment and invaluable experience
required for this.
INFO BUTTON
To control programme reception quality,
press the Info button. Information on the
current programme is displayed, including the reception level and the digital
signal/noise ratio.
If the signals are weak, this could be
because your dish is badly positioned.
Nevertheless, check the reception of
other programmes before changing your
dish positioning.
CONFIGURATION / INSTALLATION
POSITIONING ANTENNA MENU
This menu can be accessed from the
"Configuration” menu and is useful in
a number of ways:
- first installation or;
- if a violent wind has moved the positioning of the dish.
You receive digital signals
You must tell your receiver which
transponder these readings should
be taken from (frequency, polarization
and symbol rate). This depends on
the satellite. For example, you can
choose: Hotbird 13° E 12245 H 27500
Astra 19,2° E 12402 V 27500
buttons to choose
You can use the
different operating modes. The first
thing to do is to position your dish. Use
a plumb line to check that the mounting is vertical. Adjust the elevation by
following the instructions.
FIRST INSTALLATION
STANDARD DISH
(NOT MOTORISED)
Access the "Configuration/Installation/
Positioning antenna" menu, choose
"Scan with manual stop" mode. Position
your dish to obtain maximum reception
level and signal/noise ratio. Then lock
the dish in position.
Dish rotation
If your mounting is motorised, it can
be controlled using a number of
buttons.
The P P buttons are used to turn it to
the West or to the East. To stop rotation,
press OK . To finely adjust the position,
use the colour buttons for a coarse or
fine adjustment. Wait to allow the signal/
noise levels to stabilise each time the
dish has been moved.
16
Puma_s_pace_uk_text.indd
16
18/05/2003, 23:22
8
CHANNEL SCAN
Scan satellite
Scanning mode
Fast (NIT)
Satellite
ASTRA
OK
Start
Cancel
CHANNEL SCAN
With the "Channel List/Scan satellite"
menu, you can scan the available
channels on selected satellite(s).
Only the satellites defined on the configuration screen can be used.
Three scan modes are available:
- Fast (NIT)
- Exhaustive
- Frequency
Use the
mode.
NIT parameters
This method is quick and easy, although
it can only find the services defined by
the NIT. This depends on the operator.
Press the Blue button to change NIT
parameters.
Press OK to start the fast scan. A screen
displays:
In the “Fast Scan” progress screen you
can read:
buttons to select the
Fast scan (NIT)
This is the fastest scan (normally less
than two minutes for a complete satellite). It uses an information table broadcasted by the satellite in accordance
with the DVB standard (NIT: Network
Information Table). This table includes
most of the programmes available on
the satellite.
- the number of transponders (frequencies) found,
- then, during the scan, the number
of TV and radio programmes found.
Press OK to validate the scan result.
Wait a few seconds for the PUMA
to save the scan result.
17
Puma_s_pace_uk_text.indd
17
18/05/2003, 23:22
8
CHANNEL SCAN
Scan satellite
Scanning mode
Exhaustive
Satellite
HotBird
Symbol rate (kS/s)
OK
Start
27 500
22 000
29 900
30 000
Cancel
Exhaustive scan
With the exhaustive scan, you can scan
all the frequencies of a selected satellite broadcasted with a specific symbol
rate. You can specify up to four different
symbol rates.
If your satellite comprises more than four
symbol rates, activate the command
several times.
Frequency Scan
This mode is used to specify a frequency,
a polarization and a specific symbol
rate. Use this mode for scanning specific
transponders (SCPC type, for example),
or to add a new transponder, for
instance when a transponder is switched from analogue to digital mode.
18
Puma_s_pace_uk_text.indd
18
18/05/2003, 23:22
9
Programme LISTS
CHANNEL LISTS
FAVOURITES LISTS
After your Puma has scanned for channels, all the channels it has found are
stored in the All channels and Free
channels lists. TV and Radio channels
are stored in separate lists.
However, to make it quicker and simpler
for you to find the channels you want
to watch, you can organise the channels into lists of your favourite channels, known as Favourites lists. You can
create up to 8 Favourites lists.
With your PUMA, you can personalise
up to 8 favourite channel lists.
buttons for this function
Use the
TV/Radio Mode
You can switch between TV and Radio
button. When
mode, using the
Radio mode is selected, a logo appears
on the TV screen ; all other information
is available as for TV programmes. Use
of the Radio mode is identical to TV
mode.
CREATING
FAVOURITES LISTS
Select "Your TV lists" in the menu, then
select one of the eight lists displayed on
the screen. These lists are initially called
TV1, TV 2, ..., TV 8.
The List screen is then displayed.
The left-hand column contains the
names of the channels added to this
list. At first, there will just be a list of
numbers as no channels will have been
selected.
NOTE: the same channel may appear
in several lists.
Free TV
When scanning a satellite, the PUMA
detects unencrypted channels. You can
access these channels from the "Free
TV" list.
Important : a channel may
be free at certain times
and encrypted at others.
The operator is also free to
decide to change access
to a channel. Therefore,
there is no guarantee as to
whether a channel is free
or encrypted. Moreover,
some unencrypted channels are not suitable for
all viewers, especially
young or sensitive people.
Therefore, we advise you
to lock these channels
(see end of chapter).
User list: TV 1
1
2
3
4
5
6
7
8
9
10
11
12
Add channels
Swap
Free slot
Remove
Rename list
Move selection
OK
Save
19
Puma_s_pace_uk_text.indd
19
18/05/2003, 23:22
9
FAVOURITES LISTS
The right-hand column contains a
preview of the channel, the name of the
channel and several technical informations :
- Satellite name
- Frequency, polarity, symbol rate
- Conditional access
If the programme cannot be previewed,
an icon is displayed. Most importants
are :
No Reception
To sort the list, press the Red
button. You can sort by Channel name,
frequency/satellite or provider.
To save your channels and return to the
List screen, press the Blue button.
Changing the channel order
There are two different ways you can
change the order of the channels in the
list.
- press the yellow button to give it a
particular number,
- or press the green button to move
it using the P P buttons.
No card or no rights
Channel
has
disconnected
been
Changing the list Name
To change the name of the list, press
the Blue button. The "Rename list'
screen appears. Use the alphanumeric
keys to enter the new name. Press it
several times to choose betwen uppercase, lowercase or number. To validate a
letter and move on to the next, press the
button. To delete letters or numbers,
button. When you ave
press the
finished writing the name, press the
Removing channels from the list
button to delete a
Press the red
channel from the favourite list. This
does not remove it from global lists.
To do this, use "Menu/Channel list/Edit
channel list". The name appears with a
red line through it. Several names can
be deleted in this way. Deletion is definitive only once the OK button has been
pressed to record changes made to the
list.
OK
button.
Adding channels
button. Using the
Press the
buttons, choose the All channels or the
Free services list.
To select a channel, press . A cross
(X) appears next to the name of the
channel. To deselect it, press once
again.
OK
OK
20
Puma_s_pace_uk_text.indd
20
18/05/2003, 23:22
9
ALL CHANNEL LISTS
Edit channel list : All services
1
2
3
4
5
6
7
8
9
10
11
12
OK
Change list
Delete
Save
Parental lock
GLOBAL LISTS
Global lists contain all PUMA channels.
Three lists are available :
- All radio channels
- All TV channels
- All services
Global lists can be edited from the
"Channel list" menu.
Two options are available :
- Edit the list, to delete a channel or for
lock it using the parental code
- Delete channels, to delete all the channels of a satellite
Editing the list
buttons, select the global
Using the
list you wish to work on.
Use the P P buttons to change line and
to change page.
The radio channels are indicated by
a loudspeaker symbol to the right of
the name.
To delete a channel: A channel can
button.
be deleted using the red
A red line appears, crossing out the
name
To lock a channel : The yellow
button allows you to lock/unlock
a channel. Access is therefore protected
by the parental code. A $ symbol
appears to the right of the channel
name.
Press
tions.
OK
to validate all your modifica-
Deleting channels
The "Delete channel" menu allows you
to remove all channels (TV and Radio)
or just those from a specific satellite.
21
Puma_s_pace_uk_text.indd
21
18/05/2003, 23:22
10
ELECTRONIC PROGRAMME
GUIDE
The Electronic Programme Guide
provides you with information on
current programmes and a guide
(TV or radio) covering several days.
Day - hh:mm
Date
Channel
Next programme
hh:mm - hh:mm
Programme
Programme description
Now/Next
This information is available only
if broadcasted by the operator, which
is why you may note a certain disparity between channels. Sometimes
there is no information available
for some channels.
GUIDE
CURRENT CHANNEL
INFORMATION
with P P symbols appears to the right,
inviting you to scroll the text vertically.
Press the Guide button to display information on the current channel. The Now
& Next banner appears, displaying the
following information :
The name of the next programme is
displayed in the upper right-hand corner
of the screen with the time it starts
buttons allow you
and ends. The
to alternate between the display of the
current and following programme.
- the name of the channel;
- the current time and date;
- the name of the programme;
- the time the current programme
begins and ends;
- a bar which fills in as the programme
progresses;
- the name and the start and finish times
of the programme showing next;
- information about programme's
content. If the description is long, a bar
or
Press
information bar.
QUIT
to remove the
If you want to record the current or
next programme to the VCR, press the
button when the programRecord
me's full details are visible in the Now &
Next information banner.
A red line appears in the progress bar,
to indicate that the programme is scheduled for recording.
22
Puma_s_pace_uk_text.indd
22
18/05/2003, 23:22
10
ELECTRONIC PROGRAMME
GUIDE
TV Schedule
List
hh-mm
Today
Day hh : mm
Date
hh-mm
Channel 1
Channel 2
Channel 3
Channel 4
hh-mm
hh-mm
Information
Guide
TV SCHEDULE
Press the Guide button to display the
TV Schedule. You may have to wait
a few seconds before the information
appears.
The Programme Guide displays information for channels in the current list. To
change lists, exit “Guide“ mode using
buttons
the QUIT button. Use the
to select another list, then access the
guide again.
The left column indicates the name of
the channels.
Use the P P and
line and page.
Title
buttons to change
The programme guide displays information for two hours. You can extend or
reduce this display time by pressing on
the ‘Vol+ / Vol-‘ buttons. Use the
buttons to scroll the guide horizontally.
Time segments corresponding to a
programme can be of four different
colours:
- Blue : the currently selected
programme;
- Green : the programme is currently
being broadcast;
- Yellow : it will to be broadcast later;
- Orange : the programme has ended.
Some information is available:
- Time programme begins and ends
- Progress bar
- Name of the programme
- A brief summary
Press the OK button to activate the
selected channel.
Press the Guide button once again
to display detailed information on the
selected programme. Another screen
appears with details on the programme,
the different languages available and
possibly the theme of the programme .
Press the Record button to enter the
multi-function timer mode.
23
Puma_s_pace_uk_text.indd
23
18/05/2003, 23:22
11
PARENTAL LOCK - SMART CARD
Your PUMA receiver offers two
protection options : parental lock and
maturity rating.
The parental lock is a function
internal to the PUMA. The maturity
rating is specific to certain conditionnal access.
PARENTAL LOCK
The parental code is available from
the “Parental lock” menu. This code
has four digits. The preset factory code
is “1234”. If this code is activated,
access to the menu and locked channels will be restricted. You will only be
able to access unlocked channels.
To disable the parental lock, enter the
same code, then deactivate it in the
"Parental unlock" menu.
The pre-set code can be changed
as desired, in the "Configuration/
Preference/Change parental code"
menu.
Important: Do not forget this code,
as you will lose access to a large
number of receiver functions. If
you should forget it, contact your
supplier's after-sales service.
Select the card using the P P buttons,
then press OK . Depending on the type
of card, a menu appears.
You can consult your current access
rights with any type of smart card,
to check on subscription validity.
Important: If the receiver has not
been switched on for more than a
few weeks, your card rights may not
have been updated.
Maturity rating
With some smart cards, a maturity
rating, protected by a secret code, can
be defined.
A maturity rating from 0 to 15 restricts
access to certain programmes. Operators broadcast a rating for each
programme, based on content. It’s up
to you to decide the maturity level you
want. If the broadcast level is higher
than the level defined, the programme
will be off limits to anyone who does not
know the secret code.
Important: The code is registered in
the smart card. If you should forget
this code, you will have to refer to
your smart card supplier to get it
reinitialised.
SMART CARD
You can view the characteristics of the
smart card(s) inserted in your receiver
with the “Smart card” command of the
"Configuration" menu.
For each smart card reader, PUMA
recognises whether or not a card is
inserted, together with its conditionnal
access. The cards recognised depend
on your receiver model.
24
Puma_s_pace_uk_text.indd
24
18/05/2003, 23:22
12
MULTI-FUNCTION TIMER
The Multi-Function Timer can record
several events and select automatically the programme that is displayed
on the VCR/TV2 output. It is very easy
to configure it.
HOW TO ACTIVATE IT
You can activate the Multi-function
button
Timer presssing the Record
from various stages :
- in the Now & Next banner;
- in the TV schedule screen
- watching TV to display the event list.
EVENT DEFINITION
When you choose to record a
programme from the TV Scheule, the
event confirmation window appears.
You can use this window to confirm or
amend details of the event.
To confirm the existing event details, or
any changes you make, press the OK
button. To cancel any changes you
make, press the Return button.
If you want to amend the event’s details,
you use the P P buttons to highlight the
item you want to change:
• to change the channel to be recorded,
buttons.
use the
• to change the “target” where the
event is to be recorded, use the
buttons. You can choose ‘TV SCART’ or
‘VCR/TV2 SCART' as the target.
Note: When you change a time entry,
your TV Recorder will automatically
display the changed duration or end
time
• to change the start, duration and end
times, and the date of the event, use the
number buttons on your remote control.
buttons to
You can also use the
move from one digit to another if you
wish.
• to change how often an event repeats,
use the buttons. You can choose
‘Once’, ‘Daily’, ‘Weekly’, ‘Weekdays’ or
‘Monthly’.
control.
Just before an event is due to begin on
the TV SCART, an associated message
will appear on your TV screen. If your TV
Recorder is in standby when any event
is due to begin, it will turn on automatically.
EVENT LIST
This is a list of scheduled events in time/
date order. To display the Event list,
press the Events ( ) button on your
remote control. (You can also use the
Main menu to display the Event list)
For each event in the list, the following
information appears:
• the event date, start/end times and
duration;
• the channel name and programme
title;
• the “target” for the event (‘TV’ or
‘VCR/TV2’);
• a red dot to denote a currently active
event.
Editing events
To view details of, or edit, a highlighted
event (except a current event), press
the OK button. The Event confirmation
window appears.
Deleting events
To delete a highlighted event, first press
the Red button. Then press the Red
button again to confirm the deletion, or
press Return to cancel.
Listing repeating events
If you want to show every instance of
events that repeat, press the Green
button. To hide all future repeat events
press the Green button again.
25
Puma_s_pace_uk_text.indd
25
18/05/2003, 23:22
13
TECHNICAL CHARACTERISTICS*
HF SIGNAL
Input frequency . . . . . . . . . . . . 950 to 2150 MHz (L-Band)
Signal level . . . . . . . . . . . . . . . - 65 ~ - 25 dBm
DIGITAL SPECIFICATIONS
DVB compatible . . . . . . . . . . . ETS 300 421, EPG data by EIT (ETS 300 468)
Decoding . . . . . . . . . . . . . . . . . MPEG2 compatible (DVB/Main profile@Main level)
. . . . . . . . . . . . . . . . . . . . . 2 simultaneous streams (Twin Receiver)
Video . . . . . . . . . . . . . . . . . . . . 1.5 ~ 15 Mb/s (720 x 576)
Audio . . . . . . . . . . . . . . . . . . . . MPEG2 – Musicam (layer 1&2)
(32,44.1,48 kHz) / Digital output.
Symbol rate . . . . . . . . . . . . . . . 2 ~ 40 Mbaud (MCPC + SCPC)
Conditional access . . . . . . . . . Single or dual, embedded
CONAX and/or MEDIAGUARD/SECA
Mains . . . . . . . . . . . . . . . . . . .
Power requirements . . . . . . . .
Standby . . . . . . . . . . . . . . . . . .
LNB power supply . . . . . . . . .
.....................
LNB switching . . . . . . . . . . . . .
Dish positioner . . . . . . . . . . . .
POWER UNIT
90 to 240 V, 50/60 Hz
36 W max.
<= 3 W
Vert. 13 V, Hor. 18 V / 500 mA max (one output
only)
22 kHz, DiSEqC 1.1 / Tone Burst
DiSEqC 1.2 compatible
IF and loopthrough . . . . . . . .
TV . . . . . . . . . . . . . . . . . . . . .
TV2/VCR . . . . . . . . . . . . . . . . .
S-VHS . . . . . . . . . . . . . . . . . . .
Audio . . . . . . . . . . . . . . . . . . . .
Digital Audio . . . . . . . . . . . . . .
Video . . . . . . . . . . . . . . . . . . .
RF Modulator . . . . . . . . . . . . .
CONNECTIONS
4 F type connectors
1 Euro-Scart: PAL/SECAM/NTSC in CVBS and RGB
1 Euro-Scart: PAL/SECAM/NTSC in CVBS
1 Ushiden (Y/C)
2 RCA/CINCH connectors (fixed or adjustable)
1 optical fibre S/PDIF EN 60958 socket
1 RCA/CINCH connector
2 IEC type connectors, 75 Ω, PAL
ACCESSORIES
Remote control, 2 batteries, 2 scart cables, loopthrough cable, user manual.
The receiver is in compliance with the 89/336/CE standard.
* Purely indicative and subject to modifications.
26
Puma_s_pace_uk_text.indd
26
18/05/2003, 23:22
NOTES
..................................................................
..................................................................
..................................................................
..................................................................
..................................................................
..................................................................
..................................................................
..................................................................
..................................................................
..................................................................
..................................................................
..................................................................
..................................................................
..................................................................
..................................................................
..................................................................
..................................................................
..................................................................
..................................................................
..................................................................
..................................................................
27
Puma_s_pace_uk_text.indd
27
18/05/2003, 23:22
NOTES
..................................................................
..................................................................
..................................................................
..................................................................
..................................................................
..................................................................
..................................................................
..................................................................
..................................................................
..................................................................
..................................................................
..................................................................
..................................................................
..................................................................
..................................................................
..................................................................
..................................................................
..................................................................
..................................................................
..................................................................
..................................................................
28
Puma_s_pace_uk_text.indd
28
18/05/2003, 23:22