1
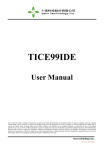
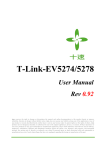
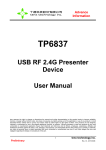
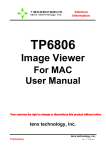
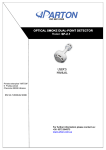
Advance
Information
TP6613
USB uTouch widget
User Manual
Tenx reserves the right to change or
discontinue this product without notice.
tenx technology inc.
1
Preliminary
tenx technology, inc.
Rev 1.1, 2010/02/24
Advance Information
UM-TP6613_E
CONTENTS
PRODUCT NAME ................................................................................................................ 3
TP6613 .............................................................................................................................. 3
USB uTouch Widget.........................................................................................................3
1. Introduction to the product’s function......................................................................3
2. Introduction to the uTouch application software..................................................... 3
3. Introduction for using the Touch Key hardware device with matching Widget
software............................................................................................................................ 4
3.1 open the hidden toolbar or execute or stop the Widget application software4
3.2 The right sliding feature ......................................................................................5
3.3 The left sliding feature.........................................................................................6
4. Introduction to the Widget software set up and editing functions ......................... 6
4.1 Add Widget ...........................................................................................................7
4.1.1 Adding Widget types: ......................................................................... 8
1. Open Application ............................................................................. 8
2. Open iGoogle Widget....................................................................... 9
3. Widgets on other websites............................................................ 10
4.1.2 The content of Icon File...................................................................... 10
4.1.3 Set up the Title, Name, and window size for Widget........................ 11
4.1.4 The execution path for Widget code and PC widgets...................... 11
4.2 Widget Management .......................................................................................... 12
4.3 Widget Dockside ................................................................................................12
4.4 Settings...............................................................................................................13
2
Preliminary
tenx technology, inc.
Rev 1.1, 2010/02/24
Advance Information
UM-TP6613_E
PRODUCT NAME
TP6613
TITLE
USB uTouch Widget
1. Introduction to the product’s function
This product is a USB capacitive touch device with matching Widget
software applications, to which Google and software gadgets shared on
the Internet can be added at will. These Widget software applications can
be edited and saved into personalized toolbar to facilitate quick launch.
2. Introduction to the uTouch application software
When connecting to the USB device for the first time, please install the
AP application software first. After installation, please click on the
uTouch.exe file icon on the Desktop and the hidden toolbar will show up.
Click on the touch area twice in a row to open the Widget software
toolbar as shown in Figure 1: (please refer to Section 3-1 for details)
Toolbar is hidden
Toolbar is in display
Figure 1. Diagram to show and hide the toolbar
There are ten basic default functions on the planning toolbar in the
hidden popup for the USB uTouch Widget application: Notepad, Timer
clock, weather forecasts, computer, RSS webpage clip, Windows Media
Player, system monitor, tape recorder, Photo viewer, etc. Users can
configure and edit more gadgets using function of the uTouch Widget
application software and select the desired gadgets through pressing and
sliding on the touch control panel. Click on the touch sensing area twice
in a row to invoke the program. Please refer to Section 4-1 Add Widget
on how to add new widgets. If changing GUI interface is required, please
refer to Section 4-4 Settings.
tenx technology, inc.
3
Preliminary
Rev 1.1, 2010/02/24
Advance Information
UM-TP6613_E
3. Introduction for using the Touch Key hardware device with
matching Widget software
The Two-button Touch Key sensing area is shown in Figure 2.
Figure 2. The Two-button touch sensing area
3.1 Open the hidden toolbar or execute or stop the Widget application
software
The user can use one of the two following buttons to select any touch
area and click twice in a row as shown in figure 3; the Widget software
will recognize those as indication to open the hidden toolbar or execute
or stop the Widget application software as shown in Figure 4.
Figure 3. Digram for clicking on any area twice in a row.
4
Preliminary
tenx technology, inc.
Rev 1.1, 2010/02/24
Advance Information
UM-TP6613_E
CLOSE WINDOWS
Open the Widget application software
Stop the Widget application software
Figure 4. Open or stop the selected tool
3.2 The right sliding feature
When the user touches the right sensing area for 0.5 to 1 second, then
leaves the sensing area, the icon on the Widget application software will
move to the right as shown in Figure 5. If the user holds and touches the
right sensing area continuously without moving, the Widget application
software will move to the right in rotation until the users' finger leaves
the sensing area.
Before Sliding
After Sliding
Figure 5. Select the moving tools to the right
5
Preliminary
tenx technology, inc.
Rev 1.1, 2010/02/24
Advance Information
UM-TP6613_E
3.3 The left sliding feature
When the user touches the left sensing area for 0.5 to 1 second first,
then leaves the sensing area, the icon on the Widget application software
will move to the left as shown in Figure 6. If the user holds and touches
the left sensing area continuously without moving, the Widget application
software will move to the left in rotation until the users' finger leaves the
sensing area.
Before Sliding
After Sliding
Figure 6. Select the moving tools to the left
4. Introduction to the Widget software set up and editing functions
Right click on the mouse button on the uTouch Widget icon on the
Toolbar in the lower right corner of computer operating system, and
selection items related to editing will show up for the user to perform
function setup as shown in the following figure:
Figure 7. uTouch Widget Add and Set up new window
6
Preliminary
tenx technology, inc.
Rev 1.1, 2010/02/24
Advance Information
UM-TP6613_E
4.1 Add Widget
The function is for this menu is to provide a way for the user to add new
Widget tools. A window interface will open after clicking on this function.
There are four main areas, which are Widget type, Icon File, Widget
Name, and Font size respectively. The fields in the code are shown in
Figure 8.
1
2
3
4
Figure 8. Window for adding new Widget tools
7
Preliminary
tenx technology, inc.
Rev 1.1, 2010/02/24
Advance Information
UM-TP6613_E
4.1.1 Adding Widget types:
There are three sources for adding Widget types: applications in the
computer operating system, iGoogle Widget, and Widgets on other
websites respectively as shown in Figure 9. Please select one of the
tool source types, then click on the open key to add.
Figure 9. The tool source type
1.
Open Application
When adding to toolbar from applications in the computer operating
system, an open window will show up. The executable file for the
Widget must be selected as shown in Figure 10.
Figure 10. Select the tool executable file in computer
8
Preliminary
tenx technology, inc.
Rev 1.1, 2010/02/24
Advance Information
2.
UM-TP6613_E
Open iGoogle Widget
When adding to toolbar from iGoogle Internet Widget, an interface
browsing window will show up and connect to the Google webpage as
shown in Figure 11.
Figure 11. iGoogle Widget will connect to the Google webpage
Select desired Widgets and press the “Get Code" button, the
system will automatically paste the code on the network to the code
field of uTouch Widget as shown in Figure 12 and set up options
related to these images. Then, click on OK to finishing adding.
Get Code
Load automatically
Figure.12 Get Code for Google Widget
9
Preliminary
tenx technology, inc.
Rev 1.1, 2010/02/24
Advance Information
3.
UM-TP6613_E
Widgets on other websites
The user can browse and look for Widget programs s/he likes on
Internet. The user only needs to copy ~ to the uTouch Widget code
field manually as shown in Figure 13 and set up options related to
these images to add.
Copy
Figure 13. Manually install Widget tools
4.1.2 The content of Icon File
Click on the default Icons directly or add the desired icons using Load
function, but the file format has to be .png as shown in Figure 14.
Figure.14 Icon File selection
10
Preliminary
tenx technology, inc.
Rev 1.1, 2010/02/24
Advance Information
UM-TP6613_E
4.1.3 Set up the Title, Name, and window size for Widget
The user can edit the text on the Widget toolbar and set the window
size once tools are opens as shown in Figure 15.
Figure 15. The setup fields for setting title and the window size
4.1.4 The execution path for Widget code and PC widgets
When the user downloads the Google web widgets, the code (or path)
will be displayed in the field. If the user adds new widgets to the
computer, the connection path will be displayed in the field as shown
in Figure 16.
C:\program files\葛拉堡電子帳簿\ida.exe
Web widget code
The connection path for the
computer software
Figure 16. Web widget code and the execution path for the
computer software
11
Preliminary
tenx technology, inc.
Rev 1.1, 2010/02/24
Advance Information
UM-TP6613_E
4.2 Widget Management
This is mainly to facilitate the user to manage and edit Widget as shown
in Figure 17. It can be used to edit exiting widgets, add new widgets,
delete unwanted widgets, and set up Widget functions.
Widget
Delete
Widget
Set up
Widget
Edit
Widget
Add
Figure.17 Widget management interface
4.3 Widget Dockside
This function is used to provide the user a way to set up the show-up
location for the toolbar; it provides up, down, left, right directions to
choose from as shown in Figure 18.
Figure 18. Setting the show-up location for the toolbar
12
Preliminary
tenx technology, inc.
Rev 1.1, 2010/02/24
Advance Information
UM-TP6613_E
4.4 Settings
This uTouch Widget Settings function allows the user to set the toolbar
rotation speed, toolbar icons size, touch device sensitivity, toolbar
rotation direction, and the interface language as shown in Figure 19.
After setting up, please close the Widget application software by right
clicking the mouse on the Widget icon on the Toolbar in the lower right
corner of the computer operating system and select End uTouch Widget ,
then restart uTouch Widget to finish setup.
Figure.19 Widget set up
13
Preliminary
tenx technology, inc.
Rev 1.1, 2010/02/24