1
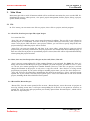
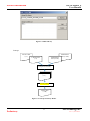
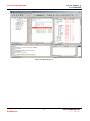
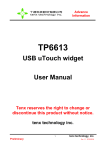
TICE99IDE User Manual tenx reserves the right to change or discontinue the manual and online documentation to this product herein to improve reliability, function or design without further notice. tenx does not assume any liability arising out of the application or use of any product or circuit described herein; neither does it convey any license under its patent rights nor the rights of others. tenx products are not designed, intended, or authorized for use in life support appliances, devices, or systems. If Buyer purchases or uses tenx products for any such unintended or unauthorized application, Buyer shall indemnify and hold tenx and its officers, employees, subsidiaries, affiliates and distributors harmless against all claims, cost, damages, and expenses, and reasonable attorney fees arising out of, directly or indirectly, any claim of personal injury or death associated with such unintended or unauthorized use even if such claim alleges that tenx was negligent regarding the design or manufacture of the part. tenx technology inc. Rev 1.1, 2013/01/28 UM-TICE99IDE_E Advance Information User Manual AMENDMENT HISTORY Version Date V1.0 Aug, 2011 New release Dec, 2012 1. Add eeprom 2. Upgrade the screen shot 3. Modify the typo 4. Add memory occupied information 5. Add delete watch description 6. Add list debug in program memory 7. Modify make library and add concept flow chart 8. Change 2.7.5 title to "Hex File Converter", and add chip list 9. Add C compiler/assembler user manual 10. Modify the screen shot of new project 11. Modify the table of supported IC list 12. Modify project setting and screen shot, section 4.8 delete the other debug screen shot 13. Modify the description of debug function V1.1 Description 2 Preliminary tenx technology inc. Rev 1.1, 2013/01/28 UM-TICE99IDE_E Advance Information User Manual CONTENTS AMENDMENT HISTORY ................................................................................................................ 2 1. Introduction ................................................................................................................................... 6 1.1 Main menu .................................................................................................................................. 7 1.2 Toolbar........................................................................................................................................ 9 1.3 Project manager ....................................................................................................................... 11 1.4 Function Manager.................................................................................................................... 12 1.5 Memory ..................................................................................................................................... 13 1.6 Register ..................................................................................................................................... 14 1.7 Output ....................................................................................................................................... 15 1.8 Search result ............................................................................................................................. 16 1.9 Variables ................................................................................................................................... 17 1.10 Watch ................................................................................................................................... 18 1.11 ICE Status Stack ................................................................................................................. 19 1.12 Program Memory ............................................................................................................... 20 1.13 Editor ................................................................................................................................... 21 1.14 Status Bar ............................................................................................................................ 22 2. Main Menu................................................................................................................................... 23 2.1 File ............................................................................................................................................. 23 2.1.1 New File, New Project, Open File, Open Project ............................................................... 23 2.1.2 Save, Save As, Save Project, Save Project As, Save All, Close, Close All ........................ 23 2.1.3 Recent File, Recent Project ................................................................................................. 23 2.1.4 Exit ...................................................................................................................................... 24 2.2 Edit ............................................................................................................................................ 25 2.2.1 Undo, Redo ......................................................................................................................... 25 2.2.2 Copy, Cut, Past, Delete, Select All ..................................................................................... 25 2.2.3 Find, Find Previous, Find Next, Find in Project, Find and Replace, Go to ........................ 25 2.3 View ........................................................................................................................................... 26 2.3.1 Project Manager, Function Viewer, Memory Window ....................................................... 26 2.3.2 Registers Viewer ................................................................................................................. 26 2.3.3 Watch, ICE Status Stack, Program Memory....................................................................... 26 2.3.4 C Variables, ASM F-Plane1, ASM F-Plane2, ASM R-Plane ............................................. 26 2.3.5 Output, Find and Search Result .......................................................................................... 27 2.3.6 LCD Editor .......................................................................................................................... 27 2.3.7 Toolbar ................................................................................................................................ 27 2.4 Project ....................................................................................................................................... 28 2.4.1 Add New ............................................................................................................................. 28 3 Preliminary tenx technology inc. Rev 1.1, 2013/01/28 UM-TICE99IDE_E Advance Information User Manual 2.4.2 Add Exist File ..................................................................................................................... 28 2.4.3 Remove ............................................................................................................................... 28 2.4.4 Project Setting ..................................................................................................................... 29 2.5 Build .......................................................................................................................................... 30 2.5.1 Build, Rebuild ..................................................................................................................... 30 2.5.2 Build and Download to ICE ................................................................................................ 30 2.5.3 Compile File ........................................................................................................................ 30 2.5.4 Configuration Debug, Release ............................................................................................ 30 2.5.5 Make Library....................................................................................................................... 30 2.6 Debug ........................................................................................................................................ 32 2.6.1 Pause ................................................................................................................................... 32 2.6.2 Run to Cursor ...................................................................................................................... 32 2.6.3 Go, Free Run ....................................................................................................................... 32 2.6.4 Single Step, Auto Single Step ............................................................................................. 32 2.6.5 Step Over, Auto Step Over.................................................................................................. 32 2.6.6 Reset ICE ............................................................................................................................ 32 2.6.7 Initialize ICE board ............................................................................................................. 32 2.6.8 Insert / Remove Break Point, Remove All Break Point ...................................................... 33 2.6.9 Debug with list file, debug with source file ........................................................................ 33 2.7 Tools .......................................................................................................................................... 34 2.7.1 Language English ................................................................................................................ 34 2.7.2 Language Simplified Chinese ............................................................................................. 34 2.7.3 Language Traditional Chinese ............................................................................................ 34 2.7.4 QTP Creater ........................................................................................................................ 34 2.7.5 Hex File Converter .............................................................................................................. 34 2.7.6 Options ................................................................................................................................ 35 2.8 Help ........................................................................................................................................... 36 2.8.1 IDE User Manual ................................................................................................................ 36 2.8.2 C Compiler User Manual .................................................................................................... 36 2.8.3 Assembler User Manual ...................................................................................................... 36 2.8.4 About ................................................................................................................................... 36 2.8.5 Update / New Version Check .............................................................................................. 36 3. Toolbar ......................................................................................................................................... 37 4. Build a Project ............................................................................................................................. 38 4.1 Create a New Project ............................................................................................................... 38 4.2 Open an Existed Project .......................................................................................................... 42 4.3 Project Setting .......................................................................................................................... 44 4.4 Editor Options .......................................................................................................................... 49 4.5 Bookmarks ................................................................................................................................ 53 4.6 Searching .................................................................................................................................. 54 4.6.1Find 54 4 Preliminary tenx technology inc. Rev 1.1, 2013/01/28 UM-TICE99IDE_E Advance Information User Manual 4.6.2Find in Project ...................................................................................................................... 55 4.6.3Find and Replace .................................................................................................................. 57 4.7 Build a Project .......................................................................................................................... 58 4.7.1Build File.............................................................................................................................. 58 4.7.2Build and Download to ICE ................................................................................................. 60 4.7.3Make Library........................................................................................................................ 62 4.8 Debug with Project .................................................................................................................. 63 4.9 Switch Language Interface ..................................................................................................... 65 4.10 QTP Creater ........................................................................................................................ 66 4.11 Hex File Converter ............................................................................................................. 67 4.12 Help ...................................................................................................................................... 69 5. Debug............................................................................................................................................ 70 6. LCD Editor .................................................................................................................................. 72 6.1 LCD Pattern Editor ................................................................................................................. 73 6.2 LCD Attributes ........................................................................................................................ 74 6.3 LCD Panel Editor .................................................................................................................... 75 7. Shortcuts ...................................................................................................................................... 76 Appendix A: Meaning of LED on ICE board ................................................................................ 77 5 Preliminary tenx technology inc. Rev 1.1, 2013/01/28 UM-TICE99IDE_E Advance Information User Manual 1. Introduction The TICE99IDE is a development tool of tenx technology inc., we provide an Integrated Development Environment (IDE) for users to develop their code for tenx chips. It supports TM57 serial chips and TMU serial chips for now. The IDE contains 4 components. They are editor, project manager, compiler and InCircuit Emulator (ICE) debugger. TICE99IDE provides editor which allows users to edit, modify the code. Project manager manages all files inside the project, including the C and ASM files. Compiler will compile source code that users entered. ICE can simulate ROM program execution and output the result. Before the simulation process, it must connect PC with TICE99 hardware. The following we will focus on these four components of the application window in the IDE, and providing a more detailed explanation. The main component of IDE window can be divided into four parts to illustrate. The first part is located on the upper left corner of the IDE window, this window contains three functions: project manager, function manager and memory. The upper right part contains only register tab page (F-Plane, R-Plane). The middle of the area is an editor where you can edit and modify the program code on here. On the bottom of the IDE, it can be divided into three parts. The lower left corner is the compiler, linker program which will display messages, which contains compiled outputs, debug results and search results. Second part of the bottom is variables, which contains C variables, and ASM variables. The ASM variables can be divided into four parts, F-Plane1, F-Plane2, R-Plane and EEPROM. If user begins to debug, the contents of all variable of C and ASM will be updated automatically. The lower right corner of debugging message contains three tab pages: watch C variable, ICE status stack, and program memory (Figure1.1). Project Manager, Function Manager and Memory Compiler Result, Debug Result, and the Searching Result Editor Variable of C and ASM Register Watch Message Figure 1.1 TICE99IDE main window 6 Preliminary tenx technology inc. Rev 1.1, 2013/01/28 UM-TICE99IDE_E Advance Information User Manual 1.1 Main menu When first executing TICE99IDE, the thing that catches your eyes is the main toolbar which is provided by the IDE - the main menu. Main menu offers all the functions of the IDE. The first level of main menu contains "File", "Edit", "View", "Project", "Build", "Debug", "Tools" and "Help." In the “File” menu, you can create a new or open an existed project or file. After editing files, you can save then close it; it is the same way when dealing with project. Also, you can close the TICE99IDE by pressing the exit button. You can even open file or project by "recently opened files" and "recently opened project", in the file/project list that are the file/project which you have ever opened before. "Edit" menu provides the functions which editor requires, including basic functions: copy, paste, cut, delete, select all, undo, redo, and advance functions such as find, find and replace, search in project or opened files, and goto (Figure 1.2). In the “View” menu, you can choose to switch the window to view, including project manager, function viewer, watch, ICE stack status, registers monitoring, output or search result, LCD editor and toolbar option (Figure 1-2). “Project” menu includes adding file to project, removing file from project and project setting. “Build” is to compile source file which will translate source files to obj files (*.o files) and execution files (*.bin files). User can decide whether it is necessary to download the compile result to ICE (Figure 1-3). “Debug” is a tool to do source code tracing, and to find out where the problem is if it has bug in it. In “Tools”, you can switch the language interface dynamically, QTP creater, hex file converter, and set the editor option. In “Help”, you can find out user manual including IDE, C compiler and Assembler, about information and update software. Figure 1.2 main menu -1 7 Preliminary tenx technology inc. Rev 1.1, 2013/01/28 UM-TICE99IDE_E Advance Information User Manual Figure 1.3 main menu -2 Figure 1.4 main menu -3 Figure 1.5 main menu -4 8 Preliminary tenx technology inc. Rev 1.1, 2013/01/28 UM-TICE99IDE_E Advance Information User Manual 1.2 Toolbar Toolbar is a shortcut to execute the function in main menu, and it contains almost most of the functions of the main menu. User can press button in toolbar rather than select it in main menu. Figure 1.6 toolbar 9 Preliminary tenx technology inc. Rev 1.1, 2013/01/28 UM-TICE99IDE_E Advance Information User Manual File Create a new file. Create a new project. Open an existed file. Open an existed project. Save current editing file. Save all files. Edit Undo Redo Copy the selection text Cut the selection text. Paste the coping text. Delete the selection text. Search specific text in current editing file. Search specific text from the current position to the beginning of the file. Search specific text from the current position to the end of the file. Search specific text and display each occurrence in a project at output window. Search specific text and replace it with new text. Build Compile all files in the current project. Delete all output files before compiling all files in the current project. Compile all files in the current project, and download the output files to ICE. Compile current editing file. Debug Pause debug process. Run to the cursor, your program is executed at full speed, then pauses and places the execution point on the line of code containing the cursor. Run, run your program, but it will ignore break-point. Auto Run, run your program, then pauses on the location of break-point if it has. Single Step, the debugger walks through your code one statement or instruction at a time. Auto Single Step, the debugger walks automatically through your code one statement or instruction at a time. Step over, same as “Single Step”, except that when the execution point is on a function call, the debugger executes the function at full speed and then pauses on the line of code or instruction following the function call. Auto step over, execute step over automatically. Reset ICE program counter. Initial ICE board. Add/remove break-point. Remove all break-point. 10 Preliminary tenx technology inc. Rev 1.1, 2013/01/28 UM-TICE99IDE_E Advance Information User Manual 1.3 Project manager Users can use project management to centrally manage chip properties file, the relevant library files and source files. These files are divided into several groups. They are source code files (.c files), assembly files (.asm files), header files (.h files), include files (.inc files), the library files, text files (.txt files), LCD files (.lcd files) and other files. You can double click the file name, the IDE will switch to corresponding file if it has already opened, or IDE will open the file automatically. Programmer can create a new file to edit, which will be named as Unit*, * means 1~n serial number. When saving the new file, the “save as dialog” will appear, and let user to save as a .c or other type of file. After saving the file, project manager will not classify the file you save into corresponding categories. You must add an existing file to the opened project, so that you can save time in programming and reuse the code as needed. In the area of project tag, right-click the mouse to show a popup menu dialog. In the popup menu, you can add existing files to a project, remove file from project, set the project and set main file. Main file only supports assembly project. When one file is main file, there will be a selection icon in front of the file name, which is shown in Figure 1.7. Figure 1.7 Project Manager 11 Preliminary tenx technology inc. Rev 1.1, 2013/01/28 UM-TICE99IDE_E Advance Information User Manual 1.4 Function Manager “Function manager” only supports .c files in your project. After you compile a project successfully, the program administrator shall automatically list all the functions which are defined in all .c files of the project. You can double click the function prototype line; it will jump to corresponding line of source code file when the file is opened, or open it and jump to corresponding line if the file is not opened. We now only support the word start with int, char, float, double, void and there’s pointer version. We will support user define structure in future version. Figure 1.8 Function Manager 12 Preliminary tenx technology inc. Rev 1.1, 2013/01/28 UM-TICE99IDE_E Advance Information User Manual 1.5 Memory Memory panel consists of F-plane1, F-plane2, R-plane and EEPROM areas. It will show content of 4 memory areas while debugging. The color of memory content depends on the current step and previous step. If the execution result between two steps is different, the color will be red, otherwise the color is black. The area will show “–“ when the memory space is not used. When you are in debug mode and the ICE is stopped, you can double click the memory address to modify the value of memory directly if the memory address is allowed to be modified. Once you change the value, the value will be updated immediately on the corresponding address in register. Figure 1.9 Memory 13 Preliminary tenx technology inc. Rev 1.1, 2013/01/28 UM-TICE99IDE_E Advance Information User Manual 1.6 Register Register panel shows the contents of registers. Register address, name, and the value are listed in tree-style in the window. Similar to memory display, it will be colored with red when content is changed otherwise the color of content is black when it is the same. You can modify the register content during project debug process (if the register is modifiable). There are three types of presentations to show content of registers. Clicking right mouse to show the popup menu, you can select binary column, hexadecimal column and value column to show. You can choose what types of demonstration you want the register presents. You can collapse or expand the tree node if you only want to see the whole value of the register. Once you collapse the tree node; the whole value will be only shown in hexadecimal column. Figure 1.10 Register 14 Preliminary tenx technology inc. Rev 1.1, 2013/01/28 UM-TICE99IDE_E Advance Information User Manual 1.7 Output Output panel shows information while compiling, assembling and linking source code. The information could include the information of warning and error. You can double click the warring line or error line; it will jump to the line of corresponding source code. Memory occupied information for C project Double Click For C project, it provides variable memory occupied information which is shown in output panel. Programmer can double click to open the file in the editor. This file lists the detail memory occupied information in the format of 2 dimension matrix. As shown in Figure 1.11 Output, sign “V” means this register address has been used; sign “-” means free. User can define “-” register address in C program. Programmer can refer to this file to know which register space has been occupied in the process of linking. Figure 1.11 Output 15 Preliminary tenx technology inc. Rev 1.1, 2013/01/28 UM-TICE99IDE_E Advance Information User Manual 1.8 Search result You can see the result of search in search result panel. There are two kinds of search, search current open files and search files in current project. You can double click the result line to jump to the line of corresponding source code. Figure 1.12 Search 16 Preliminary tenx technology inc. Rev 1.1, 2013/01/28 UM-TICE99IDE_E Advance Information User Manual 1.9 Variables Variables list all the variables in program, including C and ASM variables. In ASM variable, you can double click the window to select what variables that you want to keep. If you want to see all variables after you selected, just press the button of “Add All”. Double Click Figure 1.13 Variables 17 Preliminary tenx technology inc. Rev 1.1, 2013/01/28 UM-TICE99IDE_E Advance Information User Manual 1.10 Watch The following 3 sections will help you to trace your code while debugging. Watch will show the variables which you want to trace. Especially when you want to monitor the value of a variable or expression while you debug your code, add a watch to the Watch List Window. The Watch List window displays the current value of the watch expression based on the scope of the execution point. Each time your program is executed, the debugger evaluates all the items listed in the Watch List Window and updates their displayed values. You can set a watch expression in the following ways: The easiest way to set a watch is using mouse to drag a term from the Code editor. Right-click Watch List Window, IDE will pop-up a watch properties dialog box and users can choose the maintenance action: (1) Edit Watch: modify watch. (2) Add Watch: add a watch. (3) Insert Watch: insert a watch above the line of focused line. (4) Delete Watch: delete a watch of focused line. Double Click Figure 1.14 Watch 18 Preliminary tenx technology inc. Rev 1.1, 2013/01/28 UM-TICE99IDE_E Advance Information User Manual 1.11 ICE Status Stack Stack page shows the subroutine or program information when they have been called. Whenever you call a subroutine or program, the next address of execution point will be added to the stack record before execute the callee. When callee has been return, the address will be pop-up from the stack. Also, it provides the information about ICE status, such as W (Working register), PC (Program Counter), stack over flow and stack under flow. Figure 1.15 ICE Status Stack In the following example of C code, when the main() program calls subroutine subFoo, the program counter (i.e. next execution address after subFoo: 0x20) will be pushed into the stack (here, Stack0 address is 0x0020). When subFoo is finished and returns to main, it will pop-up the address from the stack (i.e. Stack0 address 0x0020) to facilitate the implementation of the program to continue down. 0x07 0x1F 0x20 19 Preliminary tenx technology inc. Rev 1.1, 2013/01/28 UM-TICE99IDE_E Advance Information User Manual 1.12 Program Memory Program memory will list the content of ROM code. While compiling process is success, program memory will list: program counter, machine code, mnemonic code and the parameter of operation code. Paramete r Mnemonic code Machine Code Program counter Figure 1.16 Program Memory But, if there just has one .asm file in assembly project, program memory will show the content of list file as below. 20 Preliminary tenx technology inc. Rev 1.1, 2013/01/28 UM-TICE99IDE_E Advance Information User Manual 1.13 Editor Editor provides users with a source code and editor area, the C program file, ASM program file or header file will be input file to the editor. Figure 1.17 Editor 21 Preliminary tenx technology inc. Rev 1.1, 2013/01/28 UM-TICE99IDE_E Advance Information User Manual 1.14 Status Bar Status bar shows information about editor, debugger and ICE type. The editor information is about caret position and editor mode which is insert or overwrite mode. It also shows debug mode while debugging, the ICE connecting status and chip type. Figure 1.18 Status Bar 22 Preliminary tenx technology inc. Rev 1.1, 2013/01/28 UM-TICE99IDE_E Advance Information User Manual 2. Main Menu Main menu provides a serial of functions which will be useful and convenient for you to use the IDE. It’s including File process, editor process, view panel, project management, build a project, debug a project, option of IDE, and help. 2.1 File In “File” menu, you can create a new file or a project, close a file or a project, and exit program. 2.1.1 New File, New Project, Open File, Open Project Let’s start from File. “New File” lets developers create a new empty document for editing. The new file is not collected to current project, it is individual. You have to do it by yourself. When you select File | New | project to create a new project, IDE will show a new project window, you can select a specify chip for the new project and assign where the project will be located. “Open File” can open an existed file and show it on a new editor. “Open Project” opens an existed project and you can easily visualize how all your project files are related in the Project Manager page. If there are some files in project are opened then project is closed, these file will be reopened automatically when opening the project next time. 2.1.2 Save, Save As, Save Project, Save Project As, Save All, Close, Close All “Save” can save current editing file. If the opening filename is not assigned, like Unit*, the “Save As” dialog will be shown and then you can type a filename you want and press yes button to save it. “Save As” let user save current opening file to another filename. However, if the file is in project, it will not change the filename in the project; it only saves a copy file to disk. “Save Project” is saving current project that you opened. If you want to change to another project name, you can use “Save Project As”. “Save All” will save all opened files, including the file which is not in project. “Close” can close current opened file. If you want to close the project, please press “Close All” button then it will close current project, including all the files which have been opened. 2.1.3 Recent File, Recent Project “Recent File” lists the recent opened 4 files at most; “Recent Project” stores the recent 10 projects at most. By clicking recent item, it will open corresponding file if the file is not opened or switch to an opened file. You can also open project that you recently opened from “Recent Project”, which will be the same as “Open Project”. 23 Preliminary tenx technology inc. Rev 1.1, 2013/01/28 UM-TICE99IDE_E Advance Information User Manual 2.1.4 Exit Exit the IDE program. Figure 2.1 Exit notice dialog 24 Preliminary tenx technology inc. Rev 1.1, 2013/01/28 UM-TICE99IDE_E Advance Information User Manual 2.2 Edit In “Edit” menu, you can edit your code more quickly by edit functions, they are Copy, Cut, Paste, Delete as well as Select All. If you want to recover back from a typo, you can press “Undo”. Once you change your mind from undo, you can redo it. “Edit” menu also provides a serial of search function, including Find, Find Previous, Find Next, Find in Project, and Search then replace. 2.2.1 Undo, Redo When you encounter a typo, you can use “Undo” to recover back the step that you typed. Once you change your mind, you can press “Redo” to do the action again. 2.2.2 Copy, Cut, Past, Delete, Select All Copy, Cut, Past, Delete and Select All can let programmers type their code more quickly. 2.2.3 Find, Find Previous, Find Next, Find in Project, Find and Replace, Go to You can use “Find” when you want to search a word or a letter in a file. After you find one in you searching, you can use “Find Previous” or “Find Next” to reach previous or next one target word directly. If you want to search word or letter in a project, please use “Find in Project”. “Find and Replace” let you find out the word that you want to replace. “Go to” will move cursor to the line you specified. 25 Preliminary tenx technology inc. Rev 1.1, 2013/01/28 UM-TICE99IDE_E Advance Information User Manual 2.3 View There are many panels in TICE99, including Project Manager, Function Viewer, Memory Window, Registers Viewer, Output, Find and Search Result, C Variables, ASM F-Plane1, ASM F-Plane2, ASM RPlane, Watch for C code, ICE Status stack, Program memory, and toolbars. Those are helpful for programmer to get information more clearly. 2.3.1 Project Manager, Function Viewer, Memory Window Project Manager, Function Viewer and Memory are in the same panel. To switch which tab page which you want to see, click the menu of project manager, function viewer or memory. With the “Project Manager”, you can easily visualize how all your project files are related. Also, you can select any file to display, right-click, and perform various project management tasks, such as adding or removing files; “Function Viewer” lists all function declarations in all C files; “Memory Window” contains the content for F-Planes, R-Plane and EEPROM. 2.3.2 Registers Viewer Registers viewer contains two tab pages. One is F-Plane, and the other is R-Plane. You can switch tab to see the contents. If registers viewer is disappeared, click the menu item View|Registers Viewer to show the panel. The contents of register viewer will be shown when source code has been built successfully and the output is downloaded to ICE automatically. 2.3.3 Watch, ICE Status Stack, Program Memory “Watch” will list C variables which user selected from C Variable tab or drag from source code editor. “ICE Status Stack” displays ICE information, including Working register, Program Counter (PC), stack over flow, stack under flow, and contents of stack. “Program Memory” shows up the list of machine code. To view this panel, click the menu item. 2.3.4 C Variables, ASM F-Plane1, ASM F-Plane2, ASM R-Plane User can see the detail information of C Variables, ASM F-Plane1, ASM F-Plane2 and ASM R-Plane which list all variables of source code. When successfully compiled the source code and start debugging, this window's content value of each variable will be updated automatically. The color of variable text will be changed when the result is changed between the two actions. If it does not show up, click the menu View|C Variables or View|ASM X_Plane to let this visible. 26 Preliminary tenx technology inc. Rev 1.1, 2013/01/28 UM-TICE99IDE_E Advance Information User Manual 2.3.5 Output, Find and Search Result “Output” shows the result of compiling, assembling, and linking process. If there are any error or warning messages, it will be listed on the output panel, you can double click the line, IDE will jump to the corresponding line in editor. “Output” panel shows the information about memory occupied of variable in C project. “Find and Search Result” jumps to corresponding line when the keyword you search has been found. Click the menu to let the panel visible. 2.3.6 LCD Editor LCD Editor is only for the chip which supports LCD function. The IDE will enable this menu item when chip supports LCD, and disable when does not support. 2.3.7 Toolbar Toolbar controls 4 sub-toolbars to show up or not. They are File, Edit, Build and Debug. When the item is checked, the toolbar is visible. Or you can uncheck it to hide the toolbar. 27 Preliminary tenx technology inc. Rev 1.1, 2013/01/28 UM-TICE99IDE_E Advance Information User Manual 2.4 Project "Project" provides a centralized file management mechanism. It performs various project management tasks, such as opening, adding or removing files from a project. 2.4.1 Add New When programmer clicks this menu item Project|Add|New, the IDE will create an empty document and Unit*(1~n) will be named to it. This is one way to add file to project. When you save the file, it will show a “save as dialog” to let you save another filename for this file, and the project manager will be changed too. 2.4.2 Add Exist File The other way to add files to a project is adding an existed file. You can click this item to choice the existed file and project manager will add the file you selected in project. When you click this menu item Project|Add|Exist Files, IDE will open an open dialog to let you select the file you want to add in project. 2.4.3 Remove There are two ways to remove files from the project: (1) tap out on the Project|Remove menu item and IDE will pop-up a project files window (Figure 2-2), allows users to remove files, or (2) within the tree of "project management", click the file item which will be removed, then right-click, in the pop-up menu, select "Remove" menu item. It only removes the specified files from the project tree, but the file is not actually deleted from the file storage directory. Figure 2.2 Remove from project dialog 28 Preliminary tenx technology inc. Rev 1.1, 2013/01/28 UM-TICE99IDE_E Advance Information User Manual 2.4.4 Project Setting There are two ways to set project properties: (1) Click on the menu bar Project|Project Settings menu item, or (2) within the tree of "project management", then right-click in the area and in the pop-up menu, select "Project Settings". Project settings include IC configuration settings, select the library directory and EV settings. The configuration settings will be downloaded and write to the ICE before the program codes does. The configuration settings can be set as different types of projects with ICE. The configuration tab will show the configuring value when you change the setting of configuration. Another "Project Settings" page is a "directory" to specify the directory path that can be found in the compilation and assembler which uses the directory path to find the header files or library files. EV option contains two main functions, one is to calculate the best IRCF for chip, and the other is to switch the ICE voltage. Figure 2.3 Project Setting 29 Preliminary tenx technology inc. Rev 1.1, 2013/01/28 UM-TICE99IDE_E Advance Information User Manual 2.5 Build "Build" can check the code you written whether it is correct or not, and compile the code into an executable file (.bin file) or an object file (.o file). It can also download an executable file to the ICE for online debugging. 2.5.1 Build, Rebuild “Build” only compiles files in a project; however it will not download code to ICE. You can use this menu item to check the code you written to determine whether it is correct or not. If there is any error, the message will be displayed in output panel. Double click the error line; the caret will go to the place of editor where the error occurs. “Rebuild” will clear the .o files, .bin files before build the project. 2.5.2 Build and Download to ICE Different from “Build”, “Build and Download to ICE” will download code to ICE after a successful building. 2.5.3 Compile File Compile file only compiles current file you are editing. You can use this function instead of “Build” to check only one file. 2.5.4 Configuration Debug, Release These will produce debugging information whiling compiling. If release is checked, *.o file will not contain debug information. 2.5.5 Make Library TICE99IDE provides tools let user can create own library in C and assembly language. The methods and concepts are shown in Figure 2.4. Two stages: 1. Create object file Programmer uses compiler, assembler to translate source code files into object files (*.o). 2. Create library After create object files, user can run library maker to select object files and combine functions into a library file (*.lib). 30 Preliminary tenx technology inc. Rev 1.1, 2013/01/28 UM-TICE99IDE_E Advance Information User Manual Figure 2.4 Make Library Concept: C Source File (*.c) C Source File (*.c) ASM Source File (*.asm) ASM Source File (*.asm) Compiler/Assembler Object File (*.o) Library Maker Library File (*.lib) Figure 2.5 Concept of Library Maker 31 Preliminary tenx technology inc. Rev 1.1, 2013/01/28 UM-TICE99IDE_E Advance Information User Manual 2.6 Debug 2.6.1 Pause “Pause” stops all debug steps. When the ICE is in Go, Free Run, Auto Single Step or Auto Step Over mode, press “Pause” to stop debugging. Others it will be no action. 2.6.2 Run to Cursor “Run to Cursor” will run to the line where the caret is located and wait for next debugging instruction. 2.6.3 Go, Free Run “Go” and “Free Run” both will execute the code which was downloaded to ICE. The difference between “Go” and “Free Run” is “Free Run” will not stop when encountering break point, but “Go” will stop at the breakpoint in place if breakpoints are set. 2.6.4 Single Step, Auto Single Step “Single Step” during debugging, it will execute code line by line, or execute one machine code when debugging with list file. When debugging ASM file, one line source code will correspond to one list file line. One line source code will correspond to multiple list file line when debugging C file. "Auto Step" is that IDE will automatically and periodically implement "Single Step" which is according to time setting. The timer of Auto Single Step setting is set in Tools|Option|Debug Option. The timer unit is millisecond. 2.6.5 Step Over, Auto Step Over “Step Over” is a special kind of step. It will execute a program one line at a time, stepping over functions while executing them as a single unit. “Step Over” will execute one statement when it is not a function call. 2.6.6 Reset ICE This will reset ICE’s program counter value to 0 and set the debug mode to be “single step” mode. 2.6.7 Initialize ICE board “Initialize ICE board” will download the file that FPGA needed, confirm ICE connecting status and power status, test RAM and ROM and reset ICE. 32 Preliminary tenx technology inc. Rev 1.1, 2013/01/28 UM-TICE99IDE_E Advance Information User Manual 2.6.8 Insert / Remove Break Point, Remove All Break Point "Add Breakpoint" will allow the debugging steps to stop at the breakpoint. To interrupt the running program debugging line, you can double-click on the code line to set the breakpoint. To cancel a breakpoint, just double-click on the code line which has been set a breakpoint, then you can switch a non-interrupted state. "Remove all breakpoints" removes all breakpoint settings. 2.6.9 Debug with list file, debug with source file There are two ways to debug. One is with list file, and the other is with source code. List file debugging will run one step according to the mnemonic code. However, source file will run one statement according to ASM or C file. 33 Preliminary tenx technology inc. Rev 1.1, 2013/01/28 UM-TICE99IDE_E Advance Information User Manual 2.7 Tools In “Tools”, you can switch language interface dynamically. We provide three languages now; they are English, Simplified Chinese and Traditional Chinese. You can decide what language interface you want to use, and then select it. The other function of “Tools” is “Option”. In “Option”, you can set text font and size for editor. 2.7.1 Language English The language interface is switched to English. 2.7.2 Language Simplified Chinese The language interface is switched to Simplified Chinese. 2.7.3 Language Traditional Chinese The language interface is switched to Traditional Chinese. 2.7.4 QTP Creater Output “Coding Request Form” of current project, it includes hex file name, checksum, system configuration and other information. 2.7.5 Hex File Converter Hex file converter translates the source chip hex file to destination chip hex file. Table 2.1. shows the supported list. Source Chip TM57PE11 TM57PE11A TM57PA10 TM57PA20 Destination Chip TM57PE11A TM57PE11B TM57PA10A TM57PA20A Table 2.1 Supported List 34 Preliminary tenx technology inc. Rev 1.1, 2013/01/28 UM-TICE99IDE_E Advance Information User Manual 2.7.6 Options Option provides three kinds of setting: Editor: 1. Set the text font, font size and tab stop for editor. 2. Determine whether the new IDE automatically open the project which has been opened before. 3. When user checks "Code Completion", then in code editing process, the Editor will display a resizable prompt window, which lists the valid elements for the user to select and add to your code. 4. Set the color of keywords, numbers, colors, comment text, etc... Debug: Set "Auto step" of the time setting, and the timer unit is millisecond. Key Assignments: set the keystrokes for each item of menu. 35 Preliminary tenx technology inc. Rev 1.1, 2013/01/28 UM-TICE99IDE_E Advance Information User Manual 2.8 Help “Help” collects information about the IDE, including usage of IDE, the version number of compiler, assembler and linker which are executed by IDE, and update function of the IDE. 2.8.1 IDE User Manual This will open an IDE user manual .pdf file which corresponding to the language. If you are in English language interface, it will open English version user manual, and so on. 2.8.2 C Compiler User Manual This will open a C compiler user manual .pdf file which corresponding to the language. 2.8.3 Assembler User Manual This will open an Assembler user manual .pdf file which corresponding to the language. 2.8.4 About “About” window displays copyright information, versions of IDE, C compiler, Assembler, and Linker. 2.8.5 Update / New Version Check User can check new version via Update | New Version Check. If there is no any new version, it will show the newest version window, otherwise update the newer part of IDE. 36 Preliminary tenx technology inc. Rev 1.1, 2013/01/28 UM-TICE99IDE_E Advance Information User Manual 3. Toolbar Toolbar collects the common usage of menu. The toolbar can be divided into four parts; they are “File”, “Edit”, “Build” and “Debug”. In “File” toolbar, there are 6 buttons on it. They are New File, New Project, Open File, Open Project, Save and Save All. The functions are the same as “File” menu. The second toolbar is “Edit”. Most of functions in menu are listed in here, including Undo, Redo, Copy, Cut, Paste, Delete, Find, Find Previous, Find Next, Find in Project. The last button of “Edit” toolbar is Find and Replace. Then, Build, Rebuild, Build and Download to ICE and Compile File is in the “Build” toolbar. The last toolbar is “Debug”, it includes Go, Free Run, Single Step, Auto Single Step, Pause, Step Over, Auto Step Over, Run to Cursor, Reset ICE, Initial ICE Board, Set/Remove Break Point, and Remove All Break Point. 37 Preliminary tenx technology inc. Rev 1.1, 2013/01/28 UM-TICE99IDE_E Advance Information User Manual 4. Build a Project TICE99IDE provides C and inline assembly compiler, it also provides pure assembly compiler. TICE99IDE services two types of project; they are C/Assembly project and assembly project. However, C/Assembly project may include both C and assembler program or contains only C programs alone. Programmer can select project type. Then following the step below, step by step to create a project, coding, build it, download it to ICE and test it. 4.1 Create a New Project When you want to create a new project, press the File|New|Project in toolbar. Figure 4.1 Create a New Project -1 38 Preliminary tenx technology inc. Rev 1.1, 2013/01/28 UM-TICE99IDE_E Advance Information User Manual The new project window will be displayed. Select your target chip type in chip list. Next, choose your project type, assembly or C/Assembly. Give a name to the new project and decide which file folder to store this project. 1. Select a chip 2. Select a project type 3. Key-in project name 4. Use Browse to locate where the project is, or edit directly 5. Determine create project folder or not 6. When everything is done, press OK Figure 4.2 Create a New Project -2 39 Preliminary tenx technology inc. Rev 1.1, 2013/01/28 UM-TICE99IDE_E Advance Information User Manual When selecting the target chip type, if we click on the chip, the left side of dialog will display the hint of chip related reference information. The following table is the supported IC list of TICE99 IDE: EVBoard EV1697 / EV1694 EV2780 EV2781 EV2785 EV2786 EV2786B EV2787 EV2788 EV2793 EV2795 EV2796 Chip TMU3130 TMU3132 TMU3131 TM57FE80 TM57PE11B TM57PE11BS TM57PE11C TM57PE11CS TM57MA21 TM57ML40 TM57PE10 TM57PE12 TM57PE12AS TM57P12 TM57RE12 TP6717 TM57PE15 TM57PE15A TM57PE15AS TM57RE12A TM57PE40 TM57ME20 TM57P11 TM57PA10 TM57PA10A TM57PE11 TM57PE11A TM57PE12 TM57FA40 TM57FA40A TM57PA20 TM57PA40 TM57FLA80 ROM RAM (bytes) 8K*14 (Flash) 160*8 + 128*8 48 4K*14 (MTP) 160*8 + 128*4 20 6K*14 (MTP) 160*8 + 128*4 28(max) 8K*14 (Flash) 160*8 + 128*8 48 1K*14 (OTP) 48 6 (max) 1K*14 (OTP) 48 6 (max) 1K*14 (OTP) 48 6 (max) 1K*14 (OTP) 48 6 (max) 2K*14 (MTP) 184 18(max) 4K*14 (MTP) 368 34 (max) 1K*14 (OTP) 48 16 (max) 1K*14 (OTP) 48 12 (max) 1K*14 (OTP) 48 12 (max) 1K*14 (OTP) 48 12 (max) 1K*14 (MASK) 48 12 (max) 1K*14 (OTP) 48 16 (max) 1K*14 (OTP) 48 12 (max) 1K*14 (OTP) 48 12 (max) 1K*14 (OTP) 48 12 (max) 1K*14 (MASK) 48 12 (max) 1K*14 (OTP) 48 12 (max) 2K*14 (MTP) 96 18 (max) 1K*14 (OTP) 48 6 (max) 1K*14 (OTP) 64 14 (max) 1K*14 (OTP) 64 14 (max) 1K*14 (OTP) 48 6 (max) 1K*14 (OTP) 48 6 (max) 1K*14 (OTP) 48 12 (max) 4K*14 (Flash) 184 18 (max) 4K*14 (Flash) 184 18 (max) 2K*14 (OTP) 184 18 (max) 4K*14 (OTP) 184 18(max) 8K*14 (Flash) 368 45(max) Table 4.1 Supported IC list of TICE99 IDE 40 Preliminary Pin ADC --------12bit*11 --------------12bit*6 12bit*6 ---12bit*8 12bit*8 12bit*8 12bit*8 12bit*6 LCD Future support V (8*28) V V V tenx technology inc. Rev 1.1, 2013/01/28 UM-TICE99IDE_E Advance Information User Manual Indicate where the project is located using browse button. Figure 4.3 Create a New Project -3 If you finish the needed information for the project, then push the OK button. New project will be created. Figure 4.4 Create a New Project -4 41 Preliminary tenx technology inc. Rev 1.1, 2013/01/28 UM-TICE99IDE_E Advance Information User Manual 4.2 Open an Existed Project If you have an existed project and you want to modify it. You can use “Open an Existed Project” to do it. Figure 4.5 Open an Existed Project -1 Press File|Open|Project, the “Open File” dialog will appear. In the dialog, you can find out where your project is. The extended file name of project is .prj. Select the project and push the open button to open the existed project. Figure 4.6 Open an Existed Project -2 42 Preliminary tenx technology inc. Rev 1.1, 2013/01/28 UM-TICE99IDE_E Advance Information User Manual Figure 4.7 Open an Existed Project -3 43 Preliminary tenx technology inc. Rev 1.1, 2013/01/28 UM-TICE99IDE_E Advance Information User Manual 4.3 Project Setting When you want to modify configuration parameters for ICE, you can press Project|Project Setting|Configuration to change value of parameters. The type of setting items of configuration is displayed according to the ICE types. For example, they are IRCF, WDTE, 3V/5V Selection, CLKS, LVR, ICVPD as well as PROTECT. After you choose one configuration item, the corresponding information will be shown at the bottom part of the panel. It includes name, item description, selection description and hex value. All you can do is clicking combo box of value to choose the one that you want. At the same time, the value will be changed to respond the configuration setting value. Figure 4.8 Project Setting -1 Figure 4.9 Project Setting -2 For C project, in the tab page of "Directories", there will show a selection: "Reserved Memory Size for stkptr". It will reserve an additional RAM space to capture and save the contents of STKPTR, and restore the data previously saved. Programmer has 4 selections of reserved size: 0, 1, 2, 4 byte(s). The default setting is 0 byte (non-reserved). STKPTR is a reserved area for register variables in C compiler. It holds temporary variables and results during the execution of a program. If user selects outside 0, C compiler will allocate RAM space to store STKPTR and add extra instructions within function in order to save and restore the content of STKPTR. 44 Preliminary tenx technology inc. Rev 1.1, 2013/01/28 UM-TICE99IDE_E Advance Information User Manual Figure 4.10 Project Setting -3 We provide some situations needed to set "Reserved Memory Size for STKPTR" to avoid error occurs. 1. One function invokes another function call and callee modifies the data of STKPTR in process. This situation will overwrite the STKPTR saved by caller previously. Once callee returns, caller will retrieve the overwritten STKPTR. 2. The left side of assignment statement is array (or pointer) and right side is function call (ex. array[i] = func()). Before call function, the data of array (or pointer) will be saved to STKPTR. 3. Function expression (ex. retVal = fun1() + fun2()). Before calling the second function, the result of the first function will be saved to STKPTR. 4. The more complexity of the programming, the more internal interactions will be affected. Need to save STKPTR during the execution. We strongly recommend the following program coding style to avoid the above situations. To state more particularly, using simple programming statement instead a complex one. Original Code The Best Way retVal = func(); array[i] = retVal; retVal = fun1(); retVal = retVal + fun2(); array[i] = func() retVal = fun1() + fun2() 45 Preliminary tenx technology inc. Rev 1.1, 2013/01/28 UM-TICE99IDE_E Advance Information User Manual In order to illustrate how this works, two kinds of case will be described: one is reserved memory is not set, the other is setting 1 byte reserved. We will point out the differences in *.s file. No setting reserved memory to backup STKPTR main() Reserve 1 byte memory to backup STKPTR main() Save the temporary variables and results to STKPTR 46 Preliminary tenx technology inc. Rev 1.1, 2013/01/28 UM-TICE99IDE_E Advance Information User Manual f1() f1() Backup the contents of STKPTR Overwrite the data of STKPTR Restore the data of previously-saved STKPTR Note: although setting "Reserved Memory Size for stkptr" can avoid overwriting the data of STKPTR, but it will consume more RAM memory to backup the data of STKPTR and more ROM program memory to save and restore the content of STKPTR within the function. We strongly recommend reducing programming complexity instead of setting "Reserved Memory Size for stkptr". 47 Preliminary tenx technology inc. Rev 1.1, 2013/01/28 UM-TICE99IDE_E Advance Information User Manual Figure 4-11 Project Setting -4 48 Preliminary tenx technology inc. Rev 1.1, 2013/01/28 UM-TICE99IDE_E Advance Information User Manual 4.4 Editor Options Editor setting helps programmer to change the text font style and text size for editor. Users can press Tools|Options to open option window. In editor options, you can change the font name, size and tab stops. By the way, users can change keyword color of C and ASM to fit own habit. In Other Options, IDE will auto-open recent project when option “Auto open recent project when start IDE” is checked. The editor will popup code completion proposal, when “Code Completion” is checked. Key Assignments provides function that customizes short cut for all menus, user just chooses the short cut at “Keystrokes”, and then presses “Assign New Key”. Figure 4.12 Editor Options -1 49 Preliminary tenx technology inc. Rev 1.1, 2013/01/28 UM-TICE99IDE_E Advance Information User Manual Figure 4.13 Editor Options -2 Figure 4.14 Editor Options -3 50 Preliminary tenx technology inc. Rev 1.1, 2013/01/28 UM-TICE99IDE_E Advance Information User Manual Figure 4.15 Editor Setting -4 Figure 4.16 Editor Setting -5 51 Preliminary tenx technology inc. Rev 1.1, 2013/01/28 UM-TICE99IDE_E Advance Information User Manual Figure 4.17 Editor Setting -6 52 Preliminary tenx technology inc. Rev 1.1, 2013/01/28 UM-TICE99IDE_E Advance Information User Manual 4.5 Bookmarks It is used to look for a certain period of record among the dataset, either to move from one record to another record of the sequential search for a specific keyword. A bookmark marks a location in a dataset so that an application can easily return to that location quickly. In Editor area, user can right-click to use the pop-up menu and then use bookmarks function. Each bookmark records the file name and line number, and will show a bookmark icon at the left side of the editor. Up to 10 bookmarks can be marked. Using “Goto Bookmarks” to return to the location of the bookmark. Figure 4.18 Bookmarks 53 Preliminary tenx technology inc. Rev 1.1, 2013/01/28 UM-TICE99IDE_E Advance Information User Manual 4.6 Searching With the search function, programmer can quickly search keywords in the program code area. Searching function helps user coding more efficiently. Use searching function to find out keywords to replace or modify. Short cut which is a fast way to open find window is Ctrl + F. Once there is a string in the search edit, you can press F3 to find out next one, or Ctrl + F3 to search previous one. For shortcut key combination settings, please refer to the menu Tools|Options page of the "Key Assignment". 4.6.1 Find “Find” can search a specified string or words in current active editor page. You have to key in a search string let IDE search it for you. The caret will jump to corresponding line if it finds the search string. If there is no any match string, the end of file or begin of file dialog will be shown. Once you have a search string, you can press F3 or Ctrl + F3 to search next or previous match string. Figure 4.19 Find -1 54 Preliminary tenx technology inc. Rev 1.1, 2013/01/28 UM-TICE99IDE_E Advance Information User Manual Figure 4.20 Find -2 4.6.2 Find in Project “Find in Project” will find out all the match string in project or opened files and list the searching result in search result window. User can double-click one item in the list to go to the record line in the editor. Figure 4.21 Find in Project -1 55 Preliminary tenx technology inc. Rev 1.1, 2013/01/28 UM-TICE99IDE_E Advance Information User Manual Figure 4.22 Find in Project -2 Figure 4.23 Find in Project -3 56 Preliminary tenx technology inc. Rev 1.1, 2013/01/28 UM-TICE99IDE_E Advance Information User Manual 4.6.3 Find and Replace Figure 4.24 Find and Replace -1 Figure 4.25 Find and Replace -2 57 Preliminary tenx technology inc. Rev 1.1, 2013/01/28 UM-TICE99IDE_E Advance Information User Manual 4.7 Build a Project Once you finish the coding, then it is the time to compile the code. Press Build|Build to test the code whether it is correct or not. If there has any error or warning, the output window will show all the error or warning messages. Use the output window to correct the code. When there is no any error in the code, press Build|Build and Download to ICE to prepare to simulate the program. 4.7.1 Build File “Build File” helps users to check C codes or assembly codes to determine whether they are correct or not. Users can verify if there is any error in code, and then correct it. Figure 4.26 Build Project -1 58 Preliminary tenx technology inc. Rev 1.1, 2013/01/28 UM-TICE99IDE_E Advance Information User Manual Figure 4.27 Build Project -2 59 Preliminary tenx technology inc. Rev 1.1, 2013/01/28 UM-TICE99IDE_E Advance Information User Manual 4.7.2 Build and Download to ICE Once all the codes in one project are correct, you can download the codes to ICE to simulate the action of the codes. Use “Build and Download to ICE” to download the binary execution file to ICE. Note: Before you download the code to ICE, you have to plug the ICE to PC and turn on the ICE board. Make sure the connection to PC is success. Figure 4.28 Build and Download to ICE -1 60 Preliminary tenx technology inc. Rev 1.1, 2013/01/28 UM-TICE99IDE_E Advance Information User Manual Figure 4.29 Build and Download to ICE -2 61 Preliminary tenx technology inc. Rev 1.1, 2013/01/28 UM-TICE99IDE_E Advance Information User Manual 4.7.3 Make Library Libraries are no different than regular source files. All they do is to break the code up into smaller parts so that they can be maintained better and easier to read. TICE99IDE provides a tool to make a library easily. User can link .o file to build a customized library (*.lib). First, the user needs to select an existing or input a new library file name at the field of the “Library File Name”. And then press “Add” to select .o file or press “Delete” to delete selected .o file. When pressing “Add” or “Delete”, library will prompt message and update immediately. ; Figure 4.30 Make Library -1 Figure 4.31 Make Library -2 62 Preliminary tenx technology inc. Rev 1.1, 2013/01/28 UM-TICE99IDE_E Advance Information User Manual 4.8 Debug with Project TICE99IDE has several kinds of debug, including Pause, Run to Cursor, Go, Free Run, Single Step and Step Over. “Auto Single Step” and “Auto Step Over” are extended from Single Step and Step Over. It will run “Single Step” or “Step Over” when timer is triggered. Timer can be set in Tools|Options|Debug Options. The Unit of Timer is millisecond. Figure 4.32 Debug function with Project 63 Preliminary tenx technology inc. Rev 1.1, 2013/01/28 UM-TICE99IDE_E Advance Information User Manual Figure 4.33 Debug with Project - Break point 64 Preliminary tenx technology inc. Rev 1.1, 2013/01/28 UM-TICE99IDE_E Advance Information User Manual 4.9 Switch Language Interface TICE99IDE now provides three kinds of language interface. They are English, Simplified Chinese and Traditional Chinese. Click Tools|Language to switch the language if needed. Figure 4.34 Switch Language Interface 65 Preliminary tenx technology inc. Rev 1.1, 2013/01/28 UM-TICE99IDE_E Advance Information User Manual 4.10 QTP Creater “QTP Creater” is for output “Coding Request Form” of current project, it includes information that hex file name, checksum, system configuration, total code size and usage rate. Figure 4.35 QTP Creater 66 Preliminary tenx technology inc. Rev 1.1, 2013/01/28 UM-TICE99IDE_E Advance Information User Manual 4.11 Hex File Converter TICE99IDE provides a tool to convert a hex file from one chip type to another type for programming. It will pop up a confirmation dialog after selecting a hex file. Even the conversion is successful, it still has something to re-verify, please pay attention to see the detail. Figure 4.36 TM57PE11 Convert To TM57PE11A -1 67 Preliminary tenx technology inc. Rev 1.1, 2013/01/28 UM-TICE99IDE_E Advance Information User Manual 4.37 TM57PE11 Convert To TM57PE11A -2 Figure 4.38 TM57PE11 Convert To TM57PE11A -3 68 Preliminary tenx technology inc. Rev 1.1, 2013/01/28 UM-TICE99IDE_E Advance Information User Manual 4.12 Help This user manual only introduces how to use the IDE, C compiler and Assembler. If you want to know how to write code in IDE, please refer to the C, Assembler programming guide. Figure 4.39 Help 69 Preliminary tenx technology inc. Rev 1.1, 2013/01/28 UM-TICE99IDE_E Advance Information User Manual 5. Debug ICE can simulate the status of chip via debug. The registers of ICE will be shown on IDE, which can be divided into memory, registers, ICE stack status and mnemonic code. In the following, we will describe in what situation using the appropriate debug function: Single step / Auto Single Step: If you want to trace each source code to find out some problems, then using “Single Step”. Single step will run just one program counter step then it will stop. All current statuses or register values are shown on IDE. User can use this information to determine the problem. If you want to press the button of single step many times, another choice is using “Auto Single Step” to save the times you press the button. Once you want to stop auto single step, press “Pause” to stop it. Step Over / Auto Step Over: If you do not want to step into a function call, press “Step Over”. Same as “Auto Single Step”, you can use “Auto Step Over” instead of “Step Over” continually. If you want to stop “Auto Step Over”, press “Pause”. Run to Cursor: You can use “Run to Cursor” to pass the code that you have tested. Reset ICE: When you want to start debug from beginning, “Reset ICE” will help you to achieve. Go: You can set break point to stop the ICE when you use “Go” function. Using “Insert or Remove Break Point” to maintain the setting of break point function. One thing should be mentioned is all EV has break point limitation now. The maximum number of break point setting depends on the chip you selected. Debug by source file / debug by list file: There are two ways to debug the code. One is by source file; the other is by list file. One line in list file means one program counter. However in C program, one line in source will map a range of program counter. If you want to trace source code more detail, our suggestion is using list file. Otherwise, choose source file to debug. Pick one way you feel free. View the variable value when debugging: When you are debugging and you stop debugging, you can use mouse to point to a variable, and IDE will show a hint message box to display the current value result of this variable. IDE provides a convenient way to verify the value of a variable at any time when debugging. 70 Preliminary tenx technology inc. Rev 1.1, 2013/01/28 UM-TICE99IDE_E Advance Information User Manual Figure 5.1 Tooltip expression evaluation 71 Preliminary tenx technology inc. Rev 1.1, 2013/01/28 UM-TICE99IDE_E Advance Information User Manual 6. LCD Editor LCD provided by the IDE editor is an independent function. LCD editor edits the content which will be displayed in LCD. Some chips support the LCD function. The function of LCD Editor contains three parts: LCD Panel Editor, LCD Attributes as well as LCD Pattern Editor. LCD Panel Editor is main window. However, let’s start with LCD Pattern Editor. Figure 6.1 LCD Panel Editor 72 Preliminary tenx technology inc. Rev 1.1, 2013/01/28 UM-TICE99IDE_E Advance Information User Manual 6.1 LCD Pattern Editor “LCD Pattern Editor” window is an editor which can be used to design some patterns for reuse and save it as a file, and whose default extended file name is .pat. The size range of pattern is from 2 by 2 to 32 by 32. First, you have to decide the size of pattern. Then, use draw tool to place black dot on the pattern you decided in first step. If you place in an error position, you can use eraser to erase it. Other draw tools are ellipse, line, rectangle, and font. Font is convenient tool to let you draw text more easily. By the way, there are five edit functions. They are cut, copy, paste, undo and redo. After you have finished a pattern, you can use “Save to File” to keep what you draw. The pattern file is a serial image; you can use “Add Panel to Tail” or “Insert Panel” to enrich your patterns or remove current pattern by “Delete”. You can redefine the size of pattern by LCD pattern definition. Developers can use scroll bar to change to the panel that you want to modify or use indicator to input a pattern number to jump to pattern directly. Figure 6.2 LCD Pattern Editor 73 Preliminary tenx technology inc. Rev 1.1, 2013/01/28 UM-TICE99IDE_E Advance Information User Manual 6.2 LCD Attributes Once you create a pattern file, you can use “LCD Attributes” window to load the pattern file. Use “Open File” to load the pattern, and it will be shown on patterns list. Select a pattern and switch to LCD Panel Editor window, then you can place the pattern to “LCD Panel Editor” or load external bitmap file to place on LCD Panel Editor. Except this, you can set the value of pattern, they are Segment and Common. The Segment value always represents column; on the other hand, the Common value always represents row. LCD data shows content of LCD RAM. Figure 6.3 LCD Attributes 74 Preliminary tenx technology inc. Rev 1.1, 2013/01/28 UM-TICE99IDE_E Advance Information User Manual 6.3 LCD Panel Editor In “LCD Panel Editor”, you can layout the image which will be displayed on the LCD panel connected with you chip. You can use grid as a ruler to arrange you image. At the same time, you have to set the size of grid . That includes width and height, from 1 to 32. This depends on the pattern size that you draw in LCD Pattern Editor. LCD Panel Editor places the image according to the Pattern or bitmap file according to the switch you selected, pattern editor or bitmap file. If you place the pattern on a wrong position, you can use select pattern to move to correct place. Select pattern can choose more than one pattern. The other way to move pattern is query attribute. It provides Segment and Common information and you can move the pattern at the same time. Once you finish, use save file extended file name is .LCD. This file can be added into project. 75 Preliminary to save LCD file, the tenx technology inc. Rev 1.1, 2013/01/28 UM-TICE99IDE_E Advance Information User Manual 7. Shortcuts Function Shortcut File Save Ctrl + S Edit Undo Ctrl + Z Redo Ctrl + Y Copy Ctrl + C Cut Ctrl + X Paste Ctrl + V Select All Ctrl + A Find Ctrl + F Find Previous Ctrl + F3 Find Next F3 Find and Replace Ctrl + R Go To Ctrl + G Build Build F10 Rebuild F11 Compile File F12 Build and Download to ICE Ctrl + F10 Debug Pause F4 Run to Cursor Ctrl + F4 Go F5 Free Run Ctrl + F5 Single Step F6 Auto Single Step Ctrl + F6 Step Over F7 Auto Step Over Ctrl + F7 Step Out F8 (RFU) Auto Step Out Ctrl + F8 (RFU) Reset ICE F9 Initialize ICE Ctrl + F9 Insert / Remove Break Point Ctrl + B Function Short cut Help F1 Table 7.1 Shortcuts 76 Preliminary tenx technology inc. Rev 1.1, 2013/01/28 UM-TICE99IDE_E Advance Information User Manual Appendix A: Meaning of LED on ICE board V5.0: Power from AC Adapter. DONE: FPGA download file success, ICE can work properly. 77 Preliminary tenx technology inc. Rev 1.1, 2013/01/28