1
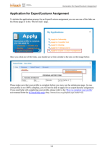
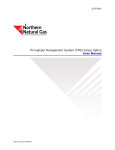
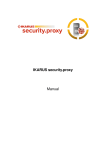
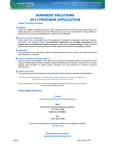
Page 1 of 59 User Manual Last Modified Date: 07/12/2011 Gas Nomination System User Manual Proprietary and confidential – disclosure is prohibited Page 2 of 59 Table Of Contents 1. Introduction ................................................................................................................. 3 1.1 Navigation ........................................................................................................... 3 1.2 Button functionalities .......................................................................................... 3 1.3 Date Formats ....................................................................................................... 4 2. Security Module .......................................................................................................... 5 2.1 Login to Gas Nomination System ....................................................................... 5 2.2 Login to Gas Nomination System for a first time user ....................................... 6 2.3 Change Password ................................................................................................ 8 2.4 Forgot Password................................................................................................ 10 3. Company Module...................................................................................................... 12 3.1 Person Search .................................................................................................... 12 3.2 Create Person .................................................................................................... 15 3.3 Update Person ................................................................................................... 19 3.4 View Company ................................................................................................. 22 4. Contract Module ....................................................................................................... 23 4.1 Contract Search ................................................................................................. 23 4.2 View Contract ................................................................................................... 26 4.3 Path Search........................................................................................................ 28 4.4 Create Path ........................................................................................................ 32 4.5 Update Path ....................................................................................................... 34 5. Nomination Module .................................................................................................. 36 5.1 Nomination Search............................................................................................ 36 6. Report Module .......................................................................................................... 41 6.1 Pool Summary Report Filter ............................................................................. 41 6.2 Service Summary Report Filter ........................................................................ 49 7. Browser Shortcut Keys ............................................................................................. 58 7.1 Internet Explorer ............................................................................................... 58 7.2 Netscape Navigator ........................................................................................... 59 Gas Nomination System User Manual Proprietary and confidential – disclosure is prohibited Page 3 of 59 1. Introduction This manual contains general information for the new user about how GNS works and how to get started. This manual is designed as a reference guide for using the GNS Web application. If, after reading this User's Manual, you still have questions about GNS, or need assistance, please contact our Customer Support. 1.1 Navigation The application can be navigated using the menu on the top of each page. By clicking the Top menu, you can see the additional Menu (Sub Menu) below to the Main Menu, which allows you to navigate other pages. 1.2 Button functionalities Save Defaults Button is used to save your default search criteria values in search screen. When you come to same screen next time, your default values will appear as the search selections. Cancel Button is used to navigate back to search screen from save or view screen. It also avoids the changes you made in the save screen. Clear Button clears all controls in the screen & there by you can enter new data in the controls. The Save button is used to save all data entries on a page. The Search Button is used to initiate a search of all entities (companies, contracts, etc) that meet the search criteria. Gas Nomination System User Manual Proprietary and confidential – disclosure is prohibited Page 4 of 59 The Create Button is used to navigate to a fresh Create page for a particular entity. Because Create is used to enter a new entity, there is no need to enter any data in the Search page before clicking the Create Button. 1.3 Date Formats You can enter the date in the application by following ways. 1. Type the date in the text box with the system allowed date formats like mm.dd.yy, mm-dd-yy, mm/dd/yy, mm.dd.yyyy, mm-dd-yyyy, mm/dd/yyyy. 2. Click the down arrow, which appears next to the date text box. This will span a new calendar window. Select the required date by clicking the Blue link. Gas Nomination System User Manual Proprietary and confidential – disclosure is prohibited Page 5 of 59 2. Security Module 2.1 Login to Gas Nomination System 1. Type in the URL (https://www.consumersenergy.com/gns) in the Address textbox in the web browser. This will bring up the Gas Nomination System website login page. 2. Enter a valid User ID in the User ID textbox. 3. Enter a valid Password for the User ID in the Password textbox. 4. Click the OK button • If there are errors related to login, they appear on the page, and You must rectify these errors in order to login. Gas Nomination System User Manual Proprietary and confidential – disclosure is prohibited Page 6 of 59 2.2 Login to Gas Nomination System for a first time user 1. The first time you log into GNS, use the User ID and temporary password (emailed to you). You will then be taken to the Change Password Page 2. Enter a new password in the New Password textbox. The password must be at least 8 characters, and is case-sensitive. 3. Enter the same new password entered above in the Confirm Password textbox. This is to verify that you did not mistype the password, as it is not visible. 4. Enter a clue question in the Clue Question textbox, and a clue answer in the Clue Answer textbox. • The Clue Question and Clue Answer will be used to verify your identity in the event you forget your password and need your password reset. The Clue Question can be any thing you like, such as Mother’s maiden name; Gas Nomination System User Manual Proprietary and confidential – disclosure is prohibited Page 7 of 59 • • • or Favorite Cartoon character. The Clue Answer should be something that only you would know. In the event you forget your password, your clue question will be displayed. If the clue answer matches what is stored in his profile, password will be emailed to you. The next time you log into GNS, you will be required to change your password. 5. Before accessing GNS for the first time, you must agree to the Terms and Conditions. 6. Click on the [click here] link to view the Terms and Conditions document. 7. After reading the Terms and Conditions document, click the checkbox next to “I agree to the terms and conditions” 8. Click the OK button or hit the Enter key to successfully login to the GNS • If there are errors related to login, they appear on the page, and You must rectify these errors in order to login. 9. Click the Cancel button to return to the Login page. Gas Nomination System User Manual Proprietary and confidential – disclosure is prohibited Page 8 of 59 2.3 Change Password 1. There are three scenarios in which you may be taken to the Change Password page. • You might have your password reset by your administrator. • When your administrator resets your password, an email with the reset and temporary password is sent to you. • When you log in to GNS using the e-mailed password, you will be taken to the Change Password page. OR • Your password expires every 90 days. • When you log in to GNS after your password has expired, you will be taken to the Change Password page OR • When you request a password in the Forgot Password page. • Your password is emailed to you. This password is now considered Gas Nomination System User Manual Proprietary and confidential – disclosure is prohibited Page 9 of 59 • temporary. When you log in to GNS using this password, you will be taken to the Change Password page. 2. Enter a new password in the New Password textbox. The password must be at least 8 characters, and is case-sensitive. 3. Enter the same new password entered above in the Confirm Password textbox. This is to verify that you did not mistype the password, as it is not visible. 4. Click the OK button or Enter key to successfully login to the GNS. • If there are errors related to login, they appear on the page, and you will need to rectify these errors in order to login. 5. Click the Cancel button to return to the Login page. Gas Nomination System User Manual Proprietary and confidential – disclosure is prohibited Page 10 of 59 2.4 Forgot Password 1. If you forget your password, click on the Forgot Password link (Note: Your User ID must be entered in the User ID textbox before clicking the Forgot Password button) • If there are related errors like Invalid UserID due to invalid Login name or Inactive User Login, they appear on the page. • You must rectify these errors in order to proceed to the Forgot Password page. • On successful correction of these errors, the user is taken to the Forgot Password page. • If you can’t get to the forgot password page, it may be that the system isn’t recognizing your UserID. If you can’t remember your UserID, you will need to call your local Administrator for help. If you don’t know who your local Administrator is, or if you are your company’s Administrator, call Consumers Energy’s Gas Transportation Services, at (517) 788-2907. Gas Nomination System User Manual Proprietary and confidential – disclosure is prohibited Page 11 of 59 2. The Clue Question your previously stored will be displayed. 3. Enter your clue answer in the Clue Answer textbox • If the clue answer matches what is stored in your profile, your current password will be emailed to you. • You can gain access into the GNS using this password, but you will be required to change your password in the change password page • Please look at the Section “Change Password” [Page: 8] for more information on the Change Password page. Gas Nomination System User Manual Proprietary and confidential – disclosure is prohibited Page 12 of 59 3. Company Module 3.1 Person Search Function: Admin can search his company persons in this page by person first name, person last name, role, contact type and person status. Admin can create, update and delete a person for his company from this page. 1. Click on Company in the Main Menu (The Person Search page of the Person Submenu is opened by default) 2. Person Search can be filtered by searching on any of the following optional fields. Alternately, to see a listing of all the persons in your company, simply click the SEARCH button: • Person First Name • Person Last Name • Role • Contact type • Person Status Gas Nomination System User Manual Proprietary and confidential – disclosure is prohibited Page 13 of 59 3. In order to search by Person First Name: • Enter the first few characters of a person’s first name in the Person textbox. 4. In order to search by Person Last Name: • Check the Last Name checkbox • Enter the first few characters of a person’s last name in the Person textbox 5. In order to search by Role: • Select a role provided in the list There are six different roles a CEAdmin can select from in the list. They are Administrator – This person can do everything a User can do, plus create and update information on other people in their company. Each company must have at least one Administrator. Multiple administrators are allowed. User – This person can create nominations, view contracts, view and create paths, and generate reports to their company, as well as maintain their own “person” information. ReadOnlyUser – This user has read only privileges. They can view all information related to their company in the GNS, but cannot make any changes. Non-User – A person who may do business with Consumers Energy, but doesn’t use the Gas Nomination System. 6. In order to search by Contact Type: • Select a contact type provided in the list In order to search by Person Status: • Select Active, Inactive or blank from the choices provided in the list • A blank status means selecting both Active and Inactive status. 7. 8. Click Search button to retrieve search results based on the combination of above criteria. Person Search Results return the following person information: • Company Name • Person Name • Contact Type • Phone • Role • Person Status (If the person is active, then the green box is checked. If the person is inactive, then the green box is unchecked) • Update Button Gas Nomination System User Manual Proprietary and confidential – disclosure is prohibited Page 14 of 59 • Delete Button If no records are found for the selection criteria, a corresponding message appears which says ‘no records found’. If records are found for the selection criteria, the selected records appear on the page. If more than one record is found for the selection criteria, the Person Search Results will be sorted alphabetically by Last Name and Role. 9. Click on the Update Button • To update the person information OR • To view detailed information of the person 10. Click on the Delete Button to delete the person. • An alert box appears asking you to confirm the delete action. • You can cancel the delete action by clicking on the Cancel button OR • Confirm the delete action by clicking the OK button The record will not be deleted if it is referenced in other areas, such as Nomination. On successful delete, a corresponding message appears which says ‘Person deleted successfully’ 11. Click Clear button to clear the contents. 12. Click Create button to create a new person. 13. Click on Save Defaults button to create your own default values. Fill in all the desired search selections. Click on the Save Defaults button. When you log in next time, your user-defined selection will appear as the search selections. Gas Nomination System User Manual Proprietary and confidential – disclosure is prohibited Page 15 of 59 3.2 Create Person Gas Nomination System User Manual Proprietary and confidential – disclosure is prohibited Page 16 of 59 Function: This page can be reached by clicking the Create button on the Person Search page. A user can successfully create a person in this page. 1. Click on Company in the Main Menu (The Person Search page of the Person Submenu is opened by default) 2. Click on the Create button in the Person Search page. 3. Fill in the required fields: • First Name • Last Name • Select Contact Types provided in the list. This will help Consumers Energy know whom to contact for various business issues (To select or deselect multiple contact types, hold the Ctrl key down while scrolling through the choices and making selections with the mouse) • Select an Address provided in the list • Select a Role provided in the list • Email Address Gas Nomination System User Manual Proprietary and confidential – disclosure is prohibited Page 17 of 59 • User ID • Password • Confirm Password Note: Email Address, User ID, Password and Confirm Password are only required for people who will be accessing the GNS. 4. Fill in optional fields: • Select a Prefix provided in the list • Fill in a Middle Name • Select a Suffix provided in the list • Fill in a Job Title • Select Email Groups provided in the list (To select or deselect multiple email groups, hold the Ctrl key down while scrolling through the choices and making selections with the mouse) 5. Check Active (optional field) This field indicates the active or inactive status of a person. If it is checked, it is an active person. If it is not checked, it is an inactive person. 6. Fill in Phone (optional field) Fill in the required fields: • Select a Phone Type provided in the list • Phone Number. You need not type punctuation. You can simply type the 10 digits, and the punctuation will be added upon saving. Fill in optional Extension if applicable: • Extension Click on the Update Button to add the phone. Click on the Cancel Button to cancel any action related to the phone. A phone once added, can be updated by clicking on the Edit Button. When the Update Button of a phone is clicked, that phone information appears in the textboxes. On updating that phone information, click on the Update Button to save the phone. Click on Delete Button to delete the phone. Phone changes take effect only on click of the Save button located at the bottom of the page. 7. Click on the Save button to create the person • If there are errors related to saving the person, they appear on the page. • The user needs to rectify those errors in order to save the person. Gas Nomination System User Manual Proprietary and confidential – disclosure is prohibited Page 18 of 59 • On successful save of a person, the user is taken back to the Person Search page with a message saying ‘Person saved successfully’. 8. Click on the Clear button to clear the contents 9. Click on the Cancel button to cancel any action related to the person and return to the Person Search page. Gas Nomination System User Manual Proprietary and confidential – disclosure is prohibited Page 19 of 59 3.3 Update Person Gas Nomination System User Manual Proprietary and confidential – disclosure is prohibited Page 20 of 59 Function: To update the person information, click on the Edit Button for a person in the Person Search Results page. 1. The clue question and clue answer can be updated only by the actual person. A company’s Administrator can update all the other fields. 2. To update the information, Follow the same procedures listed in Create Person Page. 3. Changing a phone record: • To change a phone number, click on the update Edit Button next to that phone number. The information for that phone record now appears in the text boxes. Click in the boxes and make the necessary changes. When finished, click on the Update Button to save that record. • Click on Delete Button to delete the phone 4. To Add a phone record: • Enter the phone type, Phone number and extension in the text boxes • Click on the Update Buton to save the new phone record. Gas Nomination System User Manual Proprietary and confidential – disclosure is prohibited Page 21 of 59 5. Click on the Save button to update the person • If there are errors related to saving the person, they appear on the page. • You must rectify those errors in order to save the person. • On successful save of a person, You will be taken back to the Person Search page with a message saying ‘Person saved successfully’. 6. Click on the Cancel button to cancel any action related to the person and return to the Person Search page. Gas Nomination System User Manual Proprietary and confidential – disclosure is prohibited Page 22 of 59 3.4 View Company Function: View your company details from this page. 1. Click on Company in the Main Menu (The Person Search page of the Person Submenu is opened by default) 2. Click on Company in the Sub Menu 3. The following information will be displayed: • Company Code • Company Name • DUNS • Active Status • Company Types • List of Addresses for the company • List of Aliases (Other names the company may be know by) Gas Nomination System User Manual Proprietary and confidential – disclosure is prohibited Page 23 of 59 4. Contract Module 4.1 Contract Search Gas Nomination System User Manual Proprietary and confidential – disclosure is prohibited Page 24 of 59 Function: You can search for your Company’s Contracts in this page by Pipeline, Contract Type or Contract Name, or Date Range. 1. Click on Contract in the Main Menu (The Contract Search page of the Contract Submenu is opened by default) 2. Contract Search can be filtered by searching the following fields: • Pipeline • Contract Type • Contract Code or Name • Start Date • End Date 3. In order to search by Pipeline: • Select a Pipeline from the Pipeline select box. 4. In order to search by Contract: • Enter the first few characters of Contract code or Contract Name [If Name Checkbox is checked] Gas Nomination System User Manual Proprietary and confidential – disclosure is prohibited Page 25 of 59 5. In order to search by Start Date: • Click on Commencement. • Enter a range of possible start dates in the From and To date boxes. 6. In order to search by End Date: • Click on Termination • Enter a range of possible End dates in the From and To date boxes. 7. In order to search for all contracts effective at any time within a certain date range: • Click on Effective • Enter a range of possible End dates in the From and To date boxes. 7. Click Search button to retrieve search results based on the combination of above criteria. The Contract Search Results will display the following Contract information in Contract Result Screen (in new screen). • Contract Code • Contract Name • Company Name • Pipeline • Contract Type • Start Date • End Date • View Button If no records are found for the selection criteria, a corresponding message appears which says ‘no records found’. If records are found for the selection criteria, the selected records appear on the page. If more than one record is found for the selection criteria, the contract search results will be sorted alphabetically by Contract Code. 9. Click on the View Button to view detailed information of the Contract 10. Click Clear button to clear the contents. 11. Click on Save Defaults button to create a user-defined default. Fill in all the desired search selections. Click on the Save Defaults button. When you log in from next time, your user-defined selection will appear as the search selections. Gas Nomination System User Manual Proprietary and confidential – disclosure is prohibited Page 26 of 59 4.2 View Contract Gas Nomination System User Manual Proprietary and confidential – disclosure is prohibited Page 27 of 59 Function: To view contract details, click on the View Button for a contract in the contract search results of the Contract Search Result page. 1. 5. The View Contract page will display the following information about a contract in contract: • Pipeline - Pipeline on which contract created • Company - Owner of the contract • Contract Code - Contract Code • Contract Name - Contract Name • Start Date - Contract Start date • End Date - Contract End date • Contract Type - Contract type of the contract • MDQ - Maximum daily quantity detail of the contract • MinDQ - Minimum daily quantity detail of the contract • Other details like Account Code, District, ACQ, Tolerance, Meters, Contiguous Account, Aggregated Account, Storage, Storage Quantity, Priority, MDQ Gross/Net Indicator, Fuel Full Tariff, Special Fuel, and Re-Contract Date. Click on the Cancel button to return to the Contract Search page. Gas Nomination System User Manual Proprietary and confidential – disclosure is prohibited Page 28 of 59 4.3 Path Search Gas Nomination System User Manual Proprietary and confidential – disclosure is prohibited Page 29 of 59 Function: You can search for your company’s Paths in this page by Pipeline, Contract, Point, Point Type, Path Status or Path Name. User can create or update and delete a Path from this page. 1. Click on Contract in the Main Menu (The ContractSearch page of the Contract Submenu is opened by default) 2. Click on Path in the Sub Menu 3. Path Search can be filtered by searching the following fields: • Pipeline • Contract • Point Code • Point Name • Point Type • Path Status • Path Name 4. In order to search by Pipeline: Gas Nomination System User Manual Proprietary and confidential – disclosure is prohibited Page 30 of 59 • Select a Pipeline from the Pipeline select box. 5. In order to search by Contract: • Select a Contract from the Contract select box. 6. In order to search by Point Code: • Select a point code from the point code select box. 7. In order to search by Point Name: • Select a point name from the point name select box. 8. In order to search by Path Status: • Select Active, Inactive or blank from the choices provided in the list • A blank status means selecting both Active and Inactive status. 9. In order to search by Path Name: • Enter the first few characters of a path name in the Path textbox. 10. Click Search button to retrieve search results based on the combination of above criteria. Path Search Results return the following Path information in Path Result Screen (in new screen). • Path Name • Contract Code • Contract Name • Company Name • Fuel Category • Start Date • End Date • Update Button • Delete Button • Copy Button If no records are found for the selection criteria, a corresponding message appears which says ‘no records found’. If records are found for the selection criteria, the selected records appear on the page. If more than one record is found for the selection criteria, the Path Search results will be sorted alphabetically by Path Name. 11. Click on the Edit Button • To update the Path Information OR • To view detailed information of the Path 12. Click on the Delete Button to delete the path. Gas Nomination System User Manual Proprietary and confidential – disclosure is prohibited Page 31 of 59 • • • An alert box appears asking the user to confirm the delete action. You can cancel the delete action by clicking on the Cancel button OR You can confirm the delete action by clicking the OK button The record will not be deleted if it is referenced in other entities, such as Nomination On successful delete; a corresponding message appears which says ‘Path deleted successfully’. 13. 14. 15. Click Clear button to clear the contents. Click Create button to create a new Path. Click on Save Defaults button to create a user-defined default. Fill in all the desired search selections. Click on the Save Defaults button. When the user logs in from next time, his user-defined selection will appear as the search selections. Gas Nomination System User Manual Proprietary and confidential – disclosure is prohibited Page 32 of 59 4.4 Create Path Function: This page can be reached by clicking the Create button on the Path Search page. 1. Click on Contract in the Main Menu (The Contract Search page of the Contract Submenu is opened by default) 2. Click on Path in the Sub Menu (The Path Search page is opened by default) 3. Click on the Create button in the Path Search page. 4. Fill in the required fields: • Pipeline • Contract • Receipt Point • Delivery Point Gas Nomination System User Manual Proprietary and confidential – disclosure is prohibited Page 33 of 59 • • • Path Name Start Date Status 5. Fill in Optional fields • Upstream Contract • Downstream Contract • Fuel Category • Package ID • End Date 6. Only Pool-to-Pool & External to Pool contract type’s contracts will be available in the contract select Box. 7. Receipt & Delivery Select Box will be populated based upon Contract. 8. Upstream & Downstream contract Select Box will be populated based upon Contract. (Note: For External Contract Type contract, the upstream contract select box will be Populated based upon Receipt Point) 6. Click on the Save button to create the path category • If there are errors related to saving the path, they appear on the page. • You must rectify those errors in order to save the fuel category. • On successful save of a path, You will be taken back to the Path Search page with a message saying ‘Path saved successfully’. 7. Click on the Clear button to clear the contents 8. Click on the Cancel button to cancel any action related to the Create Path and return to the Path Search page. Gas Nomination System User Manual Proprietary and confidential – disclosure is prohibited Page 34 of 59 4.5 Update Path Function: This page can be reached by clicking on the Edit Button of a Path in the Path search results of the Path Result page. 1. Click on Path in the Main Menu (The Path Search page of the Path Submenu is opened by default) 2. Perform a Path search. Path Search Results return the following Path information in Path Result Screen (in new screen). • Path Name • Contract Code • Contract Name • Company Name • Fuel Category • Start Date Gas Nomination System User Manual Proprietary and confidential – disclosure is prohibited Page 35 of 59 • • • • End Date Edit Button Delete Button Copy Button If no records are found for the selection criteria, a corresponding message appears which says ‘no records found’ If records are found for the selection criteria, the selected records appear under Path Search Results If more than one record is found for the selection criteria, the Path Search Results will be sorted alphabetically by Path Name. 4. Click on the Edit Button • To update the path OR • To view detailed information about the path 5. Pipeline, Company, Contract, Receipt Point, Upstream Contract, Delivery Point, Downstream Contract, Path Name, Start Date and End Date cannot be updated. 6. Package ID can be updated. 7. Click on the Save button to update the Path. • If there are errors related to saving the path, they appear on the page. • You must rectify those errors in order to save the path. • On successful save of a Path, You will be taken back to the Path Search page with a message saying ‘Path saved successfully’. 8. Click on the Cancel button to cancel any action related to the Update Path and return to the Path Search page. Gas Nomination System User Manual Proprietary and confidential – disclosure is prohibited Page 36 of 59 5. Nomination Module 5.1 Nomination Search Gas Nomination System User Manual Proprietary and confidential – disclosure is prohibited Page 37 of 59 Function: User can search the nominations for a date range and submit a new nomination from these screens. Nominations are acceptable, a. Only for 365 days. b. For Zero quantity. c. That may overlap the previous nominations. d. To submit multiple concurrent nominations for a path, if the paths are identified by distinct package IDs. Nominations are not acceptable, a. If a nomination date range exceeds the Path date range. b. If a nominated quantity greater than the MDQ of the contract. c. If a nomination start date less than Today – 365 days. d. On Inactive paths. If a user submits multiple nomination for a given gas day, the system will look at the most recently submitted nomination to determine which nomination quantity to apply following ‘last in wins’ rule. Gas Nomination System User Manual Proprietary and confidential – disclosure is prohibited Page 38 of 59 1. Click on Nomination in the Main Menu (The Nomination Search page of the Nomination Submenu is opened by default) 2. Nominations can be filtered by searching on the following fields: • Gas Date Range (mandatory) • Pipeline (mandatory) • Contract Type • Contract • Nomination Session 3. In order to search by Pipeline: • Select a Pipeline from the Pipeline select box. 4. In order to search by Gas Date Range: • Enter the dates in the acceptable date formats or select a date from the calendar next to the Date textbox. (Note: Acceptable date formats are mm.dd.yy, mm-dd-yy, mm/dd/yy, mm.dd.yyyy, mm-dd-yyyy, mm/dd/yyyy) 5. In order to search by Contract: • Select a Contract from the Contract select box. 6. In order to search by Nomination Session • To view all Nominations, click on “Show all Current Nominations” • To view one particular Nomination Session, click on “View a Nomination Session” and select Session Information from the select box behind to this text 7. Display Totals section • Click on “No Total” to view the Nomination result with no Total on each node. • Click on “For a Gas Day” to view the Nomination result total for a given gas day & to view the Scheduled & allocated qty for the given gas day. • Click on “For the Date Range” to view the Nomination result with Total on each node. 8. Primary Display section • Select Nominated or Scheduled or Allocated to appear as first column in the tree view display. 9. Display Option section • Check “Show Nominated” to display the nominated qty in the result screen. • Check “Show Scheduled” to display the scheduled qty in the result screen. • Check “Show Allocated” to display the allocated qty in the result screen. Gas Nomination System User Manual Proprietary and confidential – disclosure is prohibited Page 39 of 59 • Check “Include Paths With Zero Quantities” to view all paths even if the paths are not nominated. Check “Show Ranks” to view the Nominations Rank. • 10. Click Search button to retrieve search results based on the combination of above criteria. Nomination Search Results return the following information in Nomination Result screen: • Contract Code & Name • Receipt Point -> Delivery Point • Path Name • Nomination Information Nomination Date Range Nominated Gross Qty Nominated Fuel Qty Nominated Net Qty Scheduled Gross Qty Scheduled Fuel Qty Scheduled Net Qty Allocated Gross Qty Allocated Fuel Qty Allocated Net Qty Update Button Cancel Button The result will appear in the following tree view format, Add Nominations: • • • Navigate to the nomination path node by clicking the contract node & point node in the Treeview. Fill in the required fields o Start Date o End Date o Gross or Net Qty o Rank To add more nomination on another path. Navigate to that path & enter the required fields Gas Nomination System User Manual Proprietary and confidential – disclosure is prohibited Page 40 of 59 • • • • • • • To add one more nomination on the same path, click on the Update Button. To clear the added nomination in the current session, click on the Cancel Button. To save all nominations added in the current session, click the Update button and then the Save Button. o If there are errors related to saving the nomination, they appear on the Nomination error window o You must rectify those errors in order to save the nominations. o On successful save of the nominations, the window appears with the message “Your nominations have passed validation. All nominations have been saved.” To view the last nominations error, click on the link “View Nomination Save Result”. To expand the Treeview content, click “Expand All” option box To collapse the expanded Treeview content, click “Collapse All” option box Click on the Cancel button to cancel any action related to the Nomination and return to the Nomination Search page. 11. Click Clear button to clear the contents. 12. Click on Save Defaults button to create a user-defined default. Fill in all the desired search selections. Click on the Save Defaults button. When you log in next time, your user-defined selection will appear as the search selections. Gas Nomination System User Manual Proprietary and confidential – disclosure is prohibited Page 41 of 59 6. Report Module 6.1 Pool Summary Report Filter Gas Nomination System User Manual Proprietary and confidential – disclosure is prohibited Page 42 of 59 PDF File Output Function: User can retrieve Pool Summary report from this page by providing Pipeline (mandatory), Gas Day (mandatory), Group By (mandatory), Lowest level of Detail (mandatory), Show Quantity: Nominated or Show Quantity: Scheduled or Show Quantity: Allocated or Show Zero Quantities or Show Non-Zero Pool Imbalance. The report output (pdf format) will display in a new window. 1. Click on Report in the Main Menu and Click on Pool Summary Submenu. (The Pool Summary filter Submenu will be opened) 2. Pool Summary report would be filtering by the following fields: • • • • Pipeline (mandatory) Gas Day (mandatory) Pool Group by (mandatory) Gas Nomination System User Manual Proprietary and confidential – disclosure is prohibited Page 43 of 59 • • • • • • 3. Lowest level of Detail (mandatory) Show Quantity: Nominated Show Quantity: Scheduled Show Quantity: Allocated Show Zero Quantities Show Non-Zero Pool Imbalance. In order to filter by Pool: • Select a Pipeline from the Pipeline select box. AND • Enter a Gas Day (Start Date) in the first box (in the acceptable date formats or select a date from the calendar next to the Start Date textbox. (Note: Acceptable date formats are mm.dd.yy, mm-dd-yy, mm/dd/yy, mm.dd.yyyy, mm-dd-yyyy, mm/dd/yyyy) AND • 4. Enter a Gas Day (End Date) in the second box in the same row (in the acceptable date formats or select a date from the calendar next to the End Date textbox. (Note: Acceptable date formats are mm.dd.yy, mm-dd-yy, mm/dd/yy, mm.dd.yyyy, mm-dd-yyyy, mm/dd/yyyy) AND Enable Group by check box (Path or Gas Day). AND Enable Lowest Level of Detail check box (Path or Gas Day). AND Select Pool from the selection box. To see the report results in Group by Path: • Select a Pipeline from the Pipeline select box. AND • Enter a Gas Day (Start Date) in the first box (in the acceptable date formats or select a date from the calendar next to the Start Date textbox. (Note: Acceptable date formats are mm.dd.yy, mm-dd-yy, mm/dd/yy, mm.dd.yyyy, mm-dd-yyyy, mm/dd/yyyy) AND • 5. Enter a Gas Day (End Date) in the second box in the same row (in the acceptable date formats or select a date from the calendar next to the End Date textbox. (Note: Acceptable date formats are mm.dd.yy, mm-dd-yy, mm/dd/yy, mm.dd.yyyy, mm-dd-yyyy, mm/dd/yyyy) AND Enable Lowest Level of Detail check box (Path or Gas Day). AND Enable Group by Path check box. To see the report results in Group by Gas Day: • Select a Pipeline from the Pipeline select box. AND Gas Nomination System User Manual Proprietary and confidential – disclosure is prohibited Page 44 of 59 • Enter a Gas Day (Start Date) in the first box (in the acceptable date formats or select a date from the calendar next to the Start Date textbox. (Note: Acceptable date formats are mm.dd.yy, mm-dd-yy, mm/dd/yy, mm.dd.yyyy, mm-dd-yyyy, mm/dd/yyyy) AND • • 6. Enter a Gas Day (End Date) in the second box in the same row (in the acceptable date formats or select a date from the calendar next to the End Date textbox. (Note: Acceptable date formats are mm.dd.yy, mm-dd-yy, mm/dd/yy, mm.dd.yyyy, mm-dd-yyyy, mm/dd/yyyy) AND Enable Lowest Level of Detail check box (Path or Gas Day). AND Enable Group by Gas Day check box. To see the report results of Lowest Level of Detail by Path: • Select a Pipeline from the Pipeline select box. AND • Enter a Gas Day (Start Date) in the first box (in the acceptable date formats or select a date from the calendar next to the Start Date textbox. (Note: Acceptable date formats are mm.dd.yy, mm-dd-yy, mm/dd/yy, mm.dd.yyyy, mm-dd-yyyy, mm/dd/yyyy) AND • 7. Enter a Gas Day (End Date) in the second box in the same row (in the acceptable date formats or select a date from the calendar next to the End Date textbox. (Note: Acceptable date formats are mm.dd.yy, mm-dd-yy, mm/dd/yy, mm.dd.yyyy, mm-dd-yyyy, mm/dd/yyyy) AND Enable Group by check box (Path or Gas Day). AND Enable Lowest Level of Detail - Path check box. To see the report results of Lowest Level of Detail by Gas Day: • Select a Pipeline from the Pipeline select box. AND • Enter a Gas Day (Start Date) in the first box (in the acceptable date formats or select a date from the calendar next to the Start Date textbox. (Note: Acceptable date formats are mm.dd.yy, mm-dd-yy, mm/dd/yy, mm.dd.yyyy, mm-dd-yyyy, mm/dd/yyyy) AND • Enter a Gas Day (End Date) in the second box in the same row (in the acceptable date formats or select a date from the calendar next to the End Date textbox. (Note: Acceptable date formats are mm.dd.yy, mm-dd-yy, mm/dd/yy, mm.dd.yyyy, mm-dd-yyyy, mm/dd/yyyy) AND Enable Group by check box (Path or Gas Day). AND Gas Nomination System User Manual Proprietary and confidential – disclosure is prohibited Page 45 of 59 • 8. Enable Lowest Level of Detail – Gas Day check box. To see Nominated quantity in the report: • Select a Pipeline from the Pipeline select box. AND • Enter a Gas Day (Start Date) in the first box (in the acceptable date formats or select a date from the calendar next to the Start Date textbox. (Note: Acceptable date formats are mm.dd.yy, mm-dd-yy, mm/dd/yy, mm.dd.yyyy, mm-dd-yyyy, mm/dd/yyyy) AND • • • 9. Enter a Gas Day (End Date) in the second box in the same row (in the acceptable date formats or select a date from the calendar next to the End Date textbox. (Note: Acceptable date formats are mm.dd.yy, mm-dd-yy, mm/dd/yy, mm.dd.yyyy, mm-dd-yyyy, mm/dd/yyyy) AND Enable Group by check box (Path or Gas Day). AND Enable Lowest Level of Detail check box (Path or Gas Day). AND Select any combination of above criteria. Enable the check box in the Show Quantity: Nominated Check box option. To see Scheduled quantity in the report: • Select a Pipeline from the Pipeline select box. AND • Enter a Gas Day (Start Date) in the first box (in the acceptable date formats or select a date from the calendar next to the Start Date textbox. (Note: Acceptable date formats are mm.dd.yy, mm-dd-yy, mm/dd/yy, mm.dd.yyyy, mm-dd-yyyy, mm/dd/yyyy) AND • • • 10. Enter a Gas Day (End Date) in the second box in the same row (in the acceptable date formats or select a date from the calendar next to the End Date textbox. (Note: Acceptable date formats are mm.dd.yy, mm-dd-yy, mm/dd/yy, mm.dd.yyyy, mm-dd-yyyy, mm/dd/yyyy) AND Enable Group by check box (Path or Gas Day). AND Enable Lowest Level of Detail check box (Path or Gas Day). AND Select combination of fields. Enable the check box in the Show Quantity: Scheduled Check box option. To see Allocated quantity in the report: • Select a Pipeline from the Pipeline select box. Gas Nomination System User Manual Proprietary and confidential – disclosure is prohibited Page 46 of 59 • AND Enter a Gas Day (Start Date) in the first box (in the acceptable date formats or select a date from the calendar next to the Start Date textbox. (Note: Acceptable date formats are mm.dd.yy, mm-dd-yy, mm/dd/yy, mm.dd.yyyy, mm-dd-yyyy, mm/dd/yyyy) AND • • (Note: Acceptable date formats are mm.dd.yy, mm-dd-yy, mm/dd/yy, mm.dd.yyyy, mm-dd-yyyy, mm/dd/yyyy) AND Enable Group by check box (Path or Gas Day). AND Enable Lowest Level of Detail check box (Path or Gas Day). AND Select combination of fields. • Enable the check box in the Show Quantity: Allocated Check box option. 11. Enter a Gas Day (End Date) in the second box in the same row (in the acceptable date formats or select a date from the calendar next to the End Date textbox. To see Nominated, Scheduled and Allocated quantity in the report: • Select a Pipeline from the Pipeline select box. AND • Enter a Gas Day (Start Date) in the first box (in the acceptable date formats or select a date from the calendar next to the Start Date textbox. (Note: Acceptable date formats are mm.dd.yy, mm-dd-yy, mm/dd/yy, mm.dd.yyyy, mm-dd-yyyy, mm/dd/yyyy) AND • • • • 12. Enter a Gas Day (End Date) in the second box in the same row (in the acceptable date formats or select a date from the calendar next to the End Date textbox. (Note: Acceptable date formats are mm.dd.yy, mm-dd-yy, mm/dd/yy, mm.dd.yyyy, mm-dd-yyyy, mm/dd/yyyy) AND Enable Group by check box (Path or Gas Day). AND Enable Lowest Level of Detail – Gas Day check box. AND Select combination of fields. Enable the check box in the Show Quantity: Nominated, Scheduled and Allocated Check box option. To see including Zero Quantity values in the report: • Select a Pipeline from the Pipeline select box. AND • Enter a Gas Day (Start Date) in the first box (in the acceptable date formats or select a date from the calendar next to the Start Date textbox. (Note: Acceptable date formats are mm.dd.yy, mm-dd-yy, mm/dd/yy, mm.dd.yyyy, mm-dd-yyyy, mm/dd/yyyy) Gas Nomination System User Manual Proprietary and confidential – disclosure is prohibited Page 47 of 59 AND • • (Note: Acceptable date formats are mm.dd.yy, mm-dd-yy, mm/dd/yy, mm.dd.yyyy, mm-dd-yyyy, mm/dd/yyyy) AND Enable Group by check box (Path or Gas Day). AND Enable Lowest Level of Detail check box (Path or Gas Day). AND Select combination of fields. • Enable the check box in the Show Zero Quantities Check box option. 13. Enter a Gas Day (End Date) in the second box in the same row (in the acceptable date formats or select a date from the calendar next to the End Date textbox. To see Non-Zero Pool Imbalance Quantity values in the report: • Select a Pipeline from the Pipeline select box. AND • Enter a Gas Day (Start Date) in the first box (in the acceptable date formats or select a date from the calendar next to the Start Date textbox. (Note: Acceptable date formats are mm.dd.yy, mm-dd-yy, mm/dd/yy, mm.dd.yyyy, mm-dd-yyyy, mm/dd/yyyy) AND • • • 14. Enter a Gas Day (End Date) in the second box in the same row (in the acceptable date formats or select a date from the calendar next to the End Date textbox. (Note: Acceptable date formats are mm.dd.yy, mm-dd-yy, mm/dd/yy, mm.dd.yyyy, mm-dd-yyyy, mm/dd/yyyy) AND Select Display from the selection box. AND Select Sort by from the selection box. AND Select combination of fields. Enable the check box in the Show Non-Zero Pool Imbalance Check box option. Click OK button to display report results based on the combination of above criteria. Pool Summary report result would be displayed the following details. • • • • • • • • Selected Pipeline Selected Gas Day Range (Start Date through End Date) Selected Pool Pool Owner Pool Gas Day Path Nominated Gas Nomination System User Manual Proprietary and confidential – disclosure is prohibited Page 48 of 59 • • • • • • Scheduled Allocated Pool Imbalance Gas Day Subtotal Total Receipts Total Deliveries If no records were found for the selection criteria, the report result wouldn’t show any result or data except selected Pipeline and Gas Day Range. 15. Click Clear button to clear the contents. 16. Click on Save Defaults button to create a user-defined default. Fill in all the desired search selections. Click on the Save Defaults button. When the user logs in from next time, his user-defined selection will appear as the search selections. Gas Nomination System User Manual Proprietary and confidential – disclosure is prohibited Page 49 of 59 6.2 Service Summary Report Filter Gas Nomination System User Manual Proprietary and confidential – disclosure is prohibited Page 50 of 59 PDF File Output Function: User can retrieve Service Summary report from this page by providing Pipeline (mandatory), Gas Day (mandatory), Primary Sort (mandatory), Secondary Sort (mandatory) Display (mandatory), Contract Type or Contract or Receipt Point or Show: Nominated or Show: Scheduled or Show: Allocated or Show Zero Quantity. The report output (pdf format) will display in a new window. 1. Click on Report in the Main Menu and Click on Service Summary Submenu. (The Service Summary filter Submenu will be opened) 2. Service Summary report will be filtered by the following fields: • • Pipeline (mandatory) Gas Day (mandatory) Gas Nomination System User Manual Proprietary and confidential – disclosure is prohibited Page 51 of 59 • • • • • • • • • • • 3. Contract Type Contract Receipt Point Delivery Point Primary Sort (mandatory) Secondary Sort (mandatory) Display (mandatory) Show: Nominated Show: Scheduled Show: Allocated Show Zero Quantity In order to filter by Contract Type: • Select a Pipeline from the Pipeline select box. AND • Enter a Gas Day (Start Date) in the first box (in the acceptable date formats or select a date from the calendar next to the Start Date textbox. (Note: Acceptable date formats are mm.dd.yy, mm-dd-yy, mm/dd/yy, mm.dd.yyyy, mm-dd-yyyy, mm/dd/yyyy) AND • Enter a Gas Day (End Date) in the second box in the same row (in the acceptable date formats or select a date from the calendar next to the End Date textbox. (Note: Acceptable date formats are mm.dd.yy, mm-dd-yy, mm/dd/yy, mm.dd.yyyy, mm-dd-yyyy, mm/dd/yyyy) AND Enable Primary Sort check box (Gas Day or Contract or Path). AND Enable Secondary Sort check box (Gas Day or Contract or Path). AND Select Display from the selection box. AND Select Contract Type from the selection box. (Note: Primary Sort and Secondary Sort should not be same) 4. In order to filter by Contract: • Select a Pipeline from the Pipeline select box. AND • Enter a Gas Day (Start Date) in the first box (in the acceptable date formats or select a date from the calendar next to the Start Date textbox. (Note: Acceptable date formats are mm.dd.yy, mm-dd-yy, mm/dd/yy, mm.dd.yyyy, mm-dd-yyyy, mm/dd/yyyy) AND • Enter a Gas Day (End Date) in the second box in the same row (in the acceptable date formats or select a date from the calendar next to the End Date textbox. Gas Nomination System User Manual Proprietary and confidential – disclosure is prohibited Page 52 of 59 (Note: Acceptable date formats are mm.dd.yy, mm-dd-yy, mm/dd/yy, mm.dd.yyyy, mm-dd-yyyy, mm/dd/yyyy) AND Enable Primary Sort check box (Gas Day or Contract or Path). AND Enable Secondary Sort check box (Gas Day or Contract or Path). AND Select Display from the selection box. AND • Select a Contract from the Contract select box. (Note: Primary Sort and Secondary Sort should not be same) 5. In order to filter by Receipt Point: • Select a Pipeline from the Pipeline select box. AND • Enter a Gas Day (Start Date) in the first box (in the acceptable date formats or select a date from the calendar next to the Start Date textbox. (Note: Acceptable date formats are mm.dd.yy, mm-dd-yy, mm/dd/yy, mm.dd.yyyy, mm-dd-yyyy, mm/dd/yyyy) AND • Enter a Gas Day (End Date) in the second box in the same row (in the acceptable date formats or select a date from the calendar next to the End Date textbox. (Note: Acceptable date formats are mm.dd.yy, mm-dd-yy, mm/dd/yy, mm.dd.yyyy, mm-dd-yyyy, mm/dd/yyyy) AND Enable Primary Sort check box (Gas Day or Contract or Path). AND Enable Secondary Sort check box (Gas Day or Contract or Path). AND Select Display from the selection box. AND • • Select a Receipt Point Short Name from the first Receipt Point select box. OR Select a Receipt Point Long Name from the second Receipt Point select box. This will bring up the desired Receipt Point in the Receipt Point select box. (Note: Primary Sort and Secondary Sort should not be same) 6. In order to filter by Delivery Point: • Select a Pipeline from the Pipeline select box. AND • Enter a Gas Day (Start Date) in the first box (in the acceptable date formats or select a date from the calendar next to the Start Date textbox. (Note: Acceptable date formats are mm.dd.yy, mm-dd-yy, mm/dd/yy, mm.dd.yyyy, mm-dd-yyyy, mm/dd/yyyy) AND Gas Nomination System User Manual Proprietary and confidential – disclosure is prohibited Page 53 of 59 • • • Enter a Gas Day (End Date) in the second box in the same row (in the acceptable date formats or select a date from the calendar next to the End Date textbox. (Note: Acceptable date formats are mm.dd.yy, mm-dd-yy, mm/dd/yy, mm.dd.yyyy, mm-dd-yyyy, mm/dd/yyyy) AND Enable Primary Sort check box (Gas Day or Contract or Path). AND Enable Secondary Sort check box (Gas Day or Contract or Path). AND Select Display from the selection box. AND Select a Delivery Point Short Name from the first Delivery Point select box. OR Select a Delivery Point Long Name from the second Delivery Point select box This will bring up the desired Delivery Point in the Delivery Point select box. (Note: Primary Sort and Secondary Sort should not be same) 7. To see the report results in Primary Sort (Contract or Gas day or Path): • Select a Pipeline from the Pipeline select box. AND • Enter a Gas Day (Start Date) in the first box (in the acceptable date formats or select a date from the calendar next to the Start Date textbox. (Note: Acceptable date formats are mm.dd.yy, mm-dd-yy, mm/dd/yy, mm.dd.yyyy, mm-dd-yyyy, mm/dd/yyyy) AND • • Enter a Gas Day (End Date) in the second box in the same row (in the acceptable date formats or select a date from the calendar next to the End Date textbox. (Note: Acceptable date formats are mm.dd.yy, mm-dd-yy, mm/dd/yy, mm.dd.yyyy, mm-dd-yyyy, mm/dd/yyyy) AND Enable any one of the options Gas Day or Contract or Path in the Primary Sort check box. AND Enable Secondary Sort check box (Gas Day or Contract or Path). AND Select Display from the selection box. AND Select at least one field combination (Contract Type or Contract or Receipt/Delivery Point) (Note: Primary Sort and Secondary Sort should not be same) 8. To see Nominated quantity in the report: • Select a Pipeline from the Pipeline select box. Gas Nomination System User Manual Proprietary and confidential – disclosure is prohibited Page 54 of 59 • AND Enter a Gas Day (Start Date) in the first box (in the acceptable date formats or select a date from the calendar next to the Start Date textbox. (Note: Acceptable date formats are mm.dd.yy, mm-dd-yy, mm/dd/yy, mm.dd.yyyy, mm-dd-yyyy, mm/dd/yyyy) AND • • (Note: Acceptable date formats are mm.dd.yy, mm-dd-yy, mm/dd/yy, mm.dd.yyyy, mm-dd-yyyy, mm/dd/yyyy) AND Enable Primary Sort check box (Gas Day or Contract or Path). AND Enable Secondary Sort check box (Gas Day or Contract or Path). AND Select Display from the selection box. AND Select any combination of above criteria. • Enable the check box in the Show: Nominated Check box option. 9. Enter a Gas Day (End Date) in the second box in the same row (in the acceptable date formats or select a date from the calendar next to the End Date textbox. To see Scheduled quantity in the report: • Select a Pipeline from the Pipeline select box. AND • Enter a Gas Day (Start Date) in the first box (in the acceptable date formats or select a date from the calendar next to the Start Date textbox. (Note: Acceptable date formats are mm.dd.yy, mm-dd-yy, mm/dd/yy, mm.dd.yyyy, mm-dd-yyyy, mm/dd/yyyy) AND • Enter a Gas Day (End Date) in the second box in the same row (in the acceptable date formats or select a date from the calendar next to the End Date textbox. • (Note: Acceptable date formats are mm.dd.yy, mm-dd-yy, mm/dd/yy, mm.dd.yyyy, mm-dd-yyyy, mm/dd/yyyy) AND Enable Primary Sort check box (Gas Day or Contract or Path). AND Enable Secondary Sort check box (Gas Day or Contract or Path). AND Select Display from the selection box. AND Select combination of fields. • Enable the check box in the Show: Scheduled Check box option. `` 10. To see Allocated quantity in the report: • Select a Pipeline from the Pipeline select box. AND • Enter a Gas Day (Start Date) in the first box (in the acceptable date formats or select a date from the calendar next to the Start Date textbox. Gas Nomination System User Manual Proprietary and confidential – disclosure is prohibited Page 55 of 59 (Note: Acceptable date formats are mm.dd.yy, mm-dd-yy, mm/dd/yy, mm.dd.yyyy, mm-dd-yyyy, mm/dd/yyyy) AND • • (Note: Acceptable date formats are mm.dd.yy, mm-dd-yy, mm/dd/yy, mm.dd.yyyy, mm-dd-yyyy, mm/dd/yyyy) AND Enable Primary Sort check box (Gas Day or Contract or Path). AND Enable Secondary Sort check box (Gas Day or Contract or Path). AND Select Display from the selection box. AND Select combination of fields. • Enable the check box in the Show: Allocated Check box option. 11. Enter a Gas Day (End Date) in the second box in the same row (in the acceptable date formats or select a date from the calendar next to the End Date textbox. To see Nominated, Scheduled and Allocated quantity in the report: • Select a Pipeline from the Pipeline select box. AND • Enter a Gas Day (Start Date) in the first box (in the acceptable date formats or select a date from the calendar next to the Start Date textbox. (Note: Acceptable date formats are mm.dd.yy, mm-dd-yy, mm/dd/yy, mm.dd.yyyy, mm-dd-yyyy, mm/dd/yyyy) AND • • • 12. Enter a Gas Day (End Date) in the second box in the same row (in the acceptable date formats or select a date from the calendar next to the End Date textbox. (Note: Acceptable date formats are mm.dd.yy, mm-dd-yy, mm/dd/yy, mm.dd.yyyy, mm-dd-yyyy, mm/dd/yyyy) AND Enable Primary Sort check box (Gas Day or Contract or Path). AND Enable Secondary Sort check box (Gas Day or Contract or Path). AND Select Display from the selection box. AND Select combination of fields. Enable the check box in the Show: Nominated, Scheduled and Allocated Check box option. To see including Zero Quantity values in the report: • Select a Pipeline from the Pipeline select box. AND • Enter a Gas Day (Start Date) in the first box (in the acceptable date formats or select a date from the calendar next to the Start Date textbox. (Note: Acceptable date formats are mm.dd.yy, mm-dd-yy, mm/dd/yy, mm.dd.yyyy, mm-dd-yyyy, mm/dd/yyyy) Gas Nomination System User Manual Proprietary and confidential – disclosure is prohibited Page 56 of 59 AND • Enter a Gas Day (End Date) in the second box in the same row (in the acceptable date formats or select a date from the calendar next to the End Date textbox. • (Note: Acceptable date formats are mm.dd.yy, mm-dd-yy, mm/dd/yy, mm.dd.yyyy, mm-dd-yyyy, mm/dd/yyyy) AND Enable Primary Sort check box (Gas Day or Contract or Path). AND Enable Secondary Sort check box (Gas Day or Contract or Path). AND Select Display from the selection box. AND Select combination of fields. • Enable the check box in the Show Zero Quantity Check box option. 13. Click OK button to display report results based on the combination of above criteria. Service summary displays the following details: • • • • • • • • • • • • • • • • • • • • • Selected Pipeline Selected Gas Day Range (Start Date through End Date) Selected Contract Type Selected Contract Selected Receipt Point Selected Delivery Point Contract/Path Gas Day Gross Nominated Gross Scheduled Gross Allocated Net Nominated Net Scheduled Net Allocated Fuel Nominated Fuel Scheduled Fuel Allocated Grand Totals Contract Totals Path Totals Gas Day Totals. If no records were found for the selection criteria, the report result wouldn’t show any result or data except selected fields. 14. Click Clear button to clear the contents. Gas Nomination System User Manual Proprietary and confidential – disclosure is prohibited Page 57 of 59 15. Click on Save Defaults button to create a user-defined default. Fill in all the desired search selections. Click on the Save Defaults button. When the user logs in from next time, his user-defined selection will appear as the search selections. Gas Nomination System User Manual Proprietary and confidential – disclosure is prohibited Page 58 of 59 7. Browser Shortcut Keys 7.1 Internet Explorer Command Keys Copy Ctrl+C Paste Ctrl+V Cut Ctrl+X Close Window Ctrl+W Delete Next Word Ctrl+Del Scroll Up One Page Page Up Scroll Down One Page Page Down Go Up One Line Up Arrow Go Down One Line Down Arrow Undo Ctrl+Z Redo Ctrl+Shift+Z Find Ctrl+F Open Context Menu Shift+F10 Open Main Menu (Select the first drop-down menu at the top of the window: for example, "File" in Windows) F10 Move to beginning of line (in a text-editing field) Home Move to end of line (in a text-editing field) End Exit Ctrl+F4 Home Page ALT + Home Go to Next Page ALT+Right Arrow Go to the previous page ALT+Left Arrow Refresh the current page F5 or CTRL+R Open a new window CTRL + N Print the current page CTRL + P Select the text in the Address box ALT + D Gas Nomination System User Manual Proprietary and confidential – disclosure is prohibited Page 59 of 59 Toggle between full-screen and other views in the browser 7.2 F11 Netscape Navigator Command Keys Copy Ctrl+C Paste Ctrl+V Cut Ctrl+X Close Window Ctrl+W Delete Next Word Ctrl+Del Scroll Up One Page Page Up Scroll Down One Page Page Down Go Up One Line Up Arrow Go Down One Line Down Arrow Undo Ctrl+Z Redo Ctrl+Shift+Z Find Ctrl+F Find Again Ctrl+G or F3 Open Context Menu Shift+F10 Open Main Menu (Select the first drop-down menu at the top of the window: for example, "File" in Windows) Alt or F10 Move to beginning of line (in a text-editing field) Home Move to end of line (in a text-editing field) End Exit Netscape Ctrl+Q Start Navigator Ctrl+1 Start Mail & Newsgroups Ctrl+2 Start Instant Messenger Ctrl+3 Start Composer Ctrl+4 Start Address Book Ctrl+5 Gas Nomination System User Manual Proprietary and confidential – disclosure is prohibited