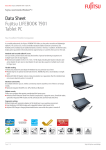
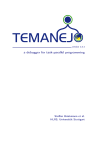
1
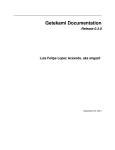
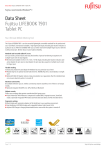
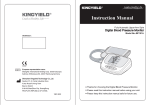
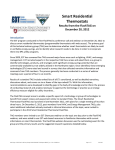
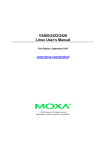
BioDen Documentation
Release 0.4.0
GiMaRIS
May 19, 2015
Contents
1
Users
3
2
Developers
5
3
Contents
3.1 Installation . . . . . . . . . . . . . . . . . . . . . . . . . . . . . . . . . . . . . . . . . . . . . . . .
3.2 User Manual . . . . . . . . . . . . . . . . . . . . . . . . . . . . . . . . . . . . . . . . . . . . . . .
7
7
8
4
Indices and tables
13
i
ii
BioDen Documentation, Release 0.4.0
BioDen is a data normaliser and processor for files containing taxon biomass/density data for ecotopes. In general the
input file of BioDen includes a list of records (rows in a table) that give species name, an abundance measure (biomass
and/or density), a sample code, the surface sampled and the ecotope (see input example). This list is transformed
to a table in which the rows represent species and the columns represent samples (see ouput examples). This table can
serve as the input file for various software applications that conduct species community analyses.
Fig. 1: BioDen screenshot
Contents
1
BioDen Documentation, Release 0.4.0
2
Contents
CHAPTER 1
Users
• SourceForge Project page
• Download BioDen
3
BioDen Documentation, Release 0.4.0
4
Chapter 1. Users
CHAPTER 2
Developers
• Get the source code
5
BioDen Documentation, Release 0.4.0
6
Chapter 2. Developers
CHAPTER 3
Contents
3.1 Installation
Release 0.4.0
Date May 19, 2015
3.1.1 Requirements
BioDen has the following dependencies:
• GTK+ (>=3.6)
• Python (>=2.7)
– PyGObject (>=3.10)
– xlrd
– xlwt
On Debian (based) systems, the dependencies can be installed from the software repository:
sudo apt-get install python-gobject python-xlrd python-xlwt
More recent versions of some Python packages can be obtained via the Python Package Index:
pip install -r requirements.txt
Windows users can install the PyGObject Windows installer with Gtk3 support. Then use pip as described above to
install the remaining dependencies.
Note: This step is not needed if you have the Windows installer for BioDen, which comes bundeled with all the
requirements.
3.1.2 Installation
From the GitHub repository:
git clone https://github.com/figure002/bioden.git
pip install bioden/
7
BioDen Documentation, Release 0.4.0
Or if you have a source archive file:
pip install bioden-x.x.tar.gz
Windows installers can be obtained from SourceForge.
Note: The Windows installer for BioDen comes bundled with third party dependencies. The third party tools bundled
with BioDen are property of their individual authors and are governed by their individual applicable license.
3.2 User Manual
Release 0.4.0
Date May 19, 2015
3.2.1 Starting BioDen
On Windows, go to Start menu > All Programs > GiMaRIS > BioDen > BioDen.
GNU/Linux users can just execute bioden.
Once bioden is started, you’ll be presented with its main window.
The main window has the following components:
Select input data file The CSV or XLS file containing the biomass and/or density data to be processed. This file must
be in a specific format. This format is described in the Input File Format section.
Select output folder Select the folder to which all output files should be saved. The output files are described in the
Output Files section.
Property for calculations The property to perform the calculations on. You have a choice between “biomass” and
“density”. Note that the input data file must contain data for the specified property. If this is not the case, an
error message will be displayed.
Format for output files The format to save the output files in. You have a choice between “Comma Separated Values
(.csv)” and “Microsoft Excel 97/2000/XP (.xls)”.
Note: Microsoft Excel files (.xls) support a maximum of 256 columns. Columns that exceed this limit will not
be exported!
Advanced Options Clicking this toggle button shows/hides the advanced options.
Target sample surface: The sample surface used for AMBI files. Default is 0.2.
Round values to n decimals: Number of decimals to round values in the output files to. Value “-1” (default) means
do not round.
CSV Input File Options Clicking this toggle button shows/hides the options for the CSV input file.
Field delimiter of the input file: A one-character string used to separate fields in the input CSV file. It defaults to
a semicolon (;). By default Excel uses the semicolon for CSV files. If the CSV file is exported by a different
application, make sure this character matches the delimiter in the data file. You can check this by opening the
data file in a text editor (e.g. Notepad).
Quote character of the input file: A one-character string used to separate fields in the input CSV file. It defaults to
a double quote (”).
8
Chapter 3. Contents
BioDen Documentation, Release 0.4.0
Fig. 3.1: BioDen main window
3.2. User Manual
9
BioDen Documentation, Release 0.4.0
Process Data Clicking this button starts the data processing. While it’s processing the data, a progress dialog is
displayed. Be patient, the calculations could take some time to finish based on the amount of data in the data
file. Clicking the Details buttons shows more detailed information about the current process.
3.2.2 Input File Format
The input data file must be a CSV or XLS file in a specific format.
For CSV input, the default settings for BioDen have been set for the format in which Excel creates CSV files. This
means that by default BioDen expects a semicolon (;) as a field separator. The quote character defaults to a double
quote (”). The “CSV Input File Options” in BioDen allow you to change these defaults, should your input CSV file
use a different field delimiter or quote character.
BioDen also expects a format for the data stored in the CSV or XLS file. BioDen expects the following data format:
1. The first row in the CSV/XLS file must be the header. The header contains the column names. BioDen expects
at least the following columns: “compiled ecotope”, “sample code”, “standardised taxon”, “density” and/or
“biomass”, and “sample surface”.
2. BioDen isn’t very strict with the column names. The column names aren’t case sensitive. So a column with
name “BioMass” works just as good. Also BioDen uses any column that contains any of the expected column
names. So a column with name “Sum Of Density” would be used as the “density” column, because it contains
the name “density”.
3. BioDen ignores the columns that don’t match the expected column names. So it’s alright if the input file contains
other columns.
4. The header row must be followed by the actual data rows.
5. BioDen automatically corrects numbers that have been stored in non-English format. This means that commas
are replaced by dots (e.g. 12,5 will be converted to 12.5).
Also see the example of an input data file with a header containing the required column names.
3.2.3 Output Files
BioDen produces several output files in the specified output folder in the spcified format. Output files are saved in
either CSV (Comma Separated Values) format or in XLS (Microsoft Excel 97/2000/XP) format, and can be opened
with any spreadsheet application (e.g. Microsoft Excel, OpenOffice Calc).
The output files are described below:
Raw ecotope files (raw_<property>_<ecotope>.csv) The original data is split by ecotope. So one data file
per ecotope is exported. The non-grouped values are exported, but the data has been re-ordered.
Each column is a sample, and each row contains the abundance measures for a species (see example
output).
Grouped files (grouped_<property>_<ecotope>.csv) One data file per ecotope is exported. Each file contains the calculated sample groups for that ecotope. Sample groups were created by summing samples for that
ecotope until the sum of the sample surfaces reached the target sample surface (default is 0.2) or higher. The
groups have not been corrected to the exact target sample surface.
Each column is a sample group, and each row contains the abundance measures for a species (see example
output).
AMBI group files (ambi_<property>_<ecotope>.csv) One data file per ecotope is exported. Each file contains the calculated sample groups for that ecotope. Sample groups were created by summing samples for that
ecotope until the sum of the sample surfaces reached the target sample surface (default is 0.2) or higher. The
10
Chapter 3. Contents
BioDen Documentation, Release 0.4.0
groups have been corrected to the exact target sample surface. This means that each sample group has a surface
of exactly the target sample surface.
Each column is a sample group, and each row contains the abundance measures for a species (see example
output).
Representatives data file (representatives_<property>.csv) One data file is exported. The file contains
one normalized sample group for each ecotope. The sample group that best represents the ecotope is exported.
The biodiversity for all sample groups are calculated, and the group that comes closest to the median of the
biodiversities is considered the representative sample group for an ecotope.
Each column contains the values from the most representative sample group for an ecotope, and each row
contains the abundance measures for a species (see example output).
3.2.4 Viewing Output Files
The output files created by BioDen are stored in either CSV format or XLS format. You can view these output files in
any spreadsheet application (e.g. Microsoft Excel, OpenOffice Calc).
Double clicking an XLS file should open it in your spreadsheet application. To open a CSV file however, your
spreadsheet application needs to know some basic information about the CSV file before it can view it properly.
For example, it needs to know the character used as a field delimiter, which is a comma. So you need to tell your
spreadsheet application to use the comma character as the field delimiter, along some other properties. Below is
explained how to do this with the two most popular spreadsheet applications.
Microsoft Excel 2007
1. Start Microsoft Excel. Make sure you have open the Excel 2007 worksheet that you would like to import the
ouput data file into.
2. Go to the “Data” tab.
3. Click on the “From Text” button. This will open the file select browser window. Navigate to where the output
files are stored. Then select one of the output CSV files.
4. After selecting an output file, the “Text Import Wizard” window is displayed. In that window set:
• “Original Data Type” to “Delimited”
• “File origin” to “United States”
5. Click the “Next” button. In the next window that appears you need to change the Delimiter from Tab to Comma.
Uncheck “Tab” and check “Comma” under “Delimiters”.
6. Press “Finish”. The data from the output file should now be displayed in the correct columns.
OpenOffice Calc
1. Right-click on an output CSV file, and select “Open With > OpenOffice Calc”. The “Text Import” window
should now appear.
2. In the Text Import window, set:
• “Language” to “English (USA)”
• “Separator options” to “Separated by” to “Comma”
3. Press OK. The data from the output file should now be displayed in the correct columns.
3.2. User Manual
11
BioDen Documentation, Release 0.4.0
3.2.5 Copying Permission Statement
BioDen is free software: you can redistribute it and/or modify it under the terms of the GNU General Public License
as published by the Free Software Foundation, either version 3 of the License, or (at your option) any later version.
BioDen is distributed in the hope that it will be useful, but WITHOUT ANY WARRANTY; without even the implied
warranty of MERCHANTABILITY or FITNESS FOR A PARTICULAR PURPOSE. See the GNU General Public
License for more details.
You should have received a copy of the GNU General Public License along with the program.
http://www.gnu.org/licenses/.
If not, see
3.2.6 Troubleshooting
“This application has failed to start because the application configuration is incorrect. Reinstalling the application my fix this pr
This error is most likely caused by a missing DLL. The installer for BioDen has the option to install the required
DLL. To fix this problem, run the installer for BioDen and make sure that the “Microsoft Visual C++” option is
checked. This will install the required DLL for BioDen.
12
Chapter 3. Contents
CHAPTER 4
Indices and tables
• genindex
• modindex
• search
13