1
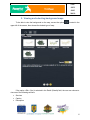
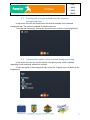
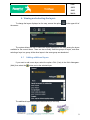
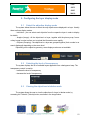
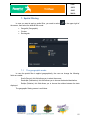
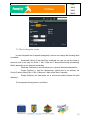
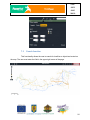
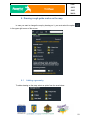
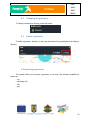
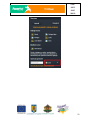
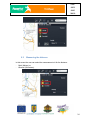
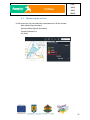
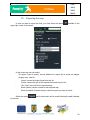
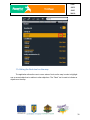
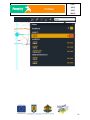
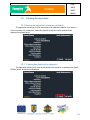
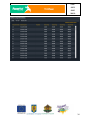
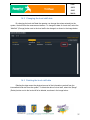
Water Application User Manual Monitoring Module DAPP ANPM ANAR INHGA Table of Contents 1. Dashboard.................................................................................................................. 5 2. Viewing and selecting background maps ....................................................................... 6 2.1 Viewing the services available for the selected background map ............................... 7 2.2 Viewing the caption of the selected background map ............................................... 7 2.3 Viewing the description of the selected background map .......................................... 8 3. Viewing and selecting the themes ................................................................................. 8 4. Viewing and selecting the layers ................................................................................... 9 4.1 Adding additional layers ........................................................................................ 9 4.2 Removing additional layers ...................................................................................10 4.3 Viewing the caption of a layer....................................................................................10 5. 6. 7. Configuring the layer display mode ..............................................................................12 5.1 Select the objective display mode .........................................................................12 5.2 Selecting the level of transparency ........................................................................12 5.3 Viewing the objectives in tabular mode ..................................................................12 5.4 Viewing the objectives in temporal mode ...............................................................13 Managing the objectives in tabular mode ......................................................................14 6.1 Filtering the list of a layer's objective details ...........................................................14 6.2 Exporting a table of objectives ..............................................................................14 Spatial filtering ...........................................................................................................15 7.1 The geographic mode ..........................................................................................15 7.2 The circular mode ................................................................................................16 7.3 The rectangular mode ..............................................................................................17 7.3 8. Search function ...................................................................................................18 Drawing rough guide marks on the map .......................................................................19 8.1 Adding a geometry...............................................................................................19 8.2 Changing the geometry ........................................................................................20 2 DAPP ANPM ANAR INHGA 8.3 Delete a geometry ...............................................................................................20 9.4 Importing geometries................................................................................................20 8.4 Exporting geometries ...........................................................................................21 Performing geographic measurements .........................................................................23 9. 9.1 Measuring the location coordinates .......................................................................23 9.2 Measuring the distance ........................................................................................24 9.3 Measuring the surface ..........................................................................................25 10. Exporing the map....................................................................................................26 11. Interacting with the map ..........................................................................................28 11.1 Using the zoom tool on the map ..............................................................................28 11.1.1 Zoom in ............................................................................................................................ 28 11.1.2 Zoom out .......................................................................................................................... 28 11.1.3 Previous zoom ................................................................................................................. 29 11.1.4 Next zoom ........................................................................................................................ 29 11.2 Viewing the entire map ...........................................................................................29 11.3 Using the pan tool on the map .................................................................................29 11.4 Using the flash tool on the map ...............................................................................30 12. Viewing the objectives .............................................................................................32 12.1 Viewing an objective's summary of details ................................................................32 12.1 Viewing the details of an objective .........................................................................32 12.3 Viewing graphs ......................................................................................................33 12.4 Viewing the graphs in tabular mode .........................................................................33 13. Graphs...................................................................................................................35 14. Managing intermediate level staffs............................................................................36 14.1 Entering level staff data ........................................................................................36 14.2 Changing the level staff data.................................................................................37 14.3 Deleting the level staff data...................................................................................37 3 DAPP ANPM ANAR INHGA Introduction This manual is intended for SII-WATER operators. The instructions on how to use the system's functionalities in the monitoring module are detailed hereafter. 4 DAPP ANPM ANAR INHGA 1. Dashboard When accessing the application, the system displays the following screen: 5 DAPP ANPM ANAR INHGA 2. Viewing and selecting background maps To be able to view the background on the map, access the option upper left of the screen, then choose the desired type of map. located in the If the option <DA> (Yes) is selected in the Detalii (Details) field, the user can choose to view one of the following sections: Services Caption Description 6 DAPP ANPM ANAR INHGA 2.1 Viewing the services available for the selected background map In this section the user can choose one of the services available for the selected background map. The section is available for certain maps only. To access this functionality, access the “Services” button as shown in the image below: 2.2 Viewing the caption of the selected background map In this section the user can view the caption of the primary map, which is updated depending on the zoom level selected for viewing it. To view the caption of the background map, access the “Caption” button as shown in the image below: 7 DAPP ANPM ANAR INHGA 2.3 Viewing the description of the selected background map In this section the user can view details on the selected background map. To view the description of a background map, access the “Description” button as shown in the image below: 3. Viewing and selecting the themes To change the theme on the map, access the option the screen: located in the upper left of 8 DAPP ANPM ANAR INHGA 4. Viewing and selecting the layers To change the layers displayed on the map, access the option the screen: in the upper left of The system allows the user to select the layers displayed on the map among the layers available for the current theme. There are also mutually exclusive groups of layers, and when selecting a layer in a group, all the other layers in the same group are deselected. 4.1 Adding additional layers If you want to add a new layer, select the option <DA> (Yest) in the field <Adaugare> (Add), then select the button next to the selected layer: The additional layers will be added automatically on the map. 9 DAPP ANPM ANAR INHGA 4.2 Removing additional layers If you want to remove a layer from the map, but not from the list, deselect it: Deselected layers will be cleared from the map. If you want to remove a layer from the newly created list, you must select the next to the layer. button 4.3 Viewing the caption of a layer If you want to view the caption of a layer, access the respective layer in the list and its caption will be displayed. 10 DAPP ANPM ANAR INHGA 11 DAPP ANPM ANAR INHGA 5. Configuring the layer display mode 5.1 Select the objective display mode The system allows the user to select the way objectives are displayed in a layer. Usually there are three display modes: - Individual - you can select each objective from the respective layer in order to display its details; - Imagine (Image) - all the objectives in a layer, together with the primary map, form a unitary image in order to allow you to upload the information more rapidly; - Grupare (Grouping) - the objectives in a layer are grouped together (their number in an area is displayed) depending on the zoom level. Depending on the objective geometry, some display modes are not available. 5.2 Selecting the level of transparency The system displays the list of available layers applicable over a background map. The transparency control is used to: - increase the level of transparency - decrease the level of transparency 5.3 Viewing the objectives in tabular mode The system allows the user to view the objectives of a layer in tabular mode, by accessing the “Tabelar” (Tabular) button, as shown in the image below. 12 DAPP ANPM ANAR INHGA 5.4 Viewing the objectives in temporal mode The system allows the user to view the objectives of a layer in temporal mode, by accessing the “Temporal” button, as shown in the image below. 13 DAPP ANPM ANAR INHGA 6. Managing the objectives in tabular mode 6.1 Filtering the list of a layer's objective details The system allows you to filter the details displayed in tabular mode, by pressing the filter button available in certain columns of attributes. You can apply a simultaneous filter by several columns of attributes. Each column allows you to filter the attributes: - by a criterion - you need to enter a specific filtering condition, - by two criteria - two specific filtering conditions must be met. 6.2 Exporting a table of objectives The application allows you to export the table of objectives in several formats: Word, Excel, PDF, .zip (Shapefile). You can export the table after applying filters also. 14 DAPP ANPM ANAR INHGA 7. Spatial filtering In case you want to apply a spatial filter, you need to select the screen, then select the desired filter mode: Geografic (Geographic) Circular Rectangular 7.1 in the upper right of The geographic mode In case the spatial filter is applied geographically, the user can change the following fields as needed: Sursă (Source): this field allows you to select the source; Destinație (Destination): this field allows you to choose the desired destination; Relație (Relation): this field allows you to choose the relation between the data displayed. The geographic filtering screen is as follows: 15 DAPP ANPM ANAR INHGA 7.2 The circular mode In case the spatial filter is applied circularly, the user can change the following fields as needed: Selectează (Select): if this check box is selected, the user can use the cursor to choose a point on the map, the X and Y positions being automatically filled in depending on the selected coordinates; Destinație (Destination): this field allows you to choose the desired destination; Poziție (Position): in case the <Selecteaza> (Select) box is not selected, the fields Poziție X (X position) and Poziție Y (Y position) will be filled in manually; Rază (Radius): enter the radius that the filter will be applied on in this field; displayed. Relație (Relation): this field allows you to choose the relation between the data The circular filtering screen is as follows: 16 DAPP ANPM ANAR INHGA 7.3 The rectangular mode In case the spatial filter is applied rectangularly, the user can change the following fields as needed: Selectează (Select): if this check box is selected, the user can use the cursor to choose a point on the map, the X Min, Y Min, X Max and Y Max positions being automatically filled in depending on the selected coordinates; Destinație (Destination): this field allows you to choose the desired destination; Poziție (Position): in case the <Selecteaza> (Select) box is not selected, the Poziție (Position) fields X Min, Y Min, X Max and Y Max will be filled in manually; displayed. Relație (Relation): this field allows you to choose the relation between the data The rectangular filtering screen is as follows: 17 DAPP ANPM ANAR INHGA 7.3 Search function This functionality allows the user to search for localities or objectives located on the map. The user must enter the field in the upper right corner of the page. 18 DAPP ANPM ANAR INHGA 8. Drawing rough guide marks on the map In case you want to change the map by drawing on it, you must select the option in the upper right corner of the screen: 8.1 Adding a geometry To add a drawing on the map, select an option from the ones below: . 19 DAPP ANPM ANAR INHGA 8.2 Changing the geometry To change a drawing on the map, select the button: 8.3 Delete a geometry To delete a geometry, identify it on the map, then delete it by pressing the button Șterge (Delete). 9.4 Importing geometries The system allows you to import a geometry on the map. The formats compatible for import are: - .csv - .zip(shape file) - .kml - .gml 20 DAPP ANPM ANAR INHGA 8.4 Exporting geometries The system allows you to export the geometries drawn on the map in a compatible file. The compatible files are: - .csv - .zip(shape file) - .kml - .gml 21 DAPP ANPM ANAR INHGA 22 DAPP ANPM ANAR INHGA 9. Performing geographic measurements In case you want to change the measurement parameters on the map, access the option “Unealtă de măsurare” (Measurement tool) 9.1 in the upper right corner of the screen: Measuring the location coordinates In this screen the user can select the format to view the location coordinates: - Stereo 70: X and Y coordinates, or WGS 84: longitude and latitude coordinates. 23 DAPP ANPM ANAR INHGA 9.2 Measuring the distance In this screen the user can select the measurement unit for the distance: - Metri (Meters), or - Kilometri (Kilometers). 24 DAPP ANPM ANAR INHGA 9.3 Measuring the surface In this screen the user can select the measurement unit for the surface: - Metri pătrați (Square meters), - Kilometri pătrați (Square kilometers), - Hectare (Hectares), or Ari (Ares). 25 DAPP ANPM ANAR INHGA 10. Exporing the map In case you want to export the map, you must select the option upper right corner of the screen: available in the In this screen the user can select: - Tip export (Type of export): choose whether the export will be made as Imagine (Image) or as .mxd file; - Layout: choose the export format from the list; - Format: choose the type of the exported document from the list; Titlu (Title): add a title for the exported map; - Nume (Name): choose a name for the exported map; Straturi printabile (Printable layers): select the layers you want in the list. Select the option and the document will be saved following the path indicated by the user. 26 DAPP ANPM ANAR INHGA 27 DAPP ANPM ANAR INHGA 11. Interacting with the map If you want to change the map size, go to the upper left corner of the screen where the following options are located: 11.1 Using the zoom tool on the map 11.1.1 Zoom in To enlarge the image, you have three options: - Click the option - Use the option and raise it until the map reaches to the desired size; Use the scroll button of the mouse. until the map reaches to the desired size; 11.1.2 Zoom out To reduce the image, you have three options: - Click the option - Use the option - Use the scroll button of the mouse. until the map reaches to the desired size; and lower it until the map reaches to the desired size; 28 DAPP ANPM ANAR INHGA 11.1.3 Previous zoom In case you want to bring the map back to its previous size, you must select the option . 11.1.4 Next zoom In case you want to bring the map to its next size, you must select the option . 11.2 Viewing the entire map In case you want to bring the map to its initial size, you must select the option . 11.3 Using the pan tool on the map The application allows the user to use a series of tools on the map in order to highlight one or several objectives in relation to other objectives. The “Pan” tool is used to center an objective on the map. 29 DAPP ANPM ANAR INHGA 11.4 Using the flash tool on the map The application allows the user to use a series of tools on the map in order to highlight one or several objectives in relation to other objectives. The “Flash” tool is used to indicate an objective on the map. 30 DAPP ANPM ANAR INHGA 31 DAPP ANPM ANAR INHGA 12. Viewing the objectives 12.1 Viewing an objective's summary of details The application allows you to view a summary of an objective's details. If you want to view a summary of the objectives, select the respective objective and a window will be displayed, as shown below: 12.1 Viewing the details of an objective The application allows you to view all the details of an objective, by pressing the “Detalii” (Details) button in the window displayed. 32 DAPP ANPM ANAR INHGA 12.3 Viewing graphs Viewing the graph corresponding to an objective means viewing all the values, depending on the time to take the data, in the form of a graph. Depending on the specific graph, the user has the possibility to subsequently choose the period of time when he/she wants to view it and to set the time step to an interval of 1 hour, 6 hours or 1 day. To view the graph, the user has to access the “Vezi grafic” (See graph) button in the window displayed, as shown in the image below: 12.4 Viewing the graphs in tabular mode Viewing the graph in tabular mode means viewing all the values on the graph, depending on the time to take the data, in the form of a table. To view the table, access the “Detalii” (Details) button in the new window displayed, select the “Măsurători” (Measurements) tab, then access the option “Schimbă în vizualizare tabelară” (Change to table view). 33 DAPP ANPM ANAR INHGA 34 DAPP ANPM ANAR INHGA 13. Graphs When clicking on the “Vezi grafic” (See graph) button of an objective, the section of graphs where the graphs corresponding to the respective objectives will be uploaded is displayed in the upper right of the screen. If a new window opens displaying the summary of details, with the option “Compară grafic” (Compare the graph), when you click a new window of graphs will open and will be displayed in parallel with the first one opened. Up to 3 graphs can be displayed simultaneously. To close a graph, select the window close button. 35 DAPP ANPM ANAR INHGA 14. Managing intermediate level staffs 14.1 Entering level staff data The system will automatically fill in the user's name and the date when the information was entered, without the possibility to change them. The measurement value to be entered cannot exceed the top level of the respective level staff. The measured value will be entered in the system only in numerical form, and a validation is performed in this respect. To enter the data, open the window with the details of a level staff, access the “Citire mire” (Read level staffs) tab, the option “Schimbă în vizualizare grafică” (Change to graph view), then access the button “Adaugă o înregistrare” (Add a record), as shown in the image below: 36 DAPP ANPM ANAR INHGA 14.2 Changing the level staff data By changing the level staff data the operator can change the values entered into the system, received from the measurement stations. To change the data of a level staff, select the “Modifică” (Change) button next to the level staff to be changed, as shown in the image below: 14.3 Deleting the level staff data Deleting the data means the physical removal of the information received from the intermediate level staff from the system. To delete the data of a level staff, select the “Șterge” (Delete) button next to the level staff to be deleted, as shown in the image below: 37 DAPP ANPM ANAR INHGA 38


![Manual de utilizare[DOWNLOAD]](http://vs1.manualzilla.com/store/data/005723533_1-258331d4abba7698d1081b2119c4c2bf-150x150.png)