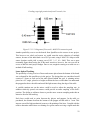
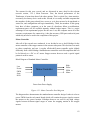
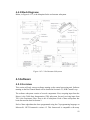
1
Football Operator and Optical Soccer Engine (FOOSE) Sponsored by SoarTech G30 Final Report Nathaniel Enos Patrick Fenelon Skyler Goodell Nicholas Phillips Senior Design Spring 2013 TABLE OF CONTENTS 1.0 Executive Summary ---------------------------------------------------------------------------- 1 2.0 Project Description ----------------------------------------------------------------------------- 2 2.1 Project Motivation and Goals -------------------------------------------------------------- 2 2.1.1 Project Motivation ---------------------------------------------------------------------- 2 2.1.2 Project Goals ---------------------------------------------------------------------------- 2 2.2 Objectives ---------------------------------------------------------------------------------- 3 2.3 Project Requirements and Specifications ------------------------------------------------- 5 2.3.1 Sensors ----------------------------------------------------------------------------------- 5 2.3.2 System Architecture -------------------------------------------------------------------- 7 2.3.2.1 Central Processing Unit ----------------------------------------------------------- 7 2.3.2.2 Hardware controllers -------------------------------------------------------------- 8 2.3.2.3 Sensor Aggregation Hardware --------------------------------------------------- 8 2.3.3 Actuators --------------------------------------------------------------------------------- 9 2.3.4 Software --------------------------------------------------------------------------------- 12 2.3.4.1 Table State Interpretation -------------------------------------------------------- 12 2.3.4.2 Artificial Intelligence Algorithms ---------------------------------------------- 13 2.3.4.3 Motion Control Algorithms ----------------------------------------------------- 13 2.3.5 Table ------------------------------------------------------------------------------------- 16 3.0 Research Related to Project Definition ----------------------------------------------------- 17 3.1 Existing Similar Projects and Products -------------------------------------------------- 17 3.1.1 Adelaide University Automated Foosball ------------------------------------------ 17 3.1.2 StarKick Robotic Foosball Table ---------------------------------------------------- 17 3.1.3 Georgia Tech Automated Foosball -------------------------------------------------- 19 3.2 Relevant Technologies --------------------------------------------------------------------- 20 3.2.1 Sensor ----------------------------------------------------------------------------------- 20 3.2.1.1 Ball Detection --------------------------------------------------------------------- 20 3.2.1.2 Player Puppet Detection --------------------------------------------------------- 28 3.2.2 System Architecture ------------------------------------------------------------------- 32 3.2.2.1 Main Processor -------------------------------------------------------------------- 32 i 3.2.2.2 Motor Controllers ----------------------------------------------------------------- 37 3.2.2.3 Data Transportation Methods --------------------------------------------------- 40 3.2.3 Actuators -------------------------------------------------------------------------------- 41 3.2.3.1 Linear Motion --------------------------------------------------------------------- 41 3.2.3.2 Rotational Motion----------------------------------------------------------------- 46 3.2.3.3 Comparison of General Motor Options ---------------------------------------- 51 3.2.4 Software --------------------------------------------------------------------------------- 53 3.2.4.1 Table Physics Model ------------------------------------------------------------- 53 3.2.4.2 AI Algorithms --------------------------------------------------------------------- 58 3.2.4.3 Linear Control Algorithms ------------------------------------------------------ 61 3.2.5 Other Hardware ------------------------------------------------------------------------ 75 3.2.5.1 Foosball Table --------------------------------------------------------------------- 75 3.3 Research Summary ------------------------------------------------------------------------- 77 4.0 Project Hardware and Software Design Details ------------------------------------------- 78 4.1 Project Overview and Block Diagrams -------------------------------------------------- 78 4.2 Sensor Design ------------------------------------------------------------------------------- 80 4.2.1 Overview -------------------------------------------------------------------------------- 80 4.2.2 Block Diagrams ------------------------------------------------------------------------ 82 4.3 System Architecture ------------------------------------------------------------------------ 82 4.3.1 Overview -------------------------------------------------------------------------------- 82 4.3.2 Block Diagrams ------------------------------------------------------------------------ 86 4.4 Actuators ------------------------------------------------------------------------------------- 87 4.4.1 Overview -------------------------------------------------------------------------------- 87 4.4.2 Block Diagrams ------------------------------------------------------------------------ 92 4.5 Software -------------------------------------------------------------------------------------- 92 4.5.1 Overview -------------------------------------------------------------------------------- 92 4.5.2 Block Diagrams ------------------------------------------------------------------------ 95 Figure 4.5.2.1: Software Class Diagram----------------------------------------------------- 95 4.6 Rod Control Board-------------------------------------------------------------------------- 95 4.6.1 Overview -------------------------------------------------------------------------------- 95 4.6.2 Schematics and Layout---------------------------------------------------------------- 97 ii 4.6.3 RCB Control Loop------------------------------------------------------------------- 105 5.0 Design Summary of Hardware and Software -------------------------------------------- 105 5.1 Hardware Summary ---------------------------------------------------------------------- 105 5.2 Software Summary ----------------------------------------------------------------------- 106 6.0 Project Prototype Construction and Coding ---------------------------------------------- 112 6.1 Parts Acquisition -------------------------------------------------------------------------- 112 6.1.1 Foosball Table ------------------------------------------------------------------------ 112 6.1.2 Other Parts ---------------------------------------------------------------------------- 113 6.2 BOM ---------------------------------------------------------------------------------------- 114 6.3 Assembly Plan ---------------------------------------------------------------------------- 116 6.4 Final Coding Plan ------------------------------------------------------------------------- 118 7.0 Project Prototype Testing ------------------------------------------------------------------- 119 7.1 Hardware Testing Environment --------------------------------------------------------- 119 7.2 Hardware Specific Testing -------------------------------------------------------------- 119 7.2.1 Electronic Component Test Plan--------------------------------------------------- 119 7.2.2 Mechanical Component Test Plan ------------------------------------------------- 121 7.3 Software Testing Environment ---------------------------------------------------------- 123 7.4 Software Test Plan ------------------------------------------------------------------------ 123 8.0 Administrative Content --------------------------------------------------------------------- 127 8.1 Milestone Discussion --------------------------------------------------------------------- 127 8.2 Budgeting and Finance ------------------------------------------------------------------- 128 8.3 Mentors and Sponsors -------------------------------------------------------------------- 128 8.3.1 Soartech ------------------------------------------------------------------------------- 128 8.3.2 Mentors-------------------------------------------------------------------------------- 130 8.4 Bibliography ------------------------------------------------------------------------------- 131 9.0 Appendix- copyright requests -------------------------------------------------------------- 136 iii 1.0 EXECUTIVE SUMMARY Since time immemorial, lonely people have wished to be able to play foosball alone, and pairs of abnormally nonconfrontational people have wished they could play foosball together, but not against each other. Solutions to these problems have come and gone, often costing tens of thousands of dollars. Enter Project FOOSE. Project FOOSE is a fully-implemented human-vs.-computer game of foosball, which operates with speed, intelligence, and grace, all at a very low cost. Long a favorite of arcades and game rooms, foosball, also known as table soccer, is basically a constrained form of regular soccer. Rows of small armless figures are affixed to metal poles which span the width of the field, which are allowed to rotate freely, thereby enabling the figures to kick a small plastic soccer ball. The object of the game is, as in regular soccer, to score by kicking the ball into the opponent‟s goal. The FOOSE project is a system which combines advanced optical tracking, artificial intelligence, control systems, and a foosball table in order to provide an entertaining tabletop soccer simulation experience for one or two human players. The FOOSE project: Processes the table state in real time, and reacts quickly Takes up only slightly more room than a foosball table would anyway Was constructed within a reasonable budget Provides an entertaining experience to a novice user FOOSE itself consists of an optical sensor to monitor the state of the foosball table. This information is fed into a processing unit, which interprets the data coming from the sensors, decides the appropriate response using artificial intelligence, and digests the response into control data which can be fed to controllers and actuators, realizing the AI‟s response, and once more changing the table state. This continues as long as the human player wishes to play. 1 2.0 PROJECT DESCRIPTION 2.1 Project Motivation and Goals 2.1.1 Project Motivation Foosball is one of the most popular home arcade games. It, like few others, has captured a place in the hearts and basements of America. The members of this group have grown up playing foosball in various contexts, and, of the members of the group, each is primarily interested in a different aspect of automating the game. To automate a foosball table is a very wide-ranging endeavor, requiring a background in a variety of disciplines, which helped to spur interest in this as a senior design project. The complete project required implementing a diverse array of sub-projects which include, but are not limited to, optical image processing and object recognition, artificial intelligence (which also involves analyzing and reducing human foosball strategies), programming, mechanical engineering of linear control systems and actuators, and the electrical communications systems needed to connect all of the above to one another. The sheer breadth of this project means that each member of the team contributed something according to their strengths, and there was much to talk about and implement. Additionally, the members of the team had the desire to do a fun project, which would have an easy to work with goal in mind. In contrast to something like (for instance) a method of controlling sewer pumps, an automatic foosball table is something very human and interactive, that everyone can enjoy. This was also a major contributing factor to choosing an automated foosball table as a senior design project. 2.1.2 Project Goals In its nearly 90-year history [1], the game has changed very little. The prospect of automating half of a foosball table, thereby making it a one-player game, has attracted significant attention in recent years. Admittedly, much of this interest has been in the form of senior design projects (with widely varying budgets) from universities around the world. However, at least one company, Star Kick, in Germany has taken the concept into the commercial sector, where they sell automatic foosball tables to arcades for $27,000. The range of quality present in such boards is, as could be expected, as variable as their budgets. The Star Kick board is reputed to beat eight out of ten humans it plays against, and a majority of even advanced players. Comparatively, of the two senior design boards (discussed in section 3.2, Relevant Technologies) one was designed in a short time on a shoestring budget, and as a result has very unsatisfying gameplay. The other has an 2 undisclosed budget and a much longer period of time in which to construct it, and is extremely polished and accurate, with the ability to win most of the games it plays. Given the current state of the art of robotic foosball tables, the motivation of this project was to come down squarely in the middle. This project combines the strengths and weaknesses of the various tables, improves upon their designs, and, in the end, produces a table with the positive qualities of each. More specifically, the goals of this project are as follows: Cheaper The budget for this project is $1000. That is less than a twentieth of the cost of a new Star Kick table, but two times that of other senior design projects surveyed. Smaller Most of the tables surveyed occupy much more space than the foosball table they incorporate. This project is designed to occupy only slightly more space than the table itself. Harder Of the tables surveyed, none with a comparable budget were able to provide a satisfying game of foosball to an average human player. This project is designed with this goal more important than the others. In short, this project‟s goal is to provide an entertaining foosball experience to a novice user, while staying under its limited budget, and occupying less space than other solutions to the same problem. 2.2 Objectives Per component, the project‟s objectives are as follows: Camera o Must be able to sense the field often enough to enable the system to react quickly to the ball‟s movement o Must be able to output data over USB to a central processing unit o Must be small enough to be mounted on a bracket above the table o Must have a high enough resolution to sense the ball‟s position to within a given level of precision Computer o Must have a processor capable of handling artificial intelligence, image interpretation, and motor control output in an acceptable amount of time 3 o Must have enough memory to handle artificial intelligence, image interpretation, and motor control output in an acceptable amount of time o Must be capable of connecting over the interfaces required by the other subsystems, which may include USB, serial, or parallel o Must be running an operating system which is capable of real-time output to control systems o Must be compatible with programs used to implement artificial intelligence, image interpretation, and motor control output Actuators o Must be capable of moving the weight of the foosball table‟s rods quickly enough to block a ball at normal speeds o Must be capable of turning the foosball table‟s rods with enough force to kick the ball at high speeds o Must be able to be controlled by either a computer or an actuator control subsystem o Must occupy a small enough amount of space so as not to interfere with adjacent control rods Foosball table o Must be a regulation standard foosball table o Must be easy to disassemble for transport o Must be easily modifiable in order to incorporate the other components of this project o Must have a flat surface, without rounded corners (in order to enable LED grid types of sensors) Artificial Intelligence o Must be able to entertain a novice user o Must be able to accept ball positions and velocities from computer vision system o Must be able to quickly calculate and output a move given inputs o Must appear to a user to be competent and intelligent Table State Interpreter o Must accept image input from camera system o Must locate ball within image o Must determine ball position and coordinates on foosball table o Must run quickly on computer system o Must work accurately in potentially variable conditions Rod Control Board o Must interface between computer system and actuator system o Must be able to control all actuators in actuator system in real time o Must accept serial input 4 Foosball o Must be a regulation-sized foosball 2.3 Project Requirements and Specifications 2.3.1 Sensors In order to play a game of foosball, an automated system must be able to sense the position of the ball and control the position of its rods. Ball Detection The maximum speed of a foosball in a game between average players is 5 m/s. The distance between rods is 5.875 in, meaning that ball will be able to move between two rods in .03 s. Thus any ball sensing system must be able to determine the position and direction within .06 s. This assumes that the computer will have 2*5.875 inches to stop a shot, because at the goal line each player has 2 rows of puppets. A discrete position sampling system such as a camera can only sense position at each sample, thus 2 samples are needed to determine direction. This means that the frame rate of any camera system would need to be at a rate of once every .03 s or ~30 Hz. A camera system would also need to take individual frames quickly, or else motion blur will make ball identification very difficult. The ball must be tracked to within 1.25 cm in order to make a straight kick, as shown in Figure 2.3.1.1 below. Figure 2.3.1.1: Puppet kicking foosball straight with maximum allowed error 5 Due to the inaccuracy of the mechanical subsystem the tracking subsystem must be able to track the ball to within .25 cm. Assuming a desire to identify the ball on a pixel based image, each pixel should represent at most .25 cm x .25 cm square on the table. The length of the table is 120 cm, meaning a horizontal resolution of around 480 pixels. Optical tracking algorithms can, however, make use of blurry pixels to make estimations on the sub pixel level, so a resolution below 480 could still be acceptable. The camera must be compatible with the computer‟s operating system, which is Windows. The table should be able to fit within a standard US household and thus should be less than 8ft or 243cm long. The height constraint also places a requirement on the minimum viewing angle of the camera. Requiring at least 7 cm clearance between the camera lenses and the ceiling and taking into account the 86 cm between the floor and table surface the minimum viewing angle of the camera would need to be 22°, shown below in Figure 2.3.1.2. Figure 2.3.1.2: Diagram depicting the minimum required viewing angle of the camera (not to scale) 6 A viewing angle of greater than 22° is preferred, as it would reduces the necessary height the camera is mounted at. Given the constraints stated above, a summary of required characteristics of a ball sensing camera is given in Table 2.3.1.1 below. Feature 120 Hz Minimum Required 30 Hz Resolution 480 x 360 320 x 240 Compatibility Windows Windows 40° 22° Frame Rate Viewing Angle Desired Table 2.3.1.1: Table summarizing the required characteristics of a foosball sensing camera 2.3.2 System Architecture 2.3.2.1 Central Processing Unit The processing for this project is quite intensive. The CPU must be able to handle the image processing, the AI, and the motor controlling. To handle this load, this project uses parallelization to achieve fast data processing. For processing the images and running the AI, this project will require a computer with a relatively high clock frequency. Because all of the processing must be done in real time, and low latency is extremely important, this project will require a processor with a minimum clock rate of 2.0 GHz. Because of the parallelization used to achieve high throughput and low latency, a modern hex-core processor is recommended. The processor must be of the normal x86-compatible architecture, and may need to be x86-64 compatible, if required by the future needs of the project. For communication with peripheral devices, such as the rod control boards and the camera, the processor must have at least 7 USB ports. In order to run the code used in this project, the computer must possess at least 2 GB of RAM, but more is always better. The computer must be otherwise compatible with Windows 7 or 8, with Windows 8 being the operating system used in the FOOSE project. The computer must run on a standard power cable, and must possess a power supply capable of powering all the necessary internal components of the computer. 7 The computer must have a means of acquiring and loading the software necessary for this project, and must be capable of running them. The computer must operate properly and reliably, with no hardware failures throughout the life of this project. 2.3.2.2 Hardware controllers The control algorithm processing in this project takes place on the rod control board (our printed circuit board). Thus, the hardware controller must be able to take the output of the central processing unit in the form of serial USB. It then must be capable of outputting a DC voltage to control the actuators. The motor controller must be able to handle a 12V output for motor control and handle 2 amps of continuous current for motor output. It will also need to be able to operate in normal room temperatures of 15 degrees Celsius to 32 degrees Celsius. The hardware controller must also be able to take in sensor data for feedback purposes. Thus, the microcontroller must have a minimum of 4 input pins per rod (16 total). Two pins per rod are used for calibration/feedback purposes and the other 2 are used to identify the different boards (there is a single board responsible for controlling each individual rod). Summary of Specifications: Receive input from central processing unit via USB Provide a 12VDC output for the motor control Handle 2 amps of continuous current for motor output Operate in normal room temperatures of 15 degrees Celsius to 32 degrees Celsius Must have 4 input pins per rod (16 total) 2.3.2.3 Sensor Aggregation Hardware The sensor aggregation hardware is responsible for interpreting the data from the sensors and converting it into useful data for the central processing unit. The sensors that the aggregation hardware is responsible for interpreting include the two buttons which act as limiters for lateral motion and any potential encoders for closed-loop linear controls. The current sensor hardware must be able to handle 2 digital inputs for the limit switches on the linear motion. Optional would be one more to calibrate the cam kicking motor. Summary of requirements: 2 Digital Inputs for limit switches 1 serial output port for computer interface 8 2.3.3 Actuators In order to meet the design requirements of a semi-automated foosball game that is challenging to an average user, the system must be built with high-quality and welldesigned mechanical subsystems. In this section the design requirements and specifications for mechanical actuators are analyzed. Prior studies have shown that an accurate estimate for the maximum speed of a foosball during a regular match is 10 meters per second [2]. Using this value and relevant dimensions from a regulation foosball table, the minimal necessary response time and speed of the actuators can be computed. Following is a diagram of a standard foosball table. The colored ovals are the position of the puppets, with colors corresponding to each player‟s team. This project will control four of the rods (one player) in both the linear direction and the rotational direction. The table‟s dimensions are 120cm long, 68cm wide, with a range of 8 cm to 15 cm perpendicular distance between rods. The goals are 20 cm wide. Each player controls thirteen players on four rods. Figure 2.3.3.1: Relevant dimensions for calculating actuator response times Lateral Motor Requirements From the measured dimensions of Figure 2.3.3.1 and the speed of 10 meters per second as an approximate maximum speed for the ball, the speed that will be required to move in 9 the lateral direction can be computed. This value will ensure that the electric motors used in the automated foosball table will be able to keep up with the gameplay. However, the requirement calculated for the motors using ideal values is unrealistic to actually implement, given the constraints of the budget. The distance between the poles is cm and assuming an ideally placed shot, the furthest the poles will have to move is cm. So, the maximum speed for a lateral actuator on the foosball table is meters per second. In an ideal final motor design, all systems would be required to keep up with this speed to play a perfect game. However, this speed is extremely fast and unrealistic given the budget and physical constraints. Since the perfect system may be impossible to create, the project requirements for lateral motion will be set to a competitive but slightly lowerthan-perfect metric. A more realistic metric for a non-professional but still competitive maximum speed of hits is 2m/s from independent research done by members of this senior design group. Furthermore, instead of calculating for the maximum distance on the board (20cm between the defenders and the wall in a worst case scenario) the average distance between puppets is considered (10cm), which is a more likely distance that will have to be moved. A maximum value of 1.33m/s will be attempted for linear actuator motion. The complete linear actuator subsystem will require at least one motor per pole, meaning a total of four actuators to control the automatic opponent‟s side of the field. Two touch sensors may be installed on each bar at the extreme end of motion. These sensors will prevent the poles from damaging themselves due to any possible software fault or failure. Summary of Requirements: Move between the extreme lateral ranges of motion within 0.25 seconds, in essence approximately 1.0 m/s. 10 4 Motors used, 1 on each non-user game pole, will control the motion of the game pieces. 2 tactile sensors will be placed on each end of each game pole to limit the movement of the lateral game pieces. This will reduce damage to the actuator system. Rotational Motors Requirements The rotational motor has a number of options for implementation. The selected design must be able to hit the foosball in a manner similar to a human in speed and accuracy. The value of 10 meters per second will be used for comparison against a maximum professional power shot from the rotational subsystem, but a more realistic measure of 2 meters per second will be used for drafting the requirements. Hijkoop, et. al. have determined that the toque needed from a rotational motor to achieve this speed is approximately 13.2N [3]. Therefore, a motor for the rotational subsystem should be able to apply 13.2 N to play an ideal game. Once again, this metric may be beyond the scope of this project. The number is good to use as a starting point, but without gearing and careful calculation a perfect 13.2 N will be challenging to achieve. The requirement to play a satisfactory game of foosball will be a more realistic goal. The complete rotational motor subsystem will require at least one motor per pole, meaning a total of four motors to control the automatic opponent‟s side of the field. The motors may be directly mounted or indirectly mounted to the pole depending on the ratio needed to kick the ball. The entire subsystem must be able to handle the motion of the linear subsystem discussed above. In order to keep the safety requirement the rotational subsystem may use two tactile sensors to stop motion at the extreme ranges. Summary of Requirements Be able to hit the ball with approximately the same amount of force as a moderate human hit. The ideal is 13.2 N but acceptable will be between 5N – 10N; 4 Motors used, 1 on each AI game pole, will control the rotation of the game pieces. 2 tactile sensors on each game pole. The axial rotation subsystem must be able to follow the motion of the linear subsystem. 11 2.3.4 Software 2.3.4.1 Table State Interpretation The table state interpretation describes the subsystem responsible for tracking and predicting the position of the foosball on the table, as well as measuring the position and rotation of all active puppets. These two parts are handled very differently in the code. The foosball tracking is done with a complicated system of inputs which feed into a software filter trained to predict and track the position of a highly maneuverable and dynamic foosball. On the other hand the position and rotation tracking of puppets is done simply through open loop control with occasional calibration. In order for a filter to work the input needed will include: Current Position Velocity Estimate Acceleration Estimate Model Error Covariance Input Error Covariance The position of the ball will be estimated through the raw inputs of the camera and computer vision algorithms (discussed in section 2.3.1). The velocity and acceleration estimates cannot be measured directly through sensors however. In order to estimate the velocity, the difference between two or more frames can be used to measure the instantaneous velocity of the ball from the last measurement. The acceleration can then be estimated using the difference in velocity. However to be more accurate and able to handle large changes in acceleration, like what would happen when the ball bounces from a wall or puppet) the acceleration will be estimated using both a constant acceleration model from the camera estimate and also a white noise estimation model. White noise is a random variable which is not time dependent and generally the mean is 0. When a filter is used using a white noise random variable as acceleration it is constantly anticipating the change and able to quickly react to a ricochet. Another responsibility of the filter will be to keep object permanence and using a physics model running in the background, it must be able to discard erroneous readings from the computer vision. Finally in order to keep a competitive game of foosball running there must be some time requirement. If the table state runs too slow then the automated foosball puppets will not be able to react to the ball fast enough to block shots. Judging from the speed of the potential cameras a safe requirement is around 30 Hz. Summary of Requirements 12 Be able to measure instantaneous position. Be able to estimate instantaneous velocity and acceleration. Update table state model at approximately 30 Hz. Be able to measure model and input error covariance. Have hardware to measure linear and rotational position of puppet rods. 2.3.4.2 Artificial Intelligence Algorithms The artificial intelligence (AI) subsystem is the decision maker which takes into account the current table state information (discussed in the previous section, 2.3.4.1 Table State Interpretation) and generates output to the motion control subsystem, discussed in the next section, 2.3.4.3, Motion Control Algorithms. This project uses a basic AI scheme which simply attempts to intercept and kick the ball whenever it can. However, regardless of the AI‟s simplicity, there are several clearlydefined requirements which it must meet. At its most basic level, the AI algorithm must be capable of accepting the current table state, which consists of the information specified in the above section, and outputting to the Rod Control Boards the desired move, which is in the form of an absolute position (for linear movement) and whether or not to kick. The AI algorithm must not add significantly to the time taken to process a frame. This is to say that the AI should, given a table state, be able to calculate and output a move in around 1ms on the central processing unit. The moves output by the AI algorithm must be correct according to the information it‟s given. This is to say that while the ball may not be kicked perfectly every time, if the actuators are working properly and the optical system has accurately sensed the ball, the AI algorithm should derive the optimal move. The AI algorithm should be able to operate with enough precision to accurately tell the Linear Movement Control subsystem what to do. (More specific numbers discussed below in 2.3.4.3, Linear Movement Control) 2.3.4.3 Motion Control Algorithms Linear Movement Control Motion control algorithms are required for the linear movement control of the robotically controlled puppets. When controlling the motors, it is required to move each of the rods holding the puppets in both directions at very high speeds for real-time response, and with relatively accurate stopping positions. To control an optimal automated opponent, the algorithm must be able to transport the puppet 20 cm to block a ball hit by a professional (10 m/s). Because the distance between 13 the rods is 15 cm, the control algorithm must move the puppet 20 cm in 0.015 seconds (average speed of 13.3 m/s, more detail shown in 2.3.3 actuator specifications). The diameter of the foosball is 4 cm. To block a shot, ideally the center of the puppet foot is lined up with the center of the ball creating a tangential contact parallel to the playing rods. This makes the ball stop completely and gives the blocker full control to return a shot in most circumstances. The width of the puppet foot is 2.5 cm. Thus, to create a full contact block the foot of the puppet must be moved to within a 2.5 cm margin of error (1.25 cm from center contact on either side of the ball). The following diagram clarifies: Figure 2.3.4.3.1: Full Block From this diagram we can see that the margin of error is 2.5 cm. The foosball player foot can be moved 1.25 cm off either side of a dead-on collision and be considered a full block. However, it is unreasonable to create an optimal opponent, because the physical game constraints would run the cost of equipment far beyond the projected budget of this project. Thus, the requirements of the linear control algorithms makes the same suboptimal game assumptions as the ones made in Section 2.3.3, Actuator Specifications, which are an average distance to move being 10 cm (which is also half the width of the goal) and an average hit of 2 m/s. Thus it must move the rod 10 cm in .075 seconds. Furthermore, the goalie puppet has twice the distance to block the shot because the closest rod to the goalie is the same team defenders so it will have .15 seconds to move to block a shot. In addition, these calculations assume instantaneous reaction time on the human end of the game, which gives additional time for the control algorithm to put the puppet in place. 14 Assuming a suboptimal game also changes the requirements for blocking. Although a full contact block is most desired to obtain control of the ball, deflections also act as a suitable defense against goals. Thus, with a 20cm goal, if the edge of the puppet hits 1 cm away from the ball‟s center, the deflection angle is great enough such that the ball will still miss the goal (this applies even when the goalie puppet is not centered in front of the goal due to the large deflection angle of a block 1 cm away from the center of the ball and relatively small goal size). Therefore, the margin of error is increased to 4.5 cm (1.25 on each side from the edge of the puppet foot hitting the ball and then an addition 1 cm on each side because the contact can be 1 cm off from the center of the ball and still deflect). The following diagram clarifies: Figure 2.3.4.3.2: Deflection From this diagram, we can see the margin of error is now 4.5 cm. When the foosball puppet foot is moved 2.25 cm from center of the ball it will deflect the ball enough for it to miss the goal. Summary of specifications and requirements: For a full block: Move the puppet up to 10 cm in 0.15 seconds with a margin of error of 2.5 cm For a deflection/blocked goal: Move the puppet up to 10cm in 0.15 seconds with a margin of error of 4.5 cm 15 Rotational Movement Control For rotational movement control, a very similar discussion could be made compared to linear movement control. However, in this project‟s design, the rotational motors simply rotate a cam kicker to use spring power to make the puppet kick. Thus a single rotation will create a single kick. The only control necessary is to make sure that the motor spins quickly and for exactly one full rotation. 2.3.5 Table In order to ensure the success of the project, the foosball table itself must conform to a strict set of specifications: The table must be of the 3-goalie, flat corners type, as this prevents the ball from flying off the table [4] The table must conform to standard Foosball table size specifications, which are 30”x56”, with the playing surface being of the size 27”x47” [4] The table must have side walls at least 1.5” thick, which allows for more predictable bounce angles The control rods must have a coefficient of friction low enough to not significantly reduce their lateral and rotational speed The puppets must be firmly affixed to the control rods, and totally immobile relative to it. The table‟s legs must be capable of being removed without damaging the table, as this is necessary for transport. 16 3.0 RESEARCH RELATED TO PROJECT DEFINITION 3.1 Existing Similar Projects and Products 3.1.1 Adelaide University Automated Foosball Five engineering students at Adelaide University (Australia), with serious funding and support from Sage Didactic and Rockwell Automation, were able to create a very effective automated foosball table in 2007 as a senior design project. A top level view of the project reveals a well-made machine that provides a fun opponent with the playing ability to “win most games”. [5] Although not explicitly stated in the sources, it can be assumed that this table had significant funding, likely on the order of tens of thousands of dollars. With its Plexiglas encasing, fine-grained motor controls, and professionally machined parts, it functions with deadly precision and looks great while doing it. The sensing mechanism consists of 96 LED laser and photoresistor pairs, creating a grid for sensing the location of the ball. This position is then sent to the PC where the studentdeveloped AI processes the decisions. The students used a Softlogix control system along with a Kinetix 2000 motion control platform for controlling the actuators. Also, because both the AI and the control systems were run on the same PC, all communication between them could be done through memory. [6] Overall, this project sets a great example of what can be done for a senior design project. It functions well and provides an exciting user experience. The only downside is its apparent cost. This project aims to provide a similar experience for a small fraction of the price, thus having to sacrifice some aesthetics and component quality. However, through smart engineering decisions, it is this project‟s goal to make a competitive table with significantly less expenditure. 3.1.2 StarKick Robotic Foosball Table German-made StarKick foosball tables are another great example of an automated foosball table. However, unlike the Adelaide University table which was developed by senior design students and later donated, the StarKick table is a commercially-available foosball table, allegedly the world‟s first. It has been sold to a few arcades around Europe and provides a competitive, mechanically-robust opponent that operates in a harsh arcade environment. However, it costs $27,000. As seen in Figure 3.1.2.1, they are very polished consumer-grade tables. 17 Pending permission from Star Kick, Inc. Figure 3.1.2.1, the Star Kick Foosball Table From a performance standpoint, this table is outstanding. Matched up in 72 games against a wide range of players including beginners, amateurs, and advanced players, it beat out 85% of its competition (2 player teams). It even won more than 50% of its games against advanced players. [7] Functionally, it works similarly to its Adelaide University counterpart. It has a 300 LED grid which samples the ball location at 50 Hz with a resolution of 384x288 (effective frame rate and resolution after processing). Compared to its prototype, which used a mounted color camera, the LED array allows for operation in a harsher playing environment. The LED grid makes the table more compact, and also more resilient to changes in lighting and ambiguity in the ball‟s location caused by obstructions. In addition to ball sensing, the table also has encoders to keep track of the human player‟s locations. In the table‟s current design, this information isn‟t used, but it is planned to be incorporated in the future. [7] 18 After the sensing information is sent to the computing system, it is processed with the AI decision engine. Star Kick as used a simple greedy AI algorithm capable of the following functions: kick the ball, kick a ball that is stuck on the wall, block the ball, and get out of the way of the ball. During a game, the automatic table works on a simple block and attack tactic, where is predicts the balls movement, moves in front of it, hits the ball toward the human‟s goal, and moves its own players out of the way of the shot. Although simple in nature, this tactic, as shown early, is quite effective. After the decisions are made, actuation is required. Starkick uses a cable driven system for horizontal movement and a belt driven system for the rotational movement. With this mechanical system, the automated table can shoot the ball at 3m/s, which, compared to an experienced player (typically shooting 6 m/s), is not as fast, but is still fast enough to consistently make goals. [7] Overall, StarKick is another great example to follow for this project. It is a robust mechanical opponent that consistently beats its human competitors. It has fine motor controls, a functioning AI, and highly accurate sensing. Again, its main disadvantage is the significant cost; $27,000 is more than 20 times the budget for this project. However, with the right engineering decisions, the loss of performance could be mitigated while drastically reducing the cost of production. 3.1.3 Georgia Tech Automated Foosball Senor design students at Georgia Tech created an automated foosball table which is radically different than those aforementioned. This foosball table would be best classified as a minimalistic robotic foosball table. In terms of performance, this table could only defeat the most inexperienced players. The reaction time was slow, the kicking speed was low, and the accuracy and defense were both rather poor. This prototype table would not provide the desired competitiveness expected from most human players. In terms of function, the ball location is determined through a mounted webcam and image processing. This provided a very slow ball recognition time and contributed to significant errors caused by table movement, visual obstruction of the ball when it rolls under a player, and different lighting scenarios. The limiting factor was reported by one of their team members as the mechanical portions and the webcam quality, not the AI or the processing. [8] However, the main reason why this project is important to consider is that it was completed in three months for only 500 dollars. This sets a great example of the most minimal version of an automated table. Thus with this project, a $1000 table should provide a significant performance increase while still maintaining a reasonable price. 19 3.2 Relevant Technologies 3.2.1 Sensor 3.2.1.1 Ball Detection Existing Magnetic Sensing Systems The use of magnetic tracking was evaluated for use in this project. The requirement for a tracker in this project is that a fast moving ball must be tracked across a limited playing field. To this effect, any magnetic tracking system must use a sensor or grid of sensors to track the position and rotation of a magnet placed in the ball. This will maintain the requirement of play that the ball not be wired to anything and also be able to quickly and accurately track the ball. Off the shelf systems exist such as the Polhemus motion tracking system, which offers extremely accurate and extremely fast motion tracking. These type of sensors require an approx. 1 cu. ft. base station and a 3 axis magnetometer to be placed on the object being tracked, the data is then relayed off the magnetometer via a wire to a wireless relay (cell phone sized) [9]. The physical setup of the Polhemus tracker is depicted in Figure 3.2.1.1.1, below. Figure pending permission from Polhemus, Inc. Figure 3.2.1.1.1: Depiction of Polhemus G4 motion tracker This will not work for foosball tracking because a small but free moving ball is the object that must be tracked. While the existing systems have a relatively small wireless relay, a cellphone sized relay is still too large for use in tracking a foosball because a foosball is considerably smaller than a cellphone. 20 The cost for these systems is also prohibitively expensive, each system ranges in the thousands of dollars. Our total project budget is less than the cost of obtaining a single off-the-shelf magnetic tracking system. Given the cost constraints and the size of the tracker, any existing, off the shelf magnetic tracker is an infeasible solution for use in this project. Custom Magnetic Tracking In order to meet the requirements of a magnetic tracking system for a foosball, a custom sensing grid was considered. The custom grid setup would consist of several 3-axis magnetometers mounted on custom PCBs that would relay information to a central processing unit. The processor would then in turn use the magnetic field direction and intensity from each sensor to compute the location of a magnet placed in the foosball to be tracked. A sample set of parts was obtained and tested for use in this type of tracking grid. The MAG3110 was used along with an N48 rare earth magnet. The MAG3110 sensor was purchased from SparkFun for $14.95 [10]; the board was easy to test with because the leads from the chip were brought out to a standard 1/10th inch spacing. The MAG3110 was selected because of its common use in the industry as well as its fast refresh rate (80 Hz [11]) and relative accuracy. The magnet chosen for the test was a cylindrical ¼ in diameter, ¼ in long N48 rare earth magnet. During testing the background magnetic field created by Earth‟s magnetic field registered as 55 uT on the sensor. In order to register a field distortion that was above the background field, the rare earth magnet used needed to be within 8 inches of the sensor, however this could be increased to 3 feet if the magnet was pointed in the direction of the sensor. The rotation of the ball cannot be relied on, thus we would need a sensor within 8 inches of every space on the board. The limitations on sensitivity would require around 10 to 20 sensors to be placed under the board. Due to the noise of the sensors in excess of 1 uT and the relative price of each sensor chip, $1.73 [12], 4 sensors could be placed near each other on each sensor chip to reduce noise. This would make up for the inaccuracy in the individual sensor. Price quotes were obtained for the construction of the sensors described above. Due to the size of the MAG 3110 sensor, we would be unable to solder the chip to the board. The small size of the leads on this sensor, 0.22 mm lead size also leads to high production costs, depicted below in Figure 3.2.1.1.2. The cost of manufacturing 15 PCBs varied between $350 and $550. The cost of assembly was in excess of $1200 for 15 PBCs. The cost of the parts was around $100. This put the total cost of sensor creation around $1700. Because this price was nearly twice the project budget, the possibility of creating boards for each sensor was out of the question. 21 Pending copyright permission from Freescale, Inc. Figure 3.2.1.1.2: Diagram of Freescale’s MAG3110 connection pads Another possibility was to use the boards from SparkFun as the sensors in our project. This however was ruled out because we would want the noise reduction of multiple sensors, because of the individual cost of $15 per unit, using 4 MAG3110 chips at each sensor location would yield a sensor cost of $15 * 4 * 10 = $600. This was a more reasonable figure than having the PCBs made ourselves; however, the cost was still in excess of half the total project budget. Due to cost, magnetic sensing was ruled out as a method of ball tracking. Laser Optical Tracking The possibility of using a series of lasers and sensors placed near the bottom of the board was evaluated for this possible use in the project. The design that was considered would consist of 2 lasers at each end of the table placed behind the goal. A spinning mirror placed at a 45° angle, placed at a height such that the laser would shine out underneath the puppets but above the table and would hit light sensors along the edge of the table. A variable rotation rate on the mirror could be used to adjust the sampling rate, in addition relatively spaced out sensors would provide accurate sampling of the ball‟s position. The ability to add more lasers to provide more accurate sampling made this an attractive idea for ball tracking. Each laser would need to point between the players and puppets. In the table we purchased, the distance between the bottom of the puppet and the table is 3 mm. This imposes a need for high mechanical accuracy with pointing of the laser. Coupled with the need to determine which laser was shining on a given sensor receiving a signal made this 22 tracking method a very difficult proposition that was likely to fail. As a result, laser optical tracking was ruled out as a ball tracking method. Infrared LED-Sensor array The University of Akron foosball table uses an array of 22 LEDs with an associated array of infrared sensors on the opposing side. This would impose the need to design a hardware controller for aggregation of the sensors. The required board wouldn‟t need to have any surface mounted components and thus could be made cheaply. The LEDs would need to between sensors, the result would be a minimization of the interference between pairs of LEDs. The position would be equal to the granularity of the array. However an assumption on constant velocity (in between strikes) would allow for much finer approximation of position. The implementation of an LED array would fit within our budget and time constraints thus is a possible solution to the problem of tracking the position of the foosball on the field. Infrared LED array-Camera The Star Kick, commercial automated foosball table uses an array 300 LEDs placed around the edges of the field, below the puppets. The field itself is made from a material that appears solid however lets through infrared light. There is an infrared camera with a resolution of 384x288 placed below the table looking at the field [3]. The LEDs illuminate the underside of the ball which then in turn shines through the field and produces an image in the camera such as the one seen below in Figure 3.2.1.1.3. The solution developed by Star Kick is a novel, reliable solution that has a relatively low cost because of the simple LEDs and camera used in its implementation. This solution has one drawback, which is that the table must be made of a special material that allows through infrared light so that camera may detect the ball. This is not a viable solution for this project because the table that was purchased for this project is solid and blocks all infrared light. 23 Permission pending Star Kick, Inc. Figure 3.2.1.1.3: Typical image from Star Kick camera, the foosball is circled in red Visible Light Camera An obvious solution to this problem is to attempt to mimic how the player tracks the ball. The typical player simply visually identifies the foosball on the field. The computer based solution to this is a camera mounted above the field attached to a processing unit running computer vision algorithms to identify the position of the ball. Two different types of off the shelf consumer camera systems were evaluated for use as a foosball tracker: the Logitech QuickCam® Pro 9000 and the Microsoft Kinect®. The Logitech QuickCam® Pro 9000 is available for $60-$90 while the Microsoft Kinect® for Windows is available to students for $150. Both cameras provide color video feeds as well as the ability to capture still images at higher resolution, however the Kinect® provides a depth map by measuring displacement in an infrared grid. With regard to simple analysis of color images, OpenCV provides a vast set of image processing algorithms. A Haar cascade can be trained to recognize the ball, this is one of the algorithms that is available in OpenCV. A Haar cascade is an algorithm that reduces a set of alike, training images to light and dark rectangles. These rectangles are arranged in a cascade that is ready to compare an image, or sub image such that the failure to satisfy 24 the first set of rectangles means that the image is a negative. Another possible algorithm for recognition of the ball is a Hough transform that is being used to recognize circles. The Hough transform is much simpler, however it requires more computing power and can only recognize geometric shapes that can described by a limited number of constants, such as a circle. The Logitech and Kinect both produced similar quality images, shown in figure 3.2.1.1.4. Figure 3.2.1.1.4: Color images captured from Logitech QuickCam® Pro 9000 (left) and the Microsoft Kinect® (right) One problem that was noticed during testing was that the ball did not appear as a circle when moving quickly, motion blur produced a streak, shown in figure 3.2.1.1.5. The motion blur produced with the color channel of the Microsoft Kinect® was much less than that of the Logitech QuickCam® Pro 9000. Figure 3.2.1.1.5: Image capture from Logitech QuickCam® Pro 9000 showing motion blur The markings on the table such as the circles marking distance in the middle of the board and the circular heads of the puppets would make detection using a Hough transform difficult. In addition to the other sources of circles in the table, motion blur would make 25 the ball not appear as a circle; thus, a Hough transform will be unlikely to yield good results. The presence of motion blur allows for determination of position, direction and speed from a single frame. This would very useful because cameras evaluated for use in this project operate at 30 Hz, thus at least 2 frames are needed to detect a direction and velocity. The frame rate constraint means the fastest detection of a new direction and velocity would take 1/30 sec + processing time. If an algorithm was implemented that could detect direction from a single frame before the next frame arrived the game could be drastically more responsive and challenging. The problem of motion from blur has been analyzed from an algorithmic point of view by Shengyang Dai and Ying Wu in a 2008 paper titled “Motion from Blur” [13]. The math has been done for this problem however no real-time implementation has been made. If the Logitech camera is used, motion from blur may be used to gather some information about direction from each frame. Depth Maps The Microsoft Kinect® also provides a depth map by measuring the displacement in a grid of infrared lights fired from the camera. The processing of the displacements back into a depth map is done onboard the Kinect® and thus would not require any extra computing power to compute. The advantage of a depth map is that table markings are not visible and cannot interfere with detection of the ball. The foosball is clearly visible from the surrounding puppets and board in figure 3.2.1.1.6. The depth map also has another advantage in that puppets are higher off the board than the ball and thus will not be detected as the foosball, but the puppets can still occlude the foosball. In testing the Kinect® sensor no motion blur was noticed in the depth map sensing, and thus a simple Hough transform could be used to detect the ball after a Canny edge detector was run on the image. An important note to mention: the puppets legs will at some time, if rotated within a very specific angle, will be at a similar height to the foosball. Thus, it will be possible to confuse a puppet foot with a ball. A Hough transform may be able to distinguish this, otherwise a search for parallel objects can be done to distinguish a ball from a puppet. The use of two cameras is also possible, the Kinect‟s® depth map and the QuickCam‟s® color map could be combined to provide more accurate foosball tracking, however this would require additional processing power. The use of individual cameras for color and depth would be preferred over the Kinect® only because the bandwidth limitation of USB imposes a limit below 30 Hz when using both depth and color. 26 Figure 3.2.1.1.6: Depth map from Microsoft Kinect®: the presence of the foosball is quite apparent in the image and easily differentiable from the puppets. Sample Normalization After an image processing algorithm determines the position or several likely positions of the foosball on each frame, these samples must be combined into coherent position and velocity data. The Kalman filter is the primary algorithm being researched for use in this system. A Kalman filter uses knowledge of the state of an object to predict where to look for it next. The filter is also able to remove noise such as a sample showing the foosball as a puppet‟s head other side of the field, because this would be inconsistent with the foosball‟s last known position and direction. The Kalman filter assumes a state-based dynamic system evolution which is very appropriate for this project, which will be tracking the physical position and velocity from a series of discrete samples. A common algorithm for use in computer vision is RANSAC or “RANdom SAmple Consensus.” RANSAC is very good at filtering a set of discrete samples into those that fit with a mathematical trend and those that do not. This is particularly useful when using an algorithm that is prone to overidentification of targets, e.g. when a Hough transform identifies 15 different circles in an image and only 1 is the foosball. RANSAC also has the advantage of being very fast, but tunable. The algorithm is non-deterministic and will 27 produce a better answer for each additional iteration it is allowed to run. This is a desirable feature for use in this system because the resultant performance can be increased by making each stage of the final foosball identification algorithm faster. Conclusion Optical camera tracking is the strongest candidate for tracking of the foosball because of its low cost and mostly software implementation allowing easy upgrades to the system. A secondary possibility is an infrared grid of LEDs and sensors due to its simplicity and accuracy. The Kinect® also provides an interesting option due to the ability to change between using a color only, hybrid depth/color or depth only tracking method with software only. If a hybrid color/depth is chosen, different cameras with individual USB root hubs would be required due to the bandwidth limitation of USB. The advantage of a hybrid color/depth model is that the motion blur from the QuickCam® could be used to determine direction in a single frame, while the depth channel could be used to provide accurate position information. The best single option however is the Kinect® depth sensor, due to its resistance to resistance to interference and false positives. 3.2.1.2 Player Puppet Detection This subsection deals with determining the minimal state vector of the rods that control the puppet‟s motion. The state vector will contain only the position of the translation along the direction of the rod and the rotation of the control rod. This will tell us exactly where each puppet is located on the field and whether they are kicking, blocking or rotated such that they will be out of the ball‟s way. The first thing to research in this section is to consider what this information would be used for within the AI subsystem, or any other subsystem, and determine if it is necessary to the FOOSE project‟s success. The position of the automated rods seems like the most critical component to keep track of. In order to implement any linear control algorithms, and in fact move the control rods to any position without dead reckoning and guessing, this information is needed. The rotation of the automated rods is another question. The rotation information would be useful for confirming the position, and if the rods were given complete 360-degree rotation control without any physical stops, then having an encoder reading the rotation of the pole would be essential. However, if the kicking/rotational mechanical subsystem is instead chosen to be a simple back and forth motion with tactile sensors to stop the motion at the extremes, then adding an encoder would be potentially unneeded. Whether the subsystem should detect the position and the rotation of the humancontrolled rods is another question entirely. In an ideal project, the human rods‟ position and rotation would be known so that the AI can react appropriately to the player‟s position, and even try to maneuver the ball around the human player‟s puppets. However, 28 in the event that the AI is not accurate enough to do this, then the information would be wasted. Furthermore, the rotation of the human player‟s puppet is only useful if the puppets are rotated up and the AI could exploit that fact. It might be just as effective and much simpler to assume the human controller rods are always rotated down. Regardless of which information is chosen to be mined, the most likely way to get this information from the physical world to the controller is using a quadrature encoder. There are many varieties of encoders to consider. There are linear encoders that run from changes in magnetic fields, and there are optical rotary encoders which use a wheel with markings to determine the rotation. Either choice will give the same data back to a microcontroller which can interpret the state. In order to interpret this data into a position, the system will need to decode quadrature encoding. Quadrature Encoding Part of this research went into learning how to read the signal from an optical encoder and create a counter to keep track of the linear position of the rods. Although the final design did not require this technology, a logical extension to the project would be to add closed loop linear controls that would be dependent on quad-encoding. Quad-encoding is a way to read a counter using just two signals. This counter can count up and down depending on the direction of the rotation. As seen in Figure 3.1.2.1, the two signals A and B will count up at each „click‟ (where a click is some arbitrary amount of rotation or linear motion down the encoder; in order to be an effective encoder this click value is very small.) Each click, however, has two parts, the A peak and the B peak. If A leads B, then this click is counting up and the accumulator in the control board must be incremented. If the B signal leads the A signal, then this is counting down and the accumulator from the board must be decremented. When at any point the control system needs to know the current position of the control rod, it will access the accumulator value that is being modified by the control boards. Figure 3.1.2.1: Quadrature Signal 29 A very fast embedded processor will be required to keep track of the encoder‟s values, likely this board will use a processor like the Arduino [14] or the Cypress system‟s processor [15]. This processor would be fed the input values and keep track of different counters. The quadrature encoding method is very common and there are numerous products of varying quality which all output the same signal. This opens up the option of many different encoders to purchase for this subsystem. A quick comparison of products follows. MakerBot Linear Encoder v1.2 The MakerBot line is built for roboticists. The core of this board is the AS5306 chip. This particular board is set up to be a linear encoder, as opposed to all other options here which are rotational encoders. This method works by using a magnetic strip which is moved over a static sensor which reads the magnetic field changes. It takes this value and creates the Quadrature encoding to send to the PCB. This is convenient for the foosball table application because it would be easy to attach to the linear actuator system. However, for obvious reasons, this would not be possible to use for rotational encoding. Website: http://store.makerbot.com/magnetic-linear-encoder-v1-2-kit.html Features and Specifications Resolution: 15 microns Voltage: 5V Length: 12 inch magnetic strip Cost: $50.00 US Digital Miniature Optical Encoder US Digital is a well-known and well trusted distributor of electronics. The applications for this tiny encoder chip are well beyond just the industrial section, including hobbyists and roboticists. This option is a rotational optical encoder, meaning that it has a shaft which rotates and the rotary wheel on the inside of the mechanical subsystem uses an optical sensor to count the quadrature ticks that are sent back to the control board. This sensor has a very tiny shaft which could be a problem for attaching to motors, depending on the selection. Website: http://www.usdigital.com/products/encoders/incremental/rotary/kit/e4p 30 Features and Specifications Resolution: 360 clicks per revolution (1 degree) Voltage: 5V Length: NA – rotational Cost: $29.95 Shaft: +/0 0.20” axial shaft of 0.59” to 0.250” Shaft Length: Minimum shaft length of 0.375” Sparkfun Rotary Encoder- 200 P/R Sparkfun is a distributor for mainly hobbyists, meaning their parts are well documented and have great support for applications. The Rotary Encoder solution provided by Sparkfun comes in two resolution options, the 200 P/R and the 1024 P/R options. Some additional research will be needed to determine how many points per revolution will be needed for an acceptable linear control loop for the different subsystems on the mechanical actuator portion. This option is a larger physical encoder and has an awkward cylindrical shape which could cause mechanical mounting issues, however the benefits are that it comes with several convenient additional resources and documentations which could be useful for the project implementation. Website: https://www.sparkfun.com/products/10790 Features and Specifications Resolution: 200/1024 clicks per revolution Maximum rotational speed: 5000 rpm Voltage: 5-12V Length: NA – rotational Cost: $29.95/$39.95 Shaft: 4mm diameter Shaft Length: 1cm length 31 3.2.2 System Architecture 3.2.2.1 Main Processor Since the FOOSE project requires intensive data compilation and interpretation, it will require some kind of central processing unit. In Section 2.2, the objectives for the central processing unit are listed as requiring a processor and RAM capable of interpreting sensor data and computing the artificial intelligence‟s next move in a reasonable amount of time, the ability to connect over serial and USB to the necessary sensors subsystems, and to be running an operating system, if any, which is capable of communicating in real time with the control systems. These objectives must be kept in mind when deciding on a central processing unit for the FOOSE project. In addition to the objectives which must necessarily be met in order for the FOOSE project to be successful, it is also necessary to take into account ease of programming, setup, and assimilation into the rest of the project, as well as the actual cost of parts required for the component. Within the constraints of the project, the one requiring the lowest amount of work and monetary cost will be the one chosen for use in the project. Keeping in mind the aforementioned assessment criteria, here are the potential candidates for central processing unit: Field-Programmable Gate Array (FPGA) AVR Microcontroller and Full computer, of which the two primary candidates are o An ultra-small-form-factor computer using an Intel Atom processor, and o A small-form-factor computer using a Pentium 4 processor Field-Programmable Gate Array The first candidate which could serve as the FOOSE project‟s central processing unit is the Field-Programmable Gate Array, or FPGA. An FPGA is a microprocessor which contains interconnected, configurable logic blocks, which effectively reproduce a network of Boolean logic gates [16]. The main function of an FPGA is to effectively replicate the job of an Application-Specific Integrated Circuit (ASIC), with the advantages of being dynamically reconfigurable and multipurpose, but the potential disadvantage of being slower, which would depend upon the model of FPGA selected. FPGA: Sensor Interpretation and AI Computation The primary question to be asked of an FPGA is whether or not it is capable of performing the computational duties required of it. Fortunately, the question has been addressed in a number of academic papers. Among these, one, researched by senior design students at the Grenoble Institute of Technology in France [17], concerns 32 implementing a modification of the Canny edge detection algorithm, called the GarciaLorca implementation, which has been adapted for optimal performance on an FPGA. In their experience using this implementation, they were able to achieve edge detection in real time, when operating on a 512x512 pixel video image being input at 60Hz. This type of video image would be sufficient for the FOOSE project‟s needs, so the implementation of this algorithm on their FPGA should not be an issue. After this, it will be necessary to actually recognize the image of the ball, post-edgedetection. One of the ways that the FOOSE project may implement object recognition is through the use of a Hough transform. A team from Algeria was able to implement a quick Hough transform on a Xilinx FPGA [18]. As the paper is rather old, the FPGA they used seems hard to come by. However, it was a cheap one, which met their needs exactly. Using one of the cheapest FPGAs available today should be able to at least replicate, and more probably improve upon, their performance. After this, the FOOSE project‟s proposed algorithm will implement a Kalman filter to reduce noise from the image and provide object permanence, part of Piaget‟s first stage of development. A team from China was able to implement this effectively on an inexpensive FPGA, and obtained sub-millisecond response times [19]. As for the AI, while an official AI scheme has not yet been decided upon, it can be reasonably assumed that the algorithmic complexity of the AI will not exceed the previous (rather intensive) operations, and so a reasonably powerful FPGA should be able to handle its processing requirements. FPGA: Physical Capabilities and Costs So, the processing ability of the FPGA has more or less been proven. The practical physical capabilities of the FPGA are now in question. The FPGA used by the French team who implemented Canny is an Altera DE2 Development and Education board. If this project were to use an FPGA, it would likely be in the form of an integrated development board like the one shown. This board contains an FPGA which was, when used in the Canny project, highly underutilized [17]. The extra capacity should, according to the other sources, be more than enough to implement the other algorithms necessary, and to perform them in a reasonable amount of time. It also has the serial and USB ports necessary to communicate with the sensors used in the project [20]. Addressing the monetary concerns, the DE2 board costs, for academic users, $269, which is within the constraints of the budget [20]. However, the major negative aspects of the FPGA come into play when time costs are considered. Using an FPGA would mean that most, if not all, of the software used would 33 have to be hand-coded, whereas with a full computer, the optical sensing algorithms could be taken care of with freely available software programs. While the FOOSE projects could travel on the shoulders of giants by making use of the research papers cited in this section, most of the authors of the papers have not made their code available, and, while the math is documented in the paper, the code is not. Also, while the code for other processors may be written in a high level language, the development for an FPGA must be done in Verilog or HDL, something that the members of the group have less experience with. This represents a significant additional expense which would not be incurred with other types of development hardware. FPGA: Conclusion In conclusion, while the other aspects of the FPGA are good and suitable for this project, the additional time investment represented is simply not something this project can afford. Another type of central processing unit will have to be used in this project. AVR Microcontroller The second candidate which could serve as the FOOSE project‟s central processing unit is the AVR microcontroller, an inexpensive, commonly used variety of programmable chip. An AVR microcontroller contains reprogrammable memory on which to store code, and a processor which is used to execute the code [21]. For the purposes of this section, an AVR microcontroller with 32KB of program space running at 16MHz will be considered [22], running on a development board with a timing clock, a USB connection, and a serial port [23]. AVR: The Costs and Physical Capabilities Given the development board seen in [23], the AVR microcontroller will certainly have the physical ports necessary to interface with the sensors and motors in use on this project. Compared to an FPGA implementation, the overall costs of an AVR microcontroller solution are much lower in a variety of ways. Firstly, the complete AVR microcontroller solution consists of two parts (unless more AVR microcontrollers are necessary), which cost a total of $38.79 [22] [23]. This is extremely affordable compared to the $269 previously considered.. Additionally, the time cost of developing for the AVR microcontroller is drastically reduced compared to the FPGA. While AVR microcontrollers can be programmed in native assembly, C compilers are supported for the AVR microcontroller [21], and C is a language the members of the FOOSE project have a great deal of experience in. So, all in all, the costs of using an AVR microcontroller as the FOOSE project‟s central processing unit are quite low. 34 AVR: Sensor Interpretation and AI Computation However, the most important question to ask is whether or not the AVR microcontroller is actually capable of supporting the functions which it needs to be able to support. Although it may be physically capable, research findings suggest that the AVR microcontroller may not be fast enough at the required precision to be suitable for this project. While even a 16MHz AVR microcontroller can perform execution of C code very rapidly, once the necessary precision increases beyond the 8 bits of the AVR microcontroller, execution slows to a crawl and it becomes difficult to implement realtime algorithms. AVR: Conclusion Despite the obvious advantages the AVR microcontroller possesses, of low price and easy development, its lack of speed and precision unfortunately make it unsuitable for use in the FOOSE project. We will have to look instead to the final type of central processing unit currently being considered. Full Computer The final candidate which could serve as the FOOSE project‟s central processing unit is simply a full-fledged off-the-shelf computer. Running a processor compatible with Intel‟s CISC x86 instruction set, and having speeds and RAM capacities much more than either an AVR microcontroller or an FPGA, a computer still has many advantages and disadvantages that must be considered. For the FOOSE project, two physical computers are being considered for use: the small-form-factor computer using a Pentium 4 processor, and the ultra-small-form-factor computer using an Intel Atom processor. Computer: The Costs and Physical Capabilities Physically, each of the computers in question comes with a plethora of peripheral options, all of which are already integrated into the computer and do not require any sort of development board or additional chip. Each has the required serial and USB ports, among others. Each of the computers in question are also already owned by members of the FOOSE group, and are willing to be sacrificed for the good of the project. The ultrasmall-form-factor computer is extremely small and could be mounted underneath the playing surface permanently once configuration is complete. In contrast, the small-formfactor computer is larger and heavier, and will be much more difficult to mount underneath the playing surface. The mounting of the computer, is, however, probably not a decisive factor in determining which computer to use. Each computer has an opportunity cost associated with it, as the 35 team member potentially providing the ultra-small-form-factor computer is currently making use of it, while the provider of the small-form-factor computer is not. Computer: Sensor Interpretation and AI Computation Several factors must be considered for each computer, and the operating system which is to be used on each must also be chosen. As can be seen in Table 3.2.2.1.1, Computer Specifications, the two computers being considered differ in a variety of ways. Computer Processor type Processor speed Cores RAM Disk space Disk type Serial port USB port Computer Specifications SFF USFF Pentium 4 Atom 330 3.0 GHz 1.6 GHz 2 logical 2 physical 1 GB 2 GB 80 GB 32 GB HDD SSD Yes Yes Yes Yes Table 3.2.2.1.1, Computer Specifications One of the most important factors being considered here is single-thread performance. That is to say, how quickly can the processor perform a single task? In this department, even a slightly slower Pentium 4 computer exhibited more than twice the performance of an Atom 330 [24]. The other factors do not matter quite as much; among two computers similar in other respects, thread performance is the most important for the applications at play, here. So, it seems as though the small-form-factor computer has won out. However, there is still one issue left to consider, which is the operating system. Computer: Operating System Since this component requires the use of an entire operating system, rather than a simple controller like the AVR microcontroller and the FPGA, it is necessary to minimize the overhead created by such a system. The operating systems which are being considered are Linux and Windows, in their several versions. Each has a number of advantages and disadvantages. First, the qualities being looked for in an operating system are (as aforementioned) low overhead. It is extremely important that the operating system chosen be able to handle the duties required of it quickly, without waiting for other processes not relevant to this project. Additionally, it must be able to support the serial communications and USB connectors. Given that only modern operating systems are being looked at, this is more or less a trivial requirement. Additionally, the operating system will need to be compatible 36 with all of the software needed to perform the artificial intelligence computation. This will include the OpenCV image processing library as well as the software that may be needed to support the camera systems under consideration. Now to consider the operating systems themselves: Linux A generic version of Linux would, for this project, mean something like a command line distribution of Ubuntu, or something comparable. Natively, Linux does not handle real time processing very well, which would make it unsuitable for this project. This is because of its microkernel design, which handles system functions as separate modules rather than as a monolithic block. However, installable modules exist which purport to add realtime functionality to the Linux kernel. One of these is called RTLinux, and is used in many realtime applications that would make the Linux kernel appropriate for use in the FOOSE project. Linux also supports serial and USB communications natively. However, Linux may limit the project‟s choice of cameras, as it does not have easy support for the Kinect imaging device, which is under consideration. Windows For this project, the most likely version of Windows to use is Windows 7, which is lightweight, fast, and stable. It also will run well on any of the candidate computers which may be selected for use in this project. Windows, unlike Linux, tends to be better at realtime communication with devices, due to its monolithic system architecture. This is one significant advantage. Also, the Windows operating system tends to work better with the Kinect hardware, as both of them are made by Microsoft and natively use and support the .Net framework, which is used to easily code for the Kinect device. All of the software modules that would have been used on Linux are also available on Windows, and often in the form of .Net applications, which the members of this group have a great deal more experience working with. All of these variables tend to indicate that Windows will be the operating system of choice for the FOOSE project. 3.2.2.2 Motor Controllers The purpose of the motor controller is to provide power and control to the actuators. In the scope of this project, the motor controller will be driving the motors for linear motion of the rods. Most motor controllers are connected between a micro-processing unit and an actuator via pulse width modulation, although other communication methods are possible, including CAN (controller area network). More information about communication methods can be found in Section 3.2.2.3, Data Transportation Methods. 37 In terms of possible choices, the following are the most widely used options for motor controllers in robotics applications: Jaguar by Texas Instruments, Inc./Innovation First International, Inc. (IFI) Jaguar is the motor controller specifically desired for the FIRST Robotics Competition, one of the most widely-known youth robotics competitions [25]. This motor controller is widely used in the robotics world because of its multiple interfaces, large voltage and amperage specifications, and widespread tools and documentation. The Jaguar motor controller has the following features, detailed in Table 3.2.2.2.1, Jaguar Specifications: Feature Title Voltage Input Amp Rating Switching Frequency Communication Methods Cost Feature Value 12 V and 24 V 40 A continuous 15 kHz CAN, PWM, QEI input, Analog input, RS232 $60.00 Table 3.2.2.2.1: Jaguar Specifications [26] [27] Talon by Cross the Road Electronics, LLC The Talon is a simple and robust motor controller for robotics. It is the lowest cost motor controller in this motor class and still maintains a wide voltage and amperage load capability. Talons are just recently entering the market and are being manufactured by a much younger company compared to the alternatives for motor controllers. This could suggest that documentation and support will be harder to find if any problems occur during design and implementation. However, the Talon does act as a “no frills” option with nothing but the basics, but everything a controller needs to run. The Talon motor controller has the following features, detailed in Table 3.2.2.2.2, Talon Specifications: Feature Title Voltage Input Amp Rating Switching Frequency Communication Methods Cost Feature Value 6-28 V 60 A continuous 15 kHz PWM $59.00 Table 3.2.2.2.2: Talon Specifications [28] Pro Victor 884 by Innovation First International, Inc. (IFI) The Pro Victor is typically seen as the alternative to the Jaguar for robotics motor controllers. Victors have less communication methods than the Jaguar, but have a smaller 38 footprint and are considered more a little more reliable than the Jaguar [29]. The Pro Victor motor controller has the following features, detailed in Table 3.2.2.2.3, Pro Victor Specifications: Feature Title Feature Value Voltage Input 6-15 V Amp Rating 40 A continuous Switching Frequency 15 kHz Communication Methods PWM Cost $89.99 Table 3.2.2.2.3, Pro Victor Specifications [30] L298N by ST Microelectronics The L298N is a motor controller for a much smaller scale motor and it is significantly less expensive then the others. The features are detailed in the following table (taken from their data sheet). Feature Title Feature Value Voltage Input 6-15 V Amp Rating 4 A continuous Switching Frequency N/A* Communication Methods VDC Cost $2.95 * this motor driver does not use PWM, it simply uses digital lines from a microcontroller to control the higher voltage output going to the motors. Other Alternative Drivers For controlling stepper motors it is also possible to use a complete stepper motor driver such as the Texas Instruments DVR8825 or Allegro A4975. However, upon initial testing these drivers did not have the current ratings that the project demanded. These options would be a good low cost alternative for smaller stepper motors. Summary of Motor Controller Research An overall summary of this section‟s research is seen below in Table 3.2.2.2.4, Motor Controller Research Summary. 39 Motor Controller Advantages Disadvantages Jaguar Has the most options for communication between devices. Can run control loops without use of separate microprocessor. Well known and widely used. Lower cost. Limited range of voltage inputs. Lower continuous current limit. Talon Highest continuous current limits. Flexible voltage and amperage specifications Newly manufactured. Limited to PWM communication. No built in fan. Victor Reliable. Well known and widely used. L298N Very low cost. Simple to use. Does not require fans. Highest cost. Limited to PWM communication. Significantly lower current rating. Table 3.2.2.2.4, Motor Controller Research Summary 3.2.2.3 Data Transportation Methods There are multiple options when choosing how to move data around between the components of a system. In this project, a few methods are discussed to see which methods best fit the project‟s needs. The types of communication are: Pulse Width Modulation (PWM), Controller Area Network (CAN), and Universal Serial Bus (USB). Pulse Width Modulation PWM is the most common method for interfacing with controller motors. It works by sending a digital signal (usually a voltage) to vary the speed of the motor. Most motors simply go forward with a positive voltage applied, reverse when a negative voltage is applied, and don‟t move when no voltage is applied. Using a PWM allows for speeds in between to be easily reached and controlled (usually by a microprocessor via a motor controller). The PWM‟s duty cycle (percentage of „on‟) will determine the speed of the motor. In some cases, 50% duty cycle means the motor is running at half speed. In others, the width of the signal tells the motor which direction to spin and how fast. [31] Overall, PWM is widely used and a great candidate for communicating between the microprocessor, the motor controller and the actuators. Controller Area Network CAN, similar to PWM, is used in motor control applications. It is an alternative to using PWM when controlling actuators. The benefits of CAN over PWM is that multiple motor controllers can be networked together so communication between them is easier. The 40 limiting factor to CAN, is that many motor controllers do not support it, so a specific motor controller must be used to take advantage of this communication method. [32] Universal Serial Bus USB is one of the most common methods for communication between computer components. The benefit of USB is that it is widely available in many devices, which makes it easy to use for communication among many different devices with a single processing unit. Also, it can supply small amounts of power to external devices. [33] 3.2.3 Actuators A critical component of the project is the mechanical motion that must occur after the state of the table has been determined through the sensing devices. Regardless of the sophistication of the algorithms and the accuracy of the sensing, if the actuators are not of a high quality then the entire table will fail to function. This section gives an overview of the research and design tradeoffs made to ensure a robust mechanical system. 3.2.3.1 Linear Motion In order to slide the game poles into position to block a shot or aim a strike downfield, the linear motion subsystem must be fast and accurate. There are a number of existing technologies and research endeavors in the area of linear actuation that must be analyzed in order to decide upon the best approach for the FOOSE project. Some research groups and undergraduate senior design students have created automated foosball tables similar to the one described here, which sets a great starting point for the research. After the existing technology used in this field, this section will take a look into different suppliers and options for linear automation. The primary metrics for comparison between options for linear motion will be as follows: Cost Speed Physical Complexity Control System Complexity Option 1) Industrial Linear Actuators The first option for linear actuators is to contact a large company that specializes in industrial linear actuators. This route has been taken by previous engineering design teams with great success [34] [35]. These linear actuators are prefabricated and have the benefit of being professionally designed and tested for industrial applications. 41 A prebuilt linear actuator would contain both the control and the linear motion rails all in a single assembly. The physical motor to move the poles forward and backward would be designed and built specifically for the motion platform. The physical quality of the assembly is a huge concern for this project and therefore this is an enormous benefit provided by this option. Many prebuilt linear actuators also have built-in control boards that handle motor controlling and tight feedback loops for the linear control algorithms. This would potentially put two control systems into one, and give us extra computing power by relieving some stress from the central computing device. Off-board control loop processing such as controller area network (CAN) processors sit on the actuator and take in the feedback from encoders or some other sensor and very quickly calculate a control algorithm to respond to the inputs. Running a control loop on a Linux OS from a general Intel chipset will have a huge amount of overhead between receiving inputs and calculating the required error adjustments for the actuators. During the delay the overhead creates, it is very likely that the old data will be outdated and the control loop‟s adjustments will be less useful. Without the OS and a dedicated processor for these actuators, the control loop input will be the most relevant and the most useful for controlling velocity and position. The primary concern with the industrial linear actuator option is that they are not intended for hobbyist or consumer use. Oftentimes it is difficult to find a quote for price anywhere online, and some distributors expect there to be large purchases in bulk from companies, and not small individual purchases from individuals. Finding a supplier for only 4 actuators can be difficult. Along that same issue is the problem of cost. Linear actuators for industries are usually made with a larger budget in mind than this project‟s. Although some of the choices from this section might be an ideally optimal choice, they may be unrealistic due to cost. Kollmorgen R2A Series This industrial linear actuator has been used in previous projects as a high-quality, extremely robust solution to the linear actuator subsystem [35]. This model comes in three options for movement: Ball screw drive, lead screw drive and belt driven drives. Ball screw is a bit more precise than the lead screw version, but the belt driven drive has the highest speed potential. A huge drawback to this choice is that they are intended for large scale industry use. This puts them well outside of our budget unless a discount is added or hardware is donated to the group. Website: http://www.kollmorgen.com/en-us/products/linear-positioners/rodlesspositioners/r2a-series/ 42 Features and Specifications Max Stroke Length- 72 inches Actuator Type- Ball Screw/Lead Screw/Belt Driven Max Thrust Force- 450/320 N Max Velocity- 30/80 inches per second Physical Complexity- Low. Prefabricated. Control System Complexity- Moderate. Well Documented. Cost- Pending price quote. Likely out of our budget range. Myostat Coolmuscle Linear Actuators The Myostat line of linear actuators was used in the highly successful Akron University Automated Foosball Table [34]. These are extremely well suited to our needs. The CoolMuscle line of actuators comes with an on-board control loop processor to ensure extremely accurate positioning. In addition, the package comes with computer software to help engineers quickly deploy their code to the on-board processor. This system is extremely robust and accurate. If selected, the group would not be required to focus on linear control algorithms quite as much as they would have if a different linear control system were used. The power and speed of the systems certainly helps as well. However, the drawback again comes in on the side of cost. In order to discover the actual price, the senior design group must inquire for a price quote from the company. The Akron University Senior Design team was only able to use this system because they were donated to the team free of charge [34]. If a similar arrangement could be made then this would be a possibility for the project at hand, otherwise this choice is again unlikely. Website: http://www.myostat.ca/coolmuscle# Features and Specifications Max Stroke Length- 511 mm Actuator Type- Lead Screw, Belt Driven Max Thrust Force- 820 N Max Velocity- 500 mm per second Physical Complexity- Low. Prefabricated. Control System Complexity- Moderate. Includes computer software and extensive documentation. Cost- Pending price quote. Likely out of our budget range. 43 ServoCity SDA4-263 Servo City caters to a more hobbyist environment than the previous two sources investigated. This is great in terms of affordability and potential for the project. There could be a concern in quality of the resulting linear actuator. If this product is inaccurate then the entire project would be critically impacted. However even more concerning is the speed of this linear actuator. The stroke speed is very slow compared to previous options analyzed. Although a competitive player could still be programmed with a slower linear actuator response, it would be preferable to have the fastest and more responsive component in this subsystem as possible. Website: http://www.servocity.com/html/560_lbs__thrust_linear_actuato.html Features and Specifications Max Stroke Length- 24 inches Actuator Type- Ball Screw Max Thrust Force- 560 lbs Max Velocity- 2.63 inches per second Physical Complexity- Moderate. No assembly required, however the design of the linear actuator would require modifications to make it work for our needs. Control System Complexity- High. Contains no on board processing. Cost- $399 Option 2) Rack And Pinion A rack and pinion solution to the linear control method would avoid the precisionengineered solutions from the industrial actuators and instead put more assembly responsibility onto the senior design group. This design consists of a strip of jagged material along the path that the linear motion occurs on. To move the pole up and down the stretch, there is a gear drive that latches to the jagged material. This design can be seen in Georgia Tech‟s Senior Design project [36]. This design would likely be the least expensive and give the senior design group the most flexibility for modifications. However, the previous team that experimented with this method noted that for future projects they would recommend a design with more capability for speed. If the rack and pinion moves too fast, then it is more likely to slip and lose accuracy. Likely, the Rack and Pinion will be a prototype design; however, the design must be watched carefully for the issues brought up in Georgia Tech‟s project [36]. 44 McMaster Rack and Pinion Gears If the project group decided upon a Rack and Pinion approach, the most likely option for a supplier would be McMaster-Carr. Their distribution center includes a vast selection of rack and pinion gears and gear racks. They provide all different sizes and qualities ranging from low-pressure plastics to high-quality steel-finished bore gears. These options are extremely bare, without much in the way of bells and whistles. They would require a very large degree of construction from the senior design group in order to get them working. This would be a major concern of the rack and pinion approach. The final hesitation is that the last design project that used rack and pinions as a method of linear motion complained about their unreliability and a lack of speed. This is countered by the extreme simplicity of implementation. It is likely that the rack and pinion method will be prototyped as a potential replacement option. Beyond the Rack and Pinion from McMaster, this option would also require one motor from the list of potential general motors. See the end of section 3.2.3.3 for more information. Website: http://www.mcmaster.com/#rack-and-pinion-gears/=k7iqfk Features and Specifications Max Stroke Length- 4 feet Actuator Type- Rack and Pinion Max Velocity- Dependent on General Motor Selection Physical Complexity- Moderate, but a lot is dependent on having robust hardware to get it work. Control Complexity- High, there is no pre-build control loops to use. All must be hand constructed. Option 3) Chain or Belt Driven System The chain and belt driven subsystem is similar to the rack-and-pinion style linear actuator described in the subsection above. Instead of using gears, which may realistically slip under too much torque, the option is to use a chain or a belt as the linear driving force and relying on a separate structure to guide the motion in a straight line. This style of motion would lack the industrial precision of a prefabricated linear actuator and would put more responsibility on the senior design group to construct a solid mechanical rail. 45 This method would have a moderate simplicity compared to rack and pinion for construction, but it would provide the benefit of having a much lower price than the industrial prefabricated options. There is still the need to construct a rail system with a belt or chain, which is certainly not trivial. However, it would be less likely to slip and would have more accuracy compared to the rack and pinion. Suppliers of the linear rails are many and extremely varied. However, the best solution to finding a monorail mounting would be to visit a local hardware supplier such as The Home Depot or even a big box retailer to purchase adequate-quality sliding rails for this project. Chains and belts can similarly be procured through general stores. 3.2.3.2 Rotational Motion After the linear actuator subsystem has moved the poles into position to block a user‟s shot, the next step is to return the attack by kicking towards their goal. The rotational subsystem is entirely in charge of generating the force for the kick, and also has some responsibility for aiming the kick. This system must be very well in tune with the linear control subsystem in order to time the kick at the same point in time that the linear control is positioned directly in front of the ball. From Section 2.3.3, the requirements for a rotational motor are to be able to hit the ball with approximately the same amount of force as a moderate human hit. The ideal is 13.2 N, but the acceptable will be considered to be between 5N – 10N. These results follow from work done in earlier work [37] where they calculate the amount of force required to hit at a professional level of 10 meters per second. Separate research done by members of this senior design team has instead indicated that for a moderate player, this maximum speed is much closer to 5 meters per second for an average/fast hit. This reduces greatly the force needed to be applied by the motor. The assumption made by the group of senior design students has been verified separately by Akron University‟s 2011 Senior Design group [38]. In their calculations, the amount of torque needed by the system is as low as 0.333 Nm to have an acceptable kick. In the project presented here, the goal will be around 3-5N for a sufficiently powerful low-end motor. The two primary options researched for rotational motors are connecting either a stepper motor, which would have precise control on the motor‟s position, or connecting a standard DC powered motor, which would use limit switches to control the kicking motion. The benefit of a stepper motor would be the extreme control that it would provide over the kicking motion. Stepper motors would get to the positions required quickly and 46 accurately. Depending on the quality of stepper motor, however, it would be possible to lose power due to low torque. The benefit of a standard DC motor would be purely in its simplicity. It would require no more than a relay to turn on and off, and it would only stop by the touch sensor input. The drawback is the lack of control in the kick. Option 1) Stepper Motor Stepper motors are a versatile motor for their speed, power and accuracy. Instead of simply giving a DC signal to the motor, they frequently come integrated with a controller that will guide the position of the shaft to a specific location instead of spinning with no destination. The increased complexity certainly does not come for free, however. The extra precision comes at a cost. On average, the stepper motors tend to cost significantly more. The question becomes whether the extra accuracy is worth the extra investment. The kicking style of the puppets is the deciding factor on this decision. If, in order to kick successfully and accurately, the kick requires extremely precise control over the force imparted to the ball, then a stepper motor would be a valuable choice. The stepper motor would also be useful for slight precise nudging kicks instead of full powered slams. If the strategy selected by the artificial intelligence section requires this style of precision then a stepper motor would probably be a better choice to fulfill it. The main drawback is again the price, but also it is possible that there is less torque from certain stepper motors. These will be key points in the analysis. Sparkfun ROB-09238 Sparkfun is a distributor of hobby-oriented electronic motors and sensors. As a result, this stepper motor is potentially a lower-quality option. The voltage and torque used in operation of this option are both lower than more expensive, more professional options. However, a potential benefit of this option is the chance that it will offer a simpler interface into the rest of the control boards. This particular model has only 4 wires input in order to control it. Two wires in the stepper motor control the power, as signified by the power and ground on the datasheet. These lines only need to be connected up to the power supply to obtain movement. However, to control precisely the position, which is the main point of the stepper motor, the other two wires are used as two phased signals. This works similarly to the pulsewidth modulation (PWM) input style. The two phased inputs must be timed correctly to indicate to the motor what position to rotate to. In order to translate to this signal the options are to purchase an easy stepper translation board from Sparkfun or to create a unique board just for this project. Either option is doable and affordable. 47 Website: https://www.sparkfun.com/products/9238 Features and Specifications Step Angle: 1.8 degrees Input Style: 2 Phase, 4 wire input Voltage Rating: 12 V Current Rating: 0.33A Maximum Torque: 0.016NM Cost: $14.99 McMaster NEMA DC Stepper Motors The option to purchase through McMaster is a very different route. Instead of a hobbyist market, this would be looking at more industrial grade parts. The benefit of this distributor, however, is that they not only distribute in large quantities, but also small quantities as well, for a fair price. This is good for a project like the one proposed here. The NEMA series from McMaster is a small frame stepper motor that comes with a suite of drivers that can move the motor accurately, to within 0.9 degrees per step. These stepper motors also come with an array of choices for model types. The frames come in different sizes, but for each size there are also several different levels of available torque that the motor can output. This is useful because in the specifications, Section 2.3.3, it was determined that an adequate motor for the rotational subsystem should have at least approximately 5 Nm of torque. Website: http://www.mcmaster.com/#stepper-motors/=k7j0xk Features and Specifications Step Angle: 0.9 degrees Input Style: Separate NEMA motor controller required. Depends on motor controller. Voltage Rating: 12-40 VDC Current Rating: 0.6 – 8.0 A Maximum torque: 0.19 – 34.00 in-lbs Cost $86.67 - $653.02 Option 2) Motor with tactile sensor response 48 Another option for the rotational hardware design is the option to use simple, generic DC motors, brushed or brushless, and instead of relying on an onboard processor for the location calculations, there would be two tactile sensors which would sense the limits of motion. In this model the kick would always be full-powered. Instead of a motor controller to control the speed of the movement, and instead of a complicated optical quad encoder control system to limit the position, the entire movement could be controlled by a relay. The relay would have to stop motion once the tactile sensors are pressed, but this is a very simple option. The primary benefit of this option is the simplicity. This would require no complicated control algorithms or sophisticated hardware fabrications. The simplicity is a huge benefit that makes it very likely to be chosen for the final design. Simplicity has its own drawbacks, however. There is very little control between the two touch sensors. This would not allow for delicate nudge-style kicks between players. If the artificial intelligence strategy requires this form of ball control for then this method of rotational actuation would be much less likely. Another benefit of this option would be in the price category. Touch sensors are very cheap and generic motors do not cost very much to acquire. Hobbyists and professionals alike have need for these components so they are available from a number of locations. To see a more in-depth analysis of the generic motors see Section 3.2.3.3 for a tradeoff. Tradeoff 1: Direct Drive vs. Indirect Drive Rotating the control rods has two options for implementation. The generic motor selected could be either connected directly to the pole via some rigid mechanical coupling or the rotational energy can be transmitted through an indirect drive using gears. Figure 3.2.3.2.1 shows a comparison of the two options. The primary consequences of this design decision are in the complexity of design and construction and in the gearing factors which would change the amount of force and torque delivered to the pole. The direct drive could be simpler to construct. Any form of rigid connection could be used to graft the driveshaft of the motor to the control rod to kick. However, if there are any problems with alignment or with kicking a solid unrelenting object, this solid connection is more likely to pop off and need to be replaced. The direct drive also may not have enough torque for the specifications set out in Section 2.3.3. If there is a problem with the torque, then the motor would have to be replaced, as there is no way to increase that in a direct drive method. 49 Figure 3.2.3.2.1: Comparison of Direct Drive vs. Indirect Drive The indirect drive would require a significant amount of hardware precision from the senior design group. If a gear were to be off by just a small degree, the entire setup would likely jam and fail. It would also require a large amount of physical space to set up the gears and the mechanical mounting for the gears. The benefit of the indirect drive, however, is that one can easily tune the torque and power tradeoffs of the motor without changing the physical properties of the motor. Gearing can increase speed for a tradeoff in torque and vice versa. Tradeoff 2: Axial Subsystem Location The entire axial subsystem consists of a single motor and, potentially, two limit switches. There is a choice to either mount the entire subsystem on the linear sliding actuator, or to instead mount the hardware off the actuator and translate the rotation to the control rod through a gearing or hex shaft system. The tradeoff for this option is similar to the tradeoff between direct and indirect drive to the shaft. Inevitably, if an off-actuator rotational location is selected then an indirect drive shaft would be necessary for the other choice. The similarity in the tradeoff is also in that an off-actuator system would be preferable in a system where hardware assembly skill and cost were of no consequence. Having the rotational subsystem off of the linear actuator would reduce the amount of weight required for the linear actuator to move which would assist in both the amount of power needed by the linear actuator and also in the control given by the linear control algorithms. The drawback of the off-actuator system is that it would be much more complicated to construct. Very precise hardware fabrication methods must be used in order to accomplish the off-actuator task. In some designs that use this method, like the one by Hijkoop, [35] precision machining was employed to create the hex-shaft and linear slide that couple perfectly to accomplish this. 50 3.2.3.3 Comparison of General Motor Options In many of the designs discussed in this section, there is a need for a general DC-style motor. In this section, a number of affordable options for general motors are considered. This information will be used to select motors in the design section. General DC Motors come in several varieties, which are identified primarily by their voltage requirements and the output given by that voltage. Another option to select between different DC motors is the option to get brushed or brushless motors. Brushed DC motors are more standard and, as a result, less expensive. The most inexpensive of options would be a low-quality brushed DC motor. Brushless motors, on the other hand, use slightly more complicated technology to remove a physical component in the motor‟s engineering. This can create more precision control of the motor. Depending on the application of the general motor in the architecture of the overall project, different features will be needed. For this section a number of general specifications and features are presented to assist with later decisions. 3-24VDC Motor- General Hobby Motor In this category is the plainest of the plain. Simple 3-24V DC motors from surplus supply stories have no warranties or guarantees on the quality of the motor, but this is the least expensive and most common variety of motor to find sitting around. This is a very likely candidate for prototyping and testing. Features and Specifications RPM o 6VDC- 2950 rpm o 12VDC- 3970 rpm o 24VDC- 8370 rpm Weight: 0.4lbs Torque: Unlisted Cost: $4.95 Sparkfun Servo- Large Full Rotation Sparkfun remains a distributor to investigate, due to their worldwide distribution and very competitive prices. For the rotational general motors they have a few varieties of servos and motors that could have use for the foosball table automation. However, the motors from this website tend to be lower powered than the options from other sources. This could be a problem, depending on the exact application and the availability of gearing. A primary option from this supplier is a standard full-rotation servo. It is extremely standard with a 3 pin PWM input cable and a small drive shaft. More information on the ROB09347 can be found on the distributor‟s website. 51 Website: https://www.sparkfun.com/products/9347 Features and Specifications Operating Voltage: 4.8 – 6.0 VDC Top operating Speed: 60-70 rpm Torque: 4.8 kg-cm Dimensions: 42 x 39.5 x 22.5 mm Weight: 44 g Cost: $13.95 CIM Motor CIM motors are a classic for hobbyists and roboticists. They have a somewhat awkward shape and are larger than other options for actuation; however, they make it up in their speed, power and reliability. A CIM motor can take in general DC voltage with no motor controller or regulator, making it very convenient for use. It is also very resistant to high amperage and burning out when in a stall state. This option is a higher cost than some other generic motors; however, it is still well within the budget proposed for this project. Website: http://www.andymark.com/CIM-motor-FIRST-p/am-0255.htm Features and Specifications Operating Voltage: 12 VDC Top Operating Amps: 2.7 A Top operating Speed: 5,310 rpm Torque: 2.42 Nm Dimensions: 2.5 inch diameter, 4.34 inch long body Weight: 2.82 lbs Cost: $28.00 AndyMark 9015 Series This is another option for a generic motor controller. AndyMark is a company that specializes in motors and controllers for competitive sport robotics. This motor quality is similar to the CIM motor discussed above; however, the difference is that this motor is slightly smaller and has lower power requirements. 52 A huge benefit of the AndyMark-series motors is that they tend to come with preattached and adjustable gearboxes on the shaft. This could help change the speed or torque of the motor to better fit the needs of the rotational or linear actuator system. However, getting the correct gearing ratio is something that must be fine-tuned and carefully designed. This would put pressure on the senior design team to select the correct ratio. Website: http://www.andymark.com/Default.asp Features and Specifications Operating Voltage: 12 VDC Top Operating Amps: 1.2 A Top operating Speed: 16,000 rpm Torque: 428 m-Nm Dimensions: 3.19 inches length Weight: 0.5 lbs Cost: $13.00 3.2.4 Software 3.2.4.1 Table Physics Model Within the CPU/Software side of the project, there must be some concept of the table state. The table state can be defined as the minimum number of variables needed to fully define the physical state of the system being modeled. In this case the system is a game of foosball. So the state can be described in terms of a number of moving components. In foosball there are only two main moving objects, first is the foosball and second are the game poles that the puppets are mounted to. This means that the game state being tracked within the computer during gameplay will consist of 8 rod positions, 8 rod rotations and the x, y position of the ball. In order to be more accurate about the game state it may also be necessary to keep some running tracker of the ball velocity and acceleration. The state of the table cannot be known immediately and consequently the system will require a number of sensors to determine the table state. Due to the controlled nature of the puppets and the rods they are connected to it is very easy to directly measure the rods‟ states. Each rod will be directly connected to a sensor which can directly read the position and rotation of the rod. More information about the sensor subsystem which detects the rod state can be found in section 3.1.2.1. The ball on the other hand is a very different issue. The ball cannot be mechanically measured in the same way the rods can be. The ball is free to move around the table and can only be indirectly sensed. Indirect sensor input is more likely to have large amounts of noise which can disrupt the table state. As a result more research will be devoted to methods of creating a steady table state observer. 53 In a matrix form the ball state can be described as follows: [ ] In the state matrix x and y represent the real x & y coordinates of the ball on the field and u & v represent the x and y velocities of the ball. This matrix will be used in several of the models that follow. In order to play a competitive game of foosball it may be necessary to do more than just keep a running track of the current game state. It would be necessary to be able to project into the future and tell where the ball is going to be when it has moved several seconds into the future. In order to predict in such a way there is a need for some understanding of the physics of the system. In this case there are many ways to create a physics model of the table state to help the AI in predicting the table state. A small amount of research and some derivations for the table states follow. Constant Acceleration Dynamics Model The first simple route of research is into the basic dynamics equations which are taught in school. In this method of state tracking the acceleration, velocity and instantaneous position are used to predict the next in discrete steps. The two main equations used in this method are simple linear relations of those three variables: The velocity required for these equations can be estimated using several contiguous frames of motion. The position would be the previous position observed in the recent image captures. The acceleration of the ball is the extremely tricky part to discern in this particular setup. The ball will have some deceleration related to friction and air resistance when it moves in a straight line with no interruption. However the more important factor of acceleration is going to involve the extreme spikes in acceleration due to collision with the walls or the many puppet obstacles that litter its path through the table. 54 One way to handle this problem would be to write up a simple model that assumes no acceleration and quickly waits to update the velocity whenever a divergence from the expected velocity is measured. This would work in many situations however the problem occurs when the ball is bouncing around rapidly in a short period of time. The velocity calculations may not have enough time to stabilize and create an accurate estimation of the true velocity of the ball. The positive points of this method include that it is extremely simple to implement and grounded in some very solid math. It is difficult to mess up an implementation of this style within the software subsystem, and would likely be completely written extremely quickly. This method would also give a noticeable improvement over the simple instantaneous readings of the ball. Even if it would be slightly inaccurate it would still give a small prediction into the future that the AI could use to line up a block before the ball is there. The primary draw-back, as mentioned already, is that it is probably too naïve of a solution to be really accurate. Highly maneuverable motions like bouncing off of walls and puppets and even the slight curvature of the table floor would throw this model off. Kalman Filter Ball Observer The Kalman Filter is a mathematically derived optimum filter for estimating the motion of linear random variables. What this all means is that the Kalman Observer works to take in a number of different sensors or even sensor reading from different points in time and it will create the best possible estimate of the true position given noise uncertainty. The Kalman Filter is derived from a linear stochastic model that predicts the motion of some observable stochastic variable. Part of the genius comes from using a model that understands some physical property of the system at hand that it can use to predict where the variables should be at in some point in the future. This model that lies at the heart of the Kalman Filter can be the exact same as the static dynamics model that we used before. However the difference now is that his model generates another estimation of the ball‟s position that can be compared to the measured position of the ball from the sensors. A short description of how the Kalman Filter would be used in our project follows. All sensor inputs will be represented as random variables in the normal form. As shown in Figure 3.2.4.1.1, this form will represent the variable as a mean and a variance which represent the predicted value and the confidence of that value respectively. In this figure it can be seen that the variable of the Kalman filter takes the shape of a bell curve. The trick of the Kalman Filter comes from the fact that no matter how uncertain we are with our measurements, we can always increase the confidence with a combination of two different stochastic values. Figure 3.2.4.1.2 demonstrates the geometric interpretation of this fact. In this figure it can be seen that using the combination of different values 55 allows for a new variable with significantly smaller standard deviation. This allows for a higher amount of certainty. Pending Permission from Navtech Seminars & GPS Supply. Figure 3.2.4.1.1: Form of the stochastic variable for the Kalman Filter. Pending Permission from Navtech Seminars & GPS Supply. Figure 3.2.4.1.2- Illustration of Kalman Filter’s combination of stochastic variables. Kalman‟s optimizations can be described by the following set of equations where represents the state matrix described in the introduction and represents the sensor 56 inputs. and are transition matrices from one state to the next discrete state. is the model uncertainty. is the model covariance and is the sensor covariance. is a matrix relating sensor input to actual physical position and is used in the calculation of an innovation factor. Predictor Step (Before Measurement) ̂ Update Step (After Measurement) ( ̂ ̂ ( ) ( ̂ ) ) These discrete update steps will estimate the position of the ball. The A and B matrices will be defined as follows: [ ] [ ] Finally the covariance terms are defined as follows: [ ] [ ] 57 With these equations, the design team could implement a very accurate Kalman Filter which would be able to predict and update the state matrix for the ball‟s position with near optimal results. 3.2.4.2 AI Algorithms While an integral subsystem without much room for error, the artificial intelligence (AI) subsystem is a highly variable part of the FOOSE project. In contrast to components such as the linear actuators, which must simply move one of the control rods along an axis, the AI subsystem has room for an extremely wide variety of styles and methods. At its simplest, the AI algorithm might simply kick the ball towards the opponent‟s goal at every chance it gets. This is akin to the method used by amateur human foosball players, and its extreme simplicity is paired with a reasonable amount of efficacy. Less simple, but more effective (and impressive!) means of running an AI algorithm might involve taking into account the positions of the opponent‟s puppets, or even taking steps to route around them. Such AI methods would be extremely interesting, but would probably exceed the abilities of the hardware in this project‟s price range. Information Taken Into Account Apart from the AI algorithms themselves, it‟s necessary to note that the algorithms could operate with different sets of information. While all of them examine the Table State and output a Move, the Table State could consist of a variable set of objects. Necessary pieces of information are the ball position and heading, and the positions of the robotic player‟s puppets, but less certain to be included are the states of the opponent‟s puppets. While some advanced algorithms require that information, many simple but successful ones do not. For instance, although the Star Kick board is commercially sold and has the hardware to examine the opponent‟s puppets, its AI does not take this information into account when calculating a move [3]. Therefore, when an algorithm takes in the “table state”, it is important to remember that the “table state” could consist of different things. Greedy AI The greedy AI is the aforementioned extremely simple AI. The algorithm for it would read as follows: 1. Acquire ball position and heading from Table State Interpretation 2. Locate nearest controlled puppet to projected location 3. Calculate the distance needed to move the puppet into the path of the ball, kicking if possible. 4. Output calculated move to Rod Control Board of correct rod 5. Repeat constantly based on updated table state The greedy algorithm is represented below in Figure 3.2.4.2.1: 58 Figure 3.2.4.2.1: Greedy Algorithm Representation This method has many advantages over some of the other potential methods. Primarily, it is easy to code. This presents a huge time benefit over other methods. Also, it is reasonably effective. Assuming responsive motors, it is not hard to imagine how dominating even this simple algorithm would be. In independent research among amateur and advanced human foosball players, it was found that most amateur foosball players used essentially this algorithm for deciding shots. However, with slow, human reaction times, this algorithm is easily beaten by advanced players. Since superhumanly fast motors cannot be counted upon as components of this project, it may be necessary to use a more advanced AI to compensate. Pathfinding AI This is the other major type of AI being considered. Unlike the greedy AI, which does not require the opponent‟s puppets‟ positions, this algorithm would require them. It would use a series of steps akin to the following: 1. Acquire ball position, heading and opponent‟s puppet positions from Table State Interpretation 2. Examine the table and find a navigable path around the opponent‟s puppets to the opponent‟s goal 3. Use the nearest puppets to execute the path, moving as needed (for instance, hitting the ball with the side of the puppet rather than simply kicking it) 4. Output the calculated move(s) to the correct Rod Control Board(s) 5. Repeat pathfinding constantly based on updated table state The pathfinding algorithm is represented below in Figure 3.2.4.2.2: 59 Figure 3.2.4.2.1: Pathfinding Algorithm Representation This algorithm is obviously a good deal more complicated than the greedy one, since it is more involved than simply finding and kicking. This involves the more sophisticated method of looking for an open route to the goal, and using intermediate computercontrolled puppets to guide the behavior of the ball and avoid opponent‟s puppets. Even within this algorithm, there is some variability in the information which can be considered. While it may be easier to simply model straight-line paths between computercontrolled puppets in the course of the pathfinding, it may be more useful to take into account bouncing off of the walls, for instance. If the pathfinder were able to use moves that involved bouncing, it would provide a more challenging user experience, which is one of the goals of the FOOSE project. On the other hand, at its most minimalistic, the pathfinding algorithm could denote something like the greedy algorithm, except with the ability to detect whether an opponent‟s puppet will be in the way of a kick. Even this low-level pathfinding AI could be able to improve performance by not essentially handing the ball into the opponent‟s control. Generic Tactical Advantages Despite the rather uninspiring title of this section, there are numerous ways in which the AI‟s performance can be enhanced without directly changing the way it decides what to kick. One of the simplest effective means of performance enhancement is something many human players do, raising and lowering the puppets based on the current position of the ball. This allows the AI to get out of its own way when kicking, and also to prevent the ball from moving too far even if it is not detected in time. Such a system would need to be considered by the AI, although it should be easy enough to implement, since the 60 ball‟s position only needs to be considered in one dimension (raise puppets ahead of it, lower those behind it). It may also help to move the lowered puppets behind the ball constantly. The motors may not enjoy constantly operating, but moving the goalie control rod back and forth is a time-honored human defense strategy, and it makes sense to have the AI do the same thing. Such a strategy would also be relatively easy to code, and should be quite effective for something so simple. Another simple way that the performance can be improved is by moving the control rods together in order to block a larger area in a coordinated fashion. The computer will have a distinct advantage over even a four-armed player in this area, as the computer can consider the positions of all the rods more or less simultaneously. In this way, the computer can prevent easy scoring by the opponent. 3.2.4.3 Linear Control Algorithms Introduction Linear control algorithms are used as an intermediary between the central processor‟s AI subsystem and the actuators‟ movement. In the scope of this project, the purpose of these algorithms is to take the desired position, speed, etc. of the robotic player from the AI and translate that into physical movement of the actuators, which simply take in a voltage signal, usually in the form of pulse-width modulation (PWM) or CAN, or similar communication method. In short, most control algorithms involve moving the puppet in the desired direction, sampling its current position and/or speed, determining how far off the puppet is from the desired location, and then moving again to limit this difference (referred to as the error). Thus, the control algorithms are responsible for getting the puppets where they should be and minimizing the error at which this will occur. Before further discussion, a concise definition list shall be given for the purposes of clarity: Controlled Variable: the controlled variable is the variable that is measured and controlled. It is typically the output of the system and is the variable that has a desired value. Control Signal or Manipulated Variable: the control signal or manipulated variable is the variable that is changed in order to affect the controlled variable and achieve the desired result. Plant: any piece of equipment that performs a function. This includes a heating furnace, chemical reactor, pneumatic pump, etc. System: a system is a combination of components acting together to perform a certain objective. 61 Disturbances: any signal that adversely affects the output of the system. Can also be referred to as noise. Feedback control: feedback control is an operation that reduces the difference between the actual output of a system and the desired output, while in the presence of unpredictable disturbances. Closed-loop control system: a closed loop control system is one where feedback is present. This means that the output of the system has an effect on the control action. Open-loop control system: an open-loop control system is one where feedback is not present. This means that the output of the system is not measured and fed back into the system and thus has no effect on the control action. [39] Summary of Control Algorithm Design The first step of designing a control system is to create a mathematical model of the system (assuming specifications have already been given). This model will relate the controlled variable to the manipulated variable. However, this model will often exclude many nontrivial factors such as loading effects, nonlinearities, noise, etc. Thus the actual performance of the control system will be worse than the predicted performance. However, a well-designed control system will handle these unaccounted variables and still meet the design specifications. The second step of the design process is to analyze the mathematical system and, if necessary, design a proper compensator and adjust its parameters to gain the desired control response. The compensator is responsible for altering the overall behavior of the system to gain the desired result. The final step is to implement the mathematical model in the real world, testing first the open-loop system and then the closed-loop system. In this final step adjustments will have to be made to make up for lost performance due to unaccounted variables. The ultimate goal of designing the control system is to create a system that meets the performance specifications and at the same time works reliably and can be created within an acceptable budget. Methods for Creating a Mathematical Model of the System The most important step of analysis of the control system is creating a reasonable mathematical model. [39]. When creating a mathematical model, the laws of the corresponding field are used (i.e. Newton‟s laws for mechanical systems, Kirchhoff‟s law for electrical systems). The goal when designing a mathematical model is to create the 62 simplest model that still meets the accuracy requirements of the project. This is important because there is an inherent tradeoff between complexity of the model and the accuracy it can obtain. Mathematical modeling method 1: Transfer functions Transfer functions are commonly used to model systems in terms of their outputs and inputs. A transfer function is defined as the Laplace transform of the output of the system divided by the Laplace transform of the input of the system. Or symbolically: ( ) ( ) ( ( ) ) ( ) ( ) The benefit of using the transfer function representation is that dynamic systems, which are usually represented as a series of differential equations, can be modeled in the Laplace domain as a polynomial in terms of the complex variable „s‟. This makes analysis and manipulation much more convenient. The downside to the transfer function model is that they are limited to linear time-invariant differential equation systems, meaning they cannot be used to represent a system that is modeled by a differential equation with a coefficient that is a function of time or a system that has a nonlinear term. Furthermore, transfer function analysis is used for single-input, single-output systems. All of these limit the complexity of the model and thus the amount of accuracy of the control system, but lead to a simpler system that is more convenient to work with. Mathematical modeling method 2: Modeling in State space While the transfer function approach is considered convenient, often it is not possible to model desired systems using this approach. For example, many applications in the real world have multiple inputs and outputs with nonlinear components and time variant terms. Thus a more complex modeling method is required for these types of systems, specifically the state space method. The state space method consists of a series of state-space equations that are made up of input variables, output variables, and state space variables. State space variables are the smallest set of variables that determine the behavior of the system for any given time. With these state-space equations, the state space method is able to model much more complex systems using matrix approaches for analysis and manipulation of the system. For the scope of this project, a transfer function approach will be selected as a proper mathematical modeling technique. This will be done for simplicity purposes and because our system (foosball rod control) can be accurately modeled with linear time-invariant 63 differential equations, with single inputs and single outputs. Thus the rest of the research explained will pertain specifically to transfer function methods and will omit methods of control system design using state space methods. Step 2: Analysis of Mathematical models and design of compensators Method 1: Root Locus In control theory, the transient response of a closed-loop system is related to the location of its closed-loop poles (the zeros of the denominator of the transfer function of the system). Using the root locus method allows for a visual approach to plotting closed-loop poles and determining stability of a system and its response at different gain levels. For example the root locus plot of the function: ( ) ( ) ( ) This plot is shown in Figure 3.2.4.3.1. From this plot, seen in Figure 3.2.4.3.1, many observances can be made. It can be realized that at a certain level of gain (K) the poles of the plot cross the imaginary axis, which will cause the system to become unstable. Also, every point on the lines shown correspond to a transient response that can be achieved just by tuning the gain. However, there are many times when simply altering the gain will not achieve the desired response. For this situation a compensator must be designed, which adds open-loop holes and zeros to the system altering the root locus and forcing the system to obtain a specific desired response. More specifically, adding poles to the open-loop transfer function lessens the stability of the system (pulling the root locus to the right) and slows down the settling of the response. Adding holes, on the other hand, will increase the stability of the system (pulling the root locus to the left) and speeds up the transient response. This is equivalent to adding a derivative control element that incorporates the speed and direction of response in the control (an anticipation aspect of control). 64 Figure 3.2.4.3.1: Root Locus Plot Example The most common compensators, however, are typically lead, lag or lead-lag compensators, which are designed to obtain an exact desired location of dominant poles in the root locus plot. In general, the root locus design approach is quite effective in situations where specifications are explicitly given in terms of time-domain quantities (i.e. damping ratio, maximum overshoot, rise time, etc.). [39] Method 2: Frequency-Response Frequency response analysis and design refers to designing control system by looking at the steady-state response of a sinusoidal input to a system and adjusting the response as necessary. Frequency-response design is advantageous because results can be obtained without explicit mathematical models of a system. One can simply get results from a physical system by inputting a sine wave and observing the resulting output. This is a commonly used method for determining the transfer functions of complicated components experimentally. 65 Another advantage of frequency-response design is that by using Nyquist stability criterion it is possible to determine the stability of the system simply from the response characteristics – again, no mathematical modeling is necessary for this analysis. Furthermore, using frequency response methods allows for design around unwanted noise and many of its design approaches can be extended into some nonlinear control systems. Thus frequency response design becomes quite convenient for designing unknown systems. Furthermore, it is also quite useful when designing systems with high frequency noise. [39] The disadvantage of frequency response design comes from its focus on the steady-state response of the system. This leaves the transient portion of response neglected in the design process; however, there still exist methods to obtain the desired transient response by altering the frequency-response characteristics. An important note to mention is that the frequency response design method and the rootlocus design method are not mutually exclusive. It is possible, and frequently done in the practical world, to use both methods while designing a system. The two methods of design complement each other. When using frequency response approach, the focus of design is on the steady-state requirements (steady-state accuracy, phase margin, gain margin, etc.) and the transient response is understood indirectly from the frequency response. After designing to meet the steady-state requirements, the transient requirements must be tested and, if they are not met, the compensator must be redesigned until these requirements are met (or until they are found to be mutually contradictory). When conducting frequency response design there are two possible approaches: one using polar plots and the other using Bode diagrams (gain vs. frequency diagrams). Bode is typically the preferred method because when the compensator is added a whole new diagram must be plotted for polar plots, but with Bode diagrams the new plot can be added to the original. The common approach to the design on the Bode diagram is the following: 1. Adjust the open-loop gain until the steady-state accuracy requirement is met 2. Plot the magnitude and phase curves of the uncompensated open loop (after openloop gain is adjusted) 3. If the specifications of the phase and gain margins are not met, then a compensator must be added to reshape the curves 4. After the compensator is added, other requirements are tested and are attempted to be met (unless found mutually contradictory) [39] When designing compensators, the most common types include: 66 Lead compensators: o lead compensators focus on improving stability margins by offsetting the phase lag of a system. Lag compensators: o lag compensators focus on improving steady-state performance by offsetting the phase lead of a system. Lead-lag compensators: o for improving both stability and stead-state response, a lead-lag compensator can be added Complex pole compensators: o for complex systems where lead and lag compensators don‟t yield satisfactory results, complex poles can be added as a compensator. Overall, the frequency-response method of control system design can be quite convenient and effective when used to design systems with specific steady-state requirements or in environments with high frequency noise. [39] Method 3: PID Controllers PID controllers are by far the most popular method of control for industrial controllers today. More than 50% of industrial controllers use PID or modified PID methods of control [39]. The reason for this is that PIDs are quite general and can be applied to most control systems. In addition, PID controllers are often the easiest way to handling controlling a plant when a mathematical model is not known or cannot be readily obtained. They work solely through adapting to feedback and can be tuned on-site. Many firms have developed their own methods for tuning PIDs; a few of the more common methods will be discussed in this project. PID controllers consist of three main components: A proportional component (P), an integral component (I) and a derivative component (D). These components are altered through their corresponding weight controlled by variables Kp for proportional control, Ti for integral control, and Td for derivative control. A block diagram of a PID Loop is given for further elaboration, labeled Figure 3.2.4.3.2. This block diagram shown in Figure 3.2.4.3.2 shows the PID controller. The challenge in getting the appropriate response is selecting the correct values of Kp, Ti, and Td, known as PID tuning. Methods of tuning include the Ziegler-Nichols Rules for tuning and the computational optimization approach for tuning and, as stated previously, many more. These two mentioned methods will be the ones discussed in this project. 67 ( ) Plant Figure 3.2.4.3.2: Block Diagram of PID Controller [39] Ziegler-Nichols Rules for Tuning The Ziegler-Nichols method for tuning can be applied for both known and unknown systems by looking at the step response of the system, but are most commonly applied for systems with plants with unknown mathematical models. Thus the Ziegler-Nichols method can be applied experimentally by putting a step response into a system and measuring its response on an oscilloscope. The downside to the Ziegler-Nichols method is that it often creates a system with an inflated maximum overshoot. So after the tuning method is complete, fine tuning must be done to minimize this overshoot. In general, the Ziegler-Nichols method can be used for a quick and readily available method to find educated guesses for parameters. Then fine tuning methods can be applied to complete the tuning process. Taking a look at this tuning process, first one must experimentally determine the step response of the plant. If the plant does not contain integrators nor does it contain complex-conjugate poles, the step response will appear as follows, shown in Figure 3.2.4.3.3. The factors that determine the tuning parameters for the PID loop come from the terms delay time L and time constant T, labeled in the graph. These values are found by drawing a line tangent at the inflection point of the S-shaped curve and tracing it down to where it intersects with the time axis. L is the value between the point time = 0 and the xvalue of the intersection point of the tangent line with the time axis. T is the value between the x-value of the intersection point of the tangent line with the time axis and the x-value of the intersection point with the line c(t) = K. K is the high value of the step function. From the values T and L the tuning parameters Kp, Ti, and Td are found using the following table, Table 3.2.4.3.1. 68 Pending approval from Pearson Education, Inc. Figure 3.2.4.3.3: S-shaped Response Curve Type of Controller Kp Ti Td P 0 PI 0 PID Table 3.2.4.3.1: Tuning Parameter Values From this table, the values of the PID parameters are selected given a reasonable beginning point in the tuning process. However, in many cases, a system will contain complex poles and integrators which will create oscillations in the response. Thus this first method cannot be used for tuning. In this case a second method must be used. The second method consists of setting Ti = ∞ and Td = 0 (proportional control). Then Kp is increased from 0 to a critical value Kcr at which the output begins to show sustained oscillations. The period at this point is also measured and is labeled Pcr. For example, in an electrical system the following graph (Figure 3.2.4.3.4) could occur: 69 Figure 3.2.4.3.4: Sustained oscillation with period T = Pcr This graph shows a system at critical gain Kcr. From this graph we can obtain the period (T). This is the value of Pcr. Using Kcr and Pcr, the following table is used to determine the values of the PID parameters: Type of Controller Kp Ti Td P 0 PI 0 PID Table 3.2.4.3.2: Further Tuning Parameter Values In more complex systems this table is used to determine the starting points for the tuning method. One important reminder is that the Ziegler-Nichols tuning rule is used as a starting point for determining PID parameters. Rarely do these values give the optimal values of the PID compensator. Thus another method must be applied for fine tuning of the PID. For this we look at the computational optimization approach. 70 Computational Optimization Tuning Method This approach uses a computational tool, such as MATLAB to explore within a search space of the PID parameters to find all of the values of the parameters that meet the specifications (e.g. max overshoot less than 10%, settling time lass than x, etc.). Reasonable ranges must be given so unreasonable gains are not found as solutions. Also, this limits the number of possible computations that must be computed. This is why it is valuable to use a coarse tuning method such as the Ziegler-Nichols method to gain an estimation as a starting point and then searching a range around estimated parameter value; if a solution is not found, the range can then be extended. It is important to note that, depending on the specifications, some systems may never give a specific desired response with a standard PID compensator, in this case this approach will yield no solution. Another important decision that must be made when using a computational approach is the step size. As the algorithm tests each value of the parameter, it does so with a finite granularity. The smaller the step size, the finer the granularity and the more computations the algorithm must make. Therefore, the length of acceptable computation time determines the granularity the search algorithm will have when looking for the optimal set of parameters within the given search space. The basic structure of a standard computational optimization tuning algorithm is as follows: 1. Evaluate the closed-loop transfer function at the given parameter value (the value of the parameter is a variable that increments through the function) 2. Determine the step response of the closed-loop transfer function 3. Calculate the values defined in the specifications 4. If the values meet the specifications save the values of the parameters and the values of the specifications 5. Increment the inner most parameter (assuming a nested loop structure) and continue 6. After all possible parameters are found within search space, sort saved parameters by value This algorithm will return a list of possible parameter values that satisfy the specifications. It is then up to the user to determine which trade off must be made to select the optimal values. Another approach is to apply a specific weighted score to each specification based on its importance and aggregate the results into single score for each set of parameters. Then the algorithm will return the highest scoring set, which will be the optimal solution at the given granularity. One downside to this algorithm is if it is searching through a three dimensional search space (one dimension for each parameter value), using a 3rd order nested loop makes 71 searching at any granularity and range very limited because the computation size will increase very rapidly as range and granularity increase. Therefore, if a greater range and granularity is desired, a more intelligent search method must be used, such as a genetic algorithm for exploring the search space. In a genetic algorithm, possible parameters are randomly generated and ranked (similarly to the method used at the end of the aforementioned standard computational approach). The top ranking parameters are saved, the others abandoned, and new parameters are generated from the best using a “copy with error” method. This process is continued until an optimal solution is found. Genetic algorithms have been found to be extremely effective in efficiently exploring large search spaces to obtain optimal parameter values. Another downside of this method is that a mathematical model of this system should be known. Without a model the computer program cannot obtain a closed loop transfer function and step response. So unless these can be found efficiently using automated testing and measuring equipment, a mathematical model is required. Overall, however, the computational optimization approach can be quite useful for fine tuning of PID parameters when the system can be expressed accurately with a mathematical model. [39] Manual Tuning Method The manual tuning method consists of using heuristics to obtain a desired response from a system. This is the most simple and straightforward method for tuning PID loops. Advantages include its simplicity and the fact that a mathematical model is not necessary for this process; one can just simply try a set of parameters, measure the response, and then adjust until the desired response is reached. However, mathematical models can be useful (if they are accurate) to give good starting points. This method works well when systems are relatively simple, or for systems that cannot be tuned using the ZieglerNichols tuning method. In this case, it acts as a good replacement for coarse tuning. The downsides of the manual tuning method is that it can become quite time-consuming if not done correctly. One could spend an eternity testing every possible combination of parameters trying to find the right set. This is work best kept for a computational approach. While manually tuning, only coarse tuning should be done. Additionally, manual tuning is far from optimal even when done very well. Without running through an unreasonable number of parameter combinations, finding an optimal response is not likely. Although this method can be classified as a brute force, or trial and error method, it does not consist of blindly guessing parameters. Many heuristics exist to achieve decent results 72 very quickly and easily. The heuristics are described relative to the parameter of the PID loop. Assuming the PID controller has the following transfer function: A proportional controller (Kp) will reduce the rise time and will improve the steady-state error (though it will never eliminate it). An integral control (Ki) will eliminate the steady state error but will make the transient response worse. And finally, a derivative control (Kd) will increase the stability of a system by reducing the overshoot and improving the transient response. A summary of the effects are in the following table, 3.2.4.3.3: Control Variable (value Increased) Kp Ki Kd Effect on Rise Time Decrease Decrease Small Change Effect Overshoot Increase Increase Decrease on Effect on Settling Time Small Change Increase Decreases Effect on Steady State Error Decrease Eliminate Small Change Table 3.2.4.3.3: Control Variables and Effects [40] From this table, it is possible to quickly and manually tune a PID loop through an iterative process of testing and improving. If the initial test has too much overshoot, then the derivative control can be increased (increase Kd) to reduce the overshoot. This process can be continued until a reasonable response is found. After using a manual tuning method, it is often useful to use a fine tuning method to optimize the response more efficiently. A computational optimizing approach is definitely possible if an accurate mathematical model of the system can be found. Open-Loop Control All of the aforementioned control methods pertain exclusively to closed-loop feedback systems, which are required for most robotics systems, specifically those with DC motors. Alternatively, using stepper motors allows for a different control method. Because stepper motors move in discrete and known increments, open-loop control is possible. One can simple tell the stepper motor to move 200 increments (typically referred to as “clicks”) and that would correspond to a full rotation of the motor (assuming 1.8 degree movement per click, a fairly standard motor design). This allows for significantly cheaper feedback design (no need for expensive quadrature encoders). The downside of open-loop control is the risk of drift error, where the motors slowly lose their accuracy over time. Thus if using this type of control limit switches are 73 recommended so the system can calibrate occasionally. This can be done easily by placing buttons at the mechanical extremes of the system. Summary of control system design methods Below, Table 3.2.4.3.3, contains a summary of the control system design methods discussed in this section. It includes all of the discussed methods for controlling systems: the root locus method, the frequency response method, the PID control method, and the open-loop method. It includes both the advantages and disadvantages of each method to aid in making a decision that best meets this project‟s needs. Control Design Method Root Locus Frequency Response PID Open-Loop Advantages Good for when explicit specifications are given in terms of time domain analysis. Uses a graphical approach to visualize the response. Good for designing transient responses. Good for design with specific steady-state response requirements. Does not need mathematical models. Good for unknown systems. Good for environments with high frequency noise. Disadvantages Accurate Mathematical Model required. Most commonly used in industrial settings. Extremely general, can be applied to almost any control environment. Straightforward design. No mathematical models necessary, but having one is useful for tuning. Very inexpensive. Easy to implement. Having an accurate mathematical model is useful for tuning. Tuning of PID loops takes a lot of time and effort. Only directly focuses on transient response. Can only be used on stepper motors. Vulnerable to drift error. Table 3.2.4.3.4: Summary of control system design methods 74 3.2.5 Other Hardware 3.2.5.1 Foosball Table When selecting a proper foosball table for this project, several factors were considered, including price, sturdiness, quality of rods and bearings, table weight, modularity, quality of the playing field, type of the playing field, and suitability for modification. Price Price was a decisive factor in selecting a foosball table. Given the project‟s tight budget and quality-focused objectives, most of the money would need to be spent on highquality sensors and responsive, accurate motors. The foosball table is a cost that should be minimized while still meeting all of the aforementioned objectives. In the beginning, it was thought that purchasing a new foosball table would be in the project‟s best interest, because it would be the highest quality, require little work to prepare it for modification, and be easy to find and purchase. This, however, quickly revealed itself to be a poor course of action. This was because new foosball tables, at the quality required, can cost anywhere from $500 to $2000 [41]. Given the project‟s budget, this price was prohibitive. So, the only other option was to look for a high-quality used foosball table. Sturdiness Sturdiness was also a crucial factor in selecting a proper foosball table. The table had to be robust enough to be modified, perhaps heavily, without concern for the integrity of the table. It is possible that the design would require drilling into the field to add sensors, so the surface had to be strong. The arms will be computer-controlled, which need to be able to malfunction without causing damage to the table. A strong frame would make this damage less likely. Finally, thick side walls result in a better angle of deflection which is crucial for accurate passing [42]. Accurate, predictable deflection will be important to the performance of the autonomous player. The quality of build materials was also a concern when choosing the foosball table. A table made from cheap plywood would not be able to stand up to energized games in any case. Given all of the transportation and modifications required for the project, high quality materials were going to be a necessity. Research showed that respected brand names of Foosball tables are Tornado, Dynamo, and Tournament Soccer. Quality of Rods and Bearings The table‟s rods are the project‟s interface with the game, so they are clearly a vital factor in the project‟s success. The most important aspects of the rods are their weight and resistance to rotational and longitudinal movement. 75 It is important for the rods to be light enough for the motors to accelerate and decelerate rapidly, but heavy enough to allow for good control. The selected table had a (subjective) comfortable balance between control and ease of acceleration. Resistance is another important aspect of the table that had to be considered. Too much resistance would make mechanically rotating and moving the rods difficult without expensive motors. Furthermore, rusted rods would potentially cause inconsistent resistance and slipping, leading to inaccurate movements disrupting the performance of the autonomous player. Table Weight and Modularity The physical weight and modularity of the table were other concerns during table selection. Weight is important because the table has to be easily transported up and down stairs, fit into the apartment where construction takes place. As nicer tables tend to be heavier, usually around two hundred pounds, [43] it was necessary to strike a balance between sturdiness and transportability. Modularity was also important to consider. Being able to disassemble the table into pieces was essential for portability. The table must be able to be transported by a normal vehicle and fit through regular doors and stairwells. Quality of Playing Field The quality of the playing field is another important factor to consider. A low quality foosball table will have inconsistencies in the field, potentially leading to erratic movement and dead spots, [42] both of which inhibit normal play and disrupt the gaming AI. Type of Playing Field The type of playing field is as important as its quality, given the nature of the project. Generally, there is not much variation in playing fields, with the exception of the two major design types: those with elevated corners and a single goalie, and those with flat corners and three goalies. It was determined that the project required flat corners, so that the entire field is flat. This makes sensing and tracking the ball much simpler, because it is not necessary to work around the curved corners, and the ball stays in a constant plane. This type of playing surface also allows the project to potentially employ means of tracking that would have been impossible with curved corners, such as laser tracking grids. Accessibility for Modification 76 For this project, a table that can be easily modified is crucial. Specifically, the project requires access to the underside of the playing field. Some tables have supports and other materials blocking access to the playing field from underneath. This would cause problems because a potential plan for sensing the ball position uses an array of magnetic sensors drilled into the playing field from underneath. 3.3 Research Summary In conclusion, the research conducted by the FOOSE project team members was allencompassing, and impacted every aspect of the design to follow. To briefly recap each section: Several other teams have created similar automated foosball tables, and this project is informed by their successes, failures and major design decisions While a number of sensor technologies were evaluated for use in this project, the Kinect depth camera came out on top as the most feasible all-around A full x86 computer will be the best central processing solution While several motor controllers have been evaluated, each has advantages and disadvantages Data links will need to be of various kinds, suitable for each application The actuators, one of the most important components of this project, also have too many options to have an obvious choice Some mathematical models have been considered for the table state interpreter, but it remains to be seen which one will work best The greedy AI will at least be the first AI in production on the table, and can be enhanced in several ways The PID loop can be tuned using a variety of techniques The foosball table itself has a lot of ideal qualities to look for All in all, the research summarized here was integral while moving forward in the design phase. 77 4.0 PROJECT HARDWARE AND SOFTWARE DESIGN DETAILS 4.1 Project Overview and Block Diagrams This section is intended to convey, at a high level, the overall structure of the hardware and software subsystems, their interconnections, and their functions. Each of these subsystems will be covered in more detail in the sections to follow. Hardware As seen below in Figure 4.1.1, Hardware Block Diagram, the hardware system of the FOOSE project comprises a number of subsystems. Figure 4.1.1: Hardware Block Diagram In general, the discussion of these systems will follow the logical progression from input to output, which is to say from current table state to executed move. This progression can be easily traced on the block diagram itself. First, somewhat trivially, is the foosball table itself. Nearly all of the hardware components are physically connected to the table, and the current state of the table is needed as an input to the FOOSE system. Second is the camera, the physical manifestation of the optical tracking subsystem. This will be a Microsoft Kinect, chosen for reasons discussed in other sections. This is mounted above the table and observes it, taking a color picture and depth map and outputting them to the computer. The computer, an off-the-shelf x86 desktop, then processes the sensor input, locating the position and heading of the ball. It then calculates the next move and outputs this to the Rod Control Boards. 78 The Rod Control Boards (there is one RCB for each rod, for a total of four) take in the next move from the computer and current position information from the quadrature encoders. They act as an interface between the central processor and the motors, outputting the correct PWM commands to the motor controllers. The actuators themselves take in input from the motor controllers and, indirectly, the RCBs, and are set up so as to physically move the table‟s control rods, thereby outputting the desired move. Attached to the linear actuators are quad encoders, which the RCB uses to calculate the current linear position of the control rod. The outputted move, of course, changes the table state, and the process begins again. Software Focusing on software, the block diagram is a little bit simpler. This can be seen in Figure 4.1.2, Software Block Diagram. Figure 4.1.2: Software Block Diagram The first input to the software system is the visual and/or depth field data from the optical sensor subsystem, which is the Microsoft Kinect. On the hardware level, this information is fed into the computer. From the perspective of software, it is fed to the table state interpretation algorithm. The table state interpretation algorithm will use edge detection and some other means to determine the location of the ball within the sensed table. It will also employ a Kalman 79 filter, which can be used to provide location prediction and velocity information. This information will be fed to the artificial intelligence (AI) subsystem. The AI subsystem (still physically located on the central processing unit) is responsible for generating an appropriate response to the current table state, which, for it, includes both the output of the previous subsystem and feedback on the current puppet positions from the RCBs. It will do this, at least initially, by using a simple greedy algorithm for determining the move (i.e., whenever possible, kick the ball towards the opponent‟s goal). This move will be in the form of a quad encoder position that a certain rod needs to be at. This move gets output to the RCB of the correct rod. Once the RCB receives the move command, it determines which direction the rod needs to move in, and commands the motor to move in that direction until the correct quad encoder value is reached. It may also order a kick or a certain rotational position, according to what commands it has received from the computer. Additionally, it must periodically feed the current position of the rod it controls back to the AI subsystem, so that that system has the most accurate information in order to compute the best move. The software system ends with the embedded programs on the RCBs, from which is outputted direct commands to the motor controllers. 4.2 Sensor Design 4.2.1 Overview The primary sensor chosen for this project is a Kinect, used to sense the table state, including ball position. Secondary sensors include (per control rod) 4 tactile sensors. Kinect The Kinect was chosen because of its cheap depth sensor that could be used to identify the ball based on height level and shape as discussed in Section 3.2.1.1. The Kinect has a viewing angle of 30°, which is within the requirement for camera base sensors as stated in Section 2.3.1. With a viewing angle of 30°, the Kinect must be mounted centered over the table at a height of between 104 and 115 cm, as shown below in figure 4.2.1.1. The Kinect cable is 10 ft. long, just long enough to reach around a mounting structure and attach to a computer mounted under the table. The Kinect requires an AC power supply which is attached to the Kinect at the end of its cable. Because of the requirement for power for the RCBs, motors and computer; an AC power source should be available under the table. 80 Figure 4.2.1.1: Kinect mounting position with minimum and maximum height Rod Position Sensors The motor will be attached to a cam that will perform the kicking action, so the rotation of the puppets will be determined by the mechanics. Only the timing of the kick will need to be able to be tuned, and this is what the radial sensors are for. Because this will only affect timing, the radial sensors are optional. However, pins will exist for them to be attached. It is important to note that each of these sensors, discussed in this section, will occur 4 times in the final product, one set for each of the computer‟s rods. Figure 4.2.1.2: Rotational tactile sensor positioning 81 The linear motion of each rod will be sensed by 2 tactile sensors. Because stepper motors were used, only the extremes of motion require sensors. This is to prevent the steppers from damaging the mechanics (when they push the rod past its extremes) and for calibration. It must be known how many steps exist between the right most and left most motions. Each rod control board must also know its position on the board (lineman/striker/goalie/defender). To this effect, 2 jumpers must be added so that the board can report its position to the computer when asked. The jumpers will use the same format as the tactile sensors: +5v wire and a sense line pulled to ground. 4.2.2 Block Diagrams The following figure, 4.2.2.1, shows the overall connection scheme for the sensors to be used in this project. Note the bottom diagram shown will be replicated 4 times, once for each rod. This diagram includes two components, the optical sensing for the ball tracking and the encoder/tactical sensors for determining the location and angle of the rod/puppets. Figure 4.2.2.1: Diagram of sensors involved in this project 4.3 System Architecture 4.3.1 Overview Main Processor After finishing the research for the central processing unit, it was decided, at least provisionally, to use a full x86 computer, namely the small-form-factor IBM Thinkcentre. 82 The reasons for this were several, and are discussed in more detail in the relevant research section, 3.2.2.1, Main Processor. First, the thread performance of the Thinkcentre is better than that of the other options. This is critical for a time-sensitive, necessarily low-latency device such as this. Second, it is a readily available computer that the members of this group already have access to, so it does not need to be purchased or waited for, and configuration can begin immediately. Third, the members of this group have three of these computers, so in the event of a hardware failure or malfunction, replacement parts will be available instantly without budget impact. This is a major advantage for an experimental project like this one. Last, this computer meets all of the necessary requirements for connectivity; it has the necessary USB ports and serial ports which may need to be used in the completion of this project. Motor Controller After all of the research was conducted, it was decided to use a dual H-bridge for the motor controller of the stepper motors in the actuator subsystem. This decision was made to reduce complexity and cost. A regular off-the-shelf motor controller works slightly differently from a dual H-bridge. Standard motor controllers work like amplifiers that can be fed directly to a DC or AC motor. Stepper motors however need a special signal pattern in order to rotate. Block Diagram of Standard Motor Controller: Low Power PWM from RCB Motor Controller High Power PWM to Motor Power from Power Supply Figure 4.3.1: Motor Controller block diagram The diagram above demonstrates the standard motor controller design. It takes in a lower power PWM from the rod control board which will contain the proper signal to actuate the motors to the correct location. H-bridges however are used to step high voltage signals between different signal stages to create the stepping motion in the stepper motors. 83 This project will require eight motor controllers in total. One motor controller for each automated rod and one for each cam kicker. The control for each rod will work independently and will be synchronized by the CPU. Data Transportation Methods Several data transportation methods were available to communicate between all of the different components of the project. All of the unique connections include: Optical Sensor to CPU CPU to Rod Control Board Rod Control Board to Motor Controller Motor Controllers to Linear Motors Rod Control Board to Relay Relay to Rotational Motor Encoders to Rod Control Board Tactile Sensors to Rod Control Board Each connection had its own communication method decided. All of the connections are labeled in the System Architecture block diagram at the end of this section (4.3.1 System Architecture Block Diagrams). Optical Sensor to CPU The optical sensor to CPU will be communicated by universal serial bus (USB). This is the standard connector for the Microsoft Kinect and allows for easy integration and communication between the camera and the CPU. No additional converters are required to use this camera for the purpose of this project. CPU to Rod Control Board The CPU will communicate to the Rod Control Board (RCB) via USB. This serial communication method will allow multiple communication features required between the CPU and RCB including: Power from the CPU to the RCB to run the board Desired location of the rod from the CPU to the RCB Current location of the rod from the RCB to the CPU Desired kick state from the CPU to the RCB Current kick state from the RCB to the CPU 84 It is important to mention that there will be four rod control boards, one for each rod. Thus, the CPU will communication with each one via USB separately, providing power and information while receiving feedback of current status at the same time. Rod Control Board to Motor Controller The rod control board (RCB) will communicate with the motor controller through a lowpowered pulse width modulation signal (LPPWM). This signal will come from the control algorithm which runs on the RCB. This pulse width modulation will contain the desired information of which direction the motor should spin and at what percentage of the max speed, however this PWM will not contain the necessary power to actually power the motor. Additionally, there are four rod control boards and four motor controllers (one for each rod) so this communication method will be duplicated and each RCB will communicate independently with its corresponding motor controller, in parallel. Motor Controllers to Linear Motors The motor controller will communicate with the linear motors through a high powered pulse width modulation (HPPWM). The signal coming from the RCB does not contain the necessary voltage (12 V) to power the motor, so the motor controller must step this signal up to the proper voltage and power to obtain the desired torque and speed for the motor. Because there are four motor controllers and four linear motors (one for each rod), this communication method will be duplicated and each motor controller will communicate with its corresponding linear motor independently and in parallel. Rod Control Board to Relay The RCB will communicate with the relay through in the simplest manner, a single bit lower power DC signal line (LPDC). The RCB will just communicate a 1 or 0 (the desired kick state, 1 = kick state (puppet held back) and 0 = hold state (puppet held down)). This signal is responsible for controlling the relay which will power the rotational motors for the kicking action. Because there are four RCBs and four relays (one for each rod) this communication method will be duplicated so each RCB will communicate independently with its corresponding relay. Relay to Rotational Motor The Relay will connect to the rotational motors through a simple high power DC line (HPDC). Because the rotational motors do not require speed and position 85 monitoring/control algorithms, they can be operated through a simple wire connection which allows for the motors to spin full speed in one direction or the other. Because there are four relays and four rotational motors (one for each rod), this communication method will be duplicated so each relay will communicate independently with its corresponding rotational motor. Tactile Sensor to Rod Control Board The Tactile sensors must also communicate to the Rod Control Board anytime the puppet is in its extreme state, either full down (kick state 0) or fully up (kick state 1). This will ensure that the rotational motor will not continue to spin while in the stop position, which would cause permanent damage to the motor. Thus to communicate between the tactile sensors and the RCB there will be a simple 2 bit low power DC signal (one for each tactile sensor). Because there are four RCBs and eight tactile sensors, this communication method will be duplicated so each RCB will communicate with its two corresponding tactile sensors (one RCB and two tactile sensors per rod) independently. 4.3.2 Block Diagrams The overall system architecture block diagram is listed below as Figure 4.3.2.1. Figure 4.3.2.1: System Architecture Block Diagram 86 4.4 Actuators The final version of the actuator design takes into account the research from section 3.2.3 and the project requirements from section 2.3.3. This section details all design decisions required for the physical construction of the automated foosball table‟s hardware. This includes the linear and rotational subsystems, the drawer-slider linear motion subsystem, the encoder and tactile sensor mounting, camera and camera cage mounting and the sidetable platform attachment. A rendering of the CAD of the actuator can be seen below in Figure 4.4.1, SolidWorks Rendering of Actuator Design. Figure 4.4.1:SolidWorks Rendering of Actuator Design Each subsystem will be described in detail and then block diagrams showing the location and interactions of that piece in the greater-design will be shown. Any data transfers or necessary power/signal inputs will be discussed in this section. The ultimate goal is for at the conclusion of this section, a reader can reproduce and build the project. 4.4.1 Overview The following design details will be discussed in this section: 87 Linear Subsystem Electronics Rotational Subsystem Electronics Linear Subsystem Mounting Rotational Subsystem Mounting Final Platform Mounting Camera Cage Mounting Linear Subsystem Electronics The linear subsystem controls movement of the rods back and forth to position the puppets in front of the foosball. The electronics of this section include a motor controller and power supply to feed and manipulate the power to the actuator and then finally a motor decision to purchase for the final assembly. The design decided upon for the linear subsystem was a roller based linear slide with drawer slides and a belt attached to the motor. Through many options the final decision for a power supply was to take a standard power unit from a desktop computer and use that DC power to move the motors on the table. This is convenient due to both the low price and the availability of PC power supplies around in the market. It will allow the team to plug the table into a wall outlet and get the power straight from there without more effort from the senior design team. There may be safety concerns with a large power supply like this being used, however with standard safety precautions from the team this should not be an issue. For the motor controller the design called for a robust high-voltage controller which could control a stepper motor. We decided on using a pure H-Bridge for the controller because of the engineering team‟s skill using H-bridges for stepper motor controlling and because other options could not hold up to the necessary amount of current. This motor controller can take 6-28VDC which is perfect for the decision of a PC power supply as the energy supply behind the work. More information on the motor controller decision can be found in section 3.3.1. Finally, the motor to use for the linear subsystem was decided to be the Japan Servo KH56JM2-901 stepper motor. This decision was primarily made due to availability and cost. The stepper motors are available in bulk with a very good price, so they are used for all linear and rotational motions. Rotational Subsystem Electronics The motors connected to the end of the control rods and attached to the platform of the linear subsystems will be used to rotate and kick the foosball. This particular subsystem has the same power supply requirement as the linear subsystem and therefore the same 88 solution. A PC Desktop power supply will be taken as the supply for the motors in this subsystem. This is primarily because it is a price-efficient and readily-available component to supply a constant convenient 12V DC power. The Rotational subsystem has different requirements when it comes to motor controller and motor selections. The motor controller for the rotational subsystem has different needs from the linear subsystem. The linear subsystem requires careful control on the rod‟s position, speed and acceleration. In the kicking case the motor must be able to accelerate unrealistically fast. The motor for the kick is a tradeoff battle between selecting high torque or high speed. A high speed kick obviously would be useful because the ball would potentially be able to get a more professional level speed in a power hit. However on the other side of the coin is the argument for high torque hits. Torque would accelerate the rod faster and potentially be able to impart higher energy on the foosball in a kick. The tradeoff has led the team to seek a unique compromise with the cam kicker, which instead of using motors for the force, uses stored elastic energy. Now the motor only needs enough torque to be able to pull back the spring. Linear Subsystem Mounting Because the linear subsystem was chosen to be a belt-driven rotation there are more mechanical construction decisions to be made by the senior design team. The linear subsystem is built into a piece of plywood with a chain looped around as the source of movement. A sliding rail used in desk drawers is mounted on the plywood as the linear rail to constrain the motion to the area desired. Figure 4.4.1.1 shows an image of the desired subsystem. Notice in Figure 4.4.1.1 that the linear subsystem is mounted straight onto a 25” x 8” piece of plywood which is held up against the side of the foosball table. The sliding rollers are then simply screwed down to the plywood to keep them stable. The desk drawer style roller extends 16” down the plywood to allow for the entire range of movement needed on the longest rod. These rollers are very easy for assembly, especially considering that they are created with consumer construction in mind. 89 Figure 4.4.1.1: Top View of the Actuator, for emphasis on the linear motion. On top of the roller is a single plywood platform. This platform is mounted to the roller in the way that a desk drawer would be mounted, however instead of a desk it is only a small piece of wood mounting. This again, like the slides mounted on the plywood, can simply be screwed down with no need for machining or any more complicated mechanical fabrication. The plywood platform is the home of the rotational subsystem which will be discussed in the next subsection. The final important parts of the linear subsystem to note are the pulley mountings on both sides of the plywood. These rods are used to loop the belt around which then go back around and connect to both sides of the platform on the drawer slider. The effect of this setup is that the platform will move back and forth with the rotation of the 12V motor mounted at the end of the subsystem. Rotational Subsystem Mounting Referring back to Figure 4.4.1.1 on the top of the platform is the rotational subsystem. The mounting decision was to simply place the entire motor on the top of the moving platform to rotate the rods. This decision was made because it is much simpler to construct on a prototype level. The motor in the original design was mounted 1:1 on to the foosball rod to create the kick. In the final version this motor is directly mounted to the spinning cam piece. The cam then pulls back the spring to activate the kick. 90 The tactile sensors can be simply attached to the edge of the platform piece to calibrate the open-loop linear control system. The first iteration of the FOOSE prototype did not include these tactile sensors, but plans were made to add them in future revisions in order to increase cam accuracy for faster kicks. Final Platform Mounting The entire platform is located on a specialized 25” x 8” piece of plywood. In order to mount the plywood there are very strong brackets holding the system up like a shelf. Figure 4.4.1.2 depicts the mounting of the complete subsystem to the side of the foosball table. Figure 4.4.1.2- Side view of mounting. Notice the 8”x 8” bracket for mounting to the foosball table. Camera Cage Mounting The final design decision involves the cage that must be constructed to hold the camera for ball tracking. The camera selected for use is a Microsoft Kinect which is a slightly heavier camera than some other options. This will require a sturdier cage to support the camera with minimal bouncing that would interfere with the camera tracking. The first revision of the FOOSE prototype did not include the Camera Cage mounting because for proof of concept it was easier to mount the Kinect directly to the ceiling. Future revisions would require the camera cage. 91 4.4.2 Block Diagrams Below, in Figure 4.4.2.1, is the blueprint for the rod actuator subsystem. Figure 4.4.2.1: Rod Actuator Subsystem 4.5 Software 4.5.1 Overview This section will only concern software running on the central processing unit. Software running on the Rod Control Board will be detailed in Section 4.6.3, RCB Control Loop. The software subsystem consists of several components. First, accepting input from the Kinect, is the Table State Interpretation (TSI) subsystem. Second, receiving input from TSI, is the Persistence Filter. Next is the AI subsystem. Each of these subsystems has been discussed in detail in Section 3. Each of these algorithms has been programmed using the C# programming language on Microsoft‟s .NET Framework version 4.5. This framework is compatible with many 92 relevant libraries, which will allow programming of the various computer vision algorithms to be much easier. Table State Interpretation The algorithm chosen for the TSI subsystem is as follows, with annotations detailing the rationale for their use. Note that this algorithm is run per frame, and is intended to operate at 30 frames per second on the central processing unit. We have actually achieved 29.7 frames per second. 1. Calibration (if selected) a. Wait an appropriate warm-up period b. Record 300 depth frames, average all these frames directly c. Gaussian blur the result of 1.b d. Save to file 2. Operation a. Load calibration image b. For each frame, off load processing from the N-UI thread to allow new frames to arrive while processing current frame c. Subtract the average image from the current frame, giving a normalized image (this corrects for height discrepancies) d. Run OpenCV (via Emgu) Canny, then circular Hough transform on the table e. Take each result and eliminate if the center pixel is a rod (too high) or is a foot (can trace a path up to a rod where a valid path has minimal depth discrepancies with neighbors) f. Mark each region as valid if returned step 1.e g. Compute the X and Y Sobel convolutions for the entire table h. If region is marked valid, compute derivative as square root of the 2 convolutions i. Run circular Hough accumulator on ball size, subtract from accumulator the small circle at the same position i. This Hough transform is being run directly on the Sobel derivative, not CANNY‟s output ii. Set minimum threshold proportional to max accumulator return 1. Set higher if max accumulator return is too low iii. return candidates above minimum threshold j. For each remaining candidate, find the min and max depth around the edge of the traced circle, if difference between min and max are too high, throw result out k. Calculate real-world position and pass to persistence filter 93 Persistence Filter The persistence filter picks up where the previous algorithm left off, and is intended to reduce the impact of noise by discarding illogical candidate balls. 1. Accept input from TSI subsystem. 2. For each result of the TSI, find a watcher the result could belong to. A ball could belong to a watcher if the new result is near an old one or lies along its projected path a. If could belong to a watcher increment watcher confidence b. If no watcher could be found, add a new one for this result 3. Each watcher updates its physics model given all results and computes position and velocity 4. Remove watchers with low confidence periodically 5. Output watcher with highest confidence to the AI subsystem. Artificial Intelligence The AI subsystem accepts input from the persistence filter, and generates and outputs an appropriate move to each RCB. Initialization: 1. Test each of the computer‟s COM ports to determine which ones represent RCBs. 2. Query each located RCB for its rod number and maximum range (determined during RCB calibration). Store both of these values. Operation: 1. Accept ball‟s current position from the Persistence Filter. 2. For each rod, do the appropriate rule of the following three to determine linear movement a. If the ball is behind the rod, center the rod. This helps the rod be ready for future ball states. b. If the ball is in front of the rod, but moving slowly or away from the rod, line up with the ball at its current position. This prepares for the opponent suddenly kicking the ball at the computer. c. If the ball is moving towards the rod at a high speed, project the ball‟s path along a line and align the rod with it. 3. For each rod, project the ball‟s position out 0.25s in the future. If the ball will be within a threshold range of the rod at that time, send the command to kick. 94 4. The complete move has now been determined. If it has been too soon since the previous move was sent to the RCB, discard this move. This reduces jitter and increases performance. 5. Calculate the current linear movement threshold value. The threshold value shrinks with time and the ball‟s distance from the rod. If the move is smaller than the threshold value, discard the move. This is an additional jitter reduction measure. 6. Send the moves to the RCBs. 4.5.2 Block Diagrams Below, in Figure 4.5.2.1, is the class diagram for the FOOSE project software system. Figure 4.5.2.1: Software Class Diagram 4.6 Rod Control Board 4.6.1 Overview Each rod has an array of sensors and motors to control its motion. To integrate all of this it was decided that a rod control board or RCB would be designed and used for each rod. This minimized the amount of design work that had to be done, because 1 board would be printed 4 times and attached to the sensor for each board. It also minimizes the prototyping costs because it reduces the chance of an error by reducing the overall complexity of the board. Using a board for each rod also has the advantage of being more robust, because only the control of a single rod will be lost if a board malfunctions. This also simplifies the software interactions on the board because only one set of signals from each of the sensors must be processed. Board I/O 95 Each rod on the table has 2 stepper motors and 2 tactile sensors. Linear and radial motion are treated separately and thus each have their own stepper motor and sensor set. The linear motion has a stepper motor and 2 tactile sensors to sense when it is at positional extremes, while the radial motion is controlled by a stepper motor on a cam and could have 2 optional tactile sensors that determine what position the cam is in. The linear motion of the rod is controlled by a stepper motor with 2 tactile sensors for configuration and dynamic calibration. The 2 sensors are placed at the extreme linear positions of the rod and prevent the motors from going beyond their range of motion, as well as allow the board to calibrate, or determine the number of steps between far right and far left. It will also allow the board to correct for missed steps. The board is able to tell when it runs into a button inadvertently, and then reset the known position to that of the button. When the computer tells the RCB to go to an extreme and it does not hit that button it will also know to continue until it hits the button. This is the dynamic calibration feature. Using dynamic calibration, the RCB will be able to maintain accuracy while playing the game, avoiding the need for resetting and recalibrating the table during play. The board also needs 2 pins for jumpers to configure the rod number. This is required because each board would otherwise be identical and the computer would be unable to tell which board controlled which rod. The kicking motion will be controlled by a stepper motor as well. However the motor is not directly attached to the rod. This motor will instead rotate a cam that will charge and release a spring that will perform the kick motion. One complete rotation will cause a kick, regardless of where the cam is in its rotation cycle. Only the timing of the kick will be affected. Due to this, the 2 tactile sensors for the kick motor are optional; however, there are sensor pins on the board to attach them. Each rod will have 2 tactile sensors to determine which of the 2 states (if any) the rod is in. The tactile sensors are “forward” and “up” which will be depressed when the rod is in the “blocking” or “up” positions, respectively. If one of the buttons is not depressed, or the wrong button is depressed; the rod control board will activate low power mode and drive the rod to the desired position. The procedure for kicking a ball will be to drive the motor full reverse until the “up” tactile sensor is activated. The drive will then change to “full forward” until the “forward” tactile sensor is activated, at which time the motor state will be changed to the ”off” state. This means there are very similar requirements for the various functions of the RCB; 6 analog sense pins that are pulled low normally and shorted to +5v when active. These 6 pins are sufficient for the 2 sets of 2 tactile sensors and 2 jumpers needed for configuration. 96 Given the above information on sensors and drivers the rod control board must communicate with and control, the I/O diagram for the rod control is given in figure 4.6.1.1, below. Figure 4.6.1.1: Rod control board external inputs and outputs. 4.6.2 Schematics and Layout The board can be broken down into the design for each of its subsystems: USB interface, Analog Sensors, Stepper Motor Drivers and power supply. The design of each of these systems will be addressed independently and then integrated. USB Interface The rod control board must be able to communicate over USB to the control computer. USB was chosen because of the quantity of RCBs (four). Serial is out of the question due to common computers today having 0, 1 or at most 2 serial ports. A daisy chain serial connection was possible, but dismissed because of the desire to have independent RCBs 97 for robustness. This project attempts to minimize cost, and to that effect a microcontroller with integrated USB would reduce cost. We decided to go with the AVR ATMega32U4, because it was the cheapest chip with USB integrated. As a bonus, it also had the ability to be programmed with the Arduino IDE. This section of the chip was taken from a reference circuit, and was fairly straight forward. Our design is below in Figure 4.6.2.1. Figure 4.6.2.1: Basic hookup of AVR ATMega32U4 and the beginning of the RCB schematic. In order to function correctly, the reset line was hooked up along with ground and power. Pin 33 was hooked up to a button with configurable resistor values that can hold the button high or low by default. Pin 33 is the boot loader load pin. When configured correctly, the USB startup sequence can be avoided, and 10 seconds can be saved on microcontroller startup. Buffer capacitors and LEDs were added to condition the power line and indicate its status. A 16 MHz crystal was chosen because it is the fastest speed this controller can run at. It was found that an isolation ferrite bead was necessary for the circuit because a previous test had shown that inductive loads of the motor in combination with the clock edge could cause the 5V supply voltage to drop below 1.9V and the processor would occasionally enter brown out mode. The addition of the ferrite bead has completely eliminated the brown outs. 98 The processor needed pins exposed for its programming; luckily, we have enough spare pins to dedicate these pins to the programmer. Isolating the programmer completely avoided potential problems with high power lines damaging a programmer while the motors are plugged in. Because using the Arduino boot loader was possible, LEDs were attached to the TX/RX indicator pins, to show when serial data was being sent over USB. The attachment of the programmer and LEDs is displayed in Figure 4.6.2.2, below. Figure 4.6.2.2: Hookup of AVR ATMega32U4 programmer and TX/RX lights. Analog Sensors The analog sensors support the 2 tactile sensors for the linear motion, the 2 optional tactile sensors for the rotational motion and 2 jumpers to configure the RCB position. They all follow the same design, simplifying the overall design and allowing backups if one or more sensor lines do not work. The first side of each sensor is a direct connection to +5V, the second side is connected to one of the 14 ADCs on our microcontroller. Pins 36-41 were selected because they lay on the same side of the chip and would allow a simplified layout and thus a smaller and more compact design. Each sense line is also pulled low through a 1M Ohm resistor, although given a second revision this should be changed to 100K Ohm, because it was noticed that with a 1M Ohm resistor the static would cause the line to register logic high for greater than 10ms after the connection to +5V was broken. This was corrected for by using the ADC to sense when the line was below 3V rather than the logic 0.8V level. A green LED was added to each line in series with a 750 Ohm resistor to indicate when the connection was active. These LEDs are not necessary on a tight budget but were beneficial for debugging connections. The final schematic for the analog sensors is shown below in figure 4.6.2.3. 99 Figure 4.6.2.3: Analog Sensor schematic. Stepper Motor Drivers Both the radial and linear motors are Japan Servo stepper motors, and for the purpose of RCB design may be treated as identical. The L298 was selected as the driver for each motor. The L298 is a dual H-bridge ideal for stepper motors like ours due to their high current demands. The DRV8825 from TI was the first selected driver; however, through testing it was unable to attain the rated current stated in its datasheet, and thus was abandoned. Due to heat dissipation issues we decided to allow room on the PCB for large heat sinks to be attached to the drivers. The L298 is able to supply 4A, at up to 42V; however, we are using 12V to drive the motors, keeping in mind that our motors are only rated for 24V operation. We followed a reference design from the manufacturer, but left out 2 important components. The first were the voltage protection diodes, to compensate for the inductive load. These were however not needed because we were using 12V, significantly smaller than the rated voltage of 42V for the drivers. The second is a large current sense resistor. The resistors in the design need to be able to dissipate 2W of power each, the resistor we chose were surface mount and only able to dissipate 1/10W. It was discovered by using a tuned timing pattern from the microcontroller we could cut this power requirement to 1/8W, sufficiently small not to damage the resistors or traces leading to them. This timing pattern was also found to have better performance on the stepper motors. For this 100 prototype, we permanently fixed the issue by soldering 8W resistors between the appropriate nets on the boards. CL2 and CL3 are 470 uF 25V surface mount capacitors necessary to buffer the motor supply voltage. If the RCB was given another prototyping revision, the following changes would be made: 1. Screw holes would be increased from M5 to M6 (a more standard screw size) 2. An increase of .14 mm between the left 2 and right 2 holes for the screw terminals 3. Higher wattage current sense resistors, including increased trace width to the resistors. The correct value is 0.5 Ohm 2-8W. 4. Add Shockley Diodes to motor output lines to dump voltages if above Vss or below Gnd 5. Expose pins 20 and 21, the serial TX/RX lines (perhaps useful for other designs) 6. Config button should be ground -> 5v when pressed, allowing R15 and R5 to be removed 7. Add screw terminals to +12V line and ground, allowing +12V to be supplied from another source. All components on +12V line are rated for up to +24V, increased voltage can yield better motor performance. 8. Tie all Enable lines to the same digital pin, freeing 3 new digital lines. 9. Expose SDA/SCL for optional real time clock, useful when operating when disconnected from a computer. 10. Expose all extra ADC pins as additional analog sensors, would allow more pins for use with radial quad encoder. 11. Remove JP6/7/8/9 these were here to allow prototyping different values of the current sense resistors. The correct value is 0.5 Ohm 2-8W. Critical, Suggested, Optional The design that was used for the H-Bridges in this project is displayed on the next page in Figure 4.6.2.4. Note that all lines leaving the left are directly connected to the microcontroller, 1 pin each. 101 Figure 4.6.2.4: Depiction of Dual-H Bridge connections 102 Power System- The power is provided by Molex from a standard computer power supply. The supply provides +5V which is used by the microcontroller and H-Bridge logic, as well as +12V which is used to driver the stepper motors. Layout We decided to use SMD components where possible to reduce the size of the board, which also reduced the cost of printing the board. We used BatchPCB.com to print the boards, because they charge per sq. in., so the smaller the board was, the cheaper it would be to print. We used vertical USB and Molex connectors because they more firmly attach to the PCB, reducing the chance of accidentally removing the connector when unplugging a connection. We used through hole components for the external jumpers because we already had header pins and screw terminals that matched up with through hole mounts. In addition the L298 was only available in a through-hole, Multiwatt 15 package. Care was taken to allow space for the large heat sinks to be attached to the HBridges. We also made sure to increase the trace width on all traces that would be handling more than 50 mA. Special care was also taken on the layout of the “Highcurrent” loop in the microcontroller, by placing the buffer capacitors as close as possible to the two voltage supply pins. Figure 4.6.2.5: RCB Layout 103 Figure 4.6.2.6: RCB Schematic 104 4.6.3 RCB Control Loop Control Design Method Upon researching many different methods to design a control system for the actuators the open-loop control was the best method. This was due to using stepper motors in the design, which made control less expensive in both a monetary and time-cost manner. Calibration Calibration is quite important for an open-loop control system so the following calibration was used to ensure accurate movements: Initial calibration Runtime calibration The initial calibration of the system begins when the RCBs are powered. The microcontroller will tell the motors to continue to spin until they hit one of the limit switches, signifying that the rod is at its maximum range. Once one limit is found, the motors will reverse direction and continue until the other limit is found. Once completed, the system will know the full range of the rod (different for each one, and sent serially to the CPU). This calibration also ensures that the motors begin at a zero point, with no error. The runtime calibration is to ensure that the motors do not lose too much accuracy while the game is running. This calibration has two components. In the first, if the motors are told to move beyond their mechanical limit, they will hit the limit switch and reset the current position to the correct point (either position zero or position maximum range). The second component is the converse, when the motor is told to spin to its maximum range and doesn‟t hit the limit switch. In this case the motor will be told to continue stepping until the limit switch is pressed. This will ensure accuracy in the case of skipping steps in either direction. 5.0 DESIGN SUMMARY OF HARDWARE AND SOFTWARE 5.1 Hardware Summary The summary of hardware includes the following design topics: Sensors System Architecture Actuators 105 Rod Control Board Sensors This project consists of two main components that must be known in order to operate: the location of the ball and the position of the automated opponent‟s rods in both the linear and rotational dimensions. For detecting the ball, the camera is the Microsoft Kinect. For the linear position of the automated opponent‟s rod, two tactile sensors are used for calibration (Skycraft Button SK4843). For the rotational position of the automated opponent‟s rod, two similar tactile sensors could be used, but were not implemented in the final project. System Architecture The system architecture consists of main processing unit, the motor controller, and the data transportation methods. The main processing unit will be an off the shelf CPU. The motor controller will be the L298N dual H-bridge. The data transportation methods will be USB to communicate to peripheral devices from the CPU. Actuators The actuators consist of a motor for rotation (kicking) and a motor to drive the linear motion of the rod via a timing pulley. The motor for rotation will be the Japan Servo stepper motor connected to a cam spring system to create the kick. The motor for the linear motion will also be a Japan Servo stepper motor and it will connect directly to the pulley that moves the slider. Rod Control Board The rod control board has been custom-designed to best fit the project‟s needs. It acts as an interface between the CPU and peripheral devices, such as sensors, motor controllers, and external relays. The schematic of the rod control board can be seen above in figure 4.6.2.6. 5.2 Software Summary The software is divided into the following sections Microcontroller code (RCB) o Interface Format o Motion Control o Calibration Main processing o Table state interpreter 106 o Persistence filter o AI Microcontroller Code Interface Format The interface format between the computer and microcontroller is done over a virtual serial port via a physical USB connection. The computer sends packets 3 bytes at a time. The first 2 bytes are the desired linear position of the rod in steps. The 3rd byte is a control byte that can perform the following actions: request rod ID (number given by jumpers), request range (in steps), request recalibration then send range, and kick. 0x00 is used when no code is needed. When the rod ID is requested, the microcontroller will send back the 2 bit ID number as 1 byte. When request range is sent, the controller will return a 2 byte packet with the range of the rod. When recalibration is requested, the controller will command the motor to move to extremes and record the resultant steps and send them back to the computer when done. In all the above actions, the desired location of the rod will be ignored. When a kick command is sent, if the rod is not in the process of kicking it will begin a kick. Kicks will not be queued. The position bytes will be accepted and the rod will continue moving to the correct position. If the control byte is null, then the desired position will be set and processed. Because commands sent from the controller to the computer have different lengths, the upper nibble of each type of response is tagged with a unique 4 bit combination to identify the type of data to follow. Motion Control A simple algorithm is able to be used because stepper motors are being used for all motion. For each of our motors, 200 steps is 1 full rotation. To control the motion we use an infinite running loop that checks the desired position vs current position or the “error”, and attempts to move the motor in the direction necessary to reduce this error, only causing the H-Bridge to step at the appropriate time. A simple linear ramping is used to stop/start motion of the motor. It was found that around 10 ramping steps were necessary to accelerate/decelerate the rod from its max speed without skipping. The ramp size and speed was tuned per rod, accounting for differences in friction between rods. Each rod was tuned to be slightly faster than the fastest speed without skipping, this induced error in the position of the rod; however, the improved performance outweighed the loss of accuracy. This error was mitigated by dynamic calibration. 107 A kick motion was performed by telling the kick motor to perform approximately 200 steps, or one complete rotation, this was again tuned per rod because each cam had a slightly different friction profile and would cause the motor to skip a different number of steps on each rod. Values between 203 and 204 were used for each rod; it was found experimentally that this best approximated 1 full rotation. Calibration The linear motion must be precise and thus the RCBs must calibrate themselves. This is done by 2 methods: startup calibration, and runtime or dynamic calibration. During startup the motors are pushed until they hit the buttons on each end of the rod, this sets the far left and far right position of linear motion. The motors are run at a slower speed so that skipping does not happen. Once this is complete, the system knows the number of steps between each end of the rod. Runtime calibration happens while in use; whenever the rod runs into one of its sensor buttons it knows its position is the one that corresponds to that button. Whenever the rod is told to go to an extreme, and does not push the corresponding button, it resets its known position to the middle, adding to the known error and thus fixing physical positioning error. Using runtime calibration, the position of the puppets remain accurate to within a few mm throughout playing a game. Main Processing The majority of the processing for this project will take place on a general purpose PC, all of this code will be written in the .NET 4.5 framework. The code will be divided into three main modules, table state interpreter, persistence filter and AI. Table State Interpreter The TSI is broken out into the following steps 1. Calibration (if selected) a. Wait an appropriate warm-up period b. Record 300 depth frames, average all these frames directly c. Gaussian blur the result of 1.b d. Save to file 2. Operation a. Load calibration image b. For each frame, off load processing from the N-UI thread to allow new frames to arrive while processing current frame 108 c. Subtract the average image from the current frame, giving a normalized image (this corrects for height discrepancies) d. Run OpenCV (via Emgu) Canny, then circular Hough transform on the table e. Take each result and eliminate if the center pixel is a rod (too high) or is a foot (can trace a path up to a rod where a valid path has minimal depth discrepancies with neighbors) f. Mark each region as valid if returned step 1.e g. Compute the X and Y Sobel convolutions for the entire table h. If region is marked valid, compute derivative as square root of the 2 convolutions i. Run circular Hough accumulator on ball size, subtract from accumulator the small circle at the same position i. This Hough transform is being run directly on the Sobel derivative, not Canny‟s output ii. Set minimum threshold proportional to max accumulator return 1. Set higher if max accumulator return is too low iii. return candidates above minimum threshold j. For each remaining candidate, find the min and max depth around the edge of the traced circle, if difference between min and max are too high, throw result out k. Calculate real-world position and pass to persistence filter Persistence Filter The persistence filter picks up where the previous algorithm left off, and is intended to reduce the impact of noise by discarding illogical candidate balls. 1. Accept input from TSI subsystem. 2. For each result of the TSI, find a watcher the result could belong to. A ball could belong to a watcher if the new result is near an old one or lies along its projected path a. If could belong to a watcher, increment watcher confidence b. If no watcher could be found, add a new one for this result 3. Each watcher updates its physics model given all results and computes position and velocity 4. Remove watchers with low confidence periodically 5. Output watcher with highest confidence to the AI subsystem. AI 109 The AI subsystem accepts input from the persistence filter, and generates and outputs an appropriate move to each RCB. Initialization: 1. Test each of the computer‟s COM ports to determine which ones represent RCBs. 2. Query each located RCB for its rod number and maximum range (determined during RCB calibration). Store both of these values. Operation: 1. Accept ball‟s current position from the Persistence Filter. 2. For each rod, do the appropriate rule of the following three to determine linear movement a. If the ball is behind the rod, center the rod. This helps the rod be ready for future ball states. b. If the ball is in front of the rod, but moving slowly or away from the rod, line up with the ball at its current position. This prepares for the opponent suddenly kicking the ball at the computer. c. If the ball is moving towards the rod at a high speed, project the ball‟s path along a line and align the rod with it. 3. For each rod, project the ball‟s position out 0.25s in the future. If the ball will be within a threshold range of the rod at that time, send the command to kick. 4. The complete move has now been determined. If it has been too soon since the previous move was sent to the RCB, discard this move. This reduces jitter and increases performance. 5. Calculate the current linear movement threshold value. The threshold value shrinks with time and the ball‟s distance from the rod. If the move is smaller than the threshold value, discard the move. This is an additional jitter reduction measure. 6. Send the moves to the RCBs. 110 Figure 5.2.1: Class Diagram 111 6.0 PROJECT PROTOTYPE CONSTRUCTION AND CODING 6.1 Parts Acquisition 6.1.1 Foosball Table The foosball table itself is certainly one of the most important physical components of the project. It is the platform on which everything else is built. The requirements for the table have been discussed point-by-point in Section 2.3.5 Table, and the research has been reported in Section 3.2.5.1. Craigslist was selected as both a market survey and the easiest way to find a locallyobtainable used table. Looking into the used market allowed for, compared to buying a new table, dramatically lower prices, options for negotiation, and the ability to thoroughly inspect the table before purchasing it (in contrast to purchasing from an online retailer). After shifting focus to the online market, a very high quality Tornado-brand table was located and selected for investigation. Though listed online at $60, the price was negotiated down to only $40. The downside to this purchase was that this table had spent a significant amount of time outside (in a screened-in porch) by a pool, which led to a great deal of rust forming on the rods. With the thick layers of rust, extensive cleaning and lubrication was required before the table would be suitable for modification and use in this project. Overall, the price goal of $60 was met, while still meeting all of the other table specifications. The purchased table is a nationally-recognized Tornado brand, and a very well built tournament-grade model at that. That indicated (and testing confirmed) that the table would be sturdy and well-built enough to meet the project‟s needs. The selected table does not use bearings to mitigate friction, but rather has plastic guide holes for the rods to slide through. This proved to be sufficient for this project. On purchase, there was significant rust on the table‟s rods from having been left exposed to the elements. However, after a thorough cleaning process which included removing the rust from the rods and applying a silicone lubricant, the rods proved to meet the necessary specifications of low rotational and longitudinal drag. The selected table is light enough to carry up a flight of stairs, but heavy enough to provide a steady playing field to an energetic game of foosball. It is important that the table remain relatively steady under normal operation, as shaking would result in the ball 112 rolling faster or slower than expected and thus making the kinematic algorithms less accurate. The purchased table has easily removable legs which dramatically improve its transportability. Upon purchasing the table it was examined and playtested for inconsistencies to ensure that it was suitable for normal use. Being a tournament quality table, it easily met all of the project‟s playing field needs. The selected table has flat corners, which enables the consideration of alternate ball tracking mechanisms, such as LED grids or laser trackers. The purchased table has a field easily accessible from both sides, which will greatly aid modification, regardless of the final design. 6.1.2 Other Parts Most parts needed for assembly of this project were acquired over the course of the Spring 2013 semester. This section discusses how these parts were obtained, organized at a subsystem level. Each subsection will discuss the parts specified in the Bill of Materials and how they were acquired. Mechanical System Parts Acquisition The mechanical system is made up of both the electronic hardware that will physically move the control rods and the mounting hardware which will hold everything together. The mounting hardware is entirely made up of things that can be purchased off-the-shelf from a local hardware store, and these components were primarily acquired from Home Depot. The electronics are more difficult and occasionally required specialized ordering. Skycraft proved to be an excellent source for some of the difficult-to-find components the project wound up requiring. The buttons used in calibration, and the large resistors both came from Skycraft, and suited the project‟s needs perfectly. Online, a valuable source was Ebay. The stepper motors used in the project were found on Ebay for a fraction (specifically, about a tenth) of their normal price, and this allowed all of the motor needs of the project to be filled by one model, which simplified the circuitry and wiring involved. 113 Electronics System Parts Acquisition The electronics system is made up of the processors and wiring that goes between the RCB, camera and central processor. Also included in this section are the sensors that will be needed to create the table state estimation. The common distributors for this area that the research group has looked into includes Sparkfun Electronics, ServoCity, McMaster, AndyMark, US Digital and some local distributors like Skycraft and used parts from Amazon or Ebay. The primary deciding factor in the acquisition decision is the price, since it has been decided that used parts will be acceptable for this prototype setup. Luckily a number of the electronic parts have been donated or are already owned by the group. These electronics will not be included in the acquisition plan. A summary is in Table 6.2.2. RCB Parts Acquisition The custom made PCB for this project, called the Rod Control Board (RCB), will require a number of subcomponents that will be soldered to a printed silicon board that will be ordered from 4PCB with a student discount to make it within the budget of the project. The board will be designed using the Eagle software before sent to 4PCB. The board is made up of 26 separate types of components which will all be soldered to the board. The 26 parts can be seen in the bill of material and will all be acquired through Sparkfun during the first week of the Spring Semester so that breadboard based prototyping may begin quickly. 6.2 BOM Below is the Bill of Materials for the project. The first table is the BOM for only the RCB parts, and the table after that considers everything except the RCB. 114 Part RCB v2 Printing 10uF Capacitors 1kOhm Resistors 120 Ohm Ferrite Chip 1mOhm Resistors 470uF Capacitors 750 Ohm Resistors L298N H-Bridges L298N Heatsinks ATMega32U4 Microcontroller Molex Connectors USB Female Type B Connector SMD Push-button switch SMD LEDs- Green SMD LEDs- Red 16MHz Oscillator Crystal SMD LEDs- Blue High-watt Resistors Jumper Wires 0.1uF Capacitors 18pF Capacitors 22Ohm resistor Male Headers 100kOhm Resistors Supplier Price per unit # Cost BatchPCB $25.11 1 $25.11 DigiKey $0.15 16 $2.41 DigiKey $0.02 20 $0.46 DigiKey $0.06 4 $0.24 DigiKey $0.02 32 $0.73 DigiKey $0.55 12 $6.60 DigiKey $0.02 28 $0.64 SparkFun $2.66 8 $21.28 SparkFun $3.95 8 $31.60 SparkFun $6.95 4 $27.80 SparkFun $0.86 4 $3.44 SparkFun $0.86 4 $3.44 SparkFun $0.86 8 $6.88 SparkFun $4.95 28 $138.60 SparkFun $5.95 8 $47.60 SparkFun $0.95 4 $3.80 SparkFun $14.95 4 $59.80 Skycraft $1.00 20 $20.00 SparkFun $24.95 1 $24.95 DigiKey $0.01 12 $0.13 DigiKey $0.01 8 $0.09 DigiKey $0.03 8 $0.20 SparkFun $1.35 4 $5.40 DigiKey $0.04 4 $0.17 Total: $431.38 Table 6.2.1: Bill of Materials- Rod Control Board Some necessary items are excluded from these tables, and these should be noted: first, a computer is required to run the software. This computer should conform to the specifications set forth in Section 2.3.2.1, Central Processing Unit Requirements and Specifications. The computer must connect to each RCB over USB, so four standard A to B USB cables are required as well. 115 Part Supplier Foosball Table KH56JM2B004 Stepper Motors 20-teeth 1/4" Pulley 14-teeth 1/4" Pulley 320MXL Timing Belt 270MXL Timing Belt 1-1/4" Shoulder Screws 1" Shoulder Screws 3/8" Titanium Hex Nuts 1/4" Washers 1/4" Hex Bolts 1/4" Hex Nuts Wood Glue Toggle Switch Covers Double Toggle Switches Switches Plastic Standoffs Shelf Brackets Plywood 2' x 4' Cable Clips 4" Cable Ties Logisys 480W PSU Microsoft Kinect Private Seller Ebay McMaster-Carr McMaster-Carr McMaster-Carr McMaster-Carr McMaster-Carr McMaster-Carr McMaster-Carr McMaster-Carr McMaster-Carr McMaster-Carr Home Depot Skycraft Skycraft Skycraft Skycraft Home Depot Home Depot Home Depot Home Depot Newegg Already Owned Price per # unit $40.00 $6.94 $10.77 $7.51 $5.84 $9.82 $4.17 $3.67 $2.74 $5.88 $4.43 $2.68 $2.97 $3.00 $3.50 $0.50 $20.00 $1.97 $9.35 $1.69 $2.38 $14.99 $150.00 Cost 1 8 $40.00 $55.56 1 1 1 1 1 1 2 1 1 1 1 3 2 10 0.1 2 1 1 1 2 1 $10.77 $7.51 $5.84 $9.82 $4.17 $3.67 $5.48 $5.88 $4.43 $2.68 $2.97 $9.00 $7.00 $5.00 $2.00 $3.94 $9.35 $1.69 $2.38 $29.98 $0.00 $229.12 Total: Table 6.2.2: Bill of Materials- Non-Rod Control Board 6.3 Assembly Plan Due to the large number of complex subsystems in this project here, there needed to be a logical structure to the final assembly. Smaller subsystems had priority early in the semester and the construction slowly built itself up into the larger final components. Hardware Prototype Plan Due to concerns about the challenge of constructing the mechanical structure attached to the foosball table, one of the first priorities was to construct a prototype for the rod control. First the 25”x8” plywood was cut to size and latched against the side of the foosball to determine the necessary bracketing method. On top of the plywood, the linear motion slides were attached to test the connection to the rods and the platform. The final component of the prototype was a belt driven system to move the platform along the 116 linear slide. The belt was connected to both ends of the small platform and around two pulleys that go underneath the plywood. The general motor connected to the end of one pulley provided the power. Figure 6.3.1 shows a rendered depiction of the first hardware test setup. Figure 6.3.1: A top rendering view of the hardware prototype plan Camera Cage Assembly The camera must be mounted directly above the foosball table in order to have an appropriate view of the playing field and to simplify the conversion from the image coordinates to real-world coordinates. Prototypes had shown that the camera must be mounted a minimum of 4 ft. above the field to see a complete view of the playing area. The camera was suspended from the ceiling above the table at approximately this height, and was subsequently tuned to provide good output. RCB Assembly The PCB for the RCB was printed using BatchPCB. The design includes many components. The design is delineated in detail in section 4.6.1. Electronic Architecture Assembly The first component for the electronic system is the main computer, which acts as the central processing unit for the computer-vision ball detection algorithm and the data acquisition from the RCB. Once the RCBs were assembled and the mechanical actuators subsystems constructed, the computer was connected to the RCBs using standard USB connections. The test plan from section 7.2.1 was used to ensure proper connection between the RCB‟s AVR processor and the CPU. The final component of the electronics hardware is the Kinect camera which was mounted as discussed in the earlier hardware 117 assembly instruction. The Kinect was connected to the computer via USB cable packaged with the sensor. In order to route power to all components, the PC power supplies were mounted to the bottom of the foosball table near the CPU. Coming from the power supply were 12V and 5V leads which were distributed to the necessary locations. The leads were packaged in the form of the standard Molex connector, wherein the 12V lines provided power to the stepper motor drivers, and the 5V line provided power to the logic circuits. 6.4 Final Coding Plan The modules for this project are divided into 2 major components, the microcontroller code and the main computer code. Because of the vastly different environments required to program each, they will each be addressed separately. Microcontroller Code Since the AVR microcontroller used in the RCB is compatible with the Arduino bootloader, it could be programmed using the Arduino IDE. This is how all of the C code run on the AVR was developed, compiled, and loaded. Since the code could be burned to the chip over USB, much time was saved vs. programming via an ISP programmer, which was the original plan. General Purpose Computing Code Microsoft® Visual Studio® 2012 Ultimate was used to program the primary computer, including the table state interpreter, physics engine, and AI algorithm. Microsoft® .NET® 4.5 was used to take advantage of the latest code optimizations and features in the new SDK for the Kinect®. Microsoft® .NET® will also simplify the process of serial I/O because prebuilt, buffered serial I/O classes already exist in .NET®. 118 7.0 PROJECT PROTOTYPE TESTING 7.1 Hardware Testing Environment In order to conduct the hardware tests, the senior design team required a large space with a number of specialized tools. The foosball table itself is fairly large and must be contained in a space that can hold it as well as have enough room to move around the mechanical parts and mount them to the table. The senior design lab was the ideal environment for conducting this testing, and the project was located there from before any construction work had begun all the way through its final presentation. The tools required for mechanical testing included a number of measuring implements for mechanical spec checking. Multimeters and oscilloscopes were on hand during the mechanical testing to debug electronic bugs. Initial mechanical testing on the rods began on the goalie rod, which was chosen for its accessible location, and the fact that it represents rod 0 in code and elsewhere. Tests involved small simulated games to test the functionality and performance of the mechanical subsystem. Before the computer vision and artificial intelligence were fully operational, the tests were run using a GUI on the computer, which was capable of outputting arbitrary commands to the RCB. The following sections outline specific tests that will be run during the testing phase: 7.2 Hardware Specific Testing 7.2.1 Electronic Component Test Plan The only electronic component in this project that we designed and therefore must test is the rod control board, discussed in detail in section 4.6. The interaction between our components and off the shelf components were tested later, once isolated tests on the rod control board were completed. The communication of the rod control board is designed to be bidirectional and must be tested as such. The interface format between the computer and microcontroller is done over a virtual serial port via a physical USB connection. The computer sends packets 3 bytes at a time. The first 2 bytes are the desired linear position of the rod in steps. The 3rd byte is a control byte that can perform the following actions: request rod ID (number given by jumpers), request range (in steps), request recalibration then send range, and kick. 0x00 is used when no code is needed. The communication tests tested basic functionality and sent each type of packet to the board in 2 different forms: one where the position matches the current position, the other 119 where the desired position does not match the current position. The RCB passed all these tests. Linear Motion The first test is to tell the board to move to any position; the success is defined as if the board moved. Our RCBs passed this test easily. The second test will be a calibration test, the RCB is commanded to move to the middle after calibration before any other command is given, using a tape measure see if the motor places the rod in the middle after calibration. The RCBs passed this test. The third test will ensure the runtime calibration is working correctly. The rod is allowed to calibrate and move to the center, and then the rod is manually moved off by 1 inch. The RCB does not know that it is now in the wrong position, but should correct for this error when a button is encountered. Command the RCB to move to the extreme in the direction it was manually moved. It should stop as soon as it hits a button. Then command the RCB to move to the center, it should be in the center as measured by a tape measure. This should be done in both directions because each end relies on a different tactile switch. The fourth test will test fall short calibration, the procedure is the same as test 3, however instead of telling the rod to move in the direction of the forced movement, command it to move to the opposite extreme. When the rod stops before hitting the button, it should start moving again until it hits the button and stops. Then the RCB should be commanded to move to the center and position verified by measurement. Like test 3, it should also be tested in each direction. After tweaking, the RCBs passed both test 3 and 4. The fifth test will test the number of skipped steps, this test is more of a gauge of tradeoff of movement speed and movement precision rather than a test, because we have the ability to calibrate on the fly, we should have some skipped steps in testing or else we aren‟t pushing the system fast enough. To perform this we start the rod at the center and mark it with tape. We then connect to the RCB and command it to move back and forth quickly changing direction, slowing down and speeding up, being careful to avoid the extremes, because this would cause calibration. After several minutes of movement the RCB is commanded to move to the center and the position relative to the marked tape is measured. We found that the RCB is off by approximately 1 inch, telling us that the RCB is pushed beyond its limit for perfectly precise moment in favor of faster movement. The RCB started off always ending up at the exact location that it was intended to; however, we were able to achieve twice the linear movement speed by performing this test and gauging the performance/precision trade off. 120 The sixth test is an overall shake down of the linear movement, it is similar to test 5 but the rod is allowed to go to the extremes and re calibrate, it is expected that during this test the rod should be off by no more than 1 inch, our result is that the rod was off by no more than 3 steps at any time or roughly 0.02 inches. Radial Motion The first test was a basic kick test: the RCB was told to kick; the result is that the cam completes one full revolution. The RCBs easily passed this test Just like linear motion we tuned speed vs. precision with a second test, we found that skips always happened in one direction, so to account for this we commanded the steppers to complete 204/200 revolutions per kick, this was a good value that returned the cam to roughly the same starting point each kick. By trading off some precision we were able to kick approximately 1.5 times faster than the first test. Integration of motion We also needed to test the kick and linear motion, so we performed a shakedown by quickly moving its position while performing kicks. This was basically test 5 in linear movement and test 2 of radial movement at the same time. We found that the combination of movement would induce more error than expected. So we turned down the performance to avoid skipping the stepper motors. After tuning, we considered this passed. Trouble shooting When the microcontrollers did not behave as expected, as they sometimes did, the circuits were thoroughly tested for electrical connection using a Fluke multimeter. This let us know when some of the pins were not soldered properly, and allowed us to fix the individual pins easily. Conclusion Once these tests were completed, the RCBs were connected to their final intended components and tested again in place. 7.2.2 Mechanical Component Test Plan The mechanical subsystem is composed of the linear and rotational subsystems that were both tested independently. This section lists a number of tests that were run to verify correct functionality of each subsystem. Mounting Support 121 Tested System: The mounting of the rod control subsystem to the side of the foosball table. Test Description: Depending on the weight of the control board and motors used on the rod control subsystem the mounting system may need different amounts of support. It is possible that the initial setup will be ineffective for long duration holding of the table. In order to test this, small weights between 5-10 pounds will be added to the very end of the control board. This test will simulate extra weight from a person bumping into the system and all the extra wear and tear from prolonged hanging. Test Actions: If the test fails, then the mounting subsystem may require additional supports in the form of support bars from the bottom of the table to the end of the platform or even as far as table legs for the end of the platform. Test Result: The mounting system was able to support the weight of the plywood, mechanical system as well as moderate weight supplied in the form of a spare stepper motor which weighed approximately 2lbs. Rotational Motion/Kick Strength Tested System: The rotational subsystem is comprised of the motor attachment to the platform on the linear slide and the adapter between the 5/8” pole shaft and the smaller drive shaft on the output of the motor. Test Description: The primary attribute to be tested is resilience and durability, to ensure that the kicking subsystem will not damage itself or fail during operation. The motor is isolated from most of the wear and tear by the cam, but the pieces of the cam should be able to last for several hours of kicking without stopping. To test this, the kick will be set on and the cam will kick for 15 minutes without stopping. At the end, the physical cam components will be inspected for wear and tear. Test Actions: If the kick is damaging itself or showing signs of wear the mechanical subsystem may require better mechanical stops to stop this from happening. These stops are discussed in section 4.4.1. Test Results: After running the cam for 15 minutes straight with no stopping the cam components showed no sign of wear. This test is considered passed. Linear Motion/Slide Speed Tested System: The linear slide comprises the sliding rails that the platform containing the rotational subsystem rides on. This slide must be able to move between the full stroke specified and with great enough speed to play a competitive game. 122 Test Description: A mechanical switch will be wired between a power supply and the motor to test the motion. Full motion strokes will test the physical stops on the end. The movement will be recorded on a video camera so the speed of the movement can be calculated and compared to the requirements laid out in section 2.3.3. Test Actions: If the slide is moving below specification then the motor used in the subsystem will be re-evaluated and potentially changed. If the slide motion is not moving along the entire stroke or the platform is moving with more friction than anticipated either more lubricant or a change of slide design will be considered. Test Results: After several runs, problem spots were identified in on the slide. Lubrication was applied at those spots. After minimal modifications the slides were able to move along their entire stroke at a constant speed. The final speed was calculated at slower than the original specification, just over 0.1 meters per second, which is slower than the original specification, but for the sake of the prototype was deemed acceptable. 7.3 Software Testing Environment There are 2 different kinds of software in this project, the software on the microcontrollers in the rod control boards and the software running on the PC. The testing of the microcontroller software is covered in section 7.2.1, electronic component testing. The testing of primary software modules will be addressed here. Every software module on the computer will be running in the .NET framework®, and thus can all be tested from one environment. Because Visual Studio® is being used for component coding, its test manager will also be used for testing. The unit test manager provides an easy to code interface that can be test all components within a solution or test individual functions. The added bonus of using the test manager is that tests can be run locally where we are coding the modules and then be run on the remote machine to validate speed testing. The software can be divided into 3 modules with clear I/O: table state interpreter, persistence filter and the AI. These are the modules that will be unit tested. Once unit testing of the individual components is complete, the functional testing of the entire project may begin. 7.4 Software Test Plan The overall plan is to individually test the table state interpreter, persistence filter and the AI separately, since they have well defined I/O. Table State Interpreter 123 There are several tests that the TSI must pass before being able to be considered passing. The tests were performed live using debug output vs. the position of the ball on the physical table. Figure 7.4.1 depicts an output frame from the TSI with the ball position in inches from the origin in the bottom right. Figure 7.4.1: TSI Output Frame The first test is ball detection consistency, or the ability of the TSI to find the ball or an area near (<1 inch) the ball as the target. The TSI must be able to detect the ball greater than 50% of frames and have false registration less than 25%. These numbers would be the minimal requirements for an ideal persistence filter to be able to produce good results. The table below shows the results Requirement Actual False positive < 25% 0.4% True Positives > 50% 86% Table 7.4.1: TSI Detection Rates The second test is the ball detection accuracy, or the ability of the TSI to record the position of the ball to within an accuracy of 1 inch of its actual position on the table. Depending on its position on the table this varied, so the range of accuracies is reported on the table below. 124 Requirement Accuracy < 1 inch Desired 0.5 inch Actual 0.25 – 0.7 inch Table 7.4.2: TSI Accuracy The third test is the speed and performance test. In order to produce a responsive game we needed >15 fps, we were targeting 30 fps with a processing latency of less than 33 ms. However, 33 ms was the original requirement, factoring in a single-thread processing environment and the need for 30 fps. The actual implementation was threaded, so much higher latency was tolerated because 30 fps could still be achieved when the processing time per frame was greater than 33 ms. We determined a target of 100 ms at 15 fps would be the minimum adequate performance to allow the TSI to pass. Requirement Desired Actual Frame Rate > 15 fps 30 fps 29.7 fps Latency 100 ms 33 ms 35 ms Table 7.4.2: TSI Speed Persistence Filter The individual tests for the persistence filter were much less formal. It was impractical to create test data because the actual nature of the input would be determined by the TSI. Thus the only component test was a basic, lineal interpolation test that it passed before it was integrated with the rest of the system. AI The AI component testing was also less formal than the TSI, because of the unknown nature of the data being passed to it testing outside the framework would have been a waste of time. The test that was performed on the AI was an integration test with the RCBs. Because the AI component was responsible with communication with the RCB, the serial communication protocol was verified before integration with the larger system. Integration Testing The first integration test was to see if the physics model was working correctly; this was simple enough to do visually. We placed a cyan box around the output position from the TSI and a purple circle around the output from the physics model and then proceeded to place the ball on the table and see what happened. The physics model initially failed this test and needed tweaking. However, after some time we were able to move the ball around and despite dropped frames and occlusion under the rods, the physics model predicted its location correctly. 125 The second major test was turning on the AI and placing the ball stationary on the table. The AI should cause all the computer controlled puppets to line up with the ball. This was easy to inspect visually. The AI initially failed, as it needed more precise measurements of the puppet position relative to their left and right most positions. Once these measurements had been adjusted, the test was a success. The third test was a kick test, the ball was rolled slowly towards each rod and each rod had to kick at the correct time. 3 of the 4 rods passed this test initially. The final rod (the striker, with the highest degree of occlusion) was fixed by tweaking the kick threshold for that rod individually. The final test was to simply turn everything on and play foosball, something the table was able to do at a novice level quite well, the software was obviously able to track the ball and move the rods accordingly, the primary limitation was the speed of the mechanical components. 126 8.0 ADMINISTRATIVE CONTENT 8.1 Milestone Discussion The following timeline, shown in figure 8.1.1 below, was laid out in order to reach our goal of a working table before the final presentation date. Milestone Setup 1 Setup 2 Date 10/10/2012 1/18/2013 Component Foosball Table Status Acquired Kinect Mounting Rod Control Board Radial Actuation Table State Interpretation Complete Ordered Prototype Assembled Beta Started Met X Required Expected X X X Setup 3 2/1/2013 Kinect Mounting Rod Control Board Linear Actuation Radial Actuation Table State Interpretation Physics Engine AI Algorithm Tweak alignment X Assembly Complete/Beta Software X Prototype Assembled X Final Version Complete Stable Module Developed Beta Started X Beta Started X Setup 4 3/1/2013 Kinect Mounting Rod Control Board Linear Actuation Radial Actuation Table State Interpretation Confirm correct positioning Software Complete Final Version Complete Final Version Complete Stable Module Developed X X Foosball Table Rod Control Board Linear Actuation Physics Engine AI Algorithm Table State Interpretation Modularity Validated All Tests passed Final Version Complete Stable Module Developed Stable Module Developed Tests Developed X X X Setup 5 3/25/2013 X X X X Software 1 4/14/2013 Table State Interpretation All Tests passed Physics Engine Stable Module Developed AI Algorithm Stable Module Developed X X X Software 2 4/17/2013 Physics Engine AI Algorithm X X All Tests passed All Tests passed Figure 8.1.1: Project completion timeline The timeline was laid out paying particular attention to having hardware ready before software because the limiting factor for quality of project will be the hardware controlling the table. 127 8.2 Budgeting and Finance Referencing the Bill of Materials, the cost of each product can be found in section 6.2. As shown by this table, it can be seen that the minimum total cost of redoing this project would be $660.50. Due to shipping, handling, taxes, and duplicate/broken parts, our actual spent budget is significantly higher, at $989.44. Given that the initial projected budget for project FOOSE was $1000, this is extremely close, especially in light of how much the project has changed over the past year. Funding for this project came primarily through SoarTech Inc. SoarTech donated $500 to the FOOSE project team to cover many of the basic expenses of the construction. More information about SoarTech can be found in the Mentorship and Sponsors section of this documentation (8.3.1 SoarTech). The rest of the funding came from the members of the group, split evenly among the four members. 8.3 Mentors and Sponsors 8.3.1 Soartech SoarTech is the sole sponsor for this project. SoarTech is a small company that specializes in commercial applications of the Soar Architecture, which was created at Carnegie Mellon. The Soar Architecture is a programming language that is designed to create rule-based artificial intelligence algorithms. Thus, SoarTech is a company that finds financial opportunities to implement AI in real-world applications, typically military in nature. With a specialty in applications of AI, SoarTech created an outreach program to fund some local engineering senior design teams. After sending in a proposal which included an executive summary, expected block diagrams, budget analysis, and a milestone table, among other documents, this project was granted a $500 sponsorship to help fund expenses. In addition to funding, SoarTech has been kind enough to offer mentorship as well, in the form of specific one-on-one feedback and group feedback in the form of presentations and question and answer forums. For example, on November 14th, 2012 the members of this project presented a current working design of the project along with plans for implementing the design. During the presentation, the project design was rigorously questioned and analyzed by more than six engineers who specialize in software design and implementation. This was a very productive feedback session; new ideas for ball detection, AI design, table physics modeling, and more were exchanged. All-in-all, SoarTech‟s mentorship has been extremely helpful and the members of this project greatly appreciate the feedback its employees have offered. 128 The following is a short written statement given by SoarTech after the presentation: This past Wednesday the two University of Central Florida Electrical and Computer Engineering Senior Design teams that SoarTech is sponsoring as part of the Orlando community outreach came to the office and presented their current working designs and plans for how they would be going about implementing them. The “No Touch” Chess team is developing a voice controlled selfactuating chess board with 2-player and 1-player versus AI modes. The “FOOSE” automated foosball table team is developing an AI controlled opponent that will actuate one of the foosball teams. Both teams are very ambitious and we look forward to seeing how their implementations progress this spring! Picture courtesy SoarTech, Inc. Figure 8.3.1.1, Presentation at SoarTech Oviedo office, 11/14/12. From left to right: Nathaniel Enos, Nick Phillips, Skyler Goodell, Patrick Fenelon 129 The above picture was taken directly after the presentation and feedback session at SoarTech. This group is extremely thankful for SoarTech‟s generosity and proud to be associated with its employees. Special thanks must be given to Joshua Haley, of SoarTech. Josh has been the lead contact and liaison between SoarTech and FOOSE and a great mentor for this project. As a recent UCF graduate (Class of Spring 2012) with a major in computer engineering, he has been a great contact and has given much guidance. The greatest thanks must be given to SoarTech. Without their funding and guidance this project would not have been possible. The members of this project greatly appreciate the generous donation of time and resources given by all of the employees involved in this outreach program. 8.3.2 Mentors Joshua Haley Joshua Haley has been a great help for this team and this project. He has been the lead contact between FOOSE and SoarTech, leading to this team‟s sponsorship. In addition to heading communication, he has also given feedback for our project. As a recent University of Central Florida graduate (class of spring 2012) his experience with computer engineering and previous senior design projects is invaluable. His specialty is software, as an employee for SoarTech he is well versed in practical applications of artificial intelligence. He has also given advice on image processing techniques and problems that might be encountered along the way. Overall, Josh has been extremely helpful for this team. Brandon Parmeter Brandon is a fourth year electrical engineering student at the University of Central Florida. He is also the captain of the underwater vehicle division of the UCF robotics club, on the team he specializes in peripheral design and electronic fabrication. His experience in robotic design and control is invaluable for this team. He has given insight into real-world problems and performance from different kind of robotic components, specifically about actuators, motor controllers, and sensors. In this project, many of the design decisions have been reviewed by Brandon to ensure no major aspect has been missed, no part purchased for too much, and no optimal solution left unconsidered. In a team full of software and electrical specialists, a mentor like Brandon, a specialist in robotics has been extremely helpful. 130 Ryan Moorin Ryan Moorin is a mechanical engineering student at UCF with 8 years of experience designing components for competitive robotics. He has provided valuable support to the project in the form of advice for possible mechanical subsystems that he has experience with. He has offered support in fabricating small parts or designing and debugging components in the mechanical subsystem. Dan Richardson Dan Richardson is a mechanical engineer working at Disney. He has provided advice on the mechanical subsystem via email to the senior design group. Dan was a contact for advice and review on the mechanical design and decisions in spring 2013. 8.4 Bibliography [1] H. S. THORNTON, "Apparatus for playing a game of table football". United States of America Patent 205,991, 1 November 1922. [2] R. Janssen, J. de Best and R. van de Molengraft, "Real-Time Ball Tracking in a Semi-automated Foosball Table," RoboCup 2009: Robot Soccer World Cup XIII, pp. 128-139, 2010. [3] E. G. Hijkoop, "Technical University of Eindhoven," 25 December 2007. [Online]. Available: http://www.mate.tue.nl/mate/pdfs/8876.pdf. [Accessed 17 November 2012]. [4] foosball.com, "Questions to the Expert," foosball.com, 2011. [Online]. Available: http://www.foosball.com/content.php?page=87. [Accessed 13 November 2012]. [5] Sage Didactic, "Robotic Foosball- YouTube," 9 January 2008. [Online]. Available: http://www.youtube.com/watch?v=KFAfwtsxarU. [Accessed 20 October 2012]. [6] D. Quick, "Man vs Machine foosball," Gizmag, 2 July 2008. [Online]. Available: http://www.gizmag.com/automated-foosball-table/9568/. [Accessed 20 October 2012]. [7] T. Weigel, "KiRo – A Table Soccer Robot Ready for the Market," in Proceedings of the 2005 IEEE International Conference on Robotics and Automation, Freiburg, 131 Germany, 2005. [8] J. Topolsky, "DIY robotic foosball table is ready to throw down," Engadget, 26 December 2007. [Online]. Available: http://www.engadget.com/2007/12/26/diyrobotic-foosball-table-is-ready-to-throw-down/. [Accessed 22 October 2012]. [9] S. Rodgers, Just Turn It On and TRAK: A White Paper on G4™ Motion Tracking Technology, Polhemus, July 2011. [10] SparkFun Electronics, "Triple Axis Magnetometer Breakout - MAG3110," SparkFun Electronics, [Online]. Available: https://www.sparkfun.com/products/10619. [Accessed 15 October 2012]. [11] Freescale Semiconductor, "Xtrinsic MAG3110 Three-Axis, Digital Magnetometer," October 2012. [Online]. Available: http://cache.freescale.com/files/sensors/doc/data_sheet/MAG3110.pdf?fpsp=1. [Accessed 30 October 2012]. [12] Digi-Key Corporation, "MAG3110FCR1 Freescale Semiconductor," Digi-Key Corporation, [Online]. Available: http://www.digikey.com/productdetail/en/MAG3110FCR1/MAG3110FCR1CT-ND/3524267. [Accessed 30 October 2012]. [13] S. D. a. Y. Wu, "Motion from Blur," [Online]. Available: http://vision.eecs.northwestern.edu/research/IP/Blur/Motion_CVPR08.pdf. [Accessed 30 October 2012]. [14] Arduino, "Arduino Uno," Arduino, Inc., 23 November 2012. [Online]. Available: http://arduino.cc/en/Main/ArduinoBoardUno. [Accessed 24 November 2012]. [15] Mouser Electronics, "Development Boards & Kits," Mouser Electronics, Inc., [Online]. Available: http://www.mouser.com/search/refine.aspx?Ntk=P_MarCom&Ntt=146302706&N. [Accessed 24 November 2012]. [16] Xilinx Inc., "What is an FPGA? Field Programmable Gate Array," Xilinx Inc., [Online]. Available: http://www.xilinx.com/training/fpga/fpga-field-programmablegate-array.htm. [Accessed 20 November 2012]. [17] R. R. R. Ponneela Vignesh, "Performance and Analysis of Edge detection using FPGA Implementation," International Journal of Modern Engineering Research, 132 vol. 2, no. 2, pp. 552-554, 2012. [18] K. A. a. O. D. Samir Tagzout, "Hough Transform Algorithm for FPGA," 2000. [Online]. Available: http://perso.telecomparistech.fr/~polti/robot/docs/Hough/Hough%20Transform%20Algorithm%20for% 20FPGA%20.pdf. [Accessed 20 November 2012]. [19] G. C. a. L. Guo, "The FPGA Implementation Of Kalman Filter," in Proceedings of the 5th WSEAS Int. Conf. on Signal Processing, Computational Geometry & Artificial Vision, Malta, 2005. [20] Altera Corporation, "DE2 Development and Education Board," Altera Corporation, [Online]. Available: http://www.altera.com/education/univ/materials/boards/de2/unv-de2-board.html. [Accessed 20 November 2012]. [21] Atmel, Inc, "8-bit AVR Microcontroller with 4/8/16/32K Bytes In-System Programmable Flash," February 2009. [Online]. Available: http://www.sparkfun.com/datasheets/Components/SMD/ATMega328.pdf. [Accessed 20 November 2012]. [22] SparkFun, Inc, "AVR 40 Pin 16MHz 32K 8A/D - ATMega32," SparkFun, Inc, [Online]. Available: https://www.sparkfun.com/products/209. [Accessed 20 November 2012]. [23] SparkFun, Inc, "40 Pin AVR Development Board w/USB Connection," SparkFun, Inc, [Online]. Available: https://www.sparkfun.com/products/32. [Accessed 20 November 2012]. [24] A. L. Shimpi, "Zotac's Ion: The World's First mini-ITX Ion Board," AnandTech, Inc, 12 May 2009. [Online]. Available: http://www.anandtech.com/show/2765/5. [Accessed 20 November 2012]. [25] FIRST, "FIRST At A Glance," FIRST, 19 October 2012. [Online]. Available: http://www.usfirst.org/aboutus/first-at-a-glance. [Accessed 21 November 2012]. [26] VEX Robotics, Inc., "Jaguar Motor Controller," VEX Robotics, Inc., [Online]. Available: http://www.vexrobotics.com/products/vexpro/217-3367.html. [Accessed 21 November 2012]. [27] Texas Instruments, Inc., "Board Data Sheet: Brushed DC Motor Control Module," 9 February 2010. [Online]. Available: 133 http://www.ti.com/lit/ug/spmu046b/spmu046b.pdf. [Accessed 21 November 2012]. [28] Cross the Road Electronics, LLC, "Talon User Manual: Brushed DC motor controller Version 1.1," 9 September 2012. [Online]. Available: http://www.crosstheroadelectronics.com/Talon_User_Manual_1_1.pdf. [Accessed 21 November 2012]. [29] FIRSTIntern, "Control System Basics," instructables, 20 August 2012. [Online]. Available: http://www.instructables.com/id/Control-System-Basics/step5/MotorControllers/. [Accessed 21 November 2012]. [30] The Robot MarketPlace, "IFI VEX Pro Victor 884," The Robot MarketPlace, [Online]. Available: http://www.robotmarketplace.com/products/IFI-V884.html. [Accessed 21 November 2012]. [31] P. Hood-Daniel, "Microcontrollers - Introduction to PWM (Pulse Width Modulation)," NewbieHack.com, 29 December 2011. [Online]. Available: http://www.youtube.com/watch?v=mVx02s1fHIY. [Accessed 29 November 2012]. [32] FIRSTIntern, "Control System Basics," instructables, 20 August 2012. [Online]. Available: http://www.instructables.com/id/Control-System-Basics/#step1. [Accessed 29 November 2012]. [33] USBCable.com, "USB Cables," USBCable.com, [Online]. Available: http://www.usbcable.com/usbbasics.htm. [Accessed 29 November 2012]. [34] K. Najjar, "Team Foosbot," 7 May 2012. [Online]. Available: http://teamfoosbot.blogspot.com/. [Accessed 10 November 2012]. [35] E. G. Hijkoop, "Designing a foosball table actuator.," 25 December 2007. [Online]. Available: http://www.mate.tue.nl/mate/pdfs/8876.pdf. [Accessed 10 November 2012]. [36] M. Aeberhard, S. Connelly, E. Tarr and N. Walker, "Single Player Foosball Table with," 10 December 2007. [Online]. Available: http://www.eskibars.com/projects/foosball_robot/final_rpt.pdf. [Accessed 10 November 2012]. [37] R. J. d. B. a. R. v. d. M. Janssen, "Real-Time Ball Tracking in a Semi-automated Foosball Table," RoboCup 2009: Robot Soccer World Cup XIII, pp. 128-139, 2010. [38] A. Alsalihi, K. Najjar, B. Van Scoy and J. Zifer, "Automated Foosball Table Project 134 Design Report," 28 November 2011. [Online]. Available: https://uakron.edu/dotAsset/1e2fb3d4-8c59-475e-9473-ed98b2504f17.pdf. [Accessed 10 November 2012]. [39] K. Ogata, Modern Control Engineering, Upper Saddle River, NJ: Prentice Hall, 2010. [40] SHARIF UNIVERSITY OF TECHNOLGY, "Introduction to PID Control," [Online]. Available: http://ee.sharif.edu/~industrialcontrol/Introduction_to_PID_Control.pdf. [Accessed 21 November 2012]. [41] Thompson Sporting Goods, "Tornado Foosball Tables," Thompson Sporting Goods, [Online]. Available: http://www.foosballstore.com/display/scat/price/77.cfm. [Accessed 13 October 2012]. [42] JustFoosballTables.com, "Foosball Tables Buying Guide," JustFoosballTables.com, [Online]. Available: http://www.justfoosballtables.com/foosballtables/foosballbuyingguidearticle.cfm. [Accessed 13 October 2012]. [43] FoosManchu, "Foosball Tables," FoosManchu, 2003. [Online]. Available: http://www.foosmanchu.com/tables/index.html. [Accessed 13 October 2012]. 135 9.0 APPENDIX- COPYRIGHT REQUESTS Copyright requested from Altera Copyright requested from Freescale Semiconductor Hello Jack, I am a student an the University of Central Florida working on a senior design project that is considering use of the MAG3110 3-axis magnetometer. I would like to ask for your companies permission to use schematics, drawings and diagrams from the document cited below in the documentation pertaining to my project. "3-Axis, Digital Magnetometer" Document Number: MAG3110 Rev 5, 05/2011 Thank you for your time. --Patrick Fenelon Copyright requested from Pearson Education 136 To Whom It May Concern, I would like to obtain permission to use a few of the figures in your book, “Modern Control Engineering”, fifth edition by Ogata. Specifically the figure I am interested in is figure 8-3 and many of the other figures of chapter 8 showing the different tuning methods of the PID compensator. I am currently a student at the University of Central Florida working on senior design documentation. I would be using these figures in the research portion of this paper to discuss the different methods of control design. All of the figures used will be cited properly giving credit to the authors and publishers. Once complete, these designs will not be sold or used for financial gain. They will only be used for the academic paper. Also, once the design is complete it will be publically available. Please let me know if I may use a few of your figures, I would greatly appreciate using them for clarifying my documentation. Thank you for the time, Nathaniel Enos Copyright requested from Polhemus, Inc. Hello Polhemus, I am a student working on a senior design project and I am considering use of the G4 tracker in my project. The project is currently in initial research stage. I would like permissions to use the images in the document titled "Just Turn It On and TRAK: A White Paper on G4™ Motion Tracking Technology" in my documentation on the project, subject to any stipulations you may imply. Thank you for your time and I look forward to hearing back from you. --Patrick Fenelon 137 Copyright granted by SparkFun, Inc. under Creative Commons license Copyright requested from Star Kick, Inc. 138 Copyright granted by Xtreme Gameroom, LLC Subject: Request for Use Hello Nathamiel You may use the picture, any other info you may need just ask. any link back to out site would be appreciated. Thank You Fred Thornbury Xtreme Gameroom Sincerely, Xtreme Gameroom LLC 139