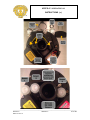
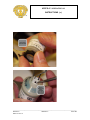
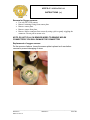
1
APECS 4™ ISCAN OPERATIONAL
INSTRUCTIONS
V1
01 Nov 2014
©2014 InnerSpace Systems Corp. All rights reserved. Distribution limited to
owners and users of ISC Closed Circuit Rebreathers. See paragraph “DOCUMENT
REPRODUCTION AND LICENSING” for specifics.
APECS 4™ OPERATIONAL
INSTRUCTIONS (v.)
DOCUMENT REPRODUCTION AND LICENSING
©2014 InnerSpace Systems Corp (ISC). All rights reserved. Distribution is intended for owners of the
APECS™ electronics system. Viewers of the electronic version of this documentation may not reproduce
electronically, on any media, nor in hard copy, in part or in whole without express written permission of ISC.
Owners of rebreather equipment featuring these electronic systems are hereby licensed to no more than
one electronic copy, one backup media copy, and one hard copy of this document intended for their
operational service of the referenced equipment. The latest revision electronic form of this document is
maintained on the ISC website for review at: http://www.customrebreathers.com. Electronic access via the
Internet is limited to referencing the ISC website. This is intended to eliminate the possibility of propagation
of out of date copies of the documentation.
______________________________________________________________________________________
Revision a
APECS 4™
1 of 63
Date: 01 Nov 14
APECS 4™ OPERATIONAL
INSTRUCTIONS (v.)
S.P.
Low, High,
ASP
Sense
SRC
On
Press Menu and
Action buttons
together or wet
sensors
Conf
Menu button
Action button
Chklst
Menu button
Action button
Logs
Menu button
Action button
Action button
Menu button
Menu button
Action button
Action button
Info
Batt
Menu button
Cal
Menu button
Menu button
Action button
Action button
Off
Comp
Menu button
Menu button
Action button
Action button
Action button
Return to
S.P.
Menu button
Action button
Firmware v 1.14
______________________________________________________________________________________
Revision a
APECS 4™
2 of 63
Date: 01 Nov 14
APECS 4™ OPERATIONAL
INSTRUCTIONS (v.)
S1
S2
S3
ISC I22D
Oxygen Sensor
ISCAN
Primary Network
ISCAN
Secondary Network
Heads Up Display
(HUD)
Auxiliary
Subconn Port
9v
Battery Box
ISCAN injection
solenoid
Apecs 4
Handset
APECS 4
Shearwater
DIVECAN,
Petrel,
NERD
9v
Battery Box
______________________________________________________________________________________
Revision a
APECS 4™
3 of 63
Date: 01 Nov 14
APECS 4™ OPERATIONAL
INSTRUCTIONS (v.)
Conventions
The various menus, commands and other screen information described in this
manual are CAPS BOLD and truncated just as they appear on the actual menu
screens for the sake of clarity. Conditions that could affect the safety of the diver
are called out in RED BOLD to facilitate proper warning of potentially hazardous
conditions. Closed Circuit Rebreathers artificially manipulate the divers breathing
environment, which creates the potential for injury and death if the apparatus is
not properly assembled, tested, calibrated, and operated. Divers certified on
previous releases of APECS™ are strongly advised to study this manual
carefully and consult with an ISC approved instructor prior to using this release.
Introduction
The ISC Advanced Personal Environmental Controller System 4 (APECS 4™) is
a family of CCR electronics designed to be used in a variety of diving roles to fit
the operational needs of the end user. The APECS 4™ family is designed to be
used in saturation, military, commercial and recreational roles providing reliable,
user-friendly operation with room for ISC factory/end user customization to
further meet the end users needs. The APECS 4™ has a simple self intuitive
Menu and Action/Confirm system and essential information dive screen that
minimizes the task loading of the diver by providing a “quick look” ability of
essential information and the ability to quickly change on the fly operational
characteristics to the breathing media. APECS 4™ is the latest general release
of the software and hardware and consolidates the tested features of APECS 2.5
into APECS 4™, a common core with unique configurations to simplify software
and hardware maintenance. APECS 4™ is also designed to accommodate the
Shearwater DiveCAN system, which facilitates integration of third party
decompression computers or CAN based components onto the ISC breathing
loop.
What is CAN?
Controller Area Network is a series of microcontrollers and devices that shares a
specialized internal communications network without a single host computer
used in conventional electronics. CAN is a proven ISO multi master priority
aberration message based protocol serial standard that allows up to any number
of devices or independent control units to communicate with each other on a
BUS/network system.
Prominent system features: Designed to work in the harshest environments
imaginable, fault tolerant and fault confinement, error detection, deterministic
redundant routing, high data speeds, device replacement units that can be
______________________________________________________________________________________
Revision a
APECS 4™
4 of 63
Date: 01 Nov 14
APECS 4™ OPERATIONAL
INSTRUCTIONS (v.)
installed within minutes by the end user and inexpensively restores electronics to
service, and CAN systems has been proven everyday the world over.
The ISC ISCAN (intelligent systems controller area network) is a new breed of
electronics that will support ISC far into the future of life support electronics.
The ISC ISCAN is based off a historically proven system used in aerospace,
military, and commercial arenas and supported by elite commercial entity’s that
wrote the book on controller area network i.e. CANBUS systems.
The ISC ISCAN can support up to 15 independent devices on each network, the
Meg 15 and Pathfinder CCR systems each have two independently powered
networks supported by Wi-Fi communications for ease of user upgrades and
water/pressure proof Subconn connectors for fast replacement and user custom
set ups.
Feature/Function list for APECS 4 handset
• InnerSpace Systems Controller Area Network (ISCAN) compatible
messaging system. Compatible with Shearwater Dive Can system.
• 3000mAh rechargeable battery. No more specialized replacement batteries.
System can stay nearly fully charged up to a year and operate the handset
over 24 hours of continuous dive time, depending on usage, power saving
settings and ambient temperature. Quickly recharged using micro
USB/USB wall plug or PC.
• TFT Brilliant full color display. Highest contrast, sharpness, and brightness.
No backlighting needed and can be seen from almost any angle. Low power
consumption, large font and colored alarm indicators.
• Rotatable screen for left arm or right arm viewing.
• 96kB of RAM memory.
• 8GB SD card for operational log memory. System can log all data up to
500 dives.
• Integrated system black box.
• Dive computer compatible. System can support the integration of
decompression computational algorithms.
• Wi-Fi capable. System can communicate over a local network as a simple,
integrated web server for configuration and downloading dive logs, and
system upgrades.
______________________________________________________________________________________
Revision a
APECS 4™
5 of 63
Date: 01 Nov 14
APECS 4™ OPERATIONAL
INSTRUCTIONS (v.)
• Integrated compass showing all 4 points of the compass rose for easy
positional orientation with concurrent displayed PO2. Displayed Depth,
Time and decompression, window with the compass a future option.
• APECS 4 is part of the independent pressure/water proofed primary and
secondary electronics and power supply’s.
• Independent isolated display system with pressure/gas and water resistant
cabling.
• SubConn connectors. Connectors allow for plug and play features and are
rated for depth of ocean.
• Leak proof, soft touch activation buttons.
• Two button self-intuitive menu navigation and action/confirm system with
10 standard selectable menu options.
• Auto safety-wet sensor or soft touch button system activation.
• Pre-breathe 5-minute countdown timer.
• Pre-dive 8-question checklist.
• Optional operator depth sensor integration or replacement.
• Anti-hypoxia .21 PO2 setting.
• Danger high 1.6 set point setting for expedited in water decompression or
emergency recompression treatment.
• Automatic set point setting (ASP). Pressure sensor independent (failure
point) hands free set point adjustment.
• On the fly set point adjustment and indicator.
• Low battery indicators for head and handset systems.
• Set point quick select up to 3 user pre-select set points.
• Average millivolt and PO2 displayed on main screen.
• Displayed 3 sensor mV and corresponding sensor PO2.
• Voting logic indicator. Indicates a sensor is out of tolerance and removed
from the sensor group.
• System Status Indicator. System heart beat indicating the electronics are not
locked up and are functioning.
• Selectable oxygen dosage. May be adjusted on the fly to allow user to set
the personal settings according to work effort and depth of dive, this may
be used to minimize oxygen spikes. This is accomplished in two ways, by
the ISC adaptive algorithm which controls the amount of time the solenoid
is open, and by the user selectable oxygen off dwell time menu which
increments in intervals of 4,5,6, 7, and 8 seconds off period.
• Air or 100% single point calibration for all independent oxygen monitoring
devices. Fastest calibration method in the world. Less than 3 seconds.
______________________________________________________________________________________
Revision a
APECS 4™
6 of 63
Date: 01 Nov 14
APECS 4™ OPERATIONAL
INSTRUCTIONS (v.)
•
•
•
•
•
Full mixed gas capable.
System may be used with any mix of Oxygen.
High altitude oxygen sensor calibration. 14,700ft/4700m.
No system lockouts.
Handset can independently power main network for back up to main
system power supply.
• System is independent of other network devices for true independent
system monitoring.
The APECS and ISCAN systems strengths come from a practical approach
based off of designer experience and the application of design principles that
closely follows function leading to form and built fit for purpose. Regarding the
functions of the APECS 4™ electronics, it is encouraged that the diver feels
free to push the buttons on the handsets to see what they do, starting with the
Menu and Action/Confirm buttons.
DANGER! The ISC rebreathers and electronics operates by using
batteries, the diver must insure that the batteries are fresh or recharged
enough to conduct the planned diving operation or the batteries must be
serviced if they are in question. Also, the power must be turned on prior
to conducting the diving operation. The Maximum allowed supply voltage
is 10.0 volts in the head batteries, and minimum voltage is 6.0. The
APECS 4 handset battery maximum is 100%. Minimal is 20% or 1/3 of time
needed for decent, 1/3 for ascent or exit, leaving 1/3 for unforeseen
circumstances.
APECS 4™ Operating Instructions
Navigation through Menu:
The APECS 4™ handset has two buttons. The top button is the Action/Confirm
button and it either unlocks access to the set point system if the system is
placed in low power mode, or it can rapidly change from the Low, High or ASP
set points if it is not in a power saving mode. Beware that if the setting is in a
non-power saving setting you could bump the button by accident and change the
set point setting to a lower or higher set point. Always watch your PO2!
______________________________________________________________________________________
Revision a
APECS 4™
7 of 63
Date: 01 Nov 14
APECS 4™ OPERATIONAL
INSTRUCTIONS (v.)
ACTIVATION:
There are 4 ways to turn on the APECS 4™ system. First by gently pushing
the Menu and Action/Confirm button on the side of the handset, 2nd by
wetting your fingers and touching the wet sensors. If you touch the wet
sensors, the APECS 4 will go strait to the dive screen and low Set point.
3rd, the replacement of batteries and power supplies, 4th the plugging in of
certain devices. Notice on the handset the opening screen on the APECS 4™.
The opening screen is the ISC helmet logo and then you will see the colors
Red, Green, Blue and White. This is a display color check. The HUD also will
go through its color check of 3 Greens, 3 Reds, 3 Amber, and flash the current
PO2 or warning. The solenoid will activate 3 times and you will hear an
audible “click” sound to show the actuator releasing the oxygen is not
frozen.
After the colored screen testing is done the Handset will settle on three
options; Breathe, Checklist, and Bypass.
______________________________________________________________________________________
Revision a
APECS 4™
8 of 63
Date: 01 Nov 14
APECS 4™ OPERATIONAL
INSTRUCTIONS (v.)
•
Breathe means “Pre-breathe”. This selection is the first thing the diver
will do prior to diving. The diver selecting the Pre-breathe option by
pushing the Action/Confirm button will display “Turn Oxygen on now”
The diver if they have not already done so, will turn on both gas
cylinders. The diver will then push the “done” button and a 5 min
countdown will start, and the diver will start the pre-breathe sequence.
After the countdown is done the device will go to the dive screen and set
itself to the Low Set Point. At anytime the diver can cancel the
countdown by pushing the Action button the display will go back to the
Pre-dive menu showing “Breathe”, “Checklist”, and “Bypass”.
,
•
Checklist is the next action taken by the diver prior to diving. The diver
will answer 8 questions that help ensure the rebreather is starting in a
safe condition. All questions are logged so please insure you answer
them properly. Once you are in the question and answer mode you must
answer to exit the checklist.
•
Yes or No, Execute checklist?
1.
2.
3.
4.
5.
6.
7.
8.
Yes or No, Calibrate today?
Yes or No, Fresh CO2 cartridge installed?
Yes or No, Negative test pass?
Yes or No, Gas valves on?
Yes or No, Set point at 0.7?
Yes or No, Pre-breathed for 5 min?
Yes or No, Do displays agree@ set point?
Yes or No Any displayed warnings?
NOTE: Any critical question’s not answered correctly will kick you back to
Step 1, and your answer will be logged.
______________________________________________________________________________________
Revision a
APECS 4™
9 of 63
Date: 01 Nov 14
APECS 4™ OPERATIONAL
INSTRUCTIONS (v.)
•
Bypass will bypass all the above and take the diver straight to the dive
screen and menu options will be available.
______________________________________________________________________________________
Revision a
APECS 4™
10 of 63
Date: 01 Nov 14
APECS 4™ OPERATIONAL
INSTRUCTIONS (v.)
NOTE: At anytime before the dive the diver can access the 3 pre-dive
options by scrolling down the menu to the “Checklist” option.
NOTE: The ISCAN system is designed to be “ON” and monitoring relevant
oxygen levels surrounding the diver.
4 activation possibilities:
1. Normal power on by pushing the Menu and Action button.
2. Wet sensors.
3. Replacing batteries or power supply.
4. Installing devices into Primary and Secondary networks.
NOTE: The system is programed to want to stay on, and failure of the
user to insure the system is in an “Off” status can drain batteries if it is
not turned off by the APECS 4 or other ISCAN/DiveCAN handsets.
Deactivation of ISCAN system
______________________________________________________________________________________
Revision a
APECS 4™
11 of 63
Date: 01 Nov 14
APECS 4™ OPERATIONAL
INSTRUCTIONS (v.)
DEACTIVATON:
To turn system off, simply Bypass the pre-dive options and the diver will be in
the dive screen, push the menu button and scroll through the menu items on
the bottom left corner until “Off” is seen. Push the Menu button until “Yes” is
annotated and push the Action/Confirm button.
The only time the diver cannot turn off the system is if the wet sensor is
activated. The diver will not be able to turn off, and adjust calibration settings.
Wet sensor in “On mode.
Primary Handset
The main operational screen will be the diver’s primary diving information on
the current status based on operational priorities. In bold numbers in red <0.5
PO2, or green >0.5 PO2, will be the Average PO2 based off of the 3 sensors
and the voting logic system.
The Average PO2 is what you want to observe primarily for decompression
reasons and to see how close you are to your desired set point. To the left of
the displayed average PO2 is the average displayed millivolts (mV) for all 3
sensors. The diver at any time may observe a color change or blinking of the
displayed sensor mV and that is an indicator of a sensor being voted out. The
diver at that time may menu to the sensor page to see which sensor is voted
out. If this is observed, the voting logic is voting out the sensor and continuing
the averaging of the two remaining sensors. The APECS 4™ and ISCAN
system will self correct if the problem is temporary, if the sensor has failed or
connection is broken the diver must abort the dive and exit the water as soon
as possible observing all displays and being prepared to conduct an immediate
action procedure (IAP). If in doubt of what the diver is breathing, the diver
should bailout to another breathing system.
______________________________________________________________________________________
Revision a
APECS 4™
12 of 63
Date: 01 Nov 14
APECS 4™ OPERATIONAL
INSTRUCTIONS (v.)
System Status Indicator: The SSI is the “heart beat” of the APECS™ and is
indicating the operational status of the electronics; the heartbeat is a
continuous growing circle and on the bottom of the screen. The dive page
(PO2 Display) has an additional indicator (*) which when present indicates the
solenoid is attempting to fire (the diver should also be able to hear the
solenoid fire and oxygen being injected).
WARNING! If for any reason the diver observes one frozen single character
instead of changing, the APECS 4™ has “Locked up” and the primary
system operating the solenoid may be affected. The diver will have to use
the other displays to operate the CCR manually and the diver must exit the
water as soon as possible and use IAP when necessary.
______________________________________________________________________________________
Revision a
APECS 4™
13 of 63
Date: 01 Nov 14
APECS 4™ OPERATIONAL
INSTRUCTIONS (v.)
Menu and Action/Confirm button: Press the Menu button of the primary hand
set and scroll through the menu options, the diver will see the following; S.P (Set
Point), Sense (Sensors) SRC (Source) Batt (Battery’s), Comp (Compass),
Cal(Calibration),Conf(Configuration) Cheklst (Checklist), Log, Info
(information), Off. The diver may select an option from the menu and press the
Action/CONFIRM button and see the option lock into place into a submenu or
some operational information the diver may want to see.
WARNING! It is imperative that the diver does NOT enter the water with a
PO2 and set point of less than 0.5 PO2 in the breathing loop and/or oxygen
cylinder off!!!
DANGER! Do not dive with oxygen sensors older than 1 year.
The Diver at any time may leave the selected option by making a selected menu
change to the APECS 4™ or the system will time out in 5 seconds and go back
to the main diving informational screen unless the diver selects Sens (Sense) or
Comp (Compass) and those two menu items will stay on for the diver to observe
and only be deactivated by the diver by using the Action button.
WARNING! Always insure that you have a breathable P02 in the loop, and
set point that will also support your planned decompression.
The 0.2 set point is an artificial set point of 0.20 and attempts to maintain a loop
PO2 of .20 (Air) at all times. It is not for surface swimming, or diving!!
Assuming the oxygen cylinder is on, the 0.2 is a failsafe set point to avoid
hypoxia, and for pre-diving the CCR to avoid wasting oxygen and battery power
through solenoid injection. The 0.2 set point is only accessed in the
Conf/Solenoid menu items. To turn on or off the 0.2 feature, simply menu to
Conf and press the Action button and you will see Solenoid highlighted and
______________________________________________________________________________________
Revision a
APECS 4™
14 of 63
Date: 01 Nov 14
APECS 4™ OPERATIONAL
INSTRUCTIONS (v.)
press the Action button again and you will see the main dive screen with the 0.2
PO2 displayed or if turned off, one of the three set points.
NOTE: If the 0.2 is displayed, then the diver cannot use the diving set point
options (LOW, HIGH, and ASP) and the diver must turn off the 0.2 option in the
Conf/Solenoid menu.
WARNING! NEVER USE THE 0.2 SET POINT FOR SURFACE SWIMMING, OR
DIVING OR WHEN GEARING UP!
WARNING! INSURE THE OXYGEN VALVE IS TURNED ON WHEN GEARING
UP AND THE BREATHING LOOP PO2 SET POINT IS SET FOR AT LEAST
0.7.
S.P: Set point selection is the first menu item on the dive screen and if it not,
then the diver may push the Menu button until S.P. observed. S.P. may be
accessed by pushing the Action/Confirm button. The diver will see one of
three pre-set S.P items, LOW, HIGH, and ASP. The first set point is LOW
usually that is a 0.7 PO2, HIGH is usually 1.3 PO2, and ASP. ASP stands for
Auto Set Point. Auto Set Point is to be used during rapid descents. ASP is
Set point set for ASP.
S.P. Set on Low (0.7).
______________________________________________________________________________________
Revision a
APECS 4™
15 of 63
Date: 01 Nov 14
APECS 4™ OPERATIONAL
INSTRUCTIONS (v.)
Set point set on High (1.3).normally selected immediately prior to descent; as the
diver descends and PO2 rises in the breathing loop, ASP ensures that the PO2
does not fall below current displayed PO2 at any point. Once the descent is
complete the diver should verify they are factually at the desired HIGH set point.
The ASP starting PO2 is 0.5, and the normal high is 1.3. The diver can select the
maximum PO2 that ASP will maintain on the SET MAX SET POINT in the
Config/Manual menu.
To reconfigure the Low, High and the ASP set points to other fixed PO2’s, the
diver will go to the Conf.- Menu and then Solenoid submenu and Set point.
Set point settings:
• 0.2 (Manual) mode. (None adjustable) Found in Conf-Solenoid menu.
• Low 0.3 to 1.4 (Normal 0.7) S.P. menu: Action button.
• High 0.3 to 1.4 (Normal 1.3) S.P. menu: Action button.
• ASP 0.5 to 1.4 (Normal 1.3) S.P. menu: Action button.
• Danger High 1.6 (None adjustable) Found in Conf-Solenoid menu.
WARNING! The diver must ensure that they have a breathable PO2 at all
times and maintain the planned PO2 to support the planned
decompression.
DANGER! THE DIVER MUST CHECK THE PO2 IN THE BREATHING LOOP
EVERY 1-4 MINUTES.
Other considerations for set point selection are Oxygen CNS toxicity and
Whole body Oxygen toxicity, the planned PO2 must insure that all oxygen
hazards are avoided by prudent CCR diving practices. So use the oxygen set
points wisely.
______________________________________________________________________________________
Revision a
APECS 4™
16 of 63
Date: 01 Nov 14
APECS 4™ OPERATIONAL
INSTRUCTIONS (v.)
Sense (Sensors): The Sensor menu item is the displayed data from all three
oxygen sensors. The displayed data is reflected in individual sensor mV
(millivolts) and PO2. The top sensor displayed is sensor one, then sensor two
and followed by sensor three. The diver can use this data to determine what
sensor has been voted out, when a sensor is out of range (9.0-13mV, sea level,
ambient air)(43mv-62.2mv, sea level, 100% oxygen) and relative speed of
response of each sensor. (Fast response sensors are best). When the sensor
page is selected it will not automatically shift back to the main diving page, the
diver must use the Action button.
The sensor mv is an indicator of sensor degradation (health), the diver may see
how the sensor is performing at all times during the pre-dive, dive, and post-dive,
operations. The diver should record the information on the pre-dive/post-dive
check sheet to monitor sensor life and performance over time. Normal sensor
mv is 9 to 13.0 in air at sea level, 25°c. Sensor mv output will be less at higher
elevations and or lower temperatures. It is a prudent habit to record the sensor
mv at various set points during the dive and to do comparison check on later
dives, or to do the mv calculation and compare results with desired set point to
insure the diver is at the desired PO2.
NOTE: SEE mV calculation at the end of this document.
Sensor 1 is voted out.
Sensor 1 is voted out. Sensor 2 and 3 are below 0.5 but are still averaging
the set point.
DANGER! IF THE DIVER SEES A SENSOR CONTINOUSLY VOTED OUT
AND HEARS THE SOLENOID CONTINOUSLY INJECTING OR THE DIVER IS
______________________________________________________________________________________
Revision a
APECS 4™
17 of 63
Date: 01 Nov 14
APECS 4™ OPERATIONAL
INSTRUCTIONS (v.)
CONTINOUSLY INJECTING OXYGEN MANUALLY WITHOUT THE
CHANGING OF DEPTH, THE DIVER SHOULD SUSPECT THE GOOD
SENSOR IS VOTED OUT AND DIVER SHOULD FLUSH THE BREATHING
LOOP WITH DILUENT AND SET THE SET POINT BELOW 1.0 PO2 OR
SIMPLY BAILOUT!!
WHEN IN DOUBT, BAILOUT!!
SRC (Source) The ISCAN system are controller area networked (CAN) based
electronics and each device such as your HUD, APECS 4 handset, and even the
Solenoid O2 network system are considered individual devices that monitor the
oxygen levels individually and that’s why they calibrate with the oxygen sensors
independently. It would stand to reason that the diver should be able to see what
each device is seeing in regards to the oxygen sensors PO2 and mV. On the
main dive screen you will see one the device names under the displayed PO2
and that is the device that is reading the current PO2. If diver sees “Hand”, that is
the APECS 4, if the diver sees “HUD” or “Sol”(Solenoid) then they are viewing
the displayed PO2 of that device.
It is standard for the diver to have the main dive screen show the Handset so the
diver can know what PO2 it sees. The HUD PO2 will be reflected by the blinking
colored LED on the HUD, and the diver can tell if the solenoid is maintaining the
proper set point by the way it maintains the desired selected set point by injecting
oxygen. Where the SRC feature comes in, is if one of the devices does not
match the other devices for the calibrated PO2 and set point, and then the diver
can use the SRC to compare and trouble shoot the problem which is normally a
bad calibration done by the diver.
______________________________________________________________________________________
Revision a
APECS 4™
18 of 63
Date: 01 Nov 14
APECS 4™ OPERATIONAL
INSTRUCTIONS (v.)
Note: PO2 is displayed.
NOTE: No displayed PO2 or mV.
NOTE: The bottom picture is showing no displayed PO2 or mV. The oxygen
sensors were disconnected from the ISCAN network system in the Meg 15
or Pathfinder head. Also notice that the battery indicator is still showing
green for OK on both head and APECS 4 handset.
NOTE: Calibrate each device at the same time using only ambient air or
100% oxygen at the proper barometric pressure (Altitude) to avoid
confusing readings.
______________________________________________________________________________________
Revision a
APECS 4™
19 of 63
Date: 01 Nov 14
APECS 4™ OPERATIONAL
INSTRUCTIONS (v.)
BATTERY: The APECS 4 uses a rechargeable battery that the user can
recharge using a micro USB/USB cable and APECS 4 connector plug. The diver
should always insure that they have adequate battery % for the length of the
dive, and fully charged is a prudent practice if the diver is not sure. The APECS 4
can be charged from a USB wall charger, PC, or in some cases a solar charger.
Depending on the use of the power save feature, brightness of display, and
temperature, and turning off when not in use, it is not unheard of to dive for
almost two weeks with no recharging when diving 4 hours a day and still have
20% or more left on the battery.
To recharge the APECS 4 handset, slide the recharging plug inside the recessed
track on to the side of the handset in between the Action/Confirm button and
Menu button, and gently engage the pins by pushing down on the lock button to
slide into the receiver. The handset will wake up and the diver can see on the
main dive screen the lightning mark over the battery indicator indicating charging.
The battery is fully charged at 100%. To speed up charging, turn off the handset
and check periodically for complete charging.
______________________________________________________________________________________
Revision a
APECS 4™
20 of 63
Date: 01 Nov 14
APECS 4™ OPERATIONAL
INSTRUCTIONS (v.)
To remove charging plug from handset, simply push the lock button down on the
plug and slide the plug off the track and disconnect the micro USB and store both
components in a dry and protected container to prevent corrosion and damage.
WARNING! The APECS 4 battery must be recharged for the APECS 4 to
operate! It is recommended that 1/3 of the charge is used for decent or
penetration, 1/3 charge for ascent or exit, and 1/3 for in-water unexpected
circumstances.
ISCAN BATTERY:
The ISCAN battery primarily powers the CAN network, solenoid and HUD. The
ISCAN system can be a single 9V battery or two 9V batteries, and each CAN
network is powered by its own power supply, so in the Meg 15 head you could
have 4 9V batteries for extended diving capability and each network has its own
pressure proof box. The Pathfinder CCR uses one 9v battery per CAN network
and both of the 9v are sealed together inside a single pressure proof box.
The ISCAN system and the APECS 4 have a partitioned power supply feature
that gives the diver options in extreme circumstances. If the diver fails to replace
a battery, the ISCAN handset, assuming it is adequately charged, will power the
CAN network but NOT the solenoid, and the diver will have to maintain the
oxygen set point manually. The HUD will be powered by the APECS handset.
If the diver has batteries powering the secondary ISCAN network, then the diver
will have another independent network to manually operate the rebreather.
The Shearwater NERD and Petrel systems are CAN based devices and are
compatible with the ISCAN system and will operate on the same principles
explained above, but at no time will they control the solenoid, that is specific to
______________________________________________________________________________________
Revision a
APECS 4™
21 of 63
Date: 01 Nov 14
APECS 4™ OPERATIONAL
INSTRUCTIONS (v.)
the APECS systems only. Consult Shearwater manual for battery data and
usage/replacement.
WARNING! The lower 9 Volt limit is 6.0 to 5.5 volts; the diver must replace
the battery!
DANGER!
Terminate the dive as soon as practical considering
decompression and other operational factors. Both conditions warrant the
battery to be replaced prior to the next dive!
In most diving scenarios, the diver has adequate time to exit the water without
sacrificing safety.
NOTE: Whenever a device or battery is installed, such as
a handset, HUD, and of course battery, the ISCAN
system in the head may turn itself on. It is the divers
responsibility to check the system and insure it is off
when not in use. Failure to check may result in a dead
power supply.
COMPASS: To activate the compass, simply Menu to Comp and push the
Action button, and the display will lock on displaying the compass. The
compass will show the current direction if held parallel to the diver and the other
3 points of the compass rose will be relative to the direction the diver is facing.
The displayed compass rose will give the diver the ability to box around objects
or do a 180 without having to do any calculations. The compass rose is displayed
in blue and the current average PO2 will be displayed off to the left in Red <0.5
or Green >0.5. To deactivate the compass, push the Action button.
The compass is reasonably accurate, however to do not use for plotting courses
or plotted courses on charts or over horizon navigation and where life and limb
could be effected. The compass shares the same critical characteristic of all
magnetic compasses, so exercise care when using it.
______________________________________________________________________________________
Revision a
APECS 4™
22 of 63
Date: 01 Nov 14
APECS 4™ OPERATIONAL
INSTRUCTIONS (v.)
Calibration of the compass is only when the device requests to be calibrated. The
device will ask to be rotated in a figure 8, so the diver just needs to hold the
APECS 4 handset out in front of them and move the handset in an arcing figure
8.
NOTE: The compass calibration can only be done before the dive out of the
water.
Future features on the compass will display depth, time, and decompression
data.
CALIBRATION OF ELECTRONICS: Calibration is matching the independent mV
output of the oxygen sensors to the electronics and essentially showing the
electronics the characteristics of each sensor. By definition, calibration is taking a
measurement of a device and comparing to a known reference, and in this case
it’s the electronics plus sensors and comparing them to Air or 100% oxygen gas
at a fixed barometric pressure.
When does the diver calibrate?
• When a sensor get replaced.
• Change in reference gas.
• Change in altitude or barometric pressure.
• When using the Pre-dive assembly checklist.
• When the diver has not used the rebreather over several days.
• When in doubt of sensor performance, such as the voting logic is
appearing on a specific oxygen sensor during the course of the dive and
the sensor is less than a year old.
• A good rule of thumb is to calibrate when changing the CO2 scrubber
canister assuming the above is consulted first.
______________________________________________________________________________________
Revision a
APECS 4™
23 of 63
Date: 01 Nov 14
APECS 4™ OPERATIONAL
INSTRUCTIONS (v.)
The APECS 4 and the ISCAN system is a single point 2 optional gas calibration
system with high altitude oxygen sensor adjustment. The diver can calibrate the
electronics to the oxygen sensors using one of two gas references, one being
ambient air (0.21) and the other being 100% oxygen and physically adjust the
calibration parameters for altitude up to 14,700 feet (4,454 m) at a PO2 of 0.12.
To best perform the calibration procedure follow the Pre dive assembly check
sheet and these instructions. When you select the calibration menu, the screen
displays the Percentage of oxygen used for calibration and the altitude used for
calibrations. This will normally be Air (0.21) or 100% oxygen, and 000 ft or
meters sea level. Ensure the calibration reference gas and the altitude are set
properly before calibration.
WARNING! IF THE OXYGEN PERCENTAGE AND ALTITUDE IS SET
INCORRECTLY THE UNIT WILL NOT CALIBRATE CORRECTLY RESULTING
IN A POTENTIALLY LETHAL CONDITION!
DANGER!: Failure to calibrate the sensors to the correct reference gas and
altitude will affect the desired breathing mixture in the CCR breathing loop
that can lead to decompression illness or death from hypoxia or hyperoxia.
Bad Data in is Bad DATA out!!
Warning! Know your reference gas and altitude! Always analyze the oxygen
in the cylinder if 100% oxygen is selected for calibration. If reference gas is
not 100% oxygen, then select Air for the calibration reference gas.
______________________________________________________________________________________
Revision a
APECS 4™
24 of 63
Date: 01 Nov 14
APECS 4™ OPERATIONAL
INSTRUCTIONS (v.)
To start the calibration process, push the Menu button until CAL is displayed
and push the Action button and the calibration page will be displayed. The diver
will see on the left of the screen O2%, Altitude, Device and Done. To the right
and under the word calibrate the diver will see O2% and under that will be either
the reference gas “AIR or 100%. The diver can select either gas by using the
Menu, Action button on the highlighted character. When done the diver can
select “Done” and push the Action button to exit the Oxygen %.
Altitude selection is done the same way as selecting the Oxygen %. Menu to
“Altitude” and push the Action button and the diver can select Alt up or Alt down
until the proper altitude zone is selected.
______________________________________________________________________________________
Revision a
APECS 4™
25 of 63
Date: 01 Nov 14
APECS 4™ OPERATIONAL
INSTRUCTIONS (v.)
The following table illustrates the permissible altitude zones.
Altitude Zone in
FEET (Meters)
> 0 (0)
> 1,200 (327)
> 2,700 (818)
> 4,200 (1272)
> 5,700 (1727)
> 7,200 (2181)
> 9,000 (2727)
> 10,700 (3242)
> 12,700 (3848)
> 14,700 (4454)
LoPO2
in AIR
0.21
0.20
0.19
0.18
0.17
0.16
0.15
0.14
0.13
0.12
HiPO2
at 100%
Oxygen
0.99
0.96
0.90
0.86
0.81
0.76
0.71
0.67
0.62
0.57
NOTE: Once the Altitude zone is selected, the Calc. PO2 will be displayed
at the bottom of the Calibrate page confirming to the diver the reference
PO2 for that altitude.
1. Initial display shows “Current PO2 = .21”. This is the current setting as
last calibrated.
2. Prompt line initially asks > 000 FT and shows = (the current PO2)(current
MAX OXYGEN setting) i.e. .21 ….100.
3. The Action button in this submenu adjusts the Alt. Up or Alt. down. The
bottom point in the zone represents the HiPO2 result as just described.
Example, 21%O2, altitude is 6,500 feet (1,969 meters). LoPO2=0.17,
HiPO2=0.81.
The altitude menu calculates the high point PO2 to be the HiPo2 at 100% oxygen
times the oxygen percentage currently set in the MAX OXYGEN menu and
displays the result as the HiPo2 as the diver selects the appropriate altitude
zone.
______________________________________________________________________________________
Revision a
APECS 4™
26 of 63
Date: 01 Nov 14
APECS 4™ OPERATIONAL
INSTRUCTIONS (v.)
HEAD ONLY METHOD CALIBRATION:
To calibrate the independent ISCAN devices such as the APECS 4, HUD, and
Solenoid, using the head only method using AIR. The diver Menu’s down to the
Device option and pushes the Action button and the Device Icon will be
highlighted. The devices that are physically linked up on the primary network will
be displayed. Assuming the APECS 4, HUD are connected to the primary
network you will see their name. Simply push the Action button and for the first
device and you will see a message stating; “Primary Handset Primary O2
Calibration successful” If you see any other message you have not calibrated
the device and you need to trouble shoot the system.
Calibrating the HUD and the Solenoid is conducted the same as above.
Calibration should take less than 3 seconds for all three devices.
NOTE: If the diver does not see the Device annotated for calibration, the
device may not be connected or has a bad battery.
When done with calibration, simply menu out of the calibration page by pushing
the Action button on “Done” and the diver will go back to the main diving page.
Warning! After calibration, all displays must be within 0.05 ATA/Bar of
each other.
To CALIBRATE USING 100% OXYGEN:
NOTE: Insure the reference gas cylinder has been analyzed prior to calibration of
the ISCAN electronics.
Loop Flush High Point Calibration
1. Perform all Pre-dive check procedures up to the step “Complete
calibration if necessary”. To complete calibration, all performance checks
prior to this need to be completed. Insure that negative pressure check
step was good and apply another vacuum to the loop sucking all the
ambient air out of the loop. Next, close the vent valve on the exhaust
counter lung and fill the loop with 100% Oxygen until the vent valve vents
gas. Let set for 10 seconds.
2. Tightly pinch the inhale breathing hose to isolate the exhaust counter lung
from the oxygen bypass on the inhalation counter lung.
______________________________________________________________________________________
Revision a
APECS 4™
27 of 63
Date: 01 Nov 14
APECS 4™ OPERATIONAL
INSTRUCTIONS (v.)
3. Push the oxygen manual bypass for 3-6 seconds; this will blow 100%
oxygen over the sensors.
4. You now have a purged loop with 100% Oxygen. You will observe the
sensor millivolt output in the APECS 4 display and the normal output is in
the zone of 43 to 62.2 millivolts. Any lower than 43mV, discard.
Note: The lower the sensor mv output at both points of calibration the
lower the sensor mv reading. Beware that the sensor is reaching its end of
useful life.
Warning! After calibration, both displays must be within 0.05 ATA/Bar of
each other.
CONFIGURATION MENU: The configuration menu gives the diver access to the
solenoid functions, Display functions, Clock settings, Units for Imperial and
Metric, and Wi-Fi communication.
To access the Config menu, push the menu button until the diver sees Config
and push the Action button to enter the menu. The diver will see a list of
submenu’s, Solenoid, Display, Clock, Units Wifi, and Done.
The diver can simply select one of the submenu’s by highlighting it with the
Menu button and push the Action button.
Solenoid: The solenoid submenu allows the diver to access solenoid control.
Manual: The 0.2 set point is an artificial set point of 0.20 and attempts to
maintain a loop PO2 of .20 (Air) at all times. It is not for surface swimming, or
______________________________________________________________________________________
Revision a
APECS 4™
28 of 63
Date: 01 Nov 14
APECS 4™ OPERATIONAL
INSTRUCTIONS (v.)
diving!! Assuming the oxygen cylinder is on, the 0.2 is a failsafe set point to
avoid hypoxia, and for pre-diving the CCR to avoid wasting oxygen and
battery power through solenoid injection. The 0.2 set point is only accessed
in the Conf/Solenoid menu items.
To turn on or off the 0.2
feature, simply menu to Conf and press the Action button and you will see
Solenoid highlighted and press the Action button again and you will see the
main dive screen with the 0.2 PO2 displayed or if turned off, one of the three
set points.
NOTE: If the 0.2 is displayed, then the diver cannot use the diving set point
options (LOW, HIGH, and ASP) and the diver must turn off the 0.2 option in the
Conf/Solenoid menu.
Set point: The Set point sub menu allows the diver to pre-set the Low, High,
and ASP set points from Low to High. The diver can do this at any time even
during the dive. The Set point pre-set allows the diver to customize the
oxygen level in the breathing loop instead of the standard 0.7, 1.3, and ASP.
Never use any higher PO2 Set point than necessary. Remember to consider
when selecting new set points the oxygen exposure limits and age and
condition of oxygen sensors.
Set point settings:
• 0.2 (Manual) mode. (None adjustable)
• Low 0.3 to 1.4 (Normal 0.7)
• High 0.3 to 1.4 (Normal 1.3)
• ASP 0.5 to 1.4 (Normal 1.3)
• Danger High 1.6 (None adjustable)
Dwell: Dwell is the off period in between the solenoid injections. Normal
dwell time is 6 seconds but the diver can set the dwell from 4, 5, 6, 7, and 8
seconds. The diver may elect to select a lower dwell time for divers that are
large and are heavy breathers and have a high VO2 and the oxygen
injections are undershooting the set point. The higher dwell times are for
smaller divers or divers that do not have high VO2’s and the oxygen injections
are over shooting the set point. Selecting the correct dwell time will also save
battery power and over use of oxygen. The purpose of controlling the required
off time between solenoid “firing” is to allow time for the oxygen in the loop to
homogenize to help avoid spikes in PO2 and to facilitate the operation of the
Adaptive Injection Algorithm. The duration of time the solenoid is permitted to
“fire” is controlled by the Adaptive Injection Algorithm (AIA). The Adaptive
______________________________________________________________________________________
Revision a
APECS 4™
29 of 63
Date: 01 Nov 14
APECS 4™ OPERATIONAL
INSTRUCTIONS (v.)
Injection Algorithm monitors the current PO2 and adjusts the permitted “firing”
time to maintain the desired set point as determined by ASP(current set point
on descent) or set via the SP menu. The permitted solenoid “firing” durations
range between a .25 second and 4 seconds depending on the rate of
response of current PO2 vs. desired PO2. To access the Dwell time, simply
use the Menu and Action buttons on the highlighted submenu.
•
WARNING! It is the diver’s responsibility to monitor and maintain a
safe PO2 at all times, and to monitor the rate of change of PO2
especially during times of high workload, descents and ascents!
COMPLANCY KILLS!
Dng High: Danger high is an optional 1.6 PO2 set point used for expediting
decompression at 20 fsw (6 msw). Traditionally the diver has to manually add
oxygen to exceed the programed set point to reach 1.6, now the diver can set
the electronics to Dng high. To access the sub menu, simply use the Menu
and Action buttons on the highlighted submenu. Upon programming Dng
high, the main dive screen will be displayed and
1.6 will replace the last known set point. To quickly exit the 1.6 set point,
simply push the Action button and it will take you to the last set point.
•
Done: (Exit) To access the sub menu, simply use the Menu and Action
buttons on the highlighted submenu and the diver will exit.
Display: The display menu allows the diver to enter the submenu’s controlling
the brightness, rotation and power saving features. To access the sub menu,
simply use the Menu and Action buttons on the highlighted submenu.
•
•
•
•
•
Bright: Bright is recommended for high ambient light on land or
underwater.
Med: Medium is the normal brightness mode.
Dim: Is very low light and power saving, but very hard to see in high
ambient light.
Pwr save: The power save feature is used for two functions, one is power
saving and the other is Locking out the Action and Menu buttons. The
diver may select one of the above brightness functions and set the Power
saving function and the handset will dim in about 8 seconds and save
power. To “wake” up the display the diver can push the Action button and
take a look at the display. The other function is to “Lock” the display from
accidental changing of the set point by the Action or Menu buttons. To
______________________________________________________________________________________
Revision a
APECS 4™
30 of 63
Date: 01 Nov 14
APECS 4™ OPERATIONAL
INSTRUCTIONS (v.)
unlock the function, the diver pushes the Action button once to wake up the
display and again to change set points or use the Menu button.
•
•
Rotate: This feature allows the diver to rotate the screen if desired to use
the APECS 4 handset on either arm or ISCAN primary or secondary
network.
Done: (Exit) To exit submenu’s, high light Done using the Menu button
and press the Action button and the diver will be returned to the dive
screen.
NOTE: With the above three options the diver has great flexibility with
which to manage power and handset readability.
CLOCK: The clock allows the diver to set relative time in 24hour time increments
and the current date. This is important for logging purposes. To set the time and
date the diver just has to use the Menu and Action button and highlight the
desired function and press Action to move to the next function or use menu to
add or subtract a character. The date is displayed as Month/Day/Year.
UNITS: The Units menu allows the diver to choose between metric and imperial
units of measurement and Fresh and Salt water. Care should be taken that both
the primary and secondary systems are set to the same setting to avoid
calibration problems.
Wi-Fi: The Wi-Fi communications system is a feature that allows the user to
upgrade or enter feature sets in the APECS 4 and the ISCAN system.
To access Wi-Fi mode, Menu and press Action button to enter Conf, highlight
using the Menu and Action buttons on Wi-Fi. Enter the Wi-Fi and the diver will
see one of two modes; Join or A.P.
______________________________________________________________________________________
Revision a
APECS 4™
31 of 63
Date: 01 Nov 14
APECS 4™ OPERATIONAL
INSTRUCTIONS (v.)
A.P. (Access Point) A.P. initially enables Wi-Fi network configuration. A.P. is the
first thing the diver will set up to the diver will enter information needed so the
APECS 4 and ISCAN systems can join the divers existing network.
A.P. also provides user information and access to diving logs.
A.P. will not allow the user to perform firmware updates.
JOIN: Join mode is used when the user has already programmed through A.P. a
current user network and is used to rejoin that existing network.
A.P. OPERATION: Enable the highlighted A.P. mode using the Menu/Action
buttons. The system will activate A.P. and it will take about 30 seconds. The
diver will see “Trying”. Once the APECS 4 fully enters A.P. mode, it will display
the name of the network it created (SSID). The APECS 4 will also display a URL
that the diver can enter into a web browser and connect to the handsets integral
webserver.
Once the APECS 4 A.P. mode, the diver can use their phone, laptop, desktop, or
other devices that has Wi-Fi to connect to the APECS 4 SSID number.
Example: iPhone, go to the phone settings, access Wi-Fi and look for “Choose
network” and look for the APECS 4 SSID number, and push the option. The
phone should now see and checkmark the APECS 4 SSID number.
(HNDO1131512P) and your phone or device is now connected.
NOTE: If the APECS 4 does not have an SSID number, it will be A4.1CE.
NOTE: APECS 4 handset may be connected or disconnected to the ISCAN
system (Meg 15 head, Pathfinder head, or other ISCAN electronics) for it to
connect. But for total system firmware updates, all devices need to be
connected.
______________________________________________________________________________________
Revision a
APECS 4™
32 of 63
Date: 01 Nov 14
APECS 4™ OPERATIONAL
INSTRUCTIONS (v.)
Next is to use the connected device web browser to connect to the APECS 4
integrated web server. When in A.P. mode the URL will be http://192.168.111.1/
iPhone photo.
The above screen may be used to enter information that will allow the APECS 4
to connect to your home or hotel’s Wi-Fi network.
At this time the diver may enter the Wi-Fi network name into the SSID field and
enter the passcode into the security field. The diver may enter authentication
options on how the APECS 4 gets it’s IP address.
Owner information filed is for the owner to program the APECS 4 with their name
and contact information such as email. This information will be present on the
Menu item “Info” screen.
Viewing dive logs link: This option will give a diver a list of all available dive
logs. The diver can click on them to download the diver log data as a CSV file
that can be imported into an Excel or some other spreadsheet application. The
dive logs link is best used with a computer.
______________________________________________________________________________________
Revision a
APECS 4™
33 of 63
Date: 01 Nov 14
APECS 4™ OPERATIONAL
INSTRUCTIONS (v.)
After the data has been filled in, push the submit button at the bottom of the
page. Next is to go back to the APECS 4 handset and select “Off” (NOT
DONE!!) Off is the highlighted “Off” icon. Selecting off turns off the Wi-Fi and the
screen will go back to the initial Wi-Fi screen. If you did push “Done” instead of
“Off” you may return to the screen and select “Off”.
Once the Wi-Fi has been turned off, and the diver has programmed the new
SSID and pass code and applied the “Submit” button, the diver will see two new
Wi-Fi menu options: Join and Forget. If the diver does not see the additional
options then the diver did not program the SSID or push the “Submit” button.
Join enables the user to access the users programmed Wi-Fi network, and will
appear with A.P. menu option on Wi-Fi start up.
Forget enables the user to erase the SSID and passcode from the APECS 4 and
will remove “Join” from the initial Wi-Fi start up.
Once the APECS 4 has been successful in joining the Wi-Fi network, the screen
will again display an SSID and URL. The SSID will be the new programmed one.
The URL will show the IP address of the local router assigned to the handset.
If the diver uses a laptop or phone and connects to the same SSID, the diver can
enter the URL into the browser to get to the APECS 4 internal web server.
Upload feature: The upload feature can transfer log files to the ISC server. This
is not useful for the diver unless the diver is experiencing strange behavior, or the
log files need to be reviewed by ISC. This is a diver option not generally
accessible by ISC.
Update feature: The update feature allows the APECS 4 and any connected
devices to connect to the ISC server to see if there are any firmware updates
available for the system. The system will either say everything is up-to-date, or
give the diver the option of updating devices. The system will tell the diver how
many items to down load such as 5 and tell the diver what items of that 5 have
been downloaded. While updating, a progress percentage will be displayed until
100% is reached.
All system devices after the upload of new firmware will automatically reboot with
the exception of the APECS 4 handset. The APECS 4 waits until it is done
updating all the devices and then asks the diver to “Reboot” the diver should say
“Yes”.
______________________________________________________________________________________
Revision a
APECS 4™
34 of 63
Date: 01 Nov 14
APECS 4™ OPERATIONAL
INSTRUCTIONS (v.)
In the future, ISC will provide other features such as Decompression computer
with a removable depth sensor system, and other firmware/hardware that will add
more advanced features for the divers enjoyment. ISC will post upgrades on the
web site www.megccr.com and on social medial sites.
To program future features, the diver will need to use a special log in and use the
serial number on the APECS 4. When the diver performs the “Update” the
APECS 4 will see the new feature and ask the diver to “Enable” to turn it on.
STEPS IN ORDER:
1. Enter A.P. mode.
2. Connect to the APECS 4 web server using the specified Wi-Fi network name
(SSID) and URL.
3. Enter Wi-Fi network information.
4. Turn Wi-Fi off on the APECS 4.
5. Select Join to connect to programmed Wi-Fi network.
6. Once connected, select “Update” to get the latest firmware. If there is an
update for the APECS 4 handset, select “Reboot” when it asks. If no update
available, select, “Off” to turn off Wi-Fi.
7. To down load dive logs, use “Join” or “A.P.” and connect to a computer.
Secondary Network
The secondary ISCAN network is an optional CAN based network that the diver
can use with any APECS handset or a Shearwater dive computer system that is
Dive CAN based. All the diver has to do is connect a device into the Secondary
network and install the battery into the power supply. The secondary network is
totally isolated from the primary system in regards to information, power supplies,
and calibration, the secondary network does not control the solenoid in any way.
The secondary network is a monitor system only. The only commonality between
the primary handset and the secondary handset are the sensors, each displaying
the sensor output. The secondary and the primary handsets are truly isolated
and independent from each other. It has been shown that a severed hand set
cable (bare wires in salt water) does not affect the independent systems
HUD Operation
The HUD is only available on the secondary handset system of a dual APECS
system or on the Primary handset on a Shearwater configuration; it displays the
3 individual sensors by color and number of blinks. The diver may at any time
______________________________________________________________________________________
Revision a
APECS 4™
35 of 63
Date: 01 Nov 14
APECS 4™ OPERATIONAL
INSTRUCTIONS (v.)
turn off the HUD especially after the dive to save battery power and may turn it
back on at any time.
Note: If the HUD is disabled and the PO2 falls below 0.5 the HUD will
automatically enable until such time as the PO2 rises above 0.5 at which time it
will automatically disable.
The HUD brightness may also be adjusted to bright and dim. The dim may be
used when there is no ambient light and the bright may be too bright. The dim
does not save any more power as the bright; in fact it uses more power.
The HUD is a powerful indicator to you and your buddy or student, at any time
the buddy/instructor can see what you/buddy/student are breathing and the
condition of each sensor by looking at the color and number of blinks.
The following is a brief explanation of the HUD color and number system (single
LED HUD).
Color
Red
PO2
<0.50
Red
Red
Red
Red
Orange
Green
Green
Green
Green
Green
0.5
0.6
0.7
0.9
1.0
1.1
1.2
1.3
1.4
>1.5
Blinks
Rapid
Blink
5 Short
4 Short
3 Short
1 Short
1 Short
1 Short
2 Short
3 Short
4 Short
Rapid
Blink
Condition
Preliminary alert to a HYPOXIC loop.
Ambient air.
Post calibration on O2
Preliminary alert to HYPEROXIC loop.
Example: During the dive the diver has a set point of 1.2, the diver will observe
the following on the HUD, Sensor 1, green blink blink, pause, Sensor 2, green
blink, blink, pause, Sensor 3, green blink blink, long pause and back to Sensor
one again.
Note: The system is very simple and is more complex to explain then to interpret.
NOTE: ALTERNATING RED/GREEN FLASHING IS AN INDICATOR THAT
THE HUD IS OUT OF CALIBRATION.
______________________________________________________________________________________
Revision a
APECS 4™
36 of 63
Date: 01 Nov 14
APECS 4™ OPERATIONAL
INSTRUCTIONS (v.)
DUAL LED HUD: The dual LED configuration features two LEDs oriented
approximately 90 degrees apart to facilitate divers with various degrees of color
blindness. The upper LED is dedicated green and the lower LED is dedicated
Red. The blinking pattern is identical to the table above with the exception of a
PO2 of 1.0 will cause both the red and green LEDs to blink instead of one LED
blinking orange.
DANGER! The diver at all times must be aware of the proper operation of
the primary and secondary systems. If the primary network at anytime fails
to activate and display the PO2 on the APECS 4 or HUD, your solenoid may
not activate due to the failure.
DANGER! If the secondary network fails and assuming you are using an
ISC approved decompression computer, you may not be able to use the
decompression computer. The diver must insure that they carry an
independent decompression calculating system.
APECS / SHEARWATER PURSUIT CONFIGURATION
ISCAN hardware, in combination with APECS 4, permits safe integration of
third party decompression solutions. At present only one product has met
the stringent criteria and testing for integration with ISC CCR’s and that is
the Shearwater Dive Computers with Dive CAN. Integration is achieved by
Plugging in the secondary network. The Shearwater is powered by it’s own
internal battery. The ISCAN secondary network provides information to the
Shearwater device and provides real time decompression data to the diver.
The ISC I22D oxygen sensor cells are connected to the Primary and
secondary networks via isolations system. A fault with either the Isolation
board or the Shearwater system or cable will not affect the APECS/ISCAN
network and vice versa.
Operational instructions and operating procedures and limitations as well
as software updates and support are available directly from Shearwater
Research Inc. (www.rebreather.ca).
______________________________________________________________________________________
Revision a
APECS 4™
37 of 63
Date: 01 Nov 14
APECS 4™ OPERATIONAL
INSTRUCTIONS (v.)
DESCRIPTION AND MAINTEANCE OF THE MEG 15 HEAD ASSEMBLY
The Meg 15 head assembly is a generation change to the time tested Megalodon
head assembly that use the APECS 2.5/2.7 and the U.S. Navy MK-28.
MEG 15 head assembly, with APECS 4
Item description on top of Meg 15 head
______________________________________________________________________________________
Revision a
APECS 4™
38 of 63
Date: 01 Nov 14
APECS 4™ OPERATIONAL
INSTRUCTIONS (v.)
Underside of Meg 15 head
______________________________________________________________________________________
Revision a
APECS 4™
39 of 63
Date: 01 Nov 14
APECS 4™ OPERATIONAL
INSTRUCTIONS (v.)
SubConn Waterproof connectors.
ISC is fundamentally against connectors as they decrease reliability by the
overuse or incorrect use by the user. ISC has identified a waterproof connector
that used wisely and correctly will offer years of reliable performance.
The SubConn Connector is a water/pressure proof connector that is rated for
depth of ocean. It has 5 gold contact conductors encapsulated in EPDM rubber
and the connector is designed to be a dry or wet plug.
The ISC Meg 15 and Pathfinder CCR systems use the SubConn connectors to
provide the diver with options of easily replacing a damaged or failed device, or
making custom configurations by easily switching positions of ISCAN devices.
Each ISCAN network on the Meg 15 head assembly has two SubConn
connectors; 2 Primary and 2 Secondary. The APECS 4 is connected to the
Primary network on the left shoulder connector and issues user commands to the
Solenoid. The HUD is connected to the Right shoulder Primary connector.
If the diver wishes to use the Secondary network, then they must install the
battery and connect another device on the Right SubConn connector. The device
may be another APECS 4 or a Shearwater DiveCAN computer. The remaining
secondary connector MUST have a blank SubConn installed to prevent
damaging the connector.
The Pathfinder head SubConn connectors is the same with the exception of
having one less Secondary connector.
WARNING: Do not dive with any disconnected SubConn connectors!
Handling:
• Always protect SubConn connectors when not connected to head assembly.
• Always leave connector installed, unless for maintenance or travel.
• Inspect for corrosion on connectors after long storage, every month, or before a
diving trip.
• Lightly grease connectors with approved grease.
• Disconnect by gently gripping the plug and not the wire and pulling straight out
not at an angle.
• Install connectors by gently pushing straight into female connector port and lock
down with locking sleeve.
______________________________________________________________________________________
Revision a
APECS 4™
40 of 63
Date: 01 Nov 14
APECS 4™ OPERATIONAL
INSTRUCTIONS (v.)
Cleaning:
• It is best to clean all electrical connectors with 100% isopropyl alcohol but only if
corrosion is observed. Only use other contact cleaners on the outside of the
breathing loop.
• Use a soft toothbrush for gently cleaning the conductors on the SubConns.
• New grease must be applied after cleaning!
SubConn connector for APECS 4/Aux Devices
______________________________________________________________________________________
Revision a
APECS 4™
41 of 63
Date: 01 Nov 14
APECS 4™ OPERATIONAL
INSTRUCTIONS (v.)
Alcohol can clean all electrical contacts and displace water from a flood!
Corroded SubConn and damaged EPDM seal from lack of grease.
______________________________________________________________________________________
Revision a
APECS 4™
42 of 63
Date: 01 Nov 14
APECS 4™ OPERATIONAL
INSTRUCTIONS (v.)
Connector cleaning kit
WARNING!
Do not use electrical solvents or cleaners on electrical connectors inside
the breathing loop. Only use 100% Alcohol.
See YouTube video on SubConn care.
______________________________________________________________________________________
Revision a
APECS 4™
43 of 63
Date: 01 Nov 14
APECS 4™ OPERATIONAL
INSTRUCTIONS (v.)
•
•
•
•
OXYGEN SENSORS
Use only the approved ISC I22D oxygen sensors. They are the only sensors tested
with the Meg-15 and ISC rebreathers.
Replace oxygen sensors once a year or from the date of receiving in the mail.
Check the manufacture date and insure the sensors are not over 6 months old first.
If they are contact ISC.
Do not use oxygen sensors in CCR if they are not acting perfectly from when
they were new!
See System requirements page for more information.
Removal of Oxygen Sensors:
• Unscrew sensor carriage 3 complete turns to loosen sensor plate.
• Remove O-ring locking down the sensor plate by pulling on the finger tab.
• Gently remove sensor plate with all three oxygen sensors.
• Do not drop sensor plate or sensors!!!
• Remove one or all oxygen sensors from plate by unscrewing sensor lock nut.
Reinstallation of oxygen sensors:
• Label oxygen sensor before installing with date and position of sensor in docking
port.
• Install oxygen sensor into their respective docking port.
• Place the sensor plate on top of the sensors and secure the sensor locking nuts.
• Replace the sensor plate O-ring and insure the tab is sticking out the side.
• Twist the sensor carriage back down snug and not tight! Sensor plate should be
secure and not move. The sensors must be tight in the docking port and not loose.
• Check plate for movement.
______________________________________________________________________________________
Revision a
APECS 4™
44 of 63
Date: 01 Nov 14
APECS 4™ OPERATIONAL
INSTRUCTIONS (v.)
______________________________________________________________________________________
Revision a
APECS 4™
45 of 63
Date: 01 Nov 14
APECS 4™ OPERATIONAL
INSTRUCTIONS (v.)
______________________________________________________________________________________
Revision a
APECS 4™
46 of 63
Date: 01 Nov 14
APECS 4™ OPERATIONAL
INSTRUCTIONS (v.)
______________________________________________________________________________________
Revision a
APECS 4™
47 of 63
Date: 01 Nov 14
APECS 4™ OPERATIONAL
INSTRUCTIONS (v.)
Replacing Meg 15 9 Volt head batteries: The Meg 15 head has two
independent ISCAN networks the Primary and Secondary that are individually
powered by 9 volt batteries in respective pressure proof boxes. The Primary side
has the “Danger” sticker on it and the Secondary has the “Warning” sticker on it.
Each network is independent from the other and the Primary is the only side that
powers the solenoid that feeds the oxygen to the breathing loop assuming the
set point oxygen addition system is used and oxygen is turned on.
Each network can independently operate off of one 9V battery or two, and having
one 9V battery in the Primary network will effect the endurance of the electronic
powered solenoid. If the Primary battery dies, the diver will have to maintain the
fixed PO2 (Set point) manually and that should never be a problem for a welltrained CCR diver.
At worst case if the diver kills the Primary or Secondary 9 Volt battery, the
APECS 4 handsets themselves to including the ISC/Shearwater DiveCAN
computer can power the network itself, but again not the Oxygen solenoid.
______________________________________________________________________________________
Revision a
APECS 4™
48 of 63
Date: 01 Nov 14
APECS 4™ OPERATIONAL
INSTRUCTIONS (v.)
Battery replacement steps:
• Turn off all electronics at the handsets.
• Unscrew the respective top of the power supply.
• Carefully remove either one or two batteries.
• Reinstall new battery and carefully place wires on top.
• Coat the O-ring seal inside the battery box with Dow Corning 111 and replace
battery lid.
• Screw down screws being careful not to cross the threads.
• Only screw down screws until snug and not tight!
• Turn on system and check for battery levels and document in Pre-dive assembly
check sheet.
• Insure you turn off all the networks from the APECS handset or Shearwater
DiveCAN handset or the system will be operating and kill the batteries.
NOTE: Replacing batteries will activate the ISCAN networks. It is the divers
responsibility to insure they are turned off.
4 Activation commands to activate the ISCAN systems.
• Pushing the Menu and Action button together.
• Wet sensor activation.
• Plugging in the SubConn connectors.
• Replacing batteries!
______________________________________________________________________________________
Revision a
APECS 4™
49 of 63
Date: 01 Nov 14
APECS 4™ OPERATIONAL
INSTRUCTIONS (v.)
PATHFINDER HEAD
Top of Pathfinder head
______________________________________________________________________________________
Revision a
APECS 4™
50 of 63
Date: 01 Nov 14
APECS 4™ OPERATIONAL
INSTRUCTIONS (v.)
______________________________________________________________________________________
Revision a
APECS 4™
51 of 63
Date: 01 Nov 14
APECS 4™ OPERATIONAL
INSTRUCTIONS (v.)
______________________________________________________________________________________
Revision a
APECS 4™
52 of 63
Date: 01 Nov 14
APECS 4™ OPERATIONAL
INSTRUCTIONS (v.)
Removal or Oxygen sensors:
• Use only ISC I22D sensors.
• Remove retaining O-ring from sensor plate.
• Remove sensor plate.
• Remove sensor from plate.
• Remove Molex connector from sensor by using a pick or gently wiggling the
connector. Do not pull on sensor wire.
NOTE: DO NOT PULL ON SENSOR WIRES TO REMOVE MOLEX
CONNECTORS! YOU WILL DAMAGE THE CONNECTOR!
Replacement of oxygen sensors:
Do the reverse of above. Insure the sensor plate is placed as it was before
removal to prevent damaging of wires.
______________________________________________________________________________________
Revision a
APECS 4™
53 of 63
Date: 01 Nov 14
APECS 4™ OPERATIONAL
INSTRUCTIONS (v.)
Installation and removal of batteries:
The removal and installation of the 9 Volt batteries are the same as the Meg 15
but with the exception, the Pathfinder uses one 9 Volt battery per network.
Meg 15 and Pathfinder system requirements with APECS 4:
1, 1 or 2 9Volt batteries for each operating Primary and Secondary network.
2, Micro USB to Standard USB cable and charging adapter for charging APECS
4.
3, 3 ISC I22D oxygen sensors that are within 1 year of receiving date.
4, Molycote 44, Molycote 111, Dow Corning 111 for Subconn connector
lubrication.
5, 100% isopropyl alcohol and soft brush for cleaning electrical contacts.
6, Oxygen analyzer for analyzing 100% oxygen in supply cylinder.
7, Ambient air or 100% oxygen for calibration.
8, Meg 15 or Pathfinder checklist.
9, These directions and phone number to contact ISC if there is any questions on
safe operation.
10, A safe diver that assumes responsibility to read and learn these directions
and applies them as well as the skills and proper attitude along with physical
ability, as intended for safe underwater CCR diving operation. Failure to apply
equals a dead diver or at the very least a very scared one.
______________________________________________________________________________________
Revision a
APECS 4™
54 of 63
Date: 01 Nov 14
APECS 4™ OPERATIONAL
INSTRUCTIONS (v.)
ADVANCED OXYGEN SENSOR KNOWLEDGE
Calculating mv: The diver knowing what the expected mv output from each
oxygen sensor at relative PO2 exposure is a handy tool. The diver can calculate
the calibrated PO2 from the mV. This tool can insure that the diver is in fact using
100% oxygen for calibration or know an expected PO2 at depth. This can aid in
finding a sensor that is not performing as expected or a bad gas.
The ISC I22D oxygen sensors have a mV output of 9 to 13mV at sea level,
ambient air, at temperature of 77°F/25°C. It stands to reason doing some simple
math the mV output of sensors at 100% Oxygen would be 43.0mV to 62.2mV,
assuming a 9.0-13.0mV output. So the diver if using an analyzed gas of 100%
Oxygen, would expect to see the above results.
The math is simple.
1, Measure the sensor mV output in ambient air at sea level, using the CCR
electronics.
2, Divide the sensor output (mV) by the ambient air (20.9). (First convert
relevant numbers to decimal).
3, Multiply the calculated output by 100 (100% oxygen) The expected answer will
be the mV output for 100% oxygen.
(Note: The mV output can vary between the independent networks due to
differences in electrical components. That is one more reason why we
calibrate).
Example 1: Calculate the expected mV output when calibrating with 100%
Oxygen.
1, Sensor 1 measures 9.0mV in ambient air.
2, 9.0⁄.209=43.06mV Calculated at 100% Oxygen.
Example 2: Calculate the expected mV output when calibrating with 100%
Oxygen.
1, Sensor 1 measures 13.0mV.
2, 13.0⁄.209=62.20mV calculated at 100% Oxygen.
______________________________________________________________________________________
Revision a
APECS 4™
55 of 63
Date: 01 Nov 14
APECS 4™ OPERATIONAL
INSTRUCTIONS (v.)
The CCR diver can use this math to do a tabletop linearity check on the sensors
if they did not calibrate that day assuming the supply gas is in fact 100%.
What if the diver did not get the calculated mV output on the linearity test or
during calibration what was thought to be 100% Oxygen?
1, Sensor 2 in air measures 10.6mV.
2, 10.6mV⁄.209=50.71mV
3, 50.71mV×1.0=50.71mV calculated.
4, But the actual mV output was 40.68mV. Why?
5, What is the % of Oxygen?
6, 40.68mV⁄50.71mV=.8022
7, .8022×100(O2%)=80.22% Oxygen. Why?
The question above is….
1, What is wrong with the oxygen analyzer?
2, Why did the diver only get 80% oxygen instead of 100%?
3, Why is this cylinder filled wrong?
4, Was it labeled wrong?
5, How old are the CCR sensors? Are they within one year shipping from the
factory?
7, Is the diver using ISC I22D sensors or non-approved sensors.
The rule is; If there is any doubt than there is doubt, do not dive unless you
are 100% convinced of what you are breathing and you will be safe.
The next calculation is calculating PO2 at depth using the sensor mV.
1, Sensor 1 measures 9.0mV.
2, 9.0⁄.209=43.06mV
3, 43.06mV×1.3 PO2 (Set point)=55.978mV calculated mV output.
4,55.97mV expected output of oxygen sensor at 1.3 set point at any depth below
10fsw/3msw.
The proper technique is to calculate all the sensors in air and then multiply that
result by the intended S.P. and write it down on a piece of white electrical tape
using a permanent sharpie pen. Place the tape on the side of the handset and
the diver can compare the outputs on the fly during the dive, especially when the
APECS 4 is in Sens menu displaying all of the millivolts and the calibrated PO2.
When the diver is at 330 fsw/100msw deep in a cave there is no better feeling
when all the Oxygen sensor millivolts are within 1 or 2 mV to what the diver
calculated and all the displays are in agreement.
______________________________________________________________________________________
Revision a
APECS 4™
56 of 63
Date: 01 Nov 14
APECS 4™ OPERATIONAL
INSTRUCTIONS (v.)
What does the diver do if the calculated mV does not match the actual output?
When in doubt bailout! Do not try to understand what is wrong just save
your life or the life of your buddy!
Understanding why the sensors are not matching up with the calculated mv or
calibrated PO2.
1,How old are the oxygen sensors. Are they within 1 year of shipping from the
factory?
2, Are they ISC approved sensors? (ISC I22D).
3, Were the electronics calibrated correctly?
• Ambient air.
• Correct Oxygen %.
• Correct altitude.
• Possible barometric pressure swings.
• Correct depth and oxygen exposure assuming at depth calibration. (Saturation
diving only)
• Calibrating under pressure when not designed to do so.
• Extreme over pressurization of oxygen sensor during calibration, I.E excessive
oxygen flow, breathing loop above 30mb, encapsulated over pressurization.
• New oxygen sensors not conditioned prior to installation.
• Possible tolerance stacking or errors.
• Premature calibration when the oxygen levels were not appropriate at the moment
of calibration.
• Excessive moisture buildup on sensors prior to calibration.
• Conductor wires damaged or excessive corrosion.
• Excessive water on sensor effectively shorting out or interrupting outputs.
• Diver mistaking the incorrect button for calibration.
• Power interruption or fluctuation interfering with output.
• Damaged sensors from handling. I.E. dropped.
• Sensors stored or exposed to excessive temperatures before calibration.
______________________________________________________________________________________
Revision a
APECS 4™
57 of 63
Date: 01 Nov 14
APECS 4™ OPERATIONAL
INSTRUCTIONS (v.)
Avoiding the dreaded voltage limited sensor:
Most eCCR’s rebreathers share a common voting system called “Sample data
control”. All rebreathers should have 3 sensors, as the saying goes, 1 is none, 2
is 1 and 3 is two. With 3 sensors you have an odd number system that can “Vote”
the odd man out or bad sensor in this case, but it can also vote the good sensor
out.
Since the sensors are the eyes of the rebreather, they send millivolts (Voltage)
down wires to the electronics, and the electronics via calibration make sense of
what the output is from the sensors, and the diver understands that as PO2
displayed on the handset.
If a sensor is somehow compromised such as being too old, it will not put out the
proper level of millivolts and in fact it will be too low and if it is a single failing
sensor it will be voted out and removed from oxygen addition system that
controls the solenoid. The other two sensors will then average the PO2 and send
signals to the solenoid to add oxygen when required.
The dreaded mV limited sensor is when two sensors go bad or all three go bad
and average the millivolts from the sensors and they cannot reach the required
mV to achieve a set point above 1.0 or higher, and they keep injecting oxygen to
try to reach the required mV output. But what happens is the diver thinks they are
breathing a PO2 of 1.3, but in reality a 2.0 or 4.0 PO2! And suffer an O2 hit as a
result.
HOW TO AVOID! CHANGE THE SENSORS YEARLY!!! USE ONLY ISC
SENSORS!!! As of 12 March 15, ISC has had a 0.03% failure of ISC sensors.
A near perfect performance.
DIVING SIGNS OF mV LIMITED SENSORS!
• A Sensor gets voted out and stays voted out.
• Sensors that are acting slow.
• Solenoid keeps injecting or you are constantly adding oxygen manually, and
you are not ascending.
• You know you have old sensors or you know you are diving the wrong ones!
Bailout if you have doubt! If there is any doubt then there is doubt and
bailout!
______________________________________________________________________________________
Revision a
APECS 4™
58 of 63
Date: 01 Nov 14
APECS 4™ OPERATIONAL
INSTRUCTIONS (v.)
ISC CCR ORDER OF PRIORITY.
The order of priority is simply an organized set of rules that establishes an
organization maintaining the breathing loop and buoyancy to help the CCR diver
to “Get it right” as fast as possible, and minimize task loading and maximize fun.
There are no exceptions to these rules!
1, Know your PO2! This includes:
• Checking the PO2 of oxygen in the breathing loop every 1 to 4 minutes, and this
includes your CCR buddies.
• Analyzing all breathing mixes to including the oxygen and properly labeling all
cylinders with MOD in meters or feet, mix contents with Oxygen first, followed
by Helium, and date of analyzing, and the initials of person who analyzed, and is
using the cylinders.
2, Maintain proper loop volume! This is not minimum loop volume, which is
improper but “optimal loop volume”. Optimal loop volume is the same breathing
volume experienced during fast moving activities such as a fast walk. The diver
does not experience any collapse and bottoming out of the counter lungs except
on descents and increasing depth of breathing that requires the addition of
diluent gas via the ADV. Minimum loop volume is to be avoided as it unnaturally
increases the expired PCO2 in the divers body and work of breathing (WOB) to
include levels of stress.
3, Drysuit: If the diver is a diving a drysuit the addition of any gas is next on the
order of priority.
4, BCD: The BCD is the last order of priority and should not be used until the
other three are addressed with Oxygen addition and PO2 being first, loop volume
next and dry suit. Fundamentally the BCD should never be used unless on the
surface. If the dry suit is used, the diver is over weighted with lead or is using a
foam dry suit, and it compresses at depth leaving the diver overweight and
compensating using the BCD.
The point of above is to maintain the rebreather in a safe condition and keep the
diver alive, next is to address buoyancy issues for the diver to increase comfort
and minimize task loading.
______________________________________________________________________________________
Revision a
APECS 4™
59 of 63
Date: 01 Nov 14
APECS 4™ OPERATIONAL
INSTRUCTIONS (v.)
How to survive on a CCR.
Bailout?: Carry the appropriate amount of bailout, but you all ready knew that.
This is not about carrying bailout, this is about staying safe on the CCR so you
never need the bailout. If you do the below correctly, only someone else will need
bailout.
Assuming your are properly trained: Your initial training is not enough, you
must use your CCR to maintain proficiency on the equipment and skills. Get
training from the best instructor possible.
Do not let apathy control behavior: The wrong attitude doing any risky sport
leads to higher risk of failure and it does not add to any enjoyment to the sport.
Do not suffer from normalcy bias: Also known as analysis paralysis, if you
know something is wrong or suspect, DO SOMETHING ABOUT IT!!! Do not
freeze and delay or think about it. React appropriately and save a life.
Follow the Pre-dive assembly checklist to the letter: Before using your
rebreather, put it together correctly using a check sheet and insure it works
before moving it to the beach or boat. Give your rebreather the same respect and
care as you would a parachute, firearm, or even a small child. Hygienically clean
it at the end of the diving weekend or every three days of diving.
Analyze, analyze, analyze!: Know what is in your cylinders at all times. FO2,
PO2, END/EAD, He, Argon, CO and label everything with gas contents, date of
analysis, and your initials. Write MOD on the side of the cylinder and the bottom.
Use the best O2 and He analyzer. For all diluent cylinders insure that you check
for He also. What you think is air could have He in it.
Have the correct sensors installed: Use only ISC I22D sensors and change
them every 12 months from date of receiving them from the factory. All other
sensor manufactures have failed to live up to scrutiny and only proved to prematurely fail.
Turn on your oxygen: This is so obvious, but many divers have died or had
close calls because of this simple valve.
Pre-breath prior to the dive: Pre-breathing is a process of insuring gases are
on, all cylinder gases can flow into the loop, all displays agree, no alarms, and
______________________________________________________________________________________
Revision a
APECS 4™
60 of 63
Date: 01 Nov 14
APECS 4™ OPERATIONAL
INSTRUCTIONS (v.)
check valves work to circulate breathing gas and breathing loop is sealed. It has
nothing to do with pre-heating the CO2 absorbent.
Watch your PO2 and your buddies every 1 to 4 minutes: Be aware of yourself
and buddy.
Learn to assist another diver in distress: If you were in trouble underwater,
you would want help from someone who is trained to render help. Trained divers
have saved unconscious divers.
Do not dive if you have any doubt: If there is doubt then there is doubt. Do not
breathe from the breathing loop.
Stay alert stay alive: Exercise situational awareness and enjoy yourself at the
same time.
______________________________________________________________________________________
Revision a
APECS 4™
61 of 63
Date: 01 Nov 14
APECS 4™ OPERATIONAL
INSTRUCTIONS (v.)
NOTES
______________________________________________________________________________________
Revision a
APECS 4™
62 of 63
Date: 01 Nov 14
APECS 4™ OPERATIONAL
INSTRUCTIONS (v.)
REVISION
INDEX
Date
Revision
CHANGES
1 Nov 14
1 Dec 14
NEW
Meg 15
9 March 15
Pathfinder
Added Pathfinder system.
15 April 15
Edit
Official draft
Added Meg 15 system
______________________________________________________________________________________
Revision a
APECS 4™
63 of 63
Date: 01 Nov 14