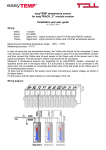
1
easyTRACK SP/F GPS / GPRS monitoring and tracking system INSTALLATION AND APPLICATION MANUAL for module version v1.62 and higher Rev. 1.63 16.11.2011 web ver. 1.63 Table of contents 1 Main functions of the easyTRACK............................................................................. 4 1.1 Versions of the product ...................................................................................... 4 1.2 Main functions of the product ............................................................................. 4 1.3 Optional function of the product ......................................................................... 5 1.4 Steps of putting the product in practice .............................................................. 6 1.5 Device registration ............................................................................................. 6 1.6 Data management.............................................................................................. 8 2 Installer settings ........................................................................................................ 9 2.1 Setup through USB connection .......................................................................... 9 2.2 Setup via internet connection ........................................................................... 10 2.3 Further settings ................................................................................................ 10 2.4 Monitoring the module status ........................................................................... 11 2.5 Setting parameters........................................................................................... 13 2.6 Parameter customization ................................................................................. 13 2.6.1 GPRS/GPS settings................................................................................. 14 2.6.2 Setting phone numbers............................................................................ 15 2.6.3 Alarm settings .......................................................................................... 17 2.6.4 Roaming settings ..................................................................................... 18 2.6.5 Relay output settings ............................................................................... 20 2.6.6 Power management................................................................................. 21 2.7 Changing module password............................................................................. 22 2.8 Reading event log ............................................................................................ 22 2.9 Reading the module’s version .......................................................................... 23 2.10 Programming the module through SMS ........................................................... 23 2.11 Position display on map on mobile phone........................................................ 24 2.12 Tracking on mobile phone ................................................................................ 25 2.13 Phone based driver identification ..................................................................... 26 3 Risk factors which affect the GSM service charges................................................. 27 4 easyTRACK WEB interface..................................................................................... 28 4.1 System requirements for using the easyTRACK WEB interface ...................... 28 4.2 Logging in ........................................................................................................ 29 4.3 User interface in “Present” mode ..................................................................... 30 4.4 User interface in “History” mode....................................................................... 32 4.5 Web settings .................................................................................................... 34 4.5.1 User account ........................................................................................... 34 4.5.2 Language................................................................................................. 36 4.5.3 Edit vehicle data ...................................................................................... 36 4.5.4 Deleting traffic data.................................................................................. 37 4.5.5 Services................................................................................................... 38 4.6 Reports ............................................................................................................ 38 4.7 Separation of business/private routes .............................................................. 44 4.8 Private POI management ................................................................................. 44 4.9 Daily graph ....................................................................................................... 46 4.10 Monthly fuel graph............................................................................................ 48 4.10.1 Tracing fuel theft ...................................................................................... 48 4.10.2 Information on the fuel probe measurement accuracy............................. 49 4.10.3 Application purpose and possibilities ....................................................... 49 4.10.4 Recommended refueling method............................................................. 49 2 5 External elements and functions of the easyTRACK module .................................. 50 5.1 SIM card case .................................................................................................. 50 5.2 Module's LED signals....................................................................................... 50 5.3 Module sounds................................................................................................. 50 5.4 LED signals of the GPS receiver...................................................................... 50 5.5 Module wiring ................................................................................................... 51 6 Installation guide ..................................................................................................... 53 6.1 Mounting .......................................................................................................... 53 6.2 Putting into operation ....................................................................................... 53 6.3 Testing and handing over................................................................................. 53 7 Troubleshooting....................................................................................................... 54 8 Guarantee ............................................................................................................... 55 8.1 The manufacturer’s limited warranty ................................................................ 55 8.2 Other important information.............................................................................. 55 9 Technical information .............................................................................................. 56 9.1 Technical specification ..................................................................................... 56 9.2 Package contents............................................................................................. 56 9.3 The manufacturer’s contact.............................................................................. 56 10 easyTRACK data traffic sheet ................................................................................. 57 3 1 Main functions of the easyTRACK GPS and GPRS based monitoring and tracking system, which forwards the signals of the vehicle alarm to monitoring station and user phone numbers, as well as reports in SMS the actual position with coordinates at the effect of a phone call to the module. Attention! The product is a sophisticated electronic device. T.E.L.L. expressly recommends to become acquainted with the user’s manual supplied with the product. T.E.L.L. is continuously improving its products, therefore it reserves the right to modify without preliminary notification the features of the product acquainted in the present document. Some of the functions or the appearance of the available services may change during improvements, therefore we recommend to keep the manual received with the product up to date by updating it regularly from the internet. 1.1 Versions of the product easyTRACK SP: version equipped with speaker output. The optional speaker can be connected to SP-SP output. Capacitive precision fuel probe, temperature and RPM sensor cannot be connected to this version. easyTRACK F: version equipped with fuel probe input, for precision fuel level measuring. To F1 and F2 inputs can be connected up to two capacitive fuel probes (for vehicles with one or two fuel tanks), and these inputs are capable for connecting temperature sensors and RPM sensor as well. To this version the optional speaker cannot be connected. 1.2 Main functions of the product For the operation of the easyTRACK communicator's main functions, a GSM SIM card is necessary, suitable for voice call and SMS sending. Main functions: Car alarm signal forwarding to monitoring station and mobile phone by call and/or SMS Individual alarming functions, e.g.: position change supervision at stopped engine (towing), alarm initiated by input contact and signalization of all these to monitoring station and mobile phone by call and/or SMS Real time vehicle position report in SMS with coordinates, at the effect of a phone call or a command SMS sent to the module Security function with local alarm initiation against GSM and GPS signal jamming 4 1.3 Optional function of the product In the course of the service the module installed into the subscriber’s vehicle collects, stores and forwards the traffic data of the vehicle to the server system operated by the service provider. The optional functions become available only after entering into service contract and paying the service fee! Service terms and conditions are included in the General Terms and Conditions of Use and Service document! For the operation of the easyTRACK communicator's optional functions, a GSM SIM card is necessary, which may be subscribed or pre-pay type, suitable for voice call, SMS sending and GPRS data communication. In the case of an average usage of the vehicle, under the setting of coordinates refreshing frequency of 3 seconds during movement and 3 minutes while parking, a card with monthly 30 Mbytes data traffic service can assure a daily 1-2 hours runtime. Take this into consideration when choosing your GPRS service package (see chapter “easyTRACK data traffic sheet”). The GPRS data traffic costs may be reduced by decreasing the coordinate sending frequency, but this decreases the fullness of details of the route as well. Do not choose such service package which is not suitable for this data traffic and application, because it may result significant data traffic expenses! If you wish to use the module’s services abroad as well, choose a GSM/GPRS service package which supports Roaming service as well, and don’t forget to activate the roaming service. Fees of the roaming service are contained by the current tariff of the GSM service provider. To avoid possible data traffic overcharges, ask your GSM service provider about limit watching service. Services related to the optional function, which are available by subscribing for different service packs: Digital map service Map views Speed diagram Route report service Route report requestable interval Separation of business/private routes Vehicle uptime report Route replay Fuel diagram and refueling report Temperature diagram and report Private POI management Phone based driver identification Tracking on mobile phone Trackmon optimum Trackmon premium Details about services can be found in the service price list. In case of using services, the easyTRACK module forwards the GPS coordinates to the server, from where the vehicle's position and route can be traced on graphical map surface with the help of an internet browser through the internet also retrospectively. 5 1.4 Steps of putting the product in practice After purchase, the following steps of putting in operation and practice are recommended: 1. Procuring the SIM card and activating the suitable service package 2. Registering the module on the website (if you wish to use the optional function) 3. Installation, putting into operation 4. Functional test (connection to the server, performing required alarm calls, SMS messages, display on website) 5. Changing the module password and the web access password 6. Putting in practice Attention! If the device is not registered but APN name is entered at settings and SIM card able for GPRS connection is inserted, the device will attempt to connect but will be rejected by the server. The connecting procedure causes data traffic which is charged by the GSM service provider! 1.5 Device registration Registration of the device is only necessary in case the optional functions are wished to be used. Registration can be performed on www.easytrackmap.com website. By performing the registration You accept the terms and conditions of service and usage, as well as You enter into service contract with T.E.L.L. Software Hungária Kft for the use of the service specified by the terms an conditions of service. It is recommended to perform the registration before installation in order to ensure possibility to verify the module’s operation right after and if necessary during installation. Steps of device registration: 1. Open the website specified above using an internet browser. The recommended browsers for accessing the easyTRACK WEB interface are Microsoft Internet Explorer and Mozzila Firefox. The browser used must be equipped with flash player. In case the player is not installed, the browser automatically offers its download when accessing the easyTRACK site. 2. Select the desired language 6 3. Click on "New device registration" label 4. Enter the ID of your device (serial number) (specified on the label on the back of the module, e.g.: EASY1001) 5. Enter device key (supplied by manufacturer in the package). If service has also been purchased together with the device, registering the device key received with the product automatically makes the service available. (The prepaid period starts from this moment) 6. Select type of registration (create new account or register the device to an existing account). You can only register modules in an existing account, if module registration has already been performed previously. This way a fleet of vehicles can be created by registering several modules into the same account, into which all devices, vehicles can be accessed at the same time using the same user name and password 7. Enter new user name and password for new account or owned user name and password for existing account (characters to be used: a-z, 0-9, „_” , accented characters cannot be used. The maximum length of the user name is 14 characters, for the password is 16 characters) 8. Read and if you agree accept the General Terms and Conditions of Service (the service becomes available only if the General Terms and Conditions of Service are accepted) 9. Press "Submit" to confirm registration When the registration is successfully finished, the trial period is promptly activated providing access to the system, so the authorized user may immediately enter the web site using the registered name and password. The service provider provides 14 days free trial period from registration, with possibility of using any of the services. Usage of the easyTRACK website is described in the “easyTRACK web interface” chapter. 7 1.6 Data management The data stored by the server is placed in encrypted database and can be accessed only with the cognition of both the user name and password. The passwords are also stored on the server in encrypted undecodable format. According to the basic contract the recorded route and other traffic data are stored retrospectively for 3 months. Data older than 3 months are erased automatically. Routes and traffic data of the given day or period may also be erased by authorized user at anytime in the way described in the “Web settings” chapter. Attention! When erasing, the traffic data concerning the given day or period is deleted physically, so they are definitively and unrecoverably destroyed ! The user is responsible for the secrecy of all those passwords through which the service can be accessed, and so is responsible for all those activities which occur through his/her access. The system logs the time of all data deletion initiations as well as the user name and the user’s IP address for the sake of the clarification of the cause of unwanted data loss, as well as for the subsequent clarification of data deletions committed intentionally by user who obtained unauthorized the access identifiers. 8 2 Installer settings The installer setting is recommended to be performed by specialist. Ask for your distributor’s help concerning this question. To perform the settings and the final tests after installation, it is necessary to hand over the password of the module and the web access identifiers (name and password) to the installer. Therefore, for maximum security, change these identifiers after installation. The module’s installer settings can be performed using the „EasyTrackX” programmer software. The desired program language can be selected using the flag icons in the lower right corner of the software window. If necessary, the version of the programming software can be updated by clicking on the “Search for program updates” link on the “Connection” page. The update procedure requires internet connection. It can be also set here, if the program should search for updates automatically on each opening, or this is performed manually by clicking on the search link. 2.1 Setup through USB connection Start the „EasyTrackX” programmer software Select the option of connecting the module via USB cable Power up the module Connect the USB cable in case you have not connected the module to PC yet As soon as the program has recognized the USB port used by the module, it will request the module password, establish connection and then a green tick icon appears next to the USB icon in the upper right corner of the main window, then the module version is displayed. (The program does not request the module password if the default password is set in the module: 1111) Thereafter settings, module status monitoring etc. become available 9 2.2 Setup via internet connection (available only if the optional functions are used !) The module should be turned on and accessible through the server Start the „EasyTrackX” programmer software Select “Connecting to a remote module via IP (internet) connection” option Enter the server's IP address (usually the same as the web interface domain) Enter the module's serial number (e.g. 1001) Enter your administrator username and password used for accessing the server’s WEB site (www.easytrackmap.com). If you would like the program to remember your password, enable the “Save password” option Press the „Start server connection” button Enter the module's password when requested (maximum 10 digits). The program does not request the module password if the default password is set in the module: 1111) After a successful connection, a green tick icon appears next to the internet icon in the upper right corner of the main window, then the module version is displayed. Thereafter settings, module status monitoring etc. become available When programming the module is finished, press „Close IP connection” button to end the session. 2.3 Further settings After connecting successfully to the module, more functions and options become available by clicking on the “Module State” or “Parameter Settings” tabs: 10 2.4 Monitoring the module status Ignition key: the current state of the ignition key (Ignition ON / Ignition OFF) Alarm input: the current state of the input connected to the car alarm (No signal / Alarming) – optional, details can be found in the ”Alarm and event settings” chapter Panic button: the current state of the panic input (No signal / Panic Alarm) GPRS connection: (Connected / No connection) GPS signal: the status of GPS satellite signal and number of satellites found (OK(x sats) / No signal), (x sats) is the number of satellites found by the GPS receiver (for exact coordinate calculation a value above 6 is required) GSM signal: exact value of GSM signal strength (0-31) (and its graphical level display). For good communication a value above 12 is suitable. Columns of the event table: o Date / Time: date and time of the event o Event: event specification o CID: the event's Contact-ID code (for reporting to the monitoring station) o G: status of reporting through GPRS o T1-T4: reports to user phone numbers 1-4 o S1-S4: SMS messages to phone numbers 1-4 o C1-C2: reports to monitoring station(s) through GSM voice call o Status: event status (Processing, Delayed, Stopped, Finished) 11 Marks displayed in T1-T4, S1-S4 and C1-C2 columns: o ? - report processing in progress o * - reporting successful o R - reporting already performed in other way, therefore reporting is not needed o ! - reporting failed o S - alarm has been cancelled, therefore reporting is not necessary o T - reporting timeout, reporting was unsuccessful during the alarming time By keeping the mouse pointer above any cell of the table, details of the specific event will be displayed. Refresh List: the event list can be refreshed at anytime with this button, however the list is automatically refreshed after each new event Stop Alarm: alarms being in progress can be stopped with this button Restart Module: the module can be easily restarted with this button if necessary Long Eventlist >>>: opens a more detailed report of module events in a separate window. For more information, please read chapter “Reading event log” State messages from the module: this window shows recent messages of the module ordered by time of occurrence. The module message window can be cleared with Clear message window button at anytime Communication details>>>: pressing this button opens a window showing detailed information about the procedures running in the module (serves only for troubleshooting) Message flow can be started and stopped by pressing “Start/Stop“ button Messages can be saved to text file using the “Save to File” button 12 2.5 Setting parameters By clicking on „Parameter Settings” tab the following window will be displayed: Functions of the upper 4 icons, respectively from left to right : Read data from file, Save data to file, Read data from module and Write data to module. With these four simple functions you can easily save, load and archive the settings of the given module. 2.6 Parameter customization By clicking on the tabs, further customizations concerning the module’s GPRS parameters, phone numbers, alarming and roaming parameters can be performed, according to the instructions in the following chapters. 13 2.6.1 GPRS/GPS settings (Necessary only for optional functions !) Home network APN1: enter the APN name (e.g. in case of T-Mobile public APN: internet, else it is provided by the GSM service provider). Entering Username and Password is required only for own, dedicated (not public) APN. Further settings necessary to establish connection with the server are preset in the module by default. If no APN name is entered, the module does not attempt to connect to the server. Do not enter home and roaming APN names if optional functions are not used! This would cause connecting attempts in case of inserting a SIM card able for GPRS connection and would generate expenses on data traffic! Roaming APN2: to have benefit of preferential roaming tariffs, an individual APN may be necessary, e.g. fleet APN. If such APN is set, the module connects to the server using this APN when the country borders are left. Attention! An APN name must be set here anyway when using the module abroad, else it will not be able to establish connection with the server! In case preferential roaming APN is not available, use the home network APN for this setting as well. GPS/GPRS report timings on home network: here it can be specified how often the module should read/report it’s position when the car is moving/parking, how much time it should wait in case of 3 consecutive GPRS connection failures before trying to reconnect, as well as how many alarm signalizations (GSM calls and SMS) it should maximally initiate within one day period when using home GSM network. Frequency of GPS reporting while moving: the forwarding frequency of GPS coordinates can be set between 3 and 255 seconds for the case of moving vehicle or ignition turned on. (recommended setting: 3 seconds). Attention! The value of the setting has effect on data traffic size. Lower entered value results larger data traffic size (see chapter “easyTRACK data traffic sheet”). Frequency of GPS reporting while parking: the forwarding frequency of GPS coordinates can be set between 1 and 255 minutes for the case of parking vehicle with ignition turned off. (recommended setting: 3 minutes). It is not recommended to set this to an extremely high value because in case of GPRS connection loss, the module detects the absence of the connection with the server with the delay set here, therefore reconnecting or switching to b server may be performed with delay, as well as the transmission through GPRS of possible alarms. Attention! The value of the setting has effect on data traffic size. Lower entered value results larger data traffic size (see chapter “easyTRACK data traffic sheet”). 14 GPRS reconnecting delay after 3 unsuccessful connecting attempts: It can be set between 0 and 255 minutes how long the module should wait before it starts trying to reconnect to the server, after 3 unsuccessful attempts. Setting value 0 means the module will continuously try to establish the GPRS connection. By setting a higher value, costs may be reduced in case of GPRS network failures, but at the same time reconnecting is delayed after network restoration. (recommended:10 min). Maximal number of SMS and GSM calls allowed per day: it can be set between 0 and 254 how many alarm signalizations (SMS and GSM calls) should be initiated maximally by the module within a period of 24 hours. If this value is set to 255, then the alarm signalizations to be initiated daily is not limited. Time zone setting: Here the time zone according to the country should be selected which is necessary for automatic internal date and clock setting. 2.6.2 Setting phone numbers 1-4. User Phone numbers: maximum 4 user phone numbers can be set, not more than 16 digits each, in a " +(country prefix)(area code)(phone number) “ format. The module will initiate calls (with siren tone) and/or send SMS to these numbers in case of alarm, according to the alarm settings. Make sure the phone number information sending service is enabled for all user phone numbers set. This is necessary for phone number identification on incoming calls to the module. Send position info in SMS in case of incoming call: if a call to the module or a position request SMS is initiated from the phone numbers enabled with this option, the module sends to the respective phone number its latest measured position data in SMS, as well as other important information that are enumerated below. The incoming call is rejected by the module, therefore only the SMS is charged. At the same time, the call enables connecting to GPRS network for 5 minutes, even if roaming is disabled at settings. Attention ! The position data and other information sent in SMS are the results of the latest measurable data obtained before the call. Time of measurement is specified in the "Time" section of the SMS. (It may namely happen, that in the moment of the call the data is not measurable, e.g. if the vehicle has formerly been parked in an underground garage or it stays in an area with unsufficient satellite signals for position determination. In this case the module sends the latest measured position data and information). This does not refer to the status of the physical inputs (ignition/alarm/panic), for these the current status is reported. 15 Content of the SMS sent by the module, if optional functions (map service) are not used, or the GPRS service is not available: EasyTrack position: Direction= XX Lat: 000.00000 Ign=(ON/OFF) Lng: 000.00000 GPRS=(ON/OFF) Time: yyyy.mm.dd. hh:mm:ss. GSM signal: 00 Speed= 000 #Sat= 00 Content of the SMS sent by the module, if optional functions are in use and the GPRS service is available: Vehicle name, Speed= 000 (country), Direction= XX (zip code), Time: yyyy.mm.dd. hh:mm:ss. city, Ign=(ON/OFF) (street, street-number) GPRS=(ON/OFF) (POI) GSM signal: 00 Lat: 000.00000 #Sat= 00 Lng: 000.00000 The position data in brackets are not available everywhere, therefore in these cases are not specified in the message! SMS explanation: Vehicle name: the name of the vehicle entered at registration country: country name specification in accordance to the latest measured position zip code: zip code specification in accordance to the latest measured position city: city name specification in accordance to the latest measured position street, street-number: street name and street-number specification in accordance to the latest measured position Street-number is specified with accuracy at block level (e.g. 26-38 Main street). POI: POI specification (filling stations, stores, institutes etc.) if the given position falls into the range of a POI Lat, Lng: latest measured latitude and longitude Speed: latest measured vehicle speed, Direction: latest measured vehicle direction (N,E,S,W,NE,SE,SW,NW), Time: position measurement date and time, Ign: state of the ignition key in the moment of the phone call GPRS: GPRS service status in the given area in the moment of the phone call GSM signal: value of the GSM signal strength in the moment of the phone call #Sat: number of satellites found in the moment of the latest measurement. Parameter setting through SMS accepted: the module accepts and executes SMS messages containing settings or commands from the phone numbers enabled here. (It sends response SMS containing the result of the settings.) 1-2. Mon. Phone nr.: the phone numbers of the monitoring station(s) Account ID: the four-digit user identification number (consisting of 0...9,A,B,C,D,E,F characters) that is necessary for the Contact-ID reporting to monitoring station(s). Monitoring station reporting mode: report and respectively wait for confirmation to/from only one monitoring station phone number or to/from both phone numbers in case of alarm. Forward incoming SMS to the following numbers: SMS messages received on the SIM card of the module can be forwarded to maximum 2 phone numbers which can be set here. The forwarded messages are deleted from the SIM card of the module. Attention ! Never set here the phone number of the SIM card inserted into the module because at the effect of an incoming message this may initiate an infinite loop of SMS messages, causing significant expenses ! 16 2.6.3 Alarm settings 01. Alarm Input: if the output of the car alarm is connected to the module's IN input through a 1k resistor and the car alarm activates its output, the module registers an alarm event. 02. Panic Button: if an emergency button is connected between the module's IN input and the ground point, by pressing this button, a panic event is initiated. 03. Move without IGN: if the vehicle moves with it’s ignition turned off (e.g. it is trailed away), an event is generated at occurrence. Attention! If the vehicle is parked in a place where the GPS receiver cannot access enough satellites for exact localization, and the accessed satellites vary at the same time, therefore the GPS receiver determines other and other position which may be interpreted as movement by the device, such exceptional cases may cause false alarms! 04. Battery low: this event occurs when the vehicle battery voltage drops for at least 30 seconds under the voltage level set on “Power management” page in “Battery Low Level” section, and 30 seconds have already elapsed from ignition state change. For each of the above events can be set how the module should signalize their occurrence. These settings can be performed as follows: Event (Contact ID code): the 3-digit code necessary for signalization to monitoring station(s). T1-T4 checkbox: select which user phone number(s) should be notified by a GSM voice call when the specific event occurs (User phone numbers 1-4). S1-S4 checkbox: select which user phone number(s) should be notified by SMS when the specific event occurs (User phone numbers 1-4). Alarms initiated to user phone numbers through GSM voice call can be confirmed by pressing the correspondent buttons on the mobile phone after receiving the call as follows: „” button pressed: „#” button pressed: confirms alarm of the given event confirms alarm of the given event and stops notification of further users about this event „9 module password #” entered: stops all alarms and notification through voice call and SMS of further users about all alarms in progress (full alarm reset) 17 Contact-ID GSM call drop down menu: - No call: if selected, the module will not send Contact ID code of the specific event through GSM voice call to the monitoring station(s) in case of GPRS failure. - Reserve: if selected, the module will send the Contact ID code of the specific event through GSM voice call to the monitoring station(s) in case of GPRS failure. - Always: if selected, the module will send the Contact ID code of the specific event through GSM voice call to the monitoring station(s) even if there is GPRS connection. Attention! If the module is used with monitoring client software, special care must be taken for the client software to run continuously, else additional data traffic expense may occur when the module cannot connect to the client software! SMS messages: the customizable text of the SMS that is to be sent to the phone numbers enabled in the S1-S4 checkboxes, when the specific event occurs. The SMS text can consist of maximum 160 characters for each event. The $ character inserted in the message is substituted with the message of the position info SMS, while @ character is substituted with a link that can be opened on smart phones and shows the vehicle’s position on map. Alarm Input: settings of the signal coming from the car alarm: - Normally Open: initiates an alarm event when IN input is shorted to GND via 1k - Normally Closed: initiates an alarm event when IN input connection to GND via 1kresistor is interrupted. Alarm input sensitivity: the minimal length of the input impulse necessary to initiate an alarm event can be set here in tenth seconds. Do not check alarm input for given time period after an alarm event: If the input alarm signal switches continuously on and off in case of alarm, this could cause the initiation of several GSM calls and SMS messages. With this function such multiple signalizations can be avoided. The function's setting range is 0 - 25 minutes. Max. number of alarm events: the maximum number of alarm events initiated by the alarm input can be set here between 0 and 25. By setting value 0, the number of alarm events is not limited. With this function the unwanted signalizations can be avoided in case of alarms caused by faulty sensors of the car alarm system. Turning the ignition on will reset the alarm event counter. Max. duration of alarm process: the duration of an alarm process caused by an alarm event can be set here between 5 and 25 minutes. This value means how long the module should make attempts to signalize the specific event. When this time expires and not all the signalizations were accomplished successfully (GSM calls, SMS sending), the module stops the alarm process and will not try to signalize the specific event anymore. This refers only to that specific event, alarms initiated by new events will be signalized. 2.6.4 Roaming settings 18 Operational modes on foreign networks: Disable Roaming & Disable Data Collection: entering foreign GSM areas, GPRS and route storing functions stop operating. Using this setting, the vehicle will not be available for tracking on the website, only position SMS can be requested or forced connecting can be initiated. Disable Roaming but Enable Data Collection: entering foreign GSM areas, GPRS functions stop operating, but the module still stores route information (last 96000 records are stored), which it will upload to the server as soon as it enters it’s primary GSM service provider’s area. Using this setting, the vehicle will not be available for tracking on the website, only position SMS can be requested or forced connecting can be initiated. Enable Roaming & Enable Data Collection: all GPRS and route storing functions are enabled abroad. There is possibility to enable connecting to GPRS for 5 minutes period even if roaming is disabled in the above settings. For this a call has to be initiated or an SMS containing the *CONNECT# command has to be sent to the module from one of the preset user phone numbers (forced connecting). Abroad GPS/GPRS report timings: here it can be specified how often the module should read/report it’s position when the car is moving/parking, how much time it should wait in case of 3 consecutive GPRS connection failures before trying to reconnect, as well as how many alarm signalizations (GSM calls and SMS) it should maximally initiate within one day period when using foreign GSM network. Frequency of GPS reporting while the vehicle is moving: the forwarding frequency of GPS coordinates can be set between 3 and 255 seconds for the case of moving vehicle or ignition turned on. (recommended setting: 120 seconds) Attention! The value of the setting has effect on data traffic size. Lower entered value results larger data traffic size (see chapter “easyTRACK data traffic sheet”). Regarding to roaming fees it is worth to set a lower data sending frequency here than at the home network usage, to reduce GPRS costs! Frequency of GPS reporting while parking: the forwarding frequency of GPS coordinates can be set between 1 and 255 minutes for the case of parking vehicle with ignition turned off. (recommended setting: 120 minutes). It is not recommended to set this to an extremely high value because in case of GPRS connection loss, the module detects the absence of the connection with the server with the delay set here, therefore reconnecting or switching to reserve server may be performed with delay, as well as the transmission through GPRS of possible alarms. Attention! The value of the setting has effect on data traffic size. Lower entered value results larger data traffic size (see chapter “easyTRACK data traffic sheet”). GPRS reconnecting delay after 3 unsuccessful connecting attempts: It can be set between 0 and 255 minutes how long the module should wait before it starts trying to reconnect to the server, after 3 unsuccessful attempts. Setting value 0 means the module will continuously try to establish the GPRS connection. Setting a low value, the frequent unsuccessful connecting attempts may contribute to expense emerging on data traffic! (recommended setting: 20 minutes). In certain countries even the GPRS connection establishment is also charged! By setting here a higher value, significant cost reduction may be realized in case of GPRS faults, but at the same time reconnecting is delayed after network restoration. Maximal number of SMS and GSM calls allowed per day: it can be set between 0 and 254 how many alarm signalizations (SMS and GSM calls) should be initiated maximally by the module within a period of 24 hours. If this value is set to 255, then the alarm signalizations to be initiated daily is not limited. 19 2.6.5 Relay output settings The relay output serves basically for local alarm initiation providing a security function against GSM and GPS signal jamming. If enabled, the output is activated in case the module observes sudden GSM or GPS signal falling after a delay of 60 seconds from ignition loss till the ignition is turned on again. The relay output provides GND signal. Attention! The GSM sabotage detection accuracy may be affected by occasional anomalies on the GSM network, network maintenance etc., therefore such exceptional cases may cause false alarms on the relay output. Maximum duration of a local alarm: it can be set in minutes between 1 and 255, how long the relay output to be activated in case of a local alarm. Maximum number of alarming during the parking time (before turning ignition on): it can be set between 1 and 255, maximum how many times the module is allowed to activate its relay output as a result of a local alarm from ignition loss till the ignition is turned on again. Setting value 0, the number of local alarms is not limited. Continuous signaling during the whole alarm period: in case of a local alarm the relay output is continuously activated for the period set. Short signals with pause during the first 30 seconds, then continuous signal: the relay output is pulsed in the first 30 seconds of alarming, then for the rest of the alarming time is continuous. How to stop a local alarm: The local alarm stops automatically when jamming is finished and service restores (GSM and GPS), or when alarm duration expires. The local alarm can be also stopped manually by turning the ignition on, or by calling the module from any of the set user phone numbers (in this case, if position SMS sending is enabled for the respective phone number, the SMS will be sent, as well as if the vehicle is in roaming area and roaming is disabled at module settings, the module will initiate the forced connection to the network for 5 minutes period – see chapter “Setting phone numbers”). Controlling the relay output in SMS: Attention! The relay output is not suited for direct engine immobilization! The relay output can also be controlled through SMS, in monostable or bistable mode, using the commands specified in the “Programming the module through SMS” chapter. Control through SMS is always available, independently of the relay output settings, however if the relay output is enabled, the relay will activate on GPS/GSM jamming as well. 20 2.6.6 Power management Since the module's nominal current consumption is relatively high (80-120mA depending on the local GSM signal strength), which may contribute to the vehicle battery voltage falling in case of parking for several days, therefore using the power saving mode may be necessary. Use of the power saving operating mode can be turned on by enabling the relevant checkbox. The current consumption of the module in power saving mode is ≈20mA @12VDC, (≈12mA @24VDC). Battery Low Level: if the vehicle’s battery voltage drops below the voltage level set here for at least 30 seconds, and 30 seconds have elapsed from ignition state change, then the module generates a “Battery low” event and transmits it according to the settings on “Alarm Settings” page. Delay of switching to sleep mode, after ignition is turned off: if the power saving mode is enabled, it can be set in hours between 1 and 255 how long the module should wait until switching to this mode, after turning the ignition off. (recommended setting: 48 hours). GPRS test report frequency in sleep mode: here the GPRS test report frequency for sleep mode can be specified in minutes between 10 and 255. (recommended setting: 30 minutes). Attention! The value of the setting has effect on data traffic size which should be specially considered when roaming is used. Lower value entered results more frequent connecting initiations to the network, which appear as entries rounded up to invoicing units in the GSM provider’s invoice. Attention ! The GPS receiver is turned off in sleep mode, therefore the "Move without ignition" event cannot be detected while the module is in this mode, thus it will not initiate alarm signalization about this event in this period! The module switches back from sleep mode to normal operating mode when ignition is turned next on and at the effect of input activation (alarm, panic button). Built in automatic battery protection The module is provided with automatic battery protection function, which is independent from the power saving mode. This function switches the module automatically to sleep mode if the ignition is off and the vehicle battery voltage drops below the 11.6V safety threshold for at least 30 seconds. Thereafter the module operates the same way as described above. 21 2.7 Changing module password The default module password is 1111. As long as the default password is set in the module, the programming software does not request the password when connecting. As soon as the default password is changed, the new password must be entered on each connecting attempt. The current password can be changed by clicking on the icon of the „Parameter settings” page. With this option the module's entry password can be changed. To change the password, please enter the old password in the first field and the new password in the second and third field for confirmation, then press the "OK" button. The "OK" button is enabled only when all the fields are filled in, and the second and third fields contain the same new password. 2.8 Reading event log After a successful connection to the module, its event memory can be downloaded by pressing "Long event list" button of the “Module state” tab: The event list can be refreshed manually by pressing the "Start event log download" button. Required list length: length of event list, this number of events will appear from the latest events. Maximum last 1000 events can be displayed. The meaning of event list columns corresponds to the description in chapter “Monitoring the module status”. Export to file: the displayed event list can be saved to file by pressing this button in the following 3 formats: o Excel: Microsoft Excel format o CSV: text file, columns separated with comma o TXT: text file, columns separated with tabulator 22 2.9 Reading the module’s version Right after the connection is established successfully, the firmware version of the connected module is automatically displayed in the upper right corner of the main window. From the example the following details can be read: Type of the module: EasyTrack Firmware version: v1.41 2.10 Programming the module through SMS The phone numbers stored in the module, the roaming and relay output settings can be modified, as well as requests and controls can be performed by sending commands in SMS from the user phone numbers enabled for this function to the phone number of the SIM card placed into the module. The commands to be sent in SMS are specified in the following table: SMS Command text Command Disable Roaming & data collection Disable Roaming & enable data *RA=DE# collection Enable Roaming & data collection *RA=EE# Modifying 1. - 4. user phone numbers and authorizations Authorizations: *T1=phonenr,auth.# EE :Enable position info sending on *T2=phonenr,auth.# incoming call and accept command *T3=phonenr,auth.# SMS *T4=phonenr,auth.# ED : Enable position info sending and reject command SMS Example: DE : Disable position info sending *T1=06301234567,ED# and accept command SMS DD : Disable position info sending & reject command SMS *RA=DD# *C1=phonenr# *C2=phonenr# *S1=phonenr# *S2=phonenr# *ALEN# *ALDIS# *ON1…999# Example: *ON5# *ON# *OFF# *CONNECT# *INFO# or INFO Modifying first and second monitoring station phone numbers Modifying first and second SMS forwarding phone numbers Enable relay output Disable relay output Activate the relay for 1…999 sec. Example: activate relay for 5 sec. Activate the relay (bistable mode) Deactivate the relay Forced connecting to GPRS for 5 minutes period Request position info in SMS (Authorization for position info is satisfactory) 23 SMS response for successful modification ROAM:DIS,COLL:DIS ROAM:DIS,COLL:EN ROAM:EN,COLL:EN PHONE NR. CHANGED CENTRAL PHONE NR. CHANGED SMS FORWARD NR CHANGED Alarm: ON. Alarm: OFF. Relay ON (5sec) Relay ON Relay OFF Connecting. Position info *MAP# or MAP *RESET# *STOP# At the effect of this command the module answers in SMS with a link. By clicking on the link using smart phone, the actual position and info can be viewed on Google Maps. Restart module after 30 seconds Stop alarm signalizations Google link Reset (30sec) Stop Alarm If the response SMS contains one of the following messages, the modification is unsuccessful. The reason(s) and the faulty part(s) of the command SMS are specified in brackets in the response message: Response SMS Explanation ERROR: MISSING '=' (.......) SYNTAX ERROR (.......) INDEX ERROR (.......) ERROR: INVALID PARAM (.......) "=" is missing from the command SMS text The sent command letter(s) is/are faulty The sent command index nr(s) is/are faulty Command parameter(s) is/are faulty (after "=") It is important that each command message must begin with * character and must end with # character, except where this can be omitted! Of course more commands can be sent in one SMS but the beginning and end characters must be used and one message must not be longer than 160 characters. If the response message from the module would exceed 160 characters, the message will only contain the first 160 characters. 2.11 Position display on map on mobile phone By sending the command *MAP# or MAP in SMS to the easyTRACK module’s phone number, the module answers with a Google link. By clicking on this link, the actual position and relevant information is displayed on the map. This function works on smart phones, which are able to display Google Maps using the internet. 24 2.12 Tracking on mobile phone It is possible to determine and trace online the vehicle’s position on smart phones that operate with Android 2.1 or higher operating system. This service needs online internet connection and installed Google Maps application on the phone. The easytrack application is available on: www.easytrackmap.com/android Recommended phones for this application: Samsung GT-I5700 Spica, ZTE Blade, Samsung Galaxy S. Installation: enable the internet connection on your phone. Download the application to your phone using the link above, then install. Configuration: Start the application After the application is started, it enters automatically a “demo” account which it contains originally Adding own account: press “menu” key on the phone, select “Add new account” option, enter the server address (easytrackmap.com), enter your account name and password in the corresponding fields, then hit “Save” to store the settings. Function keys: The phone’s keys: Up: Down: Right: Left: Middle key: Menu key: zoom in zoom out step to next vehicle step to previous vehicle toggle road map/satellite view select account (add, edit, delete) Some of the smart phones do not have navigation keys. For these devices the application displays the necessary control keys using icons. The touch screen interface: Status bar: displays the selected vehicle’s name, ID, current speed, battery voltage, number of acquired satellites and the GSM signal strength. When touched, the vehicle selection list is displayed. Help button: displays usage instructions. 25 2.13 Phone based driver identification When using the phone based driver identification function, the driver can identify himself (assignment to the given route) by initiating a call from his mobile phone to the easyTRACK module’s phone number. The call is free, since the call is rejected after identifying the caller number, then the module forwards the number to the server. For proper operation of this function it is necessary to enable caller ID sending service on the caller's phone and caller identification service on the SIM card inserted into the module. The easyTRACK module registers the caller number of any incoming call, this way unlimited number of drivers can use this function. The module only accepts as driver identification the incoming calls received from user phone numbers that are set in the module if “Send position info in SMS in case of incoming call” option is disabled for these phone numbers. For identification, the driver may call the phone number of the easyTRACK module at departure or on the way. Assignment of the driver to the given route is done from the given stop point when calling at departure, respectively from the previous stop point when calling on the way. Assigning phone numbers to driver names and downloading route reports containing driver identification can be done using the Trackmon software. Driver identification is only available in the route reports downloaded in EXCEL format. Attention! The usability of the phone based driver identification function depends on the local availability of the GSM network! The function does not operate if the easyTRACK module is not connected to the GSM network (e.g. if the vehicle is parked in a deep garage, or while driving through a tunnel, etc.). If the call is received by the module when for some reason it is disconnected from the server, or it is on roaming and data traffic is disabled for roaming, in these cases the module stores the driver identification data and forwards it to the server at the soonest the connection is reestablished. The usage of the driver identification function in the Trackmon software is described in the manual of the Trackmon monitoring client software. 26 3 Risk factors which affect the GSM service charges - Rounding up of the GPRS data traffic size to billing units by the GSM service provider When choosing the GSM service provider, it is recommended to pay special attention on the provider’s call, SMS and data traffic fees, because these strongly affect the GSM service charges of the easyTRACK unit. It is specially important to verify what rate of data traffic size rounding is applied by the GSM service provider when invoicing, that is what billing unit size is applied for initiated data packet. The bigger the billing unit is, the costly the data traffic will be in case of frequent GPRS connection loss or reconnecting. This means that for example if the module transacts a data traffic of 2 kbytes within an initiated GPRS connection, then the connection is lost and has to reconnect to continue communication, the GSM service provider rounds up the initiated data traffic to e.g. 10 kbytes and this is invoiced, generating an extra expense (this may reach 100 kbytes using roaming service). Therefore using roaming service this may generate significant expenses. - Using public APN in comparison with dedicated APN In case of using public APN, the data traffic accounting is done according to the basic pricing of the GSM service provider, applying eventually unfavorable data traffic rounding to billing units. This extra expense can be avoided by using dedicated APN, which may assure favorable data traffic fees and data traffic size rounding. This is specially important when using roaming service, because by means of dedicated APN preferred networks may be available abroad, assuring more favorable roaming fees. - Using the power saving mode and the frequency of test report in this mode To reduce expenses it is recommended to use carefully the power saving mode, specially if roaming service is also used. Entering the power saving mode requests closing of the GPRS connection, therefore the module has to reconnect when sending the test report, which means newly initiated data traffic. This may cause extra expenses due to data traffic size rounding, if using public APN and at the same time lower test report frequency setting than recommended. - Operation of security monitoring client software When using easyTRACK security monitoring client software, it is very important that the software must run continuously and must have continuous internet connection, otherwise the reports initiated by the module are not confirmed by the client software, which force the module to attempt continuously to transfer the report till the preset duration of alarm process expires. This may cause extra data traffic and by this means extra expense. - Unsuccessful connecting attempts in areas with weak GSM signal coverage (using of special GSM antenna) In areas with weak GSM signal coverage frequent GPRS connection loss may occur, which may cause frequent reconnecting and by this means extra expense, specially if using roaming service. Therefore it is highly recommended the use of GPRS reconnecting delay setting for unsuccessful connecting attempts, for home network and roaming as well. If the vehicle is used often in such areas, then it is recommended the use of a special GSM antenna for the device, e.g. model that can be installed inside the bumper (for information please contact your distributor). 27 - Daily GSM calls and SMS messages, proper setting of alarm limitations Failure of the vehicle alarm system or unit connected to the easyTRACK module may result frequent alarms and by this means extra calls and sending of extra SMS messages. To avoid this, it is recommended to use the function of daily limitation of GSM calls and SMS messages, which in such cases prevents the generation of significant expenses. At the same time the alarm input must be set with special care and it is recommended to use the available limitations for this function as well. - Proper installation, obtaining sufficient GSM signal Improper installation or mounting the GSM antenna on an unfavorable surface may result insufficient GSM signal, which may cause frequent GPRS connection loss and by this means extra expenses. The manufacturer does not take responsibility for damages or extra expenses which are the result of ignoring the factors mentioned above or improper settings that can be originated in ignoring these risk factors! 4 easyTRACK WEB interface (available only if the optional functions are used !) The WEB interface is where the position and route of the vehicles can be traced, as well as the parking places and times. The easyTRACK web interface is only available after registration and entering into service contract. The website can be accessed at www.easytrackmap.com 4.1 System requirements for using the easyTRACK WEB interface Minimal system requirements: - Processor: 1GHz - Memory: 256 MB - Internet bandwidth (download / upload): 1024 / 128 kbit/sec - Operating system: Windows 98 - Internet browser: Microsoft Internet Explorer, Mozilla Firefox - Flash Player 8 Recommended system requirements: - Processor: Core 2 Duo 2.4GHz - Memory: 1024 MB - Internet bandwidth (download / upload): 4096 / 256 kbit/sec - Operating system: Windows XP / Vista - Internet browser: Microsoft Internet Explorer, Mozilla Firefox - Flash Player 8, or higher version 28 4.2 Logging in The recommended browsers for accessing the easyTRACK WEB interface are Microsoft Internet Explorer and Mozzila Firefox. The browser used must be equipped with flash player. In case the player is not installed, the browser automatically offers its download when accessing the easyTRACK site. When logging in on the WEB interface, first language can be selected as shown below, then login window appears where a valid user name and password should be entered in the corresponding fields. Thereafter login can be performed by pressing the "Login" button. In case of entering wrong user name or password the window will remain in the foreground and "Invalid username / password" or "Unable to connect to server" message will be displayed. If login is accepted, the login window disappears and the map surface behind it will light up. In case a user account is attempted to be accessed 10 times consecutively using wrong password, then the given IP address from which the attempts were initiated will be restricted for 3 hours. Afterwards, at the first successful login a message will be displayed to advise the user how many denied login attempts were logged. By this means the system calls the user’s attention to modify the login name and password. 29 4.3 User interface in “Present” mode After successful login the following interface appears: Items of the interface are the following: Map options: the buttons labeled Road, Aerial, Hibryd placed in the upper left corner of the screen which allow switching between road map, satellite view and mixed display. Navigation panel: the disk placed below the map option buttons, containing four arrows which allow moving the map up/down and to the side. The buttons labeled “+” and “-“ placed below the navigation panel can be used for zooming in and out. Vehicle icons: icons of the available (connected) vehicles are displayed with crisp colors, while the unavailable (unconnected) ones are pale. Icons of the vehicles being in sleep mode are highlighted with yellow. Vehicles for which all services have expired appear crossed out with red line, and when selecting such vehicle, the map is not displayed. Settings: the settings menu can be opened by clicking on the icon representing a service key and a hammer placed below the zoom buttons. Details of the settings menu are described in the following chapters. Reports: the notepad icon placed below the settings icon. After clicking on it the evaluated traffic data can be downloaded in different report formats. Daily graph: can be opened using the graph icon found below the route report icon. It displays graphically the daily speed, fuel level changes and temperature measured by the temperature sensor(s) of the selected vehicle. 30 Fuel diagram: can be opened using the icon representing a gas station, found below the speed diagram icon. It displays graphically the monthly fuel usage of the selected vehicle. Status panel: is placed on the top of the screen to the right from the map options. It contains information about the current state of the selected vehicle: geographic coordinates (latitude, longitude), speed, direction, number of satellites accessed, GSM signal strength, GSM service used actually, connection status with the module, state of the ignition. The button with a down pointing arrow placed at the bottom of the status panel, can be used to open and close the additional status panel, which displays the actual fuel and temperature data. The additional status panel is only available if the capacitive fuel probe, respectively the easyTEMP temperature sensor(s) are installed in the vehicle. Auto follow: the crosshair button placed on the right of the navigation panel, labeled “Auto follow” can be used to enable / disable positioning of the selected vehicle to the centre of the screen. Auto zoom: when clicking on the button with three cars placed below the “Auto follow” button, the system applies automatic zoom on the map in such extent, to fit to screen the position of all the vehicles found in the account. Present / History buttons: the buttons are placed in the upper right corner of the screen and can be used to switch between present and history modes. Vehicle selection menu: the blue menu strip labeled “Vehicles” placed on the right side of the screen which appears if the mouse pointer is moved closed to it. In this menu the vehicle wished to be tracked can be selected. Note: all vehicles are continuously displayed on the map, but the route is displayed only for the selected vehicle. Information field: the gray field placed in the lower left corner of the screen which shows the geographic coordinates of the point placed always in the centre of the screen. By clicking on the globe and question mark button a search box opens which can be used to search on the map by coordinates or by address. After entering the data and pressing “Search” button the searched location will be positioned to the centre of the screen. 31 In the background, behind the specified elements the world map is always displayed with the vehicle icon(s) of the given user on it, which are always placed in the current position of the given vehicle. The route of the selected vehicle is displayed for not more than 24 hours retrospectively in “Present” mode, and for the specified period in “History” mode. The brighter part of the track – is the earlier – represents the route in the forepart of the selected period, while the darker part – is the later – represents the route close to the end of the period. Route types: o Blue track: represent business routes o Green track: represent private routes. The type of the route to be recorded (business/private) can be selected by the driver using the switch installed for this purpose. When the vehicle is set to “private route”, its icon is marked with a red symbol: o Yellow track: indicate stages where position sending was too infrequent, this is usually caused by insufficient satellite signal reception. o Red track: indicate stages where GPRS connection was lost. Along the route can be seen stop points marked with STOP signs. Each stop sign represent a stop of the selected vehicle lasting at least 1 minute. Small signs represent stops lasting less than 5 minutes, while large signs represent stops lasting more than 5 minutes. 4.4 User interface in “History” mode When switching to History mode, the interface shown in the previous figure appears. All the elements of the Present mode can be found here as well, only the status panel is changed and 2 more elements are added. 32 Status panel: the field with dark red background on the top of the screen which specifies the selected vehicle and the selected date. Calendar: the calendar icon placed on the right side of the status panel which can be opened by clicking on it and here the desired date of the vehicle history can be selected. Time axis: is placed on the lower part of the screen in a field with gray background. The time axis contains the hours of the day and here you can select the period of the specified day in which the route of the selected vehicle is desired to be displayed. The beginning and the end of the period can both be modified by picking the blue tear shaped buttons with the mouse and moving them horizontally, and the whole period can also be moved along the time axis by doing the same with the yellow bar. Refinement of the ends of the period can be performed by pressing the little blue arrows found around the blue tear shaped button. The right end of the yellow period bar shows the time when the selected vehicle was in the position shown on the map. By moving the left end of the yellow period bar, the point of time can be set till the route of the selected vehicle is desired to be displayed on the given day. Playback: there is possibility to playback the motion of the selected vehicle on the selected day. Playing always starts from the time adjusted with the right end of the yellow period bar. To start playback press the green triangle shaped button ( ) placed on the right end of the time axis. When pressed, the playback button turn into pause button ( ) and starts blinking, playback begins and the status panel appears containing the traffic data of the given vehicle position (coordinates, direction, speed etc.). There is possibility to adjust the playback speed using the green arrow buttons labeled “+” and “–“ placed to the right of the playback button. To stop playback press the blinking pause button ( ). 33 4.5 Web settings To open the Web settings menu press the settings icon: will appear: . The following window Settings menu elements: 4.5.1 User account This menu allows to modify the access name, the admin password as well as to create and modify the user and visitor passwords. Access levels Admin level The admin has the maximal authorization, can access all functions of the web site. User level All functions of the web site except settings menu can be accessed by logging in on the easyTRACK site using the access name and the password assigned to the user level. Visitor level The system can be accessed with the following restrictions by logging in on the easyTRACK site using the access and the password assigned to the visitor level: - visitor can access only the “Present” mode, does not have access to “History” mode, to settings menu, nor to reports, thus cannot preview or modify these items. 34 Creating and modifying passwords Admin user: to modify the admin username and/or password enter the desired user name in the “Username” field and the new password in the “Admin level” “Password” field, then still here reenter the new password in the “Confirmation” field and press “Submit” button. User password: to create or modify, enter the new user password in the “User level” “Password” field, then still here reenter the new password in the “Confirmation” field and press “Submit” button. Visitor password: to create or modify, enter the new visitor password in the “Visitor level” “Password” field, then still here reenter the new password in the “Confirmation” field and press “Submit” button. Maximum one admin, one user and one visitor password can be assigned to an account. Erasing user and visitor access The admin account’s user name and password cannot be erased, can only be modified. Erasure of the user and/or visitor access can be performed by erasing the assigned passwords. Erasure can be performed the same way as creating, just the related “Password” and “Confirmation” fields must be left blank. E-mail address User’s e-mail address must be entered here. The system sends to this address new temporary login password in case of losing the original one, and other notifications as well. Creating more user accounts, deleting accounts, moving/deleting devices User can register an easytrack device only in one user account. However, there is possibility to create more user accounts for the same device, as well as to display the same device in more user accounts, but these operations can only be performed by the Service provider on the Subscriber’s special request. The operation is performed by the Service provider only on the Subscriber’s pronounced request. The request can be sent to the Service provider by fax or mail, by proving the subscription and the identity in case of individual person, and by proving the subscription, using official business signature, and attaching the copy of specimen signature in case of company. 35 The request mentioned above may request to perform the following operations: Create further user accounts without device registration Delete an existing user account Move or copy a device in another user account Delete a device from a user account Reset user account password to default (in case of losing the password) 4.5.2 Language This menu allows to switch between the languages of the web site: 4.5.3 Edit vehicle data This menu allows to edit and customize the appearance of the information displayed in the “Vehicles” menu (vehicle icon, short name, additional data e.g. registration number), and miscellaneous settings are available after pressing “Setup” button. To modify the data of the selected vehicle enter the desired text in the relating fields, change vehicle icon if desired by pressing the “Change icon” button, then press “Submit” button. The system stores the modifications in a few seconds and then refreshes the changes on the web site as well. 36 Miscellaneous setup Press “Setup” button to open the “Miscellaneous setup” window. The “Miscellaneous setup” provides possibility to adjust the temperature upper and lower limits for the 1-5 temperature sensors. The value has to be entered in centigrade (ºC). If the measured temperature exceeds the limit set here, then the graph curves beyond the limits will be colored red respectively blue on the chart in the downloaded temperature report, and the table found below the chart will contain the duration of the upper and lower limit exceedance. To save the entered values press “OK”, then press “Submit” in the “Edit vehicle data” window, else press “Close”. 4.5.4 Deleting traffic data This menu allows erasure of recorded traffic data from the database of the selected vehicle relating to the selected day or period (routes, positions, speed etc.). Further on, the erased data will be unavailable in reports as well. To erase traffic data select the period to be deleted then press “Next” button. To confirm data erasure it is necessary to enter the user name and password. Attention! Traffic data once erased cannot be restored! 37 4.5.5 Services The “Services” menu item opens a status window, where all the services activated for the vehicles registered in the account are displayed. 4.6 Reports . Select the beginning and the To download a report press the notepad icon: end of the desired period and specify the time to be considered as stop in the appearing window, select the desired format (PDF or Excel), then press “Submit” button. The report will contain as stop points only the locations where the vehicle stayed at least for the time specified in the “Stop threshold” field. Depending on your subscription, selecting the type of the report is available: route report, vehicle uptime report, refueling report and temperature report. Depending on your subscription, the reports can be downloaded for 3, 12 or 24 months retrospectively, for not more than 1 week, or 1 month period at the same time. Attention! Traffic data erased by user does not appear in the reports. Route report can only be displayed is pop-up windows are enabled for the easyTRACK website. 38 Depending on your subscription, selecting the type of the route is available: business routes and private routes. For private routes it can be selected to display addresses in the report, or only coordinates. Route report: the displayable and printable result of the evaluated traffic data (stop points, speed, parking, time of passage etc.) recorded on the selected day or period, generated by the system on the basis of the stop points. Vehicle uptime: the displayable and printable result of the evaluated vehicle uptime, generated by the system on the basis of the ignition switch state changes. The availability of this function depends on your subscription type. Refueling report: evaluation of refueling and fuel drainage in a report, with specification of the fuel level, the location of refueling and the duration of parking. To use this service, it is necessary to install the capacitive fuel probe in the vehicle. Temperature report: graphical evaluation of the temperature data measured by the temperature sensor(s) with possibility for downloading in PDF format. To use this service, it is necessary to install the easyTEMP temperature sensor(s) in the vehicle. POI management: if the stop points fall into the range of built-in or private POI’s (points of interest), these will be specified in the reports in the cell of the relating location. POI categories of the map data base: Ferry Terminal, Hospital/Polyclinic, Hotel or Motel, Important Tourist Attraction, Museum, Open Parking Area, Opera, Park and Recreation Centre, Parking Garage, Petrol Station, Police Station, Post Office, Railway Station, Rest Area, Restaurant, Scenic Panoramic View, School, Shop, Shopping Centre, Sports Centre, Stadium, Swimming Pool, Tennis Court, Theatre, Zoo. 39 Route report sample: The requested period is specified right under the “Route report” headline. Columns of the route report: Time of Arrival: the time when the vehicle arrived to the specified location Parking time: the time spent at the specified location Location: details of the location where the vehicle stopped Fuel: the fuel quantity measured in liters when the vehicle stopped (the appearance of this column depends on your subscription). The meaning of icons and fuel level changes displayed corresponds to the specification found below at the Refueling report sample. Time of Departure: the time of departure from the specified location Journey Time: the time passed from departure till arrival to the following location Distance: distance measured from the specified location to the following location Average Speed: average speed calculated between the specified location and the following location Top Speed: top speed measured between the specified location and the following location Icons used: : refueling : fuel drainage In the lower part of the route report the summarized data of the downloaded period is shown: total distance, average speed, top speed, total journey time, total waiting time, total refueling, and average fuel consumption. Printing a route report: the displayed route report can be printed in the usual way, by selecting File / Print from the browser’s menu. 40 Vehicle uptime report sample: Vehicle started: Departure location: Fuel: Uptime: Distance: Vehicle stopped: Arrival location: the time when the ignition was turned on the location where ignition was turned on fuel level when ignition was turned on the time passed from turning the ignition on, till turning it off distance travelled from turning the ignition on till turning it off the time when the ignition was turned off the location where ignition was turned off For ease of clarity, the lines of the table are marked with icons and corresponding colors. Icons used: : Idle (ignition was on, but the engine run at idle RPM) : Working (the RPM was above the working threshold) : Traveling (the vehicle was traveling) In the lower part of the uptime report the summarized data of the downloaded period is shown: Idle / Work / Motion time (see icon explanation above) Total distance: distance travelled in the downloaded period Total working time: the time period when ignition was turned in the downloaded period Average consumption while moving: the average fuel consumption while travelling Average consumption while working: the average fuel consumption when the machine was working Total refueling: summarized filled fuel quantity in the downloaded period Total consumption: summarized fuel consumption in the downloaded period 41 Refueling report sample: Time of arrival: date and time of refueling or fuel drainage Location: location of refueling or fuel drainage Fuel: fuel level changes specified in liters, and in brackets, the filled or drained fuel quantity In the lower part of the refueling report the summarized filled fuel quantity in the downloaded period is shown. Icons used: : refueling : fuel drainage 42 Temperature report sample: Max. temperature: the highest temperature measured in the given period Min. temperature: the lowest temperature measured in the given period Duration of upper limit exceedance: the period of time for which the measured temperature in the given period was higher than the upper limit Duration of lower limit exceedance: the period of time for which the measured temperature in the given period was below the lower limit If the temperature report consists of more than one day period, then the days within the period are represented by vertical grey/white strips. If several easyTEMP temperature sensors are connected to the easyTRACK module, then the downloaded PDF document will consist of more pages, each temperature sensor’s data being shown on a different page. Adjusting the temperature upper and lower limits can be done in section Settings / Edit vehicle data / Setup. For easier overview, the curve beyond the upper limit is colored red, while the one below the lower limit is blue. 43 4.7 Separation of business/private routes Depending on your subscription, there is possibility to separate business and private routes. The type of the route (business or private) to be recorded can be selected by the driver using a toggle switch that has to be installed, which connects the IN input of the module to GND through a 2.2k resistor (see wiring diagram). When the switch is off, the route is recorded as a business route, when it is on, private route is recorded. Business routes are displayed with blue tracks, while private ones with green tracks on the web interface. When the vehicle is in “Private” mode, to indicate . When downloading reports, it can be this a red symbol appears on its icon: : selected which route types (business, private or both) to appear in the list. The function can be used for other tasks as well, e.g. separation of loaded/unloaded round of trucks, etc. 4.8 Private POI management There is possibility to add private POI’s (points of interest) on the map surface. If a vehicle stops within the range of an added POI, and the duration of parking matches the stop threshold specified in the report download window, then in the “Location” column the report will contain the name of the private POI instead of address. To open the POI management menu, drag the mouse pointer close to the blue strip labeled “POI”, placed in the lower right part of the browser window. When opening the website, the private POI display is disabled by default for faster operation of the system. The POI display can be enabled using the “Display/hide POI tacks” button. POI interface buttons: : add new POI : accept modifications : edit POI : cancel : display/hide POI shapes : delete POI : display/hide POI tacks Adding private POI’s Adjust the POI target map area to the middle of the browser window. Open the POI management menu and select the “Add new POI” icon. The new rectangular POI shape appears in the middle of the window. Zoom in the map as necessary. The rectangular area can be modified by dragging its corners. For this, move the mouse pointer above the desired corner, then keep the mouse button pressed and adjust the size as desired by dragging. It is recommended to adjust the boundaries so that the expected stop point to fall for sure within the area. The entire shape can be moved and relocated by grabbing it inside its boundaries and dragging to the desired place. 44 After finalizing the POI shape and its position, press “Accept modifications” button to proceed or “Cancel” to skip. Enter the new POI name and if necessary, the additional data (e.g. address, specification) in the “POI data” window. In the reports primarily the “Long name” is displayed, if not entered, then the “Short name” is used. In the POI management menu the “Short name” and the “Additional data” appears. Forbidden area: if this option is enabled, then the given POI is considered in the system as forbidden area where the vehicles registered in the account are not allowed to stop. If a vehicle still stops in this area, this will be indicated in the given vehicle’s reports highlighted with red color. Change icon: after pressing this button, different colored tacks can be selected Press “Submit” to store the entered data or “Close” to cancel without saving. If the target area cannot be covered properly with one shape, there is possibility to add further new POI shapes even by covering each other partially, using the same name for all. This way, stops performed within the given POI group area will appear using the same POI name in the reports. Editing private POI’s To edit an existing private POI, turn on editing mode by clicking on the “edit POI” icon in the POI menu, then click on the POI wished to be edited. On the given POI the “edit POI” icon will appear, and if pressed, the POI can be adjusted the same way like adding a new one. To erase the POI click on “delete POI” icon. To exit editing mode press again the “edit POI” icon in the POI menu. 45 4.9 Daily graph To open the daily graph press the diagram icon: , which is placed on the left side of the screen below the Reports icon. Depending on your subscription and the easyTRACK module’s outfit, the following graphs are displayed: Speed curve: colored light blue Fuel curve: colored green Temperature curve 1: colored dark blue, curve of temperature sensor 1 Temperature curve 2: colored red, curve of temperature sensor 2 Temperature curve 3: colored yellow, curve of temperature sensor 3 Temperature curve 4: colored orange, curve of temperature sensor 4 Temperature curve 5: colored purple, curve of temperature sensor 5 Functions of the buttons placed in the upper left part of the diagram window: : display/hide speed curve : display/hide fuel curve : display/hide temperature curves (1…5) The status bar found in the lower part of the chart indicates the following states: Indications if RPM Monitor rotation sensor is installed (e.g. for machines): Grey section: the vehicle was stopped and the ignition was turned off Blue section: the vehicle was travelling Yellow section: the vehicle did not move, the engine run at idle RPM Green section: the vehicle (machine) was working, the RPM was above the working threshold Indications if RPM Monitor rotation sensor is not installed (e.g. for cars): Grey section: the vehicle was stopped and the ignition was turned off Blue section: the vehicle was travelling Green section: the vehicle did not move, but the ignition was turned on 46 Functions of the buttons placed in the upper center part of the diagram window: : move the displayed period to the left : move the displayed period to the right : close chart : zoom in : zoom out By moving the mouse pointer horizontally on the diagram’s surface, the time information of the given position can be viewed on the horizontal axis, while in the upper left part of the diagram window the speed (km/h), fuel (Liters) and temperature (ºC) data are displayed in the data fields placed next to each icon. At the same time the icon of the vehicle jumps to the position indicated by the mouse pointer, this way it can be traced on the map, where was the vehicle moving with the given speed. For the availability of the fuel graph it is necessary to install the capacitive fuel probe in the vehicle. For the availability of the temperature graph it is necessary to install the easyTEMP temperature sensor(s) in the vehicle. If a graph or a service is unavailable, so the given function cannot be enabled with its icon and by default the data field does not appear next to the icon. There is possibility to zoom in the diagram by double clicking on the desired point. In this case the enlarged part is positioned to the center of the diagram window. Zooming out can be performed only using its function button. The daily graph provides an overview of the vehicle’s daily speed, the fuel level changes measured by the capacitive fuel probe, the temperatures measured by the easyTEMP sensor(s), and assures possibility to replay the vehicle’s motion from the desired time of day in “History” mode. The time period displayed in the diagram follows the time period selected on the time axis found below the chart. The replay starting point can be selected on the time axis (see description of “Time axis” in the “User interface in ‘History’ mode” chapter). The curves (speed, fuel, temperature) can be enabled/disabled one by one using the icons found in the upper left part of the diagram window. While replaying, the curves corresponding to the vehicle’s actual position are drawn at the right edge of the diagram. 47 4.10 Monthly fuel graph To open the fuel graph click on the gas station icon: , which is placed on the left side of the browser window, below the daily graph icon. The availability of this function depends on your subscription. The fuel graph displays graphically the monthly fuel usage of the selected vehicle. To use this service, it is necessary to install the capacitive fuel probe in the vehicle. The vertical strips of the fuel graph represent the days of the month. By moving the mouse pointer above the strips, the selected date is displayed in the lower right corner of the diagram. By clicking on the desired day’s strip, the daily graph of the given day is loaded, which makes possible to receive a detailed overview of the fuel level changes and to compare this with the speed. 4.10.1 Tracing fuel theft From the displayed diagram fuel theft can be easily determined, e.g. a diagram pitching vertically or rather sheer means fuel extraction. Fuel theft performed in the way of refueling “aside” (not into the vehicle’s fuel tank) can also be determined, if the curve does not reach 100% after refueling, in contempt of the command of full refueling each time, and the received invoice still contains the full refueling. This means that the vehicle was not refueled completely, and the difference of fuel quantity was poured elsewhere, out of the vehicle’s fuel tank. 48 4.10.2 Information on the fuel probe measurement accuracy The most important element of the exact operation is the calibration table created at reference refueling. If the flow meter of the refueling station used for calibration is inaccurate, then the calibration and as a result, the fuel level measurement will be inaccurate. The measurement accuracy is affected by the diesel fuel’s pollution (water, dust), temperature, outside air temperature, inclination angles differing from those at calibration, dynamic movement of the fluid. The thermal expansion of the diesel fuel is 1.01/10°C, that is in case of 1000 liters of fuel, the level increases with 30 liters without refueling, when the fuel temperature changes from 5°C to 35°C due to the ambient temperature. In case of dual tanks, this occurs multiply, such as the pressure difference in the tank. In general, the average accuracy of the calibration device and the gas stations is 1% (legally 0.5%). If the gas station’s accuracy is about 1%, this causes 10 liters difference at 1000 liters, and by adding the difference caused by the thermal expansion, for the example it may already mean 40 liters difference between the refueled and measured values. Generally the shown refueled quantity is more accurate if the temperature of the fuel used for calibration is close to the temperature of the fuel filled at the gas station. Due to the combined effect of the mentioned factors, "exact value" can only be determined with good approximation, and not exactly. Due to these influential parameters, constant accuracy cannot be determined. 4.10.3 Application purpose and possibilities The system was designed to register fuel drainage which is not operational, and to show whether the invoiced fuel quantity was filled in the tank. These two cases cover the possibilities of abuses with fuel. In case of fuel drainage: theft is considered when the fuel level in the tank drops suddenly and remains permanently at that level (or below). When parking on the roadside, fuel level changing and then restoring is expected, therefore a refueling report for the given day is not authentic. Reflecting this, the correctly processed values are only valid in relation to the past, that is the "present" is only informative, not authoritative. For this case the graph shows well the sudden changes, which is used to generate the reports. The generated report, even if not exact to liter, but it shows whether the fuel was drained or not. In case of refueling: expectation is that the invoice should be comparable to the values indicated by the fuel probe. No matter how accurate the calibration is, due to the influential factors mentioned above, the system can show the refueled quantity generally with accuracy within 5%. It is a fact, that if the system shows more than the actual refueled quantity, then abuse with fuel could not have happened. The excess may be caused by the factors mentioned previously. If it shows less, further analysis is necessary, as the indicated quantity is informative, not actual data. 4.10.4 Recommended refueling method Some degree of measurement error is included in each refueling from both the gas station’s side and the fuel probe’s side. This error may accumulate by refueling many times small quantities, therefore it is recommended to make few, but large-quantity refueling. 49 5 External elements and functions of the easyTRACK module 5.1 SIM card case The cover of the SIM case can be opened by pulling horizontally towards the LED on its marked end. Insert the SIM card here and replace the cover. 5.2 5.3 Module's LED signals RED is continuously lit Telephone power up / restart in progress or no GSM / GPRS connection RED and GREEN blink slowly and alternately The downloaded data is faulty RED blinks fast GREEN blinks with longer pause Event signalization in progress GREEN blinks impulsely, RED is not lit GPRS connection is OK Module sounds The easyTRACK SP module version informs the driver about the relevant events using sounds and voice messages through the optional external speaker. Default system sounds and voice messages: Event description Turning ignition on Turning ignition on – low battery Turning ignition off – system ready Sound and voice message specification Ascending sound signal Low battery voltage Descending sound signal Turning ignition off – GSM fault (insufficient signal strength) GSM network not available Turning ignition off – GPS fault (insufficient satellite signal) Satellilte signal lost Turning ignition off – GSM and GPS GSM network not available fault (insufficient GSM signal and satellilte signal lost strength and satellite signal) The default sounds and voice messages can be replaced with customized voice files through USB connection by using the easyTRACK Audio Manager software. 5.4 LED signals of the GPS receiver Red is continuously lit, or no signal Acquiring satellites Red blinks Position fixed 50 5.5 Module wiring Based on accessory connection, two module versions are available: with speaker output (SP) and with fuel probe input (F) for vehicles with 1 or with 2 fuel tanks). The optional speaker cannot be connected to the version with fuel probe input! easyTRACK SP version: easyTRACK F version: 51 Connecting the fuel probe: For vehicles with one fuel tank only “probe1” has to be connected. For vehicles with two fuel tanks two probes have to be used, connected to F1, respectively F2 inputs. In order to use the fuel consumption services, calibration of the fuel probe is necessary. Details about the calibration procedure can be found in the fuel probe’s installation guide. Connecting the temperature sensor: In case of using temperature sensor, maximum 3 sensors can be connected to input F2 as shown in the figure above. If a second fuel probe is necessary, this can be connected to the last temperature sensor (the green wire of the fuel probe has to be connected to the yellow wire of the last temperature sensor). Details about the temperature sensor can be found in the sensor’s installation guide. Connecting the RPM sensor: The RPM monitor rotation sensor is recommended to be used basically for machines, in order to calculate the exact work and idle times. The RPM sensor can be connected to input F2. No further accessory should be connected to this input, therefore if fuel probe and/or temperature sensor are also required, they should be connected to input F1. Details about the RPM sensor can be found in the sensor’s installation guide. *: 24VDC power source can also be used If 24VDC power source is used, then the backup battery must also be a 24V battery! The panic button, the backup battery, the speaker, the fuel probe and the temperature sensor are optional accessories. For the functions of the business/private switch see chapters “User interface in Present mode”, “Reports” and “Separation of business/private routes”. Attention! Installation of the optional battery requires increased attention to avoid eventual dangers (e.g. in case of cell short circuit the battery may overheat, or if not fixed/isolated properly, even fire may occur). Attention! Improper connecting of the GPS receiver may damage it, resulting loss of its warranty ! 52 6 Installation guide Have the installation done by specialist in a vehicle electronics workshop. For validation of the guarantee the warrantee card is necessary with the stamp and signature of the installation workshop. 6.1 Mounting Do not mount the unit in places where it can be affected by strong electromagnetic disturbances (e.g. near electric motors, etc.). Do not mount the unit in wet or humid places. Connecting the GSM antenna: antenna can be connected to an FME-M connector. It is recommended to stick the antenna found in the package avoiding large shadowing metal surfaces, e.g. vertically or horizontally at the edge of the windshield, where the GSM signal strength is at least 12 on the scale of 31 used by the module. Attention! It is recommended to install the GSM antenna as far as possible from car alarm’s ultrasonic sensors, because the continuous GSM communication also subsists when the alarm unit is armed and may disturb the operation of ultrasonic sensors, thus may cause false alarms! GPS receiver: should be mounted in a hidden place avoiding large shadowing metal surfaces, where the reception of at least 6-7 satellite's signals is assured. The unlabeled side should point to the sky. It is recommended to install the removable 5A fuse of the supply circuit in a hidden place, but accessible if necessary. This may be used for eventual firmware updating through USB. 6.2 Putting into operation Activate the SIM card and ensure it operates Disable PIN code request and voicemail on the SIM card and enable caller identification and caller ID sending services at the GSM service provider. Make sure that the SIM card is placed into its case properly. Make sure that the GSM antenna is connected properly to the module. Make sure that the wires are connected as earlier instructed. Power up the device. Make sure the power source is sufficient for the load of the module. The quiescent current of the module is 120mA, however it can reach up to 500mA for a short time during communication. 6.3 Testing and handing over After installation it is recommended to verify the device according to the followings: Check the signals of the module’s LED as well as the module sounds according to the relating tables Check the GSM signal strength and the number of satellites accessed to have satisfactory value 53 Enter the web site, apply ignition and check whether the module has established connection with the server (if the vehicle is displayed on the digital map), as well as whether the displayed traffic information are accurate (position, ignition state, speed etc.) Drive the vehicle for a few rounds and check the accuracy of the route Test the alarm events, make sure the calls and SMS messages are performed Testing the relay output: check if the relay controls the siren eventually connected to it (the easiest way to activate the relay is to cover the GPS receiver or disconnect one of wires from the module terminals) As all the desired functions operate properly, the installation and testing can be considered finished and the vehicle can be handed over to the owner. 7 Troubleshooting Fault description The GPS receiver LED and the module LED are continuously off There is no GSM signal or its level is not satisfactory There is no GPS signal or its level is not satisfactory The module does not establish connection with the server Possible reason of the fault If enabled, the module switches to sleep mode when the specified delay expires. In this mode the module LED and the LED of the GPS receiver is switched off, the module switches to normal mode when ignition is turned on or at the effect of an input event. As the module is in normal mode and the LED’s still not operate, check the power wiring and the polarity. Ensure the SIM card is placed into its case properly and touches the case pins properly. Ensure the GSM antenna is connected properly to the module, check its place of installation, to be installed avoiding large shadowing metal surfaces and if possible to be fixed such way, that its adhesive surface to face outside (to the sky). Ensure the cable of the GSM antenna has not been damaged during installation. After power up initialization of the GPS receiver may take even 5 minutes. Ensure the GPS receiver is connected properly to the module, check its place of installation, to be installed avoiding large shadowing metal surfaces and is fixed with its labeled side facing the sky. Ensure the cable of the GPS receiver has not been damaged during installation. Make sure that the module is registered on the server. Ensure the SIM card is placed into its case properly and touches the case pins properly. Check the APN setting and the GSM signal strength, as well as ensure the PIN code request is turned off on the SIM card. Ensure the SIM card is suitable for GPRS data communication and the GPRS service is activated. The relay output does not Check the relay output settings and the wiring. activate 54 8 Guarantee 8.1 The manufacturer’s limited warranty T.E.L.L. provides a 12-month guarantee on the products purchased, according to the Hungarian governmental regulation nr. 151/2003 (IX.22.). Within the warranty period T.E.L.L. repairs or replaces if necessary any T.E.L.L. product that proves to be faulty of basic commodity or production failures. The 12 months overall warranty is considered exclusively at T.E.L.L. company’s site. For warranty claim enforcement the product itself, the warranty card signed and stamped by both the distributor and the installer, as well as the copy of the sales receipt or invoice is necessary to be returned to the distributor. Warranty claim cannot be enforced: beyond the warranty period in case of improper use if the product bears evidence of serious mechanical damages due to rough handling or of high energy, over-voltage kind electrical affect if the product has been disassembled, modified or repaired by other person than the specialists of T.E.L.L., or if the barcode or IMEI serial number of the product has been removed, erased, damaged, modified or become unreadable in any other way if the product has been exposed to steam, humidity or extreme weather or environmental circumstances, or to the quick change of these circumstances, as well as to corrosion, spilling with food or drink or any chemical impacts if during the inspection process the failure turns out to be the result of inefficient installation Concerning the operation and usage of the product – including the proper use of the hardware and software as well – T.E.L.L. accepts liability only up to the price of the product and exclusively towards the Customer. 8.2 Other important information The GSM network and SIM card necessary for the operation of the product are supplied by an independent third-party GSM service provider. On the basis of the present warranty T.E.L.L. does not take responsibility for the availability, operation, coverage of the GSM network, or for missed signals and alarms or data loss resulted by failures of the telecommunication service or failures of the product and for property damages resulting directly or indirectly from such events. Under no circumstances can T.E.L.L. be held liable for such incurred unpredictable and inestimable SMS or data communication costs, which are the result of improper setting or failure of the product. The Service (including all available images and data) is provided by the Map service providers or their licensors. The Service provider and the Map service provider assumes no guaranty for the accuracy or completeness of the information provided by the Map service provider and its licensors or other Map service providers. The Map service provider does not guarantee that the Services (or their parts) satisfy all Subscriber demands, and that the Service performance will be undisturbed, safe and fail-safe. Attention! The service is not fail-safe and it has not designed and produced for high risk activities, e.g. air traffic control or life-saving systems, where realtime control is necessary or where a Service failure may cause personal injury or environmental damage. 55 9 Technical information 9.1 Technical specification Power source voltage: Nominal current consumption: Stand-by current consumption: Maximal current consumption: Relay output specification: Operating temperature: Transmission frequency: GSM phone type: Dimensions of the module: Dimensions of the GPS receiver: Weight: 9.2 Package contents 9.3 10-28 VDC 120mA ≈20mA @12VDC, ≈12mA @24VDC 500mA @ 12VDC, 250mA @ 24VDC max. 5A @ 24VDC -20ºC - +70ºC GSM 850 / 900 / 1800 / 1900 MHz Simcom SIM900 84 x 72 x 32mm 65 x 42 x 18mm 200g (400g packed) easyTRACK module + terminal connector GSM 900MHz / 1800MHz antenna (self-adhesive fixing) GPS receiver User’s Manual, Warranty Card, CD USB A-B cable The manufacturer’s contact T.E.L.L. Software Hungária Kft 4034 Debrecen, Vágóhíd u. 2. Hungary Tel.: +36-52-530-130 Fax.: +36-52-530-131 Web: www.tell.hu 56 10 easyTRACK data traffic sheet Attention! The sheet contains approximate data, without roaming data traffic! Position sending frequency while moving (seconds) 1 2 3 4 5 6 7 8 9 Average daily vehicle usage (hours) 10 11 12 13 14 15 16 17 18 19 20 21 22 23 24 3 6 10 15 30 60 120 150 15 MBytes 12 MBytes 11 MBytes 25 MBytes 22 MBytes 20 MBytes 34 MBytes 31 MBytes 30 MBytes 43 MBytes 41 MBytes 39 MBytes 53 MBytes 50 MBytes 49 MBytes 62 MBytes 60 MBytes 58 MBytes 71 MBytes 69 MBytes 68 MBytes 81 MBytes 78 MBytes 77 MBytes 90 MBytes 88 MBytes 87 MBytes 99 MBytes 97 MBytes 97 MBytes 109 MBytes 107 MBytes 106 MBytes 118 MBytes 116 MBytes 116 MBytes 127 MBytes 126 MBytes 125 MBytes 137 MBytes 135 MBytes 135 MBytes 146 MBytes 145 MBytes 144 MBytes 155 MBytes 154 MBytes 154 MBytes 165 MBytes 164 MBytes 163 MBytes 174 MBytes 173 MBytes 173 MBytes 183 MBytes 183 MBytes 182 MBytes 193 MBytes 192 MBytes 192 MBytes 202 MBytes 202 MBytes 201 MBytes 211 MBytes 211 MBytes 211 MBytes 221 MBytes 221 MBytes 221 MBytes 230 MBytes 230 MBytes 230 MBytes 11 MBytes 7 MBytes 6 MBytes 15 MBytes 12 MBytes 11 MBytes 20 MBytes 17 MBytes 15 MBytes 24 MBytes 21 MBytes 20 MBytes 29 MBytes 26 MBytes 25 MBytes 33 MBytes 31 MBytes 30 MBytes 38 MBytes 35 MBytes 34 MBytes 42 MBytes 40 MBytes 39 MBytes 47 MBytes 45 MBytes 44 MBytes 52 MBytes 50 MBytes 49 MBytes 56 MBytes 54 MBytes 53 MBytes 61 MBytes 59 MBytes 58 MBytes 65 MBytes 64 MBytes 63 MBytes 70 MBytes 68 MBytes 68 MBytes 74 MBytes 73 MBytes 72 MBytes 79 MBytes 78 MBytes 77 MBytes 83 MBytes 82 MBytes 82 MBytes 88 MBytes 87 MBytes 87 MBytes 92 MBytes 92 MBytes 91 MBytes 97 MBytes 96 MBytes 96 MBytes 102 MBytes 101 MBytes 101 MBytes 106 MBytes 106 MBytes 106 MBytes 111 MBytes 111 MBytes 110 MBytes 115 MBytes 115 MBytes 115 MBytes 9 MBytes 5 MBytes 4 MBytes 11 MBytes 8 MBytes 7 MBytes 14 MBytes 11 MBytes 10 MBytes 17 MBytes 14 MBytes 12 MBytes 19 MBytes 17 MBytes 15 MBytes 22 MBytes 19 MBytes 18 MBytes 24 MBytes 22 MBytes 21 MBytes 27 MBytes 25 MBytes 24 MBytes 30 MBytes 28 MBytes 27 MBytes 32 MBytes 30 MBytes 30 MBytes 35 MBytes 33 MBytes 32 MBytes 38 MBytes 36 MBytes 35 MBytes 40 MBytes 39 MBytes 38 MBytes 43 MBytes 42 MBytes 41 MBytes 46 MBytes 44 MBytes 44 MBytes 48 MBytes 47 MBytes 47 MBytes 51 MBytes 50 MBytes 49 MBytes 53 MBytes 53 MBytes 52 MBytes 56 MBytes 55 MBytes 55 MBytes 59 MBytes 58 MBytes 58 MBytes 61 MBytes 61 MBytes 61 MBytes 64 MBytes 64 MBytes 64 MBytes 67 MBytes 66 MBytes 66 MBytes 69 MBytes 69 MBytes 69 MBytes 8 MBytes 4 MBytes 3 MBytes 9 MBytes 6 MBytes 5 MBytes 11 MBytes 8 MBytes 7 MBytes 13 MBytes 10 MBytes 9 MBytes 14 MBytes 12 MBytes 11 MBytes 16 MBytes 14 MBytes 12 MBytes 18 MBytes 15 MBytes 14 MBytes 19 MBytes 17 MBytes 16 MBytes 21 MBytes 19 MBytes 18 MBytes 23 MBytes 21 MBytes 20 MBytes 24 MBytes 23 MBytes 22 MBytes 26 MBytes 24 MBytes 24 MBytes 28 MBytes 26 MBytes 26 MBytes 30 MBytes 28 MBytes 27 MBytes 31 MBytes 30 MBytes 29 MBytes 33 MBytes 32 MBytes 31 MBytes 35 MBytes 34 MBytes 33 MBytes 36 MBytes 35 MBytes 35 MBytes 38 MBytes 37 MBytes 37 MBytes 40 MBytes 39 MBytes 39 MBytes 41 MBytes 41 MBytes 41 MBytes 43 MBytes 43 MBytes 43 MBytes 45 MBytes 44 MBytes 44 MBytes 46 MBytes 46 MBytes 46 MBytes 7 MBytes 4 MBytes 2 MBytes 8 MBytes 4 MBytes 3 MBytes 8 MBytes 5 MBytes 4 MBytes 9 MBytes 6 MBytes 5 MBytes 10 MBytes 7 MBytes 6 MBytes 10 MBytes 8 MBytes 7 MBytes 11 MBytes 9 MBytes 8 MBytes 12 MBytes 10 MBytes 9 MBytes 13 MBytes 10 MBytes 9 MBytes 13 MBytes 11 MBytes 10 MBytes 14 MBytes 12 MBytes 11 MBytes 15 MBytes 13 MBytes 12 MBytes 15 MBytes 14 MBytes 13 MBytes 16 MBytes 15 MBytes 14 MBytes 17 MBytes 16 MBytes 15 MBytes 18 MBytes 16 MBytes 16 MBytes 18 MBytes 17 MBytes 17 MBytes 19 MBytes 18 MBytes 18 MBytes 20 MBytes 19 MBytes 19 MBytes 20 MBytes 20 MBytes 20 MBytes 21 MBytes 21 MBytes 21 MBytes 22 MBytes 22 MBytes 21 MBytes 23 MBytes 22 MBytes 22 MBytes 23 MBytes 23 MBytes 23 MBytes 6 MBytes 3 MBytes 2 MBytes 7 MBytes 3 MBytes 2 MBytes 7 MBytes 4 MBytes 2 MBytes 7 MBytes 4 MBytes 3 MBytes 7 MBytes 5 MBytes 3 MBytes 8 MBytes 5 MBytes 4 MBytes 8 MBytes 5 MBytes 4 MBytes 8 MBytes 6 MBytes 5 MBytes 8 MBytes 6 MBytes 5 MBytes 8 MBytes 6 MBytes 6 MBytes 9 MBytes 7 MBytes 6 MBytes 9 MBytes 7 MBytes 6 MBytes 9 MBytes 8 MBytes 7 MBytes 9 MBytes 8 MBytes 7 MBytes 10 MBytes 8 MBytes 8 MBytes 10 MBytes 9 MBytes 8 MBytes 10 MBytes 9 MBytes 9 MBytes 10 MBytes 10 MBytes 9 MBytes 11 MBytes 10 MBytes 10 MBytes 11 MBytes 10 MBytes 10 MBytes 11 MBytes 11 MBytes 10 MBytes 11 MBytes 11 MBytes 11 MBytes 12 MBytes 11 MBytes 11 MBytes 12 MBytes 12 MBytes 12 MBytes 6 MBytes 3 MBytes 1 MBytes 6 MBytes 3 MBytes 2 MBytes 6 MBytes 3 MBytes 2 MBytes 6 MBytes 3 MBytes 2 MBytes 6 MBytes 3 MBytes 2 MBytes 6 MBytes 4 MBytes 2 MBytes 6 MBytes 4 MBytes 3 MBytes 6 MBytes 4 MBytes 3 MBytes 6 MBytes 4 MBytes 3 MBytes 6 MBytes 4 MBytes 3 MBytes 6 MBytes 4 MBytes 3 MBytes 6 MBytes 4 MBytes 4 MBytes 6 MBytes 5 MBytes 4 MBytes 6 MBytes 5 MBytes 4 MBytes 6 MBytes 5 MBytes 4 MBytes 6 MBytes 5 MBytes 4 MBytes 6 MBytes 5 MBytes 5 MBytes 6 MBytes 5 MBytes 5 MBytes 6 MBytes 5 MBytes 5 MBytes 6 MBytes 6 MBytes 5 MBytes 6 MBytes 6 MBytes 5 MBytes 6 MBytes 6 MBytes 6 MBytes 6 MBytes 6 MBytes 6 MBytes 6 MBytes 6 MBytes 6 MBytes 6 MBytes 3 MBytes 1 MBytes 6 MBytes 3 MBytes 1 MBytes 6 MBytes 3 MBytes 2 MBytes 6 MBytes 3 MBytes 2 MBytes 6 MBytes 3 MBytes 2 MBytes 6 MBytes 3 MBytes 2 MBytes 6 MBytes 3 MBytes 2 MBytes 6 MBytes 3 MBytes 2 MBytes 6 MBytes 4 MBytes 3 MBytes 6 MBytes 4 MBytes 3 MBytes 6 MBytes 4 MBytes 3 MBytes 5 MBytes 4 MBytes 3 MBytes 5 MBytes 4 MBytes 3 MBytes 5 MBytes 4 MBytes 3 MBytes 5 MBytes 4 MBytes 3 MBytes 5 MBytes 4 MBytes 4 MBytes 5 MBytes 4 MBytes 4 MBytes 5 MBytes 4 MBytes 4 MBytes 5 MBytes 4 MBytes 4 MBytes 5 MBytes 5 MBytes 4 MBytes 5 MBytes 5 MBytes 4 MBytes 5 MBytes 5 MBytes 5 MBytes 5 MBytes 5 MBytes 5 MBytes 5 MBytes 5 MBytes 5 MBytes 57 Position sending freq. while parking 2 minutes 20 minutes 60 minutes 2 minutes 20 minutes 60 minutes 2 minutes 20 minutes 60 minutes 2 minutes 20 minutes 60 minutes 2 minutes 20 minutes 60 minutes 2 minutes 20 minutes 60 minutes 2 minutes 20 minutes 60 minutes 2 minutes 20 minutes 60 minutes 2 minutes 20 minutes 60 minutes 2 minutes 20 minutes 60 minutes 2 minutes 20 minutes 60 minutes 2 minutes 20 minutes 60 minutes 2 minutes 20 minutes 60 minutes 2 minutes 20 minutes 60 minutes 2 minutes 20 minutes 60 minutes 2 minutes 20 minutes 60 minutes 2 minutes 20 minutes 60 minutes 2 minutes 20 minutes 60 minutes 2 minutes 20 minutes 60 minutes 2 minutes 20 minutes 60 minutes 2 minutes 20 minutes 60 minutes 2 minutes 20 minutes 60 minutes 2 minutes 20 minutes 60 minutes 2 minutes 20 minutes 60 minutes