1
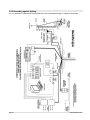
rev. March 2015 www.SolidynePro.com Page 2 Contents- 1.1 Shipping list.....................................................5 3.2.3.1 Being the cell phone on-air.....................18 3.2.3.2 Being the landline on-air.........................18 3.2.2 About return signal to the phone.........................19 3.2.3 Null-factor............................................................19 1.2 Features...........................................................5 3.3 Monitor section.............................................19 1.2.1 Input channels.......................................................5 1.2.2 Monitors................................................................5 1.2.3 Outputs.................................................................5 1.2.4 ETM – VCA faders................................................6 3.3.1Using monitors and headphones.........................19 3.3.2 Use into integrated Studios.................................20 3.3.3 Previous listening (CUE).....................................20 3.3.4 Talk back.............................................................20 CHAPTER 2 Installation and wiring ..................................7 3.4 Microphone channels...................................21 CHAPTER 1 Overview .....................................................5 2.1 Overview..........................................................7 2.1.1 Parasitic signals....................................................7 2.2 Rear panel – wiring.........................................8 2.2.1 Power source........................................................8 2.2.2 Input channels.......................................................8 2.2.2.1 LINEA inputs.............................................8 2.2.2.2 USB link....................................................8 2.2.2.3 MICROPHONE INPUTS...........................9 2.2.3 AUDIO OUTPUTS..............................................10 2.2.3.1 PROGRAM AND RECORDINGS............10 2.2.3.2 USB send................................................10 2.2.4 Monitoring outputs..............................................10 2.2.4.1 HEADPHONES.......................................10 2.2.4.2 MONITOR SPEAKERS...........................10 2.2.5 Tally light.............................................................11 2.2.6 Telephonic Hybrid...............................................11 2.2.6.1 CONECTING STANDARD LINE.............11 2.2.6.2 CONECTING A CELL PHONE...............11 Re-connections...................................................12 Setup the level....................................................12 2.2.6.3 EXTERNAL HIBRYD...............................12 2.2.7 General tips.........................................................12 2.2.8 Grounding against lighting..................................13 3.4.1 Features..............................................................21 3.4.2 Processing..........................................................21 3.5 Line channels................................................22 3.6 Recordings....................................................23 3.6.1 Direct to Hard Disc recording..............................23 3.6.2 Recording the phone lines..................................23 CHAPTER 4 Audio IP (models D612/IP) ........................25 4.1 Introduction...................................................25 4.2 Power source.................................................25 4.3 STL link..........................................................25 4.3.1 IP config..............................................................25 4.3.2 Destiny IP............................................................25 4.3.3 Audio settings.....................................................26 4.3.4 Using a microwave digital link.............................26 4.3.5 Decoding using a computer................................26 CHAPTER 5 Studio Box (optional) .................................27 5.1 Overview........................................................27 5.2 Connecting the StudioBox...........................27 CHAPTER 3 Operation ...................................................15 5.2.1 Connection to the mixer console.........................27 5.2.2 Connections at the Studio...................................27 3.1 Overview........................................................15 5.3 Using the Studio Box....................................27 3.1.1 Quick test............................................................15 3.2Hybrid channel...............................................16 3.2.1 Operation............................................................16 3.2.2 Using a cell phone..............................................16 3.2.2.1 Incoming call...........................................17 3.2.2.2 End the call.............................................17 3.2.2.3 Resume the call on the cell phone..........17 3.2.2.4 Make a call..............................................17 3.2.3 Conferences........................................................18 Page 3 CHAPTER 6 About maintenance ...................................29 5.1 How to get a long life of the console......................29 5.2 Preventive Maintenance........................................29 5.3 Spare parts............................................................29 5.5 Tech specs.............................................................31 Notes....................................................................32 www.SolidynePro.com This page was left empty intentionally. www.SolidynePro.com Page 4 CHAPTER 1 1.1 Shipping list When unpacking the unit; check the contents to verify that the console has not received blows during the shipment. Inside the packaging you receive the following elements: 1 switching power source 90-240 V This user manual 1 guaranty agreement 1 tubular connector (2,5 mm) for Tally Light 4 self-adhesive rubber pads. Optionally: Overview 3 LINE channels allow connecting up to 6 sources. Channels 3 and 4 manages unbalanced analogical inputs (Line-1 and Line-2) and balanced inputs (Bal1 and Bal-2) whereas channel 5 are digital, with direct connection to the computer via USB. In addition, all channels have one analog auxiliary input. All the channels count on a gain control, that take effects on the selected input (main or auxiliary). “Telephone Hybrid” manages one land telephone lines (2 wires) and one cellular phone linked via Bluetooth. Both can be in conference. The use is very simple, since many functions are automated. Additionally, the console has send and return connector for external hybrids. Wiring kit (optional). If you did not acquire the wiring kit, you will receive the corresponding DIN connectors. One RJ45 Ethernet wire (only for models /AoIP) 1.2 Features D-612 console is a compact, solid and elegant unit; with a great flexibility for interconnection. It includes USB digital I/O which brings digital link with the computer; avoiding the use of soundcards in the computer. D-612 has 5 100mm professional Conductive-Ceramic faders of with ETM-VCA control that offer a life utility of one million operations (over 15 years). It is the best solution for small and medium radios; and for auxiliary recording studies in great stations. 1.2.1 Input channels There are 2 microphone channels with phantom power of 48V, switched from the front panel. Mic channels have a processing stage that includes 4 bands equalizer and automatic dynamic range compressor. Each microphone channel can be sent individually to the air signal (PGM) or assigned to the processing stage. MIC-3 channel can be switched to AUX stereo line input. Each mic fader can manage two dynamic microphones. At the rear panel you find 4 XLR inputs (MIC-1a; MIC-1b; MIC-2a; MIC-2b). The built-in dynamic compressor compensates the level between the microphones. It's appropiated that mic's connected to the same channel are the same model. Page 5 1.2.2 Monitors The monitoring area distributes the signals to the loudspeakers and headphones on the studio and the control room. Studio & Control Room has a unique level knob for loudspeakers and headphones; and the assignment switches that allow select between ON-AIR signal (external tuner), console output (PGM) or recording output (REC). Usually the level in the console is fixed; since a headphones mixer allows to manage each headphone and active speakers has it own level knob. CUE monitor The console has a built-in loudspeaker for cueing, with its own control level. CUE is an internal send that allows listening to the audio signal previous to the fader. The cue signal also is sent to the Control Room headphones. Additionally, monitoring section contains the Talkback circuit; that operates as well in combination with loudspeaker CUE to engage in a private dialog from the hybrid with a telephone call without disturbing the on-air signal. 1.2.3 Outputs Solidyne D-612 has two main outputs named PGM (Program) and REC (recording). Phone lines are sent only to PGM. In addition it has an USB digital output that appear in the computer as external sound recording devices (USB recording devices) and sends the program signals. www.SolidynePro.com Summarizing, the outputs are as follows: 1. PGM, The PROGRAM output is used the send the signal to the air. 2. REC, used to recordings (and allows to listen a channel in the main monitors without send it to the air). 3. PGM/REC USB, program or recording output is also available via USB. D-612 has send & return connections for external hybrid. The audio from the external hybrid enters trough the “hybrid channel” and operates just as the built-in hybrids; which continue being operative. Please note that land lines of internal & external hybrids will work in conference. The Tally output allows the direct connection of ONAIR LED’s lights. Tally activates when opening the mic channels. The mixer has built-in tally LED. TALLY OUTPUT LOAD DOES NOT HAVE TO EXCEED 120mA (two Solidyne ON-AIR lights). If your radio uses the old incandescent light bulbs, a 12 V relay must be connected. 1.2.4 ETM – VCA faders Using a technique of control called ETM-VCA (Electrometric Voltage Controlled Amplifier) the faders DO NOT manage audio signals. The change on the level is made using low noise amplifiers of great stability. The main faders only handle control signals that modify the gain of the electronic amplifiers. For more information please visit our WEB site. The main advantages of this technology are: Eliminates the noisy signals due to dirty faders. Eliminates the maintenance and improves the life of faders. Gives a perfect stereo tracking (less than 0,1 dB error) between Left and Right channels. Allows using Conductive Ceramic faders of two million guaranteed operations (about 15 years of use). www.SolidynePro.com Page 6 CHAPTER 2 2.1 Overview Installation of Solidyne D-612 doesn’t present particular jobs. However, keep in mind the basic rules for all professional audio installations. The balanced inputs of the D-612 uses DIN-5 multipin connectors (provided with the console). In option, you can acquire the Solidyne wiring kit (MNG612), which inlcude all the cables and connectors needed for the set up. For console grounding use the rear side GND bronze tip with a 2mm cable to a good buried cooper bar. 2.1.1 Parasitic signals All unwanted signals that appear in audio lines usually consider parasitic signals. A common type are denominated humming, low frequency signals (multiples of 50/60 Hertz) caused by the interaction of electromagnetic fields coming from the AC line. When the interference source is a magnetic field (generally originated in a supply transformer) the resultant interference will be denominated electromagnetic humming. When the interference is due to such electric potentials as cables that take supply tensions, that are elevated in comparison with the audio signals present in the circuit, you will be in presence of electrostatic humming. The distinction is not merely academic, because the resolution of a problem supposes the knowledge of the noise type to apply the correct solution. Examples: To minimize the reception of electromagnetic humming in the wires, remember the following rule: "THE AREA AMONG TWO AUDIO WIRES WILL BE MINIMUM." It implies that the cables will be tied very close, like the shielded twisted pair audio cables. They should pass far away from any transformer or devices that manage high-intensity currents. Is important to remember that a wire can be good shielded, but if his conductors don’t complete the conditions of minimum area it will be susceptible to take magnetic humming. Other parasitic signals are: AC HUM, RADIO FREQUENCY and CROSSTALK. As hum noises like the radio frequency are originated by electromagnetic fields of high frequency; the first ones are originated by disturbances due to the connection and disconnection of equipment’s to the AC line, the seconds ones are generated by communications transmitters or industrial equipment. If these signals penetrate into audio lines, with sufficient intensity, Page 7 Installation and wiring can surpass the action of the special protection filters, and to reach some sensible part of the input stages. In that case, the interfering signals can be demodulated and already turned audio signal, and will be amplified by the rest of the system. It is fundamental, therefore, to maintain the interference within reduced margins. It is obtained avoiding very long audio lines, with aerial sections or that pass near of transformers or RF transmitters. For protection against very high frequencies is advisable to use double shielded cables, guarantied by the manufacturer. CROSSTALK is the reception of signals coming from other lines of audio. This, like all unwanted noise, it can be supposed controlled when its level is below the level of the system residual noise. Then, all considerations mentioned for the case of buzz are valid. 2.1.2 RF interference (Hum) D-612 consoles have numerous internal protections against RF fields, for the AM and FM broadcasting band. When the transmission station is installed correctly, there will be no interference problems, still with FM equipment of 50 KW installed in the terrace of the radio station. Nevertheless, when the antenna is badly positioned with respect to the Studio or has severe SWR problems, then it does not have the minimum value of field intensity, downward. Or maybe there is a faulty ground connection, then, strong standing waves will appear on the cables of the Studio that can induce high electrical currents inside the audio console. Symptoms: If the interference takes place at the A.M. band, the sound transmitted by the A.M. radio will be listened in the loudspeakers on background (or at buses PGM, REC). In case of FM transmissions, the interference inside the console demodulates the A.M component of the FM carrier; (usually hum from power supply) causing background humming, because in many transmitters of FM, the final output stage is not powered with stabilized tension. Therefore, if console D-612 presents humming, please make a test shutting down the transmitter a few seconds to check if the problem disappears. Sometimes, an FM transmitter with the output stage badly calibrated also produce interference in which you can hear the transmitted audio (due to the misalignment a part of the FM modulation is translated to AM modulation). www.SolidynePro.com Solution: D-612 consoles have internal filters against RF interference. Therefore, if interference’s appears, normally is caused by installation problems on the transmission station that generate elevated currents in the wiring of audio on the Studies, due to the standing waves. These currents circulates inside the cabinet of the console, and interferes to the circuits when overpass the barriers that impose to this currents the built-in RF filters. The solution, then, must be external to the console . The solution is to acquire ferrite O-rings of 60 mm diameter, to allow passing the cables and connectors. They will be used in each connector, of input and outputs. The total set of cables that goes to each connector, will have to be twisted around the ring. 2.2 Rear panel – wiring 2.2.1 Power source At the left side of the rear panel you will find the connector for the power supply. The switching power supply (provided with the console) works with any AC network (90-240 V) and tolerate zones with great variations of tension. Gives regulated 28VCC. 2.2.2.1 LINEA inputs Each line channel has two stereo inputs, selected from the frontal panel. ‘BAL-1' and 'BAL-2' inputs are symmetrical balanced, available at DIN connectors. 'LIN-1' and 'LIN-2' inputs are unbalanced, and uses Phono-RCA connectors. To connect an equipment with balanced output you will need a cable from DIN-5 to two CANNON (XLR) or stereo Plug’s (TRS ¼”) according to corresponds. The pin distribution of DIN-5 and XLR are described next. Remember that you need to connect TWO XLR to the DIN (balanced left and balanced right). PLEASE DONT REPLACE THE ORIGINAL POWER SUPPLY. The console doesn't have On/Off switch; reason why it remains fed while the power supply is connected. The grounding made through a bronze tip located in the rear panel that provides the ground connection to the chassis. Use cable of 2mm to a good buried cooper bar. 2.2.2 Input channels On the rear panel are located all the inputs and outputs connectors. Take in mind that good connections offer safe and free of faults operation. By this reason we recommend you: take it the time necessary to make the connections carefully and use always material of first quality. www.SolidynePro.com DIN 5 (stereo bal.) Female XLR 1 AUDIO (-) RIGHT 1 GND (shield) 2 GND (shield) 2 AUDIO (+) 3 AUDIO (-) LEFT 3 AUDIO (-) 4 AUDIO (+) RIGHT 5 AUDIO (+) LEFT Unbalanced lines manages signals of -10 dBV @ 10 KOhms (home type or semi-pro). The GAIN control is common for both inputs; that is to say, that operates on the selected inputs. 2.2.2.2 USB link The Channel-5 is for direct connection to the computer using an USB port. Page 8 Standard cable USB A/B are used. Ports 1.1 or 2.0 are supported. Place the CPU so next to the console as it will be possible, in order to use a wire of 2 to 3 meters of length. USB extension can be used; but it is recommended not to exceed 4 meters. The channel must be connected to a computer running Windows©XP/7/8 Linux or OSX. When connecting the channel to the PC, Windows© automatically recognizes it and installs the correspondent drivers. Additional drivers are not required. ABOUT USB DETECTION Windows XP: Check the input level at the Windows mixer(“Pro- Windows 7: Check if Windows has properly recognized the grams → Accesories → Entretainment → Volume Control”). USB recording device. If Windows recognizes the device wrongly as “microphone device”, the recording will be mono (same signal in both channels). To fix it, go to: Control Pannel → Sound → Recording → and choose USB device (appears as USB microphone). Press [Properties]. Then select 'Advanced Options', open the drop-down menu Recording format and choose stereo (2 channels, 16 bits, 44100Hz). 2.2.2.3 MICROPHONE INPUTS Before connecting the USB cable, make sure the computer has effectively grounded through its terminal on the rear panel. Microphone channels are balanced electronically, with XLR standard connectors. If you want to check the ground, connect a tester on the scale of 25 Vac between the chassis of the PC and console, and verify that the voltage is zero volts (+ / - 5V). Only then connect the USB. If the equipment is not properly grounded, could damage the USB port on the console or computer. Windows© detect the USB channel as “USB audio device”. At the console; the display indicator “Digital In/Out” will show “U4”, indicating that stereo input and output of USB channel was recognized. Remember that you can see the playing and recording devices from “Control Panel > Audio and sound Devices > Audio”. In this window you define the preferred devices for Windows (those that applications use by default). This is simple since the devices are selected from a drop-down menu. Obviously, you must configure the USB devices in the automation and editing software that you use. If your PC does not have installed a soundcard, default playing and recording device will be the USB device (Channel-5 input and PGM or REC output). ON THE LEVEL: After installation, you must adjust the PLAYING LEVEL in the Windows© mixer (“Programs > Accessories > Entertainment > Windows Mixer”); since both channels “born” SILENCED. Windows© erroneously shows the faders at middle scale, but the channels are muted. Set the main fader (gain control) and WAVE faders to the Maximum position. Each channel has two XLR connectors that are added internally. If two microphones to the same channel, agrees that these are dynamic type, the same make and model. Level differences in the voices are balanced by the audio compressor console. The action of the compressor depends on the level of the main attenuator and is indicated on the console. The key "48V" phantom power for channels MIC MIC-1a and-2a. No power is sent to the inputs "b". You should remember that if by mistake Dynamic MIC receives 48V, there is no possibility of damage because its coil has free floating decouples this tension. In addition to the input, USB offers a digital send to the computer, that appears in Windows© as “USB recording device” (PGM or REC). So that you have available in the computer, the program or recording signal. Page 9 www.SolidynePro.com 2.2.3 AUDIO OUTPUTS 2.2.4 Monitoring outputs 2.2.3.1 PROGRAM AND RECORDINGS Program output (PGM) is the main output that takes the signal that will be emitted to the air. It is balanced, with female TRS connectors (a.k.a. “jack” ¼”). Recording output (REC) is balanced with PhonoRCA connectors. In order to connect PGM outputs to an unbalance input, connect only the (+) pin, and leaving unconnected the (-) pin. To connect the balanced TRS output to a balanced XLR input, the cable will be: Balanced connection Plug to male XLR (for each channel) TRS (Plug) GND = sleeve signal (+) = tip signal (-) = ring XLR (Cannon) GND = pin 1 signal (+) = pin 2 signal (-) = pin 3 Please do not connect a signal pin (2 or 3) to ground. Never uses “mono plug' s” (TS) to connect this outputs. 2.2.4.1 HEADPHONES D-612 has outputs for Studio and Control Room headphones; with individual level konb. The headphones level knob also change the level on speakers outputs, since this console was designed to be used with active speakers, that have his own level control. In the Studio, is convenient to install a headphone's mixer (like the Solidyne Studio-box) to distribute the signal to each people; but if you wants, you can connect up to 3 headphones with built-in level control (32 Ohms) to each Headphone output. Another solution Is to mount a customized control on the speaker’s table. A potentiometer of 2 x 1KOhm will be right to manage the level. In this case the level control of the console is set to the maximum. Next scheme is the connection for the external level control. The nominal output level is +4 dBu @ 0VU. If you unbalance the outputs, take in mind that the level reduces in 6 dB, therefore 0VU = -2dBm. Note that if some nonprofessional equipment is connected to the balanced output, may the level be too high, causing saturation. In those cases a fixed attenuator must be used to reduce the level (a resistive splitter is a solution). 2.2.3.2 USB send 2.2.4.2 MONITOR SPEAKERS USB allows direct connection with a computer, and gives PROGRAM or REC signal (it switches from “USB OUT” in Channel-5). This feature don't requires special drivers. Windows automatically recognizes the USB device (see “2.2.2.2 – USB). D-612 was designed to work with active loudspeakers. The STUDIO and CONTROL outputs work with line level at 0 dBu (0,775 V RMS). They have independent controls for bus assignment and level. Both outputs use female 1/8” TRS connectors. Usually USB signal will be used for direct to hard disk recordings; or webcasting. For details of use the USB outputs in Windows© please see “3.6 - Recording of programs”. www.SolidynePro.com Remember that studio monitors are muted when mics are on-air. Control Room speakers are muted when the button Talkback is pressed. Page 10 2.2.5 Tally light 2.2.6.2 CONECTING A CELL PHONE Tally output gives 12V/120 mA (2 Solidyne Air lights) when MICs activates from Master Mic button. It requires a phone with Bluetooth connectivity. Any phone with Bluetooth can be linked to Solidyne D612, eliminating the dependency on the adapter cable "hands-free". While the phone can be up to 10 meters away from the console, you should leave it near, but not on the console. The procedure to link the phone to the console is similar to that used for other Bluetooth devices. NEVER overpass 120 mA consumption on Tally output By linking your cell phone to the console creates a link between the two devices, and allows the phone to store the ID of the console. This operation is performed only once (for one cell). Once the console and phone are connected, the console automatically connects to the phone when the Bluetooth link is enabled on both devices. Procedure: The console has a built-in light; that resolves the onair signalization for small stations. 2.2.6 Telephonic Hybrid 2.2.6.1 CONECTING STANDARD LINE The hybrid channel manages ONE land telephone lines and ONE cellular phone. The internal adjustments are from factory; so the user do not needs to make adjustments. Only the null-factor must be adjusted for the land line, only once on setup. On the rear panel there are 2 RJ11 connectors; for the telephone lines and the associated phone set. The line can directly be connected to public central telephone or the local central (PBX) of the radio station. The private central sometimes deteriorates the hybrid rejection, reason why we advised to directly connect the console to the public line, whenever it is possible. The telephone lines internally are protected against lightings by metallic oxide varistors (SIOV). Nevertheless, we recommend to use additionally external line protection of good quality. Although the console has internal protection; it is recommended to use external line a protection against transient voltage peaks due to accidents or lightings. Page 11 1. At the mixer D-612: enable the “discovery” mode. Being the Bluetooth disabled, press and hold by 5 seconds the button “Cellular Phone Bluetooth” until the LED blinks green-red (Bluetooth LED's are on vumeters panel). The LED blinking indicates that the Solidyne D-612 enters in mode “discovery” to be found by the cell phone. 2. At the cell-phone: make a Bluetooth device search. This procedure depends on brand and model of your cell phone, please refers to the users manual. 3. When the phone finds the Bluetooth device D-612, appear BTM751 code (or BTH008) on screen. Select this code and enter the default password: 0000 and confirm (see the users manual of the phone). 4. The ID of the Solidyne D-612 is now stored in the cell phone. The devices are "paired", no need to repeat this operation while using the same phone. The Bluetooth indicator light on the console switches to slow flashing green, indicating "Bluetooth is active". On some phones you need to "connect" the new device found to stay active. In others, the new device is enabled after being detected. If there are other Bluetooth systems operating in the studies, please turn off Bluetooth on the D-612, research with the phone and take note of existing ones. Then, turn on Bluetooth on the D-612 and repeat the search. The displayed (BTM-751) is the D-612 console. www.SolidynePro.com Re-connections 2.2.6.3 EXTERNAL HIBRYD To reconnect to the console a cell phone, turn Bluetooth on the D-612 by pressing for two seconds "Cellular Phone Bluetooth", until the green LED lights. Turn on the phone Bluetooth handsfree mode if necessary (some phones handsfree off to turn it off). Solidyne D-612 has a connector for send and return from external hybrids. When the phone warns that the connection has been made we are ready to operate. When you make or receive a call, the audio is routed to the console. Besides the simplicity of operation, the Bluetooth connection allows interesting working options, it is possible to use personal cell or interviewed journalists with personal contact phone numbers, who do not want to reveal to the radio. In this way we obtain interviews to air that would otherwise be impossible. “External Hybrid” uses a female TRS of ¼” (Jack) that gives signal (PGM send) by “tip” and receives signal (return or input to console) by “ring”. PGM send is MIX-MINUS, that is to say, it sends all the signals of ‘Bus' PGM, with exception of the Return from Hybrid, to avoid feedback loops. The audio from external hybrid enters to the console through the hybrid channel. The hybrid knob will behave in the same way that with the telephone lines connected to the console, sending the signal to the air or the previous circuit, according to the knob. 2.2.7 General tips Setup the level NOTE: At the cell phone, Bluetooth volume must be adjusted at maximum level in order to obtain a good reception and to sure the best signal to noise ratio. Use the console with the original power source. Do not exceed the load on Tally output. Avoid long cables hanging from connectors. Use pass-cables canals or snakes to distribute cables. Avoid mixing audio cables with AC cables. Use separated ways for each one. Does not forget that the console connects to GROUND using a bronze TIP located in rear panel. Next is an advanced diagram for grounding. This adjusting must be done with a real calling using Bluetooth. Usually, the volume of the phone's speaker is independent of the volume of Bluetooth device. If you change the phone's level without make a Bluetooth calling, you will only be changing the volume for the phone's speaker, not the Bluetooth level. To change the Bluetooth level, make a call using the console (or a hands free headset) and set the Bluetooth level to the maximum. This setting is stored at the cell phone's memory. If you use another cell phone with the console, you needs to set the Bluetooth level again. To turn-off Bluetooth at the console, press and hold “Cellular Phone Bluetooth” until LED off. LAND LINE AND CELL PHONE CAN BE CONFERENCED. www.SolidynePro.com REMEMMBER Audio equipment manages different signal levels: The professionals ones with balanced outputs operate @ +4 dBm or +8dBm, whereas the home equipment uses unbalanced outputs of - 10 dBm. Use balanced inputs (BAL) for professional equipment, and the AUX (unbalanced) for home equipment. Page 12 2.2.8 Grounding against lighting It is very important to follow these recommendations to avoid irreparable damage to equipment and people. Page 13 www.SolidynePro.com This page was left empty intentionally. www.SolidynePro.com Page 14 CHAPTER 3 3.1 Overview Operation The digital channels manage the USB digital inputs (DIG) and one analogical stereo inputs (LINE). Additionally; USB offers direct recording to Hard Disk from PGM or REC. You can see different areas in the console: Input channels. Hybrid controls. Monitoring and talk-back. CUE MIC EQ Audio compressors and USB VU-meters The different audio sources (microphones, compact disc players, computers, telephones, etc.); enter to the console through the INPUT CHANNELS that amplify them. The consoles mix all sources to generate a unique audio signal, which is sent to the transmitter. The operator manages the level of each signal using the main faders. A second stereo signal for recording purposes can be generated using the REC bus. This signal is independent of the Program signal. The operator can listen any signal before send it on-air; by pressing the CUE buttons. Line channels will be on-air just opening the fader. MIC channels are enabled from Master MIC button. The switches “PGM / REC” define the output for each channel. The signal can be on the air (PGM) and it can be routed to the recording output (REC). Many channels have two inputs; which are selected from a switch located at the top of the panel. The D-612 turret contains electronic LED’s VU-meters that show the recording and program level (average peak level) and the action of audio compressor. 3.1.1 Quick test Next are described the basic procedures to verify the console wiring. In order to check that all is work ing well, please follows the next steps: Choose a signal source, like a microphone, a CD player, etc. According to the used source, select in the channel the correspondent input (MIC-LINE or BAL-LIN). This can be the first cause of error (there is no signal because the mistaken input is assigned). Press CUE button in the channel in which the signal is. Open the CUE fader in the MONITOR SECTION. The audio will have listened in the built-in loudspeaker. To send on-air: Channels MIC 1 and MIC 2 only manages microphone signal. The phantom 48V switch enables the phantom power to MIC-1a and MIC-2a inputs. Remember that all dynamic microphones are designed to support 48V phantom, so you can mix condenser with the dynamic microphones. The microphone channels can be routed to the processing stage (4 bands EQ and compressor) with independence. The analog line channels manage balanced (BAL) and unbalanced (LINE) stereo inputs. Page 15 Send the channel to PGM, so that the signal is sent to the main output. Open the main fader until reach 0 VU in program VU-meter. The signal will be on the air. The gain knob must adjust so that the normal work position of the main fader is -15 dB (gray zone). In some countries (like England) the user prefers to adjust the normal level with the fader at maximum. www.SolidynePro.com 3.2 Hybrid channel • • Release the button CUE. Turn the control 'AIR LEVEL' until reach the apropiate level. The appropiate level for the communication is adjusted by observing the level meter "PGM", but also listening to the processed audio on the air. To put the call off-air and resume in private, turn down the knob “AIR LEVEL” and press CUE to listen and Talkback to talk. To transfer the call to the telephone, turnn down the "AIR LEVEL" to zero, pick up the phone and then release the “HOLD/AIR” button on the console. If the telephone was hung up when release the HOLD/AIR, the communication will lost. The hybrid section manages 1 standard telephone line, and 1 Bluetooth cell phone (see “2.2.6.2 Connecting a cell phone”) Both can be in simultaneous conference (see 3.2.3 – Conferences). Its use is simple and error free due to its logic of security and automatic control. The following instructions explains different scenarios of use. 3.2.1 Operation When a call enters, a blue LED will blink with the 'ring' cadence. The calling can be answered in two ways: a) Using the telephone associated to that line b) From the console, by pressing the HOLD/AIR button. When doing it, the line is taken and the LED stops blinking. To answer the call from the telephone (connected to the RJ11 on the rear panel) pick up the phone and proceed as in normal communication. To put the call on the air, press the HOLD/AIR button and then hang up the phone. To answer the call directly from the console, press HOLD/AIR. The console picks up the line and the ring's pilot light turns off. In this condition, the caller receives the program signal, and will be on-air if the 'AIR LEVEL' knob opens. Therefore it is important to check that the 'AIR LEVEL' knob be closed when take the line. To talk privately with the caller, press CUE. The caller is lietened on CUE speaker. In this condition (cue pressed) the caller not hear the program signal. To talk, press the TALKBACK and use the talck-back MIC. To hang up the line, turn AIR LEVEL to zero and release "HOLD/AIR". 3.2.2 Using a cell phone The cell phone connects to the Solidyne D612 via Bluetooth. The first time that a cell phone is used with the console, it must be paired as explained at "2.2.6.2 - Connecting a cell phone". Once paired, the procedure used for the connection every time is simple: • Make sure that the control “AIR LEVEL” is closed, and the button CUE pressed. • Turn ON Bluetooth at the console. For this, press and hold “CELLULAR PHONE BLUETOOTH” by 2 seconds (approximate) and release when the green LED (located in the VU meter panel) flashes. The LED remains flashing slowly indicating that Bluetooth is enabled. • Turn on Bluetooth at the cell phone. If the cell phone was already paired, in few seconds the connection reestablishes and the cell phone stays linked with the console. Under this condition, incoming calls are transferred directly to console. If the console is used exclusively with cellphone, ie, there is little or no use of the land line, you should leave the cellphone connected to the console and handle the calls from the hybrid. When there is a continuous use of both lines, either alternately or simultaneously (conference) raises some peculiarities in the operation, detailed in "3.2.3 Conferences". To put the call on the air: www.SolidynePro.com Page 16 3.2.2.1 Incoming call Is explained bellow the use of a cell phone in permanent link to the console. In this condition, the procedure to put a calling on-the-air is similar to the seen for land lines: • When a call incomes, the 'ringing' is listened simultaneously on the telephone and on the CUE speaker of the console (CUE button pressed) • Check for “AIR LEVEL”. It must be zero. • To answer; make a fast touch on the button “CELLULAR PHONE BLUETOOTH” of the console (the calling can be answerer too from the cellphone). After answering the call, talk to the caller, always using the hybrid of the console as follows: • With the button CUE pressed the caller is listened on CUE speaker. In this condition the send of “PGM” to the cell phone is muted. • Press and hold TALCKBAK to talk with the caller. • When CUE is released, the caller will listen to the PGM signal, but remains off-air due to the control “AIR LEVEL” stays closed. • To put the calling on-the-air, turn up “AIR LEVEL” until reach the appropriate level on VU meters. 3.2.2.2 End the call Pressing with short touch the "CELLULAR PHONE BLUETOOTH" button on the console, communication ends. It is also possible to end the call from the cell phone screen. The example shows the "Headset" icon, which transfers the call to Bluetooth device when it is powered on; and passes the phone when it is off. Other phone models can display two buttons; a button with dropdown options; or other combinations. Refer to the cell phone user manual. 3.2.2.4 Make a call To make the call using the cell phone: • In the cell phone, change the "Bluetooth" mode to "Headset" mode as explained in "3.2.2.3 - Resume call on cell phone." • Dial the number in the cell phone and call (SEND). • To transfer the call to the console, return to the Bluetooth mode on the cell phone (see "3.2.2.3 - Resume call on cell phone"). • Release the CUE button on the console. The cell phone receives the program signal, but remains off the air if "AIR LEVEL" is zero. 3.2.2.3 Resume the call on the cell phone To resume the call on cell phone; from the phone menu exit "Headset" (or Bluetooth) mode and switch to the "speaker" mode (Speaker). To transfer the call back to the console, return to the "Headset" mode. This operation differs depending on brand and model of cell phone. Below shows a screenshot of a cell phone with Android, in the case of Bluetooth enabled. Page 17 www.SolidynePro.com • To put the calling on the air, turn "AIR LEVEL" to the correct volume. • To end the call from the console, make a short tap the "CELLULAR PHONE BLUETOOTH" button. The call can also be terminated from the mobile phone. NOTE The calling can be do from cell phone without leave the Bluetooth mode, using the console's talkback circuit. • The ring tone and the voice of the caller are listened on CUE speaker (button CUE pressed). • To dialogue, use the button Talkback of D-816. • To hold the call, release the button CUE. • To put the calling on-air, release “AIR LEVEL” • To end the call, make a short tap on “CELLULAR PHONE BLUETOOTH” button of the hybrid; or can hang-up from the cell phone screen. • Make (or receive) the call using the telephone associated with the landline. • Talk with the caller. Warn him that the call will go directly to the air. Remember that this is because the hybrid is being used by a cell phone, so operator can not put the second line on hold or use the talk-back circuit. • Press "HOLD/AIR" to put the calling on-air, then hang up the telephone. The call goes immediately on-air (since "AIR LEVEL" is open). 3.2.3.2 Being the landline on-air Suppose the announcer is talking with a caller (or has been called) via landline; and the operator requires adding to someone else to the conversation: • When is not used, Bluetooth must be off at the cell phone, and so unlinked from the console. This way an incoming call (or is made) arrives to the cell phone with independence from the console. • To transfer the call to the console, turn on the Bluetooth on the cell phone (see the cell phone user manual). Depending on brand and model of cell phone, the connection with the console can be immediately re-established; or it may be necessary to select from a menu 'Bluetooth devices' one to re-connect (in this case Solidyne BTM641) Once activated Bluetooth at cell phone, the call is put on-air immediately, staying in conference with the landline that is on-air at this time. • To end the cell phone call, hang up from the cell phone. • Then, turn off Bluetooth at cell phone. This is only necessary when there are a permanent use of the landline, to avoid that an incoming call to the cell phone accidentally appears on-air when the landline is on-air. • Alternatively, to resume the call on cell phone; using the cell phone menu it will switch to "Headset" mode, as explained in "3.2.2.3 Resuming the call on the phone" Bluetooth advantages Besides the convenience of being able to connect any cell phone without cables or special connectors, provides the advantage of placing up to 8 meters away, for example in a window to get the best reception. But also enables new operational advantages for journalism, it is possible to connect the console in seconds with the private cell journalist for stories to people whose phone number is confidential and the reporter did not want to reveal (very common circumstance as journalists should be reserved with your contacts). 3.2.3 Conferences When regularly using cell phone simultaneously with the landline, the user must be careful to OFF 'BLUETOOTH' ON CELL PHONE whenever a call ends. This way, if a new call comes while the landline is on the air, the call rings at the telephone. If Bluetooth were active, the call would sound on air. The procedure for setting a conference depends on which of the two lines (landline or cell) is on the air. See the two cases below: 3.2.3.1 Being the cell phone on-air Suppose the announcer is talking with a caller (or has been called) via cell phone; and the operator requires adding to someone else to the conversation: www.SolidynePro.com Page 18 3.2.2 About return signal to the phone Most of the existing telephone hybrids on the market today, were designed over 30 years ago for analogue telephone exchanges (PBX) Solidyne hybrids, however, have been recently designed for private or public telephone exchanges today, which are fully digital. The new technology Hybrids are recognized because they have no control of air return level to phone line. This is because inside the hybrid Solidyne uses an audio processor for return signal that includes AGC, peak limiter & audio signal filtering. Therefore the return is automatically adjusted during the transmission and its level is the maximum allowed by the modern digital telephone exchanges. If you want to check the return level to phone line, you must use an oscilloscope to be placed in parallel with the telephone line and must verify that the signal is 2 volts peak to peak. Please note that above this level the return can produce problems that will cause intermodulation distortion in the audio signal that goes to air. So in Solidyne hybrids we use a processed return channel, to avoid distortion at the on-air signal. There are hybrids manufacturers that maintain the return control level as they did in the past. This allow operators to adjust "by hunch" this critic level. This makes the voices of the reporters and interviewed people distorted or with coloration. In Solidyne obviously, we keep a high grade of excellence in the audio quality of the hybrid on-air sound. And that quality do not depend on the operator settings. Note that the Solidyne Hybrid on- air audio quality of the local journalists is ever perfect and without any coloration. To achieve this level of quality we use a narrowband return filter. Then the return signal is limited to the band 400 – 2.200 Hz in order not to distort the signal to the air. This narrow band intelligibility remains high (due to processing) but occasionally may seem to the remote people that it "has little volume" because his band is narrow. This should not worry because it is a subjective sensation that does not affect the intelligibility of speech. 3.2.3 Null-factor This adjustment is only for LAND lines. The rejection factor expresses the capacity of the hybrid to avoid that the transmitted signal returns distorted to the air. Whichever greater it’s this factor more “clean” will be the sound quality of the local speaker on the air. In order set the rejection, proceed as following: 1. Make a calling through one hybrid of the console. Ask a speaker to talk into the microphone to the interviewee. Increase the level from "Telephone Control" until the voice of the interviewee move the PGM VU meter into the red zone. Page 19 2. Listening to the voice of the local speaker from the PGM monitor, carefully turns the preset “Null” until reducing to zero the distortion superposed to the speaker’s voice. Please make this adjust when the console is installed. 3. In case that the phone line connected to the console be changed, this adjustment must be repeated. 3.3 Monitor section 3.3.1 Using monitors and headphones At the monitors section you can observe the following areas: Studio Monitor: here you define what signal you will listen at the Studio monitors and headphones. Control Room Monitor: define what signal you will listen at the Control Room monitors and headphones. CUE: set the CUE level of the built-in loudspeaker. There is a knob to manages the level of headphones and monitor outputs for the Studio. Usually the monitoring level adjusts from the console for a comfortable listening in the headphones. In case that you wants individual control for each headphone; you can use an additional headphones mixer (Solidyne Studio-box or similar), or make customized external level controls using a potentiometer of 2 x 1 Kohm, mounted on the table. The Studio monitors have their own gain control, since the console’s output was designed to operate with powered speakers. Remember that when the microphones are enabled the audio in the studio monitors is muted, to avoid feedbacks loops. Like the Studio section, the Control Room has a unique knob for headphone ans speakers. Control Room monitors must be powered units (active speakers). Using the routing switches you can choose the signal that will be listened in monitors and headphones. The assignments for Studio and Control Room are independent. The options are: PGM to listen the console output. REC allows the listening of the channels that are assigned to recording output. AIR switches to an additional input, designed to connect an external tuner in order to monitoring the transmission from the www.SolidynePro.com air. This is the right way for monitoring; recommended for all situations. 3.3.2 Use into integrated Studios It is increasingly common in modern radios, the console, broadcasters and journalists are located in the same study, avoiding the use of double glazing windows separator and reducing the cost of construction and acoustic treatment. In this case it uses only one active pair of speakers connected to the output of Studio Monitor D-612. When opening the microphones, these speakers are muted. Also connect headphones to this output of journalists and guests. Operator headphones are connected instead to the output of Control Monitor. 3.3.3 Previous listening (CUE) The D-612 has an internal loudspeaker for previous listening. Each channel has a button “CUE” that allows to listen the signal present in that channel with the channel fader closed. Audition level for Studio loudspeakers and headphones Audition level for Control Room loudspeakers and headphones CUE level. Adjust the volume of the built-in loudspeaker. The signal CUE also is sent to the C. Room headphones. If CUE is pressed in several channels, the signals are added. Rotary CUE level controls the volume in loudspeaker CUE. Additionally, signal CUE is sent to the control room headphones. In this way the operator can check the channels using headphones. 3.3.4 Talk back The talk-back circuit allows the operator to talk with the speaker while he is into the studio. In order to talk, press the Talk-back button (see monitor panel drawing) . The Control Room monitors will be muted, to avoid feedbacks loops. Your voice will be listened inside the Studio, by the left channel. The right channel stays with the on-air audio, so that speakers and journalists do not lose the On-Air reference. At the same time talk-back microphone will be listen in all studio headphones. The operator can press CUE in a microphone channel to engage in a dialog with the Studio. The level of the talk-back microphone comes calibrated from factory, and usually it is not necessary to modify it. If you need to change it, there is a preset called “LEVEL” to make the adjustment. Assign PGM or REC to the Studio monitors Change the monitoring between external input ‘ON AIR’ and PGM/REC (Requires an external tuner) Talkback volume Talkback to Studio PZM MIC. For TalkBack and hybrid www.SolidynePro.com Page 20 3.4 Microphone channels 4 bands EQ. This stage has a dynamic range compressor compresor that begins to work over 0 VU. The indicator “MIC compressor” shows its action. Gain Enable/disable the phantom power (48V) for MIC-1a and MIC-2a. The processed signal can be sent to PGM and REC. To the left, the switch cancels the sending. The channels can be assigned direct to PGM or be send to the processor stage (EQ) Previous listening (Cue) Main fader. To enable the microphones press the MASTER MIC button, located at the right on the console. The gain must be adjusted in order to the main fader works over -30 dB indication. OVL indicates overload, thjat is to say, excesive input gain. The apropiate operation level is mantaining the peaks at 0 VU 3.4.1 Features Equalizer There are two microphone channels. The “Phantom 48V” is common for both channels; but only MIC-1a and MIC-2a gives phantom voltage. Remember that all dynamic microphones can connect to a line with phantom voltage, without risk of damage; because internally they have a transformer that disconnects the DC. So it is possible to mix dynamic and condenser microphones. The equalization settings are the same for all assigned channels. The figure shows the equalization curves. These curves are designed to improve the quality of the human voice. The ends of the spectrum work in shelving way, with 15 dB action. All the channels have a gain knob. It must adjust so that the main fader works over the overload “OVL” indication (- 30 dB). Remember that in all audio consoles, excessive input gain reduces the dynamic range. If you work with the main fader below this level, the signal from the previous stage must be very high and the peaks will be clipped. 3.4.2 Processing Each MIC channel can be sent directly to the air (PGM) or the processing stage (EQ + compressor). As well, the processed signal can be sent to the air or to recording out. Page 21 As reference we said that the LOW (or bass) control offers “body” and “weight” to the voices; whereas the HIGH one adds “presence” and usually improves the intelligibility. The central frequencies have a bellshaped curve (peak EQ). Mid-bass is centered in 160 Hertz, where usually the plopping effect are concentrated, or there is excessive resonance in certain masculine voices. The mid-high band is located at 5 KHz, because around this frequency usually appear the problems with the “sss” (excessive emphasis the sibilants sounds, like “shhh”) Compression The compressor maintains constant the peak level of the human voice. It starts to work when the signal surpasses the 0 VU level. Below that level the dynamic www.SolidynePro.com range is not affected. D-612 has a very steep compression slope and fast attack and recovery times. Indicator “MIC COMPRESSOR” shows in dB the reduction applied to the signal. 3.5 Line channels Solidyne D-612 mixer console has 3 stereo LINE channels. Line channels have two inputs that are selected from the front panel. Channels 3 and 4 have balanced stereo inputs (DIN-5 connector) and unbalanced stereo inputs (RCA). Channel 5 are digital, with direct connection to the PC via USB. It is equivalent to have an external sound card. Additionally it gives USB digital output (PGM or REC). The secondary input is analog unbalanced stereo (RCA). Like the microphone channels, line channels have gain adjustment that must be set for the channel faders working above the OVL zone, to avoid overload. NOTE: please see at “2.2.2.2 – Digital inputs/outputs” the special note about the USB audio levels and Windows©. To route the signal on the air; assign the channel to PGM and open the fader. The correct level is obtained when the peaks of the signal reach 0VU. Connections are explained at “Chapter 2 – Installation and wirings” Main faders of all channels work with ETM-VCA technology (Electrometric-Voltage Controlled Amplifier). The fader only manages DC, that control amplifier of variable gain. This method guarantees very low distortion and full eliminates the possibility of noise by wearing down of the fader. Complete information about the new ceramic fader technology, used in D-612, will be found at our WEB site. www.SolidynePro.com Page 22 3.6 Recordings D-612 consoles have two stereo output channels. The main channel is denominated Program (PGM) and used for the On-Air signal. For recordings, REC bus is used. The user can make recordings while, simultaneously, the console is on the air. We will see like example the procedure to make a recording in the computer whereas a musical program is on air. NOTE: the two telephone hybrids of this console are units "aired" and therefore can not be assigned to the channel REC. If you need to record an interview you should connect to the console a hybrid external; Solidyne type HL-202. 3.6.1 Direct to Hard Disc recording Remember that the main output (PGM) and the recording output (REC) are available in digital format, through connections USB. Once connected, the outputs appear in Windows© like: (Control Panel/Audio and Sound Devices/Audio) “USB Recording device”: corresponds to channel USB 5 and gives the PGM or REC signal. On the PC: configure your recording software to use an USB recording device. At the console: route the channels that you want to record to REC bus. The others remain assigned to PGM. You must proceed as follows: Now makes the recording on the PC. In order to activate the microphone, open the fader of MIC-1 channel. The recording level is verified in the REC VUmeter of the recording software, and it adjusts from the console. You cannot change the input level from software (Windows Mixer). USB RECORDING DEVICES DO NOT HAVE GAIN CONTROL FROM THE SOFTWARE The speakers will listen to the recording USING HEADPHONES or in loudspeakers. When the recording ends, it can be listened using the same REC bus, assigning to REC the channel in which the PC is. At this point; BE CAREFUL OF NOT PRODUCING A FEEDBACK LOOP IN THE OWN COMPUTER. MAKE SURE TO MUTE IN THE PC (FROM WINDOWS MIXER) ALL SOURCES OF SIGNAL EXCEPT “WAVE” AND “GAIN CONTROL” (MAIN). When the work is finished, reset all the controls to the original position, to return the console to the normal way of operation. 3.6.2 Recording the phone lines Hybrids of the D-612 signal sent only to program, therefore, only be recorded telephone communications PGM signal recording. To record the PGM output, you must use a wire tap "Y" for a "copy" of the program output, simply connecting two parallel cables. a) In Monitor Section assign the Control Room monitors to the recording bus (REC). If you want you can send REC signal to the studio monitors too. b) Assign to REC the channels required for the recording (for example MIC-1 and Line-4). When a channel is routed to REC it is removed from Air “Y” cable - Plug 1/4" BAL to XLR BAL and unbal RCA, to one input channel. For the other channel you need a second “Y” cable. c) Meanwhile the radio still on air through, for example, the channel 5 with a musical program. Page 23 Channel-5 can be used for playing with independence of the assignment to USB OUT (PGM - REC). www.SolidynePro.com This page was left empty intentionally. www.SolidynePro.com Page 24 CHAPTER 4 Audio IP (only D-612/IP) 4.1 Introduction Step 2 These models include RJ-45 output that sends streaming. It allows: Connect the console to the network via a standard cable. The network must have a router, so that the console assigned to an IP address via DHCP. D612/IP You can also connect directly to a modemrouter, as it usually also assign an IP via DHCP. • • Link the console with the transmitter. With high-quality MP3 or PCM using a point to point wireless link. Riding a web-radio. The console generates encoded in MP3 streaming without using a computer. There is a Firmware appropriate for each case. The console is shipped with firmware for Studio to Transmitter Plant link (STL). Consult your representative Solidyne if required use the console for streaming. 4.2 Power source The IP module receives power from the USB connection, so it is only available if the console is connected to a computer via USB. If the console is not connected to a computer via USB, or if the computer is off, the IP service is not available. 4.3 STL link In studies, the console works as ENCODER D-612/IP to establish a unidirectional link (half-duplex) between Studios and Transmitter Plant, generating and transmitting an audio streaming. At the transmitter plant, a device streaming decoder receives the transmission (eg Solidyne ADA102) and sends the audio processor. Another option is to have a decoder processor with streaming audio, or a computer running software that play streaming (eg. VLC Player). 4.3.1 IP config The configuration options D-612/IP Solidyne are accessed using a web browser. The unit is factory set in "Dynamic IP", so that when connected to a LAN, gets an IP address via DHCP (the router assigns an IP). The procedure is as follows: Step 3 The TCP module will announce the IP assigned. To listen to the IP address, proceed: • • • Turn "BAL-LIN" Channel-4 to "LIN-2". Press the CUE button in the Channel-4 and lift the CUE speaker level. Disconnect and reconnect the USB cable from the console (computer must be on). Take note of the address announced, it will be needed later. This operation is only needed during installation. Step 3 Once you get the IP, is ready to start working. The green LED on the rear panel (RJ45) is blinking. Can not find a DHCP server then the D-612 scans the network for a free IP address (this can take a few minutes). Step 4 Open a web browser (eg Firefox, Internet Explorer) and enter the IP address announced. The Control Panel D-612 is displayed. 4.3.2 Destiny IP The status screen indicates the IP port configuration. The module is factory-configured as Studio Encoder (option "Location" → 'Studio Encoder'). Step 5 To verify the configuration, access the "Configuration" and in the left menu choose "Basic settings". Step 1 Connect the console to the power supply. Connect a computer via USB to the D-612 to enable the IP module. Page 25 "Stream (RTP)" method" should be "Push www.SolidynePro.com In the URL field defines the DNS name or IP address, and the destination port to which the console streaming broadcast. Press "Apply" to confirm your settings. The configurations listed below require knowledge in network administration. The destination IP address is the external address of the network in the Transmitter Plant, where it is connected DECODER (static IP assigned by your ISP). When the data packets reach the router / firewall on the other end, should be re-directed to the DECODER IP (eg 192.168.0.30). As the D-612/IP transmitted to a specific IP address and port, in transmission plant all packets arriving at that port on the router address should be forwarded to the DECODER, or a particular computer, which will turn into audio. Identify which packets should be sent using port forwarding. 4.3.3 Audio settings Step 6 Go to Config → Audio Input source: Default is “Line Stereo”. Do not change it. 4.3.4 Using a microwave digital link A console connected studies D-612/IP broadband Internet to cover any distance from the studios and the transmitter. In short distances the option is point to point RF link transmiting uncompressed audio (PCM 16 bit/48 KHz). It uses a microwave link for 5.8 GHz (or 2.4 GHz in some countries) using the standard 802.11.x. This band is available in all countries and does not require special authorization. It can cover up to 45 miles if there are no obstacles between the extremes. Logically encoded audio can be transported and for special applications supports bidirectional connection. For more details, please contact us at our email ([email protected]). 4.3.5 Decoding using a computer To receive the transmission using a computer, you should use playback software that supports streaming and RTP protocol. Solidyne recommend using VLC Player (http://www.videolan.org/vlc/). To start to play in VLC go to Medio –> Open network In URL enter: [protocol]://[sourceIP]:[port] Format: Streaming format. Default values are: Format: MPEG stereo Sample rate: 44.1 KHz (MP3) Quality: 7 (highest) Example: RTP://0.0.0.0:3030 In where RTP is the protocol used by the Solidyne D612; 0.0.0.0 means from any incoming IP and '3030' is the port used. Remember to enable your computer firewall to allow incoming streaming trought port 3030 (or the port that you use). These settings produce a stream of 192 kbps. Should only be changed if the bandwidth of the Internet connection is limited, or if a link is available that enables point-to-point transmit uncompressed (PCM). NOTE: Some versions of VLC Player also supports the string RTP://@:3030 www.SolidynePro.com Page 26 CHAPTER 5 5.1 Studio Box (optional) Overview StudioBox is an optional accessory which groups in a single box to all monitoring signals that are needed into the Studio. It offers the following features: 5 headphone's outputs with independent level control. Output for Studio Monitors with level control. Tally light Timer/Clock Talk-back, to talk with the Control Room operator. 5.2 Connecting the StudioBox MIC GAIN 4.- Reverse talk-back: Is a 1/8” Jack TRS that sends the signal of the StudioBox's built-in microphone. This connector allows to plug a small active speakers at the Control Room, for the voice talents can talk to the operator of the Control Room. The operator also can use the CUE of microphones channels to listen to the Studio voices. 5.- Power source: The StudioBox feeds from an external power source 110/220V 1.25A. MIC (to control room) Usually the Studio Box is placed on the table; but a good choice is fix it to the wall when the table is next to the Control-Studio window. 5.2.1 Connection to the mixer console Studio Box connects to the mixer console using a special cable, which is provided from factory. This cable has a DB15 connecting to the following connectors: 1.- Tally light: Is a tubular connector. This connector plugs to Tally output of the mixer to take the on-air signal and activate the timer and on-air light of the StudioBox. The second connector (pass-thru) is for connect the standard tally lights. 2.- Studio speakers: Takes the monitoring mix for the studio speakers. At the Studio, the speakers (active speakers) will connect to the StudioBox. Page 27 3.- Studio headphones: Takes the mix for the studio headphones. Up to 5 headphones can be used connected to the Studio Box. 5.2.2 Connections at the Studio Headphone outputs use ¼” stereo TRS (jacks). Any combination of headphones can be used (16; 32 and 64 ohms). Loudspeakers output use a 1/8” stereo TRS (minijack). Take in mind that this is a line level output, designed to use with active speakers. 5.3 Using the Studio Box On the Studio Headphones Studio Box manages up to five headphones with independent level knobs. The maximum level depends on the Studio Headphones level at the console. The signal listening also depended on the selection done in console. www.SolidynePro.com On the Studio Monitors Loudspeakers output has a level control, but the maximum level and the signal source depended on the console selection. If the loudspeakers are connected directly to the console’s speaker outs; “Loudspeaker” doesn’t take effect. On the Studio Talkback The white button has two functions: 1. When the microphones are off-air, press the button to speak to the Control Room. The Studio Box has a built-in microphone for this purpose. At the Control Room, the operator will hear to the talents using active speakers connected to the Studio Box. To answer, the operator will use the standard talk-back circuit of the console. 2. Being on-the-air, the white button illuminates in red indicating that microphones are “on-air”. Obviously, in this condition talk-back feature is disabled. The preset located below the MIC allows to adjust the microphone gain. On Timer / Clock The display shows the current time (off-air) or the time lapsed on air (when microphones activates). The “counter mode” can be disabled; quitting an internal jumper. Open the back cover of the Studio Box and to retire the jumper. There is a unique jumper available. This will always deactivate the on-air lapsed time counter, being always the time on display. www.SolidynePro.com Page 28 CHAPTER 6 In order to obtain great results with D-612 consoles, we recommend to follow these steps. About maintenance Solidyne provides all necessary parts such as buttons, knobs or faders. Write to: [email protected] 5.1 How to get a long life of the console Maintain the room clean and free of dust. The surface of the console can be cleaning using a very smooth detergent (the kind used for painted walls) and a fine cloth hardly humid. NEVER USE alcohol, benzene or petroleum derivatives. Take this rule: NO SMOKING at the control room. The cigarette ashes are LETHAL for the faders and switches. It affects, in addition, to other equipment of the radio (CD players, microphones, etc.). By the same reason, don't drink or eat near the console. 5.4 Service Manual Service manuals, with the electrical circuits and components layout, are sent by email to Authorized Solidyne Partners and radio stations who subscribe a confidentiality agreement. This Agreement will be sent by FAX to Solidyne (5411 4702-2375) in paper letterhead of the radio and signed by its Director or General Manager D-612 consoles use the new Conductive Ceramic fader technology with more than one million operation guarantee (usually 15 years of use). Please see more information at www.solidynePRO.com The information is encrypted. To be visualized in the screen of a computer, the technician will require of a USB key and software to be able to decode and see the documentation. This software is sold separately and is used also for all the Solidyne products. This faders do not need maintenance nor cleaning. Solidyne brings full support to technicians during the repair work. Please contact us at: 5.2 Preventive Maintenance The Solidyne D-612 console is manufactured using hi-tech integrated circuits and heavy-duty electronic components, that guarantee an excellent reliability and allows eliminating the routines of preventive maintenance. • [email protected] • www.solidynePRO.com Usually D-612 console do not need special maintenance routines. Be sure the operator’s has a gentle use of the console. Remember that the rear connectors are not designed for daily use; avoid connection of headsets directly to console. When the operator’s changes frequently its headsets, use an external patch panel to avoid wearing console jacks 5.3 Spare parts Faders for all channels are connectorized. They are easy to replace, and which are mounted to the chassis with two screws and have a polarized plug to connect. In normal use, do not require faders changed throughout the life of the console, but if the environment was free of dust, or the operators were moving unnecessarily (syndrome "nervous finger"), will eventually require replacement . Page 29 www.SolidynePro.com This page was left empty intentionally. www.SolidynePro.com Page 30 5.5 Tech specs Audio inputs Distortion 4 balanced MIC inputs (XLR) 2 balanced stereo Line inputs (DIN 5) 3 unbalanced stereo Line inputs (RCA) 1 Digital stereo Line input (USB) From LINE to PGM out < 0.05% THD @30-15.000 Hz. Phase Input levels / Impedance Stereo tracking Balanced MIC= -10 dBu/-75 dBu; 150/250 Ohms Balanced LINE = -20 dBu/+26 dBu; 600~ 10Kohms Unbalanced LINE = -15 dBu/+12 dBu; 600~ 10Kohms Phantom power Two mic inputs have 48 V phantom power supply, switchable ON/OFF. Analog outputs 2 bus stereo outputs; PGM (1/4” TRS plug); REC (RCS connector) Both at +4dBm = 0VU PGM balanced: Max level +26dBu (10K), +20dBm (600 ohms) REC unbalanced: Max level +20 dBu External Hybrid: unbalanced mix minus out + 4dBu Digital Input/Output levels USB digital In/Out; Input to channel 5; Output selected PGM or REC. It uses the K-15 recommendation for broadcating. 0 VU = -15 dB Full Scale level Monitor & Hybrid Outputs 1 Stereo Studio, 0 dBu for active speakers, muted 1 Stereo Control, 0dBu for active speakers, muted 1 Stereo Studio Headphones, with Distribution AMP up to 5 headphones, + 10 dBu 1 Stereo Control Headphones, + 10 dBu 1 External Hybrid send (MIX-Minus) +4 dBu / 10K Cue monitor Internal CUE Monitor Amplifier; 250 mW , with built-in speaker. Headroom From Line to PGM, < 3º L&R @50-10.000 Hz Below 0.2 dB error L/R in fader range 0 to 40 dB Telephonic hybrid Two channels telephone active Hybrid: One phone line plus one cellular (Bluetooth linked) Frequency Response: 200 - 5.000 Hz Noise: > 60 dBA S/N Rejection: > 35 dB rejection Rejection adjust in front panel preset Preference atenuator: 12 dB local announcer interrupt priority Telephone input lightning discharge safety Telephone Hybrid inputs is transformer floating to meet the Public Telephone service isolation standards. It is protected with SIOV Varistors against soft lightning discharges. External gas discharge protection is recommended Talkback Included Talkback MIC, with Audio Limiter. Noise Cancelled PZM type. Outputs to Phone Line Hybrid or Studio Speakers & Headphones. VU-meters 2 x LED vumeters for PGM. Cuasi-peak reading. Microphone compressor indicator 0-15 dB Tally Light ON-AIR signal output (turns on when MIC is open). 12 V CC @ 0,12 amp (two Solidyne On-Air lights) Tubular connector 2.1 mm (internal pin). Power 22 dB @ LIN to PGM Ref + 4dBu/10 k Switching external power supply 90-240 V, 20VA [28V@0,5 A]. Tubular connector 1.8 mm (internal pin). Frequency response Dimensions & Weight 20-20.000 Hz +/- 0.25 dB (LIN to PGM) 20-20.000 Hz +/- 0.5 dB (MIC to PGM) Mic equalizer Four Bands MIC EQ with In/Out switch; 80 Hz top flat curve, 160 Hz bell shaped, 4 kHz bell shaped, 8 kHz top flat Action + 15 dB / -15 dB MIC compressor Low distortion MIC compressor with In/Out switch. 20 dB max compression. Attack time < 10 ms. Threshold = 0 VU Compression ratio: < 2 dB variation for 15 dB change MIC level Noise MIC input, EIN=-120 dBu/150 ohms LINE input, S/N > 75 dBA Dinamic range From Line to PGM > 90 dBA (CD quality) Crosstalk PGM-REC > 65 dBA @ 1 kHz Page 31 Wide: 405 mm; Deep: 385 mm; Height: 95 mm at rear turret Net Weight: 4,7 Kg AoIP - Optional TCP / IP Digital Streaming Output Ethernet RJ45 connection to a standard LAN (Option /AoIP). Used for sending D612 output to transmitter plant with MP3 Internet streaming or using a 5,8 GHz 802. Link Also can be used for AoIP connection with another console located inside or outside studios. It can work in linear PCM at 44.1 & 48 kHz or MP3 VBR. On-Air information using GPIO for remote processors. AoIP Delay and user modes • MP3 Layer 1 (32, 44.1 and 48 kHz) • MP3 Layer 2 (16, 22.05 and 24 kHz) • 16bit PCM uncompressed (8,16,32,44.1 & 48 kHz) Full duplex (transmitting and receiving) Delay using PCM at 48 kHz Fs (recommended) Less than 5 mS Delay using MP3 streaming. Average 100 mS www.SolidynePro.com Notes _________________________________________________________________________________________ _________________________________________________________________________________________ _________________________________________________________________________________________ _________________________________________________________________________________________ _________________________________________________________________________________________ _________________________________________________________________________________________ _________________________________________________________________________________________ _________________________________________________________________________________________ _________________________________________________________________________________________ _________________________________________________________________________________________ _________________________________________________________________________________________ _________________________________________________________________________________________ _________________________________________________________________________________________ _________________________________________________________________________________________ _________________________________________________________________________________________ _________________________________________________________________________________________ _________________________________________________________________________________________ _________________________________________________________________________________________ _________________________________________________________________________________________ _________________________________________________________________________________________ _________________________________________________________________________________________ _________________________________________________________________________________________ _________________________________________________________________________________________ _________________________________________________________________________________________ _________________________________________________________________________________________ _________________________________________________________________________________________ _________________________________________________________________________________________ _________________________________________________________________________________________ _________________________________________________________________________________________ _________________________________________________________________________________________ _________________________________________________________________________________________ _________________________________________________________________________________________ _________________________________________________________________________________________ _________________________________________________________________________________________ _________________________________________________________________________________________ _________________________________________________________________________________________ _________________________________________________________________________________________ _________________________________________________________________________________________ _________________________________________________________________________________________ _________________________________________________________________________________________ _________________________________________________________________________________________ _________________________________________________________________________________________ _________________________________________________________________________________________ _________________________________________________________________________________________ _________________________________________________________________________________________ _________________________________________________________________________________________ _________________________________________________________________________________________ _________________________________________________________________________________________ _________________________________________________________________________________________ _________________________________________________________________________________________ _________________________________________________________________________________________ www.SolidynePro.com Page 32