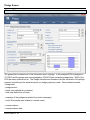
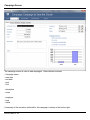
1
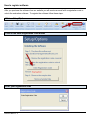
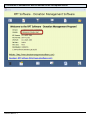
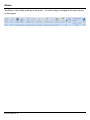
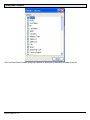
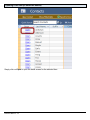
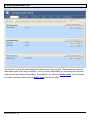
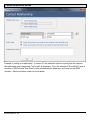
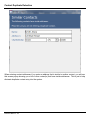
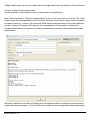
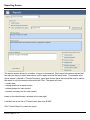
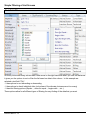
Donation Manual
1
2
3
4
5
6
Getting Started
1.1
How to register software
5
1.2
Ribbon
8
1.3
List Screens
9
1.4
Common Elements found on screens
17
Contact Management
2.1
Contact Screen
20
2.2
Contact Duplicate Detection
29
Donations and Pledges
3.1
Donation Screen
31
3.2
Batch Donations
34
3.3
QuickBooks Integration
40
3.4
Pledge Screen
42
Campaigns and Events
4.1
Campaign Screen
46
4.2
Event Screen
48
Activities and Opportunities
5.1
Activity Screen
51
5.2
Opportunity Screen
52
Companies, Employees and Invoices
6.1
Company Screen
54
6.2
Employee Screen
56
6.3
Invoice Screen
58
7
8
9
10
11
12
Letter Correspondence
7.1
Creating a letter
60
7.2
Letters using mailing Lists
64
Email Correspondence
8.1
Email Getting Started/Tips and Tricks
67
8.2
Creating an email
68
8.3
Email using mailing lists
72
Reporting
9.1
Reporting Screen
75
9.2
Using reports from details screens
77
Filtering
10.1 Simple Filtering of List Screens
79
10.2 Advanced Filters (Very Powerful Feature)
82
Setup/Options
11.1 Setup/Options Screen
87
11.2 Email Setup
89
11.3 Hide/Show Areas
91
11.4 Import Data
93
Networking/Multi User Setup
12.1 Using software on a LAN (multi users)
96
12.2 Using software on a WAN (wide area network with users geographically
seperated)
98
Getting Started
Donation Manual - 4
How to register software
After you purchase the software from our website you will receive an email with a registration code to
unlock the evaluation software. To register the software follow these steps:
Click on Setup/Options
Click on the Enter Registration Code button
Enter your registration code
Donation Manual - 5
You should see this message (indicating what version you have registered)
The version of software you own will be shown on the setup/options screen
Donation Manual - 6
The version of software will also be shown on the info/splash screen
Donation Manual - 7
Ribbon
The Ribbon is the toolbar at the top of the screen. It is used to help you navigate to the various areas
of the program.
Donation Manual - 8
List Screens
A list screen is where items are shown in a list. Numerous areas use list screens and they share some
common traits. Here we will explain the contacts list screen (which has the most features):
You can select New Contact to create new contact
Donation Manual - 9
Show/Hide Columns
Click on Show/Hide Columns brings up a screen to allow you to show/hide columns in the list
Donation Manual - 10
Export to Excel
Choose "Export to Excel" to create an excel file from the entire list, the current filtered list or by
selecting individual items. The excel file will in some cases have more data than what is shown on the
list screen (example: The contact export show various donation summary statistics that are not on the
list screen).
Donation Manual - 11
Report
By clicking the "report" button from the contact list it brought up the report screen and by default it sets
the report data to the current filtered list.
Donation Manual - 12
Email
By clicking the email button it lets you send emails to the entire list, the current filtered list or selected
contacts. This could be one email with multiple email addresses or individual customized email
templates.
Donation Manual - 13
Letter
By clicking the letter button it lets you create Microsoft word documents to the entire list, the current
filtered list or selected contacts.
Quick search and filters
This portion of the list screen allows for a
- Quick search (example: enter "Tom" and click Go to search for all contacts named "Tom"
The quick search will search multiple columns (it searches appropriate columns for each list screen)
- Show all records will remove any filtering and show all the records
- Filters will bring up the filters screen to use a custom filter (see the filter section for more details)
- Total Records: XXX this will always display how many records you are currently viewing. If the
Show All Records is visible you are not looking at all the records (the list has been filtered by quick
search, a simple filter or an advanced filter).
Donation Manual - 14
Simple Filtering and Sorting
Every column in a list screen has a little arrow on the right side of the column. By clicking that arrow
you bring up the filtering and sorting options available. In this example you are filtering on City which
is a text field and allows for sorting and text filtering (Equals..., Does Not Equal..., Begins With... etc...).
Numeric and Date fields have different types of filtering capabilities. Also if there are not too many
unique values you will see a check box list of items that you can select to do filtering.
Overall simple filtering is a very powerful feature to do simple analysis of your data!
Donation Manual - 15
Opening a list item (to show the details)
Simply click on Open to open the detail screen for the selected item.
Donation Manual - 16
Common Elements found on screens
Here we describe some of the common elements found on most screens:
We have a few areas highlighted on this screen:
- Go To this is a drop down of other contacts, so you can easily jump from one contact to another by
just selecting the contact you want to jump to (typing into a drop down box will help you quickly find the
item if the list is long)
- Save and New will save the current record and start a new record
- Save and Close will save the current record and close the record (going back to the list screen)
- Tabs many screens use tabs to help show more information than can fit on one screen. Certain tabs
might show related records in a list (such as "Activities", "opportunities", "Donations" and Pledges) on
this screen. Other tabs might show other information.
Donation Manual - 17
- Buttons with Pencil image
There are two types of these buttons:
- a pencil by itself (such as above for "Status") will allow you to edit the drop down choices
- a pencil with a + sign (such as above for "Company") will allow you to create a new record
Example: you are adding a new contact and you want to add a new company so you can link that
contact with the newly entered company.
Example: you are entering a new donation and you need to also enter the new contact that gave the
donation.
- Close "X" button you can always close a record by clicking on the close button. Changes will still be
saved (as long as you have at least the required fields for creating a new record).
Donation Manual - 18
Contact Management
Donation Manual - 19
Contact Screen
Contact General Tab
The General Tab contains some of the most common information collected from one of your donors or
contacts. A contact could be a person, a household/family or an organization. The contact is the most
important entity in this software as almost everything revolves around a contact.
Data collected includes:
- category (user defined choices)
Note: when setting up contact categories you decide which type of Name entry is most appropriate for
each category. For example you when you want a contact that is an organization you would want to
choose the "Name" field.
- name (toggles between using (prefix, first, MI, last, suffix) and just one "Name" field, depending on
Category picked.
- company
- addresses (unlimited, however only one is primary)
- phone numbers (unlimited, however only one is primary)
- email addresses (unlimited, however only one is primary)
Donation Manual - 20
- donor level (up to 8 user defined ranges example donating $500 to $1000 qualifies you for "Silver
level"
- status (user defined choices)
- type (user defined choices)
- employee
- source (user defined choices)
- next step (user defined choices)
- next step date
- groups (user defined groups, select all groups that apply to this contact)
Contact Misc Tab
The Misc tab is used for various other information:
- employment info
- salutation/addressee (used in letter making)
- When contacting this contact (used to help with how you get in touch)
- picture and/or attachments
- misc other info
Donation Manual - 21
Contact Activities tab
Show related activities, you can open an existing activity or create a new activity for this contact.
Sorting and filtering also available on this list.
Contact Opportunities Tab
Show related opportunities, you can open an existing opportunity or create a new opportunity for this
contact. Sorting and filtering also available on this list.
Donation Manual - 22
Contact Donations Tab
Show related donation, you can open an existing donation or create a new donation for this contact.
Sorting and filtering also available on this list.
A second list shows "soft credits" or examples of where this contact was not the primary contact who
gave the donation but played a role in helping to get the donation.
Donation Manual - 23
Contact Pledges Tab
Show related pledges, you can open an existing pledge or create a new pledge for this contact. Sorting
and filtering also available on this list.
Contact Donation Summary
Summarizes the donations and pledges made by this contact.
Donation Manual - 24
Contact Correspondence Tab
Shows related correspondence. See the Email or Letter sections to learn more about correspondence.
Contact Notes Tab
Just a big area for notes about this contact. If you need chronological notes you can use activities.
Donation Manual - 25
Contact Relationships Tab
Use this tab to add all the relationships this contact has to other contacts. Relationships are split into
three basic types (work, family and other). Once you add a relationship you can easily jump around to
other contacts by clicking the hyperlinks. For example if you clicked on Smith, Leslie you would jump
to Leslie's information and would see Smith, John listed as her father.
Donation Manual - 26
Contact Donor Levels
You have full control over the donor levels defined.
Donation Manual - 27
Contact Relationship screen
Example of setting up a relationship. In version 2.0 we added the option to specify that the people in
the relationship receive automatic "soft credit" on donations. So in this example if "Steve Smith" gave a
donation of $500 his wife "Sue Smith" would automatically be added as a soft credit on that $500
donation. See the donation screen for more details.
Donation Manual - 28
Contact Duplicate Detection
When entering contact addresses if you enter an address that is similar to another contact you will see
this screen popup showing you a list of other contact(s) that have similar addresses. This is just to help
eliminate duplicate contact entry into the system.
Donation Manual - 29
Donations and Pledges
Donation Manual - 30
Donation Screen
The donation screen is used to enter donations or pledge payments. It consists of the following
information:
- donation date
- donation amount
- donation type (user defined list of choices)
- fund (user defined list of funds)
- campaign (if the donation was related to a certain campaign)
- event (if the donation was related to a certain event)
- related pledge (if the donation was a payment towards a previous pledge, only pledges for the current
contact are shown to choose from)
- correspondence
- correspondence date
- acknowledged (when a correspondence is made this becomes "Yes")
Note: there are a few ways to do correspondence:
Donation Manual - 31
1. manual correspondence:
- you just specify how you did the correspondence and the date using the two fields shown and then
outside of this program you send the letter, make the phone call, send the email etc...
2. Letters
- You can press the Letter button at the top of the screen to do a letter for this donation. If you choose
to record the correspondence after the letter is generated it records the history of this correspondence
and shows the details in the list box at the bottom left of the screen. It will also show the
correspondence on the contact's detail screen (since you generated an acknowledgment letter for this
donation and for this contact). See the letters section for more details.
3. Email
- You can press the Email button at the top of the screen to do an email for this donation. If you choose
to record the correspondence after the email is generated it records the history of this correspondence
and shows the details in the list box at the bottom left of the screen. It will also show the
correspondence on the contact's detail screen (since you generated an acknowledgment email for this
donation and for this contact). See the email section for more details.
You can also choose to add this donation to a mailing list and handle the correspondence at a later
time. Example: you send out donation acknowledgments on Friday of every week.
- contact
- appeal (user defined list of choices for what caused the contact to make this donation)
- employee
- payment type (user define list of choices)
- payment details
- in honor of
- in memory of
- anonymous
- matching donation (added in version 2.0), used to specify that a matching donation was given for this
donation. When a matching donation is added a pledge is added to the system (indicating that this
donation should be collected). So in the example above Steve Smith gave $500 and acme corp
matched that $500 donation. so a pledge for $500 for acme corp was created. The actual $500
donation from acme corp is added as a seperate donation to fulfill the pledge of $500.
- receipt amount (automatically defaults to the amount of the donation but could be changed to be a
lesser amount)
Example: $100 donation but contact attends a dinner valued at $20 so the tax deductable receipt
amount is $80
- receipt number (automatically generated)
- notes (general notes about this donation)
Donation Manual - 32
Pressing Report will generate a donation summary report for this donation (for easy printing of the
donation details).
You can add a donation from various places throughout the program (donation list screen, contacts
screen, pledge screen, campaign screen, event screen)
The second tab on the donation screen is used to specify other people involved in the donation.
- employee who solicitated this donation
- Other contacts involved in getting this donation (soft credits or people who played other roles)
This is used to specify and track other people who helped get this donation along with a soft credit
amount. Soft credit amounts muct be equal to or less than the donation amount, however multiple
people can be involved and receive soft credits. On the contact screen when you setup relationships
you can specify rules for soft credits so that soft credits get automatically assigned.
Donation Manual - 33
Batch Donations
From the Donations List you can click a button at the top of the list to toggle between "Donations" and
"Donations (Batch View)". The "Donations" lists shows individual donations and the "Donations (Batch
View)" shows batches of donations. For example: a batch could be made of 50 donations that were all
collected in the same week. Let's walk through creating a new batch and see the benefits of creating
batches of donations. Note: Using batches is completely optional.
Donation Manual - 34
After you click the "New Batch" button it takes you to the batch settings screen. This screen is used to
setup the batch name and the defaults to use when entering donations. The defaults help make data
entry faster and easier.
Donation Manual - 35
This is the main screen for entering donations to the batch. The general process is to:
- enter the contact
- enter the donation amount
- enter the donation date (note: for the next donation it will remember this date since there is a good
chance you will be using the same date)
- enter any other info needed (at the top half of the screen)
- click Enter and the donation will show in the list at the bottom
Repeat this process until all donations are entered.
Our goal is to make it as easy as possible to enter donations!
Donation Manual - 36
Once you have entered all donations for the batch you will see the donations all listed on the bottom
half of the screen, you can now do the following:
- click Open on any individual donation to open it for viewing/modifications
- click Remove on any individual donation to remove it from the batch (Note: this does not delete the
donation it just removes it's association with this current batch)
- click Batch Settings to adjust the defaults used by the batch (this will then change details of what
happens when new donations are entered)
- click Post Batch to lock the batch (see below of screenshot after Posting Batch
- click Add to Batch to add individual donations that already exist and are not currently in a batch, to
the existing batch. Note: a donation can only be in ONE batch.
- click Export Batch to Excel or Quickbooks to export the batch to an Excel spreadsheet or a
Quickbook iif file (see the secdtion on Quickbooks for more detailed info on how the Quickbooks
integration works).
Donation Manual - 37
Once a batch is Posted the batch screen changes so that no additional donations can be added. Also
each individual donation now becomes locked so that the critical information on the donation cannot be
changed. So in this example if you opened any of the 45 individual donations that makeup this batch
you would see that you cannot make changes to any of these donations. At the top of the donation
screen it will show the batchname and whether it has been posted/locked. It's a good idea to post
batches of donations
Donation Manual - 38
Here is an example of opening a donation that is in a batch that has been posted/locked. The critical
fields such as dates, amounts, funds and contact are locked down so they can't be changed. The
batch name shows at the top of the donation.
Note: when trying to change information on any list of donations this same type of lockdown is also in
effect. Example: the donation list on the contact screen, campaign screen, event screen or main
donation list if you try and adjust the donation amount you will not be able to make the change.
Donation Manual - 39
QuickBooks Integration
You have the ability to export a batch of donations to Quickbooks by clicking on Export Batch to Excel
or Quickbooks and choosing Export Batch to QuickBooks (*.iif). After pressing OK and supplying
your filename an iif file will be created. The iif file can easily be imported into Quickbooks by selecting
File/Utilities/Import/IIF Files... and choosing this newly created file.
We recommend you test out importing into Quikcbooks with a small batch of a few donations.
After the file has been imported into Quickbooks, you'll be able to see any new contacts in the
Quickbooks customers page. All the donations that you just imported will be in Undeposited Funds.
You'll need to make a deposit according to your bank statement, and then reconcile as you normally do.
- Contacts are imported as Quickbooks "Customers"
- "Funds" and the "Quickbooks Class Name" you specified when setting up the fund will be exported as
Donation Manual - 40
Quickbooks "Classes"
- "Donation Types" and the "QuickBooks Income Account Name" you specified when setting up the
Donation Type will be exported as QuickBooks Income Account Names
- "Donations" are exported to Quickbooks as Sales Receipts. Each donation becomes a separate
Quickbooks sales receipt. This way, each donation is credited to the contact (or “customer”) in
Quickbooks, and the donation is also credited to the appropriate income account (Source).
We recommend you Post the batch of donations to lock them down in the donation software (since you
have transferred the data to Quickbooks).
Note: people use Quickbooks in different ways, if this method of transferring all the details of each
donation through an iif file do not meet your needs you also have the option of exporting to Excel in
various ways with our software which could then be imported into Quickbooks or whatever accounting
software you currently use.
A screenshot of how you import an iif file from Quickbooks.
Donation Manual - 41
Pledge Screen
General Tab
The general tab contains most of the information about a pledge. In this example $700 is pledged on
3/17/2010 and the pledge was acknowledged on 3/20/2010 with a standard pledge letter. $200 of the
$700 has been collected so far. The Pledge Schedule and Donations tab lists the details of the pledge
payment schedule and the actual donations (or pledge payments) made. Data collected includes:
- pledge date
- pledge amount
- status (user defined list of choices)
- fund (user defined list of funds)
- campaign (if the pledge was related to a certain campaign)
- event (if the pledge was related to a certain event)
- correspondence
- correspondence date
Donation Manual - 42
- acknowledged (when a correspondence is made this becomes "Yes")
Note: there are a few ways to do correspondence:
1. manual correspondence:
- you just specify how you did the correspondence and the date using the two fields shown and then
outside of this program you send the letter, make the phone call, send the email etc...
2. Letters
- You can press the Letter button at the top of the screen to do a letter for this pledge. If you choose to
record the correspondence after the letter is generated it records the history of this correspondence and
shows the details in the list box at the bottom left of the screen. It will also show the correspondence
on the contact's detail screen (since you generated an acknowledgment letter for this pledge and for
this contact). See the letters section for more details.
3. Email
- You can press the Email button at the top of the screen to do an email for this pledge. If you choose
to record the correspondence after the email is generated it records the history of this correspondence
and shows the details in the list box at the bottom left of the screen. It will also show the
correspondence on the contact's detail screen (since you generated an acknowledgment email for this
pledge and for this contact). See the email section for more details.
You can also choose to add this pledge to a mailing list and handle the correspondence at a later
time. Example: you send out pledge acknowledgments on Friday of every week.
- contact
- employee
- appeal (user defined list of choices for what caused the contact to make this donation)
- in honor of
- in memory of
- notes (general notes about this pledge, payment schedules etc...)
Pressing Report will generate a pledge summary report for this pledge (for easy printing of the pledge
details).
The Pledge schedule and Donations received for this pledge are found in the Pledge Schedule and
Donations tab
The Notes tab is just a big area to add notes about the details of this pledge.
Donation Manual - 43
The Pledge Schedule and Donations tab shows the pledge schedule information on the left side of
the screen and the donations collected for this pledge on the right side of the screen.
The pledge payment schedule will help calulate exact pledge payment schedule dates and populate the
pledge schedule, however you can manually change the pledge schedule to be whatever you like. Also
just because the pledge schedule is setup a certain way does not mean that you will receive donations
on those exact dates. In general we keep things pretty simple. In this example the pledge was for
$700 and 2 payments of $100 each were collected so far, so the contact still owes $500 to fulfill the
pledge.
Donation Manual - 44
Campaigns and Events
Donation Manual - 45
Campaign Screen
The campaign screen is used to add campaigns. Data collected includes:
- Campaign name
- start date
- end date
- goal
- cost
- description
- notes
- employee
- fund
- status
A summary of the donations collected for this campaign is shown in the bottom right.
Donation Manual - 46
The events tab shows related events.
The donations tab shows related donations.
The pledges tab shows related pledges.
The activities tab shows related activities
Clicking the Report button will generate a campaign summary report for this campaign. We use the
thermometer image on this report.
Donation Manual - 47
Event Screen
The event screen is used to add events. Data collected includes:
- event name
- start date
- end date
- goal
- cost
- description
- notes
- campaign (if related to a campaign)
- employee
- status
- a summary of the donations collected for/at this event is shown at the bottom right.
Donation Manual - 48
The participants tab shows contacts who participated in this event (attendance etc...).
The donations tab shows related donations.
The pledges tab shows related pledges.
The activities tab shows related activities
Clicking the Report button will generate a campaign summary report for this campaign. We use the
thermometer image on this report.
Donation Manual - 49
Activities and Opportunities
Donation Manual - 50
Activity Screen
An activity is a general purpose screen that captures information on appointments, emails, letters,
faxes, phone calls, tasks (to dos) or any other type of activity you want. For example you might of had
3 phones calls, sent 2 emails, and have one scheduled appointment with this contact. You decide how
much data you want to track. Activities can be linked to contacts, employees, campaigns, events or
any combination of those 4 entities. You can also have attachments on each activity.
Donation Manual - 51
Opportunity Screen
Opportunity Screen
An opportunity is a potential sale that you are working to try and close. Our software provides a
general opportunity management system where we can track opportunities.
This feature is only available in the Professional Version of the software.
Donation Manual - 52
Companies, Employees and
Invoices
Donation Manual - 53
Company Screen
The company screen is used to add company information. A company is a place where a contact
works. Data collected includes:
- company name
- account number
- account status
- billing address
- shipping address
Note: billing and shipping addresses are used for invoices
- phone
- mobile phone
- fax
- website
- email
- key account
Donation Manual - 54
The contacts tab shows related contacts.
The invoices tab shows related invoices.
Donation Manual - 55
Employee Screen
The employee screen is used to enter employee information. Employees are people that work at your
organization and are the users of this software. Throughout the program numerous items can be
related to an employee so it's easy to always filter a list to see what a certain employee needs to do or
what a certain employee was responsible for or associated with.
The screen is fairly simple:
- first name
- last name
- organization (type in or select from list)
- notes
Note: You can use this for multiple organizations, however most users of this software are from just one
organization.
The activities tab shows related activities.
Donation Manual - 56
The opportunities tab shows related opportunities.
Donation Manual - 57
Invoice Screen
The invoice screen is used for entering invoices. When you select a customer the bill to and ship to
addresses populate based on what was setup for that customer. Common invoice information is
collected.
For invoice lines you first need to setup products that you are selling by going to setup/options and
invoice/product setup. Then on every line when you select a product it populates the default
description and rate (however you can overwrite the defaults). Amount will be calculated and the
subtotals and totals for the entire invoice will be calculated at the bottom right. Any invoice lines that
have a "T" in the taxable column will use the tax percentage supplied to calculate taxes.
Clicking the report button will generate the printed invoice. You can easily save this to a pdf file or
quickly email this pdf file to your customer.
This feature is only available in the Professional Version of the software.
Donation Manual - 58
Letter Correspondence
Donation Manual - 59
Creating a letter
There are a few different ways to create letters (Microsoft Word documents) from data in the database:
1. Contact Related Letters:
You can create contact related letters from the contact list screen or from the contact details screen.
Example #1: You filter the contact list screen to give you a list of 50 contacts and then you click the letter
button to create a large document with 50 pages (one page per letter).
Example #2: You click the letter button from the contact detail screen to create a letter for that specific
contact.
2. Donation Related Letters:
Donation related letters can only be created from the donation detail screen by clicking on the letter
button.
3. Pledge Related Letters:
Pledge related letters can only be created from the pledge detail screen by clicking on the letter button.
Donation Manual - 60
4. Use a mailing list and create letters:
See the next topic in this manual on how to create letters from mailing lists.
Once you click the letter button you will open the screen showing you the available Microsoft Word
templates on your computer. Microsoft word templates live in these directories:
Application directory\WordContact
Application directory\WordDonation
Application directory\WordPledge
Documents in the WordContact directory are specific to create letters from contacts.
Documents in the WordDonation directory are specific to create letters from donations.
Documents in the WordPledge directory are specific to create letters from pledges.
Functionality on the above screen is as follows:
- Add New Template
Will prompt you for the name of a new word template and start Microsoft Word and create a new word
document.
Note: everything to do with setting up the mail merge connections is done for you, you just type in the
contents of the new word document and add mail merge fields where appropriate. Click save when you
are done and close the document.
- Modify the template
You select a template from the list and it opens this template for you to modify. Click save when you
are done and close the document.
- Delete the template
Will delete the microsoft word document from your computer.
- OK Merge to Word
This is the most common button to click. It will do the process of creating your final document by taking
the data from the database and merging it into the selected word document.
If you have an existing word document you can:
1 - place it in the appropriate directory
2 - modify the template
3 - save and close the document
This will setup the document so it can work with automatic word merge with the donation management
software
Note: There is a option to "Record Correspondence", if set to "Yes" everytime you click the Ok - Merge
to Word button the correspondence will be recorded. Example: on the above screen shot we are about
Donation Manual - 61
to create a Microsoft Word document for 36 contacts, so all 36 contacts will show that a letter was
made at the current date/time. Correspondence history is found on the contact correspondence tab
and on the donation and pledge detail screens.
Example of modifying a Microsoft word document
The above screen shot shows an example of modifying a Microsoft word document. In Microsoft word
2003 the insert merge field button is the one to the left of "Insert word field" on the toolbar (yes very
confusing, don't blame us this is Microsoft's product). In Microsoft Word 2007 it is a little easier to use.
If you need help with creating a word document please contact RPT Software. Remember to save and
then close the document after you are done with changes.
After you create the word document you can then use the "OK - Merge to Word" and it will populate all
the merge fields with data. Example: this one page thank you letter could be generated for all the
contacts in your database with a push of a button.
Word documents for contacts, donations and pledges have different word merge fields available.
Example: a donation word document might be used for a donation acknowledgment letter with specifics
Donation Manual - 62
on a single donation. A contact word merge document might be used to summarize the contributions of
a contact over the past year or as a monthly newsletter.
Donation Manual - 63
Letters using mailing Lists
To use a mailing list it's easiest to just give you some examples:
There are three types of mailing lists (contact, donation and pledge).
Example #1: Setup a contact mail list called "Monthly Newsletter Mail List" and use it to send a monthly
newsletter
To setup the mail list:
- goto the letters screen (shown above)
- click add new mail list
- enter the type: "contact"
- enter the name: "Monthly Newsletter mail List"
enter the description: "This mail list is used for contacts that should get the monthly newsletter."
- click ok to save the mail list
Now we goto various contacts during a three week period and click the "Add to Mailing List..." button
and add them to this mailing list.
Donation Manual - 64
So after three weeks we added (let's say 25) contacts to the mailing list.
Now we are ready to generate the monthly newsletter by doing the following:
- goto the letters screen (shown above)
- select the mail list (it should show there are currently 25 recipients, the bottom of the screen will show
that they were first added three weeks ago)
- click the "create letters for mail list receipients" button
- this will launch the normal word merge process (described in the previous topic in this manual)
Note: remember the "Record Correspondence Yes/No" will determine if correspondence history is
recorded.
After closing the Word merge screen it will ask if you "Ok to clear the recipient list for this mailing list?"
You would choose to clear the recipients if you are done with this mailing list and don't want to do
anything else with this list of 25 people.
Example: if you wanted to send a letter and email, you would not clear the list after making the letter
and then clear the list after making an email.
Example: some mailing lists you might never clear the recipient list, some you clear after every use.
Example #2: Setup a mailing list for donation acknowledgments and use it every week to send donation
acknowledgments
- Setup the mail list (very similar steps to above, except type equals "Donation" and name/description
appropriate for donation acknowledgment mail list)
- Now we add donations throughout the week and on each donation we click the "Add to mailing list.."
button and add it to this mailing list.
- After the week is over we added (lets say 20) donations to the mailing list
- Now we are ready to generate the donation acknowledgment letters for each of the 20
contacts/donations. Follow the similar process as above except choose our "donation
acknowledgement" mail list and create the letters for each of these unique donations.
Donation Manual - 65
Email Correspondence
Donation Manual - 66
Email Getting Started/Tips and Tricks
Before you can send any email using customized email templates you must supply email server setting
in the Setup/Options section of the software.
Sending massive amounts of email is never a good idea. Our customized email templates are
designed primarily for sending small amounts of email. Sending large amounts of email could cause
problems with your Email provider and could cause problems with organizations you are sending the
emails.
For large email blasts try an email service like "Constant Contact".
Contact RPT Software for more information if needed.
Donation Manual - 67
Creating an email
There are a few different ways to create emails from data in the database:
1. Simple emails vs. Customized email templates
When you click the E-Mail button anywhere through the software it will ask if you want to use a
customized e-mail template? If you choose "yes" you will see the screen above. If you choose "No"
the program will try and launch a regular email using your default e-mail client and try and fill in the "to"
email address with the appropriate email address(es).
If you choose "yes" to using a customized email template, continue reading:
There are three types of customized email templates:
1. Contact Related Emails:
You can create contact related emails from the contact list screen or from the contact details screen.
Example #1: You filter the contact list screen to give you a list of 50 contacts and then you click the
email button to create 50 individual emails.
Example #2: You click the email button from the contact detail screen to create an email for that
specific contact.
Donation Manual - 68
2. Donation Related Emails:
Donation related emails can only be created from the donation detail screen by clicking on the email
button.
3. Pledge Related Emails:
Pledge related emails can only be created from the pledge detail screen by clicking on the email button.
4. Use a mailing list and create emails:
See the next topic in this manual on how to create emails from mailing lists.
Once you click the email button you will open the screen showing you the available email templates
stored int he database. Email templates are stored right in the database (not like word templates which
live outside the database)
Functionality on the above screen is as follows:
- Add New Template
Will open a new screen with a blank email template
- Modify the template
You select a template from the list and it opens this template for you to modify.
- Delete the template
Will delete the selected email template.
- OK - Send Email
Will change the screen and start sending emails (see screen shot below). As each individual email is
sent you will see the status on this screen.
There are a few different ways to create email from data in the database:
1. Contact Related Email:
You can create contact related emails from the contact list screen or from the contact details screen.
Example #1: You filter the contact list screen to give you a list of 50 contacts and then you click the
email button to create 50 emails.
Example #2: You click the email button from the contact detail screen to create an email for that
specific contact.
2. Donation Related Email:
Donation related emails can only be created from the donation detail screen by clicking on the email
button.
3. Pledge Related Emails:
Donation Manual - 69
Pledge related emails can only be created from the pledge detail screen by clicking on the email button.
4. Use a mailing list and create emails:
See the next topic in this manual on how to create emails from mailing lists.
Note: There is a option to "Record Correspondence", if set to "Yes" every time you click the "Ok - Send
Emails" button the correspondence will be recorded. Example: on the above screen shot we are about
to create an email for 1 contact, this contact will show that an email was made at the current date/time
and the contents of the email will be saved in the correspondence history (without attachments).
Correspondence history is found on the contact correspondence tab and on the donation and pledge
detail screens.
We tried to make the functionality of creating an email template similar to how Microsoft word works to
create mail merge documents. You fill out the various fields and insert merge fields where appropriate.
Donation Manual - 70
Emails can be constructed as simple text emails or HTML emails. If using HTML the HTML will be
displayed to the user if they have a email reader that can display HTML, otherwise they will see the text
version of the email. HTML emails require a knowledge of HTML and require all images to be placed
on an internet website. Contact RPT Software for more details on creating HTML email templates.
Donation Manual - 71
Email using mailing lists
To use a mailing list it's easiest to just give you some examples:
There are three types of mailing lists (contact, donation and pledge).
Example #1: Setup a contact mail list called "Monthly Newsletter Mail List" and use it to send a monthly
email newsletter
To setup the mail list:
- goto the letters screen (shown above)
- click add new mail list
- enter the type: "contact"
- enter the name: "Monthly Newsletter mail List"
enter the description: "This mail list is used for contacts that should get the monthly newsletter."
- click ok to save the mail list
Now we goto various contacts during a three week period and click the "Add to Mailing List..." button
and add them to this mailing list.
Donation Manual - 72
So after three weeks we added (let's say 25) contacts to the mailing list.
Now we are ready to generate the monthly newsletter by doing the following:
- goto the email screen (shown above)
- select the mail list (it should show there are currently 25 recipients, the bottom of the screen will show
that they were first added three weeks ago)
- click the "create email for mail list receipients" button
- this will launch the normal email merge process (described in the previous topic in this manual)
Note: remember the "Record Correspondence Yes/No" will determine if correspondence history is
recorded.
After closing the Email merge screen it will ask if you "Ok to clear the recipient list for this mailing list?"
You would choose to clear the recipients if you are done with this mailing list and don't want to do
anything else with this list of 25 people.
Example: if you wanted to send a letter and email, you would not clear the list after making the letter
and then clear the list after making an email.
Example: some mailing lists you might never clear the recipient list, some you clear after every use.
Example #2: Setup a mailing list for donation acknowledgments and use it every week to send donation
acknowledgments
- Setup the mail list (very similar steps to above, except type equals "Donation" and name/description
appropriate for donation acknowledgment mail list)
- Now we add donations throughout the week and on each donation we click the "Add to mailing list.."
button and add it to this mailing list.
- After the week is over we added (lets say 20) donations to the mailing list
- Now we are ready to generate the donation acknowledgment emails for each of the 20
contacts/donations. Follow the similar process as above except choose our "donation
acknowledgement" mail list and create the emails for each of these unique donations.
Donation Manual - 73
Reporting
Donation Manual - 74
Reporting Screen
The reports screen allows for a number of report to be selected. Each report has various options that
the user can supply to affect what data is on the report and how the report looks. For example in the
above screen I selected a "Contact Summary" report and choose that a filter should be used to restrict
the report to only the contacts returned by the Filter. The report will show:
- contact data
- related donations for each contact
- related pledges for each contact
- donation summary text for each contact
based on the check boxes I selected in the lower right.
It will also use a sub title of "Contacts who gave over $1000"
Click "Create Report" to create the report
Donation Manual - 75
Example of one report
When a report is displayed you can use the controls on the ribbon to print the report, export the report,
zoom etc...
At the bottom of the report you can choose to cycle through the pages.
Click "Close Print Preview" when you are done with the report.
Donation Manual - 76
Using reports from details screens
Here's an example of running a report from a detail screen. I was on the campaign detail screen and
clicked the report button. It create a campaign summary report for my campaign. The trick is you need
to know to RIGHT-CLICK the screen to bring up the menu to print the report or export the report to pdf
etc....
Donation Manual - 77
Filtering
Donation Manual - 78
Simple Filtering of List Screens
Text Field Filter
On every List screen every column has a little arrow on the right hand side and if you click on that arrow
it gives you the options to sort or filter the list based on data in this column. In this example we
selected a text field "City".
- It has options to sort ascending or descending
- It has options to check individual cities (only shown if the discrete choices are not too many)
- It has text filtering options (Equals..., does not equal..., begins with..., etc...)
These options allow for all different types of filtering for easy finding of the data that you want.
Donation Manual - 79
Numeric Field Filter
Here we show filtering on a Numeric field "Donation Amount". Works similar to filtering on a text field
except the filtering options are (Equals..., Does Not Equal..., Less Than..., Greater Than..., and
Between...).
Donation Manual - 80
Date Field Filter
Here we show filtering on a Date field "Donation Date". Works similar to filtering on a text field except
the filtering options are specific to date fields. Example: You might filter on donation date to show
donations that occurred this month.
Donation Manual - 81
Advanced Filters (Very Powerful Feature)
Filters are advanced queries to return contacts that meet certain criteria. Example a simple filter might
be "select all contacts who gave more than $500 last year and that live in "pittsburgh". Filters can be
used on List Screens and on reports to restrict the data you see.
Filter List
The Filter list is the string point to add, edit, delete or duplicate filters. Select a filter and double click or
click on "edit" to change a filter.
Donation Manual - 82
Main Filter Screen
This is the main screen for setting up a filter. You must give a filter a name, description and category.
Then you add the criteria sets for the filter. Click Add Criteria Set... to add a new set or edit an existing
set of criteria. The bottom of the page shows the contacts that are returned by running the filter.
Filters are one of the most complex topics in this software, we recommend you watch the video
explaining filters or spend some time playing with filters.
Donation Manual - 83
Editing ONE Criteria Set
Editing ONE set of criteria brings up this screen. You can add as many lines of criteria as you need.
ALL of lines of criteria MUST BE MET. So for this example, the contact (must of donated more than
$1000) and (live in Pittsburgh or Chicago).
Note: Lots of filters will only use ONE set of criteria (perhaps with a line or a few lines of criteria).
Donation Manual - 84
Editing ONE Line of criteria
This is the screen you do most of the work on.
Step 1: Choose the criteria field (click the button at the top and a pop up menu will appear with LOTS of
different fields to choose from.
Step 2: Based on the type of field that is chosen you will be able to add the details about what you are
trying to do. In this example a numeric field was choose and I choose to select "IS Greater than" and
entered "$1000".
Donation Manual - 85
Setup/Options
Donation Manual - 86
Setup/Options Screen
the setup/options screen is used for a variety of tasks.
Unlocking the Software
Initially you download the evaluation version. After you purchase the software (via our website) you
receive a registration code in an email. You then click on the "Enter Registration Code" button to enter
you registration code and then activates the product and transforms the software into the version you
purchased. Optionally you can use the "Remove Sample Data" button to remove all the sample data
found in the evaluation version of the software.
Note: removing sample data will not remove certain drop down lists etc.... It will remove all the contacts
and their related donations, pledges etc... (that were found in the evaluation). At that point you can
Donation Manual - 87
enter you own data into the program.
E-Mail Setup
- see section below on email setup
This feature is only available in the Professional Version of the software.
Backup database
- clicking the "Backup Database" button will make a copy of the back-end database in the current
directory. It's an easy way to backup the data. Data should be backed up on a regular basis and
moved to an external location if possible. With the program closed you can also just copy the
"Donation.accdb" file (this contains all your data) to your backup location. If you create extra word
templates these should also be backed up.
Hide/Show Areas
- see section below on Hide/Show Areas
This feature is only available in the Professional Version of the software.
Import Data
- this feature is used to import contact data from an Excel spreadsheet into the database. The screen
walks you through the process which is basically:
- click a button and the program makes the Excel spreadsheet (with all the exact column headings that
are needed).
- you then either get your data into this excel file or move the column headings to your excel file and
putt all the data in the right places.
- you click a button and it adds the new contacts to the database
This can be used for initial setup fo the database to move contact data from your existing database or
Excel spreadsheets or on an ongoing basis, for example if you get contact data every so often and
need to add it to the database.
Note: for a more complicated data conversion or interface with other systems please contact RPT
Software for help.
Drop down Maintenance
This area has all the drop downs and other information that can be customized. About 90% of these
buttons can also be done directly from the details screens.
Donation Manual - 88
Email Setup
Email Setup
If you want to use customized email templates and have this software send emails you must first do
email setup.
By default we supply a set of email credentials (however we only allow up to 5 emails to be sent out at
one time).
After you supply your email server settings (on the left side of the screen), you can test these settings
by sending a quick test email by using the right side of the screen. If the test email works your email
settings will work for the program.
This feature is only available in the Professional Version of the software.
Donation Manual - 89
How to setup email if you use Outlook Express
If you use Outlook Express to read/send email you can do the following to get your email settings:
1. Got Tools/Accounts... on the top menu
2. Double click or select properties for the desired Mail account, a new screen will open.
3. Select the Servers tab (you should be looking at a screen like the screen shot above)
4. Your Outgoing mail (SMTP) is the mail server you want to enter.
5. Type is usually Auth Login
6. For username and password see the username/password used at the very bottom in the Outgoing
Mail Server Settings...
Donation Manual - 90
Hide/Show Areas
The Hide/Show Areas is used to hide certain parts of the software in which you do not use. For
example some non-profits might only be using a portion of the CRM features (such as opportunity
management or invoicing). Others might not be tracking events etc....
Just check the areas you want to see and un check the areas you do not want to see.
To change the software to what the Standard version allows just check all items except (Opportunities,
Invoices, Email and Letters). When using the evaluation this is a good way to tell if you want to
purchase the Standard version or the Professional version.
Donation Manual - 91
This feature is only available in the Professional Version of the software.
Donation Manual - 92
Import Data
This screen is used to import contact data into the database.
Step 1: click the button to make an excel file (with proper headings used for import)
Donation Manual - 93
Step 2: you use the excel file to add data
Step 3: click a button and it reads the new contacts from the excel file and adds them to the database.
Donation Manual - 94
Networking/Multi User Setup
Donation Manual - 95
Using software on a LAN (multi users)
At software start up it looks for the back-end database with all your data
Using our software on a local area network (LAN):
To use our software on a network is very easy. First you need to make sure you have purchased an
Unlimited users version of the software. Then you just need to do the following process:
1 - Install the evaluation and register the Unlimited users version of the software
2 - Close the software
3 - Move the back-end database file to a shared network drive
Example: By default when you installed the software you will see a file called "Donation_BE.accdb" in
the "C:\RPTSoftware\" directory. You need to use windows explorer to move this one file to a new
location that is shared by all the users you are going to have (example: You move the file to the shared
H: drive).
Donation Manual - 96
4 - Start the software
At start up the software, since you moved the back-end database the software will not be able to find
the database and will display a screen for you to locate the back-end database. Simply change the
location to the shared network drive you placed the database, select the file and click Open. The
software will now remember that it should always use this back-end database.
At this point you have ONE user using the software, with the database in the right location. For
each additional user do the following steps:
- Install the software
- Enter the correct registration code
- Close the software
- DELETE the file "Donation_BE.accdb" found in the installation directory (usually C:\RPTSoftware\).
- Start the software
- The software should prompt for the new location of the back-end database, choose the file on the
shared network drive and click Open
Feel free to contact RPT Software for help in setting up your software so it works with multiple
people on your network.
If you need to use the software across a wide area network (WAN) please contact RPT Software for
details.
Donation Manual - 97
Using software on a WAN (wide area network with users geographically seperated)
To use our software on a WAN or any situation where you have users not just at the office where they
are on the office network please contact RPT Software for details. Our software is a typical Microsoft
Access 2007 database with a front-end applicationa dn a back-end database and there are technicques
to use for these situations.
Donation Manual - 98